Page 17 of 212
 Height adjustment
(where provided)
Move lever 2 up or down until the
required height is reached.
IMPORTANT Carry out the adjustment
whilst seated in the driver's seat.
Backrest angle adjustment
Tu")
Height adjustment
(where provided)
Move lever 2 up or down until the
required height is reached.
IMPORTANT Carry out the adjustment
whilst seated in the driver's seat.
Backrest angle adjustment
Turn knob 3 until the required position is
reached.
Lumbar adjustment
(where provided)
Turn knob 4 until the required position is
reached.
Folding the seats
(where provided)
To access the rear seats, pull handle
5 upwards: the backrest will fold
forwards and the seat will slide forwards
when you push the backrest. Moving back
the backrest will return the seat to its
original position.
Heated seats
(where provided)
With key at MAR, press button
fig. 10 (one per seat) to activate/
deactivate the function. When the
function is enabled, the LED on the
button turns on.
SPORT FRONT SEATS(where provided)
Lengthwise adjustment
Lift lever 1 fig. 11 and push the seat
forwards or backwards: in the driving
position, you should be able to rest your
arms on the rim of the steering wheel.
Backrest angle adjustment
Turn knob 2 until the required position is
reached
Backrest tilt
To access the rear seats lift handle
3 upwards (behind the backrest). Then
release the lever and pushing on the
backrest, slide the seat forwards.
REAR SEAT
Seat folding
Proceed as follows:
raise the headrests to the maximum
height, press both buttons 1 fig. 12 to the
side of the two supports, then remove
the head restraints by sliding them
upwards;
move the seat belts to the side,
making sure that they are correctly
extended and not twisted;
raise the backrest retaining levers 1
fig. 13 and fold ahead the desired cushion
10A0J0301C
11A0J0163C
15
Page 18 of 212
 (the lever 1 raising is highlighted with a
“red band”).
Repositioning the rear seat
Move the seat belts to the side, making
sure that they are correctly extended and
not twisted.
Raise the previou")
(the lever 1 raising is highlighted with a
“red band”).
Repositioning the rear seat
Move the seat belts to the side, making
sure that they are correctly extended and
not twisted.
Raise the previously folded backrest until
you hear the click of the locking
mechanism, visually checking that the“red bands” on levers 1 fig. 13 are no
longer visible. The “red band” indicates
that the backrest is not secured.
Finally, reposition the head restraints,
inserting them into their housings.
WARNING
6)All adjustments must be made with the
car stationary.
7)Once you have released the adjustment
lever, always check that the seat is locked on
the guides by trying to move it back and
forth. If the seat is not locked into place, it
may unexpectedly slide and cause the driver
to lose control of the car.
8)For maximum safety, keep the backrest
upright, lean back into it and make sure the
seat belt fits closely across your chest and
pelvis.
HEADRESTS
FRONT
These are height-adjustable and lock into
the desired position automatically.
To adjust the height, proceed as follows:
upwards adjustment: raise the head
restraint until it clicks into place;
downward adjustment: press button 1
fig. 14 and lower the head restraint.
9)
Proceed as follows to remove the head
restraints:
raise the head restraints to their
maximum height;
press buttons 1 and 2, then remove
the head restraints by pulling them
upwards.
12A0J0083C
13A0J0082C
14A0J0130C
16
GETTING TO KNOW YOUR CAR
Page 19 of 212
 REAR
Two height-adjustable head restraints
are provided for the back seats (for the
adjustment see the previous paragraph).
On some versions a head restraint is also
provided for the central seat.
Pro")
REAR
Two height-adjustable head restraints
are provided for the back seats (for the
adjustment see the previous paragraph).
On some versions a head restraint is also
provided for the central seat.
Proceed as follows to remove the head
restraints:
raise the head restraints to their
maximum height;
press buttons 1 fig. 15 then remove
the head restraints by pulling them
upwards.
WARNING
9)Head restraints must be adjusted so that
the head, rather than the neck, rests on
them. Only in this case they can protect your
head correctly.
STEERING WHEEL
10) 11)
It can be adjusted axially and vertically.
To adjust, release the lever 1 fig. 16 by
pushing it forwards (position A) and
adjust the steering wheel. Having made
the adjustment, lock lever 1 by pulling it
towards the steering wheel (position B).
NOTE “Veloce” and “Sport” versions are
equipped with sports configuration
steering wheel.
WARNING
10)All adjustments must be carried out only
with the car stationary and engine off.11)It is absolutely forbidden to carry out
any after-market operation involving
steering system or steering column
modifications (e.g. installation of anti-theft
device) that could adversely affect
performance and safety, invalidate the
warranty and also result in the car not
meeting type-approval requirements.
15A0J0083C
16A0J0034C
17
Page 20 of 212
 REAR VIEW MIRRORS
INTERIOR MIRROR
Manual adjustment: operate lever 1
fig. 17 to adjust the mirror between two
positions: normal or anti-glare.
Electrochromic mirror
Some versions are equipped with an")
REAR VIEW MIRRORS
INTERIOR MIRROR
Manual adjustment: operate lever 1
fig. 17 to adjust the mirror between two
positions: normal or anti-glare.
Electrochromic mirror
Some versions are equipped with an
electro-chrome mirror with an ON/OFF
switch to activate/deactivate the
electro-chrome function. When reverse
gear is engaged, the mirror is
automatically set for daytime use.
DOOR MIRRORS
12)
Electric adjustment
The mirrors can be adjusted/folded away
only if the ignition key is in the MAR
position.Select the desired mirror using device 1
fig. 18:
Position A: left mirror selected;
Position C: right mirror selected.
To adjust the selected mirror, press
button 2 in the four directions shown by
the arrows.
IMPORTANT Once adjustment is
complete, rotate device 1 to position B to
prevent accidental movements.
Electrical mirror folding
(where present)
To fold the mirrors, press button 3. Press
the button again to restore the mirrors to
the driving position.
Manual mirror folding
When required, fold the mirrors in
towards the vehicle.
IMPORTANT When driving, the mirrors
must always be open.
WARNING
12)As the driver's door mirror is curved, it
may slightly alter the perception of distance.
17A0J0108C
18A0J0022C
18
GETTING TO KNOW YOUR CAR
Page 21 of 212
 EXTERNAL LIGHTS
The left stalk fig. 19 operates most of
the exterior lights. The external lights can
only be switched on when the ignition key
is at MAR.
DAYTIME RUNNING LIGHTS (DRL)\"Daytime Runni")
EXTERNAL LIGHTS
The left stalk fig. 19 operates most of
the exterior lights. The external lights can
only be switched on when the ignition key
is at MAR.
DAYTIME RUNNING LIGHTS (DRL)"Daytime Running Lights"
With the ignition key at MAR and ring nut
1 turned to
position, the daytime
running lights switch on. The other lights
and interior lighting stay off.
IMPORTANT The daytime running lights
are an alternative to the dipped
headlights for driving during the daytime
in countries where it is compulsory to
have lights on during the day; where it is
not compulsory, the use of daytime
running lights is permitted.IMPORTANT Daytime running lights
cannot replace dipped beam headlights
when driving at night or through tunnels.
The use of daytime running lights is
governed by the Highway Code of the
country in which you are driving. Comply
with legal requirements.
SIDE LIGHTS/DIPPED BEAM
HEADLIGHTS
With the ignition key turned to MAR, turn
the ring nut 1 to
.
The daytime running lights are switched
off and the side lights and dipped
headlights are switched on. The
warning light switches on in the
instrument panel.
PARKING LIGHTS
These lights can only be switched on with
ignition key at STOP or removed, by
moving ring nut 1 first to
position and
then to
position.
With the parking lights, also the plate
lights and front and rear direction lights
(daytime running lights DRL remain
switched off) switch on.
The
warning light switches on in the
instrument panel.
Operate the direction indicator stalk to
select the light side (right or left)
AUTOMATIC LIGHTING CONTROL
(AUTOLIGHT) (Dusk sensor)
(where provided)
A sensor, located on the windscreen,
detects the variations in outside
brightness depending on the light
sensitivity set with the Setup Menu: the
greater the sensitivity, the less external
light is required to activate the exterior
lights.
Activation
Turn the ring 1 to the
position to
activate automatic control of the dipped
beam headlights and taillights according
to the external light conditions.
When the lights are automatically
switched off, the front and rear fog lights
(if activated) are also switched off. The
next time the lights are switched on
automatically, the fog lights must be
reactivated manually (if required).
The headlights can only be flashed with
the sensor on. To activate the dipped
beam headlights, turn ring 1 to the
position
and then switch on the dippd
beam headlights.
MAIN BEAM HEADLIGHTS
To activate the main beam headlights,
with ring nut 1 to
, pull the stalk
towards the steering wheel beyond the
end of travel position. The
warning
light switches on in the instrument panel.
19A0J0063C
19
Page 22 of 212
 When the stalk is pulled towards the
steering wheel again, beyond the end of
travel position, the main beam headlights
deactivate, the dipped headlights
reactivate and the
warning light
switches off.")
When the stalk is pulled towards the
steering wheel again, beyond the end of
travel position, the main beam headlights
deactivate, the dipped headlights
reactivate and the
warning light
switches off.
It is not possible to switch on the main
beam headlights constantly if automatic
light control is active.
FLASHING
To do this, pull the stalk towards the
steering wheel (unstable position),
regardless of the position of ring nut 1.
The
warning light switches on in the
instrument panel.
HEADLIGHT ALIGNMENT CORRECTOR
This device works with the ignition key in
the MAR position and the dipped
headlights on.
Headlight alignment adjustment
Press buttons
andfig. 20. to
adjust. The adjustment position is shown
on the display.
Position 0: one or two people on the
front seats.
Position 1: 4 people.
Position 2: 4 people + load in luggage
compartment.
Position 3: driver + maximum
permitted load stowed in the luggage
compartment.NOTE The button panel can change
according to the versions.
IMPORTANT Check the alignment every
time the load carried changes.
FRONT FOG LIGHTS
(where provided)
Operation
Press the button
fig. 21 to switch the
lights on/off. With the lights on, the
warning light
in the instrument panel
switches on.
REAR FOG LIGHT
Operation
Press the button
to switch the lights
on/off.
The rear fog light switches on only when
the dipped headlights are on.
Press the button again to switch the light
off.
With the light on, the warning light
in
the instrument panel switches on.
DIRECTION INDICATORS
Bring the stalk to the (stable) position:
upwards: activates right direction
indicator;
downwards: activates left direction
indicator.
The
orwarning light will blink on
the instrument panel.
20A0J0306C21A0J0303C
20
GETTING TO KNOW YOUR CAR
Page 23 of 212
 The direction indicators are switched off
automatically when the steering wheel is
straightened.
\"Lane change\" function
If you wish to signal a lane change, place
the left stalk in the unstabl")
The direction indicators are switched off
automatically when the steering wheel is
straightened.
"Lane change" function
If you wish to signal a lane change, place
the left stalk in the unstable position for
less than half a second. The direction
indicator on the selected side flashes
three times and then switches off
automatically.
"FOLLOW ME HOME" DEVICE
This device allows you to illuminate the
area in front of the car for a certain
amount of time.
Activation
With the key turned to STOP or removed,
pull the left-hand stalk 1 towards the
steering wheel within 2 minutes from
when the engine is turned off.
Each time the stalk is moved, the lights
stay on for an extra 30 seconds up to a
maximum of 210 seconds; then the lights
are switched off automatically.
When the stalk is operated, the warning
light
on the instrument panel
switches on. The display shows a
message and the time set for the
function.
The warning light comes on when the
stalk is operated and stays on until the
function is automatically deactivated.Each movement of the stalk only
increases the amount of time the lights
stay on.
Deactivation
Keep the stalk pulled towards the
steering wheel for more than 2 seconds.
EXTERNAL COURTESY LIGHTS
These light up the car and the space in
front of it when the doors are unlocked.
Activation
When the car is parked and the doors are
unlocked by pressing the
button on the
remote control (or the luggage
compartment is unlocked by pressing
), the dipped beam headlights, rear
side lights and number plate lights are
activated.
The lights stay on for approximately
25 seconds unless the doors and luggage
compartment are locked again with the
remote control or the doors (or luggage
compartment) are opened and reclosed.
In these cases they switch off after
5 seconds.
INTERIOR LIGHTS
FRONT CEILING LIGHT
Switch 1 fig. 22 is used to switch on/off
roof lights.
Switch 1 positions:
central position (A position): lights
3 and 4 switch on/off when the doors are
opened/closed;
pressed to the left (0 position): lights
3 and 4 are always switched off;
pressed to the right (B position): lights
3 and 4 are always switched on.
Lights switch on/off progressively.
Switch 2 fig. 22 operates the map
reading light.
Switch 2 positions:
central position (A position): lights
3 and 4 are always switched off;
22A0J0066C
21
Page 24 of 212
 pressed to the left (0 position): light
3 switches on;
pressed to the right (B position): light
4 switches on.
IMPORTANT Before getting out of the
car, make sure that both switches are in
the central")
pressed to the left (0 position): light
3 switches on;
pressed to the right (B position): light
4 switches on.
IMPORTANT Before getting out of the
car, make sure that both switches are in
the central position: when the doors are
closed the lights will switch off to avoid
draining the battery. In any case, if the
switch is left in the on position, the roof
light switches off automatically about
15 minutes after the engine has been
switched off.
ROOF LIGHT TIMING
Timing while getting into the car
The roof lights come on won unlocking,
opening and closing. The timed period is
interrupted when the ignition is turned to
"MAR-ON".
Timing while getting out of the car
The roof lights come on when the key is
removed from the ignition within
2 minutes of switching off the engine, on
opening and closing a door with the
removed key. The timing stops
automatically when the doors are locked.
WINDSCREEN / REAR WINDOW
WIPERS
This operates only with the ignition key
turned to MAR.
WINDSCREEN WASHER / WIPER
Operation
13) 14)
Ring 2 fig. 23 can be set to the following
positions:
O– windscreen wiper off;
– intermittent operation (low
speed);
AUTO– rain sensor on (where provided);
– intermittent operation;
– continuous slow operation;
– continuous fast operation.
Move the stalk upwards (unstableposition) to limit operation to the time
for which the stalk is held in this position.
When released, the stalk will return to its
default position and the windscreen
wiper will be automatically stopped.
“Smart washing” function
Pull the stalk towards the steering wheel
(unstable position) to operate the
windscreen washer. Keep the stalk pulled
for more than half a second to operate
the windscreen washer jet and wiper
automatically with a single movement.
The windscreen wiper stops working
three strokes after the stalk is released.
A further stroke after approx. 6 seconds
completes the wiping cycle.
RAIN SENSOR(where provided)
It can detect the presence of rain and
consequently manage windscreen wiping
in accordance with the amount of water
on the windscreen.
The sensor is activated when the ring 2 is
turned to “automatic” position (“AUTO”
control): the windscreen wiper stroke
frequency is thus adjusted in accordance
with the amount of water on the
windscreen.
If no rain is detected, the wiper will not
carry out any strokes.
23A0J0064C
22
GETTING TO KNOW YOUR CAR
 1
1 2
2 3
3 4
4 5
5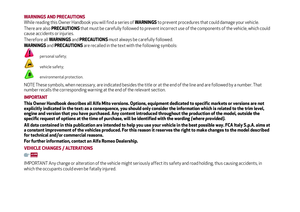 6
6 7
7 8
8 9
9 10
10 11
11 12
12 13
13 14
14 15
15 16
16 17
17 18
18 19
19 20
20 21
21 22
22 23
23 24
24 25
25 26
26 27
27 28
28 29
29 30
30 31
31 32
32 33
33 34
34 35
35 36
36 37
37 38
38 39
39 40
40 41
41 42
42 43
43 44
44 45
45 46
46 47
47 48
48 49
49 50
50 51
51 52
52 53
53 54
54 55
55 56
56 57
57 58
58 59
59 60
60 61
61 62
62 63
63 64
64 65
65 66
66 67
67 68
68 69
69 70
70 71
71 72
72 73
73 74
74 75
75 76
76 77
77 78
78 79
79 80
80 81
81 82
82 83
83 84
84 85
85 86
86 87
87 88
88 89
89 90
90 91
91 92
92 93
93 94
94 95
95 96
96 97
97 98
98 99
99 100
100 101
101 102
102 103
103 104
104 105
105 106
106 107
107 108
108 109
109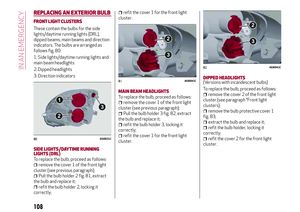 110
110 111
111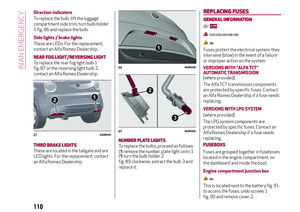 112
112 113
113 114
114 115
115 116
116 117
117 118
118 119
119 120
120 121
121 122
122 123
123 124
124 125
125 126
126 127
127 128
128 129
129 130
130 131
131 132
132 133
133 134
134 135
135 136
136 137
137 138
138 139
139 140
140 141
141 142
142 143
143 144
144 145
145 146
146 147
147 148
148 149
149 150
150 151
151 152
152 153
153 154
154 155
155 156
156 157
157 158
158 159
159 160
160 161
161 162
162 163
163 164
164 165
165 166
166 167
167 168
168 169
169 170
170 171
171 172
172 173
173 174
174 175
175 176
176 177
177 178
178 179
179 180
180 181
181 182
182 183
183 184
184 185
185 186
186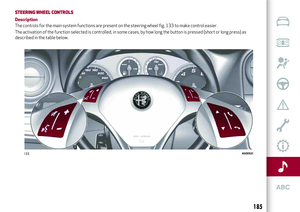 187
187 188
188 189
189 190
190 191
191 192
192 193
193 194
194 195
195 196
196 197
197 198
198 199
199 200
200 201
201 202
202 203
203 204
204 205
205 206
206 207
207 208
208 209
209 210
210 211
211