Page 201 of 264

MULTIMEDIA199
UCONNECT SETTINGS
The Uconnect system uses a combination of
buttons on the touchscreen and buttons on the
faceplate located on the center of the instru -
ment panel that allows you to access and
change the customer programmable features.
Many features can vary by vehicle.
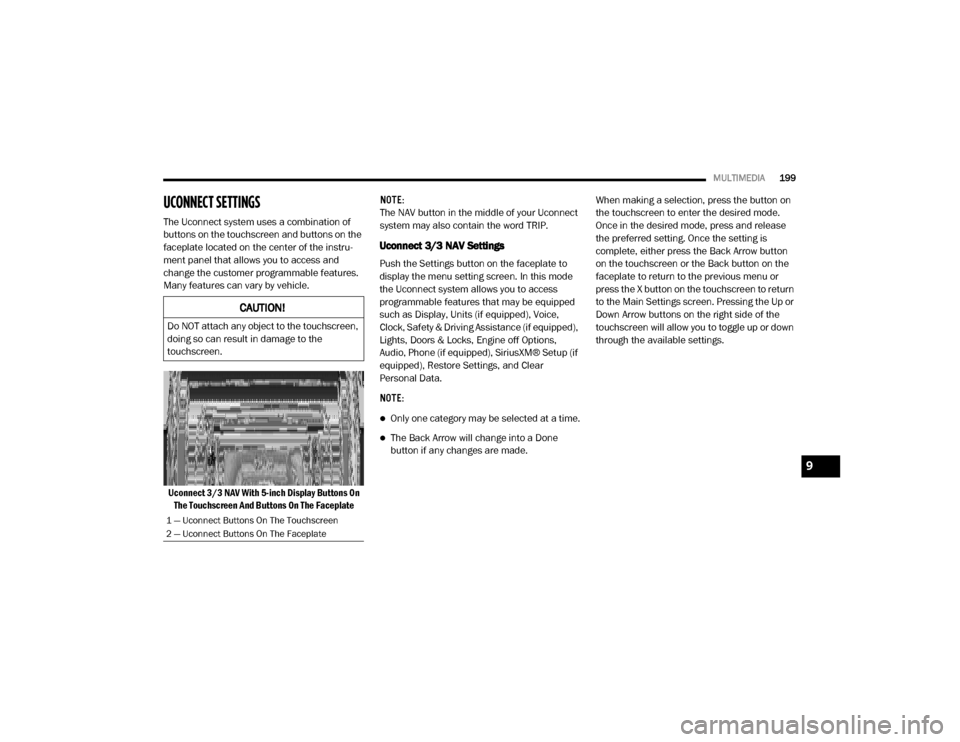
Uconnect 3/3 NAV With 5-inch Display Buttons On The Touchscreen And Buttons On The Faceplate NOTE:
The NAV button in the middle of your Uconnect
system may also contain the word TRIP.
Uconnect 3/3 NAV Settings
Push the Settings button on the faceplate to
display the menu setting screen. In this mode
the Uconnect system allows you to access
programmable features that may be equipped
such as Display, Units (if equipped), Voice,
Clock, Safety & Driving Assistance (if equipped),
Lights, Doors & Locks, Engine off Options,
Audio, Phone (if equipped), SiriusXM® Setup (if
equipped), Restore Settings, and Clear
Personal Data.
NOTE:
Only one category may be selected at a time.
The Back Arrow will change into a Done
button if any changes are made.
When making a selection, press the button on
the touchscreen to enter the desired mode.
Once in the desired mode, press and release
the preferred setting. Once the setting is
complete, either press the Back Arrow button
on the touchscreen or the Back button on the
faceplate to return to the previous menu or
press the X button on the touchscreen to return
to the Main Settings screen. Pressing the Up or
Down Arrow buttons on the right side of the
touchscreen will allow you to toggle up or down
through the available settings.
CAUTION!
Do NOT attach any object to the touchscreen,
doing so can result in damage to the
touchscreen.
1 — Uconnect Buttons On The Touchscreen
2 — Uconnect Buttons On The Faceplate
9
20_VF_OM_EN_US_t.book Page 199
Page 202 of 264
200MULTIMEDIA
Display
After pressing the Display button on the touchscreen, the following settings will be available:
Setting Name Selectable Options
Display ModeAuto Manual
Display Brightness With Headlights
ON Up Arrow Button
Down Arrow Button
NOTE:
This feature is only available in Manual Display Mode.
Display Brightness With the
Headlights Off Up Arrow Button
Down Arrow Button
NOTE:
This feature is only available in Manual Display Mode.
Language List Of Selectable Language
NOTE:
When the “Language” feature is selected, you may select one of multiple languages (English/Français/Español) for all display nomenclature including
the trip functions and the navigation system (if equipped). Press the Set Language button on the touchscreen, then press the desired language button
on the touchscreen until a check-mark appears next to the language, showing that setting has been selected.
Touchscreen Beep On Off
Display Trip B On Off
20_VF_OM_EN_US_t.book Page 200
Page 203 of 264
MULTIMEDIA201
Units — If Equipped
After pressing the Units button on the touchscreen, the following settings will be available:
Voice
After pressing the Voice button on the touchscreen, the following settings will be available:
Setting Name Selectable Options
UnitsUSMetricCustom
NOTE:
The “Custom” option allows you to set the “Distance” (mi, or km), “Fuel Consumption” [MPG (US), MPG (UK), L/100 km, or km/L] (if equipped), and
“Temperature” (°C, or °F) units of measurement independently (if equipped).
Setting Name Selectable Options
Voice Response LengthBriefLong
Show Command List Neverw/ HelpAlways
NOTE:
This setting will display the possible options while in a voice session.
9
20_VF_OM_EN_US_t.book Page 201
Page 204 of 264

202MULTIMEDIA
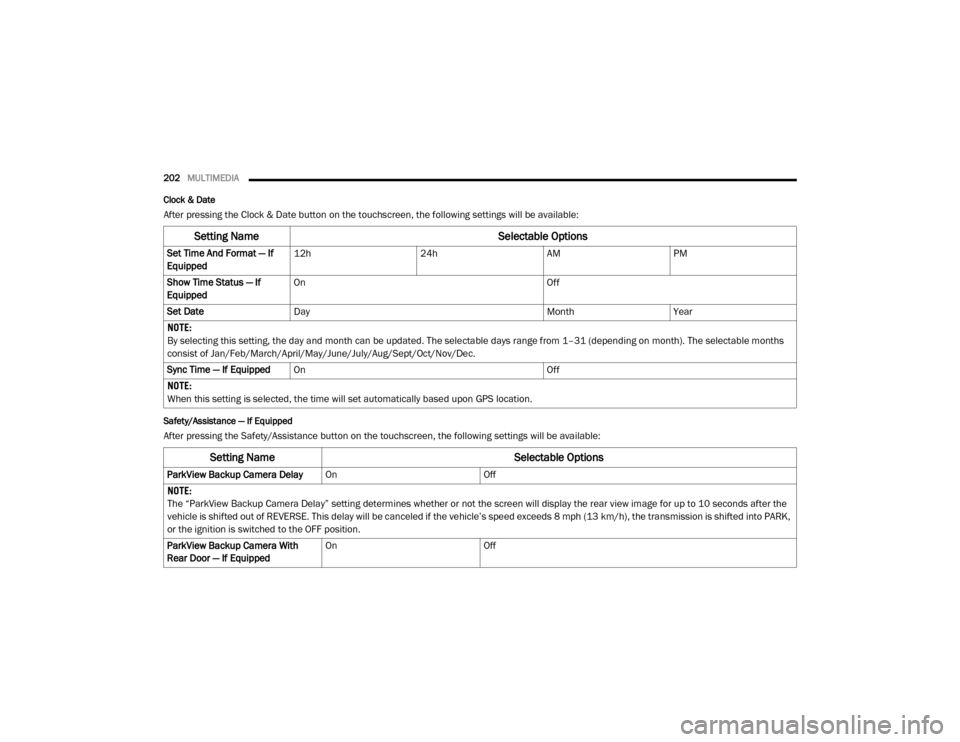
Clock & Date
After pressing the Clock & Date button on the touchscreen, the following settings will be available:
Safety/Assistance — If Equipped
After pressing the Safety/Assistance button on the touchscreen, the following settings will be available:
Setting Name Selectable Options
Set Time And Format — If
Equipped12h
24hAMPM
Show Time Status — If
Equipped On
Off
Set Date Day MonthYear
NOTE:
By selecting this setting, the day and month can be updated. The selectable days range from 1–31 (depending on month). The selectable months
consist of Jan/Feb/March/April/May/June/July/Aug/Sept/Oct/Nov/Dec.
Sync Time — If Equipped On Off
NOTE:
When this setting is selected, the time will set automatically based upon GPS location.
Setting Name Selectable Options
ParkView Backup Camera DelayOnOff
NOTE:
The “ParkView Backup Camera Delay” setting determines whether or not the screen will display the rear view image for up to 10 seconds after the
vehicle is shifted out of REVERSE. This delay will be canceled if the vehicle’s speed exceeds 8 mph (13 km/h), the transmission is shifted into PARK,
or the ignition is switched to the OFF position.
ParkView Backup Camera With
Rear Door — If Equipped On
Off
20_VF_OM_EN_US_t.book Page 202
Page 205 of 264
MULTIMEDIA203
Lights — If Equipped
After pressing the Lights button on the touchscreen, the following settings will be available:
Doors & Locks
After pressing the Doors & Locks button on the touchscreen, the following settings will be available:
Engine Off Options
After pressing the Engine Off Options button on the touchscreen, the following settings will be available:
Setting Name Selectable Options
Daytime Running LightsOnOff
NOTE:
When the “Daytime Running Lights” feature is selected, the daytime running lights can be turned On or Off. This feature is only available if allowed by
law in the country of the vehicle purchase.
Setting Name Selectable Options
Auto Door LocksYesNo
NOTE:
When this feature is selected, all doors will lock automatically when the vehicle reaches a speed of 12 mph (20 km/h). Horn w/ Lock Off1st Press2nd Press
Setting Name Selectable Options
Radio Off Delay0 sec 20 min
9
20_VF_OM_EN_US_t.book Page 203
Page 206 of 264

204MULTIMEDIA
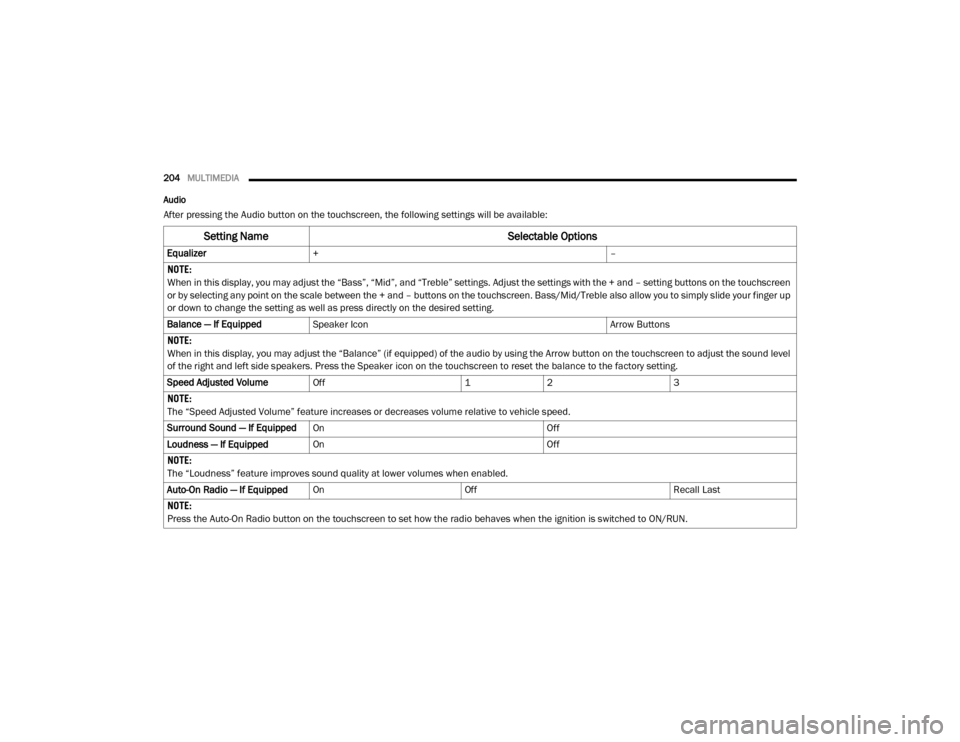
Audio
After pressing the Audio button on the touchscreen, the following settings will be available:
Setting Name Selectable Options
Equalizer+ –
NOTE:
When in this display, you may adjust the “Bass”, “Mid”, and “Treble” settings. Adjust the settings with the + and – setting buttons on the touchscreen
or by selecting any point on the scale between the + and – buttons on the touchscreen. Bass/Mid/Treble also allow you to simply slide your finger up
or down to change the setting as well as press directly on the desired setting.
Balance — If Equipped Speaker Icon Arrow Buttons
NOTE:
When in this display, you may adjust the “Balance” (if equipped) of the audio by using the Arrow button on the touchscreen to adjust the sound level
of the right and left side speakers. Press the Speaker icon on the touchscreen to reset the balance to the factory setting.
Speed Adjusted Volume Off 12 3
NOTE:
The “Speed Adjusted Volume” feature increases or decreases volume relative to vehicle speed.
Surround Sound — If Equipped On Off
Loudness — If Equipped On Off
NOTE:
The “Loudness” feature improves sound quality at lower volumes when enabled.
Auto-On Radio — If Equipped On Off Recall Last
NOTE:
Press the Auto-On Radio button on the touchscreen to set how the radio behaves when the ignition is switched to ON/RUN.
20_VF_OM_EN_US_t.book Page 204
Page 207 of 264
MULTIMEDIA205
Phone/Bluetooth®
After pressing the Phone/Bluetooth® button on the touchscreen, the following settings will be available: AUX Volume Offset
+ –
NOTE:
This feature provides the ability to tune the audio level for portable devices connected through the AUX input.
Auto Play On Off
NOTE:
The Auto Play feature allows a media device to begin playing when the media device is plugged in. To make your selection, press the On or Off buttons
to activate or deactivate Auto Play.
Setting Name Selectable Options
Setting NameSelectable Options
Paired Phones/DevicesList of Paired Phones/Devices
NOTE:
This feature shows which phones are paired to the Phone system.
9
20_VF_OM_EN_US_t.book Page 205
Page 208 of 264

206MULTIMEDIA
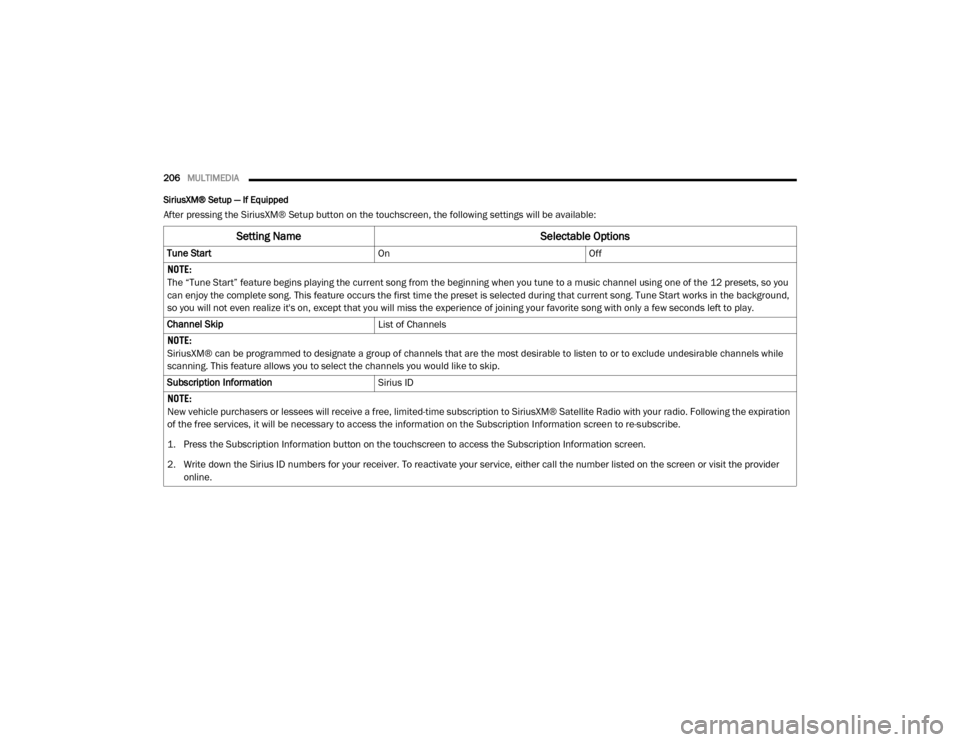
SiriusXM® Setup — If Equipped
After pressing the SiriusXM® Setup button on the touchscreen, the following settings will be available:
Setting Name Selectable Options
Tune StartOnOff
NOTE:
The “Tune Start” feature begins playing the current song from the beginning when you tune to a music channel using one of the 12 presets, so you
can enjoy the complete song. This feature occurs the first time the preset is selected during that current song. Tune Start works in the background,
so you will not even realize it's on, except that you will miss the experience of joining your favorite song with only a few seconds left to play.
Channel Skip List of Channels
NOTE:
SiriusXM® can be programmed to designate a group of channels that are the most desirable to listen to or to exclude undesirable channels while
scanning. This feature allows you to select the channels you would like to skip.
Subscription Information Sirius ID
NOTE:
New vehicle purchasers or lessees will receive a free, limited-time subscription to SiriusXM® Satellite Radio with your radio. Following the expiration
of the free services, it will be necessary to access the information on the Subscription Information screen to re-subscribe.
1. Press the Subscription Information button on the touchscreen to access the Subscription Information screen.
2. Write down the Sirius ID numbers for your receiver. To reactivate your service, either call the number listed on the screen or visit the provider online.
20_VF_OM_EN_US_t.book Page 206