2020 AUDI A8 lights
[x] Cancel search: lightsPage 149 of 360

4N0012721BD
High-voltage system
Indicator lights Meaning Solution
© Red There is a malfunction inthe | End the charging process at the vehicle
O O off vehicle charging system. The | and remove the vehicle cable from the ve-
@ B Red charging process has been in- | hicle charging port. Disconnect the charg-
O 6 of terrupted. er from the power supply and reconnect it
after 60 seconds. Restart the charging
9 Off process > page 139. If the malfunction
continues, have the vehicle checked by an
authorized Audi dealer or authorized Audi
Service Facility.
O Red There is an overvoltage inthe | Disconnect the charger from the power
© CQ Flashing red charging infrastructure of the | supply and reconnect it after 60 seconds.
power supply/household con- | If the malfunction continues, have the
O & off
O 6 off nection. The charging process | power supply/household connection
© has been interrupted. checked by a qualified electrician.
Off
© Red The control unit has atechni- | Disconnect the charger from the power
O 0 Off cal malfunction. The charging | supply and reconnect it after 60 seconds.
O Bot process has been interrupted. |If the malfunction continues, have the
@ 0 Red control unit checked by an authorized
© Audi dealer or authorized Audi Service Fa-
9 Off cility.
© Red The control unit has atechni- | Disconnect the charger from the power
O 0 off cal malfunction (self-test supply and reconnect it after 60 seconds.
O Bot failed). The charging process _ | If the malfunction continues, have the
© 6 Flashi d has been interrupted. control unit checked by an authorized
asning re Audi dealer or authorized Audi Service Fa-
© Off cility.
© Red The charging infrastructure of | Have the control unit checked by an au-
@ CO Red the power supply/household | thorized Audi dealer or authorized Audi
@ & Red connection is insufficient. The | Service Facility, and have the power sup-
O 6 of ground conductor is interrupt- | ply/household connection checked by a
ed or not present. The ground | qualified electrician. Do not use the pow-
9 Off conductor monitor has inter- | er supply/household connector until the
rupted the charging process. | malfunction is corrected.
© Red The indicator light in the reset | Have the control unit replaced by an au-
@ OC Red button on the control unit is | thorized Audi dealer or authorized Audi
@ B& Red faulty. The charging process _| Service Facility.
@ © Red has been interrupted.
e
9 Off
147
Page 150 of 360

High-voltage system
Indicator lights Meaning Solution
O Red The control unit has detected | Press and hold the © button for at least
@ X Red residual current. The charging | two seconds. If the malfunction contin-
@ EB Red process has been interrupted. | ues, have the control unit checked by an
@ © Red authorized Audi dealer or authorized Audi
. / Service Facility, and have the power sup-
o Flashing red ply/household connection checked by a
qualified electrician.
© Red The charging infrastructure is | Disconnect the charger from the power
© Q Flashing red wired incorrectly. The charging | supply. Have the power supply/household
© & Flashing red process has been interrupted. | connection checked by a qualified electri-
© § Flashing red eas
9 Off
O Red The control unit has a techni- | Disconnect the charger from the power
@ CX Red cal malfunction. Possible supply and reconnect it after 60 seconds.
@ EB Red cause of the malfunction: If the malfunction continues, have the
@ 0 Red software error or the load re-_ | control unit checked by an authorized
. lay has been switched incor- _| Audi dealer or authorized Audi Service Fa-
9 Red rectly. The charging process cility, and have the power supply/house-
has been interrupted. hold connection checked by a qualified
electrician.
O Flashing red The control unit has a serious | Have the control unit replaced by an au-
O 0 off malfunction. The charging thorized Audi dealer or authorized Audi
O Bot process has been interrupted. | Service Facility.
@ @ Red
9 Off
© Off The indicator light in the Have the control unit replaced by an au-
@ C Red On/Off button on the control | thorized Audi dealer or authorized Audi
@ B Red unit is faulty. The charging Service Facility.
@ 0 Red process has been interrupted.
e
© Red
148
Page 151 of 360

4N0012721BD
High-voltage system
Technical Data
Output 9.6 kw
Current rating 40 A single phase
System voltage 120V-240V
Power frequency 50 Hz/60 Hz
Overvoltage category (EN 60664) II
Short-time current rating (EN <10 kA eff.
61439-1)
Power plug versions NEMA 6-30; NEMA 6-50; NEMA 14-30; NEMA 14-50; NEMA
5-15
Integrated residual-current device |AC: 20 mA; DC: 56 mA
Vehicle charging connector Type 1
Protection class I
IP Code 55 (USA: Enclosure 3)
Control unit mass 5.3 lbs - 7.7 lbs (2.4 - 3.5 kg)
Control unit dimensions (height x
width x depth)
12.2 inx 4.1 in x 2.8 in (310 mm x 105 mm x 72 mm)
G) Tips
— The device runs a self test after power has
been restored to the control unit. If a self
test is successful, all indicator lights will il-
luminate green for two seconds.
— The Audi e-tron compact charging system is
designed for charging at sockets with a volt-
age of 120 V/240 V. If your socket has a dif-
ferent voltage, contact and authorized Audi
dealer or authorized Audi Service Facility.
— If your Audi e-tron compact charging sys-
tem has a fixed connection, meaning can be
connected directly to the power supply
without a power cable, contact a qualified
electrician or an authorized Audi dealer or
authorized Audi Service Facility.
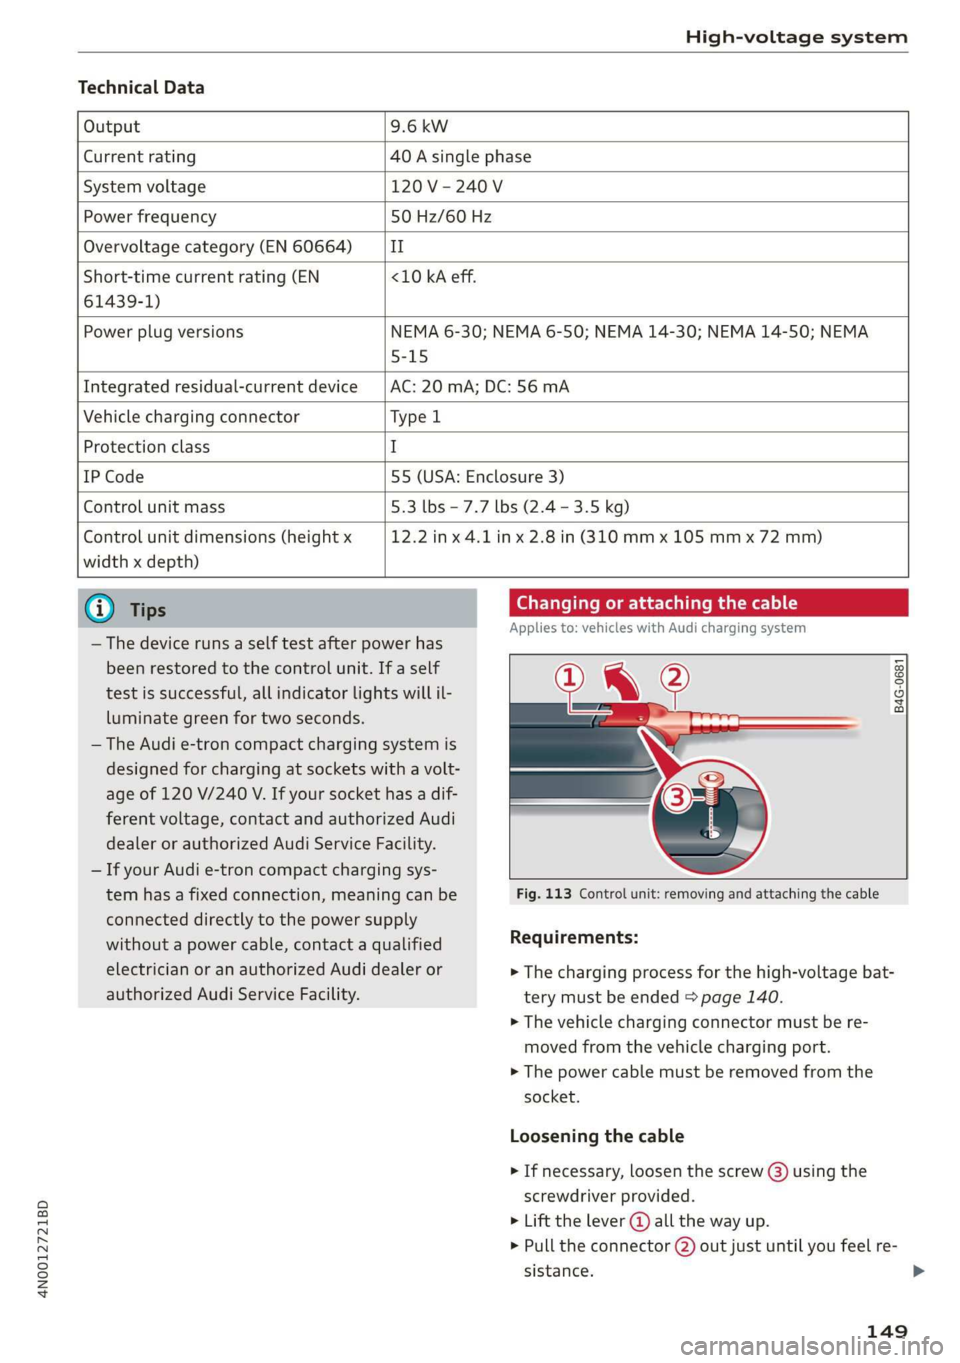
Changing or attaching the cable
Applies to: vehicles with Audi charging system
8
° oO
a
Fig. 113 Control unit: removing and attaching the cable
Requirements:
> The charging process for the high-voltage bat-
tery must be ended > page 140.
> The vehicle charging connector must be re-
moved from the vehicle charging port.
> The power cable must be removed from the
socket.
Loosening the cable
» If necessary, loosen the screw @) using the
screwdriver provided.
> Lift the lever @ all the way up.
> Pull the connector @) out just until you feel re-
sistance.
149
>
Page 154 of 360

Trailer towing
you are operating the vehicle. Contact an author-
ized Audi dealer or authorized Audi Service Facili-
ty for more information.
Before you start driving, check all lighting equip-
ment on the trailer while it is hitched to the vehi-
cle.
The headlight range control automatically ad-
justs the light range of the headlights.
Safety chains
Make sure the safety chains are correctly applied
when pulling a trailer. The chains should hang
enough so that the trailer can drive around
curves. However, they must not touch the
ground.
Air suspension
Applies to: vehicles with air suspension
The Audi drive select* comfort mode > page 128
must be selected before you adjust the tongue
weight on the trailer and hitch the trailer >@,
=> page 130.
Likewise, the vehicle cannot be raised manually
using the Raise function > page 130.
For vehicles with a retrofitted trailer hitch, you
must switch on the air suspension trailer mode
manually.
Applies to: MMI: Select on the home screen: VE-
HICLE > Settings & Service > Air suspension:
trailer.
Switch it off again when you are no longer towing
a trailer.
When using carrier systems that are mounted di-
rectly on the trailer hitch ball head, you can also
switch trailer mode off manually.
If you must drive on roads that are in poor condi-
tion, you can raise the vehicle again after hitching
the trailer or after adjusting the tongue weight
=> page 130.
Vehicle levels below the values set in the comfort
level will no longer be available, even if you are
lowering the vehicle manually.
152
Z\ WARNING
— Never turn off trailer mode while driving
when a trailer is hitched, because then the
restrictions for controlling the vehicle level
will be turned off.
— Driving with a trailer on unpaved roads when
the vehicle is raised may change the vehicle
handling. Adapt your speed.
— Note that the vehicle will lower automatical-
ly at certain speeds if you have lifted the ve-
hicle manually.
() Note
— Applies to: vehicles with air suspension: Se-
lect the Audi drive select* comfort mode.
Otherwise, the tongue load specified for
your vehicle will no longer be applicable.
— Attachments retrofitted on the vehicle may
cause damage, especially on the trailer
hitch ball head. In cases of damage, have
the function checked by an authorized Audi
dealer or authorized Audi Service Facility.
G) Tips
— Block the wheels with chocks when parking
on inclines if the trailer is loaded.
— Having the vehicle inspected between the
inspection intervals is recommended if you
tow a trailer frequently.
— Avoid driving with a trailer during the vehi-
cle break-in period.
Driving with a trailer
Driving with a trailer requires extra caution.
Speed
Adhere to the legal speed limits. Follow the legal
regulations that are applicable in the country
where you are operating the vehicle.
As the speed increases, the driving stability of
the trailer decreases. Therefore you should not
exceed the maximum legal speed limit when
there are unfavorable road, weather, and/or wind
conditions. This especially applies when driving
downhill.
Page 156 of 360

Assist systems
Assist systems
General information
Safety precautions
ZA WARNING
— As the driver, you are always completely re-
sponsible for all driving tasks. The assist
systems cannot replace the driver's atten-
tion. Give your full attention to driving the
vehicle, and be ready to intervene in the
traffic situation at all times.
— Activate the assist systems only if the sur-
rounding conditions permit it. Always adapt
your driving style to the current visual,
weather, road, and traffic conditions.
— Loose objects can be thrown around the ve-
hicle interior during sudden driving or brak-
ing maneuvers, which increases the risk of
an accident. Store objects securely while
driving.
— For the assist systems to be able to react
correctly, the function of the sensors and
cameras must not be restricted. Note the in-
formation on sensors and cameras
=> page 155.
@ Tips
— Pay attention to applicable local regulations
relating to driving tasks, leaving space for
emergency vehicles, vehicle distance, speed,
parking location, wheel placement, etc. The
driver is always responsible for following
the laws that are applicable in the location
where the vehicle is being operated.
— You can cancel a steering or braking inter-
vention by the system, by braking or accel-
erating noticeably, steering, or deactivating
the respective assist system.
— Always check the assist systems settings be-
fore driving. The settings could have been
changed, for example, by other drivers or if
another personal profile was used.
154
System limitations
ZA\ WARNING
— The use of an assist system cannot over-
come the natural laws of physics. A collision
cannot be prevented in certain circumstan-
ces.
— Warnings, messages, or indicator lights may
not be displayed or initiated on time or cor-
rectly, for example, if vehicles are approach-
ing very fast.
— Corrective interventions by the assist sys-
tems, such as steering or braking interven-
tions, may not be sufficient or they may not
occur. Always be ready to intervene.
G) Tips
— Due to the system limitations when detect-
ing the surrounding area, the systems may
warn or intervene unexpectedly or too late
in certain situations. The assist systems may
also interpret a driving maneuver incorrectly
and then warn the driver unexpectedly.
— The systems may not function as expected
in unusual driving situations, such as driving
offroad, on unpaved roads, on loose ground,
on inclines, or on grooves in the road.
— The systems may not function correctly in
unclear traffic situations, such as turning
lanes, exit ramps, construction zones, rises
or dips that obstruct visibility, intersections,
toll stations, or city traffic.
— The detection of the surrounding area can
be limited, for example by vehicles driving
ahead or by rain, snow, heavy spray, or light
shining into the camera.
— If accessories have been mounted on the
steering wheel, the ability for the steering
systems to react may be limited.
Page 163 of 360

4N0012721BD
Driving information
Traffic light information
Applies to: vehicles with traffic light information
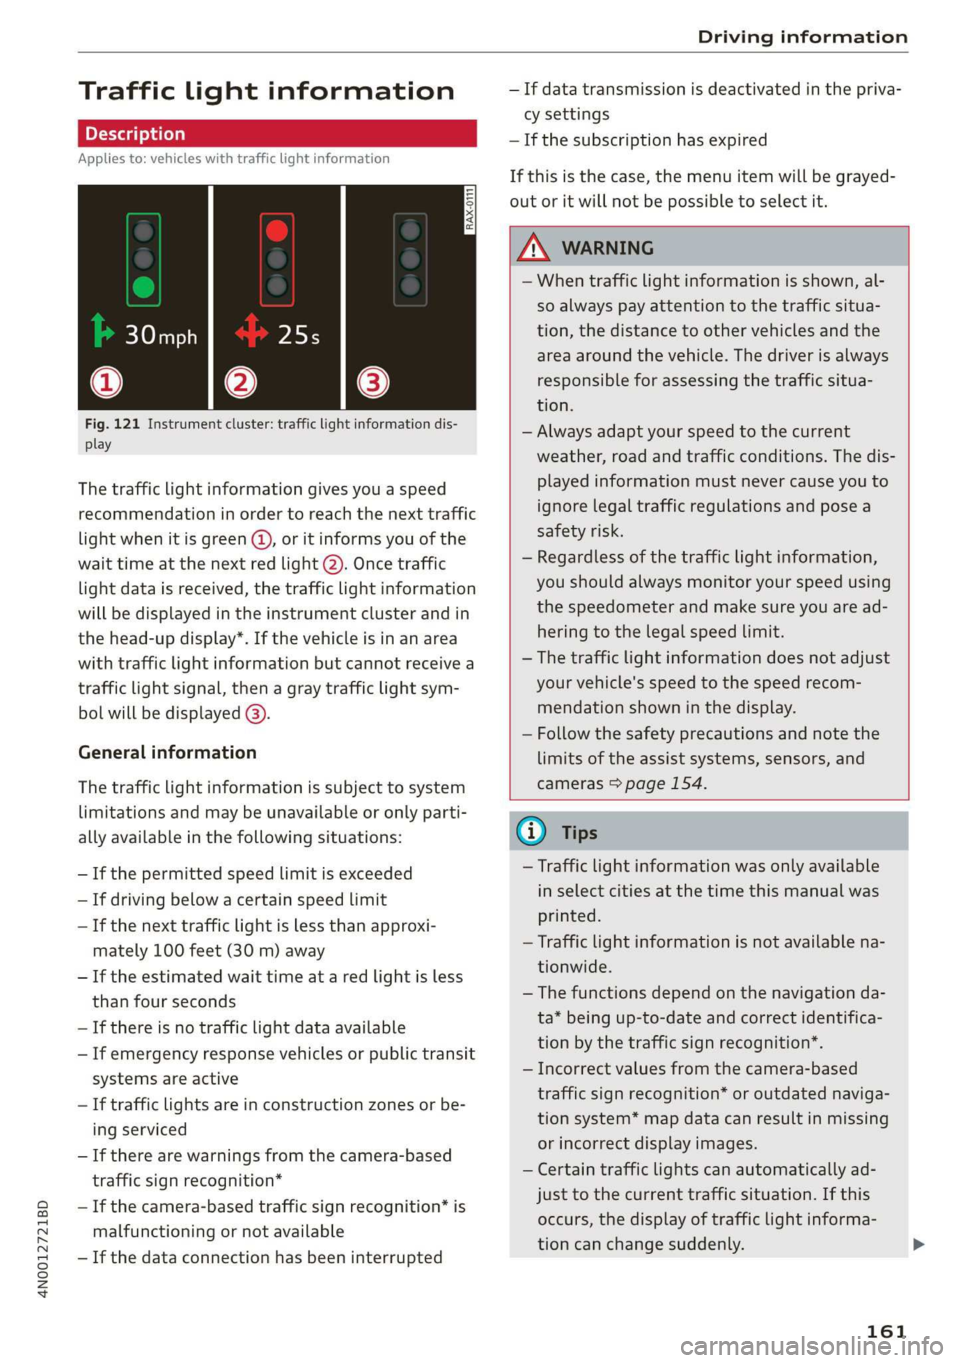
Fig. 121 Instrument cluster: traffic light information dis-
play
The traffic light information gives you a speed
recommendation in order to reach the next traffic
light when it is green @, or it informs you of the
wait time at the next red light 2). Once traffic
light
data is received, the traffic light information
will be displayed in the instrument cluster and in
the head-up display*. If the vehicle is in an area
with traffic light information but cannot receive a
traffic light signal, then a gray traffic light sym-
bol will be displayed @).
General information
The traffic light information is subject to system
limitations and may be unavailable or only parti-
ally available in the following situations:
—If the permitted speed limit is exceeded
— If driving below a certain speed limit
— If the next traffic light is less than approxi-
mately 100 feet (30 m) away
— If the estimated wait time at a red light is less
than four seconds
— If there is no traffic light data available
— If emergency response vehicles or public transit
systems are active
— If traffic lights are in construction zones or be-
ing serviced
— If there are warnings from the camera-based
traffic sign recognition*
— If the camera-based traffic sign recognition* is
malfunctioning or not available
—If the data connection has been interrupted
— If data transmission is deactivated in the priva-
cy settings
— If the subscription has expired
If this is the case, the menu item will be grayed-
out or it will not be possible to select it.
ZA\ WARNING
— When traffic light information is shown, al-
so always pay attention to the traffic situa-
tion, the distance to other vehicles and the
area around the vehicle. The driver is always
responsible for assessing the traffic situa-
tion.
— Always adapt your speed to the current
weather, road and traffic conditions. The dis-
played information must never cause you to
ignore legal traffic regulations and pose a
safety risk.
— Regardless of the traffic light information,
you should always monitor your speed using
the speedometer and make sure you are ad-
hering to the legal speed limit.
— The traffic light information does not adjust
your vehicle's speed to the speed recom-
mendation shown in the display.
— Follow the safety precautions and note the
limits of the assist systems, sensors, and
cameras > page 154.
(i) Tips
— Traffic light information was only available
in select cities at the time this manual was
printed.
— Traffic light information is not available na-
tionwide.
— The functions depend on the navigation da-
ta* being up-to-date and correct identifica-
tion by the traffic sign recognition*.
— Incorrect values from the camera-based
traffic sign recognition* or outdated naviga-
tion system* map data can result in missing
or incorrect display images.
— Certain traffic lights can automatically ad-
just to the current traffic situation. If this
occurs, the display of traffic light informa-
tion can change suddenly.
161
Page 167 of 360

4N0012721BD
Driving information
The Sl symbol will appear when pedestrian and
wild animal detection is not available.
Marking light*
To direct the driver's attention to a pedestrian,
the headlights can flash on the pedestrian when
there is a pedestrian warning.
This occurs at speeds above approximately
35 mph (60 km/h) if you are outside of illuminat-
ed areas and no detected vehicles are shown. The
marking light is not used for wild animals. The
high beam assistant* controls the marking
light*> page 61.
Adjusting the contrast
Applies to: vehicles with night vision assist
Requirement: the night vision assist must be
switched on and the 1 tab must be displayed.
> Applies to: MMI: Select on the home screen:
VEHICLE > Driver assistance > (23) > Night vi-
sion assist.
> To set the desired contrast, move the slider.
G) Tips
Certain settings are stored automatically in
the active personal profile.
Applies to: vehicles with night vision assist
Night vision assist: currently unavailable.
See owner's manual
The system is not functioning correctly so it has
been switched off. If this malfunction persists,
drive immediately to an authorized Audi dealer or
authorized Audi Service Facility to have the mal-
function repaired.
165
Page 168 of 360

Driver assistance
Driver assistance
Cruise control system
Applies to: vehicles with cruise control system
The cruise control system assists the driver in
maintaining a constant speed above approxi-
mately 15 mph (20 km/h). The system maintains
the desired speed by braking and accelerating.
ZA WARNING
— Always pay attention to the traffic around
your vehicle when the cruise control system
is in operation. As the driver, you are always
responsible for controlling your vehicle
speed and the distance between your vehicle
and
other vehicles.
— For safety reasons, cruise control should not
be used in the city, in stop-and-go traffic, on
winding roads, and when road conditions are
poor (such as ice, fog, gravel, heavy rain,
and conditions that could lead to hydroplan-
ing), because this increases the risk of an ac-
cident.
— Switch the cruise control off temporarily
when driving in turning lanes, highway exits,
or in construction zones.
—To reduce the risk of an accident, you should
only resume the stored speed if it is suitable
for the current traffic conditions.
C) Note
— Conventional drive system: Before driving
downhill a long distance on a steep hill, de-
crease your speed and select a lower gear.
This makes use of the engine braking effect
and reduces the load placed on the brakes.
— Plug-in hybrid drive: Before driving downhill
a long distance on a steep hill, decrease
your speed and use the braking effect of re-
cuperation > page 118. This reduces the
load on the brakes.
@ Tips
The brake lights turn on when the brakes are
applied automatically.
166
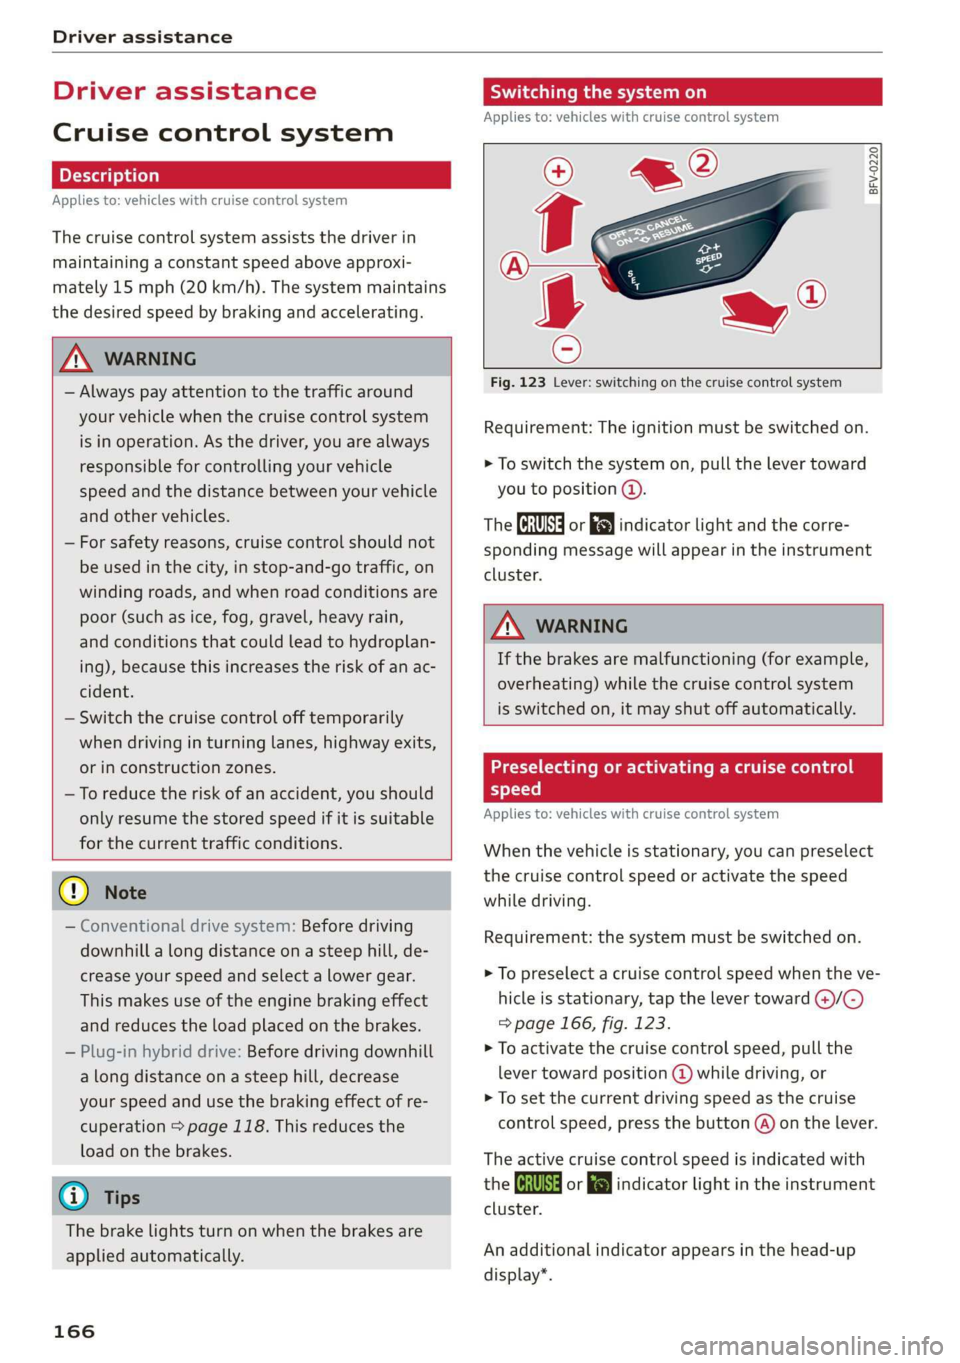
Switching the system on
Applies to: vehicles with cruise control system
BFV-0220
Fig. 123 Lever: switching on the cruise control system
Requirement: The ignition must be switched on.
> To switch the system on, pull the lever toward
you to position @.
The Ga or 8) indicator light and the corre-
sponding message will appear in the instrument
cluster.
A WARNING
If the brakes are malfunctioning (for example,
overheating) while the cruise control system
is switched on, it may shut off automatically.
Preselecting or activating a cruise control
speed
Applies to: vehicles with cruise control system
When the vehicle is stationary, you can preselect
the cruise control speed or activate the speed
while driving.
Requirement: the system must be switched on.
> To preselect a cruise control speed when the ve-
hicle is stationary, tap the lever toward @)/C)
=> page 166, fig. 123.
> To activate the cruise control speed, pull the
lever
toward position @ while driving, or
> To set the current driving speed as the cruise
control speed, press the button @) on the lever.
The active cruise control speed is indicated with
the Gs or kl indicator light in the instrument
cluster.
An additional indicator appears in the head-up
display*.