2019 MERCEDES-BENZ EQC SUV reset
[x] Cancel search: resetPage 150 of 629
Fo
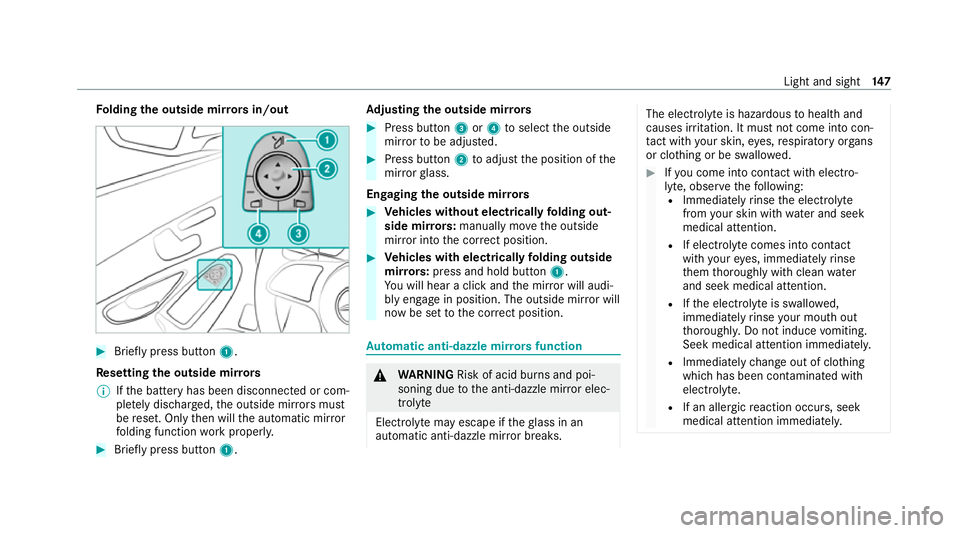
lding the outside mir rors in/out #
Brief lypress button 1.
Re setting the outside mir rors
% Ifth e battery has been disconnected or com‐
ple tely discharged, the outside mir rors must
be reset. Only then will the automatic mir ror
fo lding function workproperly. #
Brief lypress button 1. Ad
justing the outside mir rors #
Press button 3or4 toselect the outside
mir rorto be adjus ted. #
Press button 2toadjust the position of the
mir rorgl ass.
Engaging the outside mir rors #
Vehicles without electrical lyfolding out‐
side mir rors: manually mo vethe outside
mir ror into the cor rect position. #
Vehicles with electrical lyfolding outside
mir rors: press and hold button 1.
Yo u will hear a click and the mir ror will audi‐
bly engage in position. The outside mir ror will
now be set tothe cor rect position. Au
tomatic anti-dazzle mir rors function &
WARNING Risk of acid bu rns and poi‐
soning due tothe anti-dazzle mir ror elec‐
trolyte
Electrolyte may escape if theglass in an
automatic anti-dazzle mir ror breaks. The electrolyte is hazardous
tohealth and
causes ir rita tion. It mu stnot come into con‐
ta ct wi thyour skin, eyes,respiratory or gans
or clo thing or be swallo wed. #
Ifyo u come into contact with electro‐
ly te , obser vethefo llowing:
R Immediately rinse the electrolyte
from your skin with water and seek
medical attention.
R If electrolyte comes into contact
with your eyes, immediately rinse
th em thoroughly with clean water
and seek medical attention.
R Ifth e electrolyte is swallo wed,
immediately rinse your mouth out
th oroughl y.Do not induce vomiting.
Seek medical attention immediately.
R Immedia tely ch ange out of clo thing
which has been con taminated with
electrolyte.
R If an allergic reaction occurs, seek
medical attention immediatel y. Light and sight
147
Page 272 of 629
R
Active Dis tance Assi stDISTRONIC displa ys
( / page 212)
R Active Lane Change Assi stdispla ys
( / page 221) Calling up displa
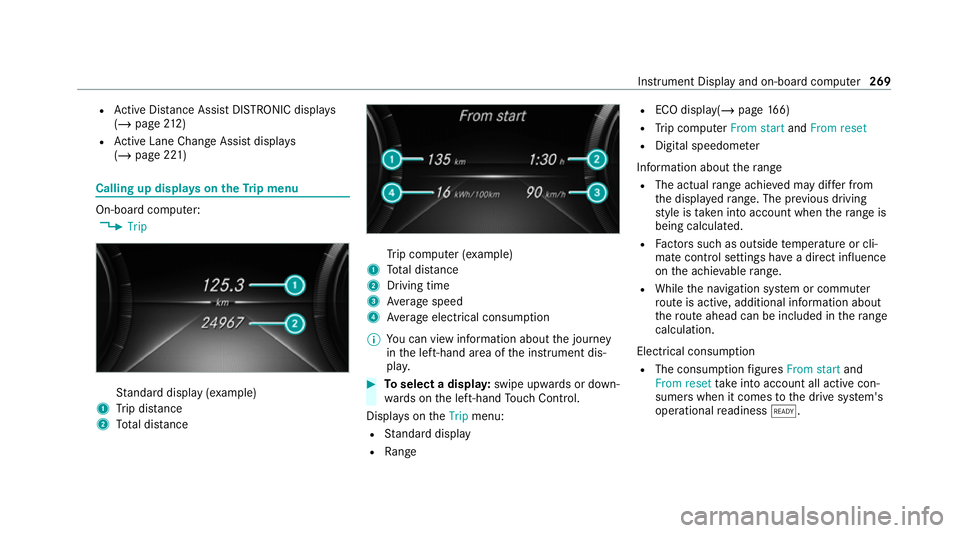
yson theTr ip menu On-board computer:
4 Trip St
andard display (e xamp le)
1 Trip dis tance
2 Total dis tance Tr
ip computer (e xamp le)
1 Total dis tance
2 Driving time
3 Average speed
4 Average electrical consum ption
% You can view information about the journey
in the left-hand area of the instrument dis‐
pla y. #
Toselect a displa y:swipe upwards or down‐
wa rds on the left-hand Touch Control.
Displa yson theTrip menu:
R Standard display
R Range R
ECO displ ay(/ page 166)
R Trip computer From startandFrom reset
R Digital speedom eter
Information about thera nge
R The actual range achi eved may dif fer from
th e displa yedra nge. The pr evious driving
st yle is take n into account when thera nge is
being calculated.
R Factors su chas outside temp erature or cli‐
mate control settings ha vea direct influence
on the achie vable range.
R While the navigation sy stem or commuter
ro ute is active, additional information about
th ero ute ahead can be included in thera nge
calculation.
Electrical consu mption
R The consumption figures From start and
From reset take into account all active con‐
sumers when it comes tothe drive sy stem's
operational readiness õ. In
stru ment Display and on-board computer 269
Page 273 of 629
Re
setting values on the trip menu of the on-
board compu terOn-board computer:
4 Trip
Yo u can reset theva lues of thefo llowing func‐
tions:
R Trip dis tance
R Trip computer From startandFrom reset
R ECO display (/ page166) #
Toselect the function tobe rese t:swipe
upwards or down wards on the left-hand
To uch Control. #
Press the left-hand Touch Control. #
Select Yes. #
Press the left-hand Touch Control.
If yo u press and hold the left-hand Touch Con‐
trol, theva lues of the function will be reset
immediatel y. Calling up navigation instructions on
the on-
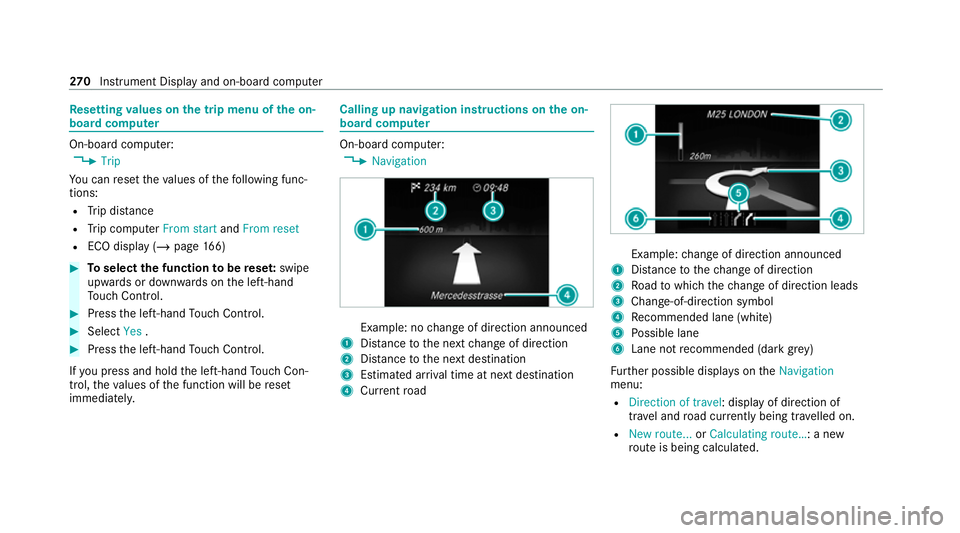
board compu ter On-board computer:
4 Navigation Example: no
change of direction announced
1 Distance tothe next change of direction
2 Distance tothe next destination
3 Estimated ar riva l time at next destination
4 Current road Example:
change of direction announced
1 Distance tothech ange of direction
2 Road towhich thech ange of direction leads
3 Chan ge-of-direction symbol
4 Recommended lane (white)
5 Possible lane
6 Lane not recommended (da rkgrey)
Fu rther possible displa yson theNavigation
menu:
R Direction of travel: display of direction of
tra vel and road cur rently being tr avelled on.
R New route... orCalculating route… : a new
ro ute is being calculated. 270
Instrument Display and on-board computer
Page 274 of 629
R
Road not mapped :th ero ad is unknown, e.g.
fo r newly built roads.
R No route: no route could be calculated tothe
selected destination.
R Off map: the map forth e cur rent location is
not available.
R Area of destination reached: you ha ve
re ached the area of the destination.
R O: you ha vereached the destination or an
intermediate destination. #
Toexitth e menu: pressthe back button on
th e left.
Ve hicles with the MBUX multimedia sy stem:
Yo u can also start navigation toone of the
re cent destinations on theNavigation menu: #
Press the left-hand Touch Control. #
Toselect a destination: swipe upwards or
down wards on the left-hand Touch Control. #
Press the left-hand Touch Control.
Ro ute guidance will start. If
ro ute guidance has already been activated,
a qu ery will appear asking whe ther you wish
to end the cur rent route guidance. #
Select Yes. #
Press the left-hand Touch Control.
Ro ute guidance will start. Selecting
radio stations using the on-boa rd
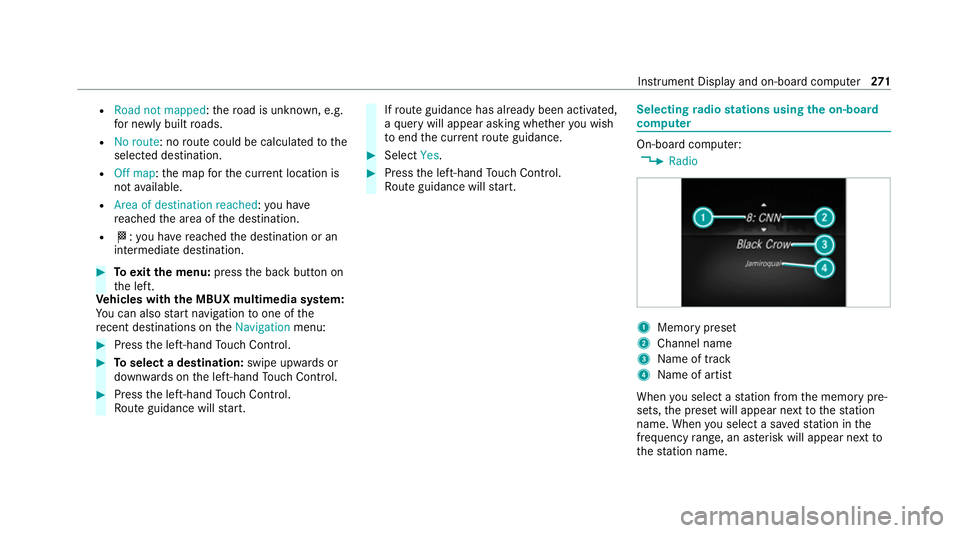
compu ter On-board computer:
4 Radio 1
Memory preset
2 Channel name
3 Name of track
4 Name of artist
When you select a station from the memory pre‐
sets, the preset will appear next tothest ation
name. When you select a sa vedstation in the
frequency range, an as terisk will appear next to
th est ation name. In
stru ment Display and on-board computer 271
Page 275 of 629
#
Toselect a radio station: swipe upwards or
down wards on the left-hand Touch Control.
Selecting the frequency range or memory
preset #
Press the left-hand Touch Control. #
Toselect the frequency range/station
prese t:swipe upwards or down wards on the
left-hand Touch Control. #
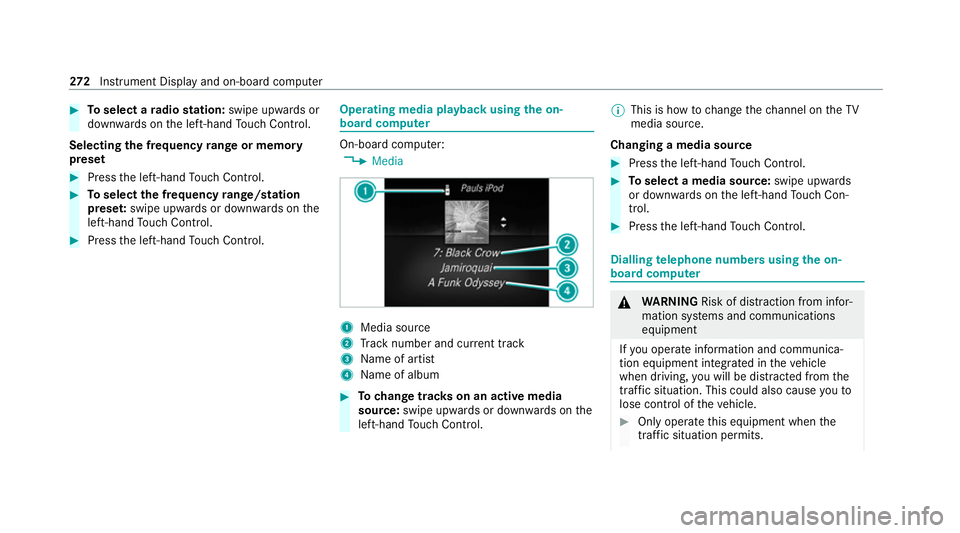
Press the left-hand Touch Control. Ope
rating media playba ckusing the on-
board compu ter On-board computer:
4 Media 1
Media source
2 Track number and cur rent track
3 Name of artist
4 Name of album #
Tochange trac kson an active media
source: swipe upwards or down wards on the
left-hand Touch Control. %
This is how tochange thech annel on theTV
media source.
Changing a media source #
Press the left-hand Touch Control. #
Toselect a media source: swipe upwards
or down wards on the left-hand Touch Con‐
trol. #
Press the left-hand Touch Control. Dialling
telephone numbers using the on-
board compu ter &
WARNING Risk of di stra ction from infor‐
mation sy stems and communications
equipment
If yo u operate information and communica‐
tion equipment integ rated in theve hicle
when driving, you will be distracted from the
traf fic situation. This could also cause youto
lose control of theve hicle. #
Only operate this equipment when the
traf fic situation permits. 272
Instrument Display and on-board computer
Page 314 of 629

#
Toconfigure suggestions: selectSugges-
tions settings (/page 315). #
Toreset favo urites or themes: select
Reset favourites to factory settings orReset
themes to factory settings. #
Select Yes. #
Toreset a profile: selectReset profile to
factory settings. #
Select Yes. #
Todel ete a profile: selectDelete profile . #
Select Yes.
% The guest profile cannot be dele ted.
Pr otecting profile content
To protect your profile content and settings you
can crea tea PIN in the Mercedes me por talfor
yo ur profile. When PIN pr otection is active, you
ha ve toenter the PIN toselect your profile. #
Select Protect content . #
Select Mercedes me portal.
The br owser opens and you are trans ferred
to the Mercedes me por tal. Selecting a profile
Multimedia sy
stem:
4 © 5
f Profiles
% You can cancel the setting process with the
fo llowing actions:
R Tap on thePositioning seat and steering
wheel. Please tap to cancel. warning on
th e media displa y.
R Press one of the seat operating buttons
in the driver's door. #
Select a profile. #
Press thea button toconfirm the mes‐
sage.
The profile is loaded and activated.
% Alternatively, the profile can already be
selected when theve hicle is entered
(/ page 312).
Synchronising a profile
Re quirements:
R You ha vea Mercedes me user account.
R The vehicle is connected with your Mercedes
me user account. R
The personalisation service is activated on
Mercedes me connect.
Multimedia sy stem:
4 © 5
f Profiles
5 General settings
Synchronisation enables thefo llowing:
R You can configure theve hicle settings using
th e Mercedes me app.
R The profile on Mercedes me connect and the
profile in theve hicle are aligned (profile man‐
agement). #
Activate Synchronise profiles automatically.
The profiles in theve hicle are automatically
synchronised with the profiles on Mercedes
me connect when the ignition is switched on
and off.
or #
Select Synchronise profiles now.
Af ter selecting this option, the profiles in the
ve hicle are synchronised with the profiles on
Mercedes me connect. MBUX multimedia sy
stem 311
Page 318 of 629
R
From the beginning of usage, the multimedia
sy stem must analyse the user habits. When
suf ficient da tais collec tedth en the sugges‐
tions are available.
If th erequ irements mentioned are not fulfilled, a
pr ev iew with a desc ript ion of the function
appears in theSUGGESTIONS menu.
Yo u can configure data recording (/ page 315)
or del eteth e suggestions recorded
(/ page 316).
Calling up sugges tions
Re quirements:
R A profile has been created and is selected
(/ page 311). #
Tap on © inthe media displa y.
The home screen is shown. #
Swipe up until theSUGGESTIONS menu is
shown. #
Select a navigation destination, a media
source, a radio station or a con tact.
If ro ute guidance is already active, you can‐
not start a new route guidance or set an intermediate destination
forth eex isting
ro ute.
Configuring sug gestions
Re quirements:
R Toprotect settings using a PIN: your pro‐
fi le is connec ted with Mercedes me and your
Mercedes me account is PIN pr otected.
Multimedia sy stem:
4 © 5
f Profiles #
Select ufor a profile. #
Select Suggestions settings . #
Toswitch suggestions display on/off:
switch Allow destination suggestions ,Allow
music suggestions andAllow contact sugges-
tions on or off.
If an option is switched on, suggestions for
navigation de stinations, media sources, radio
st ations or con tacts are shown.
If th e option is switched off, no suggestions
are shown. #
Todeactivate the learn function for one
da y:activate Deact. learn. for 24h .
Fo r24 hours no new actions will be trained
and no data recorded forth e active profile.
Suggestions will continue tobe shown. The
re maining time is shown next toDeact.
learn. for 24h .
Before the time runs out, a messa geis
shown that the multimedia sy stem will con‐
tinue the learn function shortl y.
Example: if the option is switched on and a
ro ute toa new destination has been calcula‐
te d, this destination would not be take n into
account forth e learn function. #
Toreset the suggestion his tory:select
Reset suggestion history.
% This process cannot be reve rsed. #
Select Yes. #
Toprotect settings with a PIN: switchon
PIN protection.
If PIN pr otection is switched on, you must
en terth e Mercedes me PIN toset the sug‐
ge stions. This PIN will be set in the Mercedes MBUX multimedia sy
stem 315
Page 339 of 629

#
Set a new PIN.
Ac tivating PIN pr otection for data export #
Select Protect data export .
Ac tivate or deacti vate the function.
Un blocking the PIN via the Mercedes me por‐
tal
If th e PIN has been entered incor rectly three
times, the PIN will be bloc ked. You can ha ve a
single-use password sent to you via the
Mercedes me connect online por talto reset the
PIN pr otection. #
Select Unblock PIN. #
Ente rth e single-use password.
PIN pr otection is reset, and you can set a
new PIN. Software upda
teInformation on software upda
tes
A software upda teconsi sts of thre esteps:
R Downloading or copying of the data requ ired
fo r ins tallation
R Installation of the update R
Activation of the update byrestarting the
sy stem
The multimedia sy stem pr ovides a message
when an update is available.
Depending on the source, you can per form vari‐
ous updates:
Software updates Source of
the
update Up
date type
Interne tN avigation map, sys‐
te m updates, Digital
Owner's Manual
External storage
medium, e.g. USB
fl ash drive Na
vigation maps %
Installation can take several minutes and
cancellation is not possible. If you do not
ins tallth e software updates then thest atus
of your vehicle will not be up-to-date. During
th e ins tallation, individual functions or con‐ trol elements are not
available or on lyavaila‐
ble toa limited deg ree.
Ad vantages of updating software
Software updates ensure your vehicle's tech nol‐
ogy is up-to-date.
In order toimpr oveth equ ality of our services
yo u will recei vefuture updates foryo ur multime‐
dia sy stem, the Mercedes me connect services
and your vehicle's communication module.
These will con veniently be sent to you via the
mobile phone connection in your vehicle and, in
many cases, ins talled automaticall y.Yo u can
monitor thest atus of your updates at any time
on the Mercedes me por tal and find information
about po tential inno vations.
Yo ur advantages at a glance:
R con veniently recei vesoftware update s via
th e mobile phone network
R impr ovesth equ ality and availability of
Mercedes me connect services
R keeps your multimedia sy stem and communi‐
cation module up-to-date 336
MBUX multimedia sy stem