2019 MERCEDES-BENZ EQC SUV reset
[x] Cancel search: resetPage 31 of 629

Fa
ult memories in theve hicle can be reset by a
service outlet as part of repair or maintenance
wo rk.
Depending on the selected equipment, you can
import data into vehicle con venience and info‐
ta inment functions yourself.
This includes, forex ample:
R multimedia data such as music, films or pho‐
to sfo r playback in an integrated multimedia
sy stem
R address book data for use in connection with
an integrated hands-free sy stem or an inte‐
grated navigation sy stem
R entered navigation destinations
R data about the use of internet services
This data can be sa ved locally in theve hicle or it
is located on a device which you ha veconnected
to theve hicle (e.g. a smartphone, USB flash
drive or MP3 pla yer). If this data is stored in the
ve hicle, you can dele teit at any time. This data
is sent tothird parties only at your requ est, par‐
ticular lywhen you use online services in accord‐
ance with the settings that you ha veselected. Yo
u can store or change con venience settings/
individualisations in theve hicle at any time.
Depending on the equipment, this includes, for
ex ample:
R settings forth e seat and steering wheel posi‐
tions
R suspension and climate control settings
R customisations such as interior lighting
If yo ur vehicle is accordingly equipped, you can
connect your smartphone or ano ther mobile end
device totheve hicle. You can cont rolth is by
means of the control elements integrated in the
ve hicle. Images and audio from the smartphone
can be output via the multimedia sy stem. Cer‐
ta in information is simultaneously transfer redto
yo ur smartphone.
Depending on the type of integration, this can
include:
R general vehicle data
R position data
This allo wsyouto use selected apps on your
smartphone, such as navigation or music play‐ bac
k.There is no fur ther interaction between the
smartphone and theve hicle; in particular, vehi‐
cle data is not directly accessible. Which type of
fur ther data processing occurs is de term ined by
th e pr ovider of the specific app used. Which set‐
tings you can make, if an y,depends on the spe‐
cific app and the operating sy stem of your
smartphone. Online services
Wire
less network connection
If yo ur vehicle has a wireless network connec‐
tion, it enables data tobe exc hanged between
yo ur vehicle and additional sy stems. The wire‐
less network connection is enabled via theve hi‐
cle's transmission and reception unit or via con‐
nected mobile end devices (e.g. sma rtphones).
Online functions can be used via the wireless
network connection. This includes online serv‐
ices and applications/apps pr ovided bythe man‐
ufacturer or other pr oviders.
Manu factu rer's se rvices
Re garding online services of the manufacturer,
th e individual functions are described bythe 28
General no tes
Page 91 of 629
1
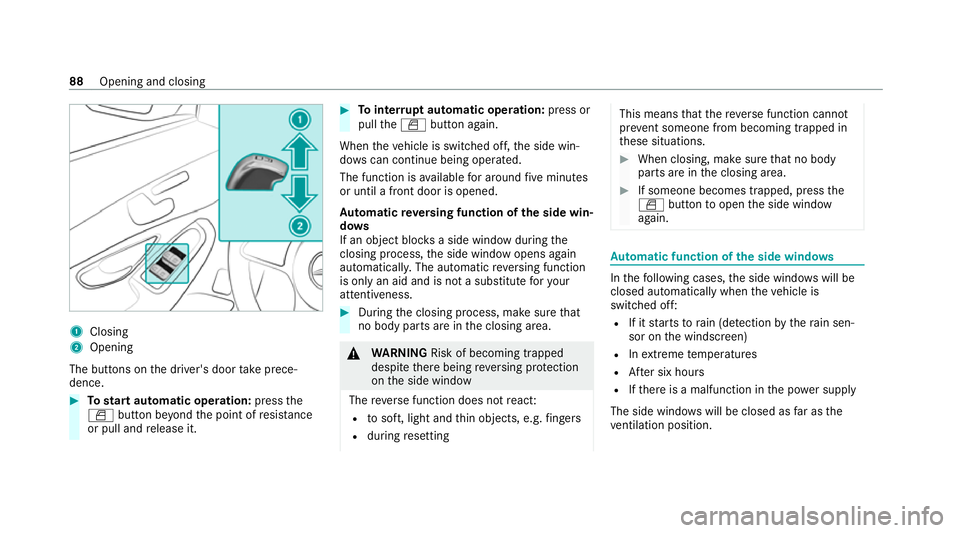
Closing
2 Opening
The but tons on the driver's door take prece‐
dence. #
Tostart automatic operation: pressthe
W button be yond the point of resis tance
or pull and release it. #
Tointer rupt automatic operation: press or
pull theW button again.
When theve hicle is switched off, the side win‐
do ws can continue being ope rated.
The function is available for around five minutes
or until a front door is opened.
Au tomatic reve rsing function of the side win‐
do ws
If an object bloc ksa side wind owduring the
closing process, the side window opens again
automaticall y.The automatic reve rsing function
is only an aid and is not a substitute foryo ur
attentiveness. #
During the closing process, make sure that
no body parts are in the closing area. &
WARNING Risk of becoming trapped
despi tethere being reve rsing pr otection
on the side window
The reve rse function does not react:
R tosoft, light and thin objects, e.g. fingers
R during resetting This means
that there ve rse function cann ot
pr eve nt someone from becoming trapped in
th ese situations. #
When closing, make sure that no body
parts are in the closing area. #
If someone becomes trapped, press the
W button toopen the side window
again. Au
tomatic function of the side windo ws In
thefo llowing cases, the side windo wswill be
closed automatically when theve hicle is
switched off:
R If it starts torain (de tection bythera in sen‐
sor on the windscreen)
R Inextreme temp eratures
R After six hours
R Ifth ere is a malfunction in the po wer supp ly
The side windo wswill be closed as far as the
ve ntilation position. 88
Opening and closing
Page 95 of 629
*
NO
TEDama gecaused byprotru ding
objects Objects
that pr otru de from the sliding sun‐
ro of may damage the sealing strips. #
Do not allow anything toprotru de from
th e sliding sunroof. *
NO
TEImpo rtant points toremember
when a roof rack isfitted When a
roof rack isfitted, raising or opening
th e sliding sunroof may be limited. #
Check whe ther the sliding sunroof can
be raised or opened when a roof rack is
fi tted. #
If in doubt, do not raise or open the
sliding sunroof. 1
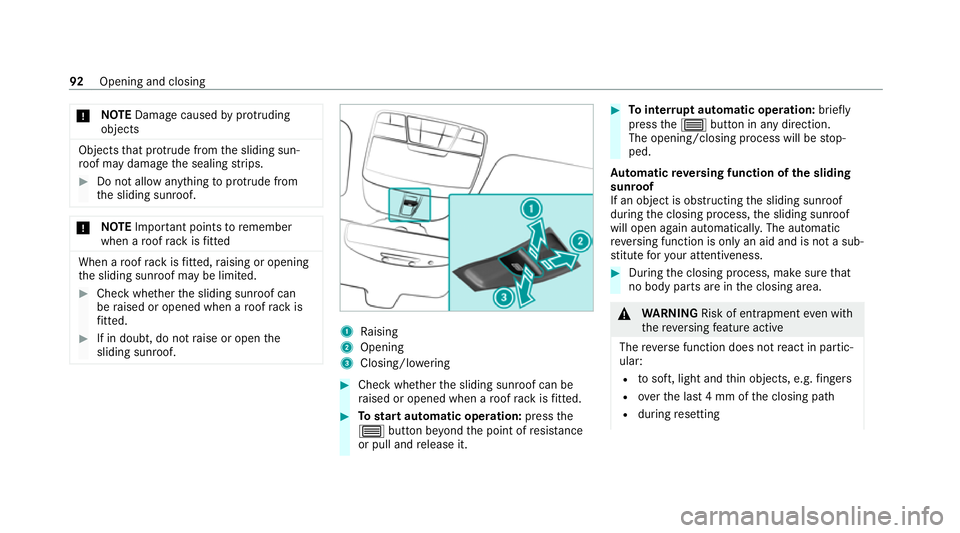
Raising
2 Opening
3 Closing/lo wering #
Check wh ether the sliding sunroof can be
ra ised or opened when a roof rack isfitted. #
Tostart automatic operation: pressthe
3 button be yond the point of resis tance
or pull and release it. #
Tointer rupt automatic operation: briefly
press the3 button in any direction.
The opening/closing process will be stop‐
ped.
Au tomatic reve rsing function of the sliding
sunroof
If an object is obstructing the sliding sunroof
during the closing process, the sliding sunroof
will open again automaticall y.The automatic
re ve rsing function is only an aid and is not a sub‐
st itute foryo ur attentiveness. #
During the closing process, make sure that
no body parts are in the closing area. &
WARNING Risk of entrapment even wi th
th ere ve rsing feature active
The reve rse function does not react in partic‐
ular:
R tosoft, light and thin objects, e.g. fingers
R overth e last 4 mm of the closing path
R during resetting 92
Opening and closing
Page 97 of 629
Problems with
the sliding sunroof Problem
Possible causes/consequences and M
MSolutions
The sliding sunroof cann otbe closed
and you cannot see the cause. &
WARNING Risk of becoming trapped or fata l injury byclosing the sliding sunroof again
If yo u close the sliding sunroof again immediately af ter it has been bloc ked or reset, the sliding sunroof
closes with increased forc e.
Pa rts of the body could become trapped in the closing area in the process. #
Make sure that no parts of the body are in the closing area. #
Release the button immediately if somebody becomes trapped.
or #
Press the button in any direction during the automatic closing process.
The closing process is stopped. If
th e sliding sunroof is obstructed during closing and reopens again slightly: #
Immediately af ter auto matic reve rsing, pull and hold the3 button down again tothe point of resist‐
ance until the sliding sunroof is closed.
The sliding sunroof will be closed with increased forc e.
If th e sliding sunroof is obstructed again and reopens again slightly: 94
Opening and closing
Page 109 of 629
Ad
justing the driver's seat position tobody
size
The vehicle will calculate a suitable driver's seat
position on the basis of the driver's body size
and set this direct ly. #
Select SEAT POSITIONING .#
Toset the unit of measurement: selectcm
or ft/in. #
Set the size using the scale. #
Select Start positioning.
The driver's seat position will be adjus tedto
th e body size that has been set.
% Ifth e driver's seat position calculated bythe
ve hicle is not practical or comfor table, it can
be changed manually at any time via the
control buttons.
The outside mir rors are not set via this func‐
tion. Ins tead, they have tobe set manually
via the switches.
% You can also make these settings via the
Mercedes me por talfo ryo ur user profile. By
syn chro nising the profiles in theve hicle and
th e Mercedes me connect profiles, you can
car ryove rth ese settings foryo ur vehicle. Fu
rther information about synchronising
user profiles (/ page311).
Setting the easy entry and exitfeature #
Activate or deacti vate the function.
% Ifyo u use an individual user profile and ha ve
set your body size, this information is car ried
ove rfo rth e easy entry andexitfeature. This
causes the driver's seat toautomatically
mo veinto the cor rect position
(/ page 310). Selec
ting the massage prog ramme for the
front seats Multimedia sy
stem:
4 © 5
Comfort 5
Massage #
Select Wave Massage orPulsating Massage .
The selected prog ramme will start. #
Start the program forth e desired seat ;. #
Toset the massage intensit y:switch High
intensity on or off . Re
setting seat settings Multimedia sy
stem:
4 © 5
Comfort 5
Seat comfort #
Select Reset. #
Select ßforth e desired seat.
The settings forth e selected seat are reset. Switching
the seat heating on/off &
WARNING Risk of bu rns due torepeat‐
edly switching on the seat heater
Re peatedly switching on the seat heater can
cause the seat cushion and seat backrest
padding tobecome very hot.
The health of persons with limited temp era‐
ture sensitivity or a limited ability toreact to
high temp eratures may be af fected or they
may even su ffer burn-like injuries. #
Do not repeatedly switch on the seat
heater. 106
Seats and stowing
Page 115 of 629
#
If somebody becomes trapped, immedi‐
ately release the memory function posi‐
tion button.
The adjustment process is stopped. &
WARNING Risk of entrapment if the
memory function is activated bychildren
Children could become trapped if they acti‐
va te the memory function, particularly when
unattended. #
Never lea vechildren unat tended in the
ve hicle. #
When leaving theve hicle, alw aysta ke
th eke y with you and lock theve hicle. This also applies
tothe Digital Vehicle Key if the
"Digital Vehicle Key" function is activated via
Mercedes me connect.
The memory function can be used when the igni‐
tion is switched off.
St oring
Seat adjustments for up tothre e people can be
st ored and called up using the memory function. The
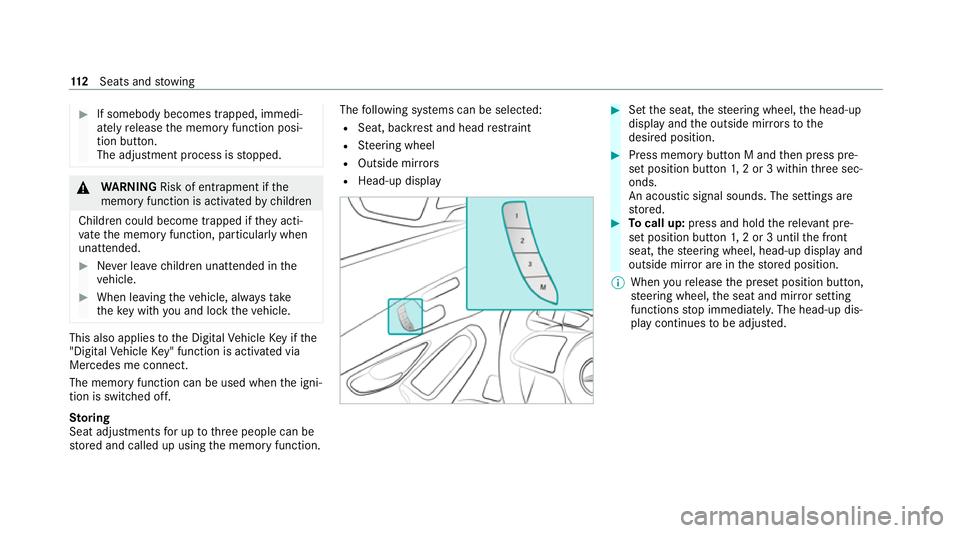
following sy stems can be selected:
R Seat, backrest and head restra int
R Steering wheel
R Outside mir rors
R Head-up display #
Set the seat, thesteering wheel, the head-up
display and the outside mir rors to the
desired position. #
Press memory button M and then press pre‐
set position button 1,2 or 3 within thre e sec‐
onds.
An acoustic signal sounds. The settings are
st ored. #
Tocall up: press and hold there leva nt pre‐
set position button 1,2 or 3 until the front
seat, thesteering wheel, head-up display and
outside mir ror are in thestored position.
% When youre lease the preset position button,
st eering wheel, the seat and mir ror setting
functions stop immediatel y.The head-up dis‐
play continues tobe adjus ted. 11 2
Seats and stowing
Page 119 of 629
#
Vehicles without a memory function:
mo vethe driver's or front passenger seat for‐
wa rds, if necessar y. #
Vehicles with a memory function: if at
lea stone section of there ar seat backrest is
fo lded forw ards, the cor responding front seat
will mo veforw ards slightl y,if necessar y,to
av oid a collision. #
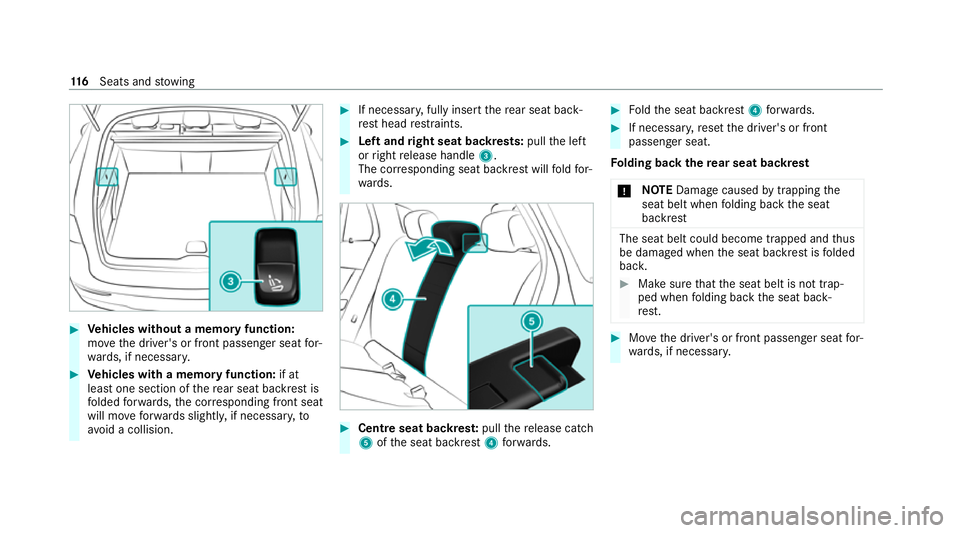
If necessar y,fully insert there ar seat back‐
re st head restra ints. #
Left and right seat backrests: pullthe left
or right release handle 3.
The cor responding seat backrest will fold for‐
wa rds. #
Centre seat backres t:pull there lease cat ch
5 ofthe seat backrest 4forw ards. #
Foldthe seat backrest 4forw ards. #
If necessar y,reset the driver's or front
passenger seat.
Fo lding back there ar seat backrest
* NO
TEDama gecaused bytrapping the
seat belt when folding back the seat
backrest The seat belt could become trapped and
thus
be damaged when the seat backrest is folded
bac k. #
Make sure that the seat belt is not trap‐
ped when folding back the seat back‐
re st. #
Movethe driver's or front passenger seat for‐
wa rds, if necessar y. 11 6
Seats and stowing
Page 145 of 629
#
Select Multi-colour.
The reare ten preset colour combinations
av ailable. #
Select a colour combination.
Ac tivating multi-coloured animation #
Select Colour. #
Select Multi-colour animat..
The chosen colour combination will change
at predefined inter vals.
Ac tivating welcome lighting #
Select Colour. #
Select Welcome.
When theve hicle is unloc ked, a special ambi‐
ent lighting sequence will run.
Ac tivating dependency on air conditioning
settings #
Select Colour. #
Select Climate.
If ch anges are made tothete mp erature set‐
ting in theve hicle, the colour of the ambient
lighting will change brief ly. Switching
the interior lighting switch-off
delay time on/off Multimedia sy
stem:
4 © 5
Settings 5
Lights
5 Int. light. del. sw. off #
Switch the lighting switch-off delay time on
or off.
When this function is active, the interior light‐
ing is lit up for short time af terth eve hicle
has been loc ked. Wi
ndscreen wipers and windscreen washer
sy stem Switching
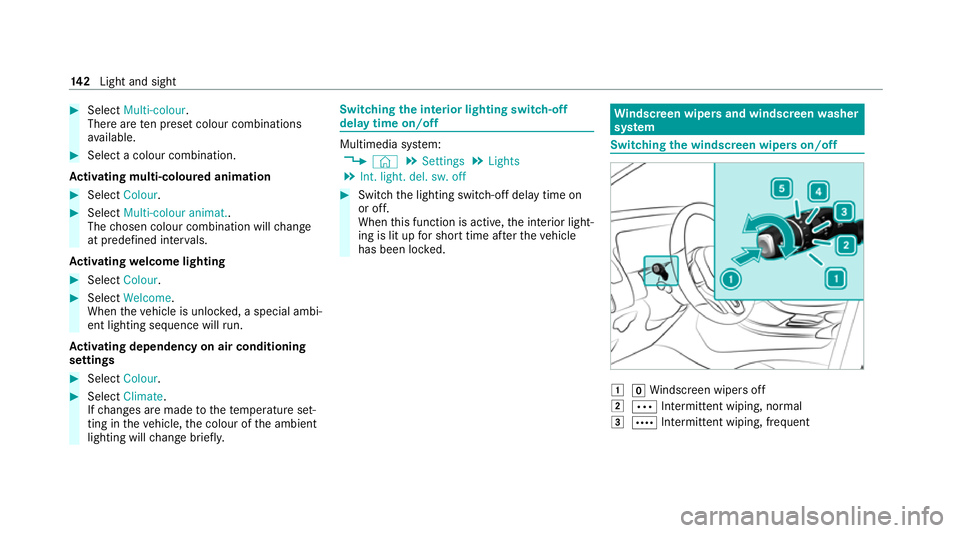
the windscreen wipers on/off 1
gWindsc reen wipers off
2 Ä Intermittent wiping, normal
3 Å Intermittent wiping, frequent 14 2
Light and sight