2019 MERCEDES-BENZ AMG GT ROADSTER engine
[x] Cancel search: enginePage 263 of 298
X
Turn the SmartKey to key position 0092in the
ignition lock and remove it.
X Secure the vehicle. Tow-starting (emergency engine
starting)
! Vehicles with automatic transmission must
not be tow-started. You could otherwise dam- age the automatic transmission.
i You can find information on "Jump-starting"
under (Y page 256). Fuses
Important safety notes
G
WARNING
If you manipulate or bridge a faulty fuse or if
you replace it with a fuse with a higher amper- age, the electric cables could be overloaded.
This could result in a fire. There is a risk of an
accident and injury.
Always replace faulty fuses with the specified
new fuses having the correct amperage.
Blown fuses must be replaced with fuses of the
same rating, which you can recognize by the
color and value. The fuse ratings are listed in the
fuse allocation chart.
The fuse allocation chart is on the fuse box in the trunk (Y page 262).
If a newly inserted fuse also blows, have the
cause traced and rectified at a qualified special-
ist workshop, e.g. an authorized Mercedes-Benz Center.
! Only use fuses that have been approved for
Mercedes-Benz vehicles and which have the
correct fuse rating for the system concerned.
Otherwise, components or systems could be
damaged.
! Make sure that no moisture can enter the
fuse box when the cover is open.
! When closing the cover, make sure that it is
lying correctly on the fuse box. Moisture seep-
ing in or dirt could otherwise impair the oper- ation of the fuses. The fuses in your vehicle serve to close down
faulty circuits. If a fuse blows, all the compo-
nents on the circuit and their functions stop
operating. Before changing a fuse
X Switch off the engine.
X Switch off all electrical consumers.
X Open the driver's door.
The on-board electronics are now in key posi-
tion 0092. This is the same as the key having
been removed.
or, if the SmartKey is inserted in the ignition
lock: X Remove the SmartKey from the ignition lock.
X Secure the vehicle against rolling away
(Y page 127).
All indicator lamps in the instrument cluster
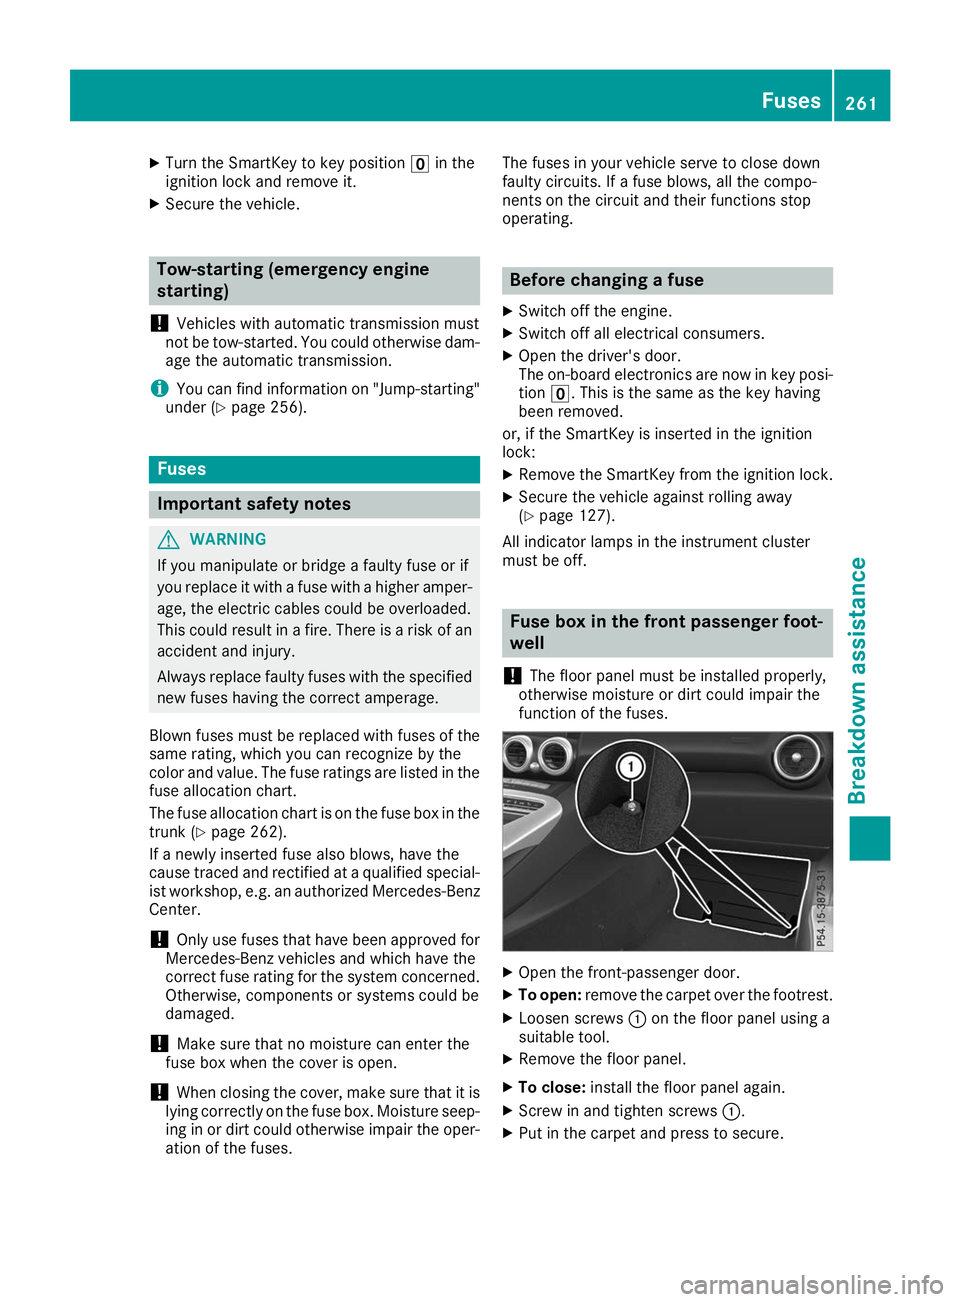
must be off. Fuse box in the front passenger foot-
well
! The floor panel must be installed properly,
otherwise moisture or dirt could impair the
function of the fuses. X
Open the front-passenger door.
X To open: remove the carpet over the footrest.
X Loosen screws 0043on the floor panel using a
suitable tool.
X Remove the floor panel.
X To close: install the floor panel again.
X Screw in and tighten screws 0043.
X Put in the carpet and press to secure. Fuses
261Breakdown assistance Z
Page 284 of 298
An arrow on the sidewall of the tire indicates its
correct direction of rotation. Storing wheels
Store wheels that are not being used in a cool,
dry and preferably dark place. Protect the tires
from oil, grease, gasoline and diesel. Mounting a wheel
Preparing the vehicle X
Stop the vehicle on solid, non-slippery and
level ground.
X Apply the electric parking brake manually.
X Bring the front wheels into the straight-ahead
position.
X Shift the transmission to position 005D.
X Switch off the engine.
X With KEYLESS-GO start function or vehi-
cles with KEYLESS-GO:
open the driver's
door.
The vehicle electronics are now in key posi-
tion 0092. This is the same as the SmartKey
having been removed.
or X Remove the SmartKey from the ignition lock.
X If included in the vehicle equipment, remove
the tire-change tool kit from the vehicle.
X Safeguard the vehicle against rolling away.
Securing the vehicle to prevent it from
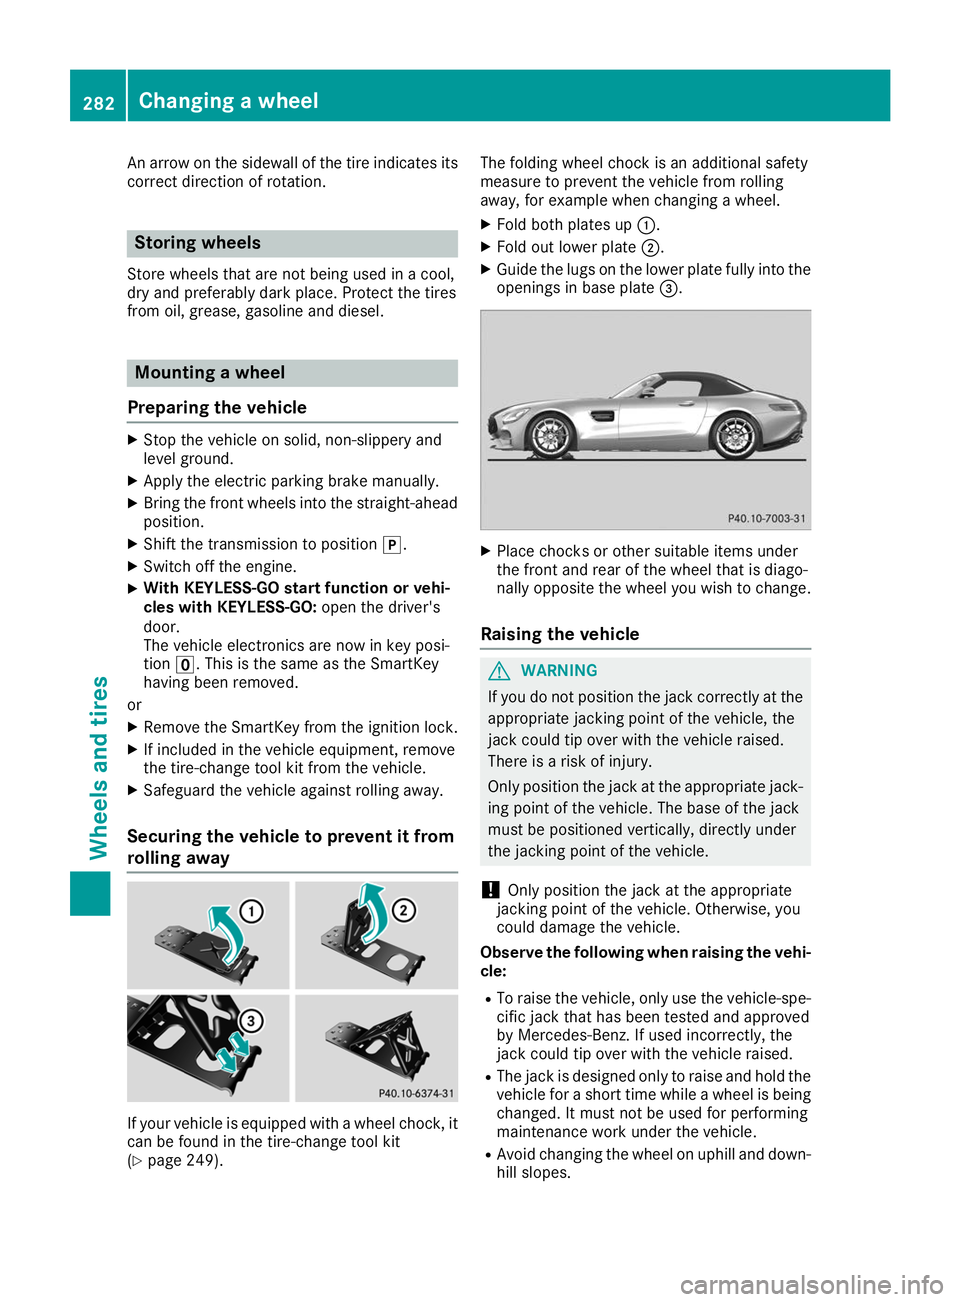
rolling away If your vehicle is equipped with a wheel chock, it
can be found in the tire-change tool kit
(Y page 249). The folding wheel chock is an additional safety
measure to prevent the vehicle from rolling
away, for example when changing a wheel.
X Fold both plates up 0043.
X Fold out lower plate 0044.
X Guide the lugs on the lower plate fully into the
openings in base plate 0087. X
Place chocks or other suitable items under
the front and rear of the wheel that is diago-
nally opposite the wheel you wish to change.
Raising the vehicle G
WARNING
If you do not position the jack correctly at the appropriate jacking point of the vehicle, the
jack could tip over with the vehicle raised.
There is a risk of injury.
Only position the jack at the appropriate jack-
ing point of the vehicle. The base of the jack
must be positioned vertically, directly under
the jacking point of the vehicle.
! Only position the jack at the appropriate
jacking point of the vehicle. Otherwise, you
could damage the vehicle.
Observe the following when raising the vehi- cle:
R To raise the vehicle, only use the vehicle-spe-
cific jack that has been tested and approved
by Mercedes-Benz. If used incorrectly, the
jack could tip over with the vehicle raised.
R The jack is designed only to raise and hold the
vehicle for a short time while a wheel is being
changed. It must not be used for performing
maintenance work under the vehicle.
R Avoid changing the wheel on uphill and down-
hill slopes. 282
Changing a wheelWheels and tires
Page 285 of 298
R
Before raising the vehicle, secure it from roll-
ing away by applying the parking brake and
inserting wheel chocks. Do not disengage the parking brake while the vehicle is raised.
R The jack must be placed on a firm, flat and
non-slip surface. On a loose surface, a large,
flat, load-bearing underlay must be used. On a slippery surface, a non-slip underlay must be
used, e.g. rubber mats.
R Do not use wooden blocks or similar objects
as a jack underlay. Otherwise, the jack will not
be able to achieve its load-bearing capacity
due to the restricted height.
R Make sure that the distance between the
underside of the tires and the ground does not
exceed 1.2 in (3 cm).
R Do not place your hands or feet under the
raised vehicle.
R Do not lie under the vehicle.
R Do not start the engine when the vehicle is
raised.
R Do not open or close a door or the trunk lid
when the vehicle is raised.
R Make sure that no persons are present in the
vehicle when the vehicle is raised.
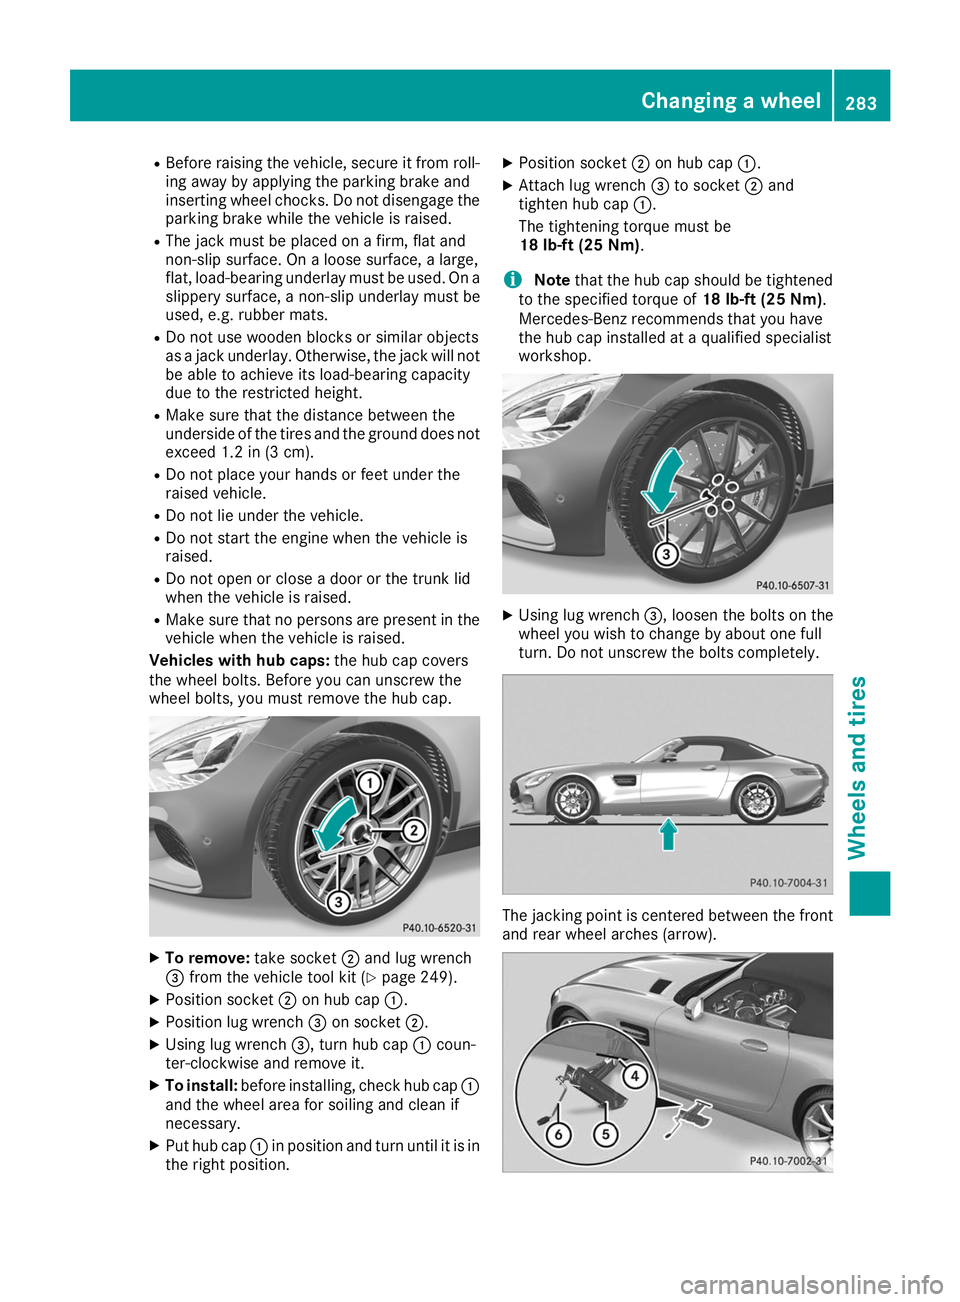
Vehicles with hub caps: the hub cap covers
the wheel bolts. Before you can unscrew the
wheel bolts, you must remove the hub cap. X
To remove: take socket0044and lug wrench
0087 from the vehicle tool kit (Y page 249).
X Position socket 0044on hub cap 0043.
X Position lug wrench 0087on socket 0044.
X Using lug wrench 0087, turn hub cap0043coun-
ter-clockwise and remove it.
X To install: before installing, check hub cap 0043
and the wheel area for soiling and clean if
necessary.
X Put hub cap 0043in position and turn until it is in
the right position. X
Position socket 0044on hub cap 0043.
X Attach lug wrench 0087to socket 0044and
tighten hub cap 0043.
The tightening torque must be
18 lb-ft (25 Nm).
i Note
that the hub cap should be tightened
to the specified torque of 18 lb-ft (25 Nm).
Mercedes-Benz recommends that you have
the hub cap installed at a qualified specialist
workshop. X
Using lug wrench 0087, loosen the bolts on the
wheel you wish to change by about one full
turn. Do not unscrew the bolts completely. The jacking point is centered between the front
and rear wheel arches (arrow). Changing a wheel
283Wheels and tires Z
Page 289 of 298
Information regarding technical data
i The data stated here specifically refers to a
vehicle with standard equipment. Consult an
authorized Mercedes-Benz Center for the
data for all vehicle variants and trim levels. Vehicle electronics
Tampering with the engine electron-
ics
! Have the engine electronics and associated
parts, such as control units, sensors, actuat-
ing components or electric cables serviced
only at a qualified specialist workshop. Vehi-
cle components may otherwise wear more
quickly and the vehicle's operating permit
may be invalidated. Installing wireless devices and mobile
phones G
WARNING
The electromagnetic radiation from two-way
radios can interfere with the vehicle electron-
ics if two-way radios are manipulated or ret-
rofitted incorrectly. This could jeopardize the
operating safety of the vehicle. There is a risk of an accident.
You should have all work on electrical and
electronic components carried out at a quali-
fied specialist workshop. G
WARNING
If you incorrectly operate two-way radios in
the vehicle, the electromagnetic radiation
may interfere with the vehicle electronics, for example if:
R the two-way radio is not connected to an
exterior antenna
R the exterior antenna is not correctly moun-
ted or is not low-reflection
This could jeopardize the operating safety of
the vehicle. There is a risk of an accident. Have the low-reflection exterior antenna
installed at a qualified specialist workshop.
Always connect two-way radios to the low-
reflection exterior antenna when operating in the vehicle.
! The operating permit may be invalidated if
the instructions for installation and use of
two-way radios are not observed.
In particular, the following conditions must be
complied with:
R only approved wavebands may be used.
R observe the maximum permissible output
in these wavebands.
R only approved antenna positions may be
used.
Excessive levels of electromagnetic radiation
may cause damage to your health and the health
of others. Using an exterior antenna takes into
account current scientific discussions relating
to the possible health hazards that may result
from electromagnetic fields.
The following can be used in the vehicle without restrictions:
R two-way radios with a maximum transmission
output of up to 100 mW
R mobile phones (2G/3G/4G) Identification plates
Vehicle identification plate with vehi-
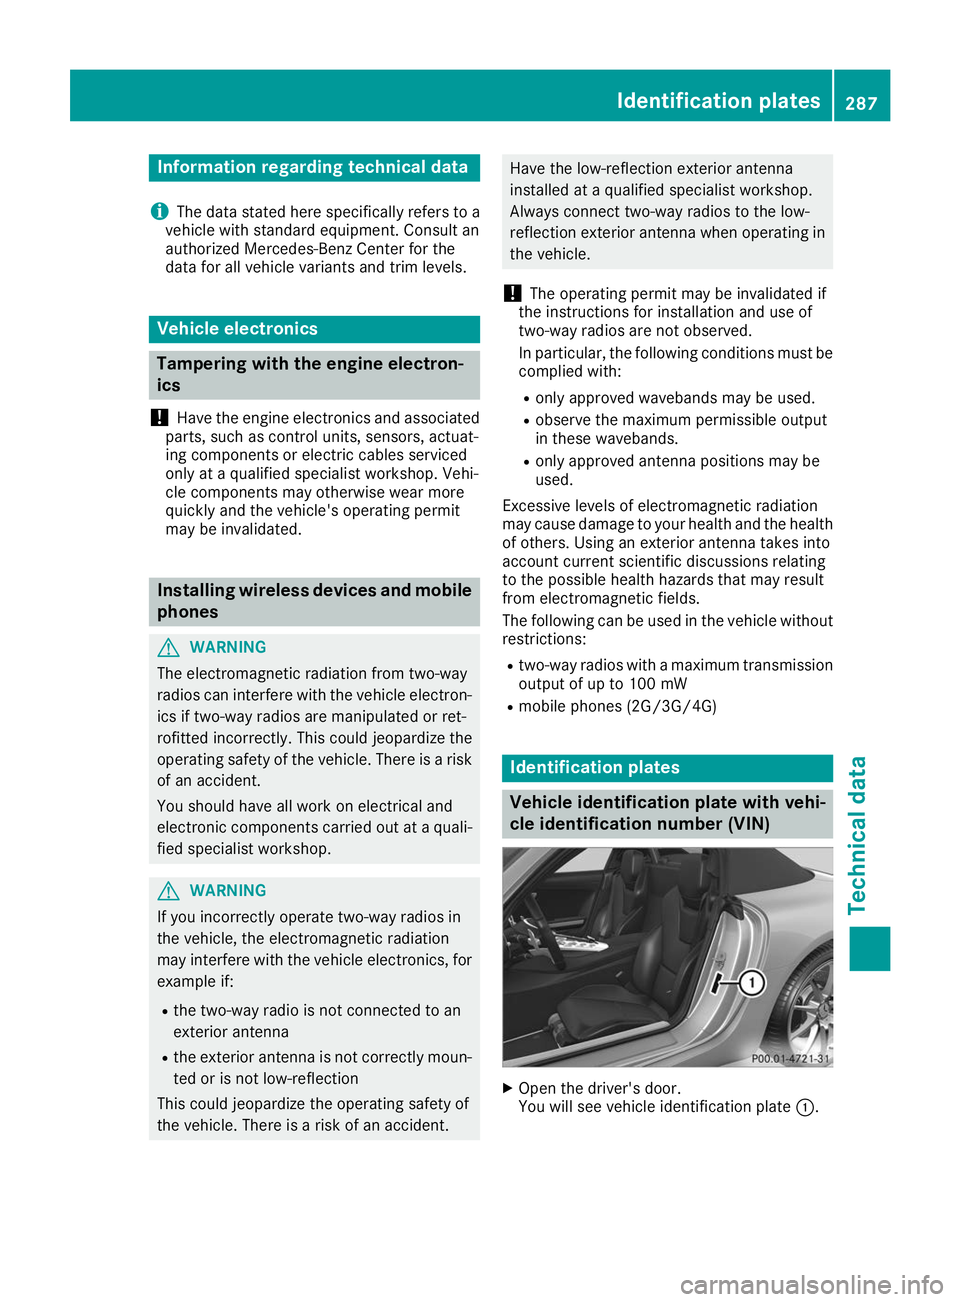
cle identification number (VIN) X
Open the driver's door.
You will see vehicle identification plate 0043. Identification plates
287Technical data Z
Page 290 of 298
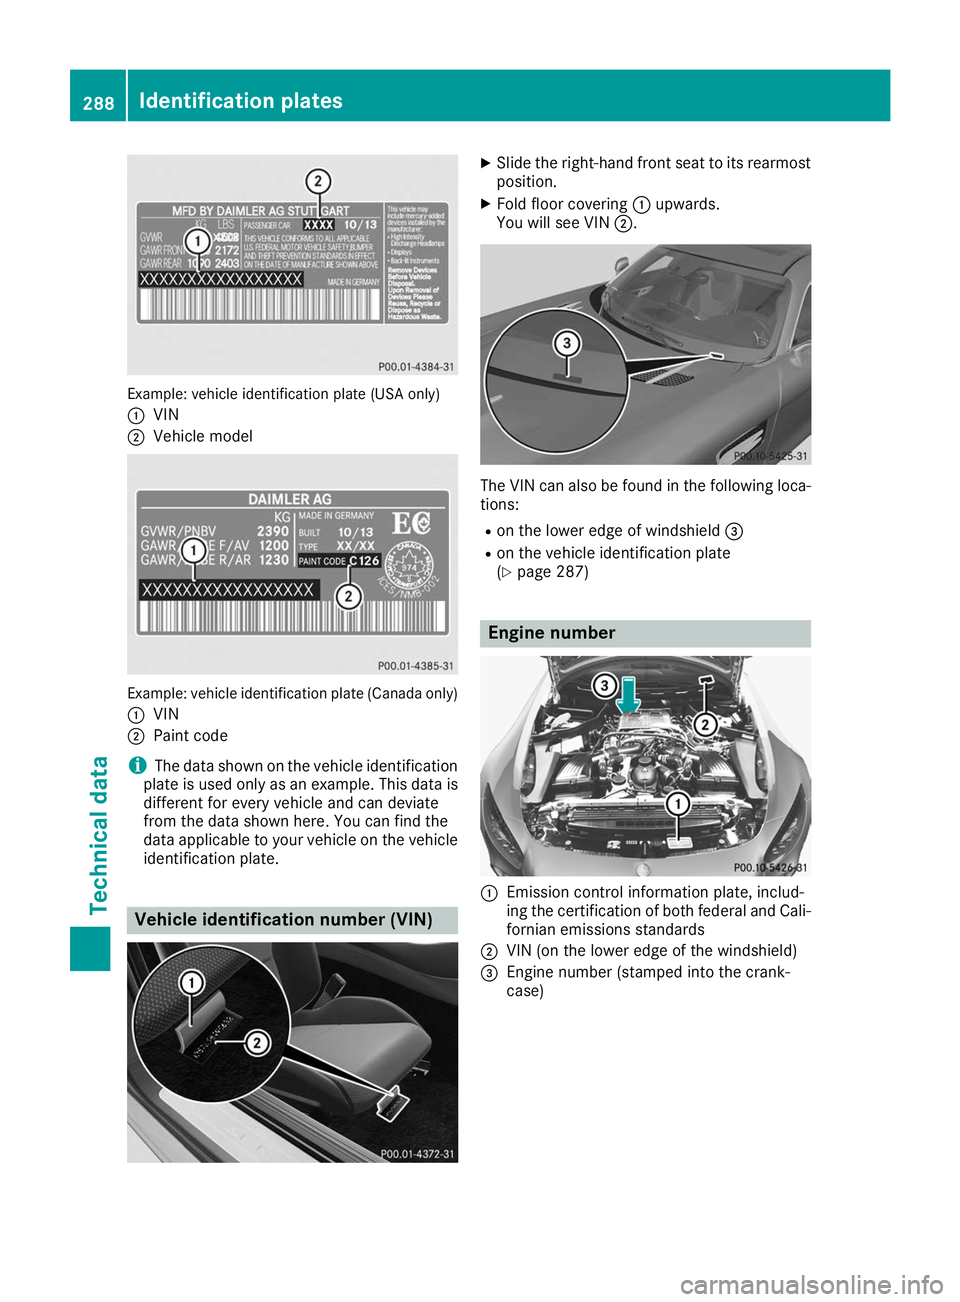
Example: vehicle identification plate (USA only)
0043 VIN
0044 Vehicle model Example: vehicle identification plate (Canada only)
0043 VIN
0044 Paint code
i The data shown on the vehicle identification
plate is used only as an example. This data is
different for every vehicle and can deviate
from the data shown here. You can find the
data applicable to your vehicle on the vehicle identification plate. Vehicle identification number (VIN) X
Slide the right-hand front seat to its rearmost
position.
X Fold floor covering 0043upwards.
You will see VIN 0044. The VIN can also be found in the following loca-
tions:
R on the lower edge of windshield 0087
R on the vehicle identification plate
(Y page 287) Engine number
0043
Emission control information plate, includ-
ing the certification of both federal and Cali-
fornian emissions standards
0044 VIN (on the lower edge of the windshield)
0087 Engine number (stamped into the crank-
case) 288
Identification platesTechnical data
Page 291 of 298
Service products and filling capaci-
ties
Important safety notes
G
WARNING
Service products may be poisonous and haz-
ardous to health. There is a risk of injury.
Comply with instructions on the use, storage
and disposal of service products on the labels of the respective original containers. Always
store service products sealed in their original containers. Always keep service products out
of the reach of children. H
Environmental note
Dispose of service products in an environ-
mentally responsible manner.
Service products include the following: R Fuels
R Lubricants (e.g. engine oil, transmission oil)
R Coolant
R Brake fluid
R Windshield washer fluid
R Climate control system refrigerant
Components and service products must match.
Only use products recommended by Mercedes-
Benz. Damage which is caused by the use of
products which have not been recommended is
not covered by the Mercedes-Benz warranty or
goodwill gestures. They are listed in this
Mercedes-Benz Operator's Manual in the appro- priate section.
Information on tested and approved products
can be obtained at an authorized Mercedes-
Benz Center or on the Internet at
http://bevo.mercedes-benz.com.
You can recognize service products approved by Mercedes-Benz by the following inscription on
the containers:
R MB-Freigabe (e.g. MB-Freigabe 229.51)
R MB-Approval (e.g. MB-Approval 229.51)
Other designations or recommendations indi-
cate a level of quality or a specification in
accordance with an MB Sheet Number (e.g. MB
229.5). They have not necessarily been
approved by Mercedes-Benz. Other identifications, for example:
R 0 W-30
R 5 W-30
R 5 W-40 Fuel
Important safety notes G
WARNING
Fuel is highly flammable. Risk of fire and
explosion by improper handling of fuel.
You must avoid fire, open flames, smoking
and creating sparks. Switch off the ignition
before refueling and, if present, switch off the auxiliary heating. G
WARNING
Fuel is poisonous and hazardous to health.
There is a risk of injury.
You must make sure that fuel does not come into contact with your skin, eyes or clothing
and that it is not swallowed. Do not inhale fuel
vapors. Keep fuel away from children.
If you or others come into contact with fuel,
observe the following:
R Wash away fuel from skin immediately
using soap and water.
R If fuel comes into contact with your eyes,
immediately rinse them thoroughly with
clean water. Seek medical assistance with-
out delay.
R If fuel is swallowed, seek medical assis-
tance without delay. Do not induce vomit-
ing.
R Immediately change out of clothing which
has come into contact with fuel.
Tank capacity Model Total capacity
All models
19.8 US gal
(75.0 l) Service products and filling capacities
289Technical data Z
Page 292 of 298
Model Of which
reserve All models
Approx.
3.2 US gal (12.0 l) Gasoline
Fuel grade
!
Do not use diesel to refuel vehicles with a
gasoline engine. Do not switch on the ignition if you accidentally refuel with the wrong fuel.
Otherwise, the fuel will enter the fuel system.
Even small amounts of the wrong fuel could
result in damage to the fuel system and the
engine. Notify a qualified specialist workshop
and have the fuel tank and fuel lines drained
completely.
! Only refuel using unleaded premium grade
gasoline with at least 91 AKI/95 RON.
i E10 fuel contains up to 10% bioethanol.
Your vehicle is E10-compatible. You can
refuel your vehicle using E10 fuel.
! Only use the fuel recommended. Operating
the vehicle with other fuels can lead to dam-
age to the fuel system, engine and exhaust
system.
! Never refuel using:
R Diesel
R Gasoline with more than 10% ethanol by
volume, e.g. E15, E20, E85, E100
R Gasoline with more than 3% methanol by
volume, e.g. M15, M30, M85, M100
R Gasoline with metalliferous additives
Do not mix such fuels with the fuel recom-
mended for your vehicle.
! To ensure the longevity and full perform-
ance of the engine, only premium-grade
unleaded gasoline may be used.
If premium-grade unleaded gasoline is
unavailable and you have to refuel with regu-
lar unleaded gasoline, observe the following
precautions:
R Only fill the fuel tank to half full with regular
unleaded gasoline and add the rest as soon as possible with premium-grade unleaded
gasoline.
R Do not drive at the maximum design speed.
R Avoid sudden acceleration and engine
speeds over 3000 rpm.
Reformulated Gasoline (RFG) and/or unleaded
gasoline with additives can be used. The con-
centration of additives in the fuel, however,
must not exceed 10%, for example: R Ethanol
R TAME
R ETBE
R IPA
R TBA
For MTBE, the concentration should not exceed
15%.
The concentration of methanol in gasoline,
including other additives, must not exceed 3%.
All of these blends must fulfill the fuel require-
ments, for example:
R knock resistance
R boiling point
R vapor pressure
i For further information, consult a qualified
specialist workshop or visit
http://www.mbusa.com (USA only).
Information on refueling (Y page 126).
Additives ! Operating the engine with fuel additives
added later can lead to engine failure. Do not
mix fuel additives with fuel. This does not
include additives for the removal and preven- tion of residue buildup. gasoline must only be
mixed with additives recommended by
Mercedes-Benz. Comply with the instructions for use on the product label. More information
about recommended additives can be
obtained from any authorized Mercedes-Benz
Center.
Mercedes-Benz recommends that you use bran-
ded fuels that have additives.
The fuel quality available in some countries may not be sufficient. Residue could build up in the
fuel injection system as a result. In such cases,and in consultation with an authorized
Mercedes-Benz Center, the fuel may be mixed
with the cleaning additive recommended by
Mercedes-Benz. You must observe the notes
and mixing ratios specified on the container. 290
Service products and filling capacitiesTechnical data
Page 293 of 298
Engine oil
General notes !
Do not use engine oil or an oil filter with
specifications deviating from those expressly
required for the prescribed service intervals.
Do not change the engine oil or oil filter in
order to set replacement intervals longer than those prescribed. This could otherwise causedamage to the engine or exhaust gas after-
treatment.
Follow the instructions on the service interval
display for changing the engine oil. This could otherwise cause damage to the engine or
exhaust gas aftertreatment.
When handling engine oil, observe the important safety notes on service products (Y page 289).
The engine oils are matched to the performance
of Mercedes-Benz engines and service intervals.
You should therefore only use engine oils and oil
filters that are approved for vehicles with main- tenance systems.
For a list of approved engine oils and oil filters,
consult an authorized Mercedes-Benz Center.
Or visit the website
http://bevo.mercedes-benz.com.
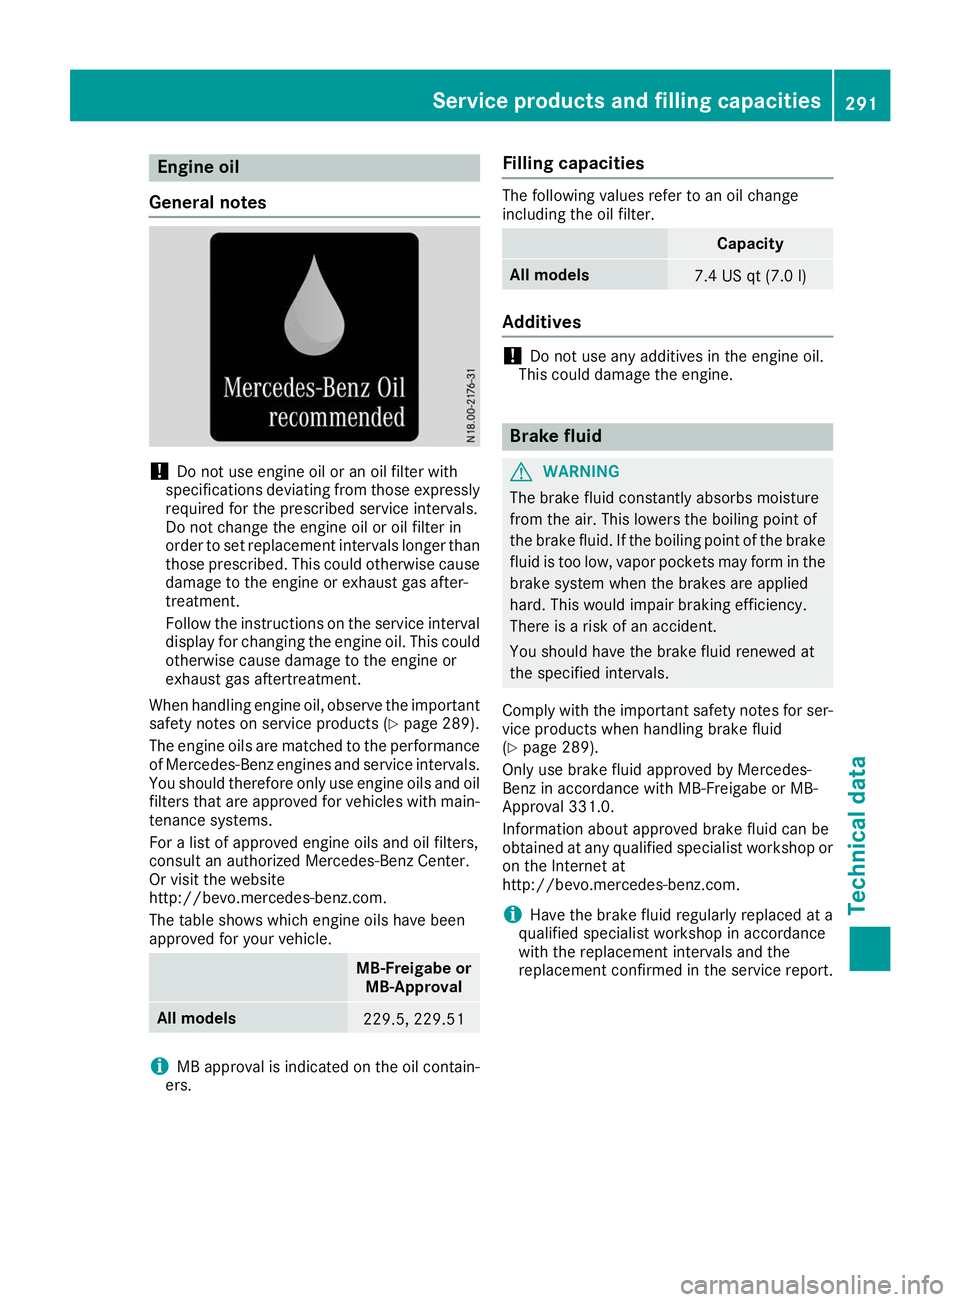
The table shows which engine oils have been
approved for your vehicle. MB-Freigabe or
MB-Approval All models
229.5, 229.51
i
MB approval is indicated on the oil contain-
ers. Filling capacities The following values refer to an oil change
including the oil filter.
Capacity
All models
7.4 US qt
(7.0l) Ad
ditives !
Do not use any additives in the engine oil.
This could damage the engine. Brake fluid
G
WARNING
The brake fluid constantly absorbs moisture
from the air. This lowers the boiling point of
the brake fluid. If the boiling point of the brake fluid is too low, vapor pockets may form in the brake system when the brakes are applied
hard. This would impair braking efficiency.
There is a risk of an accident.
You should have the brake fluid renewed at
the specified intervals.
Comply with the important safety notes for ser- vice products when handling brake fluid
(Y page 289).
Only use brake fluid approved by Mercedes-
Benz in accordance with MB-Freigabe or MB-
Approval 331.0.
Information about approved brake fluid can be
obtained at any qualified specialist workshop or on the Internet at
http://bevo.mercedes-benz.co m.
i Have the brake fluid regularly replaced at a
qualified specialist workshop in accordance
with the replacement intervals and the
replacement confirmed in the service report. Service products and filling capacities
291Technical data Z