Page 174 of 682
3-83
Convenient features of your vehicle
3
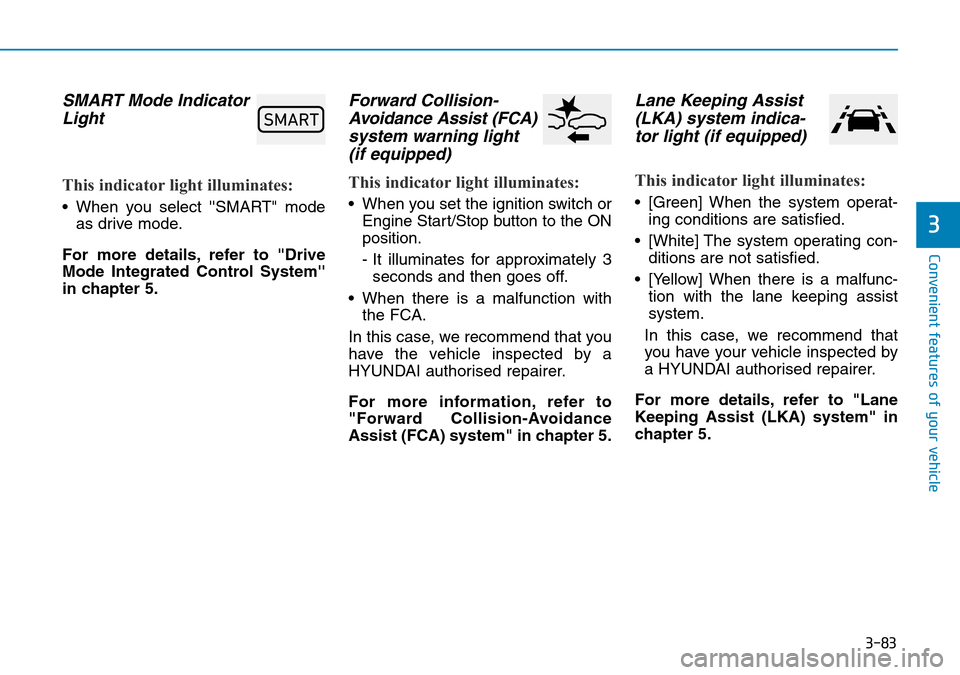
SMART Mode Indicator
Light
This indicator light illuminates:
• When you select ''SMART" mode
as drive mode.
For more details, refer to "Drive
Mode Integrated Control System''
in chapter 5.
Forward Collision-
Avoidance Assist (FCA)
system warning light
(if equipped)
This indicator light illuminates:
• When you set the ignition switch or
Engine Start/Stop button to the ON
position.
- It illuminates for approximately 3
seconds and then goes off.
• When there is a malfunction with
the FCA.
In this case, we recommend that you
have the vehicle inspected by a
HYUNDAI authorised repairer.
For more information, refer to
"Forward Collision-Avoidance
Assist (FCA) system" in chapter 5.
Lane Keeping Assist
(LKA) system indica-
tor light (if equipped)
This indicator light illuminates:
• [Green] When the system operat-
ing conditions are satisfied.
• [White] The system operating con-
ditions are not satisfied.
• [Yellow] When there is a malfunc-
tion with the lane keeping assist
system.
In this case, we recommend that
you have your vehicle inspected by
a HYUNDAI authorised repairer.
For more details, refer to "Lane
Keeping Assist (LKA) system" in
chapter 5.
�6�0�$�5�7
Page 190 of 682
3-99
Convenient features of your vehicle
3
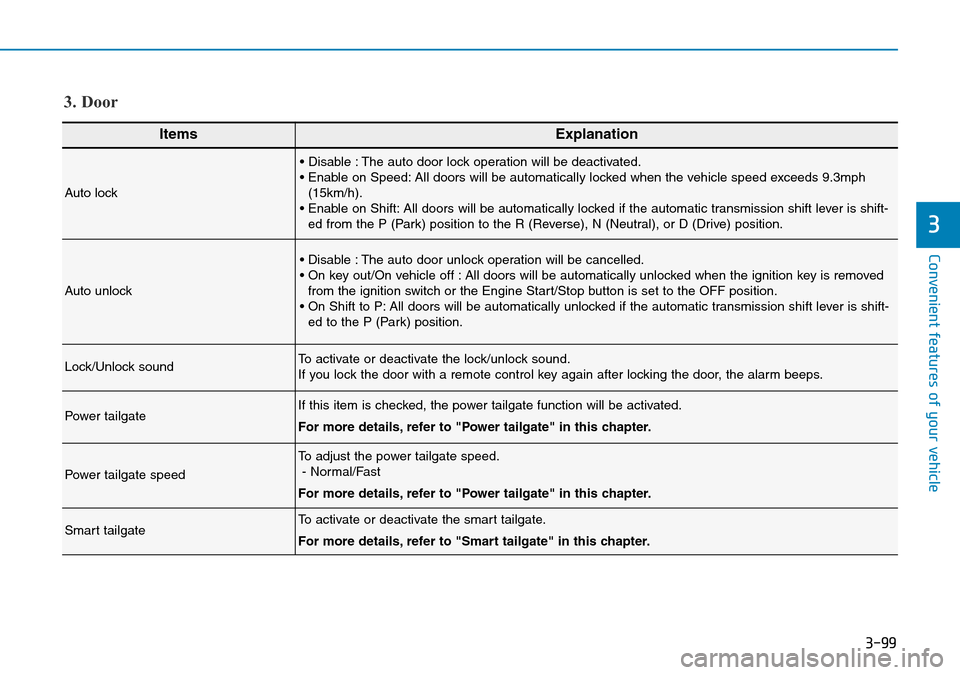
ItemsExplanation
Auto lock
• Disable : The auto door lock operation will be deactivated.
• Enable on Speed: All doors will be automatically locked when the vehicle speed exceeds 9.3mph
(15km/h).
• Enable on Shift: All doors will be automatically locked if the automatic transmission shift lever is shift-
ed from the P (Park) position to the R (Reverse), N (Neutral), or D (Drive) position.
Auto unlock
• Disable : The auto door unlock operation will be cancelled.
• On key out/On vehicle off : All doors will be automatically unlocked when the ignition key is removed
from the ignition switch or the Engine Start/Stop button is set to the OFF position.
• On Shift to P: All doors will be automatically unlocked if the automatic transmission shift lever is shift-
ed to the P (Park) position.
Lock/Unlock soundTo activate or deactivate the lock/unlock sound.
If you lock the door with a remote control key again after locking the door, the alarm beeps.
Power tailgateIf this item is checked, the power tailgate function will be activated.
For more details, refer to "Power tailgate" in this chapter.
Power tailgate speed
To adjust the power tailgate speed.
- Normal/Fast
For more details, refer to "Power tailgate" in this chapter.
Smart tailgateTo activate or deactivate the smart tailgate.
For more details, refer to "Smart tailgate" in this chapter.
3. Door
Page 194 of 682
3-103
Convenient features of your vehicle
3
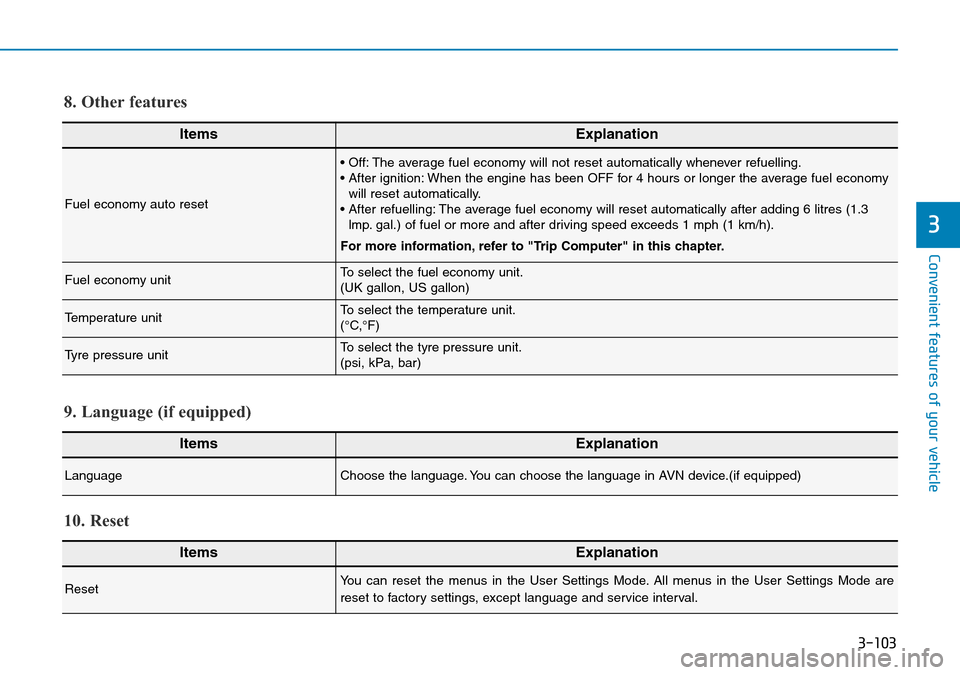
ItemsExplanation
Fuel economy auto reset
• Off: The average fuel economy will not reset automatically whenever refuelling.
• After ignition: When the engine has been OFF for 4 hours or longer the average fuel economy
will reset automatically.
• After refuelling: The average fuel economy will reset automatically after adding 6 litres (1.3
lmp. gal.) of fuel or more and after driving speed exceeds 1 mph (1 km/h).
For more information, refer to "Trip Computer" in this chapter.
Fuel economy unitTo select the fuel economy unit.
(UK gallon, US gallon)
Temperature unitTo select the temperature unit.
(°C,°F)
Tyre pressure unitTo select the tyre pressure unit.
(psi, kPa, bar)
8. Other features
ItemsExplanation
LanguageChoose the language. You can choose the language in AVN device.(if equipped)
9. Language (if equipped)
ItemsExplanation
ResetYou can reset the menus in the User Settings Mode. All menus in the User Settings Mode are
reset to factory settings, except language and service interval.
10. Reset
Page 196 of 682
3-105
Convenient features of your vehicle
3
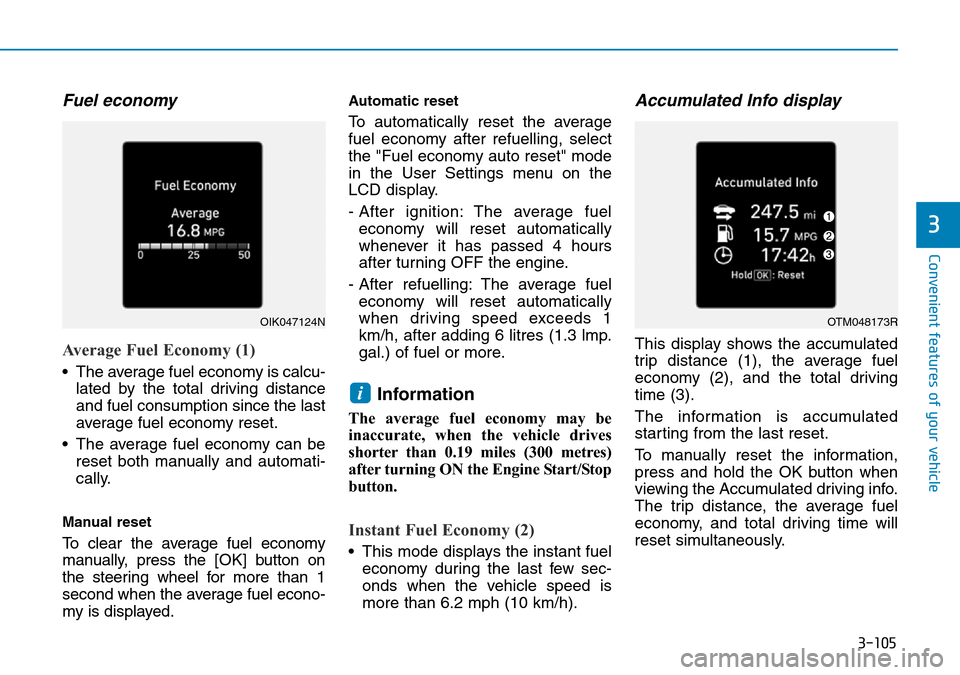
Fuel economy
Average Fuel Economy (1)
• The average fuel economy is calcu-
lated by the total driving distance
and fuel consumption since the last
average fuel economy reset.
• The average fuel economy can be
reset both manually and automati-
cally.
Manual reset
To clear the average fuel economy
manually, press the [OK] button on
the steering wheel for more than 1
second when the average fuel econo-
my is displayed.
Automatic reset
To automatically reset the average
fuel economy after refuelling, select
the "Fuel economy auto reset" mode
in the User Settings menu on the
LCD display.
- After ignition: The average fuel
economy will reset automatically
whenever it has passed 4 hours
after turning OFF the engine.
- After refuelling: The average fuel
economy will reset automatically
when driving speed exceeds 1
km/h, after adding 6 litres (1.3 lmp.
gal.) of fuel or more.
Information
The average fuel economy may be
inaccurate, when the vehicle drives
shorter than 0.19 miles (300 metres)
after turning ON the Engine Start/Stop
button.
Instant Fuel Economy (2)
• This mode displays the instant fuel
economy during the last few sec-
onds when the vehicle speed is
more than 6.2 mph (10 km/h).
Accumulated Info display
This display shows the accumulated
trip distance (1), the average fuel
economy (2), and the total driving
time (3).
The information is accumulated
starting from the last reset.
To manually reset the information,
press and hold the OK button when
viewing the Accumulated driving info.
The trip distance, the average fuel
economy, and total driving time will
reset simultaneously.
i
OIK047124NOTM048173R
Page 197 of 682
3-106
Convenient features of your vehicle
The accumulated driving information
will continue to be counted whilst the
engine is still running (for example,
when the vehicle is in traffic or
stopped at a stop light).
Information
The vehicle must be driven for a min-
imum of 0.19 miles (300 metres) since
the last ignition key cycle before the
average fuel economy will be recalcu-
lated.
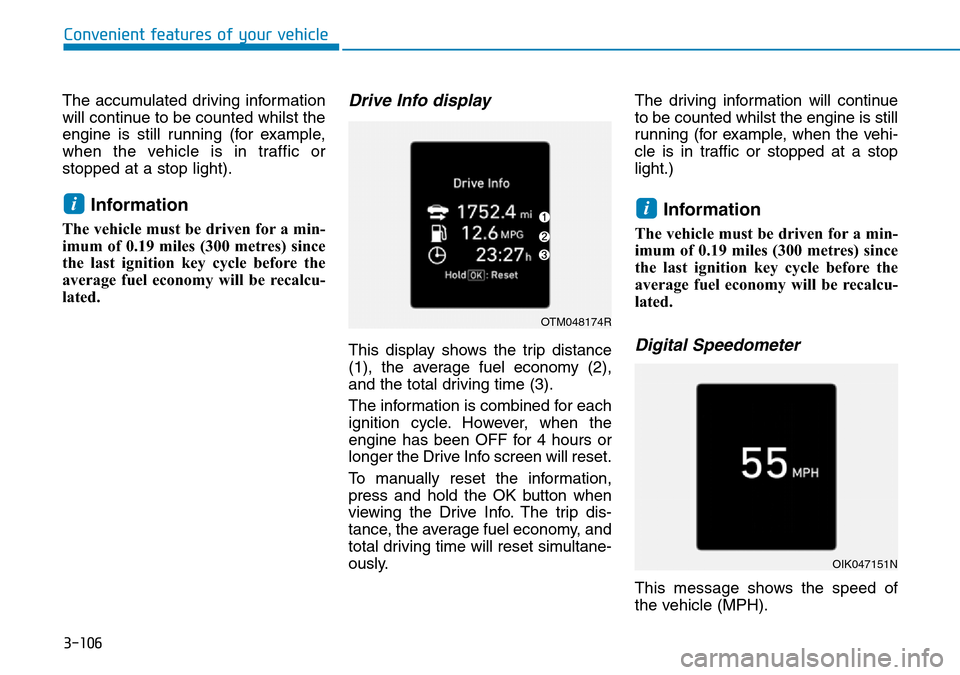
Drive Info display
This display shows the trip distance
(1), the average fuel economy (2),
and the total driving time (3).
The information is combined for each
ignition cycle. However, when the
engine has been OFF for 4 hours or
longer the Drive Info screen will reset.
To manually reset the information,
press and hold the OK button when
viewing the Drive Info. The trip dis-
tance, the average fuel economy, and
total driving time will reset simultane-
ously.The driving information will continue
to be counted whilst the engine is still
running (for example, when the vehi-
cle is in traffic or stopped at a stop
light.)
Information
The vehicle must be driven for a min-
imum of 0.19 miles (300 metres) since
the last ignition key cycle before the
average fuel economy will be recalcu-
lated.
Digital Speedometer
This message shows the speed of
the vehicle (MPH).
ii
OTM048174R
OIK047151N
Page 203 of 682
3-112
Convenient features of your vehicle
Position lamp position ( )
The position lamp, license plate lamp
and instrument panel lamp are turned
ON.
Headlamp position ( )
The headlamp, position lamp, license
plate lamp and instrument panel lamp
are turned ON.
Information
The ignition switch must be in the ON
position to turn on the headlamp.
High beam operation
To turn on the high beam headlamp,
push the lever away from you. The
lever will return to its original position.
The high beam indicator will light
when the headlamp high beams are
switched on.
To turn off the high beam headlamp,
pull the lever towards you. The low
beams will turn on.
i
OAE046469LOAE046467L
OAE046453L
Do not use high beam when there
are other vehicles approaching
you. Using high beam could
obstruct the other driver's vision.
WARNING
Page 209 of 682
3-118
Convenient features of your vehicle
Battery saver function
The purpose of this feature is to pre-
vent the battery from being dis-
charged. The system automatically
turns off the position lamp when the
driver turns the engine off and opens
the driver-side door.
With this feature, the position lamps
will turn off automatically if the driver
parks on the side of the road at night.
If necessary, to keep the lamps on
when the engine is turned off, perform
the following:
1) Open the driver-side door.
2) Turn the position lamps OFF and
ON again using the light switch on
the steering column.
Headlamp delay function
(if equipped)
If you place the ignition switch to the
ACC or OFF position with the head-
lamps ON, the headlamps (and/or
position lamps) remain on for about 5
minutes. However, with the engine off if
the driver’s door is opened and closed,
the headlamps (and/or position lamps)
are turned off after 15 seconds.
The headlamps (and/or position
lamps) can be turned off by pressing
the lock button on the remote key or
smart key twice or turning the light
switch to the OFF or AUTO position.
However, if you turn the light switch
to the AUTO position when it is dark
outside, the headlamps will not be
turned off.
You can activate or deactivate the
Headlamp Delay function from the
User Settings mode on the LCD dis-
play.For more details, refer to
"LCD Display" in this chapter.If the driver gets out of the vehicle
through other doors (except dri-
ver's door), the battery saver func-
tion does not operate and the
headlamp delay function does not
turn off automatically. Therefore, It
causes the battery to be dis-
charged. In this case, make sure to
turn off the headlamps before get-
ting out of the vehicle.
Daytime running light (DRL)
(if equipped)
The Daytime Running Lights (DRL)
can make it easier for others to see
the front of your vehicle during the
day, especially after dawn and before
sunset.
The DRL system will turn the dedi-
cated lamps OFF when:
1. The headlamps or front fog lights
are in the ON position.
2. The position light switch is in the
ON position.
3. The engine is turned off.
NOTICE
Page 218 of 682
3-127
Convenient features of your vehicle
3
Information
If there is heavy accumulation of snow
or ice on the windscreen, defrost the
windscreen for about 10 minutes, or
until the snow and/or ice is removed
before using the windscreen wipers to
ensure proper operation.
If you do not remove the snow and/or
ice before using the wiper and washer,
it may damage the wiper and washer
system.
AUTO (Automatic) control
(if equipped)
The rain sensor located on the upper
end of the windscreen glass senses
the amount of rainfall and controls
the wiping cycle for the proper inter-
val. The wiper operation time will be
automatically controlled depends on
rainfall.
When the rain stops, the wiper stops.
To vary the sensitivity setting, turn
the sensitivity control knob.
If the wiper switch is set in AUTO
mode when the ignition switch is in
the ON position, the wiper will oper-
ate once to perform a self-check of
the system.
i
To avoid personal injury from the
windscreen wipers, when the
engine is running and the wind-
screen wiper switch is placed in
the AUTO mode:
•Do not touch the upper end of
the windscreen glass facing
the rain sensor.
•Do not wipe the upper end of
the windscreen glass with a
damp or wet cloth.
•Do not put pressure on the
windscreen glass.
•Set the wiper switch to the O
(OFF) position when the wiper
is not in use.
WARNING