2019 Hyundai Santa Fe battery replacement
[x] Cancel search: battery replacementPage 10 of 682
Biodiesel
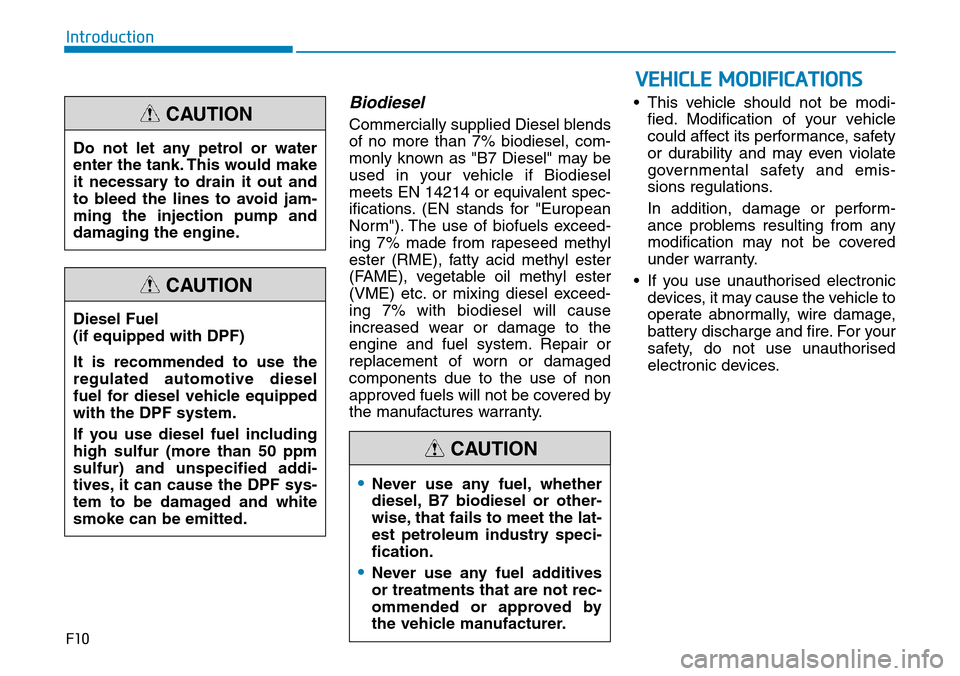
Commercially supplied Diesel blends
of no more than 7% biodiesel, com-
monly known as "B7 Diesel" may be
used in your vehicle if Biodiesel
meets EN 14214 or equivalent spec-
ifications. (EN stands for "European
Norm"). The use of biofuels exceed-
ing 7% made from rapeseed methyl
ester (RME), fatty acid methyl ester
(FAME), vegetable oil methyl ester
(VME) etc. or mixing diesel exceed-
ing 7% with biodiesel will cause
increased wear or damage to the
engine and fuel system. Repair or
replacement of worn or damaged
components due to the use of non
approved fuels will not be covered by
the manufactures warranty.• This vehicle should not be modi-
fied. Modification of your vehicle
could affect its performance, safety
or durability and may even violate
governmental safety and emis-
sions regulations.
In addition, damage or perform-
ance problems resulting from any
modification may not be covered
under warranty.
• If you use unauthorised electronic
devices, it may cause the vehicle to
operate abnormally, wire damage,
battery discharge and fire. For your
safety, do not use unauthorised
electronic devices.
F10
Introduction
Do not let any petrol or water
enter the tank. This would make
it necessary to drain it out and
to bleed the lines to avoid jam-
ming the injection pump and
damaging the engine.
CAUTION
Diesel Fuel
(if equipped with DPF)
It is recommended to use the
regulated automotive diesel
fuel for diesel vehicle equipped
with the DPF system.
If you use diesel fuel including
high sulfur (more than 50 ppm
sulfur) and unspecified addi-
tives, it can cause the DPF sys-
tem to be damaged and white
smoke can be emitted.
CAUTION
•Never use any fuel, whether
diesel, B7 biodiesel or other-
wise, that fails to meet the lat-
est petroleum industry speci-
fication.
•Never use any fuel additives
or treatments that are not rec-
ommended or approved by
the vehicle manufacturer.
CAUTION
VEHICLE MODIFICATIONS
Page 97 of 682
3-6
Convenient features of your vehicle
This is specifically relevant when the
phone is active such as making and
receiving calls, text messaging,
and/or sending/receiving emails.
Avoid placing the remote key and
your mobile phone in the same loca-
tion and always try to maintain an
adequate distance between the two
devices.
Information
Changes or modifications not express-
ly approved by the party responsible
for compliance could void the user’s
authority to operate the equipment. If
the keyless entry system is inoperative
due to changes or modifications not
expressly approved by the party
responsible for compliance, it will not
be covered by your manufacturer’s
vehicle warranty.
Keep the remote key away from
electromagnetic materials that
block electromagnetic waves to
the key surface.
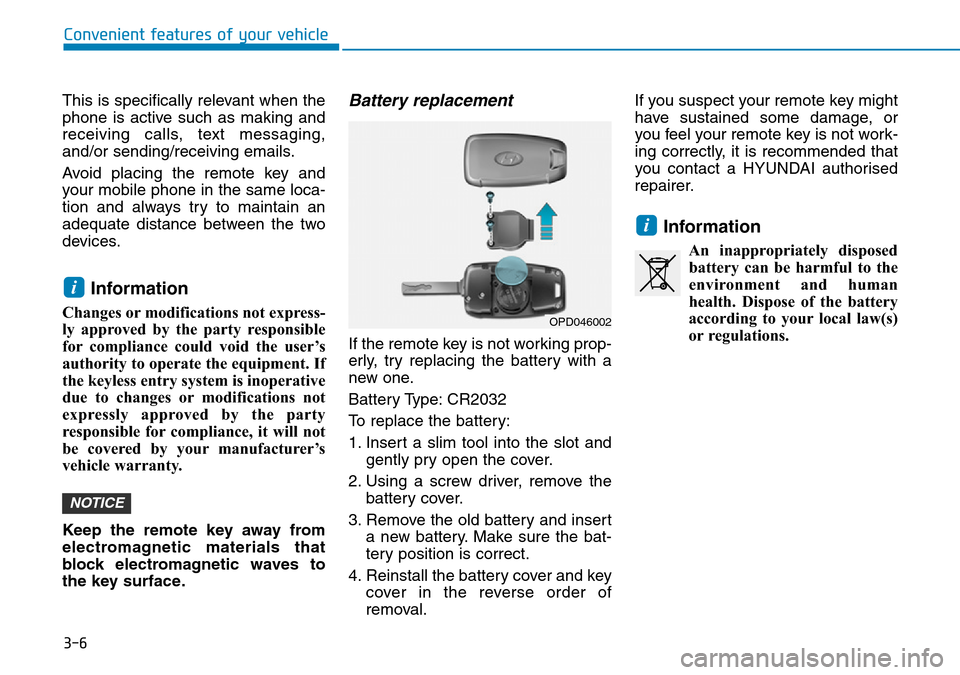
Battery replacement
If the remote key is not working prop-
erly, try replacing the battery with a
new one.
Battery Type: CR2032
To replace the battery:
1. Insert a slim tool into the slot and
gently pry open the cover.
2. Using a screw driver, remove the
battery cover.
3. Remove the old battery and insert
a new battery. Make sure the bat-
tery position is correct.
4. Reinstall the battery cover and key
cover in the reverse order of
removal.If you suspect your remote key might
have sustained some damage, or
you feel your remote key is not work-
ing correctly, it is recommended that
you contact a HYUNDAI authorised
repairer.
Information
An inappropriately disposed
battery can be harmful to the
environment and human
health. Dispose of the battery
according to your local law(s)
or regulations.
i
NOTICE
i
OPD046002
Page 102 of 682
3-11
Convenient features of your vehicle
3
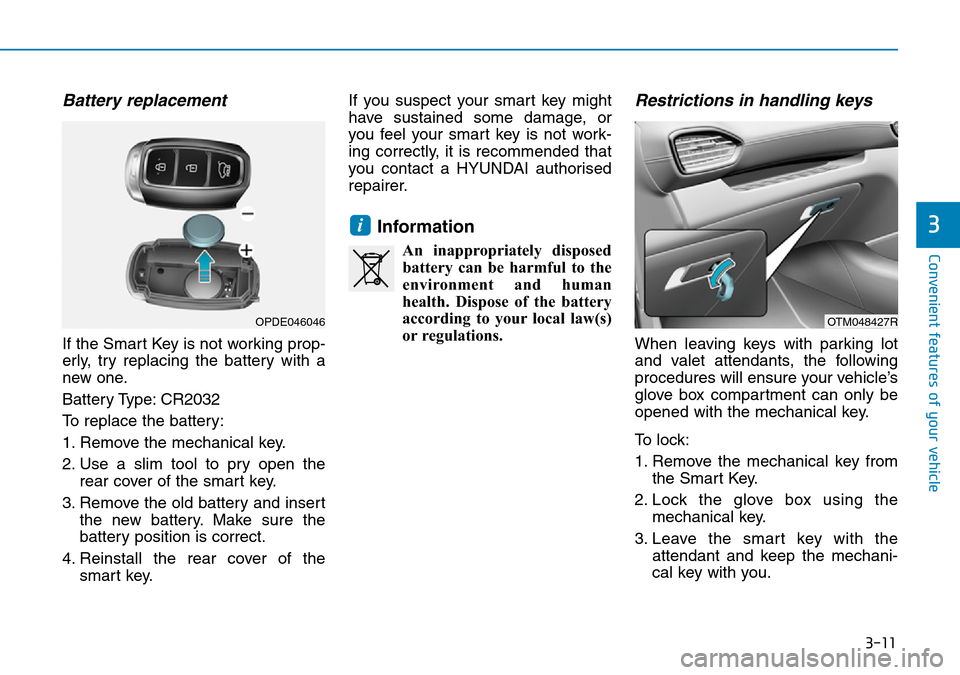
Battery replacement
If the Smart Key is not working prop-
erly, try replacing the battery with a
new one.
Battery Type: CR2032
To replace the battery:
1. Remove the mechanical key.
2. Use a slim tool to pry open the
rear cover of the smart key.
3. Remove the old battery and insert
the new battery. Make sure the
battery position is correct.
4. Reinstall the rear cover of the
smart key.If you suspect your smart key might
have sustained some damage, or
you feel your smart key is not work-
ing correctly, it is recommended that
you contact a HYUNDAI authorised
repairer.
Information
An inappropriately disposed
battery can be harmful to the
environment and human
health. Dispose of the battery
according to your local law(s)
or regulations.
Restrictions in handling keys
When leaving keys with parking lot
and valet attendants, the following
procedures will ensure your vehicle’s
glove box compartment can only be
opened with the mechanical key.
To lock:
1. Remove the mechanical key from
the Smart Key.
2. Lock the glove box using the
mechanical key.
3. Leave the smart key with the
attendant and keep the mechani-
cal key with you.
i
OPDE046046OTM048427R
Page 397 of 682
![Hyundai Santa Fe 2019 Owners Manual - RHD (UK, Australia) 5-68
Driving your vehicle
The battery sensor deactiva-
tion
[A] : Battery sensor
The battery sensor is deactivated,
when the battery is disconnected
from the negative pole for mainte-
nance purpose.
I Hyundai Santa Fe 2019 Owners Manual - RHD (UK, Australia) 5-68
Driving your vehicle
The battery sensor deactiva-
tion
[A] : Battery sensor
The battery sensor is deactivated,
when the battery is disconnected
from the negative pole for mainte-
nance purpose.
I](/manual-img/35/16317/w960_16317-396.png)
5-68
Driving your vehicle
The battery sensor deactiva-
tion
[A] : Battery sensor
The battery sensor is deactivated,
when the battery is disconnected
from the negative pole for mainte-
nance purpose.
In this case, the ISG system is limit-
edly operated due to the battery sen-
sor deactivation. Thus, the driver
needs to take the following proce-
dures to reactivate the battery sen-
sor after disconnecting the battery.
Prerequisites to reactivate the
battery sensor
Keep the engine in the OFF status
for 4 hours, and attempt to restart the
engine 3 to 4 times for the battery-
sensor reactivation.
Pay extreme caution not to connect
any accessories (i.e. navigation and
black box) to the vehicle with the
engine in the OFF status. If not, the
battery sensor may not be reactivat-
ed.
Information
The ISG system may not operate in
the following situations.
- There is a malfunction with the ISG
system.
- The battery is weak.
- The brake vacuum pressure is low.
In those cases, we recommend that
you have the ISG system checked by a
HYUNDAI authorised repairer. • Use only the genuine HYUNDAI
ISG battery for replacement. If
not, the ISG system may not nor-
mally operate.
• Do not recharge the ISG battery
with a general battery charger. If
not, it may damage or explode
the ISG battery.
• Do not remove the battery cap. If
not, the battery electrolyte,
which is harmful to the human
body, may leak out.
NOTICE
iOTM058025L
Page 576 of 682
7
Maintenance
7
Maintenance
Engine compartment .............................................7-3
Maintenance services ...........................................7-6
Owner's responsibility ......................................................7-6
Owner maintenance precautions ..................................7-6
Owner maintenance ...............................................7-7
Owner maintenance schedule ........................................7-8
Scheduled maintenance services.........................7-9
Explanation of scheduled maintenance items .7-10
Engine oil ..............................................................7-13
Checking the engine oil level (Petrol engine) ..........7-13
Checking the engine oil level (Diesel Engine)..........7-14
Checking the engine oil and filter ..............................7-15
Engine coolant......................................................7-16
Checking the engine coolant level..............................7-16
Changing the engine coolant .......................................7-18
Brake/clutch fluid ................................................7-19
Checking the brake/clutch fluid level ........................7-19
Washer fluid .........................................................7-20
Checking the washer fluid level ..................................7-20
Parking brake .......................................................7-21
Checking the parking brake .........................................7-21
Fuel Filter (For Diesel)........................................7-22
Draining water from fuel filter ....................................7-22
Fuel filter cartridge replacement ................................7-22
Air cleaner ............................................................7-22
Filter replacement ...........................................................7-22
Climate control air filter .....................................7-24
Filter inspection ...............................................................7-24
Filter replacement ...........................................................7-24
Wiper blades .........................................................7-25
Blade inspection ..............................................................7-25
Blade replacement ..........................................................7-25
Battery...................................................................7-28
For best battery service................................................7-29
Battery capacity label ....................................................7-29
Battery recharging .........................................................7-30
Reset items .......................................................................7-31
Tyres and wheels .................................................7-32
Tyre care ...........................................................................7-32
Recommended cold tyre inflation pressures ...........7-33
Check tyre inflation pressure ......................................7-34
Tyre rotation ....................................................................7-34
Wheel alignment and tyre balance.............................7-35
Tyre replacement ............................................................7-36
Wheel replacement .........................................................7-37
Tyre traction .....................................................................7-37
Tyre maintenance ...........................................................7-37
Tyre sidewall labelling ....................................................7-37
Low aspect ratio tyres...................................................7-41
7
Page 606 of 682
7-31
7
Maintenance
By jump starting
After a jump start from a good bat-
tery, drive the vehicle for 20-30 min-
utes before it is shutoff. The vehicle
may not restart if you shut it off
before the battery had a chance to
adequately recharge. See “Jump
Starting” in chapter 6 for more infor-
mation on jump starting procedures.
Information
An inappropriately disposed
of battery can be harmful to
the environment and human
health.
Dispose of the battery according to
your local law(s) or regulations.
Reset items
The following items may need to be
reset after the battery has been dis-
charged or the battery has been dis-
connected.
• Auto up/down window
• Sunroof
• Trip computer
• Climate control system
• Driver position memory system
• Clock
• Audio system
i
AGM battery (if equipped)
•Absorbent Glass Matt (AGM)
batteries are maintenance-
free and we recommend that
the AGM battery be serviced
by a HYUNDAI authorised
repairer. For charging your
AGM battery, use only fully
automatic battery chargers
that are specially developed
for AGM batteries.
•When replacing the AGM bat-
tery, we recommend that you
use parts for replacement
from a HYUNDAI authorised
repairer.
•Do not open or remove the
cap on top of the battery. This
may cause leaks of internal
electrolyte that could result in
severe injury.
CAUTION
Page 617 of 682
7-42
Maintenance
FUSES
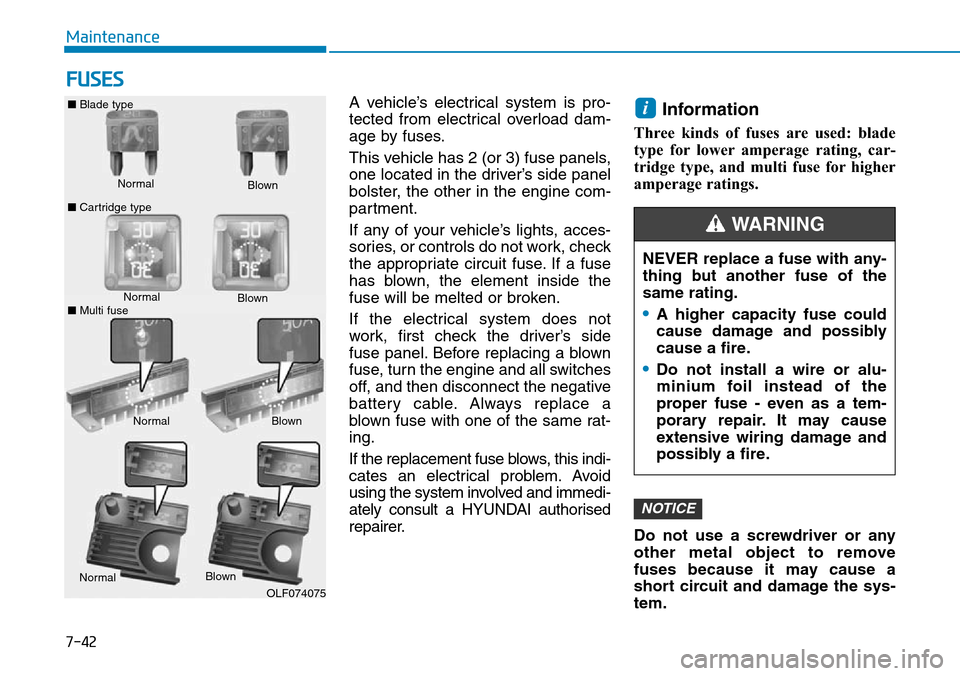
A vehicle’s electrical system is pro-
tected from electrical overload dam-
age by fuses.
This vehicle has 2 (or 3) fuse panels,
one located in the driver’s side panel
bolster, the other in the engine com-
partment.
If any of your vehicle’s lights, acces-
sories, or controls do not work, check
the appropriate circuit fuse. If a fuse
has blown, the element inside the
fuse will be melted or broken.
If the electrical system does not
work, first check the driver’s side
fuse panel. Before replacing a blown
fuse, turn the engine and all switches
off, and then disconnect the negative
battery cable. Always replace a
blown fuse with one of the same rat-
ing.
If the replacement fuse blows, this indi-
cates an electrical problem. Avoid
using the system involved and immedi-
ately consult a HYUNDAI authorised
repairer.Information
Three kinds of fuses are used: blade
type for lower amperage rating, car-
tridge type, and multi fuse for higher
amperage ratings.
Do not use a screwdriver or any
other metal object to remove
fuses because it may cause a
short circuit and damage the sys-
tem.
NOTICE
i
Normal ■Blade type
■Cartridge typeBlown
NormalBlown
NormalBlown
OLF074075
NEVER replace a fuse with any-
thing but another fuse of the
same rating.
•A higher capacity fuse could
cause damage and possibly
cause a fire.
•Do not install a wire or alu-
minium foil instead of the
proper fuse - even as a tem-
porary repair. It may cause
extensive wiring damage and
possibly a fire.
WARNING
Normal
Blown
■Multi fuse
Page 619 of 682
7-44
Maintenance
Engine compartment panel
fuse replacement
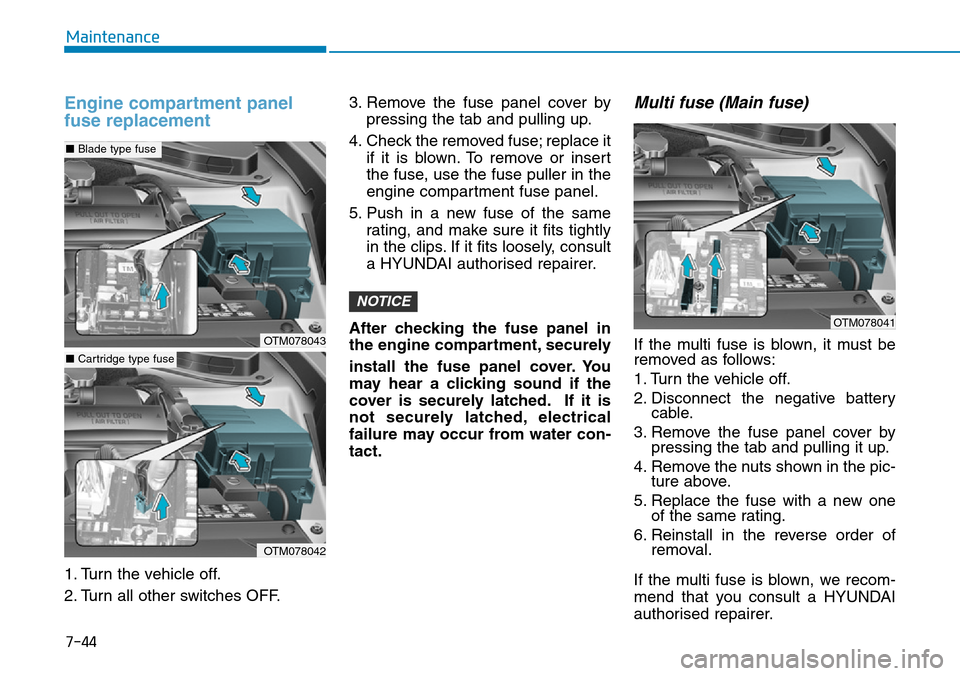
1. Turn the vehicle off.
2. Turn all other switches OFF.3. Remove the fuse panel cover by
pressing the tab and pulling up.
4. Check the removed fuse; replace it
if it is blown. To remove or insert
the fuse, use the fuse puller in the
engine compartment fuse panel.
5. Push in a new fuse of the same
rating, and make sure it fits tightly
in the clips. If it fits loosely, consult
a HYUNDAI authorised repairer.
After checking the fuse panel in
the engine compartment, securely
install the fuse panel cover. You
may hear a clicking sound if the
cover is securely latched. If it is
not securely latched, electrical
failure may occur from water con-
tact.
Multi fuse (Main fuse)
If the multi fuse is blown, it must be
removed as follows:
1. Turn the vehicle off.
2. Disconnect the negative battery
cable.
3. Remove the fuse panel cover by
pressing the tab and pulling it up.
4. Remove the nuts shown in the pic-
ture above.
5. Replace the fuse with a new one
of the same rating.
6. Reinstall in the reverse order of
removal.
If the multi fuse is blown, we recom-
mend that you consult a HYUNDAI
authorised repairer.
NOTICE
OTM078043
■Blade type fuse
OTM078042
■Cartridge type fuse
OTM078041