Page 185 of 232

183
Check and top up the fluid level regularly.
Replace the fluid annually. Replace the fluid if it
contains water.
Check the condition of the hydraulic hose and
the sealing of the hydraulic system regularly.
Pump and motor
Requires no ser vicing; the ball bearings are
lubricated for life and the pump bearings by the
pumped fluid.
Lubrication
The tipper body and ram pivots do not have
grease nipples. Lubricate the hinges and
retainers for the tipper body sides regularly,
as well as the catches for the rear tipper body
side.
Sub-chassis and tipper body
For maximum life, we recommend that you
clean your tipper body by washing it down
regularly with a hose.
Touch up paint chips quickly to avoid rust
spreading.After 8
months of use, check the
tightening torque of the fixings of the
underbody to the chassis (following the
recommendations of the body converter).
Cleaning the valve slider
F Loosen the cap 244A paying attention to
the ball and retrieving it.
F
U
sing a wide screwdriver, unscrew the
bore/piston bolt assembly.
F
C
heck that the piston slides smoothly and
remove any impurities. Pass a
magnet over
if there is any swar f present.
F
R
efit the assembly and ensure that the
piston slides smoothly. Retain the ball with
some grease on the plug for reassembly.
F
B
leed the hydraulic unit.
Bleeding the electro-hydraulic
unit
F Remove the hexagonal plug 257 .
F S lacken by a half turn the bolt 587 located
inside, using a
6 mm Allen key.
F
O
perate the electro-hydraulic unit for a few
moments by pressing the raise button.
F
T
he tipper body does not rise, or rises very
slowly. When fluid flows from the orifice,
the system is bled.
F
R
etighten the bolt 587
and refit the plug
257 . Check that the tipper body lowers
c o r r e c t l y.
Detailed view of the UD2386 electro-
h ydraulic unit
Maintenance
Reser voir
For safety reasons, we strongly advise
against doing anything under the tipper
body while it is being operated or while it
is being serviced.
10
Special features
Page 186 of 232

184
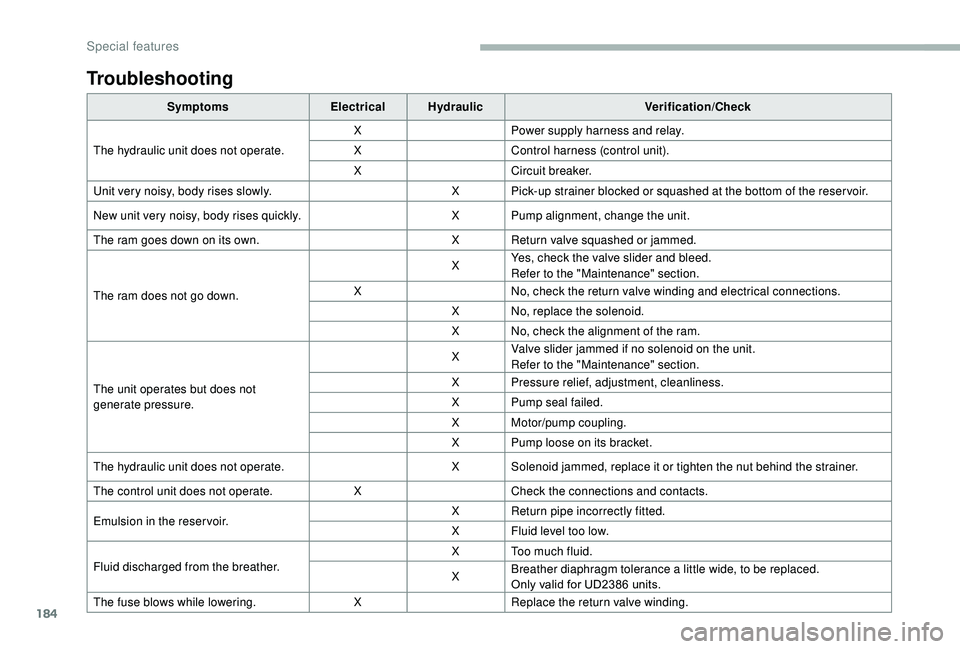
Troubleshooting
SymptomsElectricalHydraulic Verification/Check
The hydraulic unit does not operate. X
Power supply harness and relay.
X Control harness (control unit).
X Circuit breaker.
Unit very noisy, body rises slowly. X Pick-up strainer blocked or squashed at the bottom of the reser voir.
New unit very noisy, body rises quickly. X Pump alignment, change the unit.
The ram goes down on its own. X Return valve squashed or jammed.
The ram does not go down. X
Yes, check the valve slider and bleed.
Refer to the "Maintenance" section.
X No, check the return valve winding and electrical connections.
X No, replace the solenoid.
X No, check the alignment of the ram.
The unit operates but does not
generate pressure. X
Valve slider jammed if no solenoid on the unit.
Refer to the "Maintenance" section.
X Pressure relief, adjustment, cleanliness.
X Pump seal failed.
X Motor/pump coupling.
X Pump loose on its bracket.
The hydraulic unit does not operate. X Solenoid jammed, replace it or tighten the nut behind the strainer.
The control unit does not operate. XCheck the connections and contacts.
Emulsion in the reser voir. X
Return pipe incorrectly fitted.
X Fluid level too low.
Fluid discharged from the breather. X Too much fluid.
X
Breather diaphragm tolerance a
little wide, to be replaced.
Only valid for UD2386
units.
The fuse blows while lowering. XReplace the return valve winding.
Special features
Page 187 of 232

1
Touch screen Audio-Telematic system
Multimedia audio system –
Bluetooth® telephone – GPS
navigation
Contents
First steps
1
G
lossary
2
S
teering wheel mounted controls
3
M
enus
3
R
adio
4
D
AB radio (Digital Audio Broadcasting)
5
M
edia
6
N
avigation
9
T
elephone
1
2
Vehicle information
1
4
Settings
1
4
Voice commands
1
6The system is protected in such a
way that
it will only operate in your vehicle.
For safety reasons, the vehicle must
always be stationary for the driver to
perform operations that require close
attention.
When the engine is switched off and to
prevent discharging of the battery, the
system switches off after activation of
energy economy mode.
First steps
Use the buttons arranged below the touch
screen for access to the main menus, then
press the virtual buttons in the touch screen.
The screen is of the "resistive" type, it is
necessary to press firmly, particularly for
"flick" gestures (scrolling through a
list,
moving the map, etc.). A simple wipe will
not be enough. Pressing with more than
one finger is not recognised.
The screen can be used with gloves. This
technology allows use at all temperatures.
To clean the screen, use a
soft non-
abrasive cloth (e.g. spectacles cloth)
without any additional product.
Do not use sharp objects on the screen.
Do not touch the screen with wet hands.
In very hot conditions, the volume may be
limited to protect the system. This returns
to normal when the temperature in the
passenger compartment drops.
The system may also go into standby
(screen and sound completely off) for
a
minimum period of 5 minutes.
.
Touch screen Audio-Telematic system
Page 188 of 232
2
Press: on/off.
Rotate: adjust the volume (each
source is independent).
Eject CD.
Screen off/on.
Mute/pause the volume.
Radio, rotate: search for a radio
station.
Media, rotate: select the previous/
next track.
Press: confirm the option displayed
in the screen.
Activate, deactivate, adjust certain
system and vehicle functions.
Abandon the current operation.
Go up one level (menu or folder).Glossary
System details Meanings/corresponding actions
VOLUME Adjust the volume by rotation.
RADIO Access the radio menu.
MEDIA Access the media menu and the different audio sources.
N AV Access the navigation menu.
PHONE Access the telephone menu.
MORE Access vehicle information.
BROWSE
TUNE
SCROLL Turn the button to:
-
m
ove in a menu or a list.
-
s
elect a radio station.
ENTER Confirm an option displayed in the screen by pressing.
Touch screen Audio-Telematic system
Page 189 of 232

3
Steering wheel mounted controls
Activate/deactivate the pause
function of CD, USB/iPod and
Bluetooth
® sources.
Activate/deactivate the radio mute
function.
Switch the microphone off/on during
a
telephone call.
Push up or down: increase or
decrease the volume for voice
announcements and music sources,
hands-free and speaking texts.
Switch voice recognition on.
Interrupt a
voice message to start
a
new voice command.
Interrupt voice recognition.
Accept an incoming call.
Accept a
second incoming call and
put the current call on hold.
Switch on voice recognition for the
telephone function.
Interrupt a
voice message to issue
another voice command.
Interrupt voice recognition. Radio, push up or down: select the
next/previous station.
Radio, hold up or down: sweep
frequencies up/down until the button
is released.
Media, push up or down: select the
next/previous track.
Media, hold up or down: fast
for ward/back until the button is
released.
Reject the incoming call.
End the call in progress.
Menus
Radio
Select the different radio sources.
Activate, deactivate and adjust
certain functions.
Telephone
Connect a telephone by Bluetooth®.
.
Touch screen Audio-Telematic system
Page 190 of 232

4
Vehicle information
Access to the exterior temperature,
the clock, the compass and the trip
computer.
Navigation
Enter navigation settings and
choose a destination.
Settings
Activate, deactivate, and configure
certain functions of the system and
the vehicle.
Media
Select from the different music
sources.
Activate, deactivate, and adjust
certain functions.
Radio
Press "RADIO " to display the radio
menus:
Press the 9
or: buttons briefly for an
automatic search.
Press and hold the buttons for a
quick search.
Pressing Pre-set
Press and hold the button to pre-set the current
radio station.
The current station is highlighted.
Press the "All" button to display all the pre-set
radio stations in the frequency band selected.
Navigate
-
L
ist of stations .
Select a
station by pressing once.
-
U
pdate the list according to reception.
-
P
ress the 5 or 6 buttons to scroll through
the radio stations received.
-
G
o directly to the desired letter in the list.
AM/DAB
-
C
hoose the band .
Choose the waveband.
Touch screen Audio-Telematic system
Page 191 of 232

5
Adjustment
- D irect adjustment .
The screen virtual keypad can be used to
enter a
single number corresponding to
a
station.
-
T
he "more" or "less" graphic symbols allow
precise adjustment of the frequency.
Info
-
I
nformation .
Display information on the current radio
station.
Audio
-
E
qualiser .
Adjust the bass, mid-range and treble.
-
B
alance/Fade .
Adjust the balance of the speakers, front
and rear, left and right.
Press the button in the middle of the arrows
to balance the adjustments.
-
V
olume/Speed .
Select the desired setting, the option is
highlighted.
-
L
oudness .
Optimise audio quality at low volume.
-
A
utomatic radio .
Adjust the radio on startup or restore the
active state the last time the ignition was
switched to STOP.
-
R
adio off delay .
Adjust the setting.
-
A
UX vol. adjustment .
Adjust the settings.DAB (Digital Audio
Broadcasting) radio
Digital Radio
Digital radio provides higher quality
reception and also the graphical display
of current information on the radio station
being listened to.
The different "multiplex/ensembles" offer
a
choice of radio stations in alphabetical
o r d e r.
Press repeatedly on " RADIO" to
display the "DAB Radio".
Select the " Navigate" tab.
Select a
list from the filters
proposed: " All", "Genres ",
" Ensembles " and then select
a
radio station.
Press the " Update" button to update
the list of "DAB Radio" stations
received.
DAB/FM tracking
"DAB" does not cover 100% of the
te r r i to r y.
When the digital radio signal is weak,
the " AF" (alternative frequencies) option
allows you to continue listening to the
same station, by automatically switching to
the corresponding "FM" analogue station
(if there is one).
When the system switches to analogue
radio, there is a
difference of a few
seconds with sometimes a
change in
volume.
When the digital signal is restored, the
system automatically changes back to
" DA B ".
If the "DAB" station being listened to is
not available, the sound will cut out while
the digital signal is too weak and the
alternative "AF" frequency will be greyed
out.
.
Touch screen Audio-Telematic system
Page 192 of 232

6
Media
Press "MEDIA" to display the media
menus:
Press the 9
or: buttons to play the previous/
next track.
Press and hold the buttons for fast for ward or
rewind in the track selected.
Navigate
-
N
avigate by: Playing currently, Ar tists,
Albums, Genres, Tracks, Playlists, Audio
books, Podcasts .
Navigate and select tracks on the active
device.
The selection options depend on the device
connected or type of CD inserted.
Source
-
C
D, AUX, USB .
Select the desired audio source from those
available or insert a
device intended for
this purpose; the system starts playing the
source automatically.
-
Bl
uetooth
®.
Pair a
Bluetooth® audio device.
Info
-
I
nformation .
Display information on the track playing. Random
Press the button to play tracks on the CD, USB,
iPod or Bluetooth
® device in random order.
Repeat
Press the button to activate this function.
Audio
-
E
qualiser .
Adjust the bass, mid-range and treble.
-
B
alance/Fade .
Adjust the balance of the speakers, front
and rear, left and right.
Press the button in the middle of the arrows
to balance the adjustments.
-
V
olume/Speed .
Select the desired setting, the option is
highlighted.
-
L
oudness .
Optimise audio quality at low volume.
-
A
utomatic radio .
Adjust the radio on startup or restore the
active state the last time the ignition was
switched to STOP.
-
R
adio off delay .
Adjust the setting.
-
A
UX vol. adjustment .
Adjust the settings.
USB port
Insert a USB memory stick or connect
a peripheral device to the USB port in
the central storage space , provided for
transferring data to the system, using a
suitable
cable (not supplied).
To protect the system, do not use a
USB
hub.
The system builds playlists (in temporary
memory), an operation which can take from
a
few seconds to several minutes at the first
connection.
Reduce the number of non-music files and the
number of folders to reduce the waiting time.
The playlists are updated every time the
ignition is switched off or a
USB memory stick
is connected. The lists are stored: if they are
not modified, the subsequent loading time will
b e s h o r t e r.
Touch screen Audio-Telematic system