Page 97 of 180
A PARTNERSHIP FOR PERFORMANCE!
The PEUGEOT TOTAL team knows how to push back the
limits of performance to win victories in the most difficult
conditions, as confirmed by the first three places achieved in
2 0 17.
To obtain these exceptional results, the PEUGEOT Sport
teams chose TOTAL QUARTZ for the PEUGEOT 3008 DKR, a
high-tech lubricant that protects the engine in the most severe
conditions.
TOTAL QUARTZ protects your engine against the
effects of time.
TOTAL QUARTZ Ineo First is a high performance lubricant,
t he result of work done together by PEUGEOT and TOTAL
R&D. Specially formulated for the engines in PEUGEOT
vehicles, its innovative technology significantly reduces
CO
2 emissions and keeps your engine clean.
PEUGEOT & TOTAL
Page 98 of 180

96
Fuel tank
The capacity of the tank is about 35 litres.
Low fuel level
When the fuel in the tank reaches
a low level, this warning lamp
comes on in the instrument panel,
accompanied by an audible warning.
The message "LO FUEL" is displayed instead
of the range.
You have about 5
litres of fuel left.
In certain driving conditions and depending on
the engine in your vehicle, your range may be
less than 30
miles (50 km).
If you run out of fuel, the emission
control warning lamp may come on
in the instrument panel. It will go out
automatically after several engine starts.
Refuelling
Refuelling must be done with the engine and
ignition off (ignition switch to " LOCK" or
" OFF "). Opening the filler cap may create a
noise
caused by an inrush of air. This is entirely
normal and results from the sealing of the fuel
system.
To refuel in complete safety:
F
Y
ou must stop the engine and turn off
the ignition (switch to LOCK or OFF
mode) .
F
P
ull the control on the lower part of the
dashboard, driver's side, to unlock the fuel
filler flap.
F
O
pen the fuel filler flap.
A label inside the fuel flap reminds you of the
type of fuel to use.
Additions of fuel must be of at least 5 litres, in
order to be registered by the fuel gauge. F
U
nscrew the cap and place it on its support
(on the flap).
F
I
ntroduce the filler nozzle and push it in as
far as possible before starting to refuel (risk
of blowback).
F
K
eep it in this position during the whole
filling operation.
Once you have finished refuelling:
F
S
crew the cap back on again until you hear
a click. When you release the cap, it will
turn slightly in the opposite direction.
F
P
ush the fuel flap to close it.
When filling the tank, do not continue
beyond the 3
rd cut off of the nozzle; this
could cause malfunctions.
Your vehicle is fitted with a
catalytic converter,
which helps to reduce the level of harmful
emissions in the exhaust gases.
The filler neck is narrower, allowing only
unleaded petrol nozzles to be introduced.
Practical information
Page 99 of 180

97
Compatibility of fuels
Fuel used for petrol engines
The petrol engines are compatible with biofuels
that conform to current and future European
standards and which can be obtained from
filling stations:
Petrol that meets standard EN228,
mixed with a biofuel that meets
standard EN15376.
The only petrol additives authorised
for use are those that meet the
B715001
standard.
Travelling abroad
Cer tain fuels could damage the engine of
your vehicle.
In cer tain countries, the use of a par ticular
fuel may be required (specific octane
rating, specific trade name, etc.) to ensure
correct operation of the engine.
For any additional information, contact a
dealer.
Snow chains
In wintry conditions, snow chains
improve traction as well as the
behaviour of the vehicle when
braking.
Snow chains must be fitted only to the
front wheels. They must never be fitted to
"space-saver" type spare wheels.
Take account of the legislation in force in
your country on the use of snow chains
and the maximum authorised speed.
Installation tips
It is strongly recommended that before
you leave, you practise fitting the snow
chains on a level and dry sur face.
Avoid driving with snow chains on roads
that have been cleared of snow to avoid
damaging your vehicle's tyres and the
road sur face. If your vehicle is fitted with
alloy wheels, check that no part of the
chain or its fixings is in contact with the
wheel rim.
Only use the chains designed to be fitted to the
type of wheels fitted to your vehicle:
Original tyre size Maximum link size
165/65
R14 9
mm
165/60
R15
F
I
f you have to fit the chains during a
journey,
stop the vehicle on a
flat sur face on the side
of the road.
F
A
pply the parking brake and position any
wheel chocks under the wheels to prevent
movement of your vehicle.
F
F
it the chains following the instructions
provided by the manufacturer.
F
M
ove off gently and drive for a
few
moments, without exceeding 31
mph
(50
km/h).
F
S
top your vehicle and check that the snow
chains are correctly tightened. For more information on snow chains,
contact a
PEUGEOT dealer or a qualified
workshop.
When you drive with snow chains, you
should deactivate the lane departure
warning system.
7
Practical information
Page 100 of 180

System which manages the duration of use of
certain functions to conser ve a sufficient level
of cha")
98
Energy economy mode
(Only for vehicles equipped with the Keyless
Entry and Starting system.)
System which manages the duration of use of
certain functions to conser ve a sufficient level
of charge in the battery.
After the engine has stopped, you can still
use functions such as the audio system,
windscreen wipers, dipped beam headlamps,
courtesy lamps, etc. for a
max. combined time
of 20
minutes.
This period may be greatly reduced if the
battery is not fully charged.
Entry into the mode
Once this time has elapsed, the active
functions are put on standby.
Exiting the mode
These functions will be automatically restored
the next time the vehicle is used.
To restore the use of these functions
immediately, start the engine and allow it run
for at least 5
minutes. Let the engine run for the duration
specified to ensure that the battery charge
is sufficient.
Do not repeatedly and continuously restart
the engine in order to charge the battery.
A flat battery prevents the engine from
starting.
For more information on the 12
V batter y
,
refer to the corresponding section.
Fitting roof bars
Maximum authorised weight on the roof
bars, with a loading height not exceeding
40
cm (except bicycle carriers): 40 kg.
If the height exceeds 40
cm, adapt the
speed of the vehicle to the profile of the
road to avoid damaging the roof bars.
Please refer to national legislation
to comply with the regulations for
transporting objects that are longer than
the vehicle.
Use the accessories recommended by
PEUGEOT to install transverse roof bars,
following the manufacturer's recommendations.
For more information, contact a
PEUGEOT
dealer or a
qualified workshop.
Bonnet
Opening
F Pull the interior release lever, located in the lower dashboard, towards you.
Practical information
Page 101 of 180

99
F Push the exterior safety catch to the left and raise the bonnet.
F
U
nclip the bonnet stay from its housing.
F
F
ix the stay in the notch to hold the bonnet
open.
Do not open the bonnet under very windy
conditions.
When the engine is hot, handle the
exterior safety catch and the stay with
care (risk of burns).
The cooling fan may star t after
switching off the engine: take care
with articles and clothing that might be
caught by the fan blades.
Because of the presence of electrical
equipment under the bonnet, it is
recommended that exposure to water
(rain, washing, etc.) be limited.
Closing
F Take the stay out of the support notch.
F C lip the stay in its housing.
F
L
ower the bonnet and release it near the
end of its travel.
F
P
ull on the bonnet to check that it is fully
latched.
To avoid damaging the electrical units,
never use a
high-pressure jet wash in the
engine compartment.
Engine compartment
1. Windscreen washing fluid reservoir.
2. Engine coolant reservoir.
3. A i r f i l t e r.
4. Brake fluid reser voir.
5. Battery.
6. Fusebox.
7. Engine oil dipstick.
8. Engine oil filler cap.
9. Remote earth point.
To access the brake fluid reser voir and/
or the fusebox, unclip the plastic cover,
located at the base of the windscreen, by
pressing the two tabs.
Checking levels
Check all of these levels regularly, in line with
the manufacturer's service schedule. Top them
up if necessary, unless other wise indicated.
If a
level drops significantly, have the
corresponding system checked by a
PEUGEOT
dealer or a
qualified workshop.
The liquid must comply with the
manufacturer's recommendations and with
the vehicle's engine.
7
Practical information
Page 102 of 180
 and the
cooling fan could start at any time (even
with the ignition off).
Used prod")
100
Take care when working under the bonnet,
as certain areas of the engine may be
extremely hot (risk of burns) and the
cooling fan could start at any time (even
with the ignition off).
Used products
Avoid prolonged contact of used oil or
fluids with the skin.
Most of these fluids are harmful to health
or indeed very corrosive.Do not discard used oil or fluids into
sewers or onto the ground.
Take used oil to a
PEUGEOT dealer
or a
qualified workshop and dispose
of in the containers reser ved for this
purpose.
Engine oil level
The check is carried out either
using the oil level indicator on the
instrument panel when the ignition is
switched on, for vehicles equipped
with an electric gauge, or using the
dipstick. To ensure that the reading is correct, your
vehicle must be parked on a
level sur face
with the engine stopped for more than
30
minutes.
It is normal to top up the oil level between
two ser vices (or oil changes). PEUGEOT
recommends that you check the level, and top
up, if necessary, every 3,000 miles (5,000 km).
Checking using the dipstick
The location of the dipstick is shown in the
corresponding underbonnet layout view.
F
T
ake the dipstick by its coloured grip and
pull it out completely.
F
W
ipe the end of the dipstick using a clean
non-fluffy cloth.
F
R
efit the dipstick and push fully down, then
pull it out again to make the visual check:
the correct level is between marks A and B .A = MA X
B = MIN
If you find that the level is above the A mark or
below the B mark, do not star t the engine .
- I f the level is above the MAX mark (risk of
damage to the engine), contact a
PEUGEOT
dealer or a
qualified workshop.
-
I
f the level is below the MIN mark, you must
top up the engine oil.
Oil grade
Before topping up the oil or changing the oil,
check that the oil is the correct grade for your
engine and conforms to the manufacturer's
recommendations.
Practical information
Page 103 of 180

101
Topping up the engine oil level
The location of the oil filler cap is shown in the
corresponding underbonnet layout view.
F
U
nscrew the oil filler cap to access the filler
opening.
F
A
dd oil in small quantities, avoiding any
spills on engine components (risk of fire).
F
W
ait a few minutes before checking the
level again using the dipstick.
F
A
dd more oil if necessary.
F
A
fter checking the level, carefully refit the oil
filler cap and the dipstick in its tube.
Engine oil change
In order to maintain the reliability of the engine
and emissions control system, never use
additives in the engine oil.
Brake fluid level
The fluid level should be close to the
"MA X" mark. If it is not, check the
brake pad wear.
Access to the tank
F Unclip the plastic cover, located at the bottom of the windscreen, by pressing on
both tabs.
When you unclip the plastic cover, make
sure not to remove the seal.
Fluid specification
This fluid must conform to the manufacturer's
recommendations.
Coolant level
The level of this fluid must be
between the marks " FULL" or "F"
and " LOW " or "L". The check and top up must only be done with
the engine cold.
A low coolant level presents a
risk of serious
damage to your engine.
When the engine is hot, the temperature of the
coolant is regulated by the fan.
In addition, as the cooling system is
pressurised, wait at least one hour after
switching off the engine before carrying out any
work.
To avoid any risk of scalding, unscrew the cap
two turns to release the pressure. After it has
dropped, remove the cap and top up.
The cooling fan may star t after
switching off the engine: take care
with articles and clothing that might be
caught by the fan blades.
Screenwash fluid level
Top up to the required level when
necessary.
Fluid specifications
These fluids must conform to the
manufacturer's recommendations.
7
Practical information
Page 104 of 180

102
Checks
Unless otherwise indicated, check these
components in accordance with the
manufacturer's service schedule.
Other wise, have them checked by a PEUGEOT
dealer or a
qualified workshop.
12 V battery
The battery does not require any
maintenance.
However, check regularly that the
terminals are correctly tightened
(versions without quick release terminals)
and that the connections are clean.
For more information on the precautions
to take before starting work on the 12 V
battery , refer to the corresponding
section.
Air filter
Depending on the environment
(e.g. dusty atmosphere) and the
use of the vehicle (e.g. city driving),
replace it twice as often if
necessary .
Passenger compartment
filter
Depending on the environment
(e.g. dusty atmosphere) and the
use of the vehicle (e.g. city driving),
replace it twice as often if
necessary. A clogged passenger compartment
filter may have an adverse effect on
the per formance of the air conditioning
system and generate undesirable odours.
Oil filter
Change the oil filter each time the
engine oil is changed.
Manual gearbox
The gearbox does not require any
maintenance (no oil change).
Clutch
Versions equipped with Stop & Start are
fitted with a
12 V lead-acid battery of
specific technology and specification.
Its replacement should be carried out
only by a
PEUGEOT dealer or a qualified
workshop.
The clutch is mechanically operated and
requires regular adjustment.If there is a
malfunction (for example,
difficulty in pulling away), contact
a
PEUGEOT dealer or a qualified
workshop.
Fluid specification
The screenwash fluid must be topped up with
a ready for use mix.
In winter (temperatures below zero), a fluid with
antifreeze must be used that is appropriate for
the prevailing conditions, in order to preser ve
the elements of the system (pump, tank, ducts,
e t c .) .
Filling with pure water is prohibited under all
circumstances (risk of freezing, limestone
deposits, etc.).
Practical information
 1
1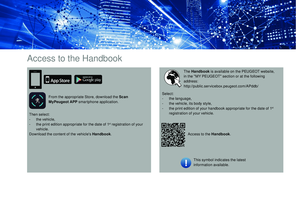 2
2 3
3 4
4 5
5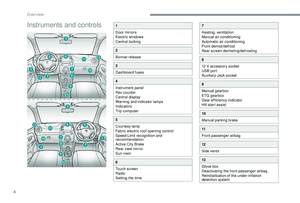 6
6 7
7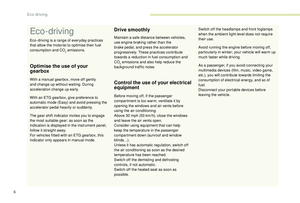 8
8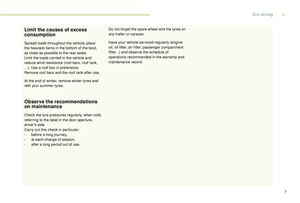 9
9 10
10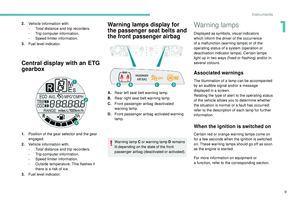 11
11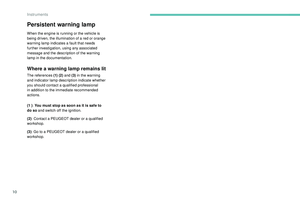 12
12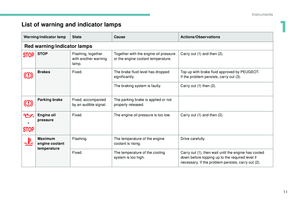 13
13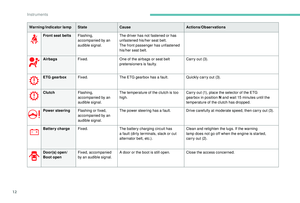 14
14 15
15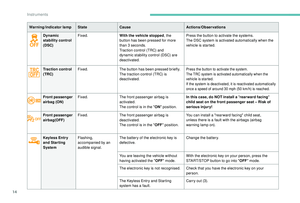 16
16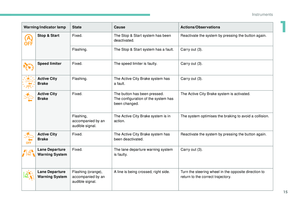 17
17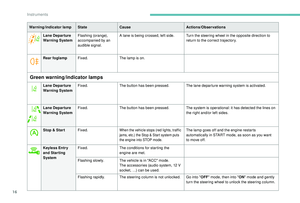 18
18 19
19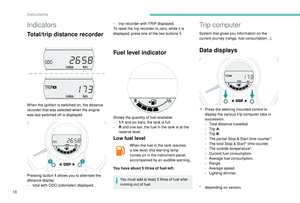 20
20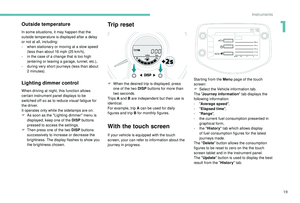 21
21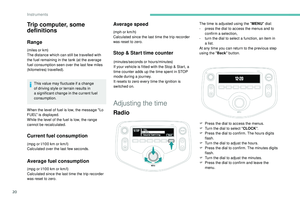 22
22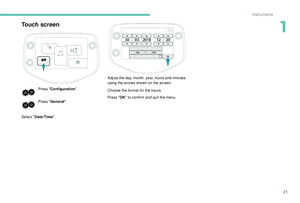 23
23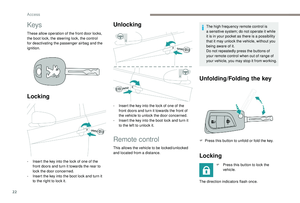 24
24 25
25 26
26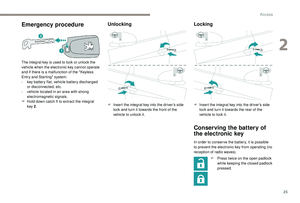 27
27 28
28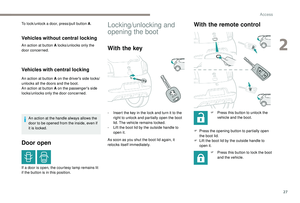 29
29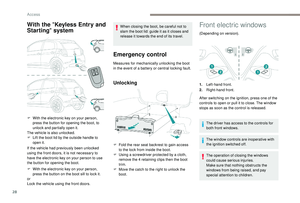 30
30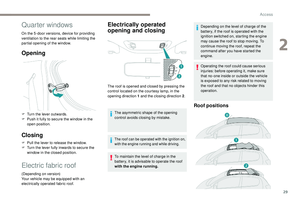 31
31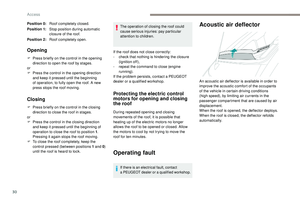 32
32 33
33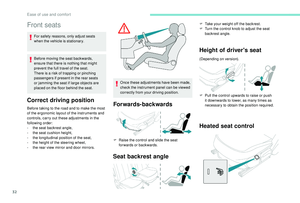 34
34 35
35 36
36 37
37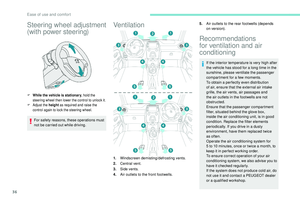 38
38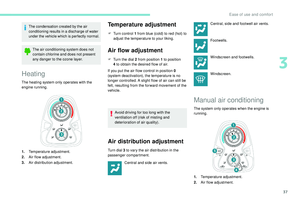 39
39 40
40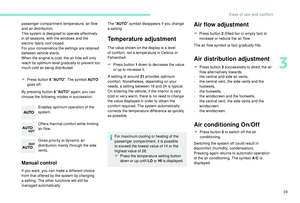 41
41 42
42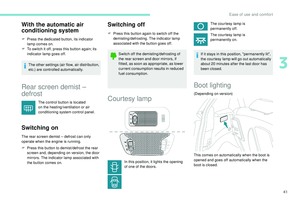 43
43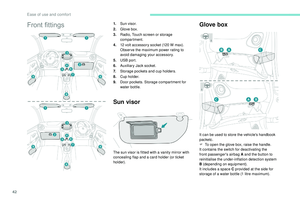 44
44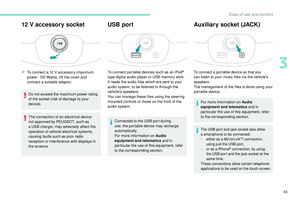 45
45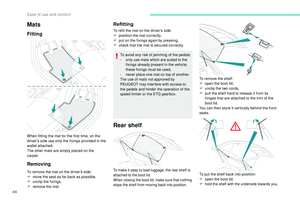 46
46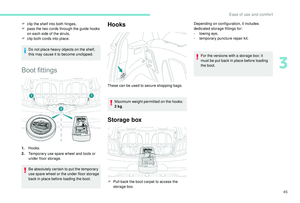 47
47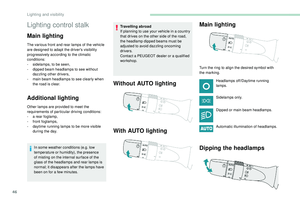 48
48 49
49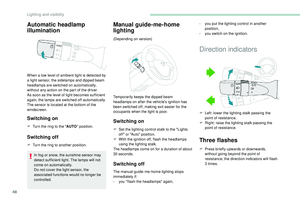 50
50 51
51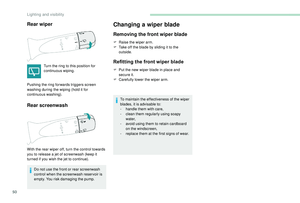 52
52 53
53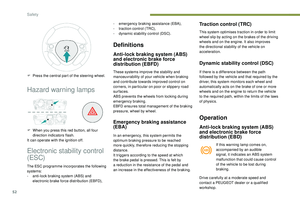 54
54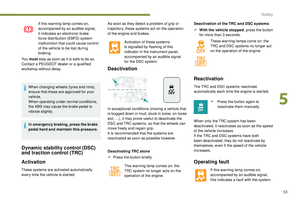 55
55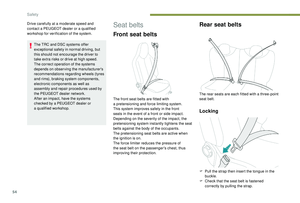 56
56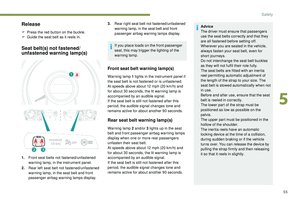 57
57 58
58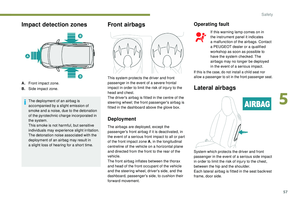 59
59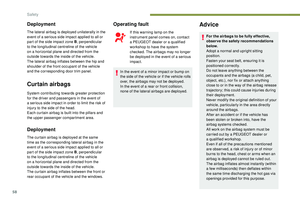 60
60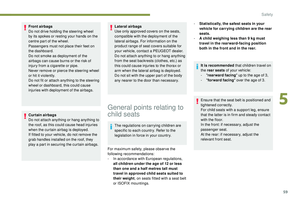 61
61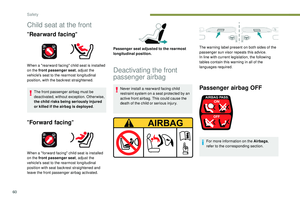 62
62 63
63 64
64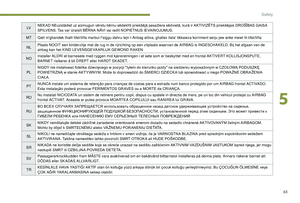 65
65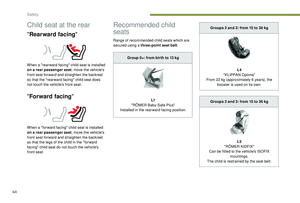 66
66 67
67 68
68 69
69 70
70 71
71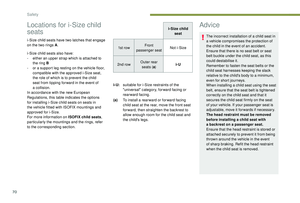 72
72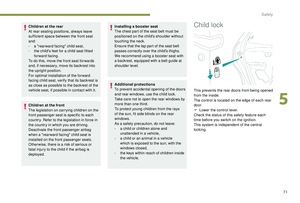 73
73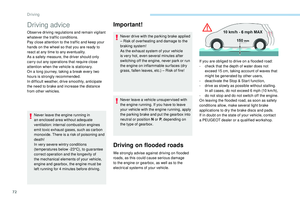 74
74 75
75 76
76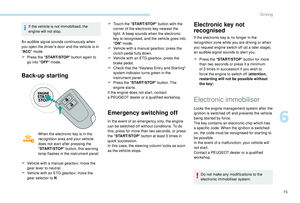 77
77 78
78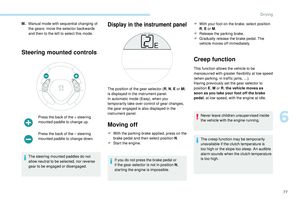 79
79 80
80 81
81 82
82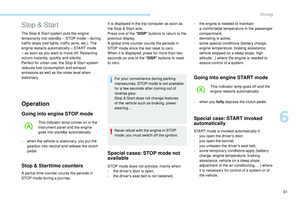 83
83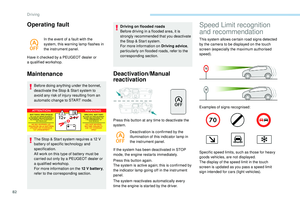 84
84 85
85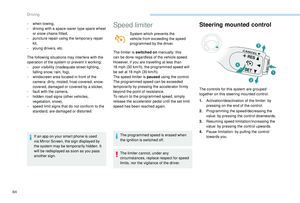 86
86 87
87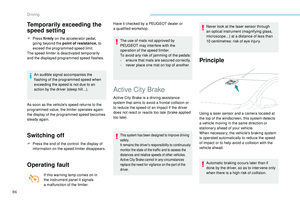 88
88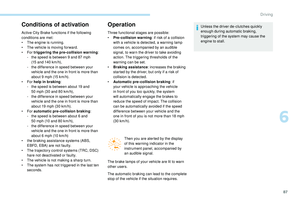 89
89 90
90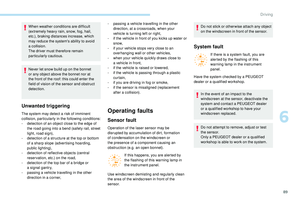 91
91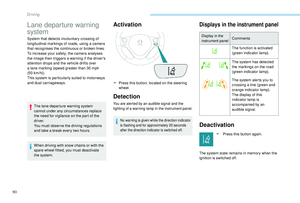 92
92 93
93 94
94 95
95 96
96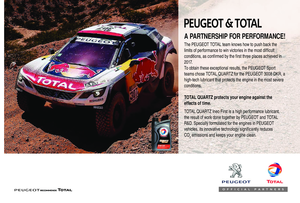 97
97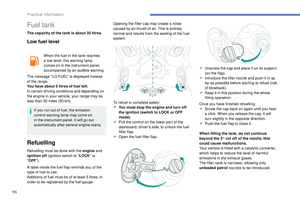 98
98 99
99 100
100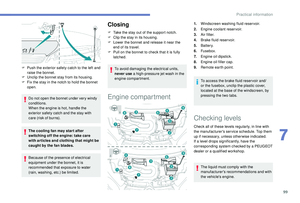 101
101 102
102 103
103 104
104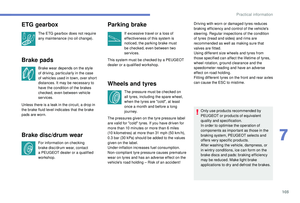 105
105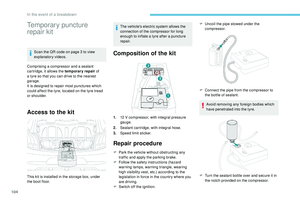 106
106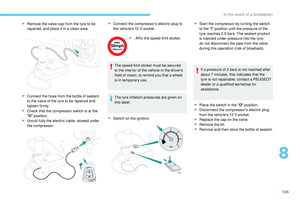 107
107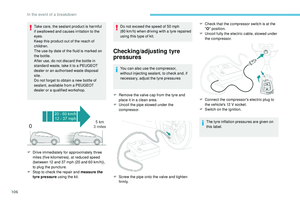 108
108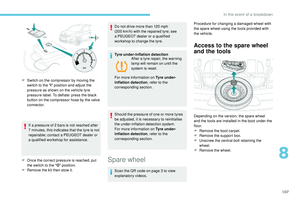 109
109 110
110 111
111 112
112 113
113 114
114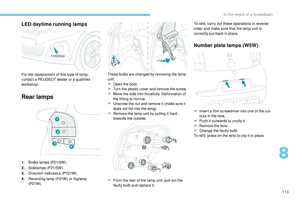 115
115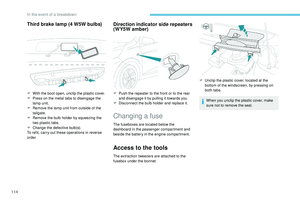 116
116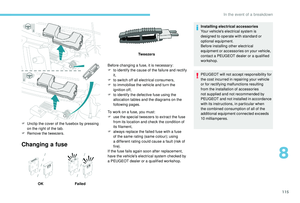 117
117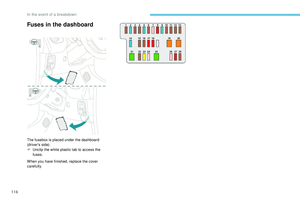 118
118 119
119 120
120 121
121 122
122 123
123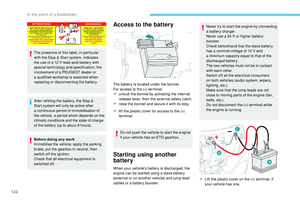 124
124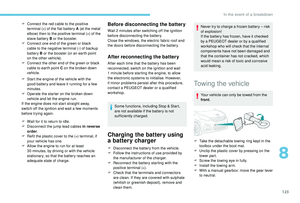 125
125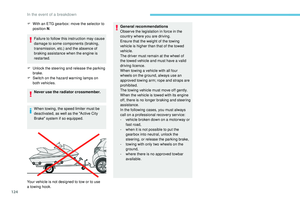 126
126 127
127 128
128 129
129 130
130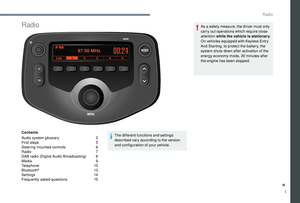 131
131 132
132 133
133 134
134 135
135 136
136 137
137 138
138 139
139 140
140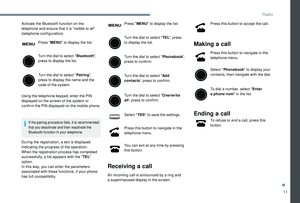 141
141 142
142 143
143 144
144 145
145 146
146 147
147 148
148 149
149 150
150 151
151 152
152 153
153 154
154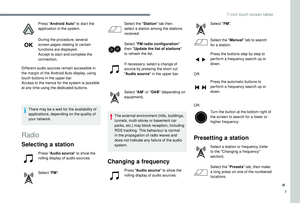 155
155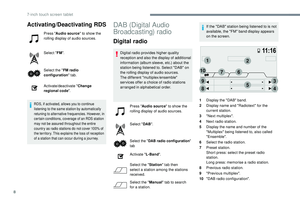 156
156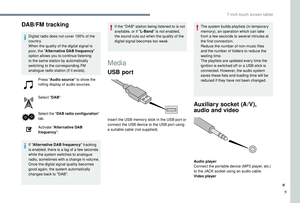 157
157 158
158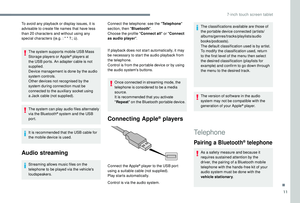 159
159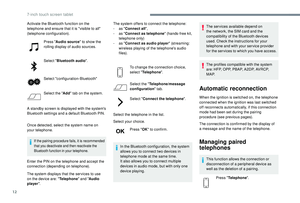 160
160 161
161 162
162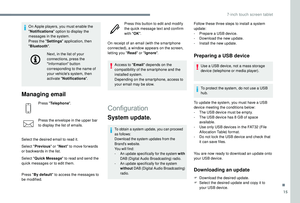 163
163 164
164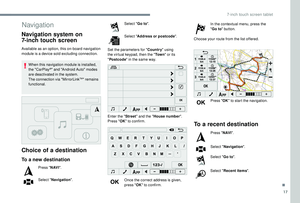 165
165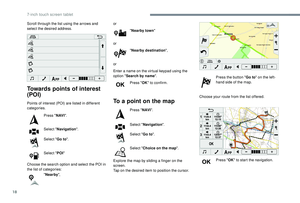 166
166 167
167 168
168 169
169 170
170 171
171 172
172 173
173 174
174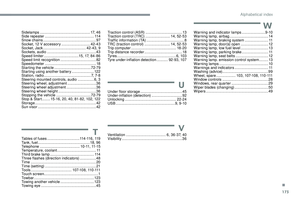 175
175 176
176 177
177 178
178 179
179