2018 PEUGEOT 108 ignition
[x] Cancel search: ignitionPage 7 of 180

5
Instruments and controls (continued)1
Lighting controls
Direction indicators
2
Stop & Start
Active City Brake
Electric mirrors adjustment
Headlamp adjustment
Deactivating the DSC/TRC systems.
Front foglamps (accessory)
3
Opening the fuel filler flap
4
ETG gearbox steering mounted control
paddles
5
Steering wheel height adjustment
Horn
Driver front airbag
6
Steering mounted controls
-
T
ouch screen, Radio
-
L
ane Departure Warning System
7
Speed limiter
8
Wiper control stalk
9
Ignition, starting/switching off (key)
Ignition, starting/switching off ("Keyless
Entry and Starting" system)
10
Hazard warning lamps
.
Over view
Page 11 of 180

9
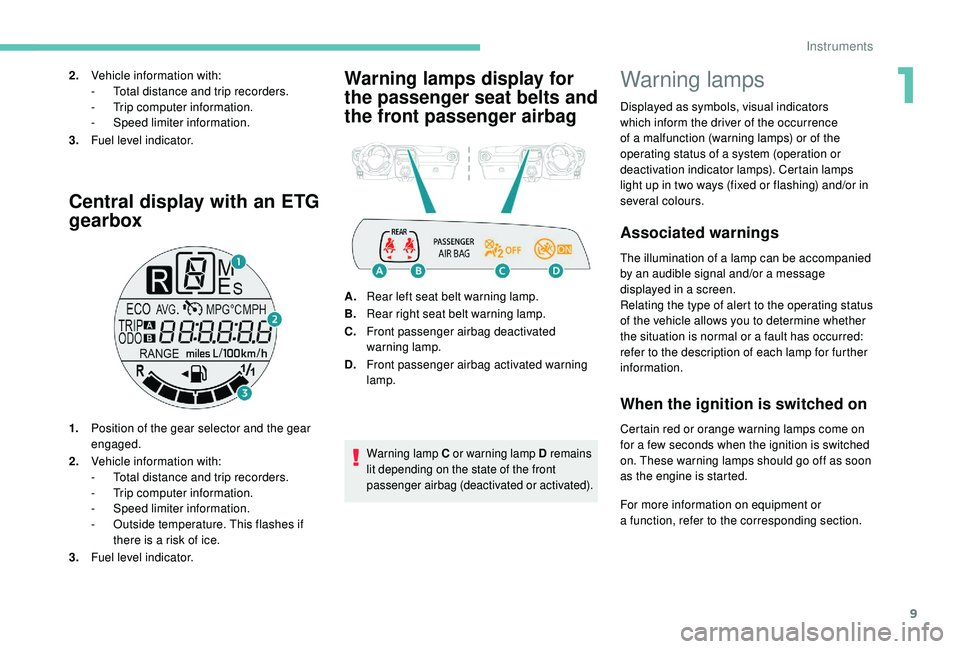
Central display with an ETG
gearbox
1.Position of the gear selector and the gear
engaged.
2. Vehicle information with:
-
T
otal distance and trip recorders.
-
T
rip computer information.
-
S
peed limiter information.
-
O
utside temperature. This flashes if
there is a
risk of ice.
3. Fuel level indicator.
Warning lamps display for
the passenger seat belts and
the front passenger airbag2.Vehicle information with:
-
T otal distance and trip recorders.
-
T
rip computer information.
-
S
peed limiter information.
3. Fuel level indicator.
A.Rear left seat belt warning lamp.
B. Rear right seat belt warning lamp.
C. Front passenger airbag deactivated
warning lamp.
D. Front passenger airbag activated warning
lamp.
Warning lamp C or warning lamp D remains
lit depending on the state of the front
passenger airbag (deactivated or activated).
Warning lamps
Displayed as symbols, visual indicators
which inform the driver of the occurrence
of a
malfunction (warning lamps) or of the
operating status of a
system (operation or
deactivation indicator lamps). Certain lamps
light up in two ways (fixed or flashing) and/or in
several colours.
Associated warnings
The illumination of a lamp can be accompanied
b y an audible signal and/or a message
displayed in a
screen.
Relating the type of alert to the operating status
of the vehicle allows you to determine whether
the situation is normal or a
fault has occurred:
refer to the description of each lamp for further
information.
When the ignition is switched on
Certain red or orange warning lamps come on
for a few seconds when the ignition is switched
on. These warning lamps should go off as soon
as the engine is started.
For more information on equipment or
a
function, refer to the corresponding section.
1
Instruments
Page 12 of 180

10
Persistent warning lamp
When the engine is running or the vehicle is
being driven, the illumination of a red or orange
warning lamp indicates a
fault that needs
further investigation, using any associated
message and the description of the warning
lamp in the documentation.
Where a warning lamp remains lit
The references (1) (2) and (3) in the warning
and indicator lamp description indicate whether
you should contact a
qualified professional
in addition to the immediate recommended
actions.
(1 ) : You must stop as soon as it is safe to
do so and switch off the ignition.
(2): Contact a
PEUGEOT dealer or a qualified
workshop.
(3) : Go to a
PEUGEOT dealer or a qualified
workshop.
Instruments
Page 20 of 180

18
Indicators
Total/trip distance recorder
When the ignition is switched on, the distance
recorder that was selected when the engine
was last switched off is displayed.-
t
rip recorder with TRIP displayed.
To reset the trip recorder to zero, while it is
displayed, press one of the two buttons 1 .
Fuel level indicator
Low fuel level
When the fuel in the tank reaches
a
low level, this warning lamp
comes on in the instrument panel,
accompanied by an audible warning.
You must add at least 5
litres of fuel after
running out of fuel.
Trip computer
System that gives you information on the
current journey (range, fuel consumption…).
Data displays
* depending on version. F
P
ress the steering mounted control to
display the various trip computer tabs in
succession.
-
T
otal distance travelled.
- Trip
A.
- Trip
B.
-
T
he partial Stop & Start time counter*.
-
T
he total Stop & Start* time counter.
-
T
he outside temperature*.
-
C
urrent fuel consumption.
-
A
verage fuel consumption.
-
Range.
-
A
verage speed.
-
L
ighting dimmer.
Pressing button 1
allows you to alternate the
distance display:
-
t
otal with ODO (odometer) displayed, Shows the quantity of fuel available:
-
1/
1
and six bars, the tank is full.
-
R
and one bar, the fuel in the tank is at the
reser ve level.
You have about 5
litres of fuel left.
Instruments
Page 22 of 180

20
Trip computer, some
definitions
Range
(miles or km)
The distance which can still be travelled with
the fuel remaining in the tank (at the average
fuel consumption seen over the last few miles
(kilometres) travelled).This value may fluctuate if a
change
of driving style or terrain results in
a
significant change in the current fuel
consumption.
When the level of fuel is low, the message "Lo
FUEL" is displayed.
While the level of the fuel is low, the range
cannot be recalculated.
Current fuel consumption
(mpg or l/100 km or km/l)
C alculated over the last few seconds.
Average fuel consumption
(mpg or l/100 km or km/l)
C alculated since the last time the trip recorder
was reset to zero.
Average speed
(mph or km/h)
Calculated since the last time the trip recorder
was reset to zero.
Stop & Start time counter
(minutes/seconds or hours/minutes)
If your vehicle is fitted with the Stop & Start, a
time counter adds up the time spent in STOP
mode during a
journey.
It resets to zero every time the ignition is
switched on.
Adjusting the time
Radio
The time is adjusted using the " MENU" dial:
- p ress the dial to access the menus and to
confirm a
selection,
-
t
urn the dial to select a function, an item in
a
list.
At any time you can return to the previous step
using the " Back" button.
F
P
ress the dial to access the menus.
F
T
urn the dial to select " CLOCK".
F
P
ress the dial to confirm. The hours digits
flash.
F
T
urn the dial to adjust the hours.
F
P
ress the dial to confirm. The minutes digits
flash.
F
T
urn the dial to adjust the minutes.
F
P
ress the dial to confirm and leave the
menu.
Instruments
Page 24 of 180

22
Keys
These allow operation of the front door locks,
the boot lock, the steering lock, the control
for deactivating the passenger airbag and the
ignition.
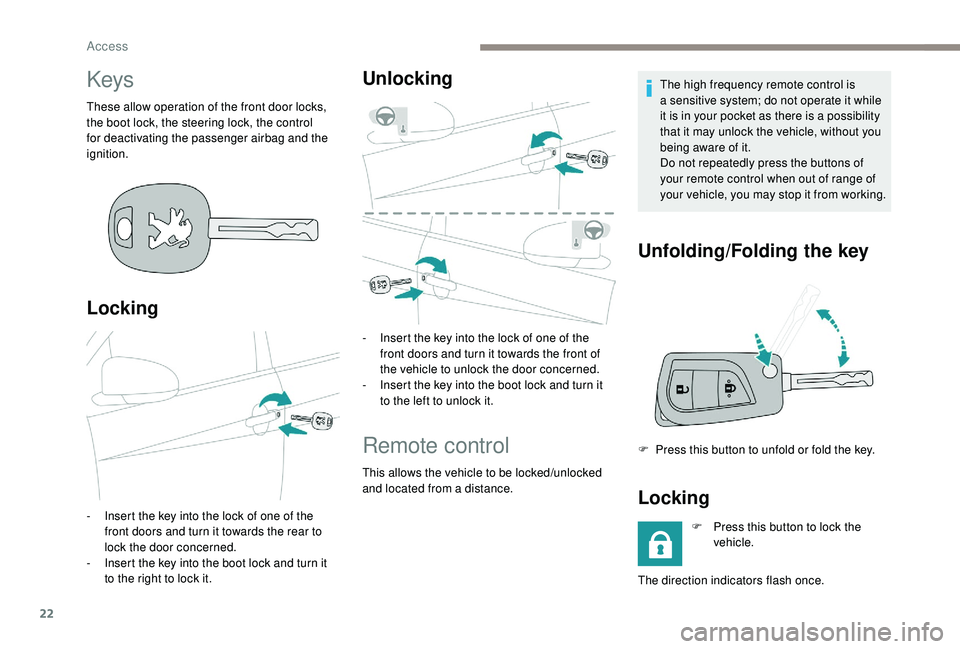
Locking
- Insert the key into the lock of one of the front doors and turn it towards the rear to
lock the door concerned.
-
I
nsert the key into the boot lock and turn it
to the right to lock it.
Unlocking
- Insert the key into the lock of one of the front doors and turn it towards the front of
the vehicle to unlock the door concerned.
-
I
nsert the key into the boot lock and turn it
to the left to unlock it.
Remote control
This allows the vehicle to be locked/unlocked
and located from a distance. The high frequency remote control is
a
sensitive system; do not operate it while
it is in your pocket as there is a possibility
that it may unlock the vehicle, without you
being aware of it.
Do not repeatedly press the buttons of
your remote control when out of range of
your vehicle, you may stop it from working.
Unfolding/Folding the key
F Press this button to unfold or fold the key.
Locking
F Press this button to lock the vehicle.
The direction indicators flash once.
Access
Page 28 of 180

26
Check that the light on the electronic key
flashes 4 times.
While this function is activated, the "
K
eyless
Entry and Starting" system is inoperative.
To reactivate the electronic key, press one of
the buttons (open or closed padlock).
Changing the battery of the
electronic key
Battery type: CR2032/3 volts.
I f the battery of the electronic key is
defective, this warning lamp comes
on in the instrument panel. F
F
it the new battery into its compartment
observing the original fitting direction.
F
R
eplace the protective cover.
F
C
lip the cover onto the casing.
Advice
Remote control/electronic key
These high frequency remote controls are
sensitive systems; do not handle them
while in your pocket as there is a
risk that
the vehicle may unlock without you being
aware of it.
Do not repeatedly press the buttons of
your remote control or your electronic key
when out of range and out of sight of your
vehicle. You may stop it from working.
The remote control would then have to be
reinitialised.
Locking the vehicle
Driving with the doors locked could make
it difficult for the emergency ser vices to
enter the vehicle in an emergency.
As a
safety precaution (with children on
board), remove the key from the ignition or
take the electronic key when you leave the
vehicle, even for a
short time. Lost keys, remote control, electronic
key
Visit a
PEUGEOT dealer with the vehicle's
registration certificate, your personal
identification documents and if possible,
the label bearing the key code.
The PEUGEOT dealer will be able to look
up the key code and the transponder code
required to order a new key.
Purchasing a
second-hand vehicle
Have the pairing of all of the keys in your
possession checked by a
PEUGEOT
dealer, to ensure that only your keys can
be used to open and start the vehicle.
F
U
nclip the cover using a
small screwdriver
at the cut-out.
F
R
emove the casing.
F
R
emove the protective cover from the
battery by pulling it upwards.
F
R
emove the dead battery from its
compartment.
Doors
Locking/unlocking from
inside
Access
Page 30 of 180

28
With the " Keyless Entry and
Starting " system
If the vehicle had previously been unlocked
using the front doors, it is not necessary to
have the electronic key on your person to use
the button for opening the boot.
F
W
ith the electronic key on your person,
press the button on the boot sill to lock it.
or
Lock the vehicle using the front doors. When closing the boot, be careful not to
slam the boot lid: guide it as it closes and
release it towards the end of its travel.
Emergency control
Measures for mechanically unlocking the boot
in the event of a
battery or central locking fault.
Unlocking
F Fold the rear seat backrest to gain access to the lock from inside the boot.
F
U
sing a screwdriver protected by a cloth,
remove the 4
retaining clips then the boot
trim.
F
M
ove the catch to the right to unlock the
boot.
Front electric windows
(Depending on version).
1. Left-hand front.
2. Right-hand front.
After switching on the ignition, press one of the
controls to open or pull it to close. The window
stops as soon as the control is released.
The driver has access to the controls for
both front windows.
The window controls are inoperative with
the ignition switched off.
The operation of closing the windows
could cause serious injuries.
Make sure that nothing obstructs the
windows from being raised, and pay
special attention to children.
F
W
ith the electronic key on your person,
press the button for opening the boot, to
unlock and partially open it.
The vehicle is also unlocked.
F
L
ift the boot lid by the outside handle to
open it.
Access