2018 PEUGEOT 108 ignition
[x] Cancel search: ignitionPage 86 of 180

84
- when towing,
- d riving with a space-saver type spare wheel
or snow chains fitted,
-
p
uncture repair using the temporary repair
kit,
-
y
oung drivers, etc.
The following situations may inter fere with the
operation of the system or prevent it working:
-
p
oor visibility (inadequate street lighting,
falling snow, rain, fog),
-
w
indscreen area located in front of the
camera: dirty, misted, frost-covered, snow-
covered, damaged or covered by a
sticker,
-
f
ault with the camera,
-
h
idden road signs (other vehicles,
vegetation, snow),
-
s
peed limit signs that do not conform to the
standard, are damaged or distorted.
If an app on your smart phone is used
via Mirror Screen, the sign displayed by
the system may be temporarily hidden. It
will be redisplayed as soon as you pass
another sign.Speed limiter
System which prevents the
vehicle from exceeding the speed
programmed by the driver.
The limiter is switched on manually: this
can be done regardless of the vehicle speed.
However, if you are travelling at less than
18
mph (30 km/h), the programmed speed will
be set at 18
mph (30 km/h).
The speed limiter is paused using the control.
The programmed speed can be exceeded
temporarily by pressing the accelerator firmly
beyond the point of resistance.
To return to the programmed speed, simply
release the accelerator pedal until the set limit
speed has been reached again.
The programmed speed is erased when
the ignition is switched off.
The limiter cannot, under any
circumstances, replace respect for speed
limits, nor the vigilance of the driver.
Steering mounted control
The controls for this system are grouped
together on this steering mounted control.
1.Activation/deactivation of the limiter: by
pressing on the end of the control.
2. Programming the speed/decreasing the
value: by pressing the control downwards.
3. Resuming speed limitation/increasing the
value: by pressing the control upwards.
4. Pause limitation: by pulling the control
towards you.
Driving
Page 92 of 180

90
Lane departure warning
system
System that detects involuntary crossing of
longitudinal markings of roads, using a camera
that recognises the continuous or broken lines.
To increase your safety, the camera analyses
the image then triggers a
warning if the driver's
attention drops and the vehicle drifts over
a
lane marking (speed greater than 30 mph
(50
km/h)).
This system is particularly suited to motor ways
and dual carriageways.
The lane departure warning system
cannot under any circumstances replace
the need for vigilance on the part of the
driver.
You must obser ve the driving regulations
and take a
break every two hours.
When driving with snow chains or with the
spare wheel fitted, you must deactivate
the system.
Activation
Detection
You are alerted by an audible signal and the
lighting of a warning lamp in the instrument panel.
No warning is given while the direction indicator
is flashing and for approximately 20 seconds
after the direction indicator is switched off.
Displays in the instrument panel
Display in the
instrument panelComments
The function is activated
(green indicator lamp).
The system has detected
the markings on the road
(green indicator lamp).
The system alerts you to
crossing a
line (green and
orange indicator lamp).
The display of this
indicator lamp is
accompanied by an
audible signal.
Deactivation
F Press this button, located on the steering wheel.
F
P
ress this button again.
The system state remains in memory when the
ignition is switched off.
Driving
Page 95 of 180

93
F If you have a compressor (for example the
one provided in the temporary puncture
repair kit), check the pressure of all four
tyres. If it is not possible to do this check
immediately, drive carefully at reduced
speed.
or
F
I
n the event of a puncture, use the
temporary puncture repair kit or the spare
wheel (depending on equipment).
The alert is kept active until the system is
reinitialised.
Reinitialisation
Before reinitialising the system, ensure
that the pressures of the four tyres
are correct for the conditions of use
of the vehicle and conform to the
recommendations on the tyre pressure
label.
The under-inflation alert can only be relied
on if the reinitialisation of the system has
been done with the pressures in the four
tyres correctly adjusted.
The under-inflation detection system
does not give a
warning if a pressure is
incorrect at the time of reinitialisation. The system must be reset with the ignition on
(switch in the " ON" position or " ON" mode) and
the vehicle stationary.
F
O
pen the glove box.
F
P
ress the reinitialisation button.F
W
hen the indicator flashes
3
times in the instrument panel,
the reinitialisation is complete.
F
W
ait a few minutes before switching off
the ignition (switch to " ACC" or " LOCK "
position, or " OFF" m o d e).
The new pressure parameters saved are
treated as reference values by the system.
Snow chains
The system does not have to be
reinitialised after fitting or removing snow
chains.
The under-inflation alert can only be relied
on if the reinitialisation of the system has
been done with the pressures in the four
tyres correctly adjusted.
The system must be reinitialised after any
adjustment to the pressures of one or more
tyres, and after changing one or more wheels.
A label on the driver's side centre pillar reminds
you of this.
6
Driving
Page 98 of 180

96
Fuel tank
The capacity of the tank is about 35 litres.
Low fuel level
When the fuel in the tank reaches
a low level, this warning lamp
comes on in the instrument panel,
accompanied by an audible warning.
The message "LO FUEL" is displayed instead
of the range.
You have about 5
litres of fuel left.
In certain driving conditions and depending on
the engine in your vehicle, your range may be
less than 30
miles (50 km).
If you run out of fuel, the emission
control warning lamp may come on
in the instrument panel. It will go out
automatically after several engine starts.
Refuelling
Refuelling must be done with the engine and
ignition off (ignition switch to " LOCK" or
" OFF "). Opening the filler cap may create a
noise
caused by an inrush of air. This is entirely
normal and results from the sealing of the fuel
system.
To refuel in complete safety:
F
Y
ou must stop the engine and turn off
the ignition (switch to LOCK or OFF
mode) .
F
P
ull the control on the lower part of the
dashboard, driver's side, to unlock the fuel
filler flap.
F
O
pen the fuel filler flap.
A label inside the fuel flap reminds you of the
type of fuel to use.
Additions of fuel must be of at least 5 litres, in
order to be registered by the fuel gauge. F
U
nscrew the cap and place it on its support
(on the flap).
F
I
ntroduce the filler nozzle and push it in as
far as possible before starting to refuel (risk
of blowback).
F
K
eep it in this position during the whole
filling operation.
Once you have finished refuelling:
F
S
crew the cap back on again until you hear
a click. When you release the cap, it will
turn slightly in the opposite direction.
F
P
ush the fuel flap to close it.
When filling the tank, do not continue
beyond the 3
rd cut off of the nozzle; this
could cause malfunctions.
Your vehicle is fitted with a
catalytic converter,
which helps to reduce the level of harmful
emissions in the exhaust gases.
The filler neck is narrower, allowing only
unleaded petrol nozzles to be introduced.
Practical information
Page 102 of 180

100
Take care when working under the bonnet,
as certain areas of the engine may be
extremely hot (risk of burns) and the
cooling fan could start at any time (even
with the ignition off).
Used products
Avoid prolonged contact of used oil or
fluids with the skin.
Most of these fluids are harmful to health
or indeed very corrosive.Do not discard used oil or fluids into
sewers or onto the ground.
Take used oil to a
PEUGEOT dealer
or a
qualified workshop and dispose
of in the containers reser ved for this
purpose.
Engine oil level
The check is carried out either
using the oil level indicator on the
instrument panel when the ignition is
switched on, for vehicles equipped
with an electric gauge, or using the
dipstick. To ensure that the reading is correct, your
vehicle must be parked on a
level sur face
with the engine stopped for more than
30
minutes.
It is normal to top up the oil level between
two ser vices (or oil changes). PEUGEOT
recommends that you check the level, and top
up, if necessary, every 3,000 miles (5,000 km).
Checking using the dipstick
The location of the dipstick is shown in the
corresponding underbonnet layout view.
F
T
ake the dipstick by its coloured grip and
pull it out completely.
F
W
ipe the end of the dipstick using a clean
non-fluffy cloth.
F
R
efit the dipstick and push fully down, then
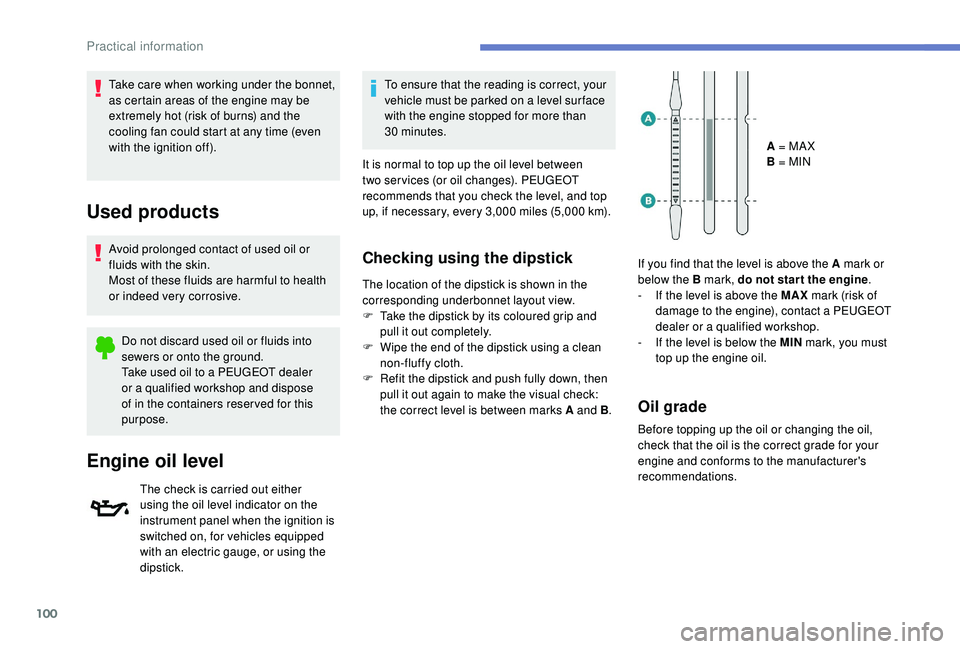
pull it out again to make the visual check:
the correct level is between marks A and B .A = MA X
B = MIN
If you find that the level is above the A mark or
below the B mark, do not star t the engine .
- I f the level is above the MAX mark (risk of
damage to the engine), contact a
PEUGEOT
dealer or a
qualified workshop.
-
I
f the level is below the MIN mark, you must
top up the engine oil.
Oil grade
Before topping up the oil or changing the oil,
check that the oil is the correct grade for your
engine and conforms to the manufacturer's
recommendations.
Practical information
Page 106 of 180

104
Temporary puncture
repair kit
Scan the QR code on page 3 to view
e xplanatory videos.
Comprising a
compressor and a sealant
cartridge, it allows the temporary repair of
a
tyre so that you can drive to the nearest
garage.
It is designed to repair most punctures which
could affect the tyre, located on the tyre tread
or shoulder.
Access to the kit
This kit is installed in the storage box, under
the boot floor. The vehicle's electric system allows the
connection of the compressor for long
enough to inflate a
tyre after a puncture
repair.
Composition of the kit
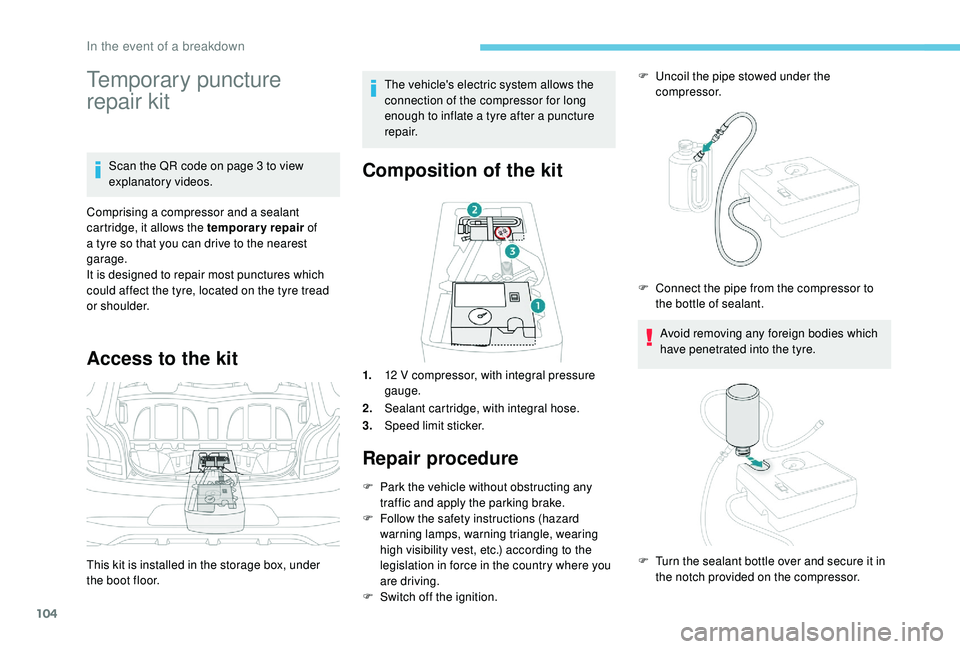
1. 12 V compressor, with integral pressure
gauge.
2. Sealant cartridge, with integral hose.
3. Speed limit sticker.
Repair procedure
F Park the vehicle without obstructing any
traffic and apply the parking brake.
F
F
ollow the safety instructions (hazard
warning lamps, warning triangle, wearing
high visibility vest, etc.) according to the
legislation in force in the country where you
are driving.
F
S
witch off the ignition. F
U
ncoil the pipe stowed under the
compressor.
Avoid removing any foreign bodies which
have penetrated into the tyre.
F
C
onnect the pipe from the compressor to
the bottle of sealant.
F
T
urn the sealant bottle over and secure it in
the notch provided on the compressor.
In the event of a breakdown
Page 107 of 180

105
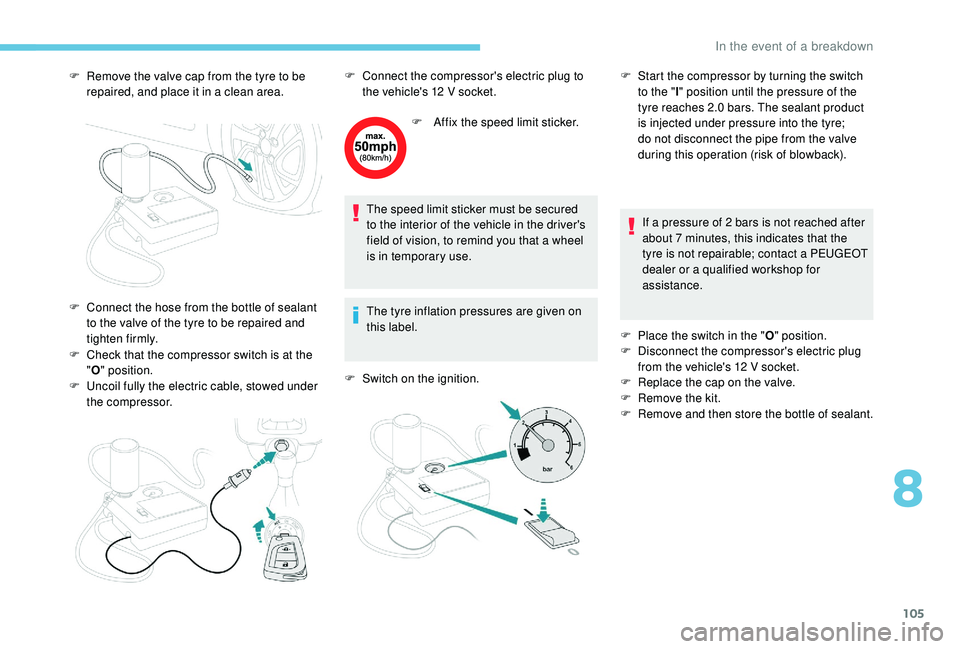
F Remove the valve cap from the tyre to be repaired, and place it in a clean area.
F
C
heck that the compressor switch is at the
" O " position.
F
U
ncoil fully the electric cable, stowed under
the compressor. F
A
ffix the speed limit sticker.
The speed limit sticker must be secured
to the interior of the vehicle in the driver's
field of vision, to remind you that a
wheel
is in temporary use.
The tyre inflation pressures are given on
this label.
F
S
witch on the ignition.If a
pressure of 2 bars is not reached after
about 7
minutes, this indicates that the
tyre is not repairable; contact a
PEUGEOT
dealer or a
qualified workshop for
assistance.
F
P
lace the switch in the "O" position.
F
D
isconnect the compressor's electric plug
from the vehicle's 12
V socket.
F
R
eplace the cap on the valve.
F
R
emove the kit.
F
R
emove and then store the bottle of sealant.
F
C
onnect the hose from the bottle of sealant
to the valve of the tyre to be repaired and
tighten firmly. F
C onnect the compressor's electric plug to
the vehicle's 12 V socket.F
S tart the compressor by turning the switch
to the " l" position until the pressure of the
tyre reaches 2.0
bars. The sealant product
is injected under pressure into the tyre;
do not disconnect the pipe from the valve
during this operation (risk of blowback).
8
In the event of a breakdown
Page 108 of 180

106
Take care, the sealant product is harmful
if swallowed and causes irritation to the
eyes.
Keep this product out of the reach of
children.
The use-by date of the fluid is marked on
the bottle.
After use, do not discard the bottle in
standard waste, take it to a PEUGEOT
dealer or an authorised waste disposal
site.
Do not forget to obtain a
new bottle of
sealant, available from a
PEUGEOT
dealer or a
qualified workshop. Do not exceed the speed of 50
mph
(80 km/h) when driving with a tyre repaired
using this type of kit.
Checking/adjusting tyre
pressures
You can also use the compressor,
without injecting sealant, to check and, if
necessary, adjust the tyre pressures
F
R
emove the valve cap from the tyre and
place it in a
clean area.
F
U
ncoil the pipe stowed under the
compressor. F
C
heck that the compressor switch is at the
" O " position.
F
U
ncoil fully the electric cable, stowed under
the compressor.
The tyre inflation pressures are given on
this label.
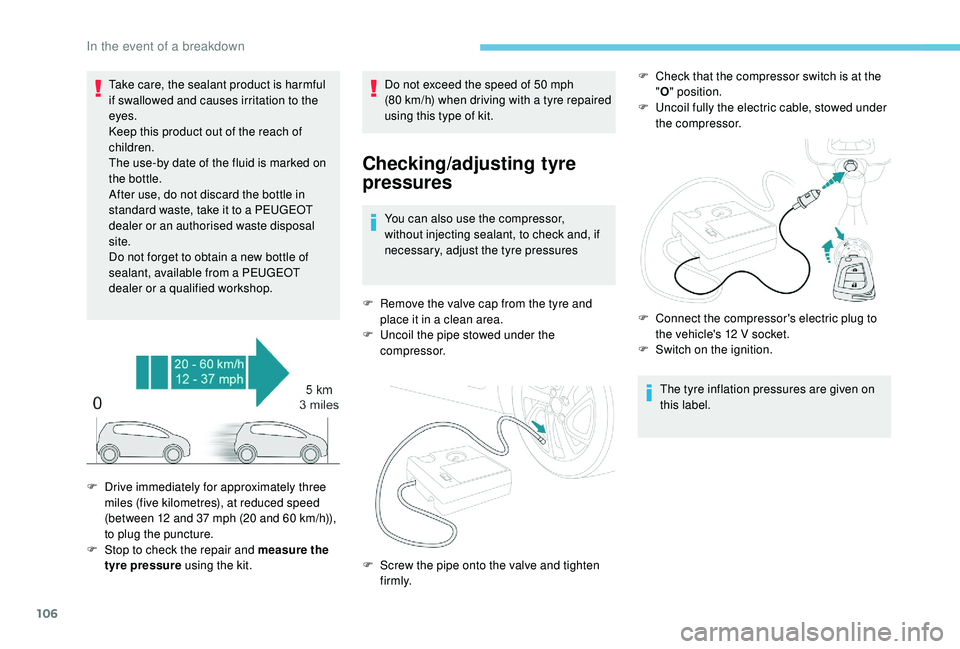
F
D
rive immediately for approximately three
miles (five kilometres), at reduced speed
(between 12
and 37
mph (20
and 60
km/h)),
to plug the puncture.
F
S
top to check the repair and measure the
tyre pressure using the kit. F
S
crew the pipe onto the valve and tighten
f i r m l y. F
C
onnect the compressor's electric plug to
the vehicle's 12
V socket.
F
S
witch on the ignition.
In the event of a breakdown