2018 PEUGEOT 108 ignition
[x] Cancel search: ignitionPage 110 of 180
108
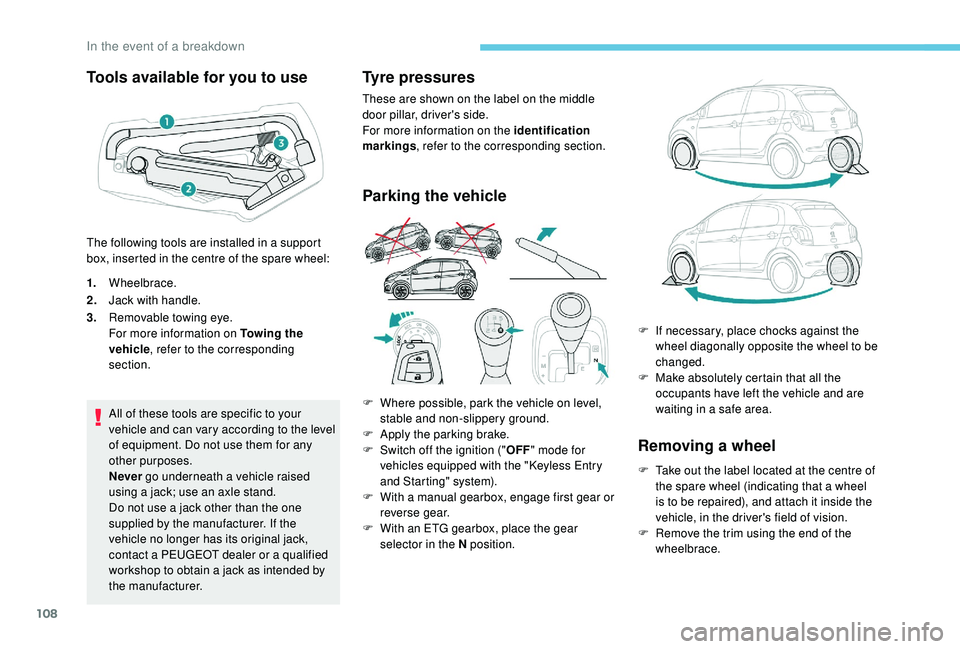
Tools available for you to use
1.Wheelbrace.
2. Jack with handle.
3. Removable towing eye.
For more information on Towing the
vehicle , refer to the corresponding
section.
All of these tools are specific to your
vehicle and can vary according to the level
of equipment. Do not use them for any
other purposes.
Never go underneath a
vehicle raised
using a
jack; use an axle stand.
Do not use a
jack other than the one
supplied by the manufacturer. If the
vehicle no longer has its original jack,
contact a
PEUGEOT dealer or a qualified
workshop to obtain a
jack as intended by
the manufacturer.
Tyre pressures
These are shown on the label on the middle
door pillar, driver's side.
For more information on the identification
markings , refer to the corresponding section.
Parking the vehicle
Removing a wheel
F Take out the label located at the centre of the spare wheel (indicating that a wheel
is to be repaired), and attach it inside the
vehicle, in the driver's field of vision.
F
R
emove the trim using the end of the
wheelbrace.
The following tools are installed in a
support
box, inserted in the centre of the spare wheel:
F
W
here possible, park the vehicle on level,
stable and non-slippery ground.
F
A
pply the parking brake.
F
S
witch off the ignition ("
OFF" mode for
vehicles equipped with the " K
eyless Entry
and Starting" system).
F
W
ith a
manual gearbox, engage first gear or
reverse gear.
F
W
ith an ETG gearbox, place the gear
selector in the N position. F
I
f necessary, place chocks against the
wheel diagonally opposite the wheel to be
changed.
F
M
ake absolutely certain that all the
occupants have left the vehicle and are
waiting in a safe area.
In the event of a breakdown
Page 114 of 180
112
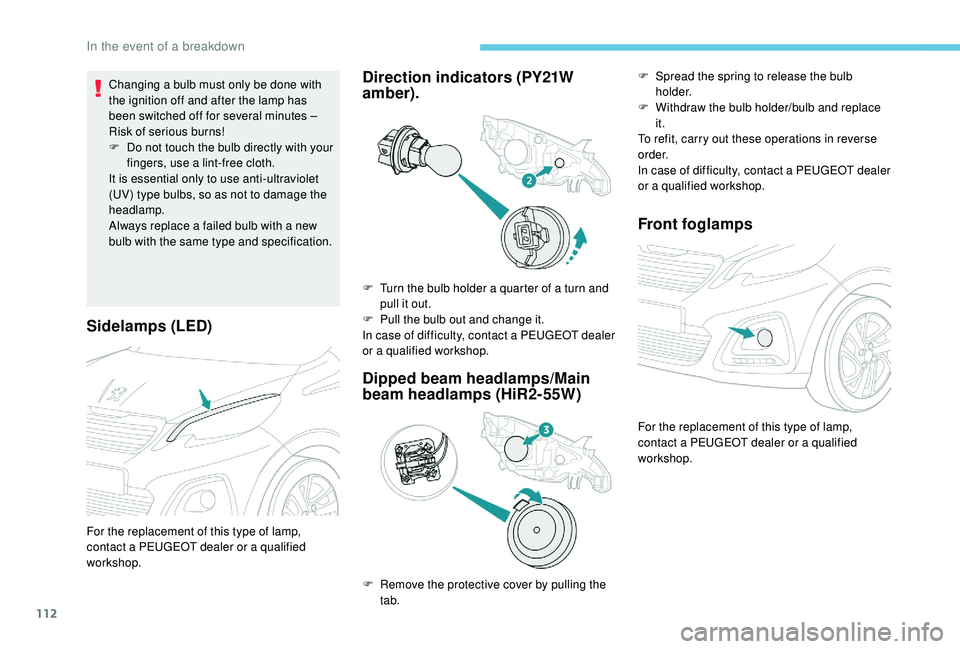
Sidelamps (LED)
Changing a bulb must only be done with
the ignition off and after the lamp has
been switched off for several minutes –
Risk of serious burns!
F
D
o not touch the bulb directly with your
fingers, use a
lint-free cloth.
It is essential only to use anti-ultraviolet
(UV) type bulbs, so as not to damage the
headlamp.
Always replace a
failed bulb with a new
bulb with the same type and specification.Direction indicators (PY21W
amber).
Dipped beam headlamps/Main
beam headlamps (HiR2-55W) Front foglamps
F Turn the bulb holder a
quarter of a turn and
pull it out.
F
P
ull the bulb out and change it.
In case of difficulty, contact a
PEUGEOT dealer
or a
qualified workshop.
F
R
emove the protective cover by pulling the
tab. F
S
pread the spring to release the bulb
h o l d e r.
F
W
ithdraw the bulb holder/bulb and replace
it.
To refit, carry out these operations in reverse
o r d e r.
In case of difficulty, contact a PEUGEOT dealer
or a
qualified workshop.
For the replacement of this type of lamp,
contact a PEUGEOT dealer or a qualified
workshop.
For the replacement of this type of lamp,
contact a
PEUGEOT dealer or a
qualified
workshop.
In the event of a breakdown
Page 117 of 180
115
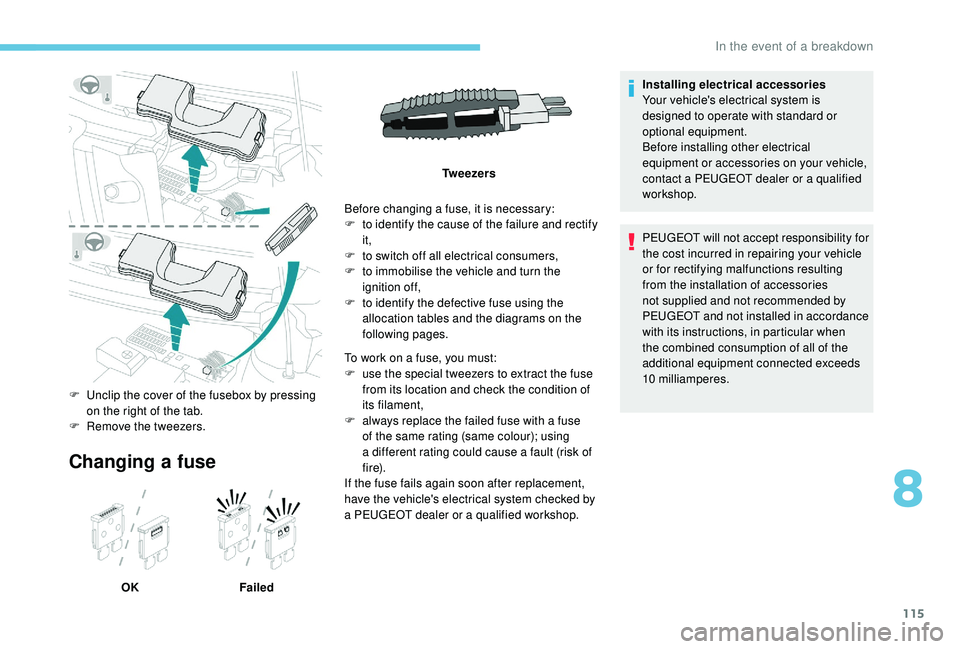
Changing a fuse
OK FailedBefore changing a
fuse, it is necessary:
F
t
o identify the cause of the failure and rectify
it,
F
t
o switch off all electrical consumers,
F
t
o immobilise the vehicle and turn the
ignition off,
F
t
o identify the defective fuse using the
allocation tables and the diagrams on the
following pages.
F
U
nclip the cover of the fusebox by pressing
on the right of the tab.
F
R
emove the tweezers. Tw e e z e r s
To work on a fuse, you must:
F
u
se the special tweezers to extract the fuse
from its location and check the condition of
its filament,
F
a
lways replace the failed fuse with a fuse
of the same rating (same colour); using
a different rating could cause a fault (risk of
f i r e).
If the fuse fails again soon after replacement,
have the vehicle's electrical system checked by
a PEUGEOT dealer or a qualified workshop.Installing electrical accessories
Your vehicle's electrical system is
designed to operate with standard or
optional equipment.
Before installing other electrical
equipment or accessories on your vehicle,
contact a
PEUGEOT dealer or a qualified
workshop.
PEUGEOT will not accept responsibility for
the cost incurred in repairing your vehicle
or for rectifying malfunctions resulting
from the installation of accessories
not supplied and not recommended by
PEUGEOT and not installed in accordance
with its instructions, in particular when
the combined consumption of all of the
additional equipment connected exceeds
10
milliamperes.
8
In the event of a breakdown
Page 124 of 180
122
The presence of this label, in particular
with the Stop & Start system, indicates
the use of a 12 V lead-acid battery with
special technology and specification; the
involvement of a
PEUGEOT dealer or
a
qualified workshop is essential when
replacing or disconnecting the battery.
After refitting the battery, the Stop &
Start system will only be active after
a
continuous period of immobilisation of
the vehicle, a period which depends on the
climatic conditions and the state of charge
of the battery (up to about 8
hours).
Before doing any work
Immobilise the vehicle: apply the parking
brake, put the gearbox in neutral, then
switch off the ignition.
Check that all electrical equipment is
switched off.
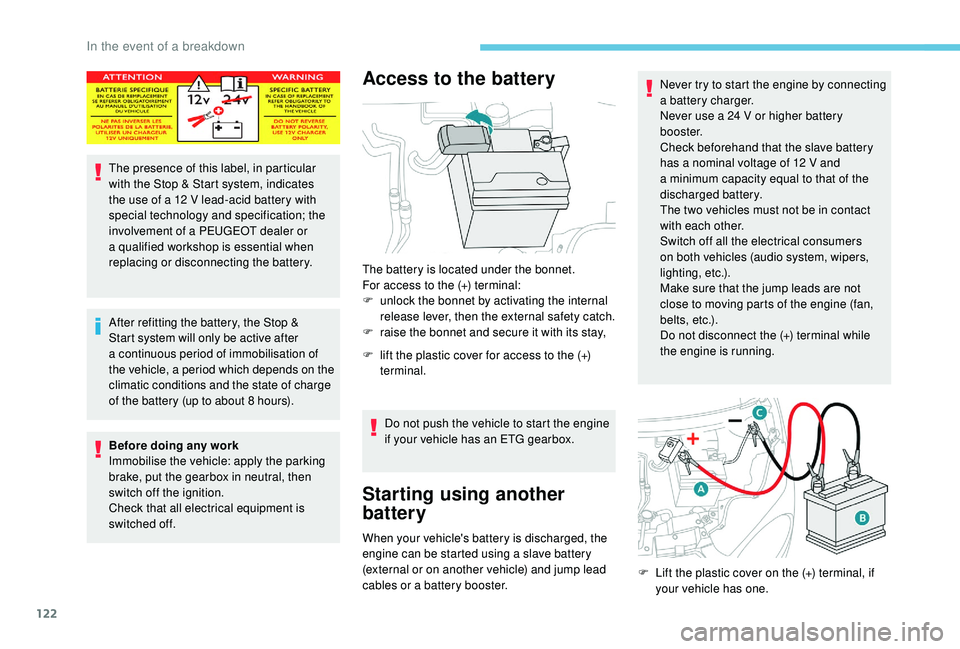
Access to the battery
The battery is located under the bonnet.
For access to the (+) terminal:
F
u
nlock the bonnet by activating the internal
release lever, then the external safety catch.
F
r
aise the bonnet and secure it with its stay,
F
l
ift the plastic cover for access to the (+)
terminal.
Do not push the vehicle to start the engine
if your vehicle has an ETG gearbox.
Starting using another
battery
When your vehicle's battery is discharged, the
engine can be started using a slave battery
(external or on another vehicle) and jump lead
cables or a
battery booster. Never try to start the engine by connecting
a
battery charger.
Never use a 24 V or higher battery
b o o s t e r.
Check beforehand that the slave battery
has a nominal voltage of 12 V and
a
minimum capacity equal to that of the
discharged battery.
The two vehicles must not be in contact
with each other.
Switch off all the electrical consumers
on both vehicles (audio system, wipers,
lighting, etc.).
Make sure that the jump leads are not
close to moving parts of the engine (fan,
belts, etc.).
Do not disconnect the (+) terminal while
the engine is running.
F
L
ift the plastic cover on the (+) terminal, if
your vehicle has one.
In the event of a breakdown
Page 125 of 180
123
F Connect the red cable to the positive terminal (+) of the flat battery A (at the metal
elbow) then to the positive terminal (+) of the
slave battery B or the booster.
F
C
onnect one end of the green or black
cable to the negative terminal (-) of backup
battery B or the booster (or an earth point
on the other vehicle).
F
C
onnect the other end of the green or black
cable to earth point C on the broken down
vehicle.
F
S
tart the engine of the vehicle with the
good battery and leave it running for a
few
minutes.
F
O
perate the starter on the broken down
vehicle and let the engine run.
If the engine does not start straight away,
switch off the ignition and wait a
few moments
before trying again.
F
W
ait for it to return to idle.
F
D
isconnect the jump lead cables in reverse
order .
F
R
efit the plastic cover to the (+) terminal, if
your vehicle has one.
F
A
llow the engine to run for at least
30
minutes, by driving or with the vehicle
stationary, so that the battery reaches an
adequate state of charge.Before disconnecting the battery
Wait 2 minutes after switching off the ignition
b efore disconnecting the battery.
Close the windows, the electric fabric roof and
the doors before disconnecting the battery.
After reconnecting the battery
After each time that the battery has been
reconnected, switch on the ignition and wait
1
minute before starting the engine, to allow
the electronic systems to initialise. However,
if minor problems persist after this procedure,
contact a
PEUGEOT dealer or a qualified
workshop.
Some functions, including Stop & Start,
are not available if the battery is not
sufficiently charged.
Charging the battery using
a battery charger
Never try to charge a frozen battery – risk
o f explosion!
If the battery has frozen, have it checked
by a
PEUGEOT dealer or by a qualified
workshop who will check that the internal
components have not been damaged and
that the container has not cracked, which
would mean a
risk of toxic and corrosive
acid leaking.
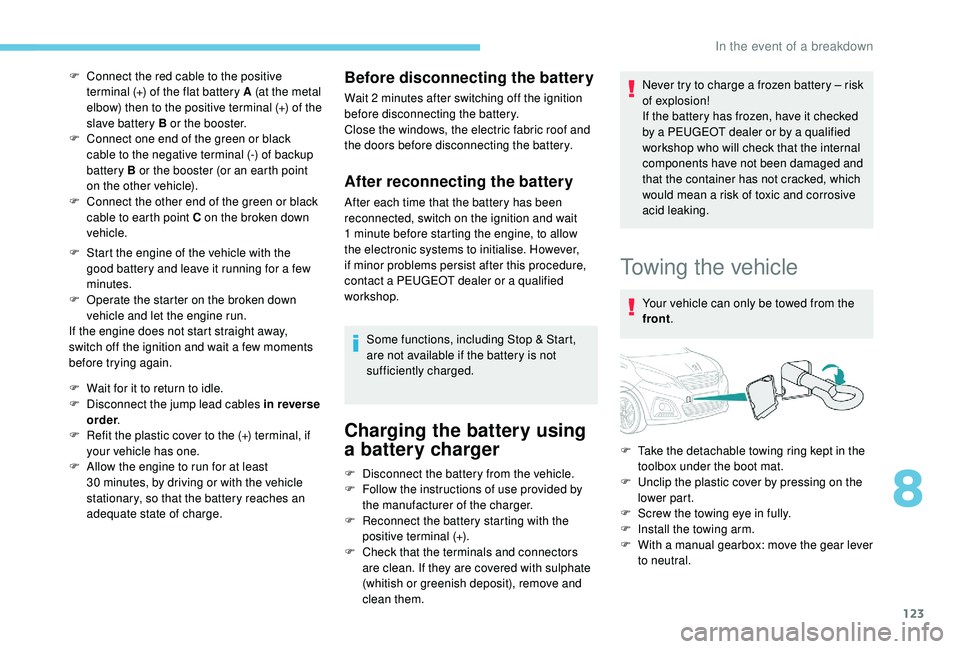
Towing the vehicle
Your vehicle can only be towed from the
front .
F
D
isconnect the battery from the vehicle.
F
F
ollow the instructions of use provided by
the manufacturer of the charger.
F
R
econnect the battery starting with the
positive terminal (+).
F
C
heck that the terminals and connectors
are clean. If they are covered with sulphate
(whitish or greenish deposit), remove and
clean them. F
T
ake the detachable towing ring kept in the
toolbox under the boot mat.
F
U
nclip the plastic cover by pressing on the
lower part.
F
S
crew the towing eye in fully.
F
I
nstall the towing arm.
F
W
ith a manual gearbox: move the gear lever
to neutral.
8
In the event of a breakdown
Page 139 of 180

9
If "DAB AF " tracking is enabled, there
is a lag of a few seconds while the
system switches to "FM" analogue radio,
sometimes with a
change in volume.
Once the digital signal quality becomes
good again, the system automatically
changes back to "DAB".
If the "DAB" station being listened to is
not available, or if the " DAB AF" is not
enabled, the sound is muted when the
quality of the digital signal becomes too
p o o r.
Media
USB USB
Insert the USB memory stick in the USB port or
connect the USB device to the USB port using
a
suitable cable (not supplied). The system builds playlists (in temporary
memory), an operation which can take
from a
few seconds to several minutes at
the first connection.
Reduce the number of non-music files
and the number of folders to reduce the
waiting time.
The playlists are updated every time the
ignition is switched off or a USB stick is
connected. However, the audio system
saves these lists and loading time will be
reduced if they have not been changed.
Auxiliary socket (AUX)
Connect the portable device (MP3 player, etc.)
t o the JACK socket using an audio cable.
Information and advice
The audio system reads files with the following
extensions:
".wma," Ver7
and Ver8 types with a flow rate
between 48
and 192 Kbps and Ver9 with a rate
between 48
and 320 Kbps.
".aac," with a
flow rate between 16 Kbps and
320
Kbps.
".mp3 - MPEG1" with a
flow rate between
32
and 320 Kbps and ".mp3 - MPEG2" at a rate
between 8
to 160 Kbps.
Sampling frequencies supported are 11, 22,
44
and 48 kHz.
Use only USB memory sticks in FAT32
format
(File Allocation Table).
To avoid any playback or display issues, it is
advisable to create file names that have less
than 20
characters and without using any
special characters (e.g.: " " ?.; ù).
The system supports mobile USB Mass
Storage players or Apple
® at the USB
ports. An adapter cable is not supplied.
Device management is done by the audio
system controls.
Other devices not recognized by the
system during connection must be
connected to the auxiliary socket using
a
Jack cable (not supplied).
.
Radio
Page 157 of 180

9
DAB/FM tracking
Digital radio does not cover 100% of the
c o u nt r y.
When the quality of the digital signal is
poor, the "Alternative DAB frequency "
option allows you to continue listening
to the same station by automatically
switching to the corresponding FM
analogue radio station (if it exists).
Press " Audio source " to show the
rolling display of audio sources.
Select " DAB".
Select the " DAB radio configuration "
tab.
Activate " Alternative DAB
frequency ".
If " Alternative DAB frequency " tracking
is enabled, there is a
lag of a few seconds
while the system switches to analogue
radio, sometimes with a
change in volume.
Once the digital signal quality becomes
good again, the system automatically
changes back to "DAB". If the "DAB" station being listened to is not
available, or if "
L- Band" is not enabled,
the sound cuts out when the quality of the
digital signal becomes too weak.
Media
USB port
Insert the USB memory stick in the USB port or
connect the USB device to the USB port using
a
suitable cable (not supplied). The system builds playlists (in temporary
memory), an operation which can take
from a
few seconds to several minutes at
the first connection.
Reduce the number of non-music files
and the number of folders to reduce the
waiting time.
The playlists are updated every time the
ignition is switched off or a USB stick is
connected. However, the audio system
saves these lists and loading time will be
reduced if they have not been changed.
Auxiliary socket (A/V),
audio and video
Audio player
Connect the portable device (MP3 player, etc.)
to the JACK socket using an audio cable.
Video player
.
7-inch touch screen tablet
Page 158 of 180
10
Select the "A/V" auxiliary source.
The next time the ignition is switched on,
the system remembers the last audio or
media source used. The steering mounted "
MODE" button can
be used to go directly to the next media
source, available if the source is active.
Watching a video
For safety reasons and because of the
required sustained attention of the driver,
viewing a
video is only possible when the
vehicle is stationary and the ignition
is switched on; as soon as movement
resumes, the video stops.
The " Miracast " function requires
a
compatible smartphone and compatible
applications.
Activate the " MiracastWi-Fi" option in the
system.
Activate sharing of the Wi-Fi connection
on the smartphone.
It is recommended to prioritise the USB
connection when using the " Miracast"
video function.
Insert a peripheral device into the USB port or
an audio/video cable into the auxiliary socket,
suitable for playing back files recorded in the
PAL or NTSC standard. Press "Configuration ". Select "
Connection " in the system.
Select " Connect Miracast "
During the procedure, several screen pages
relating to certain functions are displayed.
Accept to start and complete the connection.
To remove the peripheral device,
press the pause button to stop the
video, then remove the peripheral
device from the USB port or the
auxiliary socket.
Information and advice
The audio system reads files with the following
extensions:
".wma," Ver7 and Ver8 types with a flow rate
between 48
and 192 Kbps and Ver9 with a rate
between 48
and 320 Kbps.
".aac," with a
flow rate between 16 Kbps and
320
Kbps.
".mp3 - MPEG1" with a
flow rate between
32
and 320 Kbps and ".mp3 - MPEG2" with
a
rate between 8 to 160 Kbps.
Sampling frequencies supported are 11, 22,
44
and 48 kHz.
Use only USB memory sticks in FAT32
format
(File Allocation Table).
Selecting the source
Press " Audio source " to show the
rolling display of audio sources (FM,
AM, DAB, USB, Bluetooth, A / V.
Select the " USB" source.
OR
Then use the play settings at the bottom of the
screen. Connect the portable device using an audio/
video cable suitable for playing back files
recorded in PAL or NTSC standard.
7-inch touch screen tablet