2018 PEUGEOT 108 light
[x] Cancel search: lightPage 4 of 180

2
.
.
Instrument panels 8
D isplays 9
Warning and indicator lamps
9
I
ndic ators
18
Trip computer
1
8
Adjusting the time
2
0Keys
22
"
K
eyless Entry and Starting" system
2
3
Doors 26
Boot
27
Front electric windows
2
8
Quarter windows
2
9
Electric fabric roof
2
9
Advice on care
3
1
Front seats
3
2
Rear seats
3
4
Mirrors
35
Steering wheel adjustment
3
6
Ventilation
3
6
Heating
3
7
Manual air conditioning
3
7
Automatic air conditioning
3
8
Front demist – defrost
4
0
Rear screen demist – defrost
4
1
Courtesy lamp
4
1
Boot lighting
4
1
Interior fittings
4
2
Rear shelf
4
4
Boot fittings
4
5Lighting control stalk
4
6
Automatic headlamp illumination
4
8
Direction indicators
4
8
Headlamp adjustment
4
9
Wiper control stalk
4
9
Changing a
wiper blade
5
0
General safety recommendations 5 1
H o r n 51
Hazard warning lamps
5
2
ESC system
5
2
Seat belts
5
4
Airbags
56
Child seats
5
9
Deactivating the front passenger airbag
6
0
ISOFIX mountings and child seats
6
6
i-Size child seats
7
0
Child lock
7
1
InstrumentsAccess
Over view
Ease of use and comfort Lighting and visibility
Safety
Eco-driving
Instruments and controls 4
E co-driving
6
Contents
Page 7 of 180

5
Instruments and controls (continued)1
Lighting controls
Direction indicators
2
Stop & Start
Active City Brake
Electric mirrors adjustment
Headlamp adjustment
Deactivating the DSC/TRC systems.
Front foglamps (accessory)
3
Opening the fuel filler flap
4
ETG gearbox steering mounted control
paddles
5
Steering wheel height adjustment
Horn
Driver front airbag
6
Steering mounted controls
-
T
ouch screen, Radio
-
L
ane Departure Warning System
7
Speed limiter
8
Wiper control stalk
9
Ignition, starting/switching off (key)
Ignition, starting/switching off ("Keyless
Entry and Starting" system)
10
Hazard warning lamps
.
Over view
Page 8 of 180

6
Eco- driving
Optimise the use of your
gearbox
With a manual gearbox, move off gently
an d change up without waiting. During
acceleration change up early.
With an ETG gearbox, give preference to
automatic mode (Easy) and avoid pressing the
accelerator pedal heavily or suddenly.
Drive smoothly
Maintain a safe distance between vehicles,
u se engine braking rather than the
brake pedal, and press the accelerator
progressively. These practices contribute
towards a
reduction in fuel consumption and
CO
2 emissions and also help reduce the
b
ackground traffic noise.
Control the use of your electrical
equipment
Before moving off, if the passenger
compartment is too warm, ventilate it by
opening the windows and air vents before
using the air conditioning.
Above 30
mph (50 km/h), close the windows
and leave the air vents open.
Consider using equipment that can help
keep the temperature in the passenger
compartment down (sunroof and window
b l i n d s …) .
Unless it has automatic regulation, switch off
the air conditioning as soon as the desired
temperature has been reached.
Switch off the demisting and defrosting
controls, if not automatic.
Switch off the heated seat as soon as
possible. Switch off the headlamps and front foglamps
when the ambient light level does not require
their use.
Avoid running the engine before moving off,
particularly in winter; your vehicle will warm up
much faster while driving.
As a
passenger, if you avoid connecting your
multimedia devices (film, music, video game,
etc.), you will contribute towards limiting the
consumption of electrical energy, and so of
fuel.
Disconnect your portable devices before
leaving the vehicle.
Eco-driving is a
range of everyday practices
that allow the motorist to optimise their fuel
consumption and CO
2 emissions.
T
he gear shift indicator invites you to engage
the most suitable gear: as soon as the
indication is displayed in the instrument panel,
follow it straight away.
For vehicles fitted with an ETG gearbox, this
indicator only appears in manual mode.
Eco-driving
Page 10 of 180

8
Instrument panels
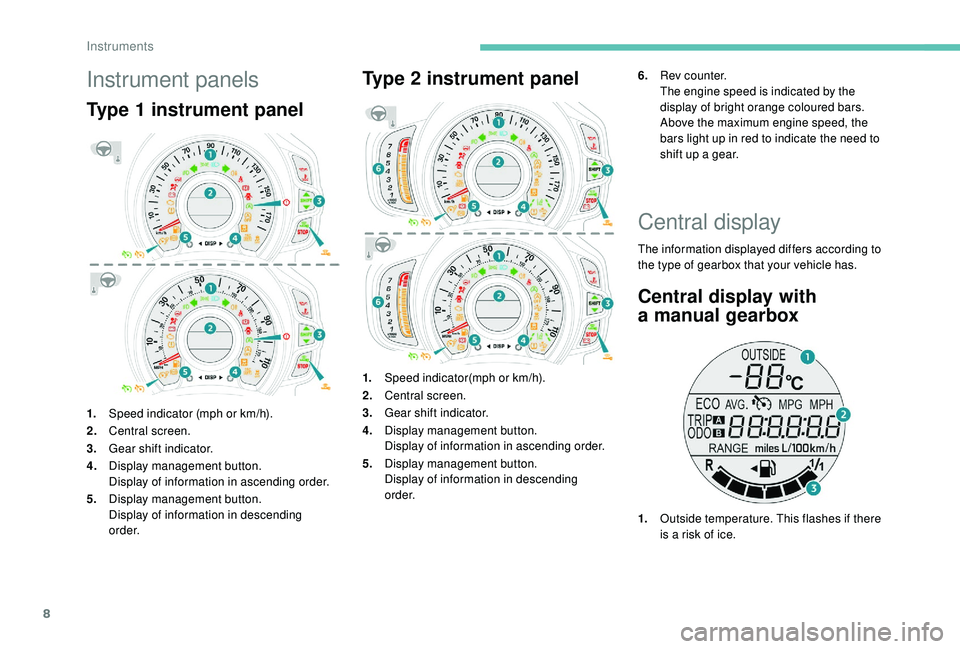
Type 1 instrument panel
1.Speed indicator (mph or km/h).
2. Central screen.
3. Gear shift indicator.
4. Display management button.
Display of information in ascending order.
5. Display management button.
Display of information in descending
o r d e r.
Type 2 instrument panel
1.Speed indicator(mph or km/h).
2. Central screen.
3. Gear shift indicator.
4. Display management button.
Display of information in ascending order.
5. Display management button.
Display of information in descending
o r d e r. 6.
Rev counter.
The engine speed is indicated by the
display of bright orange coloured bars.
Above the maximum engine speed, the
bars light up in red to indicate the need to
shift up a gear.
Central display
The information displayed differs according to
the type of gearbox that your vehicle has.
Central display with
a
manual gearbox
1. Outside temperature. This flashes if there
is a
risk of ice.
Instruments
Page 11 of 180

9
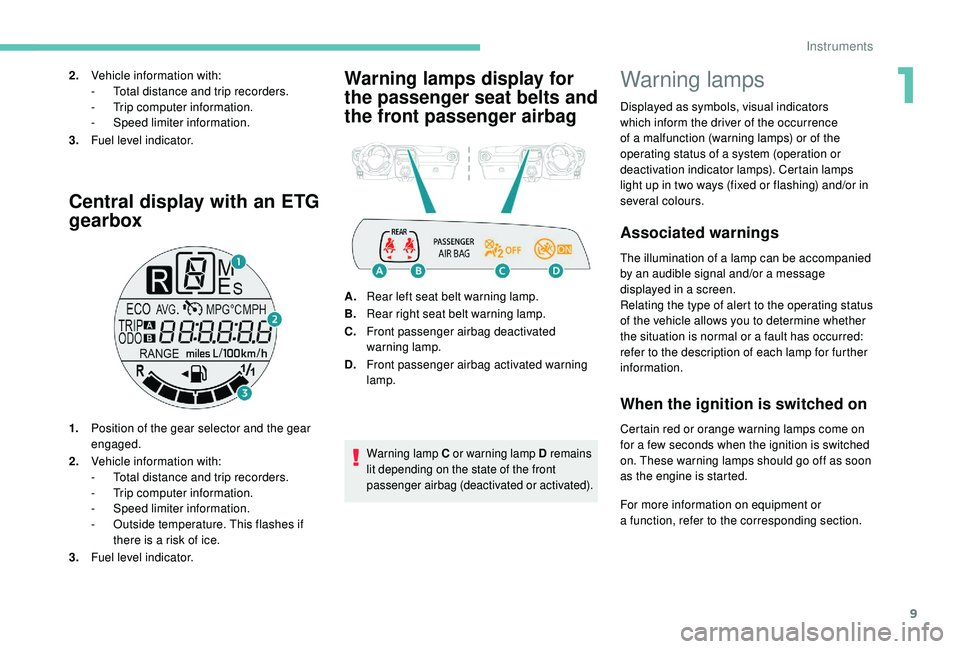
Central display with an ETG
gearbox
1.Position of the gear selector and the gear
engaged.
2. Vehicle information with:
-
T
otal distance and trip recorders.
-
T
rip computer information.
-
S
peed limiter information.
-
O
utside temperature. This flashes if
there is a
risk of ice.
3. Fuel level indicator.
Warning lamps display for
the passenger seat belts and
the front passenger airbag2.Vehicle information with:
-
T otal distance and trip recorders.
-
T
rip computer information.
-
S
peed limiter information.
3. Fuel level indicator.
A.Rear left seat belt warning lamp.
B. Rear right seat belt warning lamp.
C. Front passenger airbag deactivated
warning lamp.
D. Front passenger airbag activated warning
lamp.
Warning lamp C or warning lamp D remains
lit depending on the state of the front
passenger airbag (deactivated or activated).
Warning lamps
Displayed as symbols, visual indicators
which inform the driver of the occurrence
of a
malfunction (warning lamps) or of the
operating status of a
system (operation or
deactivation indicator lamps). Certain lamps
light up in two ways (fixed or flashing) and/or in
several colours.
Associated warnings
The illumination of a lamp can be accompanied
b y an audible signal and/or a message
displayed in a
screen.
Relating the type of alert to the operating status
of the vehicle allows you to determine whether
the situation is normal or a
fault has occurred:
refer to the description of each lamp for further
information.
When the ignition is switched on
Certain red or orange warning lamps come on
for a few seconds when the ignition is switched
on. These warning lamps should go off as soon
as the engine is started.
For more information on equipment or
a
function, refer to the corresponding section.
1
Instruments
Page 18 of 180

16
Warning/indicator lampStateCause Actions/Observations
Lane Depar ture
Warning System Flashing (orange),
accompanied by an
audible signal. A lane is being crossed, left side. Turn the steering wheel in the opposite direction to
return to the correct trajectory.
Rear foglamp Fixed. The lamp is on.
Green warning/indicator lamps
Lane Depar ture
Warning SystemFixed.
The button has been pressed. The lane departure warning system is activated.
Lane Depar ture
Warning System Fixed.
The button has been pressed. The system is operational: it has detected the lines on
the right and/or left sides.
Stop & Star t Fixed.
When the vehicle stops (red lights, traffic
jams, etc.) the Stop & Start system puts
the engine into STOP mode.The lamp goes off and the engine restarts
automatically in START mode, as soon as you want
to move off.
Keyless Entr y
and Star ting
System Fixed.
The conditions for starting the
engine are met.
Flashing slowly. The vehicle is in "ACC" mode.
The accessories (audio system, 12
V
socket, …) can be used.
Flashing rapidly. The steering column is not unlocked. Go into " OFF" mode, then into " ON" mode and gently
turn the steering wheel to unlock the steering column.
Instruments
Page 21 of 180

19
Outside temperature
In some situations, it may happen that the
outside temperature is displayed after a delay
or not at all, including:
-
w
hen stationary or moving at a slow speed
(less than about 16
mph (25 km/h),
-
i
n the case of a change that is too high
(entering or leaving a
garage, tunnel, etc.),
-
d
uring very short journeys (less than about
2
minutes).
Lighting dimmer control
When driving at night, this function allows
certain instrument panel displays to be
switched off so as to reduce visual fatigue for
the driver.
It operates only while the sidelamps are on.
F
A
s soon as the "Lighting dimmer" menu is
displayed, keep one of the DISP buttons
pressed to access the settings.
F
T
hen press one of the two DISP buttons
successively to increase or decrease the
brightness. The display flashes to show you
the brightness chosen.
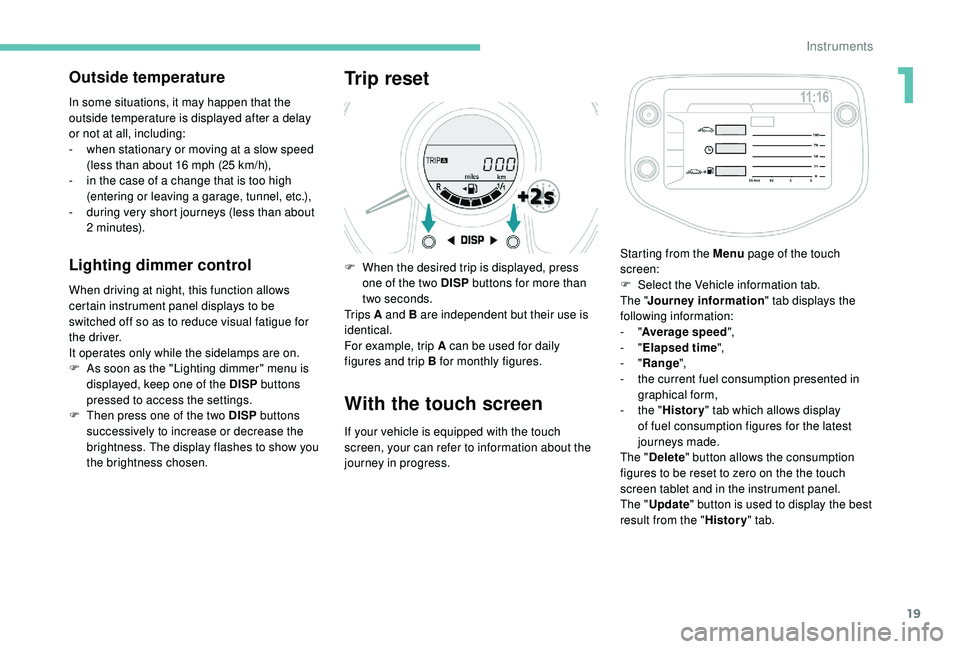
Trip reset
F When the desired trip is displayed, press one of the two DISP buttons for more than
two seconds.
Tr i p s A and B are independent but their use is
identical.
For example, trip A can be used for daily
figures and trip B for monthly figures.
With the touch screen
If your vehicle is equipped with the touch
screen, your can refer to information about the
journey in progress. Starting from the Menu
page of the touch
screen:
F
S
elect the Vehicle information tab.
The " Journey information " tab displays the
following information:
- "
Average speed ",
- "
Elapsed time ",
- "
Range ",
-
t
he current fuel consumption presented in
graphical form,
-
t
he "
History " tab which allows display
of fuel consumption figures for the latest
journeys made.
The " Delete " button allows the consumption
figures to be reset to zero on the the touch
screen tablet and in the instrument panel.
The " Update " button is used to display the best
result from the " History" tab.
1
Instruments
Page 25 of 180

23
If you find that a door is not properly
c losed after locking, close it again and
then relock the vehicle.
Unlocking
F Press this button to unlock the vehicle.
The direction indicators flash twice.
Locating your vehicle
F Press this button to locate your locked vehicle in a car park.
This is signalled by the lighting up of the
direction indicators for a
few seconds.
Changing the remote
control battery
Battery type: CR 2016/3 volts.
F U nclip the cover by inserting a small
screwdriver in the slot.
F
R
emove the cover.
F
R
emove the dead battery from its
compartment.
F
F
it the new battery into its compartment
observing the original fitting direction.
F
C
lip the cover into place.Do not throw remote control batteries
away, they contain metals which are
harmful to the environment.
Take them to a
PEUGEOT dealer or to
any other approved collection point.
" Keyless Entry and
Starting" system
System that allows the unlocking, locking
and starting of the vehicle while keeping the
electronic key on your person.
Electronic key
For security, the detection zones in which
the electronic key is operational have
a
radius of about 70 cm around each
opening button.
This electronic key can also be used as
a
remote control.
It includes a built-in emergency key.
For more information on the remote control ,
refer to the corresponding section.
2
Access