2018 PEUGEOT 108 light
[x] Cancel search: lightPage 49 of 180

47
In the lighting off and sidelamps modes, the
driver can switch on the main beam headlamps
temporarily ("headlamp flash"), for as long as
the stalk is kept pulled.
Displays
Illumination of the corresponding indicator
lamp in the instrument panel confirms that the
lighting selected is switched on.
Selection ring for the
foglamps
Front foglamps and rear
foglamp
With the dipped beams on, push the control
for wards to switch on the main beams. Pull the
control towards you to return to dipped beams.
The foglamps operate when the dipped or main
beams are on. Turn and release the ring:
F
f
or wards once to switch on the rear
foglamp,
F
f
or wards a
second time to switch on the
front foglamps,
F
b
ackwards once to switch off the front
foglamps,
F
b
ackwards a
second time to switch off the
rear foglamp.
If the lighting is switched off automatically
(version with AUTO lighting) or the dipped
beams are switched off manually, the foglamps
and sidelamps remain on.
F
T
urn the ring backwards and release it to
turn off all the lamps. In good or rainy weather, both day and
night, using the front foglamps and the
rear foglamp is prohibited. In these
situations, the power of their beams may
dazzle other drivers. They should only be
used in fog or falling snow.
In these weather conditions, it is your
responsibility to switch on the foglamps
and dipped headlamps manually as the
sunshine sensor may detect sufficient
light.
Do not forget to turn off the front foglamps
and the rear foglamp as soon as they are
no longer necessary.
Switching off the lamps when the
ignition is switched off
When switching off the ignition, all of the
lamps turn off immediately, except for
dipped beam if guide-me-home lighting is
activated.
Switching on the lighting after the
ignition is switched off
To reactivate the lighting control, rotate
the ring to the 0
position – lamps off, then
to the desired position.
On opening the driver's door a
temporary
audible signal warns the driver that the
lighting is on.
4
Lighting and visibility
Page 50 of 180

48
Automatic headlamp
illumination
Switching on
F Turn the ring to the "AUTO" position.
Switching off
F Turn the ring to another position.
In fog or snow, the sunshine sensor may
detect sufficient light. The lamps will not
come on automatically.
Do not cover the light sensor, the
associated functions would no longer be
controlled.
Manual guide-me-home
lighting
Switching on
F Set the lighting control stalk to the "Lights off " or "Auto" position.
F
W
ith the ignition off, flash the headlamps
using the lighting stalk.
The headlamps come on for a
duration of about
30
seconds.
Switching off
The manual guide-me-home lighting stops
immediately if:
-
y
ou "flash the headlamps" again,
When a
low level of ambient light is detected by
a
light sensor, the sidelamps and dipped beam
headlamps are switched on automatically,
without any action on the part of the driver.
As soon as the level of light becomes sufficient
again, the lamps are switched off automatically.
The sensor is located at the bottom of the
windscreen. (Depending on version)
Temporarily keeps the dipped beam
headlamps on after the vehicle's ignition has
been switched off, making exit easier for the
occupants when the light is poor.
Direction indicators
Three flashes
F Press briefly upwards or downwards,
without going beyond the point of
resistance; the direction indicators will flash
3
times.
-
y
ou put the lighting control in another
position,
-
y
ou switch on the ignition.
F
L
eft: lower the lighting stalk passing the
point of resistance.
F
R
ight: raise the lighting stalk passing the
point of resistance.
Lighting and visibility
Page 51 of 180

49
Headlamp adjustment
To avoid causing a nuisance to other road
u sers, the height of the headlamp beams
should be adjusted according to the load in the
vehicle.
0. Driver only.
0.5. Driver + front passenger.
1.5. 4
people.
3. 4
people + maximum authorised load.
3.5. Driver + maximum authorised load.
The initial setting is position 0.
Wiper control stalk
In wintry conditions, remove snow, ice or
frost present on the windscreen, around
the wiper arms and blades and the
windscreen seal, before operating the
wipers.
Do not operate the wipers on a
dry
windscreen. Under extremely hot or cold
conditions, ensure that the wiper blades
are not stuck to the windscreen before
operating the wipers.
Manual controls
Front wipers
Wiping speed control stalk: raise or lower the
stalk to the desired position. Single wipe.
For a single wipe of the windscreen, raise the
control then release it.
Of f.
Intermittent wipe.
Normal wiping (moderate rain).
Fast wiping (heavy rain).
Front screenwash
Pull the wiper control stalk towards you. The
screenwash and then the wipers operate for
a
preset time.
4
Lighting and visibility
Page 52 of 180

50
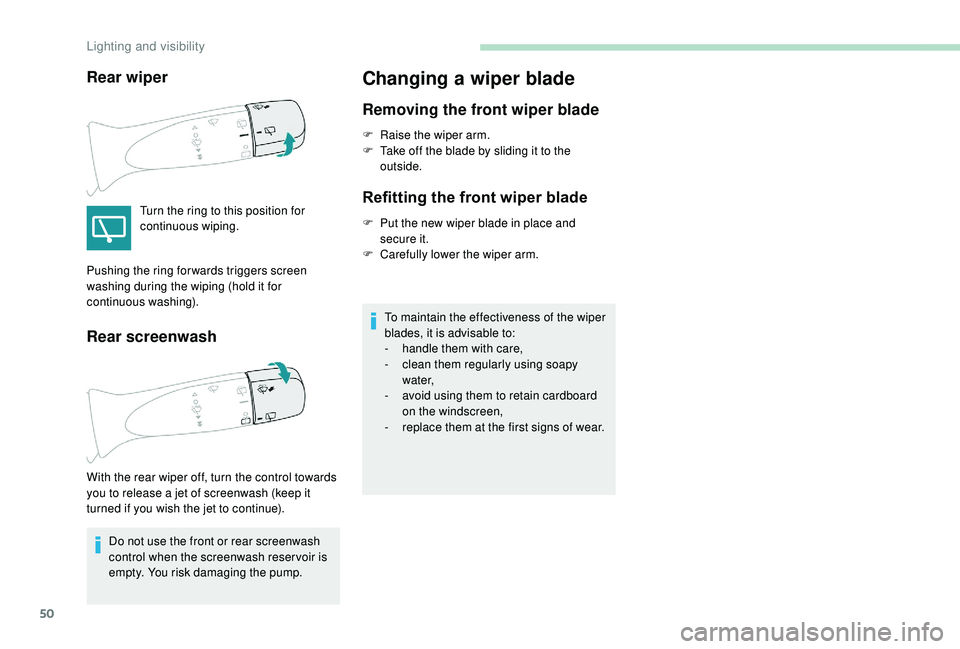
Rear wiper
Turn the ring to this position for
continuous wiping.
Rear screenwash
Do not use the front or rear screenwash
control when the screenwash reser voir is
empty. You risk damaging the pump.
Changing a wiper blade
Removing the front wiper blade
F Raise the wiper arm.
F T ake off the blade by sliding it to the
outside.
Refitting the front wiper blade
F Put the new wiper blade in place and secure it.
F
C
arefully lower the wiper arm.
To maintain the effectiveness of the wiper
blades, it is advisable to:
-
h
andle them with care,
-
c
lean them regularly using soapy
water,
-
a
void using them to retain cardboard
on the windscreen,
-
r
eplace them at the first signs of wear.
Pushing the ring for wards triggers screen
washing during the wiping (hold it for
continuous washing).
With the rear wiper off, turn the control towards
you to release a
jet of screenwash (keep it
turned if you wish the jet to continue).
Lighting and visibility
Page 55 of 180

53
If this warning lamp comes on,
accompanied by an audible signal,
it indicates an electronic brake
force distribution (EBFD) system
malfunction that could cause control
of the vehicle to be lost during
braking.
Yo u must stop as soon as it is safe to do so.
Contact a
PEUGEOT dealer or a qualified
workshop without delay.
When changing wheels (tyres and rims),
ensure that these are approved for your
vehicle.
When operating under normal conditions,
the ABS may cause the brake pedal to
vibrate slightly.
In emergency braking, press the brake
pedal hard and maintain this pressure.
Dynamic stability control (DSC)
and traction control (TRC)
Activation
These systems are activated automatically
every time the vehicle is started. Activation of these systems
is signalled by flashing of this
indicator in the instrument panel,
accompanied by an audible signal
for the DSC system.
Deactivation
In exceptional conditions (moving a vehicle that
i s bogged down in mud, stuck in snow, on loose
soil, …), it may prove useful to deactivate the
DSC and TRC systems, so that the wheels can
move freely and regain grip.
It is recommended that the systems are
reactivated as soon as possible however.
F
P
ress the button briefly.
Deactivating TRC alone
This warning lamp comes on: the
TRC system no longer acts on the
operation of the engine. Deactivation of the TRC and DSC systems
F
W
ith the vehicle stopped
, press the button
for more than 3 seconds.
These warning lamps come on: the
TRC and DSC systems no longer act
on the operation of the engine.
Reactivation
The TRC and DSC systems reactivate
automatically each time the engine is started.
F
P
ress the button again to
reactivate them manually.
When only the TRC system has been
deactivated, it reactivates as soon as the speed
of the vehicle increases.
If the TRC and DSC systems have both
been deactivated, they do not reactivate by
themselves, even if the speed of the vehicle
increases.
Operating fault
If this warning lamp comes on,
accompanied by an audible signal,
this indicates a fault with the system.
As soon as they detect a
problem of grip or
trajectory, these systems act on the operation
of the engine and brakes.
5
Safety
Page 57 of 180

55
Release
F Press the red button on the buckle.
F G uide the seat belt as it reels in.
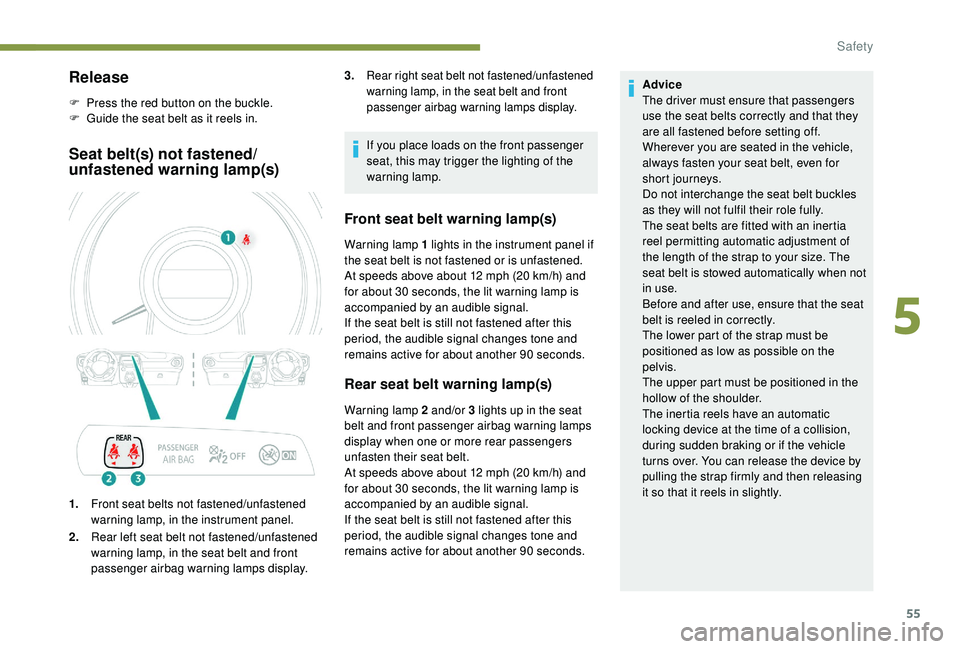
Seat belt(s) not fastened/
unfastened warning lamp(s)
1.Front seat belts not fastened/unfastened
warning lamp, in the instrument panel.
2. Rear left seat belt not fastened/unfastened
warning lamp, in the seat belt and front
passenger airbag warning lamps display. If you place loads on the front passenger
seat, this may trigger the lighting of the
warning lamp.
Front seat belt warning lamp(s)
Warning lamp 1 lights in the instrument panel if
t he seat belt is not fastened or is unfastened.
At speeds above about 12
mph (20 km/h) and
for about 30
seconds, the lit warning lamp is
accompanied by an audible signal.
If the seat belt is still not fastened after this
period, the audible signal changes tone and
remains active for about another 90
seconds.
Rear seat belt warning lamp(s)
Warning lamp 2 and/or 3 lights up in the seat
b elt and front passenger airbag warning lamps
display when one or more rear passengers
unfasten their seat belt.
At speeds above about 12
mph (20 km/h) and
for about 30
seconds, the lit warning lamp is
accompanied by an audible signal.
If the seat belt is still not fastened after this
period, the audible signal changes tone and
remains active for about another 90
seconds.Advice
The driver must ensure that passengers
use the seat belts correctly and that they
are all fastened before setting off.
Wherever you are seated in the vehicle,
always fasten your seat belt, even for
short journeys.
Do not interchange the seat belt buckles
as they will not fulfil their role fully.
The seat belts are fitted with an inertia
reel permitting automatic adjustment of
the length of the strap to your size. The
seat belt is stowed automatically when not
in use.
Before and after use, ensure that the seat
belt is reeled in correctly.
The lower part of the strap must be
positioned as low as possible on the
pelvis.
The upper part must be positioned in the
hollow of the shoulder.
The inertia reels have an automatic
locking device at the time of a
collision,
during sudden braking or if the vehicle
turns over. You can release the device by
pulling the strap firmly and then releasing
it so that it reels in slightly.
3.
Rear right seat belt not fastened/unfastened
warning lamp, in the seat belt and front
passenger airbag warning lamps display.
5
Safety
Page 58 of 180

56
Advice
In order to be effective, a seat belt must:
-
b
e tightened as close to the body as
possible,
-
b
e pulled in front of you with a smooth
movement, checking that it does not
twist,
-
b
e used to restrain only one person,
-
n
ot show any signs of cuts or fraying,
-
n
ot be converted or modified to avoid
affecting its performance.
In accordance with current safety
regulations, for all repairs on your
vehicle's seat belts, go to a
qualified
workshop with the skills and equipment
needed, which a
PEUGEOT dealer is able
to provide.
Have your seat belts checked regularly
by a
PEUGEOT dealer or a qualified
workshop, particularly if the straps show
signs of damage.
Clean the seat belt straps with soapy
water or a
textile cleaning product, sold by
PEUGEOT dealers.
After folding or moving a
seat or rear
bench seat, ensure that the seat belt is
positioned and reeled in correctly. Instructions for children
Use a
suitable child seat, if the passenger
is less than 12
years old or shorter than
one and a
half metres.
Never use the same seat belt to secure
more than one person.
Never allow a
child to travel on your lap.
For more information on Child seats , refer
to the corresponding section.
In case of impact
Depending on the nature and
seriousness of the impact , the
pyrotechnic system may be deployed
before and independent of the airbags.
Deployment of the pretensioners is
accompanied by a
slight discharge of
harmless smoke and a
noise, due to the
activation of the pyrotechnic cartridge
incorporated in the system.
In all cases, the airbag warning lamp is lit.
After an impact, get the seat belt system
checked and if necessary have it replaced
by a
PEUGEOT dealer or a qualified
workshop.Airbags
Designed to contribute to the safety of the
occupants in case of violent collisions. The
airbags supplement the action of the force-
limiting seat belts.
If a
collision occurs, the electronic detectors
record and analyse the front and side impacts
sustained in the impact detection zones:
-
I
n the event of violent impact, the
airbags are deployed instantly and help
better protect occupants of the vehicle;
immediately after the impact, the airbags
deflate rapidly in order not to hinder
the visibility or the possible exit of the
occupants.
-
I
n the event of a slight impact, an impact
at the rear of the vehicle and under certain
conditions of rollover, the airbags may not
deploy; only the seat belt helps to protect
you in these situations.
The airbags do not operate when the
ignition is switched off.
This equipment will only deploy once. If
a
second impact occurs (during the same
or a
subsequent accident), the airbag will
not be deployed again.
Safety
Page 59 of 180

57
Impact detection zones
A.Front impact zone.
B. Side impact zone.
The deployment of an airbag is
accompanied by a
slight emission of
smoke and a
noise, due to the detonation
of the pyrotechnic charge incorporated in
the system.
This smoke is not harmful, but sensitive
individuals may experience slight irritation.
The detonation noise associated with the
deployment of an airbag may result in
a
slight loss of hearing for a short time.
Front airbags
This system protects the driver and front
passenger in the event of a severe frontal
impact in order to limit the risk of injury to the
head and chest.
The driver's airbag is fitted in the centre of the
steering wheel; the front passenger's airbag is
fitted in the dashboard above the glove box.
Deployment
The airbags are deployed, except the
passenger's front airbag if it is deactivated, in
the event of a
serious front impact to all or part
of the front impact zone A , in the longitudinal
centreline of the vehicle on a
horizontal plane
and directed from the front to the rear of the
vehicle.
The front airbag inflates between the thorax
and head of the front occupant of the vehicle
and the steering wheel, driver's side, and the
dashboard, passenger's side, to cushion their
for ward movement.
Operating fault
If this warning lamp comes on in
the instrument panel it indicates
a
malfunction of the airbags. Contact
a
PEUGEOT dealer or a qualified
workshop as soon as possible to
have the system checked. The
airbags may no longer be deployed
in the event of a
serious impact.
If this is the case, do not install a child seat nor
a llow a passenger to sit in the front passenger seat.
Lateral airbags
System which protects the driver and front
passenger in the event of a serious side impact
in order to limit the risk of injury to the chest,
between the hip and the shoulder.
Each lateral airbag is fitted in the seat backrest
frame, door side.
5
Safety