2018 PEUGEOT 108 light
[x] Cancel search: lightPage 28 of 180

26
Check that the light on the electronic key
flashes 4 times.
While this function is activated, the "
K
eyless
Entry and Starting" system is inoperative.
To reactivate the electronic key, press one of
the buttons (open or closed padlock).
Changing the battery of the
electronic key
Battery type: CR2032/3 volts.
I f the battery of the electronic key is
defective, this warning lamp comes
on in the instrument panel. F
F
it the new battery into its compartment
observing the original fitting direction.
F
R
eplace the protective cover.
F
C
lip the cover onto the casing.
Advice
Remote control/electronic key
These high frequency remote controls are
sensitive systems; do not handle them
while in your pocket as there is a
risk that
the vehicle may unlock without you being
aware of it.
Do not repeatedly press the buttons of
your remote control or your electronic key
when out of range and out of sight of your
vehicle. You may stop it from working.
The remote control would then have to be
reinitialised.
Locking the vehicle
Driving with the doors locked could make
it difficult for the emergency ser vices to
enter the vehicle in an emergency.
As a
safety precaution (with children on
board), remove the key from the ignition or
take the electronic key when you leave the
vehicle, even for a
short time. Lost keys, remote control, electronic
key
Visit a
PEUGEOT dealer with the vehicle's
registration certificate, your personal
identification documents and if possible,
the label bearing the key code.
The PEUGEOT dealer will be able to look
up the key code and the transponder code
required to order a new key.
Purchasing a
second-hand vehicle
Have the pairing of all of the keys in your
possession checked by a
PEUGEOT
dealer, to ensure that only your keys can
be used to open and start the vehicle.
F
U
nclip the cover using a
small screwdriver
at the cut-out.
F
R
emove the casing.
F
R
emove the protective cover from the
battery by pulling it upwards.
F
R
emove the dead battery from its
compartment.
Doors
Locking/unlocking from
inside
Access
Page 33 of 180
31
Precautions in use
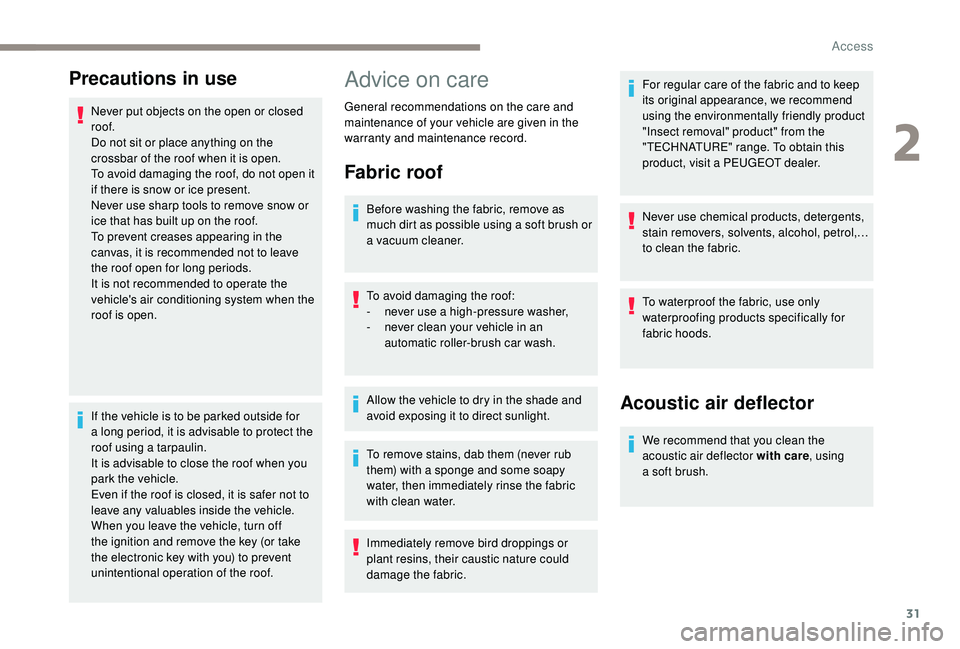
Never put objects on the open or closed
roof.
Do not sit or place anything on the
crossbar of the roof when it is open.
To avoid damaging the roof, do not open it
if there is snow or ice present.
Never use sharp tools to remove snow or
ice that has built up on the roof.
To prevent creases appearing in the
canvas, it is recommended not to leave
the roof open for long periods.
It is not recommended to operate the
vehicle's air conditioning system when the
roof is open.
If the vehicle is to be parked outside for
a long period, it is advisable to protect the
roof using a
tarpaulin.
It is advisable to close the roof when you
park the vehicle.
Even if the roof is closed, it is safer not to
leave any valuables inside the vehicle.
When you leave the vehicle, turn off
the ignition and remove the key (or take
the electronic key with you) to prevent
unintentional operation of the roof.
Advice on care
General recommendations on the care and
maintenance of your vehicle are given in the
warranty and maintenance record.
Fabric roof
Before washing the fabric, remove as
much dirt as possible using a soft brush or
a
vacuum cleaner.
To avoid damaging the roof:
-
n
ever use a high-pressure washer,
-
n
ever clean your vehicle in an
automatic roller-brush car wash.
Allow the vehicle to dry in the shade and
avoid exposing it to direct sunlight.
To remove stains, dab them (never rub
them) with a
sponge and some soapy
water, then immediately rinse the fabric
with clean water.
Immediately remove bird droppings or
plant resins, their caustic nature could
damage the fabric. For regular care of the fabric and to keep
its original appearance, we recommend
using the environmentally friendly product
"Insect removal" product" from the
"TECHNATURE" range. To obtain this
product, visit a
PEUGEOT dealer.
Never use chemical products, detergents,
stain removers, solvents, alcohol, petrol,…
to clean the fabric.
To waterproof the fabric, use only
waterproofing products specifically for
fabric hoods.
Acoustic air deflector
We recommend that you clean the
acoustic air deflector with care , using
a
soft brush.
2
Access
Page 37 of 180
35
To raise the head restraint, pull it upwards.
To lower it, press the catch A then push down
the head restraint.
To remove it:
-
s
lightly tilt the backrest,
-
m
ove the head restraint to the high position,
-
p
ress the catch A while pulling the head
restraint upwards.
To reinstall it:
-
s
lightly tilt the backrest,
-
i
nsert the rods of the head restraint into the
holes.
To reach the low position, press the catch A .
Mirrors
Manual door mirrors
F Move the lever in any of the four directions
to adjust the mirror.
Electric door mirrors
Adjustment
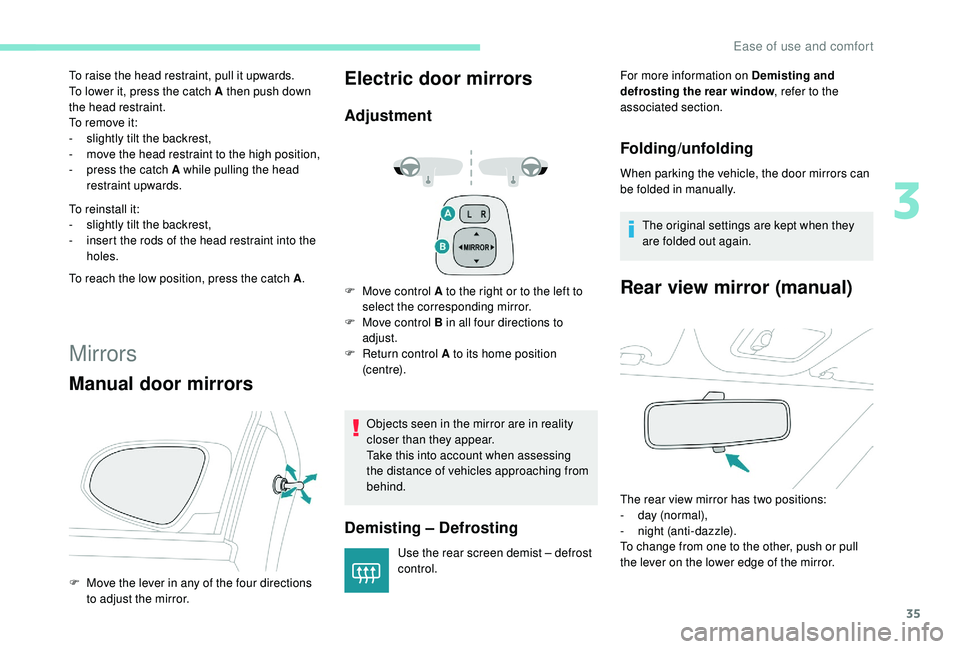
F Move control A to the right or to the left to select the corresponding mirror.
F
M
ove control B in all four directions to
adjust.
F
R
eturn control A to its home position
(c e nt r e).
Objects seen in the mirror are in reality
closer than they appear.
Take this into account when assessing
the distance of vehicles approaching from
behind.
Demisting – Defrosting
Use the rear screen demist – defrost
control. For more information on Demisting and
defrosting the rear window
, refer to the
associated section.
Folding/unfolding
When parking the vehicle, the door mirrors can
be folded in manually.
The original settings are kept when they
are folded out again.
Rear view mirror (manual)
The rear view mirror has two positions:
- d ay (normal),
-
n
ight (anti-dazzle).
To change from one to the other, push or pull
the lever on the lower edge of the mirror.
3
Ease of use and comfort
Page 39 of 180
37
The condensation created by the air
conditioning results in a discharge of water
under the vehicle which is per fectly normal.
The air conditioning system does not
contain chlorine and does not present
any danger to the ozone layer.
Heating
The heating system only operates with the
engine running.
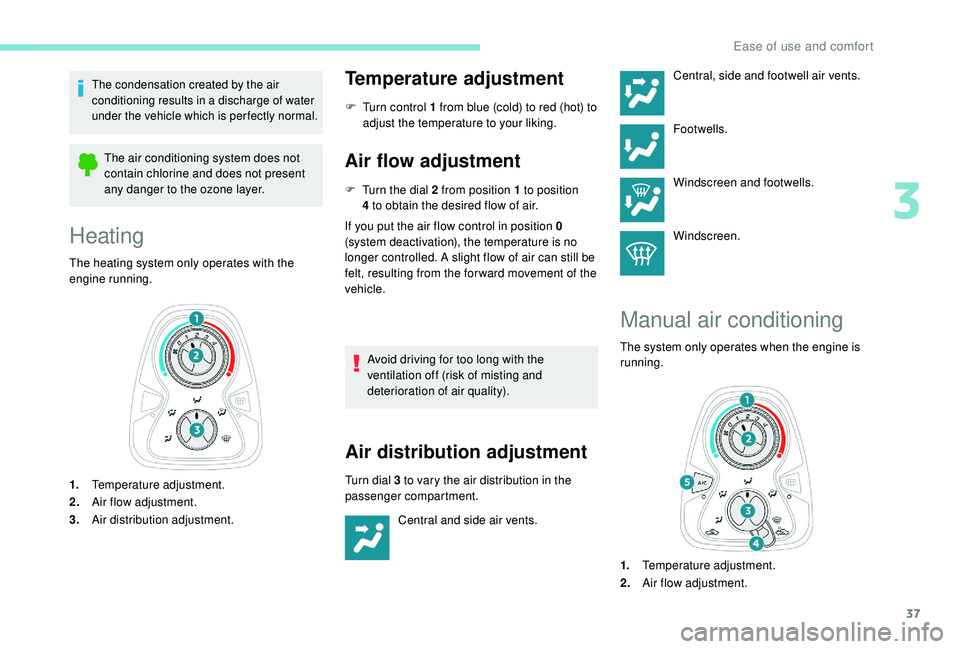
1. Temperature adjustment.
2. Air flow adjustment.
3. Air distribution adjustment.
Temperature adjustment
F Turn control 1 from blue (cold) to red (hot) to
adjust the temperature to your liking.
Air flow adjustment
F Turn the dial 2 from position 1 to position
4 to obtain the desired flow of air.
If you put the air flow control in position 0
(system deactivation), the temperature is no
longer controlled. A slight flow of air can still be
felt, resulting from the for ward movement of the
vehicle.
Avoid driving for too long with the
ventilation off (risk of misting and
deterioration of air quality).
Air distribution adjustment
Turn dial 3 to vary the air distribution in the
p assenger compartment.
Central and side air vents. Central, side and footwell air vents.
Footwells.
Windscreen and footwells.
Windscreen.
Manual air conditioning
The system only operates when the engine is
running.
1.
Temperature adjustment.
2. Air flow adjustment.
3
Ease of use and comfort
Page 40 of 180
38
3.Air distribution adjustment.
4. Recirculation of interior air.
5. Air conditioning On/Off.
Temperature adjustment
F Turn control 1 from blue (cold) to red (hot) to
adjust the temperature to your liking.
Air flow adjustment
F Turn the dial 2 from position 1 to position
4 to obtain the desired flow of air.
If you put the air flow control in position 0
(system deactivation), the temperature is no
longer controlled. A slight flow of air can still be
felt, resulting from the for ward movement of the
vehicle.
Avoid driving for too long with the
ventilation off (risk of misting and
deterioration of air quality).
Air distribution adjustment
Turn dial 3 to vary the air distribution in the
p assenger compartment.
Air conditioning
Central and side air vents.
Central, side and footwell air vents.
Footwells.
Windscreen and footwells.
Windscreen.
With the engine running, the air conditioning is
designed to operate effectively in all seasons,
with the windows closed.
It allows you:
-
i
n summer, to lower the temperature,
-
t
o increase the effectiveness of the
demisting in winter, above 3°C.
On/Off
F Press button 5 to activate/deactivate the air
conditioning system. The air conditioning does not operate
when the air flow is deactivated.
Automatic air conditioning
The air conditioning system operates when the
engine is running.
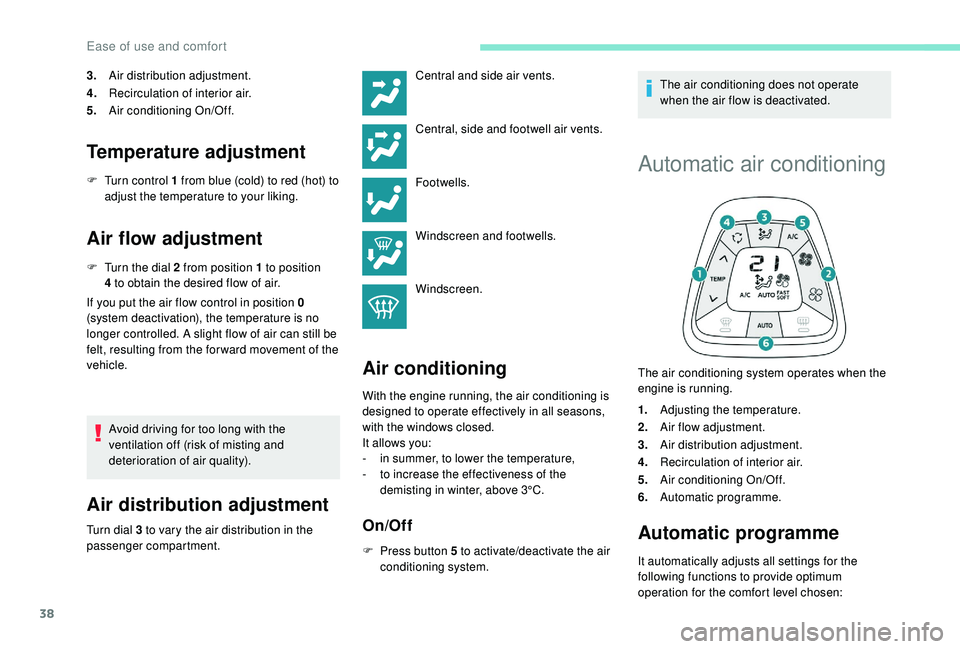
1.
Adjusting the temperature.
2. Air flow adjustment.
3. Air distribution adjustment.
4. Recirculation of interior air.
5. Air conditioning On/Off.
6. Automatic programme.
Automatic programme
It automatically adjusts all settings for the
following functions to provide optimum
operation for the comfort level chosen:
Ease of use and comfort
Page 42 of 180

40
Deactivating the system
F Press air flow button 2 (empty fan) until the fan symbol disappears.
This action deactivates all functions of the air
conditioning system.
Temperature is no longer regulated. A slight air
flow can still be felt however, resulting from the
for ward movement of the vehicle.
Pressing the 6 " AUTO" button again reactivates
the system with the values in use at the time it
was switched off.
Avoid driving for long periods with the
system deactivated (risk of misting and
deterioration of air quality).
Recirculation of interior air
Recirculation of interior air isolates the
passenger compartment from exterior odours
and fumes.
Return to exterior air intake as soon as possible
to avoid deterioration of the air quality and the
formation of mist.Avoid using recirculation of interior air for
prolonged periods – Risk of misting and
deterioration of the air quality!
With a manual air conditioning
system
F Move the manual control 4 to the left to be
in the "Recirculation of interior air" position
or to the right to return to the "Exterior air
intake" position.
With an automatic air
conditioning system
F Press button 4 to recirculate the interior air
or to allow the intake of exterior air.
Pressing button 4
again or the "AUTO" button
6
returns to automatic management of the
intake of air. The air recirculation symbol goes
of f.
Front demist – defrost
These markings on the control
panels indicate the control positions
for rapid demisting or defrosting of
the windscreen and side windows.
During the winter period, direct
the side air vents towards the side
windows to optimise their demisting
and defrosting. With Stop & Start, when demisting –
defrosting has been activated, STOP
mode is not available.
With the heating/ventilation
system
F Put the temperature and air flow controls to
the dedicated marked position.
F
S
et the air distribution control to the
"Windscreen" position.
With the manual air
conditioning system
F Put the temperature and air flow controls to the dedicated marked position.
F
P
ut the air intake control to the "Exterior air
intake" position (manual control moved to
the right).
F
S
et the air distribution control to the
"Windscreen" position.
F
S
witch on the air conditioning by pressing
the A /C button; the indicator lamp for the
button comes on.
Ease of use and comfort
Page 43 of 180
41
With the automatic air
conditioning system
F Press the dedicated button, its indicator lamp comes on.
F
T
o switch it off, press this button again; its
indicator lamp goes off.
The other settings (air flow, air distribution,
etc.) are controlled automatically.
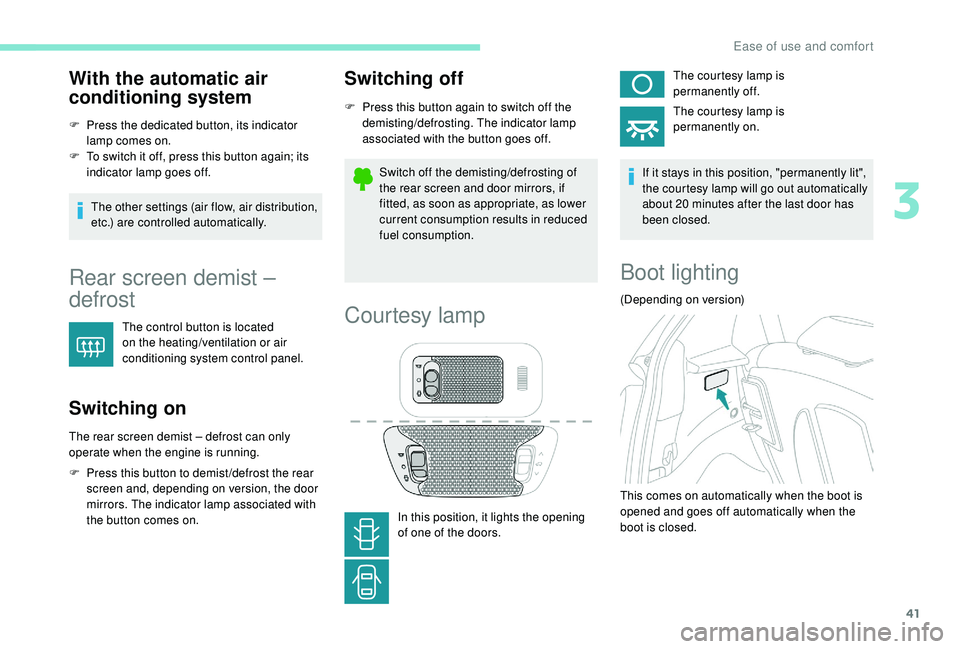
Rear screen demist –
defrost
The control button is located
on the heating/ventilation or air
conditioning system control panel.
Switching on
The rear screen demist – defrost can only
operate when the engine is running.
F
P
ress this button to demist /defrost the rear
screen and, depending on version, the door
mirrors. The indicator lamp associated with
the button comes on.
Switching off
F Press this button again to switch off the demisting/defrosting. The indicator lamp
associated with the button goes off.
Switch off the demisting/defrosting of
the rear screen and door mirrors, if
fitted, as soon as appropriate, as lower
current consumption results in reduced
fuel consumption.
Courtesy lamp
In this position, it lights the opening
of one of the doors. The courtesy lamp is
permanently off.
The courtesy lamp is
permanently on.
If it stays in this position, "permanently lit",
the courtesy lamp will go out automatically
about 20 minutes after the last door has
been closed.
Boot lighting
(Depending on version)
This comes on automatically when the boot is
opened and goes off automatically when the
boot is closed.
3
Ease of use and comfort
Page 48 of 180

46
Lighting control stalk
Main lighting
The various front and rear lamps of the vehicle
are designed to adapt the driver's visibility
progressively according to the climatic
conditions:
-
s
idelamps, to be seen,
-
d
ipped beam headlamps to see without
dazzling other drivers,
-
m
ain beam headlamps to see clearly when
the road is clear.
Additional lighting
Other lamps are provided to meet the
requirements of particular driving conditions:
-
a
rear foglamp,
-
f
ront foglamps,
-
d
aytime running lamps to be more visible
during the day.
In some weather conditions (e.g. low
temperature or humidity), the presence
of misting on the internal sur face of the
glass of the headlamps and rear lamps is
normal; it disappears after the lamps have
been on for a
few minutes. Travelling abroad
If planning to use your vehicle in a
country
that drives on the other side of the road,
the headlamp dipped beams must be
adjusted to avoid dazzling oncoming
drivers.
Contact a PEUGEOT dealer or a qualified
workshop.
Without AUTO lighting
With AUTO lighting Main lighting
Turn the ring to align the desired symbol with
the marking.
Headlamps off/Daytime running
lamps.
Sidelamps only.
Dipped or main beam headlamps.
Automatic illumination of headlamps.
Dipping the headlamps
Lighting and visibility