2018 PEUGEOT 108 jump start
[x] Cancel search: jump startPage 124 of 180

122
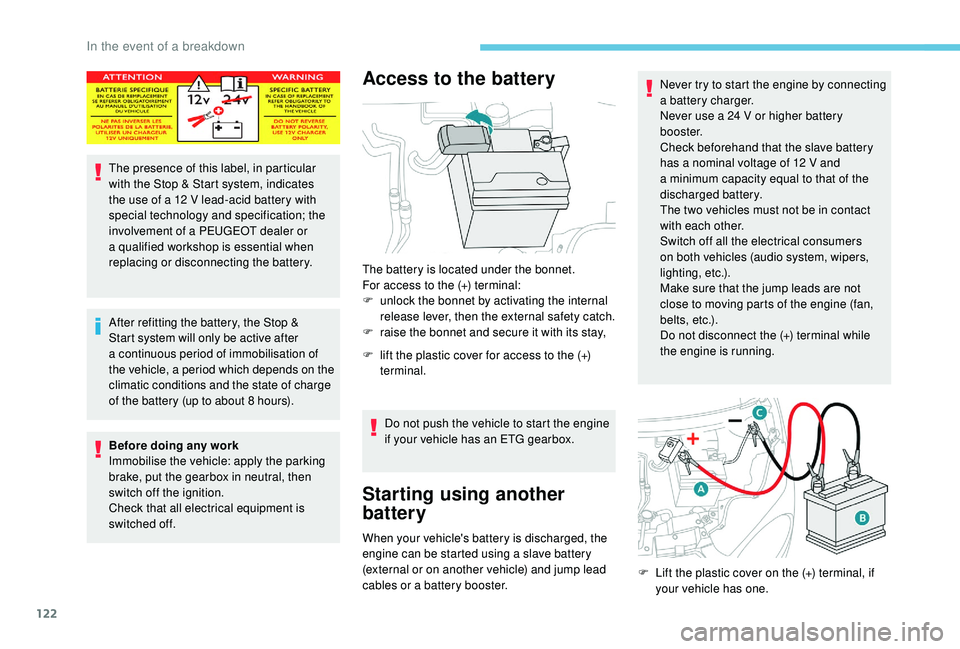
The presence of this label, in particular
with the Stop & Start system, indicates
the use of a 12 V lead-acid battery with
special technology and specification; the
involvement of a
PEUGEOT dealer or
a
qualified workshop is essential when
replacing or disconnecting the battery.
After refitting the battery, the Stop &
Start system will only be active after
a
continuous period of immobilisation of
the vehicle, a period which depends on the
climatic conditions and the state of charge
of the battery (up to about 8
hours).
Before doing any work
Immobilise the vehicle: apply the parking
brake, put the gearbox in neutral, then
switch off the ignition.
Check that all electrical equipment is
switched off.
Access to the battery
The battery is located under the bonnet.
For access to the (+) terminal:
F
u
nlock the bonnet by activating the internal
release lever, then the external safety catch.
F
r
aise the bonnet and secure it with its stay,
F
l
ift the plastic cover for access to the (+)
terminal.
Do not push the vehicle to start the engine
if your vehicle has an ETG gearbox.
Starting using another
battery
When your vehicle's battery is discharged, the
engine can be started using a slave battery
(external or on another vehicle) and jump lead
cables or a
battery booster. Never try to start the engine by connecting
a
battery charger.
Never use a 24 V or higher battery
b o o s t e r.
Check beforehand that the slave battery
has a nominal voltage of 12 V and
a
minimum capacity equal to that of the
discharged battery.
The two vehicles must not be in contact
with each other.
Switch off all the electrical consumers
on both vehicles (audio system, wipers,
lighting, etc.).
Make sure that the jump leads are not
close to moving parts of the engine (fan,
belts, etc.).
Do not disconnect the (+) terminal while
the engine is running.
F
L
ift the plastic cover on the (+) terminal, if
your vehicle has one.
In the event of a breakdown
Page 125 of 180

123
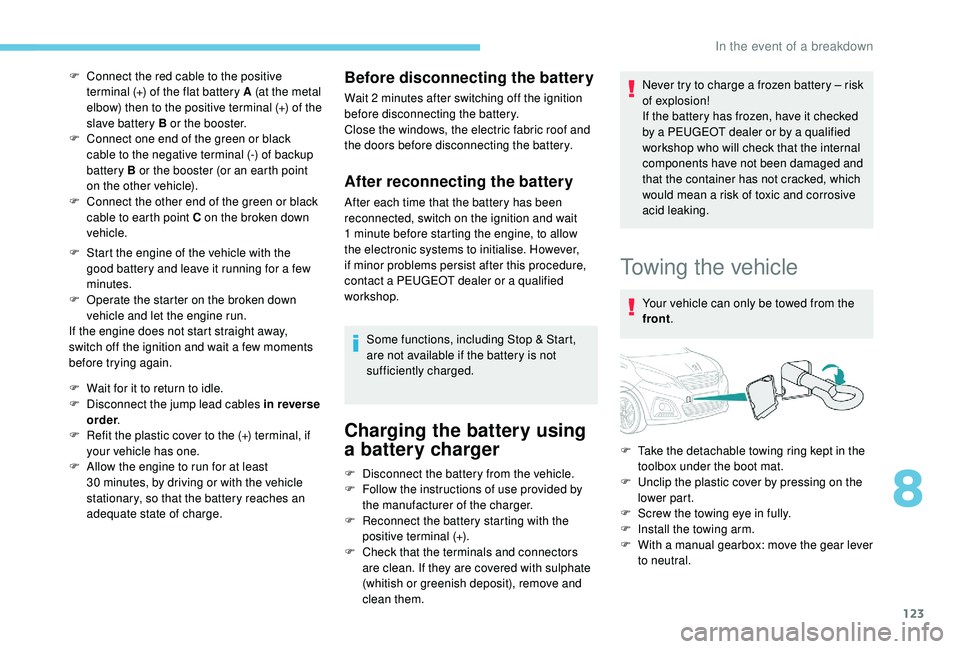
F Connect the red cable to the positive terminal (+) of the flat battery A (at the metal
elbow) then to the positive terminal (+) of the
slave battery B or the booster.
F
C
onnect one end of the green or black
cable to the negative terminal (-) of backup
battery B or the booster (or an earth point
on the other vehicle).
F
C
onnect the other end of the green or black
cable to earth point C on the broken down
vehicle.
F
S
tart the engine of the vehicle with the
good battery and leave it running for a
few
minutes.
F
O
perate the starter on the broken down
vehicle and let the engine run.
If the engine does not start straight away,
switch off the ignition and wait a
few moments
before trying again.
F
W
ait for it to return to idle.
F
D
isconnect the jump lead cables in reverse
order .
F
R
efit the plastic cover to the (+) terminal, if
your vehicle has one.
F
A
llow the engine to run for at least
30
minutes, by driving or with the vehicle
stationary, so that the battery reaches an
adequate state of charge.Before disconnecting the battery
Wait 2 minutes after switching off the ignition
b efore disconnecting the battery.
Close the windows, the electric fabric roof and
the doors before disconnecting the battery.
After reconnecting the battery
After each time that the battery has been
reconnected, switch on the ignition and wait
1
minute before starting the engine, to allow
the electronic systems to initialise. However,
if minor problems persist after this procedure,
contact a
PEUGEOT dealer or a qualified
workshop.
Some functions, including Stop & Start,
are not available if the battery is not
sufficiently charged.
Charging the battery using
a battery charger
Never try to charge a frozen battery – risk
o f explosion!
If the battery has frozen, have it checked
by a
PEUGEOT dealer or by a qualified
workshop who will check that the internal
components have not been damaged and
that the container has not cracked, which
would mean a
risk of toxic and corrosive
acid leaking.
Towing the vehicle
Your vehicle can only be towed from the
front .
F
D
isconnect the battery from the vehicle.
F
F
ollow the instructions of use provided by
the manufacturer of the charger.
F
R
econnect the battery starting with the
positive terminal (+).
F
C
heck that the terminals and connectors
are clean. If they are covered with sulphate
(whitish or greenish deposit), remove and
clean them. F
T
ake the detachable towing ring kept in the
toolbox under the boot mat.
F
U
nclip the plastic cover by pressing on the
lower part.
F
S
crew the towing eye in fully.
F
I
nstall the towing arm.
F
W
ith a manual gearbox: move the gear lever
to neutral.
8
In the event of a breakdown
Page 173 of 180

171
EBFD ............................................................... 52
Eco-driving (advice) .......................................... 6
Economy mode
............................................... 98
E
lectronic brake force distribution (EBFD)
.....52
Emergency braking assistance (EBA)
............52
Emergency warning lamps
.............................52
Energy economy mode
................................... 98
E
ngine, petrol
...............................
.....97, 99, 125
Engine compartment
...................................... 99
E
ngines
......................................................... 125
Environment
...................................................... 6
Filling the fuel tank
.................................... 96 -97
Filter, air
........................................................ 102
Filter, oil
................
......................................... 102
Filter, passenger compartment
.....................102
Fitting a
wheel ......................... 1 0 7-1 0 8 , 11 0 -111
Fittings, boot
................................................... 45
Fittings, interior
............................................... 42
F
lashing indicators
...........................4 8 , 112 -114
Foglamp, rear
..................................... 16, 47, 113
Foglamps, front
........................................ 4 7, 11 2
Folding the rear seat backrest
........................34
Folding/unfolding the door mirrors
................. 35
F
requency (radio)
........................................... 7- 8
Fuel .................................................. 6, 18, 96 -97
Fuel consumption
.................................. 6, 18, 96
Fusebox, dashboard
.......................114 -11 6 , 11 9
Fusebox, engine compartment
.......114 -11 6 , 11 9
Fuses
............................................... 11
4 -11 6 , 11 9Gauge, fuel
................................................ 18, 9 6
Gearbox, ETG
.........................6, 12, 76 -79, 103
Gearbox, manual
....................6, 76, 81- 82, 102
Gear lever
.........................................................6
Gear lever, manual gearbox
...........................76
Gear shift indicator ~ Gear efficiency indicator
.................................17, 7 9
Glossary, audio system
....................................2
Glove box
........................................................42
Hazard warning lamps
....................................52
headlamp adjustment
.....................................49
Headlamps
....................................................112
Headlamps, automatic illumination
..........46, 48
Headlamps, dipped beam
..................17, 46, 112
Headlamps, main beam
.....................17, 46, 112
Head restraints, rear
.......................................34
Heating
.................................................. 6
, 37, 40
Hill start assist
.................................................80
Hooks
..............................................................45
Horn ................................................................. 51Identification
.................................................. 127
Immobiliser, electronic
....................................75
Indicators, direction
........................................48
Inflating tyres
................................................103
Inflating tyres and accessories (using the kit)
......................................104, 10 6
Instrument panel
...............................................8
ISOFIX
......................................................67- 6 9
ISOFIX mountings ........................................... 66
Jack
...............................
.......1 0 7-1 0 8 , 11 0 -111, 9
Jump starting
................................................12 2
Key
..................................................................22
Key, electronic
...........................................23-26
Keyless Entry and Starting
......1
6, 23 -24, 73 -74
Kit, hands-free
..................................... 1
0 , 11 -12
Kit, temporary puncture repair
........45, 104, 10 6E
F
G
H
I
J
K
.
Alphabetical index