2018 PEUGEOT 108 instrument panel
[x] Cancel search: instrument panelPage 4 of 180

2
.
.
Instrument panels 8
D isplays 9
Warning and indicator lamps
9
I
ndic ators
18
Trip computer
1
8
Adjusting the time
2
0Keys
22
"
K
eyless Entry and Starting" system
2
3
Doors 26
Boot
27
Front electric windows
2
8
Quarter windows
2
9
Electric fabric roof
2
9
Advice on care
3
1
Front seats
3
2
Rear seats
3
4
Mirrors
35
Steering wheel adjustment
3
6
Ventilation
3
6
Heating
3
7
Manual air conditioning
3
7
Automatic air conditioning
3
8
Front demist – defrost
4
0
Rear screen demist – defrost
4
1
Courtesy lamp
4
1
Boot lighting
4
1
Interior fittings
4
2
Rear shelf
4
4
Boot fittings
4
5Lighting control stalk
4
6
Automatic headlamp illumination
4
8
Direction indicators
4
8
Headlamp adjustment
4
9
Wiper control stalk
4
9
Changing a
wiper blade
5
0
General safety recommendations 5 1
H o r n 51
Hazard warning lamps
5
2
ESC system
5
2
Seat belts
5
4
Airbags
56
Child seats
5
9
Deactivating the front passenger airbag
6
0
ISOFIX mountings and child seats
6
6
i-Size child seats
7
0
Child lock
7
1
InstrumentsAccess
Over view
Ease of use and comfort Lighting and visibility
Safety
Eco-driving
Instruments and controls 4
E co-driving
6
Contents
Page 6 of 180

4
Instruments and controls1
Door mirrors
Electric windows
Central locking
2
Bonnet release
3
Dashboard fuses
4
Instrument panel
Rev counter
Central display
Warning and indicator lamps
Indicators
Trip computer
5
Courtesy lamp
Fabric electric roof opening control
Speed Limit recognition and
recommendation
Active City Brake
Rear view mirror
Sun visor
6
Touch screen
Radio
Setting the time
7
Heating, ventilation
Manual air conditioning
Automatic air conditioning
Front demist/defrost
Rear screen demisting/defrosting
8
12 V accessory socket
USB port
Auxiliary Jack socket
9
Manual gearbox
ETG gearbox
Gear efficiency indicator
Hill start assist
10
Manual parking brake
11
Front passenger airbag
12
Side vents
13
Glove box
Deactivating the front passenger airbag
Reinitialisation of the under-inflation
detection system
Over view
Page 8 of 180

6
Eco- driving
Optimise the use of your
gearbox
With a manual gearbox, move off gently
an d change up without waiting. During
acceleration change up early.
With an ETG gearbox, give preference to
automatic mode (Easy) and avoid pressing the
accelerator pedal heavily or suddenly.
Drive smoothly
Maintain a safe distance between vehicles,
u se engine braking rather than the
brake pedal, and press the accelerator
progressively. These practices contribute
towards a
reduction in fuel consumption and
CO
2 emissions and also help reduce the
b
ackground traffic noise.
Control the use of your electrical
equipment
Before moving off, if the passenger
compartment is too warm, ventilate it by
opening the windows and air vents before
using the air conditioning.
Above 30
mph (50 km/h), close the windows
and leave the air vents open.
Consider using equipment that can help
keep the temperature in the passenger
compartment down (sunroof and window
b l i n d s …) .
Unless it has automatic regulation, switch off
the air conditioning as soon as the desired
temperature has been reached.
Switch off the demisting and defrosting
controls, if not automatic.
Switch off the heated seat as soon as
possible. Switch off the headlamps and front foglamps
when the ambient light level does not require
their use.
Avoid running the engine before moving off,
particularly in winter; your vehicle will warm up
much faster while driving.
As a
passenger, if you avoid connecting your
multimedia devices (film, music, video game,
etc.), you will contribute towards limiting the
consumption of electrical energy, and so of
fuel.
Disconnect your portable devices before
leaving the vehicle.
Eco-driving is a
range of everyday practices
that allow the motorist to optimise their fuel
consumption and CO
2 emissions.
T
he gear shift indicator invites you to engage
the most suitable gear: as soon as the
indication is displayed in the instrument panel,
follow it straight away.
For vehicles fitted with an ETG gearbox, this
indicator only appears in manual mode.
Eco-driving
Page 10 of 180

8
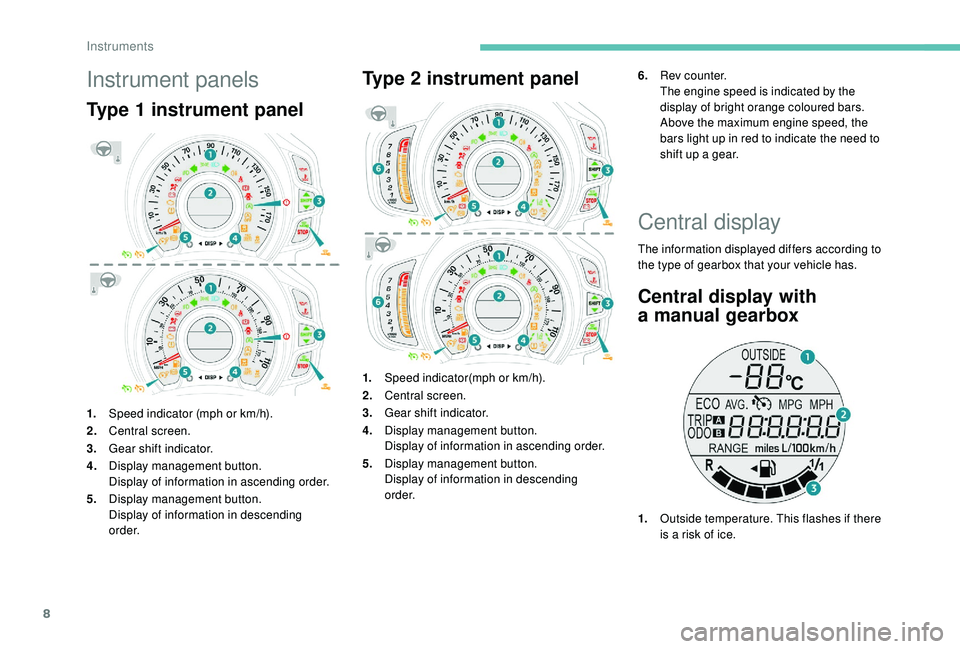
Instrument panels
Type 1 instrument panel
1.Speed indicator (mph or km/h).
2. Central screen.
3. Gear shift indicator.
4. Display management button.
Display of information in ascending order.
5. Display management button.
Display of information in descending
o r d e r.
Type 2 instrument panel
1.Speed indicator(mph or km/h).
2. Central screen.
3. Gear shift indicator.
4. Display management button.
Display of information in ascending order.
5. Display management button.
Display of information in descending
o r d e r. 6.
Rev counter.
The engine speed is indicated by the
display of bright orange coloured bars.
Above the maximum engine speed, the
bars light up in red to indicate the need to
shift up a gear.
Central display
The information displayed differs according to
the type of gearbox that your vehicle has.
Central display with
a
manual gearbox
1. Outside temperature. This flashes if there
is a
risk of ice.
Instruments
Page 20 of 180

18
Indicators
Total/trip distance recorder
When the ignition is switched on, the distance
recorder that was selected when the engine
was last switched off is displayed.-
t
rip recorder with TRIP displayed.
To reset the trip recorder to zero, while it is
displayed, press one of the two buttons 1 .
Fuel level indicator
Low fuel level
When the fuel in the tank reaches
a
low level, this warning lamp
comes on in the instrument panel,
accompanied by an audible warning.
You must add at least 5
litres of fuel after
running out of fuel.
Trip computer
System that gives you information on the
current journey (range, fuel consumption…).
Data displays
* depending on version. F
P
ress the steering mounted control to
display the various trip computer tabs in
succession.
-
T
otal distance travelled.
- Trip
A.
- Trip
B.
-
T
he partial Stop & Start time counter*.
-
T
he total Stop & Start* time counter.
-
T
he outside temperature*.
-
C
urrent fuel consumption.
-
A
verage fuel consumption.
-
Range.
-
A
verage speed.
-
L
ighting dimmer.
Pressing button 1
allows you to alternate the
distance display:
-
t
otal with ODO (odometer) displayed, Shows the quantity of fuel available:
-
1/
1
and six bars, the tank is full.
-
R
and one bar, the fuel in the tank is at the
reser ve level.
You have about 5
litres of fuel left.
Instruments
Page 21 of 180

19
Outside temperature
In some situations, it may happen that the
outside temperature is displayed after a delay
or not at all, including:
-
w
hen stationary or moving at a slow speed
(less than about 16
mph (25 km/h),
-
i
n the case of a change that is too high
(entering or leaving a
garage, tunnel, etc.),
-
d
uring very short journeys (less than about
2
minutes).
Lighting dimmer control
When driving at night, this function allows
certain instrument panel displays to be
switched off so as to reduce visual fatigue for
the driver.
It operates only while the sidelamps are on.
F
A
s soon as the "Lighting dimmer" menu is
displayed, keep one of the DISP buttons
pressed to access the settings.
F
T
hen press one of the two DISP buttons
successively to increase or decrease the
brightness. The display flashes to show you
the brightness chosen.
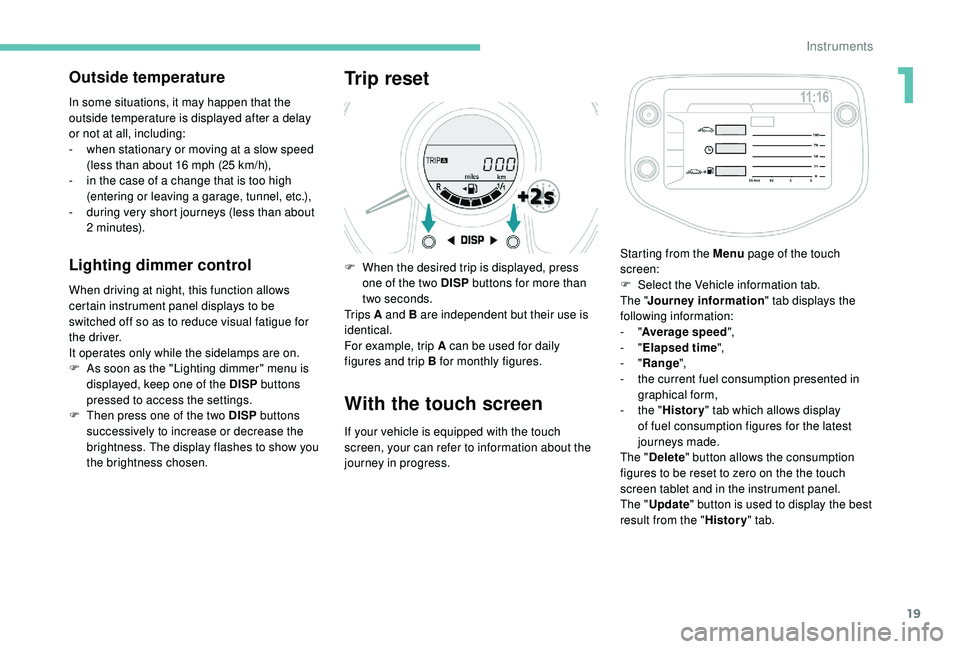
Trip reset
F When the desired trip is displayed, press one of the two DISP buttons for more than
two seconds.
Tr i p s A and B are independent but their use is
identical.
For example, trip A can be used for daily
figures and trip B for monthly figures.
With the touch screen
If your vehicle is equipped with the touch
screen, your can refer to information about the
journey in progress. Starting from the Menu
page of the touch
screen:
F
S
elect the Vehicle information tab.
The " Journey information " tab displays the
following information:
- "
Average speed ",
- "
Elapsed time ",
- "
Range ",
-
t
he current fuel consumption presented in
graphical form,
-
t
he "
History " tab which allows display
of fuel consumption figures for the latest
journeys made.
The " Delete " button allows the consumption
figures to be reset to zero on the the touch
screen tablet and in the instrument panel.
The " Update " button is used to display the best
result from the " History" tab.
1
Instruments
Page 28 of 180

26
Check that the light on the electronic key
flashes 4 times.
While this function is activated, the "
K
eyless
Entry and Starting" system is inoperative.
To reactivate the electronic key, press one of
the buttons (open or closed padlock).
Changing the battery of the
electronic key
Battery type: CR2032/3 volts.
I f the battery of the electronic key is
defective, this warning lamp comes
on in the instrument panel. F
F
it the new battery into its compartment
observing the original fitting direction.
F
R
eplace the protective cover.
F
C
lip the cover onto the casing.
Advice
Remote control/electronic key
These high frequency remote controls are
sensitive systems; do not handle them
while in your pocket as there is a
risk that
the vehicle may unlock without you being
aware of it.
Do not repeatedly press the buttons of
your remote control or your electronic key
when out of range and out of sight of your
vehicle. You may stop it from working.
The remote control would then have to be
reinitialised.
Locking the vehicle
Driving with the doors locked could make
it difficult for the emergency ser vices to
enter the vehicle in an emergency.
As a
safety precaution (with children on
board), remove the key from the ignition or
take the electronic key when you leave the
vehicle, even for a
short time. Lost keys, remote control, electronic
key
Visit a
PEUGEOT dealer with the vehicle's
registration certificate, your personal
identification documents and if possible,
the label bearing the key code.
The PEUGEOT dealer will be able to look
up the key code and the transponder code
required to order a new key.
Purchasing a
second-hand vehicle
Have the pairing of all of the keys in your
possession checked by a
PEUGEOT
dealer, to ensure that only your keys can
be used to open and start the vehicle.
F
U
nclip the cover using a
small screwdriver
at the cut-out.
F
R
emove the casing.
F
R
emove the protective cover from the
battery by pulling it upwards.
F
R
emove the dead battery from its
compartment.
Doors
Locking/unlocking from
inside
Access
Page 34 of 180

32
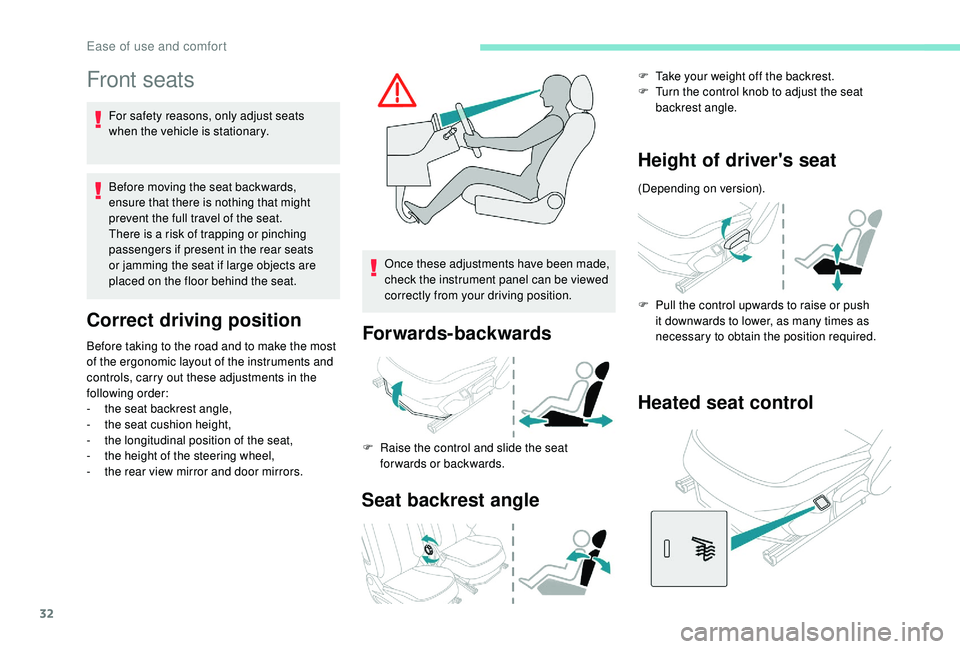
Front seats
For safety reasons, only adjust seats
when the vehicle is stationary.
Before moving the seat backwards,
ensure that there is nothing that might
prevent the full travel of the seat.
There is a risk of trapping or pinching
passengers if present in the rear seats
or jamming the seat if large objects are
placed on the floor behind the seat.
Correct driving position
Before taking to the road and to make the most
of the ergonomic layout of the instruments and
controls, carry out these adjustments in the
following order:
-
t
he seat backrest angle,
-
t
he seat cushion height,
-
t
he longitudinal position of the seat,
-
t
he height of the steering wheel,
-
t
he rear view mirror and door mirrors. Once these adjustments have been made,
check the instrument panel can be viewed
correctly from your driving position.Forwards-backwards
F Raise the control and slide the seat
forwards or backwards.
Seat backrest angle
F Take your weight off the backrest.
F T urn the control knob to adjust the seat
backrest angle.
Height of driver's seat
(Depending on version).
F
P
ull the control upwards to raise or push
it downwards to lower, as many times as
necessary to obtain the position required.
Heated seat control
Ease of use and comfort