Page 4 of 180

2
.
.
Instrument panels 8
D isplays 9
Warning and indicator lamps
9
I
ndic ators
18
Trip computer
1
8
Adjusting the time
2
0Keys
22
"
K
eyless Entry and Starting" system
2
3
Doors 26
Boot
27
Front electric windows
2
8
Quarter windows
2
9
Electric fabric roof
2
9
Advice on care
3
1
Front seats
3
2
Rear seats
3
4
Mirrors
35
Steering wheel adjustment
3
6
Ventilation
3
6
Heating
3
7
Manual air conditioning
3
7
Automatic air conditioning
3
8
Front demist – defrost
4
0
Rear screen demist – defrost
4
1
Courtesy lamp
4
1
Boot lighting
4
1
Interior fittings
4
2
Rear shelf
4
4
Boot fittings
4
5Lighting control stalk
4
6
Automatic headlamp illumination
4
8
Direction indicators
4
8
Headlamp adjustment
4
9
Wiper control stalk
4
9
Changing a
wiper blade
5
0
General safety recommendations 5 1
H o r n 51
Hazard warning lamps
5
2
ESC system
5
2
Seat belts
5
4
Airbags
56
Child seats
5
9
Deactivating the front passenger airbag
6
0
ISOFIX mountings and child seats
6
6
i-Size child seats
7
0
Child lock
7
1
InstrumentsAccess
Over view
Ease of use and comfort Lighting and visibility
Safety
Eco-driving
Instruments and controls 4
E co-driving
6
Contents
Page 5 of 180

3
.
bit.ly/helpPSA
.
Starting/Switching off the engine with the
key 73
Starting/Switching off the engine with the
system
K
eyless Entry and Starting
7
3
Manual parking brake
7
6
5-speed manual gearbox
7
6
ETG gearbox
7
6
Gear shift indicator
7
9
Hill start assist
8
0
Stop & Start
8
1
Speed Limit recognition and
recommendation
82
Speed limiter
8
4
Active City Brake
8
6
Lane departure warning system
9
0
Reversing camera
9
1
Under-inflation detection
9
2
Fuel tank
9
6
Compatibility of fuels
9
7
Snow chains
9
7
Energy economy mode
9
8
Fitting roof bars
9
8
Bonnet
98
Engine compartment
9
9
Checking levels
9
9
Checks
10
2Temporary puncture repair kit 1
04
Spare wheel
1
07
Changing a
bulb
1
11
Changing a
fuse
1
14
12
V battery
1
21
Towing the vehicle
1
23
Engine specifications
1
25
Engines
1
25
Dimensions
126
Identification markings
1
27
Driving
Practical information In the event of a
breakdown
Technical data Alphabetical index
Audio equipment and telematics
Radio
7-inch touch screen tablet
Access to additional videos
.
Contents
Page 7 of 180
5
Instruments and controls (continued)1
Lighting controls
Direction indicators
2
Stop & Start
Active City Brake
Electric mirrors adjustment
Headlamp adjustment
Deactivating the DSC/TRC systems.
Front foglamps (accessory)
3
Opening the fuel filler flap
4
ETG gearbox steering mounted control
paddles
5
Steering wheel height adjustment
Horn
Driver front airbag
6
Steering mounted controls
-
T
ouch screen, Radio
-
L
ane Departure Warning System
7
Speed limiter
8
Wiper control stalk
9
Ignition, starting/switching off (key)
Ignition, starting/switching off ("Keyless
Entry and Starting" system)
10
Hazard warning lamps
.
Over view
Page 9 of 180
7
Limit the causes of excess
consumption
Spread loads throughout the vehicle; place
the heaviest items in the bottom of the boot,
as close as possible to the rear seats.
Limit the loads carried in the vehicle and
reduce wind resistance (roof bars, roof rack,
…). Use a roof box in preference.
Remove roof bars and the roof rack after use.
At the end of winter, remove winter tyres and
refit your summer tyres.
Observe the recommendations
on maintenance
Check the tyre pressures regularly, when cold,
referring to the label in the door aperture,
driver's side.
Carry out this check in particular:
-
b
efore a long journey,
-
a
t each change of season,
-
a
fter a long period out of use. Have your vehicle ser viced regularly (engine
oil, oil filter, air filter, passenger compartment
filter…) and obser ve the schedule of
operations recommended in the warranty and
maintenance record. Do not forget the spare wheel and the tyres on
any trailer or caravan.
.
Eco-driving
Page 17 of 180

15
Warning/indicator lampStateCause Actions/Observations
Stop & Star t Fixed. The Stop & Start system has been
deactivated. Reactivate the system by pressing the button again.
Flashing. The Stop & Start system has a
fault. Carry out (3).
Speed limiter Fixed. The speed limiter is faulty. Carry out (3).
Active City
Brake Flashing.
The Active City Brake system has
a
fault.Carry out (3).
Active City
Brake Fixed.
The button has been pressed.
The configuration of the system has
been changed. The Active City Brake system is activated.
Flashing,
accompanied by an
audible signal. The Active City Brake system is in
action.
The system optimises the braking to avoid a
collision.
Active City
Brake Fixed.
The Active City Brake system has
been deactivated. Reactivate the system by pressing the button again.
Lane Depar ture
Warning System Fixed.
The lane departure warning system
is faulty. Carry out (3).
Lane Depar ture
Warning System Flashing (orange),
accompanied by an
audible signal. A line is being crossed, right side. Turn the steering wheel in the opposite direction to
return to the correct trajectory.
1
Instruments
Page 18 of 180

16
Warning/indicator lampStateCause Actions/Observations
Lane Depar ture
Warning System Flashing (orange),
accompanied by an
audible signal. A lane is being crossed, left side. Turn the steering wheel in the opposite direction to
return to the correct trajectory.
Rear foglamp Fixed. The lamp is on.
Green warning/indicator lamps
Lane Depar ture
Warning SystemFixed.
The button has been pressed. The lane departure warning system is activated.
Lane Depar ture
Warning System Fixed.
The button has been pressed. The system is operational: it has detected the lines on
the right and/or left sides.
Stop & Star t Fixed.
When the vehicle stops (red lights, traffic
jams, etc.) the Stop & Start system puts
the engine into STOP mode.The lamp goes off and the engine restarts
automatically in START mode, as soon as you want
to move off.
Keyless Entr y
and Star ting
System Fixed.
The conditions for starting the
engine are met.
Flashing slowly. The vehicle is in "ACC" mode.
The accessories (audio system, 12
V
socket, …) can be used.
Flashing rapidly. The steering column is not unlocked. Go into " OFF" mode, then into " ON" mode and gently
turn the steering wheel to unlock the steering column.
Instruments
Page 34 of 180

32
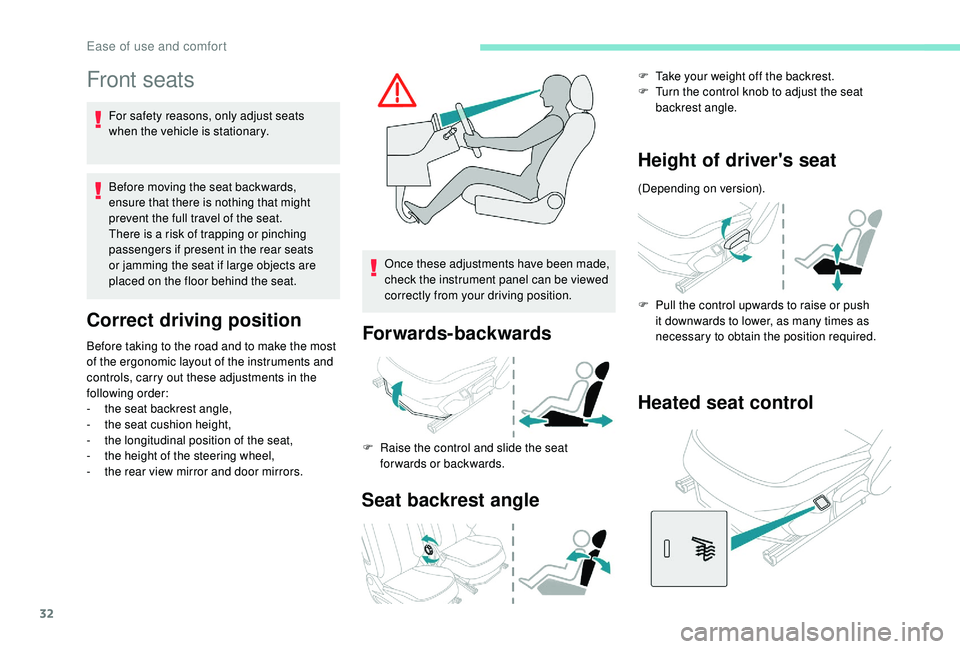
Front seats
For safety reasons, only adjust seats
when the vehicle is stationary.
Before moving the seat backwards,
ensure that there is nothing that might
prevent the full travel of the seat.
There is a risk of trapping or pinching
passengers if present in the rear seats
or jamming the seat if large objects are
placed on the floor behind the seat.
Correct driving position
Before taking to the road and to make the most
of the ergonomic layout of the instruments and
controls, carry out these adjustments in the
following order:
-
t
he seat backrest angle,
-
t
he seat cushion height,
-
t
he longitudinal position of the seat,
-
t
he height of the steering wheel,
-
t
he rear view mirror and door mirrors. Once these adjustments have been made,
check the instrument panel can be viewed
correctly from your driving position.Forwards-backwards
F Raise the control and slide the seat
forwards or backwards.
Seat backrest angle
F Take your weight off the backrest.
F T urn the control knob to adjust the seat
backrest angle.
Height of driver's seat
(Depending on version).
F
P
ull the control upwards to raise or push
it downwards to lower, as many times as
necessary to obtain the position required.
Heated seat control
Ease of use and comfort
Page 38 of 180

36
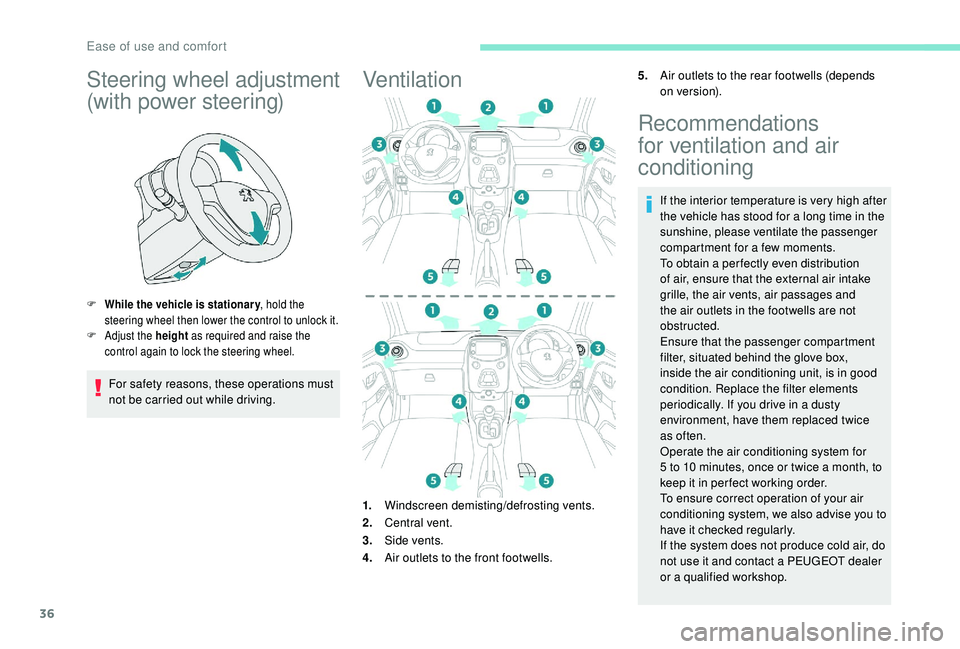
Steering wheel adjustment
(with power steering)
F While the vehicle is stationary, hold the
steering wheel then lower the control to unlock it.
F
A
djust the height as required and raise the
control again to lock the steering wheel.
For safety reasons, these operations must
not be carried out while driving.
Ventilation5. Air outlets to the rear footwells (depends
on version).
1. Windscreen demisting/defrosting vents.
2. Central vent.
3. Side vents.
4. Air outlets to the front footwells.
Recommendations
for ventilation and air
conditioning
If the interior temperature is very high after
the vehicle has stood for a
long time in the
sunshine, please ventilate the passenger
compartment for a
few moments.
To obtain a
per fectly even distribution
of air, ensure that the external air intake
grille, the air vents, air passages and
the air outlets in the footwells are not
obstructed.
Ensure that the passenger compartment
filter, situated behind the glove box,
inside the air conditioning unit, is in good
condition. Replace the filter elements
periodically. If you drive in a
dusty
environment, have them replaced twice
as often.
Operate the air conditioning system for
5
to 10 minutes, once or twice a month, to
keep it in per fect working order.
To ensure correct operation of your air
conditioning system, we also advise you to
have it checked regularly.
If the system does not produce cold air, do
not use it and contact a
PEUGEOT dealer
or a
qualified workshop.
Ease of use and comfort