2018 PEUGEOT 108 wheel
[x] Cancel search: wheelPage 99 of 180

97
Compatibility of fuels
Fuel used for petrol engines
The petrol engines are compatible with biofuels
that conform to current and future European
standards and which can be obtained from
filling stations:
Petrol that meets standard EN228,
mixed with a biofuel that meets
standard EN15376.
The only petrol additives authorised
for use are those that meet the
B715001
standard.
Travelling abroad
Cer tain fuels could damage the engine of
your vehicle.
In cer tain countries, the use of a par ticular
fuel may be required (specific octane
rating, specific trade name, etc.) to ensure
correct operation of the engine.
For any additional information, contact a
dealer.
Snow chains
In wintry conditions, snow chains
improve traction as well as the
behaviour of the vehicle when
braking.
Snow chains must be fitted only to the
front wheels. They must never be fitted to
"space-saver" type spare wheels.
Take account of the legislation in force in
your country on the use of snow chains
and the maximum authorised speed.
Installation tips
It is strongly recommended that before
you leave, you practise fitting the snow
chains on a level and dry sur face.
Avoid driving with snow chains on roads
that have been cleared of snow to avoid
damaging your vehicle's tyres and the
road sur face. If your vehicle is fitted with
alloy wheels, check that no part of the
chain or its fixings is in contact with the
wheel rim.
Only use the chains designed to be fitted to the
type of wheels fitted to your vehicle:
Original tyre size Maximum link size
165/65
R14 9
mm
165/60
R15
F
I
f you have to fit the chains during a
journey,
stop the vehicle on a
flat sur face on the side
of the road.
F
A
pply the parking brake and position any
wheel chocks under the wheels to prevent
movement of your vehicle.
F
F
it the chains following the instructions
provided by the manufacturer.
F
M
ove off gently and drive for a
few
moments, without exceeding 31
mph
(50
km/h).
F
S
top your vehicle and check that the snow
chains are correctly tightened. For more information on snow chains,
contact a
PEUGEOT dealer or a qualified
workshop.
When you drive with snow chains, you
should deactivate the lane departure
warning system.
7
Practical information
Page 105 of 180
103
Brake pads
Brake wear depends on the style
of driving, particularly in the case
of vehicles used in town, over short
distances. It may be necessary to
have the condition of the brakes
checked, even between vehicle
services.
Unless there is a
leak in the circuit, a drop in
the brake fluid level indicates that the brake
pads are worn.
Brake disc/drum wear
For information on checking
brake disc/drum wear, contact
a
PEUGEOT dealer or a qualified
workshop.
Parking brake
If excessive travel or a loss of
e ffectiveness of this system is
noticed, the parking brake must
be checked, even between two
services.
This system must be checked by a
PEUGEOT
dealer or a
qualified workshop.
Wheels and tyres
The pressure must be checked on
all tyres, including the spare wheel,
when the tyres are "cold", at least
once a month and before a long
j o u r n ey. Driving with worn or damaged tyres reduces
braking efficiency and control of the vehicle's
steering. Regular inspections of the condition
of tyres (tread and sides) and rims are
recommended as well as making sure that
valves are fitted.
Using different size wheels and tyres from
those specified can affect the lifetime of tyres,
wheel rotation, ground clearance and the
speedometer reading and have an adverse
effect on road holding.
Fitting different tyres on the front and rear axles
can cause the ESC to mistime.
Only use products recommended by
PEUGEOT or products of equivalent
quality and specification.
In order to optimise the operation of
components as important as those in the
braking system, PEUGEOT selects and
offers very specific products.
After washing the vehicle, dampness, or
in wintry conditions, ice can form on the
brake discs and pads: braking efficiency
may be reduced. Make light brake
applications to dry and defrost the brakes.
ETG gearbox
The ETG gearbox does not require
any maintenance (no oil change).
The pressures given on the tyre pressure label
are valid for "cold" tyres. If you have driven for
more than 10
minutes or more than 6 miles
(10
kilometres) at more than 31 mph (50 km/h),
0.3
bar (30 kPa) should be added to the values
given on the label.
Under-inflation increases fuel consumption.
Non-compliant tyre pressure causes premature
wear on tyres and has an adverse effect on the
vehicle's road holding – Risk of an accident!
7
Practical information
Page 107 of 180
105
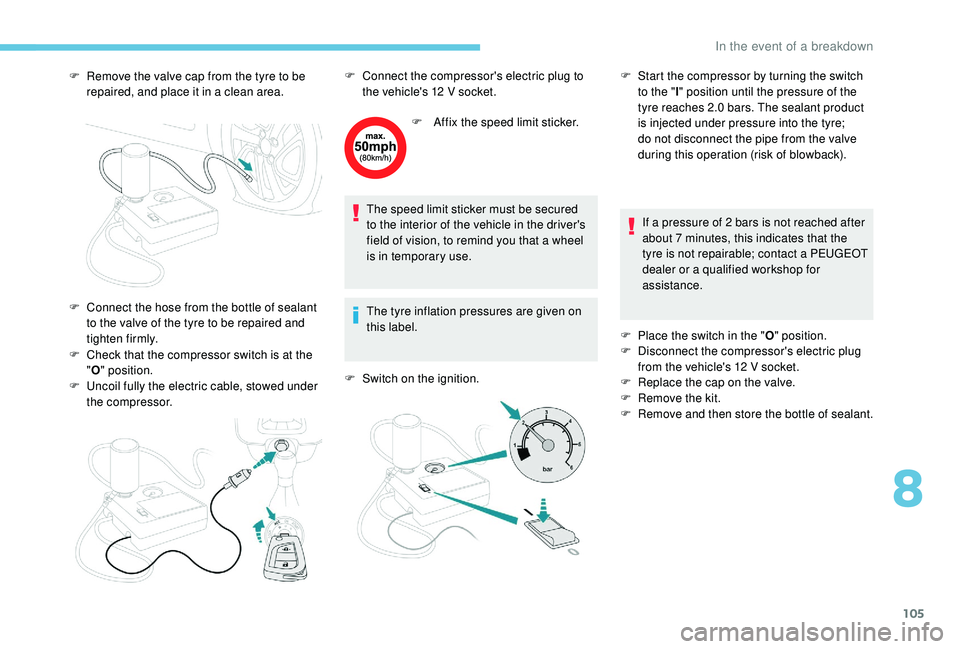
F Remove the valve cap from the tyre to be repaired, and place it in a clean area.
F
C
heck that the compressor switch is at the
" O " position.
F
U
ncoil fully the electric cable, stowed under
the compressor. F
A
ffix the speed limit sticker.
The speed limit sticker must be secured
to the interior of the vehicle in the driver's
field of vision, to remind you that a
wheel
is in temporary use.
The tyre inflation pressures are given on
this label.
F
S
witch on the ignition.If a
pressure of 2 bars is not reached after
about 7
minutes, this indicates that the
tyre is not repairable; contact a
PEUGEOT
dealer or a
qualified workshop for
assistance.
F
P
lace the switch in the "O" position.
F
D
isconnect the compressor's electric plug
from the vehicle's 12
V socket.
F
R
eplace the cap on the valve.
F
R
emove the kit.
F
R
emove and then store the bottle of sealant.
F
C
onnect the hose from the bottle of sealant
to the valve of the tyre to be repaired and
tighten firmly. F
C onnect the compressor's electric plug to
the vehicle's 12 V socket.F
S tart the compressor by turning the switch
to the " l" position until the pressure of the
tyre reaches 2.0
bars. The sealant product
is injected under pressure into the tyre;
do not disconnect the pipe from the valve
during this operation (risk of blowback).
8
In the event of a breakdown
Page 109 of 180
107
If a pressure of 2 bars is not reached after
7 minutes, this indicates that the tyre is not
repairable; contact a
PEUGEOT dealer or
a
qualified workshop for assistance.
F
O
nce the correct pressure is reached, put
the switch to the " O" position.
F
R
emove the kit then stow it. Do not drive more than 120
mph
(200 km/h) with the repaired tyre; see
a PEUGEOT dealer or a qualified
workshop to change the tyre.
Tyre under-inflation detection After a tyre repair, the warning
lamp will remain on until the
system is reset.
For more information on Tyre under-
inflation detection , refer to the
corresponding section.
Should the pressure of one or more tyres
be adjusted, it is necessary to reinitialise
the under-inflation detection system.
For more information on Tyre under-
inflation detection , refer to the
corresponding section.
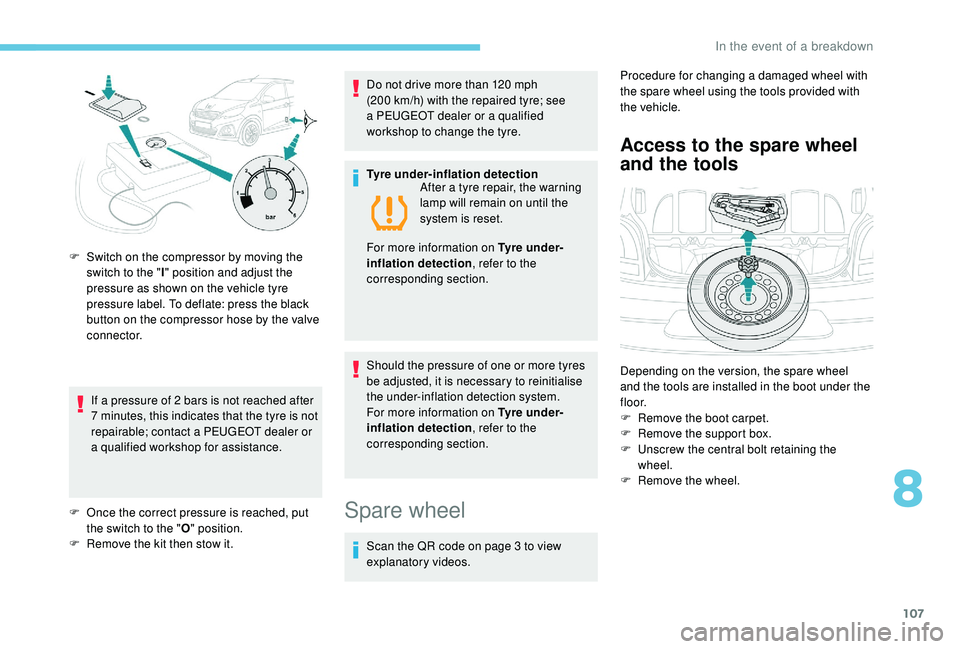
F
S
witch on the compressor by moving the
switch to the " I" position and adjust the
pressure as shown on the vehicle tyre
pressure label. To deflate: press the black
button on the compressor hose by the valve
connector.
Spare wheel
Scan the QR code on page 3 to view
e xplanatory videos. Procedure for changing a
damaged wheel with
the spare wheel using the tools provided with
the vehicle.
Access to the spare wheel
and the tools
Depending on the version, the spare wheel
and the tools are installed in the boot under the
f l o o r.
F
R
emove the boot carpet.
F
R
emove the support box.
F
U
nscrew the central bolt retaining the
wheel.
F
R
emove the wheel.
8
In the event of a breakdown
Page 110 of 180
108
Tools available for you to use
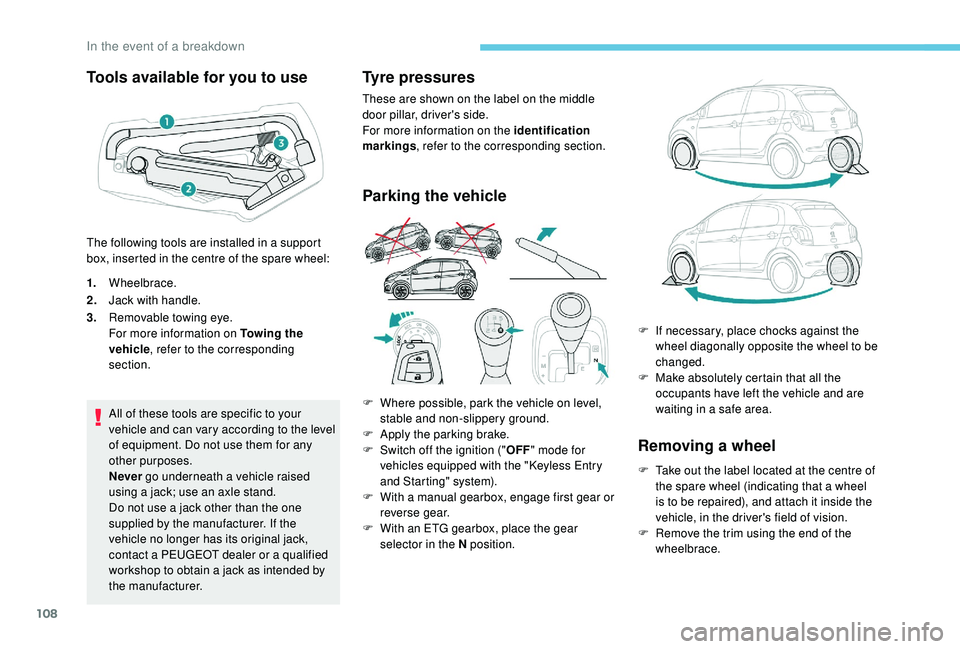
1.Wheelbrace.
2. Jack with handle.
3. Removable towing eye.
For more information on Towing the
vehicle , refer to the corresponding
section.
All of these tools are specific to your
vehicle and can vary according to the level
of equipment. Do not use them for any
other purposes.
Never go underneath a
vehicle raised
using a
jack; use an axle stand.
Do not use a
jack other than the one
supplied by the manufacturer. If the
vehicle no longer has its original jack,
contact a
PEUGEOT dealer or a qualified
workshop to obtain a
jack as intended by
the manufacturer.
Tyre pressures
These are shown on the label on the middle
door pillar, driver's side.
For more information on the identification
markings , refer to the corresponding section.
Parking the vehicle
Removing a wheel
F Take out the label located at the centre of the spare wheel (indicating that a wheel
is to be repaired), and attach it inside the
vehicle, in the driver's field of vision.
F
R
emove the trim using the end of the
wheelbrace.
The following tools are installed in a
support
box, inserted in the centre of the spare wheel:
F
W
here possible, park the vehicle on level,
stable and non-slippery ground.
F
A
pply the parking brake.
F
S
witch off the ignition ("
OFF" mode for
vehicles equipped with the " K
eyless Entry
and Starting" system).
F
W
ith a
manual gearbox, engage first gear or
reverse gear.
F
W
ith an ETG gearbox, place the gear
selector in the N position. F
I
f necessary, place chocks against the
wheel diagonally opposite the wheel to be
changed.
F
M
ake absolutely certain that all the
occupants have left the vehicle and are
waiting in a safe area.
In the event of a breakdown
Page 111 of 180

109
F Undo the wheel bolts using the wheelbrace 1.
F Place the foot of jack 2 on the ground and
ensure that it is directly below the front
A or rear B jacking point provided on the
underbody, whichever is closest to the
wheel to be changed. F
E
xtend jack 2 until its head comes into
contact with jacking point A or B used,
with contact sur face A or B on the vehicle
correctly engaged with the central part of
the head of the jack.
Ensure that the jack is stable. If the
ground is slippery or loose, the jack may
slip or collapse – risk of injury!
Ensure that the jack is positioned only
at one of jacking points A or B under the
vehicle, making sure that the vehicle's
contact sur face is centred on the head of
the jack. Otherwise, the vehicle could be
damaged and/or the jack could collapse –
risk of injury! F
L
ift the vehicle, until there is a sufficient
space between the wheel and the ground,
for easily putting the spare wheel (not
punctured).
F
R
emove the bolts and keep them in a clean
place.
F
R
emove the wheel.
8
In the event of a breakdown
Page 112 of 180
110
Refitting the wheel
The jack must only be used to change a wheel
w ith a damaged or punctured tyre.
The jack does not require any maintenance.
The jack meets European standards, as defined
in the Machinery Directive 2006/42/CE.
Certain parts of the jack such as the screw
thread or the joints could cause injury:
avoid touching them.
Carefully remove all traces of lubrication
grease.
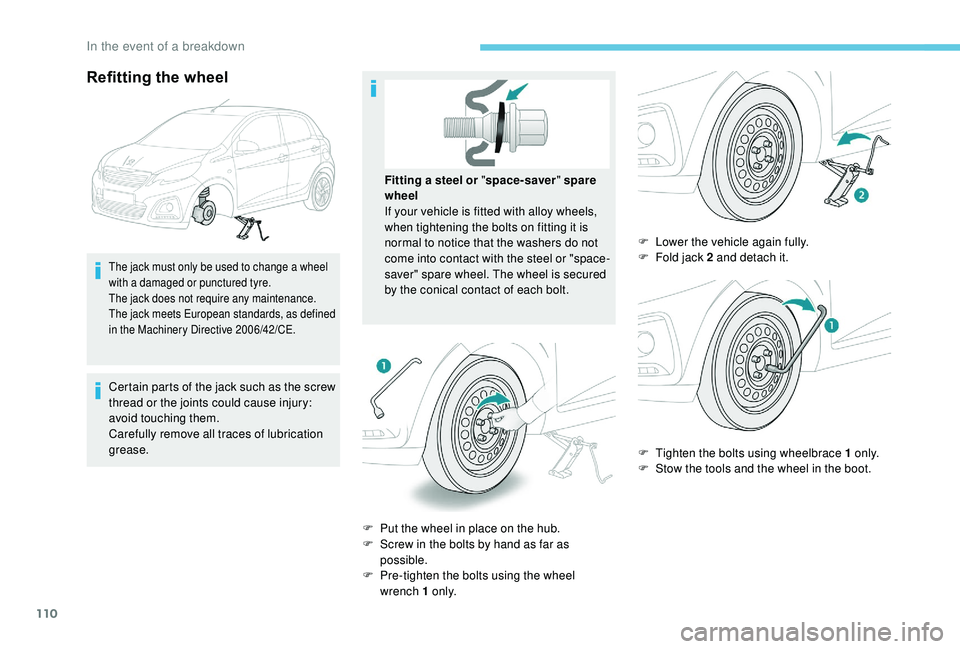
F
P
ut the wheel in place on the hub.
F
S
crew in the bolts by hand as far as
possible.
F
P
re-tighten the bolts using the wheel
wrench 1
o n l y.F
L
ower the vehicle again fully.
F
F
old jack 2 and detach it.
F
T
ighten the bolts using wheelbrace 1 o n l y.
F
S
tow the tools and the wheel in the boot.
Fitting a
steel or "
space-saver " spare
wheel
If your vehicle is fitted with alloy wheels,
when tightening the bolts on fitting it is
normal to notice that the washers do not
come into contact with the steel or "space-
saver" spare wheel. The wheel is secured
by the conical contact of each bolt.
In the event of a breakdown
Page 113 of 180
111
After changing a wheel
Have the tightness of the bolts and the
pressure of the spare wheel checked by
a
PEUGEOT dealer or a qualified workshop
without delay.
Have the punctured wheel repaired and
replace it on the vehicle as soon as possible.
When using the "space-saver" type spare
wheel, do not exceed 50 mph (80 km/h).
When you drive with the spare wheel
fitted, you should deactivate the lane
departure warning system.
Changing a bulb
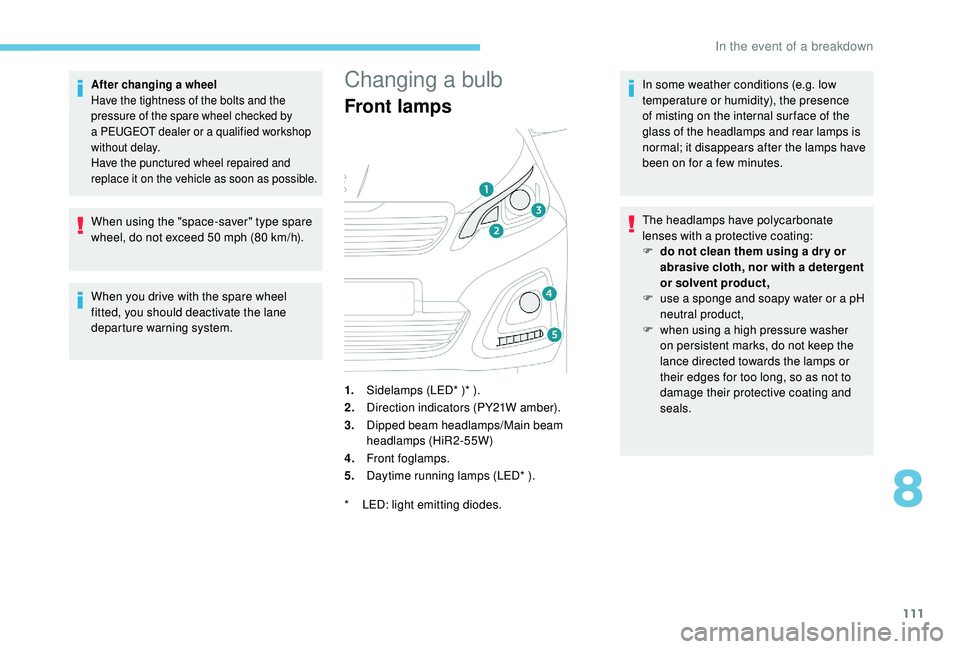
1.Sidelamps (LED* )* ).
2. Direction indicators (PY21W amber).
3. Dipped beam headlamps/Main beam
headlamps (HiR2-55W)
4. Front foglamps.
5. Daytime running lamps (LED* ). In some weather conditions (e.g. low
temperature or humidity), the presence
of misting on the internal sur face of the
glass of the headlamps and rear lamps is
normal; it disappears after the lamps have
been on for a
few minutes.
*
L
ED: light emitting diodes. The headlamps have polycarbonate
lenses with a
protective coating:
F
d
o not clean them using a dr y or
abrasive cloth, nor with a detergent
or solvent product,
F
u
se a sponge and soapy water or a pH
neutral product,
F
w
hen using a high pressure washer
on persistent marks, do not keep the
lance directed towards the lamps or
their edges for too long, so as not to
damage their protective coating and
seals.
Front lamps
8
In the event of a breakdown