2018 PEUGEOT 108 low oil pressure
[x] Cancel search: low oil pressurePage 13 of 180
11
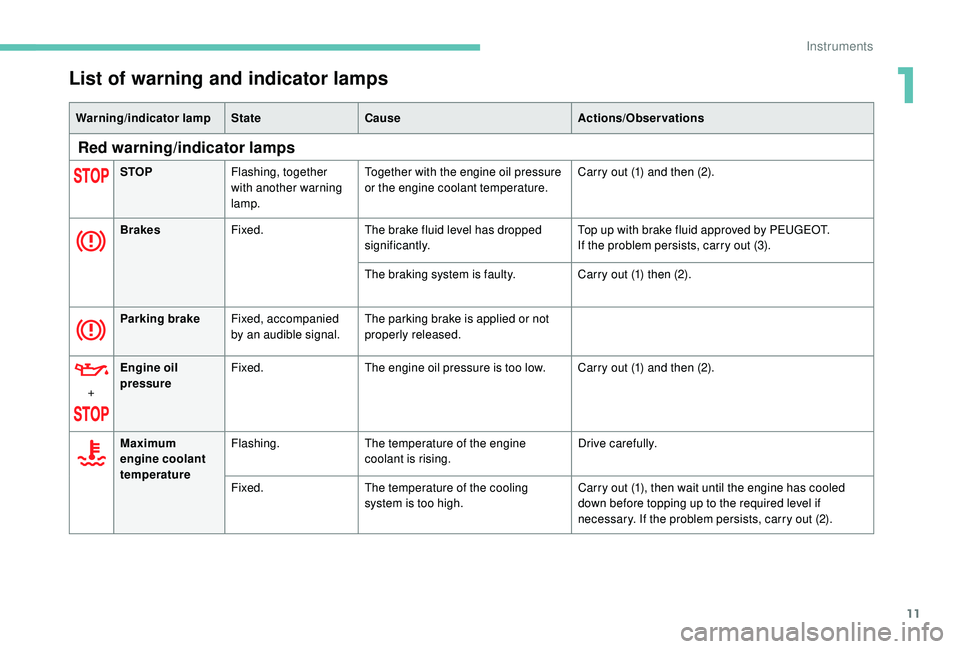
List of warning and indicator lamps
Warning/indicator lampStateCause Actions/Observations
Red warning/indicator lamps
STOPFlashing, together
with another warning
lamp. Together with the engine oil pressure
or the engine coolant temperature.
Carry out (1) and then (2).
Brakes Fixed. The brake fluid level has dropped
significantly. Top up with brake fluid approved by PEUGEOT.
If the problem persists, carry out (3).
The braking system is faulty. Carry out (1) then (2).
Parking brake Fixed, accompanied
by an audible signal. The parking brake is applied or not
properly released.
+ Engine oil
pressure
Fixed.
The engine oil pressure is too low. Carry out (1) and then (2).
Maximum
engine coolant
temperature Flashing.
The temperature of the engine
coolant is rising. Drive carefully.
Fixed. The temperature of the cooling
system is too high. Carry out (1), then wait until the engine has cooled
down before topping up to the required level if
necessary. If the problem persists, carry out (2).
1
Instruments
Page 103 of 180
101
Topping up the engine oil level
The location of the oil filler cap is shown in the
corresponding underbonnet layout view.
F
U
nscrew the oil filler cap to access the filler
opening.
F
A
dd oil in small quantities, avoiding any
spills on engine components (risk of fire).
F
W
ait a few minutes before checking the
level again using the dipstick.
F
A
dd more oil if necessary.
F
A
fter checking the level, carefully refit the oil
filler cap and the dipstick in its tube.
Engine oil change
In order to maintain the reliability of the engine
and emissions control system, never use
additives in the engine oil.
Brake fluid level
The fluid level should be close to the
"MA X" mark. If it is not, check the
brake pad wear.
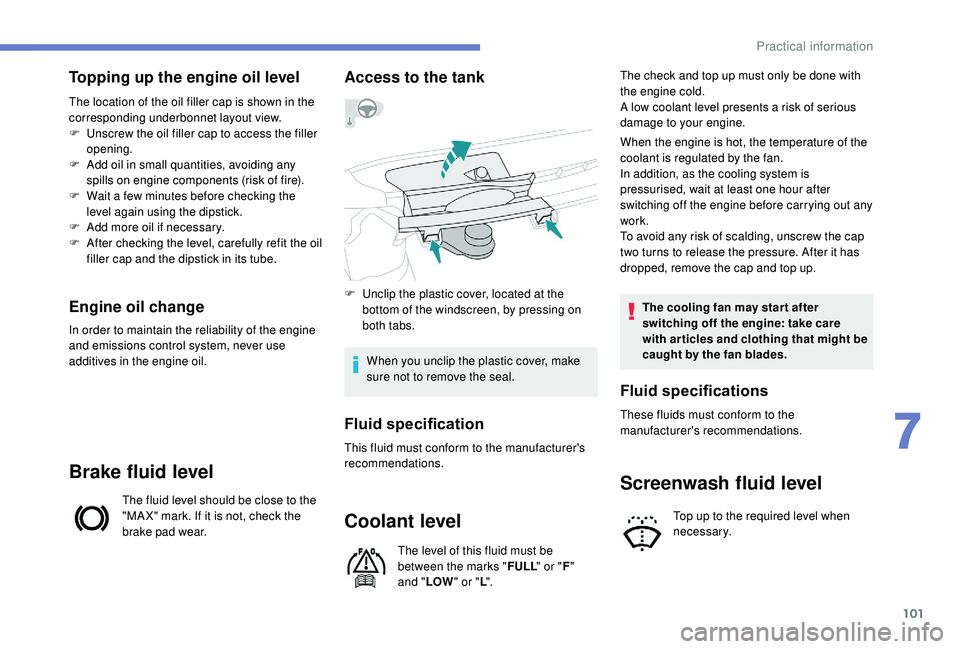
Access to the tank
F Unclip the plastic cover, located at the bottom of the windscreen, by pressing on
both tabs.
When you unclip the plastic cover, make
sure not to remove the seal.
Fluid specification
This fluid must conform to the manufacturer's
recommendations.
Coolant level
The level of this fluid must be
between the marks " FULL" or "F"
and " LOW " or "L". The check and top up must only be done with
the engine cold.
A low coolant level presents a
risk of serious
damage to your engine.
When the engine is hot, the temperature of the
coolant is regulated by the fan.
In addition, as the cooling system is
pressurised, wait at least one hour after
switching off the engine before carrying out any
work.
To avoid any risk of scalding, unscrew the cap
two turns to release the pressure. After it has
dropped, remove the cap and top up.
The cooling fan may star t after
switching off the engine: take care
with articles and clothing that might be
caught by the fan blades.
Screenwash fluid level
Top up to the required level when
necessary.
Fluid specifications
These fluids must conform to the
manufacturer's recommendations.
7
Practical information
Page 106 of 180
104
Temporary puncture
repair kit
Scan the QR code on page 3 to view
e xplanatory videos.
Comprising a
compressor and a sealant
cartridge, it allows the temporary repair of
a
tyre so that you can drive to the nearest
garage.
It is designed to repair most punctures which
could affect the tyre, located on the tyre tread
or shoulder.
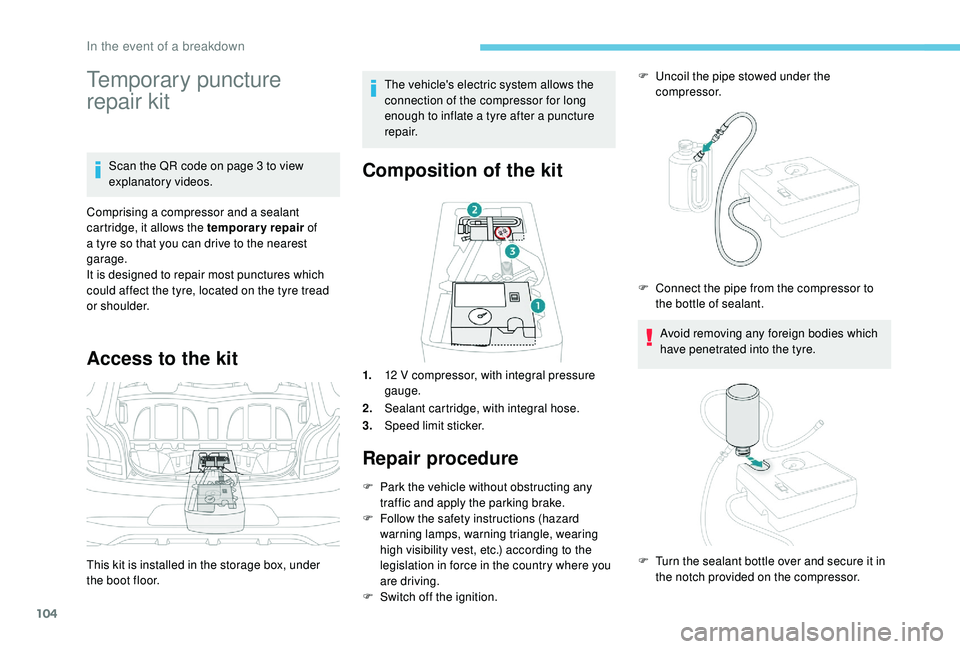
Access to the kit
This kit is installed in the storage box, under
the boot floor. The vehicle's electric system allows the
connection of the compressor for long
enough to inflate a
tyre after a puncture
repair.
Composition of the kit
1. 12 V compressor, with integral pressure
gauge.
2. Sealant cartridge, with integral hose.
3. Speed limit sticker.
Repair procedure
F Park the vehicle without obstructing any
traffic and apply the parking brake.
F
F
ollow the safety instructions (hazard
warning lamps, warning triangle, wearing
high visibility vest, etc.) according to the
legislation in force in the country where you
are driving.
F
S
witch off the ignition. F
U
ncoil the pipe stowed under the
compressor.
Avoid removing any foreign bodies which
have penetrated into the tyre.
F
C
onnect the pipe from the compressor to
the bottle of sealant.
F
T
urn the sealant bottle over and secure it in
the notch provided on the compressor.
In the event of a breakdown
Page 107 of 180
105
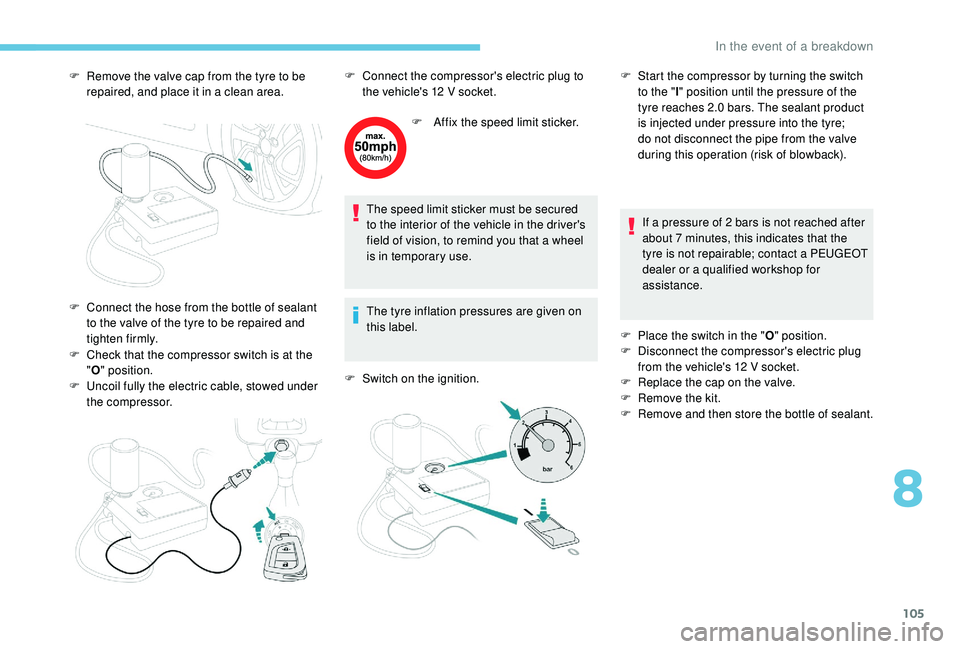
F Remove the valve cap from the tyre to be repaired, and place it in a clean area.
F
C
heck that the compressor switch is at the
" O " position.
F
U
ncoil fully the electric cable, stowed under
the compressor. F
A
ffix the speed limit sticker.
The speed limit sticker must be secured
to the interior of the vehicle in the driver's
field of vision, to remind you that a
wheel
is in temporary use.
The tyre inflation pressures are given on
this label.
F
S
witch on the ignition.If a
pressure of 2 bars is not reached after
about 7
minutes, this indicates that the
tyre is not repairable; contact a
PEUGEOT
dealer or a
qualified workshop for
assistance.
F
P
lace the switch in the "O" position.
F
D
isconnect the compressor's electric plug
from the vehicle's 12
V socket.
F
R
eplace the cap on the valve.
F
R
emove the kit.
F
R
emove and then store the bottle of sealant.
F
C
onnect the hose from the bottle of sealant
to the valve of the tyre to be repaired and
tighten firmly. F
C onnect the compressor's electric plug to
the vehicle's 12 V socket.F
S tart the compressor by turning the switch
to the " l" position until the pressure of the
tyre reaches 2.0
bars. The sealant product
is injected under pressure into the tyre;
do not disconnect the pipe from the valve
during this operation (risk of blowback).
8
In the event of a breakdown
Page 108 of 180
106
Take care, the sealant product is harmful
if swallowed and causes irritation to the
eyes.
Keep this product out of the reach of
children.
The use-by date of the fluid is marked on
the bottle.
After use, do not discard the bottle in
standard waste, take it to a PEUGEOT
dealer or an authorised waste disposal
site.
Do not forget to obtain a
new bottle of
sealant, available from a
PEUGEOT
dealer or a
qualified workshop. Do not exceed the speed of 50
mph
(80 km/h) when driving with a tyre repaired
using this type of kit.
Checking/adjusting tyre
pressures
You can also use the compressor,
without injecting sealant, to check and, if
necessary, adjust the tyre pressures
F
R
emove the valve cap from the tyre and
place it in a
clean area.
F
U
ncoil the pipe stowed under the
compressor. F
C
heck that the compressor switch is at the
" O " position.
F
U
ncoil fully the electric cable, stowed under
the compressor.
The tyre inflation pressures are given on
this label.
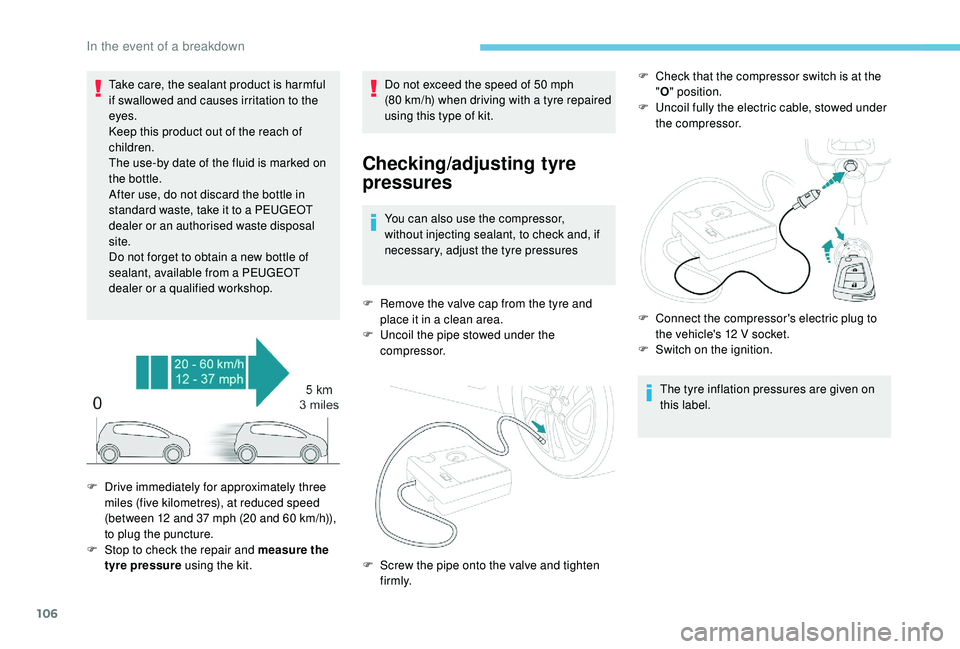
F
D
rive immediately for approximately three
miles (five kilometres), at reduced speed
(between 12
and 37
mph (20
and 60
km/h)),
to plug the puncture.
F
S
top to check the repair and measure the
tyre pressure using the kit. F
S
crew the pipe onto the valve and tighten
f i r m l y. F
C
onnect the compressor's electric plug to
the vehicle's 12
V socket.
F
S
witch on the ignition.
In the event of a breakdown
Page 174 of 180
172
Safety, children ......57, 59 - 61, 64, 66 - 68, 70 -71
Screen, colour ............................................... 3-
4
Screenwash
.................................................... 49
Screenwash, rear
............................................ 50
Seat belts
................................ 12, 34, 54-56, 64
Seats, front
...............................
.......................32
Seats, heated
.................................................. 33
Seats, rear
................................................. 33-34
Selector, gear
............................................ 76 -79
Servicing
........................................................... 6
M
aintenance, routine
........................................
6
Manual mode
............................................
76 -79
Mat
..................................................................
44
Mirror, rear view
..............................................
35
Mirror, vanity
...................................................
42
Mirrors, door .................................................... 35
Mode, driving
............................................
76 -79
Mode, Easy (automatic mode)
.................. 76 -79
Mountings, ISOFIX
................................... 66, 69
Lamp, boot
......................................................
41
Lamps, front
..................................................
112
Lamps, rear
...................................................
113
Lane Departure Warning System (LDWS)
...........................
15 -16 , 9 0 - 91
Level, brake fluid
...........................................
101
Level, engine coolant
....................................
101
Level, engine oil
.....................................
10 0 -101
Level, screenwash fluid
.........................
10
1-102
Levels and checks
..............................
....
9 9 -10 2
Lighting
..........................................................
112
Lighting, guide-me home
................................
48
Lighting dimmer
.........................................
18 -19
Loading
.............................................................
6
Locating your vehicle
......................................
23
Locking/unlocking a door from the inside...26-27
Low fuel level
............................................ 18
, 9 6 OIl, engine
...............................
...............10 0 -101
Oil change
.............................................. 10
0 -101
Oil consumption
.....................................
10 0 -101
Opening the bonnet
..................................
98-99
Opening the boot
................................
23 -24, 27
Opening the doors
....................................
23 -24
Number plate lamps
......................................
113
Pads, brake
................................................... 103
Parcel shelf, rear
.............................................44
Parking brake
..........................................76, 103
Pedal, clutch.................................................. 102
Plates, identification ...................................... 127
Player, USB
................................................... 9, 9
Port, USB
.......................................... 42- 43, 9, 9
Power steering
...............................
.................12
Pressures, tyres
............................103, 107, 127
Pre-tensioning seat belts
..........................55-56
Protecting children
.......57, 59 - 61, 64, 66 - 68, 70
Puncture
..........................104, 10 6 -108, 110 -111 Radio
.......................................................
7, 7, 1 0
Radio, digital (Digital Audio Broadcasting – DAB) ..............................
8, 8 -9
RDS
................
...................................................
8
Rear screen, demisting
...................................
41
Recharging the battery
.................................
123
Recirculation, air
.......................................
38-40
Reinitialisation of the under- inflation detection system
.............................
93
Reminder, lighting on
...................................... 47
R
emote control
....................................
22-23, 26
Removing and fitting a fuse
............
11
4 -11 6 , 11 9
Removing a wheel ..................
1 0 7-1 0 8 , 11 0 -111
Removing the mat
...........................................
44
Replacing bulbs ...................................... 111 -112
Replacing the air filter ................................... 10
2
Replacing the oil filter ................................... 10
2
Replacing the passenger compartment filter ...102
Reservoir, screenwash
.......................... 101-102
Reversing camera
...............................
............ 91
Reversing lamps
..............................
............. 113
Roof, electric fabric
......................................... 29
Roof bars
......................................................... 98
S
M
L
O
N
P
R
Alphabetical index