2018 PEUGEOT 108 AUX
[x] Cancel search: AUXPage 6 of 180

4
Instruments and controls1
Door mirrors
Electric windows
Central locking
2
Bonnet release
3
Dashboard fuses
4
Instrument panel
Rev counter
Central display
Warning and indicator lamps
Indicators
Trip computer
5
Courtesy lamp
Fabric electric roof opening control
Speed Limit recognition and
recommendation
Active City Brake
Rear view mirror
Sun visor
6
Touch screen
Radio
Setting the time
7
Heating, ventilation
Manual air conditioning
Automatic air conditioning
Front demist/defrost
Rear screen demisting/defrosting
8
12 V accessory socket
USB port
Auxiliary Jack socket
9
Manual gearbox
ETG gearbox
Gear efficiency indicator
Hill start assist
10
Manual parking brake
11
Front passenger airbag
12
Side vents
13
Glove box
Deactivating the front passenger airbag
Reinitialisation of the under-inflation
detection system
Over view
Page 44 of 180

42
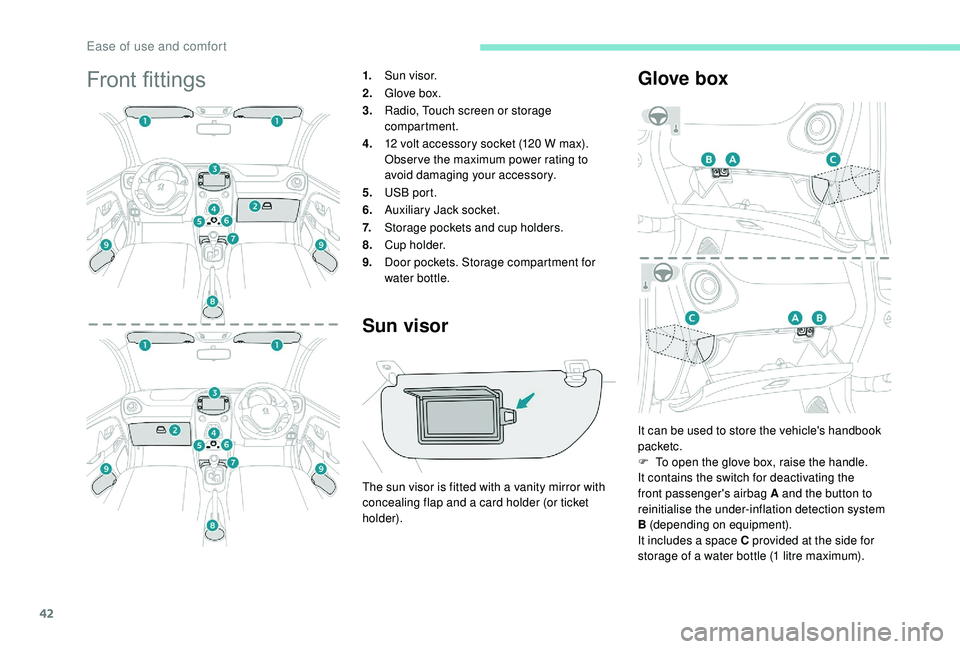
Front fittings1.Sun visor.
2. Glove box.
3. Radio, Touch screen or storage
compartment.
4. 12
volt accessory socket (120 W max).
Obser ve the maximum power rating to
avoid damaging your accessory.
5. USB port.
6. Auxiliary Jack socket.
7. Storage pockets and cup holders.
8. C u p h o l d e r.
9. Door pockets. Storage compartment for
water bottle.
Sun visor
The sun visor is fitted with a vanity mirror with
c oncealing flap and a card holder (or ticket
holder).
Glove box
It can be used to store the vehicle's handbook
packetc.
F
T
o open the glove box, raise the handle.
It contains the switch for deactivating the
front passenger's airbag A and the button to
reinitialise the under-inflation detection system
B (depending on equipment).
It includes a
space C provided at the side for
storage of a
water bottle (1 litre maximum).
Ease of use and comfort
Page 45 of 180

43
12 V accessory socket
Do not exceed the maximum power rating
of the socket (risk of damage to your
device).
The connection of an electrical device
not approved by PEUGEOT, such as
a
USB charger, may adversely affect the
operation of vehicle electrical systems,
causing faults such as poor radio
reception or inter ference with displays in
the screens.
USB port
To connect portable devices such as an iPod®
type digital audio player or USB memory stick.
It reads the audio files which are sent to your
audio system, to be listened to through the
vehicle's speakers.
You can manage these files using the steering
mounted controls or those on the front of the
audio system.
Connected to the USB port during
use, the portable device may recharge
automatically.
For more information on Audio
equipment and telematics and in
particular the use of this equipment, refer
to the corresponding section.
Auxiliary socket (JACK)
To connect a portable device so that you
c an listen to your music files via the vehicle's
speakers.
The management of the files is done using your
portable device.
For more information on Audio
equipment and telematics and in
particular the use of this equipment, refer
to the corresponding section.
The USB port and jack socket also allow
a smartphone to be connected:
-
e
ither as a MirrorLink
TM connection,
using just the USB port,
-
o
r as a
iPhone
® connection, by using
the USB port and the jack socket at the
same time.
These connections allow certain telephone
applications to be used on the touch screen.
F To connect a 12 V accessory (maximum
power: 120 Watts), lift the cover and
connect a
suitable adaptor.
3
Ease of use and comfort
Page 132 of 180

2
Audio system glossary
System detailsMeaning/corresponding actions
Add contacts Add contact.
Add SD Associate key with a
contact.
All calls All calls.
ASL Mid/Low/High/Off Adjust the sound atmosphere (medium/low/high).
AUX On/Off Enable or disable the AUX mode (Auxiliary).
Back Back.
Balance Adjust sound distribution.
Bass Adjust bass.
Bluetooth info Information related to Bluetooth system.
BT Power On/Off Enable or disable automatic Bluetooth connection.
B TA Audio Bluetooth.
BTA – BT audio player not found The system does not recognise audio player via Bluetooth.
Call volume Adjust volume of call.
Car device info Information about the system.
Clock Adjust time.
Delete Delete.
Delete call history Delete call history.
Delete contact Delete contact from directory.
Delete phonebook Delete directory.
Radio
Page 135 of 180

5
MODE
MODE
First steps
Audio system
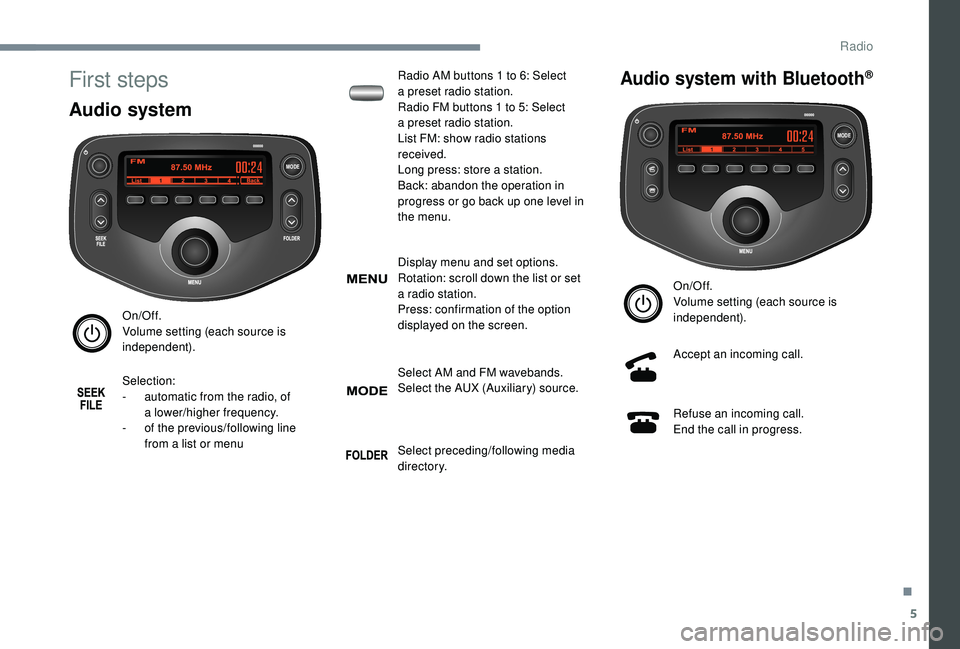
On/Off.
Volume setting (each source is
independent).
Selection:
-
a
utomatic from the radio, of
a
lower/higher frequency.
-
o
f the previous/following line
from a
list or menu Radio AM buttons 1
to 6: Select
a
preset radio station.
Radio FM buttons 1 to 5: Select
a
preset radio station.
List FM: show radio stations
received.
Long press: store a station.
Back: abandon the operation in
progress or go back up one level in
the menu.
Display menu and set options.
Rotation: scroll down the list or set
a
radio station.
Press: confirmation of the option
displayed on the screen.
Select AM and FM wavebands.
Select the AUX (Auxiliary) source.
Select preceding/following media
di r e c to r y.
Audio system with Bluetooth®
On/Off.
Volume setting (each source is
independent).
Accept an incoming call.
Refuse an incoming call.
End the call in progress.
.
Radio
Page 136 of 180

6
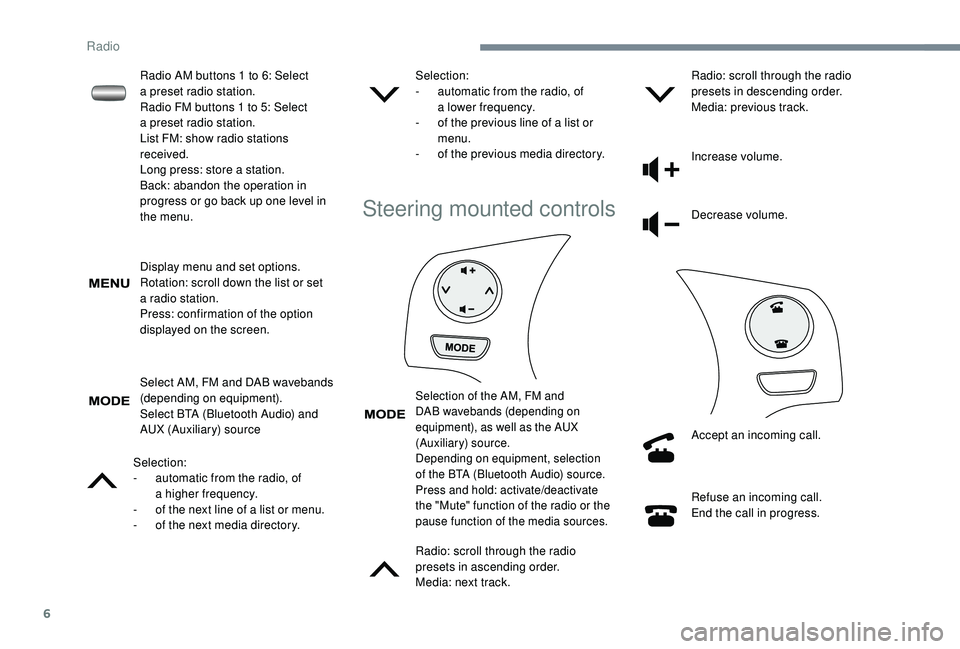
Display menu and set options.
Rotation: scroll down the list or set
a
radio station.
Press: confirmation of the option
displayed on the screen.
Select AM, FM and DAB wavebands
(depending on equipment).
Select BTA (Bluetooth Audio) and
AUX (Auxiliary) source
Selection:
-
a
utomatic from the radio, of
a
higher frequency.
-
o
f the next line of a list or menu.
-
o
f the next media directory. Selection:
-
a
utomatic from the radio, of
a
lower frequency.
-
o
f the previous line of a list or
menu.
-
o
f the previous media directory.
Steering mounted controls
Selection of the AM, FM and
DAB wavebands (depending on
equipment), as well as the AUX
(Auxiliary) source.
Depending on equipment, selection
of the BTA (Bluetooth Audio) source.
Press and hold: activate/deactivate
the "Mute" function of the radio or the
pause function of the media sources.
Radio: scroll through the radio
presets in ascending order.
Media: next track.Radio: scroll through the radio
presets in descending order.
Media: previous track.
Increase volume.
Decrease volume.
Accept an incoming call.
Refuse an incoming call.
End the call in progress.
Radio AM buttons 1
to 6: Select
a
preset radio station.
Radio FM buttons 1
to 5: Select
a
preset radio station.
List FM: show radio stations
received.
Long press: store a
station.
Back: abandon the operation in
progress or go back up one level in
the menu.
Radio
Page 139 of 180

9
If "DAB AF " tracking is enabled, there
is a lag of a few seconds while the
system switches to "FM" analogue radio,
sometimes with a
change in volume.
Once the digital signal quality becomes
good again, the system automatically
changes back to "DAB".
If the "DAB" station being listened to is
not available, or if the " DAB AF" is not
enabled, the sound is muted when the
quality of the digital signal becomes too
p o o r.
Media
USB USB
Insert the USB memory stick in the USB port or
connect the USB device to the USB port using
a
suitable cable (not supplied). The system builds playlists (in temporary
memory), an operation which can take
from a
few seconds to several minutes at
the first connection.
Reduce the number of non-music files
and the number of folders to reduce the
waiting time.
The playlists are updated every time the
ignition is switched off or a USB stick is
connected. However, the audio system
saves these lists and loading time will be
reduced if they have not been changed.
Auxiliary socket (AUX)
Connect the portable device (MP3 player, etc.)
t o the JACK socket using an audio cable.
Information and advice
The audio system reads files with the following
extensions:
".wma," Ver7
and Ver8 types with a flow rate
between 48
and 192 Kbps and Ver9 with a rate
between 48
and 320 Kbps.
".aac," with a
flow rate between 16 Kbps and
320
Kbps.
".mp3 - MPEG1" with a
flow rate between
32
and 320 Kbps and ".mp3 - MPEG2" at a rate
between 8
to 160 Kbps.
Sampling frequencies supported are 11, 22,
44
and 48 kHz.
Use only USB memory sticks in FAT32
format
(File Allocation Table).
To avoid any playback or display issues, it is
advisable to create file names that have less
than 20
characters and without using any
special characters (e.g.: " " ?.; ù).
The system supports mobile USB Mass
Storage players or Apple
® at the USB
ports. An adapter cable is not supplied.
Device management is done by the audio
system controls.
Other devices not recognized by the
system during connection must be
connected to the auxiliary socket using
a
Jack cable (not supplied).
.
Radio
Page 150 of 180

2
First steps
* Depending on equipment
In ACC mode or on starting the vehicle, the
system starts up.
A press will mute the sound and
activate the sleep mode (displaying
time and shortcuts).
A long press resets the system.
Volume adjustment by turning (each
source is independent).
Press to access the menu carousel,
then press the virtual buttons in the
touch screen.
A second press allows you to return
to the last source activated.
Turn the knob to access a
list or
higher or lower range. Smartphone voice commands via
the system.
Pressing this button activates the
voice commands function.
In prolonged sunshine and extremely
hot conditions, the system may go into
stand-by for protection (screen and sound
completely off) for a
period of at least
5
minutes.
The return to normal takes place when
the temperature in the passenger
compartment drops.
Pressing with more than one finger is not
recognised.
The touch screen is of the "capacitive"
type.
To clean the screen, we recommend
using a
soft non-abrasive cloth (e.g. a
spectacles cloth) without any additional
products, or a
damp cloth.
Do not use sharp objects on the screen.
Do not touch the screen with wet hands. Selecting the audio source (depending on
version):
-
"
FM "/ "AM "/ " DAB*" radio.
-
"
USB" players.
-
T
elephone connected via Bluetooth and
Bluetooth multimedia broadcast (streaming).
-
M
edia player connected via the auxiliary
socket (jack, cable not supplied).
Shortcuts: Certain information is displayed
in the left-hand bar of the touch screen. It is
possible to directly access the media, the
telephone functions, the "Mirror Screen
®" mode
or the choice of the sound source.
7-inch touch screen tablet