2018 MERCEDES-BENZ SLC ROADSTER display
[x] Cancel search: displayPage 64 of 298
Characteristics when ESP®is deactivated
If ESP®is deactivatedand oneorm orew heels
start to spin,t he÷ ESP®warning lamp in the
instrumentc lusterflashes. In suchs ituations,
ESP
®will no tstabilizet hevehicle.
If you deactivate ESP®:
RESP®no longer improve sdriving stability
Rengine torque is no longer limited and the
driv ewheels are able to spin
Rtraction control is still activated
RActiv eBrake Assist is no longer available; nor
is it activated if you brak efirmly with assis-
tance from ESP
®
RPRE-SAFE®is no longer available, no risit
activated if you brak efirmly and ESP®inter-
venes
RESP®still provides support when you brake
firmly
Activating/deactivatin gESP®(except
Mercedes-AMG SLC 43)
Important safety notes
iObserv ethe "Important safety notes" sec-
tio n(Ypage 56).
You can selectb etween thefollowings tate so f
ESP
®:
RESP®is activated
RSPORT handlingm ode is activated
RESP®is deactivated.
GWARNING
When SPORT handlingm ode is activated,
there is agreate rrisk of skiddinga nd acci-
dents.
Only activat eSPORT handlingm ode in thesit-
uations describe dinthefollowing.
GWARNING
If you deactivate ESP
®,E SP®no longer sta-
bilizes th evehicle .Thereisani ncreased risk
of skiddinga nd an accident.
Only deactivate ESP
®in th esituations descri-
bed in th efollowing. In th
efollowings ituations,itmay be bette rto
activat eSPORT handlingm ode or deactivate
ESP
®:
Rwhen usings nowc hains
Rind eep snow
Ron sandorg ravel
Ron specially designated roads when th evehi-
cle's own oversteering and understeering
characteristics are desired
Spinning th ewheels results in acuttin gaction
whichp rovides bette rgrip.
Drivin ginSPORT handlingm ode or without
ESP
®requires an extremely qualified and expe-
rienced driver.
iActivate ESP®as soon as th esituations
describe dabovenol onger apply. ESP®will
otherwise no tbeable to stabilizet hevehicle if
th ev ehicle start stoskidoraw heel start sto
spin.
!Avoid spinnin gthe driven wheels for an
extended period with ESP®deactivated. You
coul dotherwise damage th edrivetrain.
Deactivating/activatin gESP®
XTo activate SPORTh andling mode: briefly
pres sbutton :.
The M SPORT handlingm ode warning
lamp in th einstrumentc lusterlightsu p. The
SPORT Handling Mode
message appearsi n
th em ultifunction display.
XTo deactivat eSPORTh andling mode:
briefly pres sbutton :.
The M SPORT handlingm ode warning
lamp in th einstrumentc lustergoes out.
62Driving safety systems
Safety
Page 65 of 298
XTo deactivate ESP®:press button :until
the å ESP®OFF warning lamp lights up in
the instrument cluster.
The ÷ OFF
message appears in the multi-
functio ndisplay.
XTo activate ESP®:briefl ypress button :.
The å ESP®OFF warning lamp in the
instrument cluster goe sout.T he ÷ ESP®
ONmessage appears in the multifunctio ndis-
play.
Characteristic sofactivatedS PORT han-
dling mode
If SPOR Thandling modeisa ctivatedand one or
more wheels start to spin, the ÷ESP®warn-
ing lamp in the instrument cluster flashes. ESP®
onlys tabilizes the vehicl etoalimite dd egree.
Whe nSPOR Thandling modeisa ctivated:
RESP®onlyimprovesd riving stability to alim i-
ted degree
Rtractio ncontroliss tilla ctivated
Rengine torque is no longer limite dand the
drive wheels are able to spin
RESP®stil lprovides support when yo ubrake
firmly
Characteristic swhenE SP®is deactivated
If ESP®is deactivate dand one or more wheels
start to spin, the ÷ESP®warning lamp in the
instrument cluster flashes. In such situations,
ESP
®will not stabilize the vehicle.
If yo udeactivate ESP®:
RESP®no longer improvesd riving stability
Rengine torque is no longer limite dand the
drive wheels are able to spin
Rtractio ncontroliss tilla ctivated
RActive Brake Assist is no longer available ;nor
is it activate difyoubrake firmly with assis-
tance from ESP
®
RPRE-SAFE®is no longer available ,nor is it
activate difyoubrake firmly and ESP®inter-
venes
RESP®stil lprovides support when yo ubrake
fi
rmly
EBD (electronicb rake forcedistribu-
tion)
General information
EBD monitors and controls the brake pressure
on the rearw heelstoi mprove driving stability
whil ebraking.
Important safety notes
iObserve the "Important safety notes "sec-
tio nfor driving safety systems(Ypage 56).
GWARNING
If EBD is malfunctioning ,the rearw heelscan
lock, e.g .under ful lbraking .Thisi ncreases the
ris kofs kidding and an accident.
Yo us houl dtherefore adap tyou rd riving style
to the different handling characteristics. Have
the brake system checked at aquali fied spe-
cialist workshop.
Observe informatio nregarding indicator and
warning lamps (
Ypage 204 )aswellasd isplay
messages (Ypage 181).
ADAPTIVE BRAKE
i
Observe the "Important safety notes "sec-
tio n(Ypage 56).
ADAPTIVE BRAK Eenhances braking safety and
offers increased braking comfort. In additio nto
the braking function, ADAPTIVE BRAK Ealsoh as
the HOLD functio n(
Ypage 148)and hill start
assist (Ypage 118).
Protectio nagainstt heft
Immobilizer
XTo activate with the SmartKey: remove the
SmartKey from the ignition lock.
XTo activate with KEYLESS-GO: switch the
ignition off and open the driver'sd oor.
XTo deactivate: switch on the ignition.
The immobilize rprevents your vehicl efrom
being started withou tthe correct SmartKey.
Whe nleaving the vehicle, always take the
SmartKey with yo uand lock the vehicle. The
Protectiona gainsttheft63
Safety
Z
Page 80 of 298
Make sure that the roof and rear window are
clean and dry before opening the roof. Other-
wise, water or dirt could enter the vehicle inte-
rior or trunk.
Opening and closing using the roof
switch
Important safety notes
GWARNING
When opening or closing the roof, body parts
could be trapped by, for example, the roof
mechanism, trunk lid or side windows. There
is ar isk of injury.
When raising or lowering the roof, make sure
that no body parts are in the vicinity of moving
components. If someone becomes trapped,
release the button.
For safety reasons, you can only open or close
the roof when the vehicle is stationary.
!Operating the roof while pulling away:
RObserve the following traffic carefully.
RDo not drive faster than 25 mph (40 km/h).
RAvoid abrupt braking and swerving maneu-
vers.
Do not operate the roof when cornering, driv-
ing on uneven surfaces or during strong
winds. The vehicle may otherwise be dam-
aged.
iIf the traffic conditionsm ean that you have
to drive off while opening/closing the roof,
the procedure which was started while sta-
tionary can be continued at speeds of up to
approximately 25 mph (40 km/h).
Opening and closing
XVehicles without semi-automatic trunk
partition: close the trunk partition
(
Ypage 79).
XClose the trunk lid (Ypage 72).
XTurn the SmartKey to position 2in the igni-
tion lock.
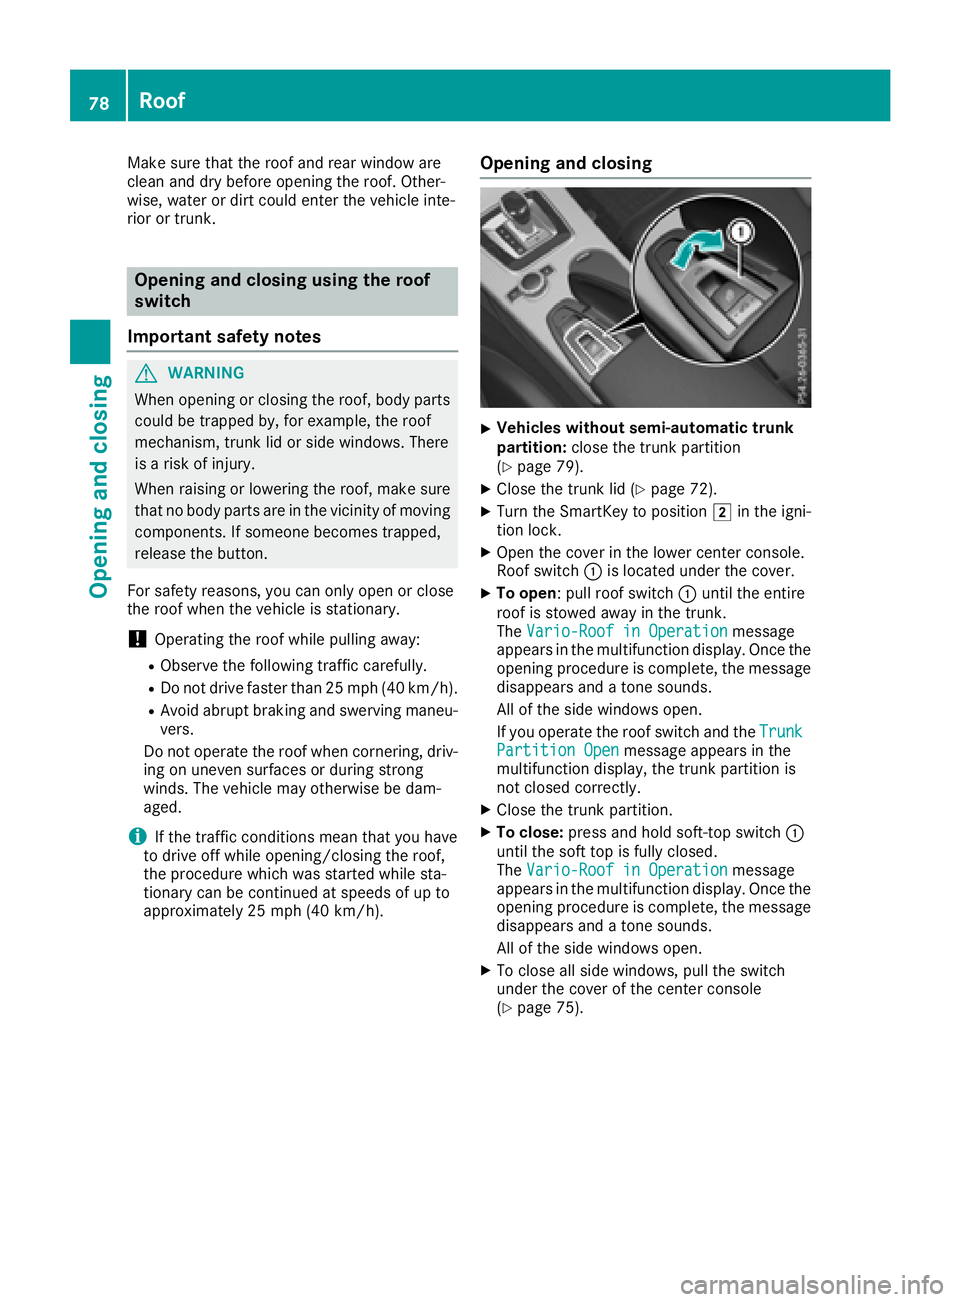
XOpen the cover in the lower center console.
Roof switch :is located under the cover.
XTo open:p ull roof switch :until the entire
roof is stowed away in the trunk.
The Vario-Roof in Operation
message
appears in the multifunction display.O nce the
opening procedure is complete, the message
disappears and atone sounds.
All of the side windows open.
If you operate the roof switch and the Trunk
Partition Openmessage appears in the
multifunction display,t he trunk partition is
not closed correctly.
XClose the trunk partition.
XTo close: press and hold soft-top switch :
until the soft top is fully closed.
The Vario-Roof in Operation
message
appears in the multifunction display.O nce the
opening procedure is complete, the message
disappears and atone sounds.
All of the side windows open.
XTo close all side windows, pull the switch
under the cover of the center console
(
Ypage 75).
78Roof
Opening and closing
Page 81 of 298
Opening/closing using the SmartKey
Important safetyn otes
GWARNING
When opening or closing the roof, body parts
could be trapped by, for example, the roof
mechanism, trun klid or side windows. There
is ar isk of injury.
When raising or lowering the roof, make sure
that no body parts are in the vicinity of moving
components. If someoneb ecomes trapped,
release the button.
Opening and closing
This function is only available on vehicles with
KEYLESS-GO or with roof comfort operation.
XClose the trun klid (Ypage 72).
XVehicles with comfort operation: point the
tip of the SmartKey at the driver's door han-
dle.
XVehicles with KEYLESS-GO: the SmartKey
must be within 6ft(2m)ofthe vehicle.
XTo open: press and hold the %button on
the SmartKey until the roof is fully opened.
The roof and the rear side windows open. The
fronts ide windows close.
XTo interrupt the opening procedure:
release the %button.
XTo open the front side windows: press the
% button on the SmartKey again.
XTo close: press and hold the &button on
the SmartKey until the roof is fully closed.
The roof and the side windows close.
XTo interrupt the closing procedure: release
the & button.
Locking the roof again
Important safetyn otes
GWARNING
If you do not fully open/close the soft top, the
soft-top hydraulics depressurizea fterashort
time. This causes the soft top to lower unex-
pectedly and may cause you or other stobe
trapped. There is arisk of injury.
Always open or close the soft top completely.
The roof is not locked if:
Rthe K symbol and the Vario-Roof inOperationmessage appear in the multifunc-
tion display
Rthe K symbol and the Open/CloseVario-RoofCompletelymessage appear in
the multifunction display and you hear awarn-
ing tone
Ryou hear awarning ton efor up to ten seconds
when pulling away or while driving
Locking
You can lock the roof again if it is not locked
fully.
XPull over and stop the vehicle safely as soon
as possible, paying attention to road and traf-
fic conditions.
XEnsure that the SmartKey is in position 2in
the ignition lock.
XPress the roof switch (Ypage 78).
Trunk partition
General notes
!To avoid damaging the roof or luggage when
folding back the roof, you should:
Ronly load the trun ktobelow the trun kpar-
tition
Rnot place any objects on or in frontoft he
trun kpartition
Rnot place any objects on the cover behind
the roll bars
Rnot allow the cargo to push the trun kpar-
tition upwards
The trun kpartition can be used to cover luggage
and loads in the trunk.
Roof79
Opening and closing
Z
Page 86 of 298
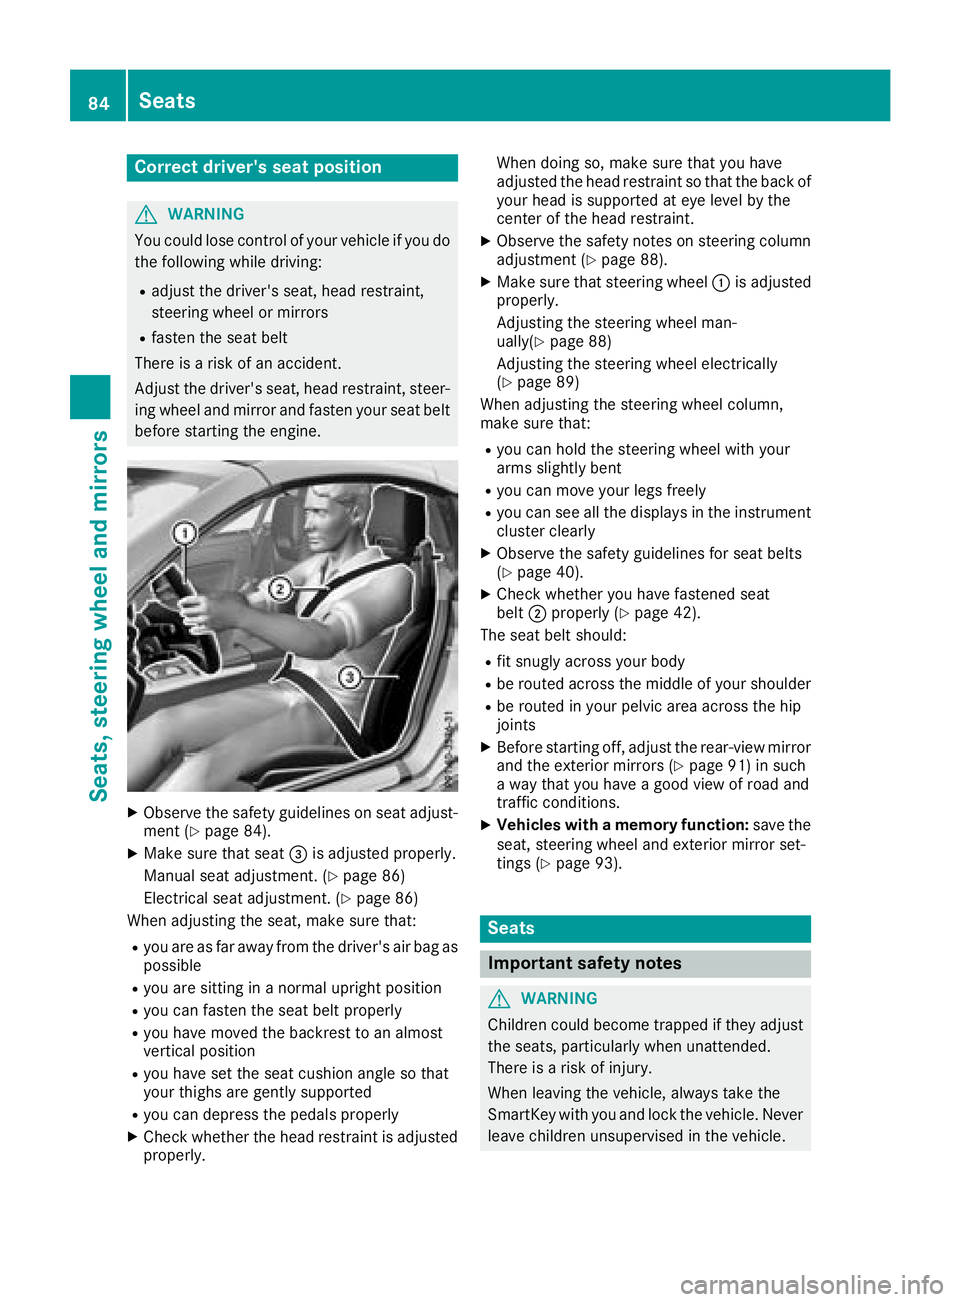
Correct driver's seat position
GWARNING
You coul dlose control of your vehicle if you do
th ef ollowingw hile driving:
Radjust thedriver'ss eat,head restraint,
steering wheel or mirrors
Rfasten th eseat belt
Thereisar iskofana ccident.
Adjust th edriver'ss eat,head restraint ,steer-
ing wheel and mirror and fasten your seat belt before starting th eengine.
XObserv ethe safety guideline sonseat adjust-
men t(Ypage 84).
XMakes ure that seat =is adjusted properly.
Manual seat adjustment. (
Ypage 86)
Electrical seat adjustment. (
Ypage 86)
When adjusting th eseat,m akes ure that:
Ryou are as far away from th edriver'sa ir bag as
possible
Ryou are sittin ginanormalupright position
Ryou can fasten th eseat belt properly
Ryou have moved th ebackres ttoana lmost
vertical position
Ryou have set th eseat cushion angle so that
your thighs are gently supported
Ryou can depress th epedals properly
XCheckw hether th ehead restraint is adjusted
properly. When doings
o, makesure that you have
adjusted th ehead restraint so that th eback of
your head is supported at eye leve lbythe
cente rofthehead restraint.
XObserv ethe safety note sonsteering column
adjustmen t(Ypage 88).
XMakesure that steering wheel :is adjusted
properly.
Adjusting th esteering wheel man-
ually(
Ypage 88)
Adjustin gthe steering wheel electrically
(
Ypage 89)
When adjusting th esteering wheel column,
mak esure that:
Ryou can hold th esteering wheel withy our
arm sslightly bent
Ryou can mov eyour legs freely
Ryou can see all th edisplays in th einstrument
cluste rclearly
XObserv ethe safety guideline sfor seat belts
(Ypage 40).
XCheckw hether you have fastened seat
belt ;properl y(Ypage 42).
The seat belt should:
Rfit snugly across your body
Rbe routed across th emiddle of your shoulder
Rbe routed in your pelvic area across th ehip
joints
XBefore starting off ,adjust th erear-view mirror
and th eexteri or mirror s(Ypage 91) in such
aw ay that you have agood view of road and
traffic conditions.
XVehicles with amemory function: save the
seat,s teering wheel and exterior mirror set-
tings (
Ypage 93).
Seats
Important safety notes
GWARNING
Children coul dbecome trapped if they adjust
th es eats, particularly when unattended.
Thereisar iskofi njury.
When leaving th evehicle ,always tak ethe
SmartKey withy ou and lockthevehicle .Never
leave childre nunsupervised in th evehicle.
84Seats
Seats, steerin gwheel and mirrors
Page 100 of 298
vehicle, and consequently switches the head-
lampsfrom high beamtol ow beam.
The system automatically adapts the low-beam
headlamp range depending on the distance to
the other vehicle. Once the system no longer
detects any other vehicles, it reactivates the
high-beam headlamps.
The system' soptical sensor is located behind
the windshieldn ear the overheadc ontrol panel.
Important safety notes
GWARNING
Adaptive Highbeam Assist does not recognize
road users:
Rwho have no lights, e.g. pedestrians
Rwho have poor lighting, e.g. cyclists
Rwhosel ighting is blocked,e .g. byabarrier
On very rare occasions, Adaptive Highbeam
Assist may fail to recognize other road users
that have lights, or may recognize them too
late. In this, or in similar situations, the auto-
matic high-beam headlamp swilln ot be deac-
tivated or wil lbeactivated regardless. There is
ar isk of an accident.
Always carefully observe the traffic conditions
and switch off the high-beam headlamp sin
good time.
Adaptive Highbeam Assist cannot take into
account road ,weather or traffic conditions.
Adaptive Highbeam Assist is only an aid .You are
responsible for adjusting the vehicle's lighting
to the prevailing light, visibility and traffic con-
ditions.
In particular, the detection of obstacles can be
restricted if there is:
Rpoor visibility, e.g. due to fog, heavy rain or
snow
Rdirt on the sensors or the sensors are
obscured
Switching Adaptive Highbeam Assist
on/off
XTo switch on: turn the light switch to Ã.
XPress the combination switch beyond the
pressure point in the directionofa rrow:.
The _ indicator lamp in the multifunction
display lights up when it is dark and the light
sensor activates the low-beam headlamps.
If you are driving at speeds above approx-
imatel y16m ph (25 km/h):
The headlamp range is set automatically
depending on the distance between the vehi-
cle and other road users.
If you are driving at speeds above approx-
imatel y19m ph (30 km/h )and no other road
users have been detected:
The high-beam headlamp sare switched on
automatically. The Kindicator lamp in the
instrument cluster als olights up.
If you are driving at speeds belowa pprox-
imatel y16m ph (25 km/h) or other road users
have been detected or the road sare ade-
quately lit:
The high-beam headlamp sare switched off
automatically. The Kindicator lamp in the
instrument cluster goes out. The _indi-
cator lamp in the multifunction display
remains lit.
XTo switch off: move the combination switch
back to its normal position or move the light
switch to another position.
The _ indicator lamp in the multifunction
display goes out.
98Exteriorl ighting
Lights and windshield wipers
Page 109 of 298
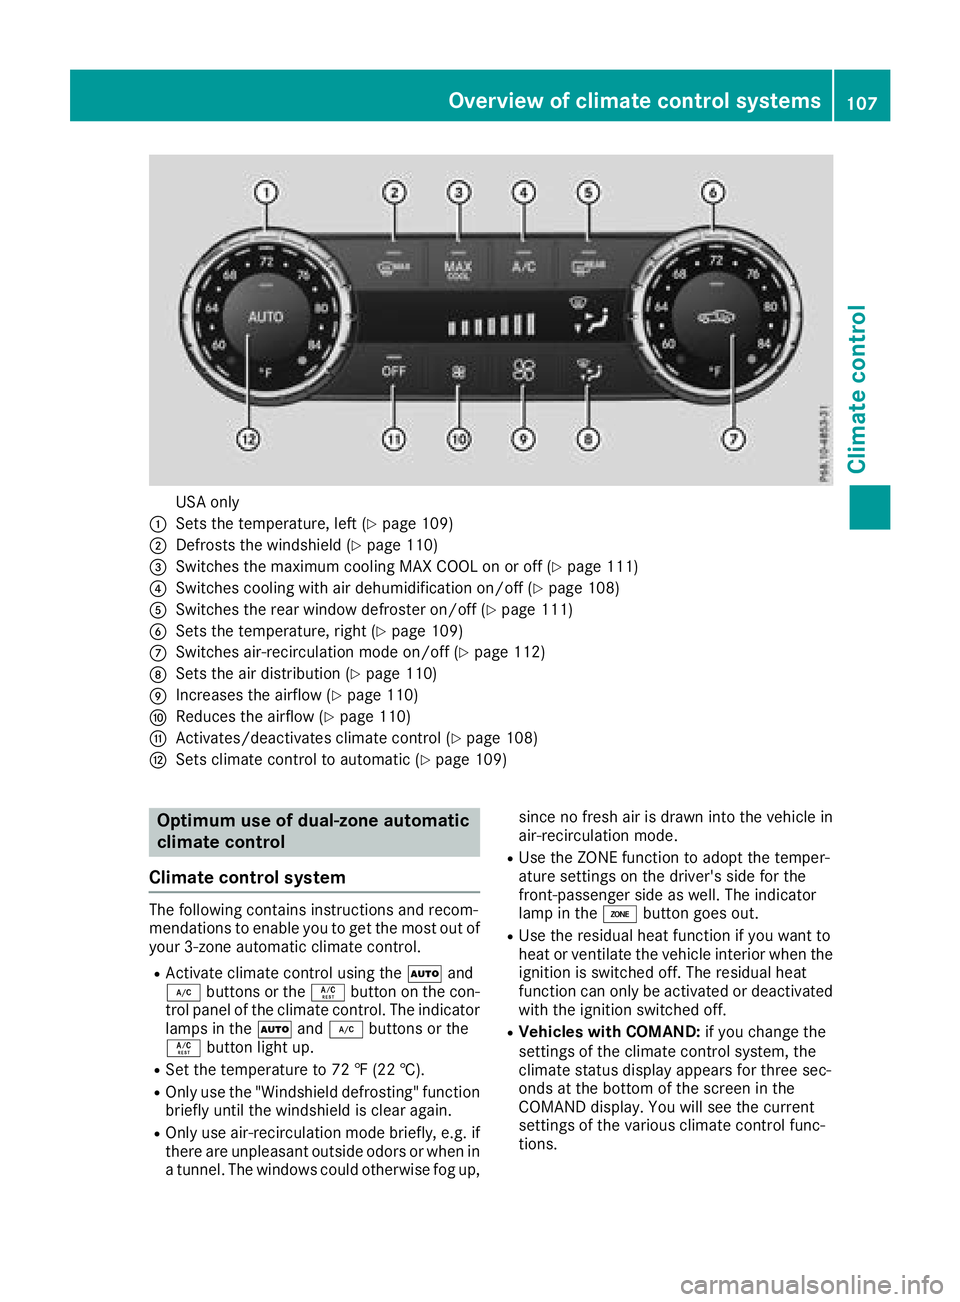
USA only
:Sets the temperature, left (Ypage 109)
;Defrosts the windshield(Ypage 110)
=Switches the maximum cooling MAX COOL on or off (Ypage 111)
?Switches cooling with air dehumidification on/off (Ypage 108)
ASwitches the rear window defroster on/off (Ypage 111)
BSets the temperature, right (Ypage 109)
CSwitches air-recirculation mode on/off (Ypage 112)
DSets the air distribution (Ypage 110)
EIncreases the airflow (Ypage 110)
FReduces the airflow (Ypage 110)
GActivates/deactivates climate control (Ypage 108)
HSets climate control to automatic (Ypage 109)
Optimumuse of dual-zone automatic
climate control
Climate control system
The following contains instructionsa nd recom-
mendations to enable you to get the most out of
your 3-zonea utomatic climate control.
RActivate climate control using the Ãand
¿ buttons or the Ábutton on the con-
trol panel of the climate control. The indicator
lamps in the Ãand¿ buttons or the
Á button light up.
RSet the temperature to 72 ‡(22 †).
ROnly use the "Windshield defrosting" function
briefly until the windshieldisc lear again.
ROnly use air-recirculation mode briefly,e .g. if
there are unpleasant outside odors or when in
at unnel. The windows could otherwise fog up, since no fresh air is drawn into the vehicle in
air-recirculation mode.
RUse the ZONE function to adopt the temper-
ature settings on the driver's side for the
front-passenger side as well.T
he indicator
lamp in the ábutton goes out.
RUse the residualh eat function if you want to
heat or ventilate the vehicle interior when the
ignition is switched off. The residualh eat
function can only be activated or deactivated
with the ignition switched off.
RVehicles with COMAND: if you change the
settings of the climate control system, the
climate status displaya ppears for three sec-
onds at the bottom of the screen in the
COMAND display. You will see the current
settings of the various climate control func-
tions.
Overview of climatec ontrol systems107
Climatecontrol
Page 112 of 298
Setting the air distribution
Air-conditioning system
XTurn the SmartKey to position 2in the igni-
tion lock (Ypage 116).
XPress one or more of the P,O,¯
buttons.
The correspondingi ndicator lamp lights up
briefly.
The following air distribution settings can be
selected:
¯ Directsa ir through the defroster vents
O Directsa ir through the footwell air vents
P Directsa ir through the center and side air
vents
iYou can also activate several air distribution
settings simultaneously. To do this, press
multiple air distribution buttons. The air is
then directed through various vents.
3-zone automatic climate control
XTurn the SmartKey to position 2in the igni-
tion lock (Ypage 116).
XPress the _button repeatedly until the
desired symbol appears in the display.
The following air distribution settings can be
selected:
P Directsa ir through the center and side air
vents
O Directsa ir through the footwell air vents
S Directsa ir through the center, side and
footwell vents
¯ Directsa ir through the defroster vents
b Directst he airflow through the defroster,
center and side air vents( Canada only)
a Directsa ir through the defroster and
footwell vents
_ Directst he airflow through the defroster
vents, the center and side air ventsa s
well as the footwell air vents( Canada
only)
iRegardless of the air distribution setting,
airflow is always directed through the side air
vents. You can only close the side air vents, by fully closing the adjuster on the side air vents
(
Ypage 113).
Setting the airflow
Air-conditioning system
XTurn the SmartKey to position 2in the igni-
tion lock (Ypage 116).
XTo increase or reduce: turn controlC
clockwise or counter-clockwise (Ypage 104).
3-zone automatic climate control
XTurn the SmartKey to position 2in the igni-
tion lock (Ypage 116).
XTo increase or reduce: press theKor
I button.
Switching the ZONE function on/off
This function is only available with 3-zone auto-
matic climate control on vehicles for Canada.
XTo switch on: press theábutton.
The indicator lamp in the ábutton lights
up. The temperature settingf or the driver's
side is not adopted for the front-passenger
side.
XTo switch off: press theábutton.
The indicator lamp in the ábutton goes
out. The temperature settingf or the driver's
side is adopted for the front-passenger side.
Defrosting the windshield
General notes
You can use this function to defrost the wind-
shield or to defrost the inside of the windshield
and the side windows.
Switch off the "Windshield defrosting" function
as soon as the windshield is clear again.
Switching the "windshield defrosting"
function on or off
XTurn the SmartKey to position 2in the igni-
tion lock (Ypage 116).
XTo switch on: press the¬button.
The indicator lamp in the ¬button lights
up.
110Operating the climate control systems
Climatec ontrol