2018 MERCEDES-BENZ SLC ROADSTER fog light
[x] Cancel search: fog lightPage 14 of 298

L
Lampssee Warning and indicator lamps
Lane Keeping Assist
Activating/deactivating ................ .171
Display message ............................ 193
Function/informatio n.................... 161
Lap time (RACETIMER) ...................... 175
License plate lamp (display mes-
sage) ................................................... 189
Light function, active
Displa ymessage ............................ 189
Light senso r(display message) ....... 189
Lights
Activating/deactivating the inte-
riorlighting delaye dswitch-off ....... 173
Active light function ......................... 97
Automati cheadlamp mode. ............. 95
Cornering light function ................... 97
Hazard warning lamps ..................... 97
Hig hbeamf lasher. ........................... 96
High-beam headlamp s..................... 96
Light switch ..................................... 95
Low-bea mheadlamp s...................... 96
Parking lamps .................................. 96
Rear fog lamp .................................. 96
Setting the brightness of the
ambient lighting (on-board com-
puter) ............................................. 172
Setting the color of the ambient
lighting (on-board computer) ......... 173
Standing lamps ................................ 96
Switching the daytime running
lamps on/off( on-board com-
puter) ............................................. 172
Switching the exterio rlighting
delaye dswitch-off on/off( on-
board computer) ............................ 173
Switching the surround lighting
on/off( on-board computer) .......... 173
Turn signal s..................................... 96
see Interior lighting
see Replacing the bulbs
Locking
see Central locking
Locking (doors)
Automati c........................................ 71 Emergency locking ........................... 72
From inside (central locking but-
ton) .................................................. 71
Locking centrally
see Central locking
Locking verification signal (on-
board computer) ............................... 174
Low-b eam he
adlamps
Displa ymessage ............................ 189
Replacing bulb s............................. 100
Switching on/off. ............................. 96
Luggag ecover
see Trunk partition
Lumbar support ................................... 87
M
M+S tires............................................ 262
MAGIC SKYC ONTROL ......................... 82
Malfunctio nmessage
see Displa ymessages
Matte finis h(clea ning instruc-
tions) .................................................. 240
mbrace
Call priority .................................... 227
Displa ymessage ............................ 184
Emergency cal l.............................. 225
Generaln otes ................................ 224
MB info cal lbutton ........................ 226
Remote fault diagnosis. ................. 227
Roadsid eassis tance button ........... 226
Self-test ......................................... 224
System .......................................... 224
Mechanical key
Function/note s................................ 67
Genera lnotes .................................. 67
Inserting .......................................... 67
Locking vehicl e................................ 72
Removing ......................................... 67
Unlocking the driver'sd oor.............. 72
Medi aInterface
see Digital Operator's Manual
Memory card (audio) ......................... 169
Memory function ................................. 93
Mercedes-Benz Intelligent Drive
Rear vie wcamera .......................... 154
Messagem emory (on-board com-
puter) .................................................. 178
12Index
Page 17 of 298

General notes............................... .118
Q
QR code
Mercedes-Ben zGuide Ap p................. 1
Rescue car d.................................... .28
Qualified specialist workshop ........... 27
R
RACE TIMER (on-board computer,
Mercedes-AMG vehicles).................. 175
Radio
Selecting astation .........................1 68
see Digita lOperator's Manual
Radio mode
see also Digita lOperator's Man-
ua l..................................................2 11
Radio-wave reception/transmis-
sionint he vehicle
Declaratio nofconformity ................ 26
Readingl amp....................................... 99
Rear fog lamp
Display message ............................ 189
Switching on/off .............................. 96
Rear lamps
see Lights
Rear viewc amera
Cleaning instructions ..................... 242
Display in the multimedias ystem .. 155
Function/notes .............................1 54
Switching on/off ........................... 155
Rear window defroster
General notes ................................ 111
Problem (malfunction) ................... 112
Switching on/off ........................... 111
Rear-vie wmirror
Anti-glare (manual ).......................... 90
Dipping (automatic) ......................... 92
Refrigerant (air-conditioning sys-
tem)
Important safety notes .................. 294
Refueling
Fuel gauge ....................................... 32
Important safety notes .................. 129
Refueling process. ......................... 130
see Fuel Remote control
Programming (garage door
opener) .......................................... 229
Replacing bulbs
High-beam headlamps ................... 100
Important safety notes .................... 99
Installing/removing the cover
(front wheel arch) .......................... 100
Low-beam headlamps .................... 100
Overview of bul btype s.................. 100
Reportin gsafety defects .................... 27
Rescue card ......................................... 28
Reserve (fuelt ank)
see Fuel
Reserve fuel
Display message ............................ 192
Warning lamp ................................. 207
Residual heat (climate control) ........112
Restraints ystem
Display message .............. .............. 185
Introdu
ction ..................................... 38
Warning lamp ................................. 206
Warning lamp (function) ................... 38
Reverse gear
Engaging (automatic transmis-
sion) ............................................... 123
Reversiblef loor panel (trunk) .......... 221
Reversing feature
Side windows ................................... 74
Reversing lamps (display mes-
sage) ................................................... 189
Roadside Assistance( breakdown).... 25
Roof
Display message ............................ 200
Important safety notes .................... 77
Opening/closing (with roof
switch) ............................................. 78
Opening/closing (with SmartKey ).... 79
Overview .......................................... 77
Problem (malfunction) ..................... 83
Relocking ......................................... 79
Roof carrier ........................................ 221
Roof switch .......................................... 78
Route guidance
see also Digita lOperator's Man-
ua l..................................................2 11
Route guidance active ......................167
Index15
Page 34 of 298
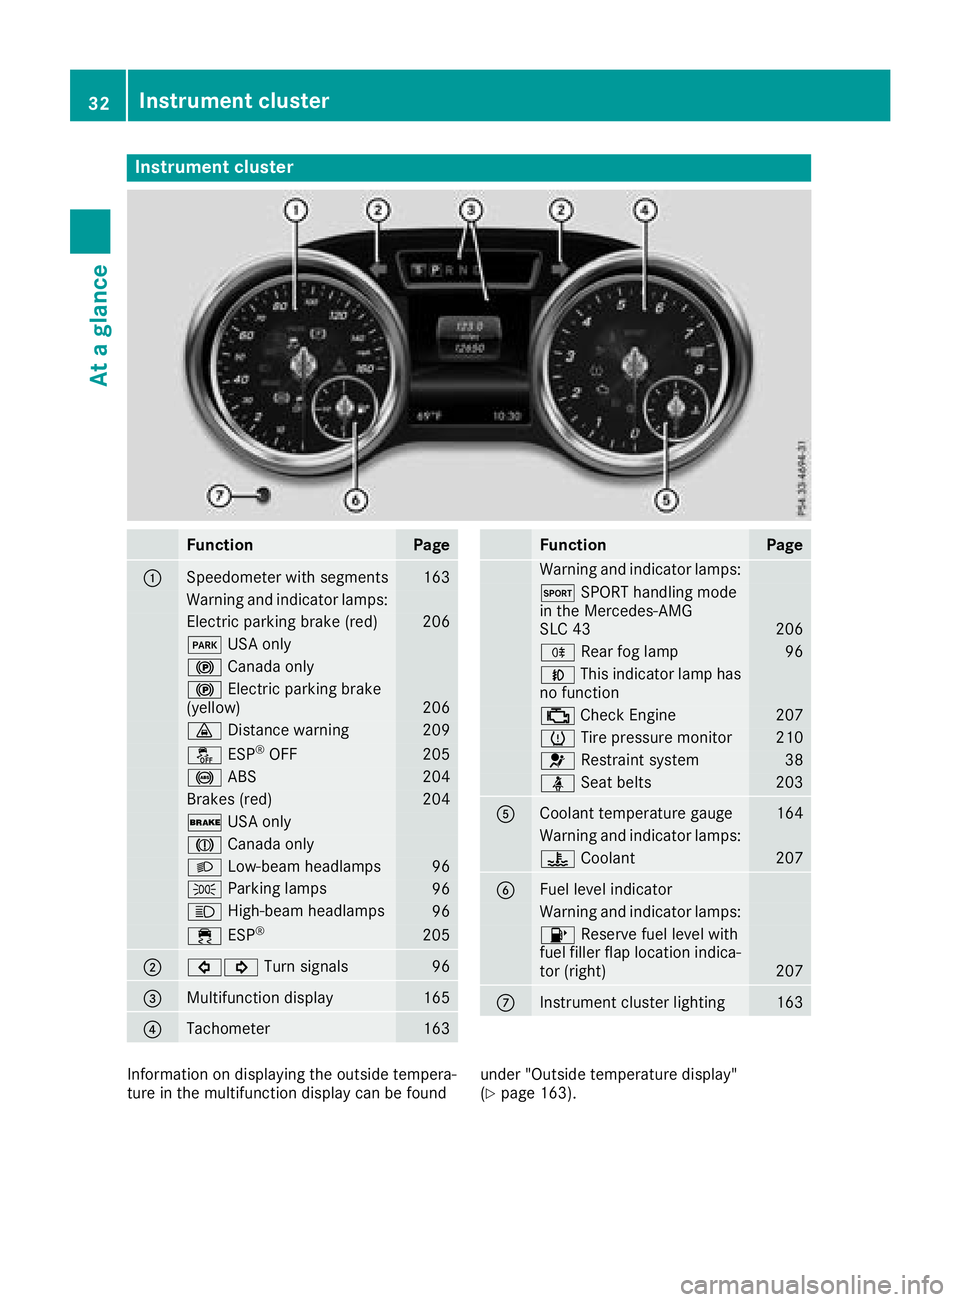
Instrumentcluster
FunctionPag e
:Speedometer wit hsegments163
Warning and indicator lamps:
Electric parking brak e(red)20 6
F USAo nly
! Canad aonly
! Electric parking brak e
(yellow)20 6
· Distanc ewarning209
å ESP®OF F205
! ABS204
Brake s(red)20 4
$ USAo nly
J Canad aonly
L Low-beam headlamps96
TParking lamp s96
KHigh-beam headlamps96
÷ESP®20 5
;#! Turn signals96
=Multifunction display165
?Tachometer163
FunctionPag e
Warning and indicator lamps:
M SPORT handlin gmode
in th eMercedes-AM G
SL C4 3
206
R Rear fog lamp96
NThis indicator lamp has
no function
; CheckEngine20 7
h Tirep ressur emonitor210
6 Restrain tsystem38
ü Seat belt s203
ACoolan ttem perature gauge164
Warning and indicator lamps:
? Coolan t207
BFue llevel indicator
Warning and indicator lamps:
8 Reserve fuel level wit h
fuel filler flap location indica-
to r( right )
207
CInstrumen tcluste rlighting16 3
Information on displayin gthe outside tempera-
tur eint hemultifunction display can be foun dunder "Outside temperature display"
(Ypage 163).
32Instrumen
tcluster
At ag lance
Page 97 of 298
Exteriorlighting
General notes
For reasonsofs afety, Mercedes-Ben zrecom-
mends that you driv ewith th elightss witched on
even durin gthe daytime. In somec ountries,
operatio noftheheadlamps varies due to legal
requirement sand self-imposedo bligations.
Settingthe exterio rlighting
Settin goptions
Exterior lighting can be set using:
Rthel ight switch
Rthec ombinatio nswitch (Ypage 96)
Rtheo n-board compute r(Ypage 172)
Light switch
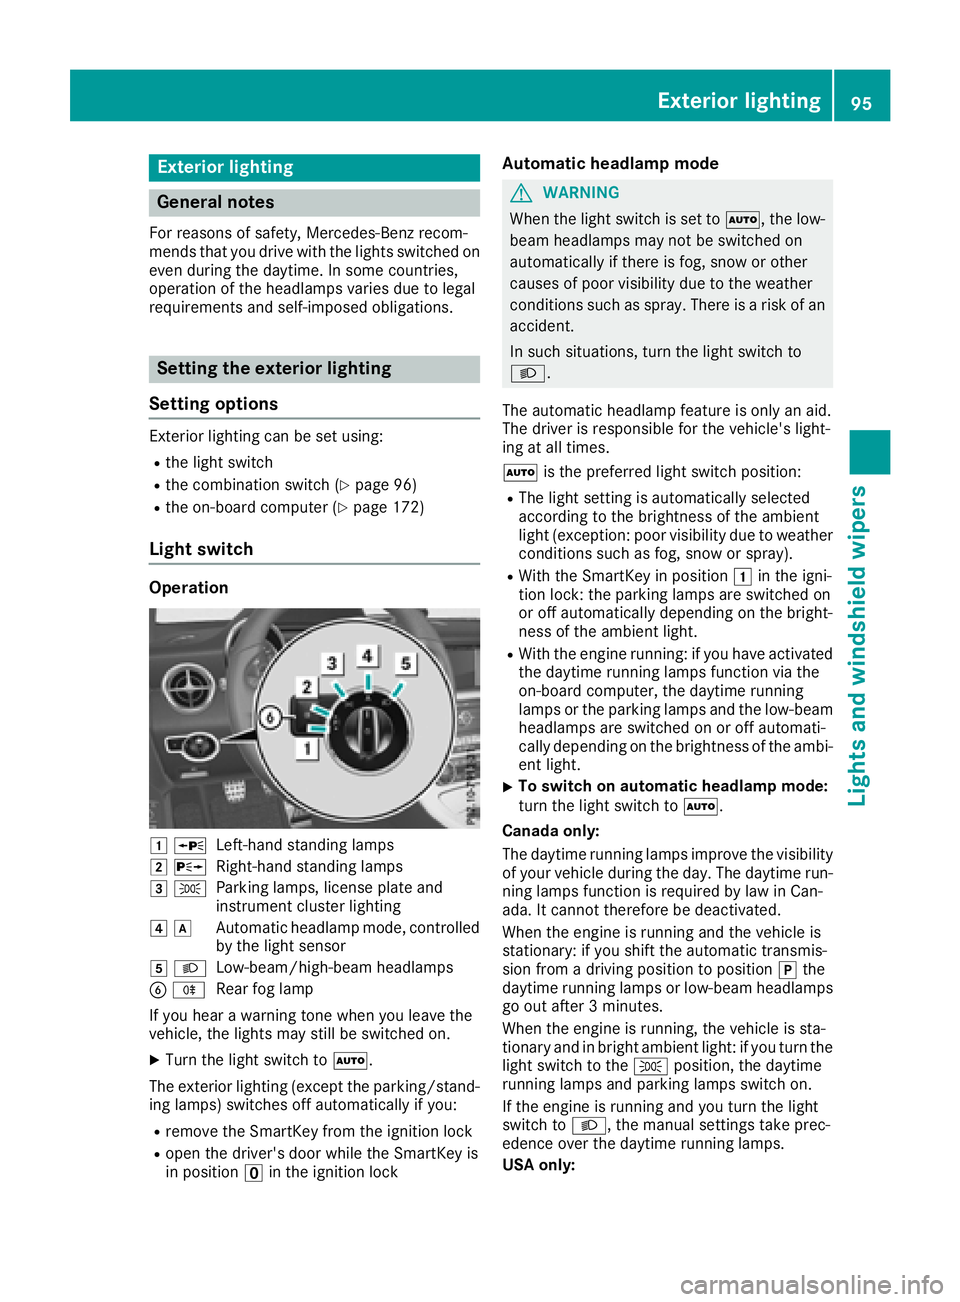
Operation
1WLeft-hands tanding lamps
2 XRight-hand standing lamps
3TParking lamps ,licens eplatea nd
instrumen tcluste rlighting
4dAutomatic headlam pmode, controlled
by the light sensor
5 LLow-beam/high-bea mheadlamps
BRRear fog lamp
If yo uhearaw arning tone when yo uleave the
vehicle, the lights mays till be switched on.
XTurn the light switch toÃ.
The exterio rlighting (excep tthe parking/stand-
ing lamps )switches off automaticall yifyou:
Rremove the SmartKeyf rom the ignition lock
Ropen the driver's door whil ethe SmartKeyi s
in position uin the ignition lock
Automati cheadlamp mode
GWARNING
Whe nthe light switch is set to Ã,the low-
beam headlamps mayn ot be switched on
automaticall yifthereisf og,snow or other
causes of poor visibility du etothe weather
conditions such as spray .There is ariskofa n
accident.
In such situations, turn the light switch to
L.
The automatic headlam pfeature is onlyana id.
The driver is responsibl efor the vehicle's light-
ing at al ltimes.
à is the preferred light switch position:
RThe light setting is automaticall yselected
according to the brightness of the ambient
light (exception: poor visibility du etoweather
conditions such as fog ,snow or spray).
RWith the SmartKeyinp osition 1in the igni-
tio nlock: the parking lamps ar eswitched on
or off automaticall ydepen ding on the bright-
ness of the ambient light.
RWith the engine running :ifyouhave activated
the daytime running lamps functio nvia the
on-board computer, the daytime running
lamps or the parking lamps and the low-beam
headlamps ar eswitched on or off automati-
cally depending on the brightness of the ambi-
ent light.
XTo switc honautomatic headlamp mode:
turn the light switch to Ã.
Canada only:
The daytime running lamps improve the visibility of your vehicl eduri
ng the day. The daytime run-
ning lamps functio nisr equired by la winCan-
ada. It canno ttherefore be deactivated.
Whe nthe engine is running and the vehicl eis
stationary: if yo ushift the automatic transmis-
sion from adriving positio ntoposition jthe
daytime running lamps or low-bea mheadlamps
go outa fter3m inutes.
Whe nthe engine is running ,the vehicl eissta-
tionar yand in bright ambient light: if yo uturn the
light switch to the Tposition, the daytime
running lamps and parking lamps switch on.
If the engine is running and yo uturn the light
switch to L,the manua lsettings take prec-
edence overt he daytime running lamps.
US Ao nly:
Exterior lighting95
Lights and windshield wiper s
Z
Page 98 of 298
The daytime runninglamps improve the visibility
of your vehicle during the day. To do this, the
daytime runnin glamps function must be
switched on using the on-board computer
(
Ypage 172).
If the engine is runnin gand you turn the light
switch to TorL,t he manual settings
take precedenceo ver the daytime running
lamps.
Low-beam headlamps
GWARNING
When the light switch is set to Ã,the low-
beam headlamps may not be switched on
automatically if there is fog, snow or other
causes of poor visibility due to the weather
conditions such as spray. There is arisk of an
accident.
In such situations, turn the light switch to
L.
Even if the light sensor does not detect that it is
dark, the parking lamps and low-beam head-
lamps switch on when the ignition is switched on and the light switch is set to the Lposition.
This is aparticularly useful function in the event
of rain and fog.
XTo switch on the low-beam headlamps:
turn the SmartKey to position 2in the igni-
tion lock or start the engine.
XTurn the light switch to L.
The green Lindicator lamp in the instru-
ment cluster lights up.
Rear fog lamp
The rear fog lamp improves visibility of your
vehicle for the traffic behind in the event of thick
fog. Please take noteoft he country-specific
regulations for the use of rear fog lamps.
XTo switch on the rear fog lamp: turn the
SmartKey to position 2in the ignition lock or
start the engine.
XTurn the light switch to LorÃ.
XPress the Rbutton.
The yellow Rindicator lamp in the instru-
ment cluster lights up.
XTo switch off the rear fog lamp: press the
R button.
The yellow Rindicator lamp in the instru-
ment cluster goes out.
Parking lamps
!If the battery charge is very low, the parking
lamps or standin glamps are automatically
switched off to enable the next engine start.
Always park your vehicle safely and in awell lit
area, in accordanc ewith the relevant legal
stipulations. Avoid using the Tparking
lamps over aperiod of several hours. If pos-
sible, switch on the right-hand Xor left-
hand W standin glamps.
XTo switch on: turn the light switch to T.
The green Tindicator lamp in the instru-
ment cluster lights up.
Standing lamps
Switching on the standin glamps ensures the
corresponding side of the vehicle is illuminated.
XTo switch on the standing lam ps:the
SmartKey is not in the ignition lock or it is in
position uin the ignition lock.
XTurn the light switch to W(left-han dside of
the vehicle) or X(right-hand side of the
vehicle).
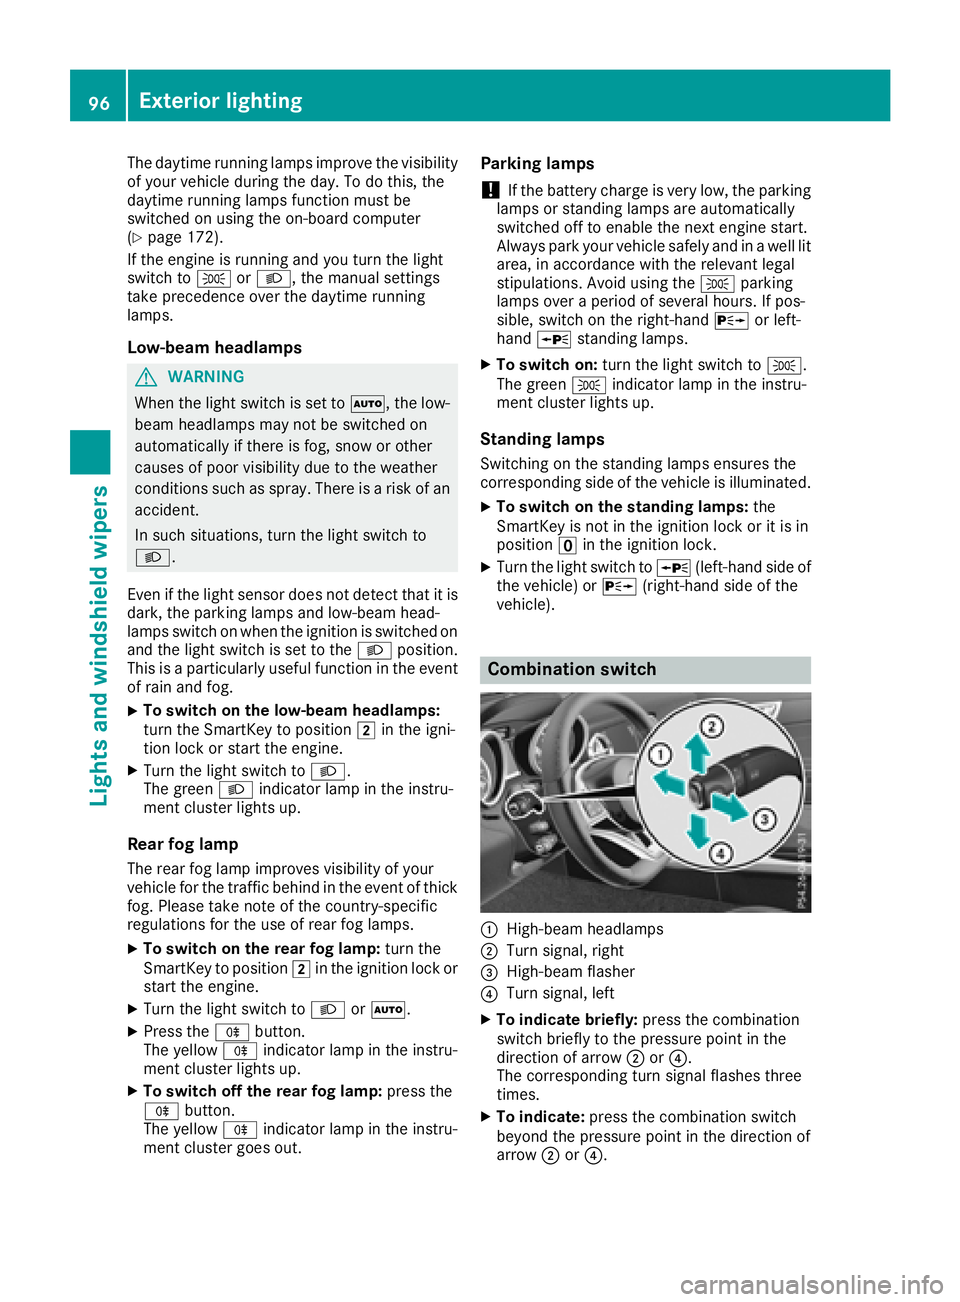
Combination switch
:High-beam headlamps
;Turn signal, right
=High-beam flasher
?Turn signal, left
XTo indicate briefly: press the combination
switch briefly to the pressure point in the
direction of arrow ;or?.
The corresponding turn signal flashes three
times.
XTo indicate: press the combination switch
beyond the pressure point in the direction of
arrow ;or?.
96Exterior lighting
Lights and windshield wipers
Page 100 of 298
vehicle, and consequently switches the head-
lampsfrom high beamtol ow beam.
The system automatically adapts the low-beam
headlamp range depending on the distance to
the other vehicle. Once the system no longer
detects any other vehicles, it reactivates the
high-beam headlamps.
The system' soptical sensor is located behind
the windshieldn ear the overheadc ontrol panel.
Important safety notes
GWARNING
Adaptive Highbeam Assist does not recognize
road users:
Rwho have no lights, e.g. pedestrians
Rwho have poor lighting, e.g. cyclists
Rwhosel ighting is blocked,e .g. byabarrier
On very rare occasions, Adaptive Highbeam
Assist may fail to recognize other road users
that have lights, or may recognize them too
late. In this, or in similar situations, the auto-
matic high-beam headlamp swilln ot be deac-
tivated or wil lbeactivated regardless. There is
ar isk of an accident.
Always carefully observe the traffic conditions
and switch off the high-beam headlamp sin
good time.
Adaptive Highbeam Assist cannot take into
account road ,weather or traffic conditions.
Adaptive Highbeam Assist is only an aid .You are
responsible for adjusting the vehicle's lighting
to the prevailing light, visibility and traffic con-
ditions.
In particular, the detection of obstacles can be
restricted if there is:
Rpoor visibility, e.g. due to fog, heavy rain or
snow
Rdirt on the sensors or the sensors are
obscured
Switching Adaptive Highbeam Assist
on/off
XTo switch on: turn the light switch to Ã.
XPress the combination switch beyond the
pressure point in the directionofa rrow:.
The _ indicator lamp in the multifunction
display lights up when it is dark and the light
sensor activates the low-beam headlamps.
If you are driving at speeds above approx-
imatel y16m ph (25 km/h):
The headlamp range is set automatically
depending on the distance between the vehi-
cle and other road users.
If you are driving at speeds above approx-
imatel y19m ph (30 km/h )and no other road
users have been detected:
The high-beam headlamp sare switched on
automatically. The Kindicator lamp in the
instrument cluster als olights up.
If you are driving at speeds belowa pprox-
imatel y16m ph (25 km/h) or other road users
have been detected or the road sare ade-
quately lit:
The high-beam headlamp sare switched off
automatically. The Kindicator lamp in the
instrument cluster goes out. The _indi-
cator lamp in the multifunction display
remains lit.
XTo switch off: move the combination switch
back to its normal position or move the light
switch to another position.
The _ indicator lamp in the multifunction
display goes out.
98Exteriorl ighting
Lights and windshield wipers
Page 107 of 298
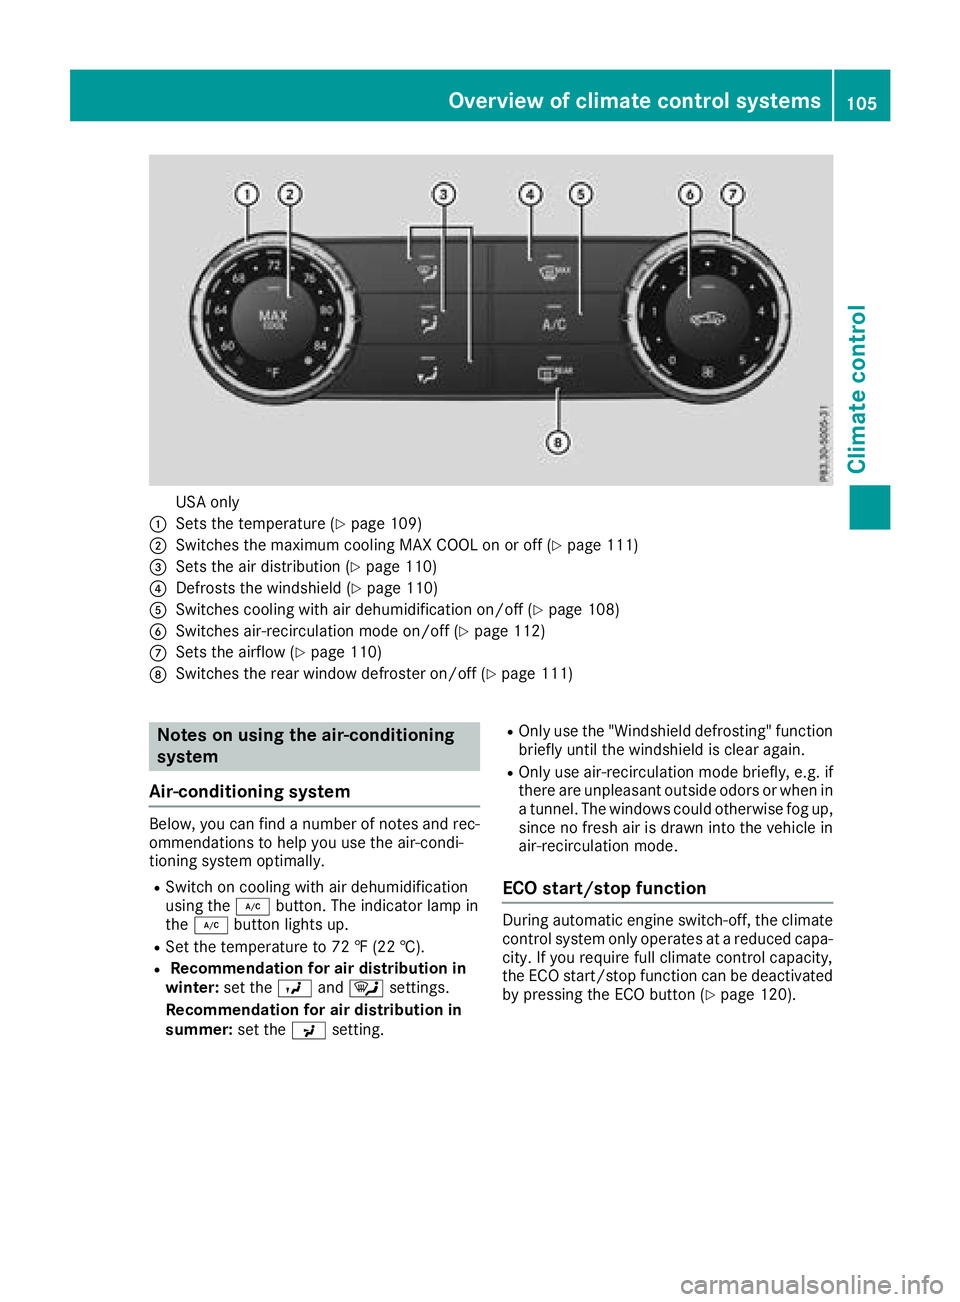
USA only
:Sets the temperature (Ypage 109)
;Switches the maximum cooling MAX COOL on or off (Ypage 111)
=Sets the air distribution (Ypage 110)
?Defrosts the windshield(Ypage 110)
ASwitches cooling with air dehumidification on/off (Ypage 108)
BSwitches air-recirculation mode on/off (Ypage 112)
CSets the airflow (Ypage 110)
DSwitches the rear window defroster on/off (Ypage 111)
Notes on using the air-conditioning
system
Air-conditioning system
Below, you can find anumber of notes and rec-
ommendations to help you use the air-condi-
tioning system optimally.
RSwitch on cooling with air dehumidification
using the ¿button. The indicator lamp in
the ¿ button lights up.
RSet the temperature to 72 ‡(22 †).
RRecommendation for air distribution in
winter: set theOand¯ settings.
Recommendation for air distribution in
summer: set thePsetting.
ROnly use the "Windshield defrosting" function
briefly until the windshieldisc lear again.
ROnly use air-recirculation mode briefly,e .g. if
there are unpleasant outside odors or when in
at unnel. The windows could otherwise fog up,
since no fresh air is drawn into the vehicle in
air-recirculation mode.
ECO start/stop function
During automatic engine switch-off, the climate
control system only operates at areduced capa-
city. If you require full climate control capacity,
the ECO start/stop function can be deactivated by pressing the ECO button (
Ypage 120).
Overview of climatec ontrol systems105
Climatecontrol
Page 109 of 298
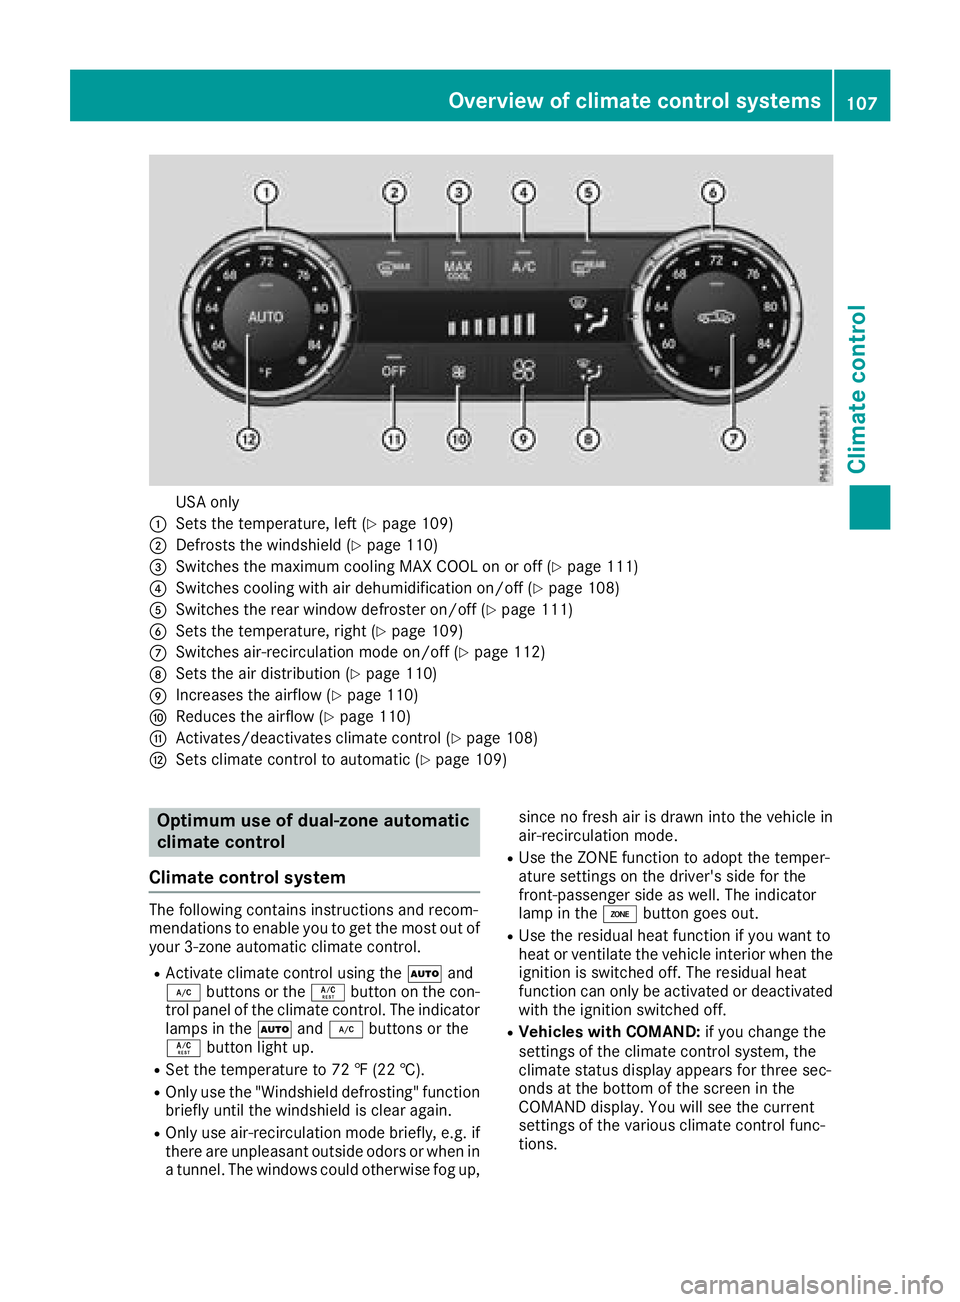
USA only
:Sets the temperature, left (Ypage 109)
;Defrosts the windshield(Ypage 110)
=Switches the maximum cooling MAX COOL on or off (Ypage 111)
?Switches cooling with air dehumidification on/off (Ypage 108)
ASwitches the rear window defroster on/off (Ypage 111)
BSets the temperature, right (Ypage 109)
CSwitches air-recirculation mode on/off (Ypage 112)
DSets the air distribution (Ypage 110)
EIncreases the airflow (Ypage 110)
FReduces the airflow (Ypage 110)
GActivates/deactivates climate control (Ypage 108)
HSets climate control to automatic (Ypage 109)
Optimumuse of dual-zone automatic
climate control
Climate control system
The following contains instructionsa nd recom-
mendations to enable you to get the most out of
your 3-zonea utomatic climate control.
RActivate climate control using the Ãand
¿ buttons or the Ábutton on the con-
trol panel of the climate control. The indicator
lamps in the Ãand¿ buttons or the
Á button light up.
RSet the temperature to 72 ‡(22 †).
ROnly use the "Windshield defrosting" function
briefly until the windshieldisc lear again.
ROnly use air-recirculation mode briefly,e .g. if
there are unpleasant outside odors or when in
at unnel. The windows could otherwise fog up, since no fresh air is drawn into the vehicle in
air-recirculation mode.
RUse the ZONE function to adopt the temper-
ature settings on the driver's side for the
front-passenger side as well.T
he indicator
lamp in the ábutton goes out.
RUse the residualh eat function if you want to
heat or ventilate the vehicle interior when the
ignition is switched off. The residualh eat
function can only be activated or deactivated
with the ignition switched off.
RVehicles with COMAND: if you change the
settings of the climate control system, the
climate status displaya ppears for three sec-
onds at the bottom of the screen in the
COMAND display. You will see the current
settings of the various climate control func-
tions.
Overview of climatec ontrol systems107
Climatecontrol