2018 MERCEDES-BENZ SLC ROADSTER display
[x] Cancel search: displayPage 132 of 298
!Overfilling the fuel tank could damage the
fuel system.
!Take care not to spill any fuel on painted
surfaces. You could otherwise damage the
paintwork.
!Use afilter when adding fuel from afuel can.
The fuel lines and/or the fuel injection system
could otherwise be blocked by particles from
the fuel can.
If you overfill the fuel tank, fuel could spray out
when the fuel pump nozzle is removed.
For further information on fuel and fuel quality
(
Ypage 291).
Refueling
General information
The fuel filler flap is unlocked or locked auto-
matically when you unlock or lock the vehicle
with the SmartKey or using KEYLESS-GO.
The position of the fuel filler cap is displayed
8 in the instrument cluster. The arrow next
to the filling pump indicates the side of the vehi-
cle.
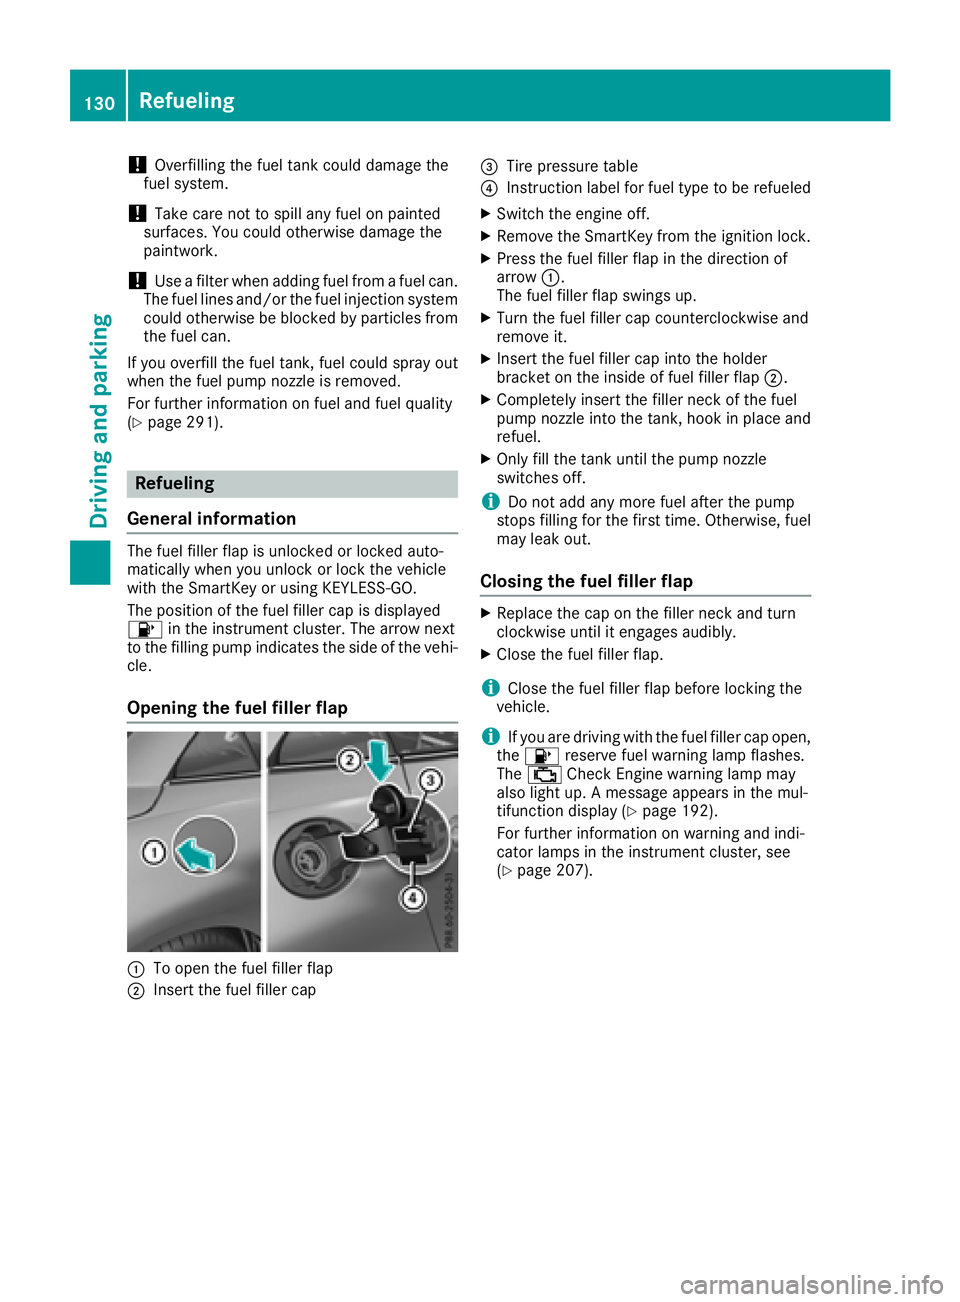
Opening the fuel filler flap
:To open the fuel filler flap
;Insert the fuel filler cap
=Tire pressure table
?Instruction label for fuel type to be refueled
XSwitch the engine off.
XRemove the SmartKey from the ignition lock.
XPress the fuel filler flap in the direction of
arrow :.
The fuel filler flap swings up.
XTurn the fuel filler cap counterclockwise and
remove it.
XInsert the fuel filler cap into the holder
bracket on the inside of fuel filler flap ;.
XCompletely insert the filler neck of the fuel
pump nozzle into the tank, hook in place and
refuel.
XOnly fill the tank until the pump nozzle
switches off.
iDo not add any more fuel after the pump
stops filling for the first time. Otherwise, fuel
may leak out.
Closing the fuel filler flap
XReplace the cap on the filler neck and turn
clockwise until it engages audibly.
XClose the fuel filler flap.
iClose the fuel filler flap before locking the
vehicle.
iIf you are driving with the fuel filler cap open,
the 8 reserve fuel warning lamp flashes.
The ; Check Engine warning lamp may
also light up. Amessage appears in the mul-
tifunction display(
Ypage 192).
For further information on warning and indi-
cator lamps in the instrument cluster, see
(
Ypage 207).
130Refueling
Driving and parking
Page 137 of 298
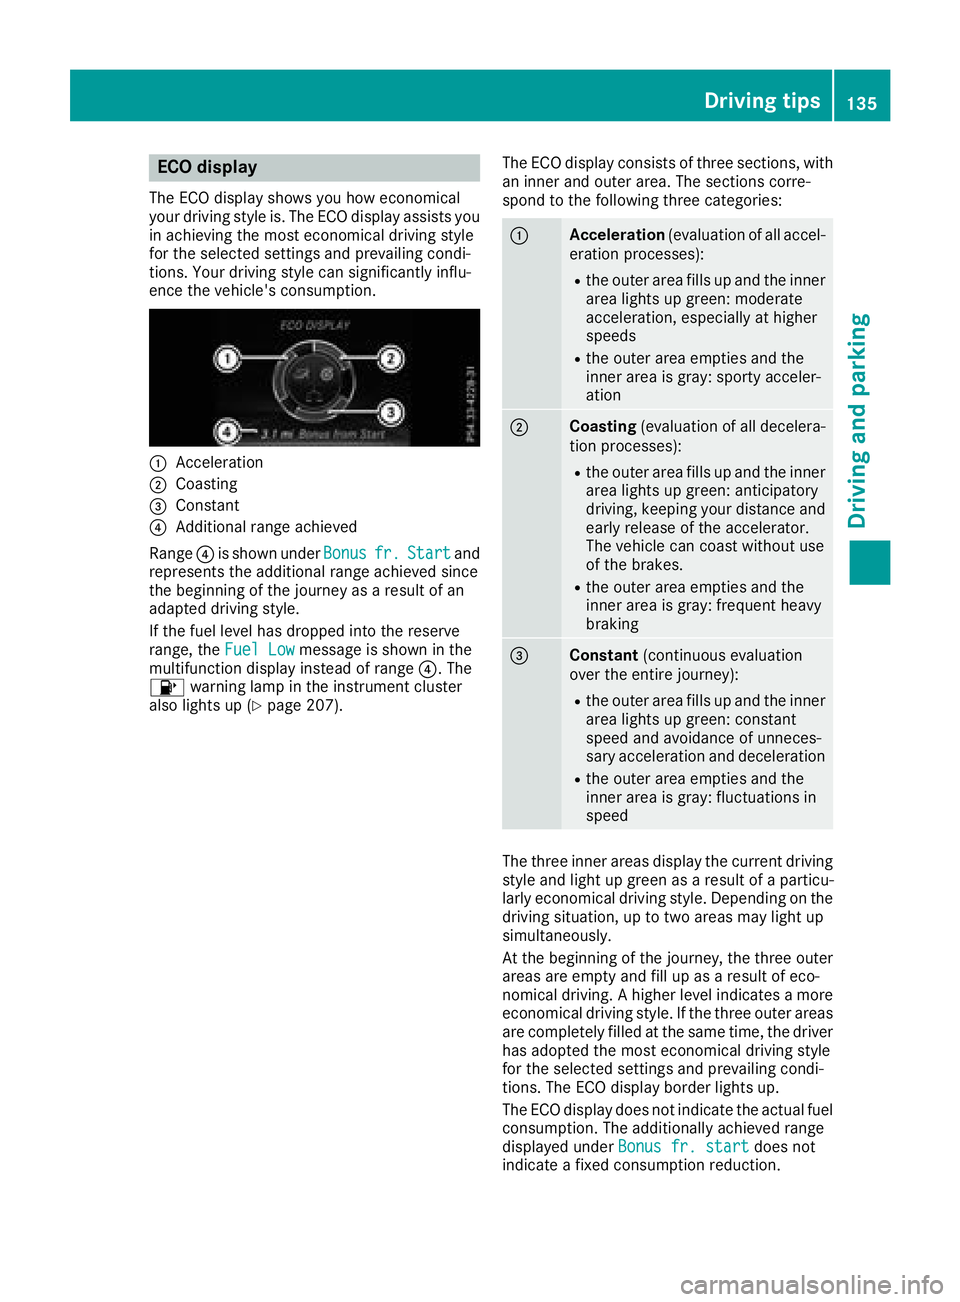
ECO display
The ECO display showsyou how economical
your driving style is. The ECO display assists you
in achievin gthe mos teconomical driving style
for th eselecte dsettings and prevailingc ondi-
tions .Your driving style can significantly influ-
enc ethe vehicle's consumption.
:Acceleration
;Coasting
=Constant
?Additional range achieved
Range ?is shownu nderBonus
fr.Startand
represents th eadditional range achieve dsince
th eb eginnin gofthejourney as aresult of an
adapted driving style.
If th efuel leve lhas dropped int othe reserve
range, the FuelLow
message is shownint he
multifunction display instead of range ?.The
8 warning lamp in th einstrumen tcluster
also lightsup(
Ypage 207). The ECO display consistsoft
hree sections ,with
an inner and outer area. The sections corre-
spondtot hefollowingt hree categories:
:Acceleration (evaluationofall accel-
eration processes):
Rth eo uter area fills up and th einner
area lightsupg reen: moderate
acceleration, especiall yathigher
speeds
Rth eo uter area empties and the
inner area is gray: sporty acceler-
ation
;Coasting (evaluationofall decelera-
tio np rocesses):
Rtheo uter area fills up and th einner
area lightsupg reen: anticipatory
driving ,kee pingy our distanc eand
early release of th eaccelerator.
The vehicle can coas twithout use
of th ebrakes.
Rtheo uter area empties and the
inner area is gray: frequenth eavy
braking
=Constant (continuous evaluation
ove rthe entire journey):
Rtheo uter area fills up and th einner
area lightsupg reen: constant
speeda nd avoidanc eofunneces-
sary acceleratio nand deceleration
Rtheo uter area empties and the
inner area is gray: fluctuationsi n
speed
The three inner areas display th ecurren tdriving
style and light up green as aresult of aparticu-
larly economical driving style. Dependingont he
driving situation, up to two areas may light up
simultaneously.
At th ebeginnin gofthejourney, th ethree outer
areas are emptya nd fill up asaresult of eco-
nomical driving .Ahigher leve lindicates amore
economical driving style. If th ethree outer areas
are completely fille datthesame time, th edriver
has adopted th emoste conomical driving style
for th eselecte dsettings and prevailingc ondi-
tions .The ECO display border lightsu p.
The ECO display does no tindicat ethe actual fuel
consumption. The additionally achieve drange
displayed under Bonus fr. start
does not
indicat eafixed consumptio nreduction.
Driving tips135
Driving and parking
Z
Page 138 of 298
In addition to driving style, the actual consump-
tion is affected by other factors, such as:
Rload
Rtire pressure
Rcold start
Rchoice of route
Ractive electrical consumers
These factors are not includedint he ECO dis-
play.
An economical driving style specially requires
driving at moderate engine speeds.
Achieving ahigher valueint he categories
"Acceleration" and "Constant":
Robserve the gearshift recommendations.
Rdrive the vehicle in drive program Cor E.
In urbant raffic and stop-start traffic, drive pro-
gram Cis recommended.
On long journeys at aconstant speed,e .g. on the
highway, only the outer area for "constant" will
change.
The ECO display summarizes the driving style
from the start of the journey to its completion.
Therefore, there are more marked changes in
the outer areasatt he start ofajourney. On lon-
ger journeys, there are fewer changes. For more
marked changes, perform amanua lrest
(
Ypage 167).
Further information on the ECO display
(
Ypage 166).
Braking
Important safety notes
GWARNING
If you shift down on aslippery road surface in
an attempt to increase the engine's braking
effect, the drive wheelsc ould lose their grip.
There is an increased danger of skidding and
accidents.
Do not shift down for additional engine brak-
ing on aslippery road surface.
Downhill gradients
!On long, steep gradients, you must reduce
the load on the brakes. To use engine braking,
shift to alowerg ear in good time. This helps you to avoid overheating the brakes and wear-
ing them out excessively.
When making use of the engine braking
effect, it is possible that
adrive wheel may not
turn for some time, e.g. in the case of sud-
denly changing or slippery road surface con-
ditions. This could cause damage to the drive
train. This type of damage is not covered by
the Mercedes-Benz warranty.
Change into alowerg ear in good time on long
and steep downhill gradients. This is especially
important if the vehicle is laden.
This also applies if you have activated cruise
control or Distance PilotD ISTRONIC.
Heavy and light loads
GWARNING
If you rest you rfoot on the brake pedalw hile
driving, the braking system can overheat. This increases the stopping distance and can even
cause the braking system to fail.T here is a
risk of an accident.
Never use the brake pedalasaf ootrest. Never
depresst he brake pedala nd the accelerator
pedalatt he same time.
!Depressing the brake pedalc onstantly
results in excessive and premature weart o
the brake pads.
If the brakes have been subjected to aheavy
load,don ot stop the vehicle immediately,b ut
drive on for ashort while. This allows the airflow
to cool the brakes more quickly.
Wet roads
If you have driven for along time in heavy rain
withoutb raking, there may be adelayed reac-
tion from the brakes when braking for the first
time. This may also occur after the vehicle has
been washed or driven through deep water.
You then have to depresst he brake pedalmore
firmly.M aintainagreater distance from the
vehicle in front.
After driving on awet road or having the vehicle
washed, brake firmly whilep aying attention to
the traffic conditions. This willw arm up the
brake discs, thereby drying them more quickly
and protecting them against corrosion.
136Driving tips
Driving and parking
Page 139 of 298
Limited braking performance on salt-
treated roads
If you driveonsalted roads,alayer of salt resi-
due may for monthebraked iscsand brake
pads. This can result in asignificantly longer
braking distance.
RIn ordertop revent any salt build-up, apply the
brakes occasionally while paying attention to th et raffic conditions.
RCarefully depress th ebrakep edal and the
beginnin gand end of ajou rney.
RMaintain agreater distanc etothevehicle
ahead.
Servicing th ebrakes
!The brakef luid level may be to olow, if:
Rif th ered brakew arning lamp lightsupi n
th ei nstrumentc luster and
Ryou hearawarning tone while th eengine is
running
Observe additional warning messages in the
multifunction display.
The brakef luid level may be to olow due to
brak epad wear or leaking brak elines.
Hav ethe brakes ystem checked immediately.
Consult aqualifie dspecialist workshop to
arrange this.
!As th eESP®system operates automatically,
th ee ngine and th eignitio nmust be switched
off (th eSmartKey must be in position uor
1 in th eignitio nlock), if th eelectric parking
brakeist ested onabraking dynamometer
(maximum 10 seconds).
Brakin gtriggered automatically by ESP
®may
cause severe damage to th ebrakes ystem.
All check sand maintenanc ework on th ebrake
system must be carried out at aqualifie dspe-
cialis tworkshop.
Hav ebrakep ads installe dand brak efluid
replaced at aqualifie dspecialist workshop.
If th ebrakes ystem has onl ybeen subject to
moderatel oads, you should tes tthe functional-
ity of your brakes at regular intervals.
Information on BA S(Brake Assist)(
Ypage 57).
Mercedes-Ben zrecommend stha tyou onl yhave
brakep ads/linings installe donyour vehicle
whichh ave been approved for Mercedes-Benz
vehicle sorwhichcorrespondtoane quivalent
qualitys tandard. Brake pads/linings whichh avenot been approved for Mercedes-Ben
zv
ehic
les
or whicha re not of an equivalent qualityc ould
affect your vehicle's operatin gsafety.
Mercedes-Ben zrecommend sthaty ou onl yuse
brakef luid that has been specially approved for
your vehicle by Mercedes-Benz, or whichc orre-
sponds to an equivalent qualitys tandard. Brake
fluid whichh as not been approved for
Mercedes-Ben zvehicle sorw hichisn ot of an
equivalent qualityc ould affect your vehicle's
operatin gsafety.
High-performance brake system
(except Mercedes-AMG SLC 43)
AM Gb rakes ystems are designed for heavy
loads and have component swith corresponding
properties. This may lead to noise when braking.
This will dependo n:
RSpeed
RBrakingforce
RAmbientc onditions, e.g .temperature and
humidity
The wear of individual component softhebrake
system, such as th ebrakep ads/linings or brake
discs, depends on th eindividual driving style
and operatin gconditions.
For this reason, it is impossibletos tate am ile-
age that will be valid unde rall circumstances. An
aggressived riving style will lead to high wear.
You can obtain morei nformationonthisf roma
qualifie dspecialist workshop.
New and replaced brakep ads and discsonly
reacht heir optimum braking effect after several
hundred kilometers of driving .Compensate for
this by applyingg reater force to thebrakep edal.
Keep this in mind, and adapt your driving and
braking accordingl yduringt hisb reak-in period.
Excessive heavy braking results in correspond-
ingly high brak ewear. Observe th ebrakes ystem
warning lamp in th einstrumentc luster and note
any brak estatus messages in th emultifunction
display. Especially for high performanc edriving,
it is important to maintain and have th ebrake
system checked regularly.
Driving tips137
Driving and parking
Z
Page 141 of 298
speed foraprolonged period. You can store any
road speed above 20 mph (30 km/h).
Important safety notes
If you fail to adapty our driving style, cruise con-
trol can neither reduce the risk of an accident
nor override the laws of physics. Cruise control
cannot take into account the road, traffic and
weather conditions. Cruise control is only an
aid. You are responsible for the distance to the
vehicle in front,f or vehicle speed, for braking in
good time and for staying in lane.
Do not use cruise control:
Rin road and traffic conditions which do not
allow you to maintain aconstant speed e.g. in
heavy traffic or on winding roads
Ron slippery road surfaces. Braking or accel-
erating could cause the drive wheels to lose
traction and the vehicle could then skid
Rwhen there is poor visibility, e.g. due to fog,
heavy rain or snow
If there is achange of drivers, advise the new
driver of the speed stored.
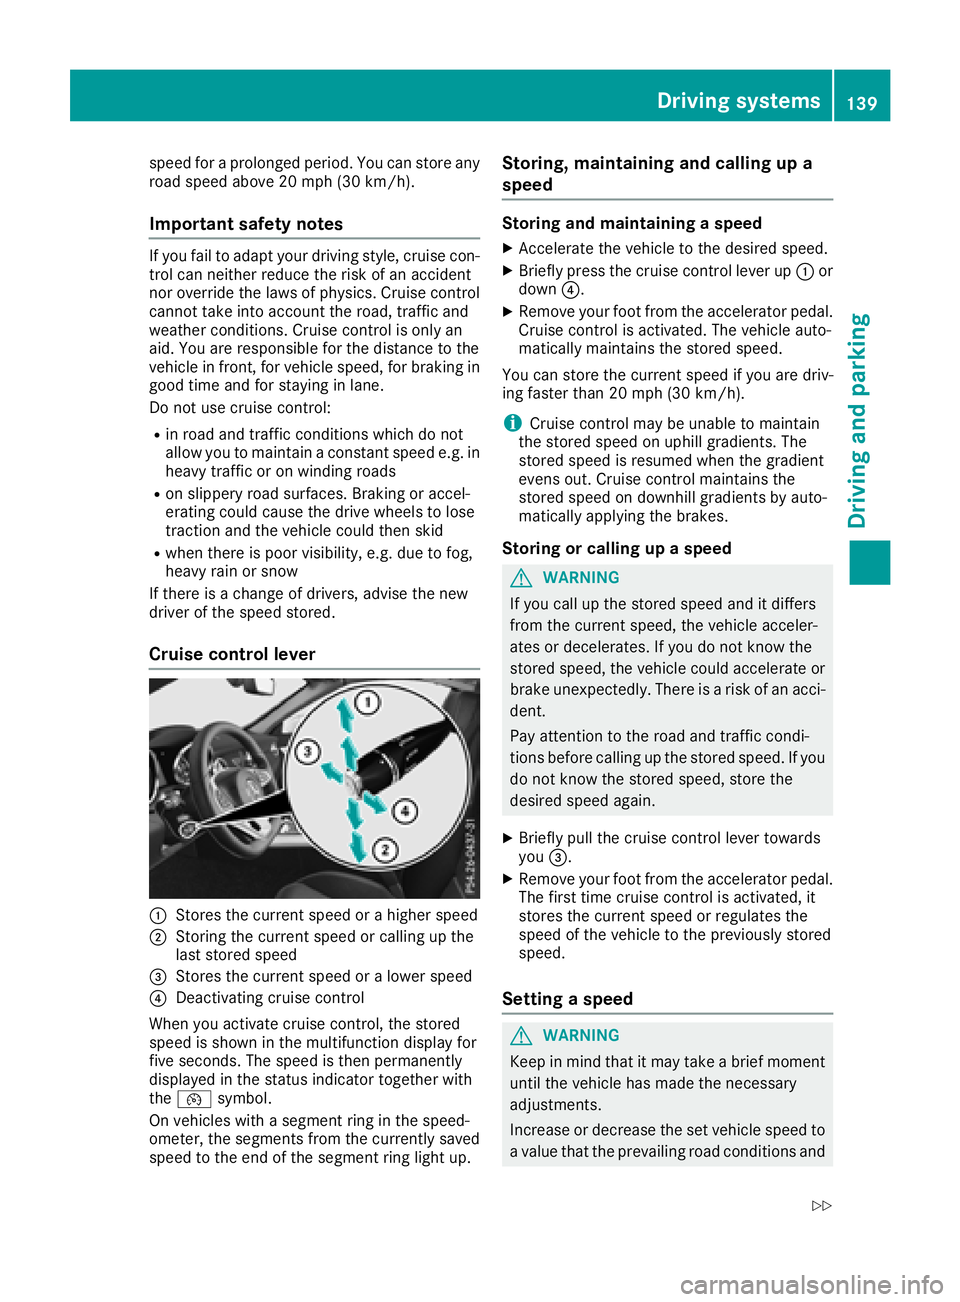
Cruise control lever
:Stores the current speed or ahigher speed
;Storing the current speed or calling up the
last stored speed
=Stores the current speed or alower speed
?Deactivating cruise control
When you activate cruise control, the stored
speed is shown in the multifunction displayf or
five seconds. The speed is then permanently
displayed in the status indicator together with
the ¯ symbol.
On vehicles with asegment ring in the speed-
ometer, the segments from the currently saved speed to the end of the segment ring light up.
Storing, maintaining and callingupa
speed
Storing and maintaining aspeed
XAccelerate the vehicle to the desired speed.
XBriefly press the cruise control lever up :or
down ?.
XRemove your foot from the accelerator pedal.
Cruise control is activated. The vehicle auto-
matically maintains the stored speed.
You can store the current speed if you are driv-
ing faster than 20 mph (30 km/h).
iCruise control may be unable to maintain
the stored speed on uphillg radients. The
stored speed is resumed when the gradient
evens out. Cruise control maintains the
stored speed on downhill gradients by auto-
matically applying the brakes.
Storing or callingupa speed
GWARNING
If you call up the stored speed and it differs
from the current speed, the vehicle acceler-
ates or decelerates. If you do not know the
stored speed, the vehicle could accelerate or brake unexpectedly. There is arisk of an acci-
dent.
Pay attention to the road and traffic condi-
tions before calling up the stored speed. If you
do not know the stored speed, store the
desired speed again.
XBriefly pull the cruise control lever towards
you =.
XRemove your foot from the accelerator pedal.
The first time cruise control is activated, it
stores the current speed or regulates the
speed of the vehicle to the previously stored
speed.
Setting aspeed
GWARNING
Keep in mind that it may take abrief moment
until the vehicle has made the necessary
adjustments.
Increase or decrease the set vehicle speed to
av alue that the prevailing road conditions and
Driving systems139
Driving and parking
Z
Page 142 of 298
legal speed limitspermit. Otherwise, sudden
and unexpected acceleration or deceleration
of the vehicle could cause an accident and/or serious injury to you and others.
XTo adjust th eset speed in 1mphincre-
ment s(1k m/hincrements): briefly press
the cruis econtrol lever up :to the pressure
point for ahigher speed, or down ?for a
lower speed.
Every tim ethe cruis econtrol lever is pressed
up or down, the last speed stored is increased
or reduced.
XTo adjust th eset speed in 5mphincre-
ment s(10 km/h increments): briefly press
the cruis econtrol lever up :past the pres-
sure point for ahigher speed, or down ?for
al ower speed.
Every tim ethe cruis econtrol lever is pressed
up or down, the last speed stored is increased or reduced.
iThe speed indicated in the speedometer
may differs lightly fromt he speed stored.
iCruise control is not deactivate difyou
depresst he accelerator pedal. For example, if
you accelerateb riefly to overtake, cruis econ-
trol adjust sthe vehicle's speed to the last
speed stored after you have finished overtak-
ing.
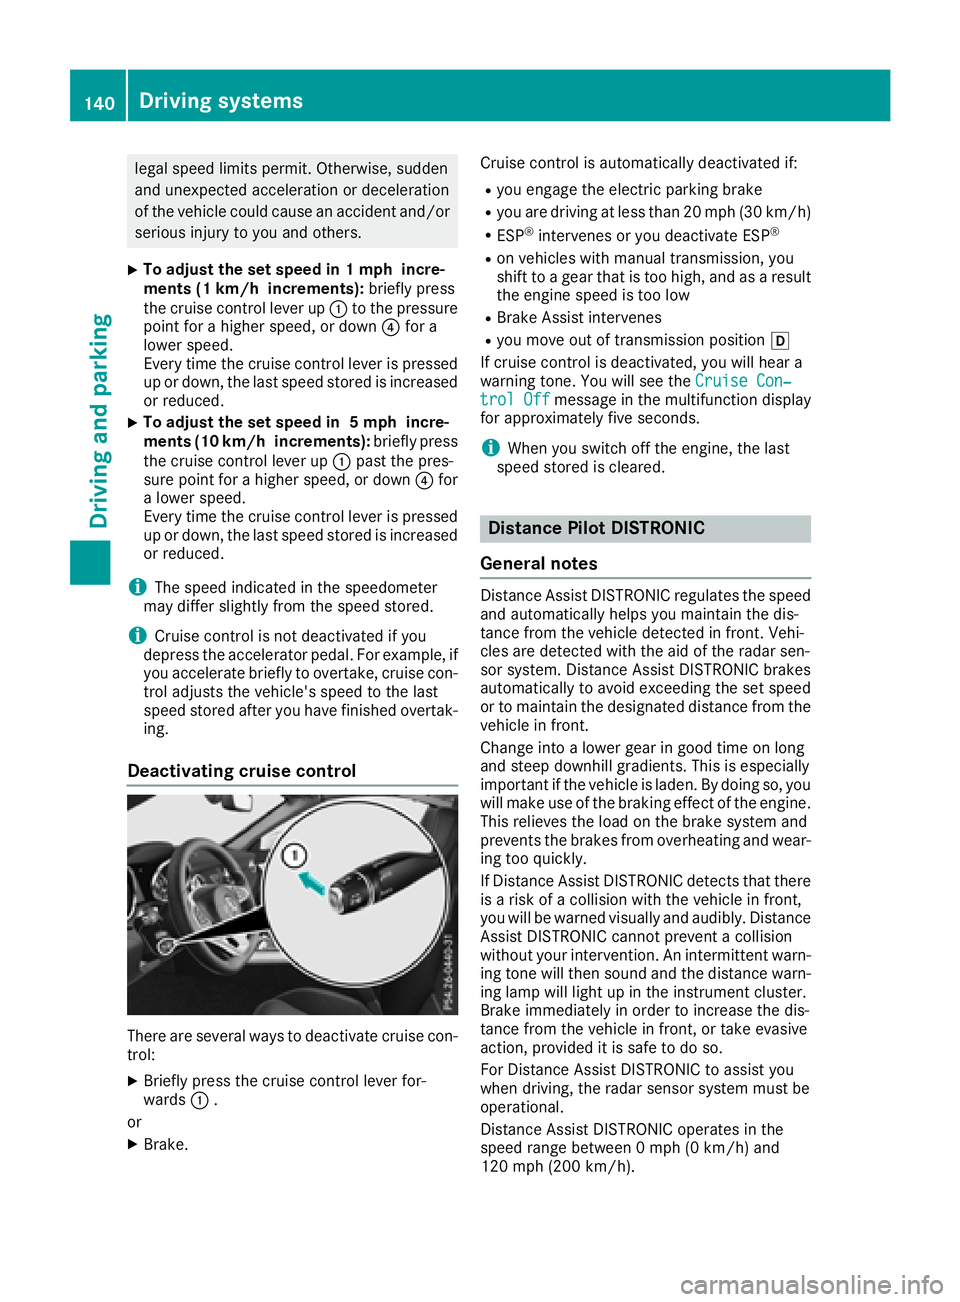
Deactivating cruise control
There are several ways to deactivate cruis econ-
trol:
XBriefly press the cruis econtrol lever for-
wards :.
or
XBrake. Cruise control is automatically deactivated if:
Ryou engag
ethe electric parking brake
Ryou are drivingatl ess than 20 mph (3 0km/ h)
RESP®intervenes or you deactivateE SP®
Ron vehicles with manual transmission,y ou
shift to agear that is too high, and as aresult
the engin espeed is too low
RBrak eAssist intervenes
Ryou move out of transmission position h
If cruis econtrol is deactivated, you will hear a
warnin gtone. You will see the Cruise Con‐
trol Offmessage in the multifunction display
for approximately five seconds.
iWhen you switc hoff the engine, the last
speed stored is cleared.
Distance Pilot DISTRONIC
General notes
Distanc eAssist DISTRONIC regulates the speed
and automatically helps you maintain the dis-
tance fromt he vehicle detected in front .Vehi-
cles are detected with the aid of the radar sen-
sor system. Distanc eAssist DISTRONIC brakes
automatically to avoid exceeding the set speed
or to maintain the designated distanc efromt he
vehicle in front.
Change int oalower gear in good tim eonlong
and steep downhill gradients. This is especially
importan tifthe vehicle is laden. By doing so, you
will make use of the braking effect of the engine.
This relieves the load on the brakes ystem and
prevent sthe brakes fromo verheatingand wear-
ing too quickly.
If Distanc eAssist DISTRONIC detect sthat there
is ar isk of acollision with the vehicle in front,
you will be warne dvisually and audibly. Distance
Assist DISTRONIC cannot prevent acollision
without your intervention. An intermitten twarn-
ing ton ewill the nsound and the distanc ewarn-
ing lamp will light up in the instrumentc luster.
Brak eimmediately in order to increase the dis-
tance fromt he vehicle in front ,ortakee vasive
action, provided it is safe to do so.
For Distanc eAssist DISTRONIC to assist you
when driving, the radar sensor system must be
operational.
Distanc eAssist DISTRONIC operates in the
speed rang ebetwee n0mph (0 km/h) and
120 mph (200 km/h).
140Driving systems
Driving and parking
Page 145 of 298
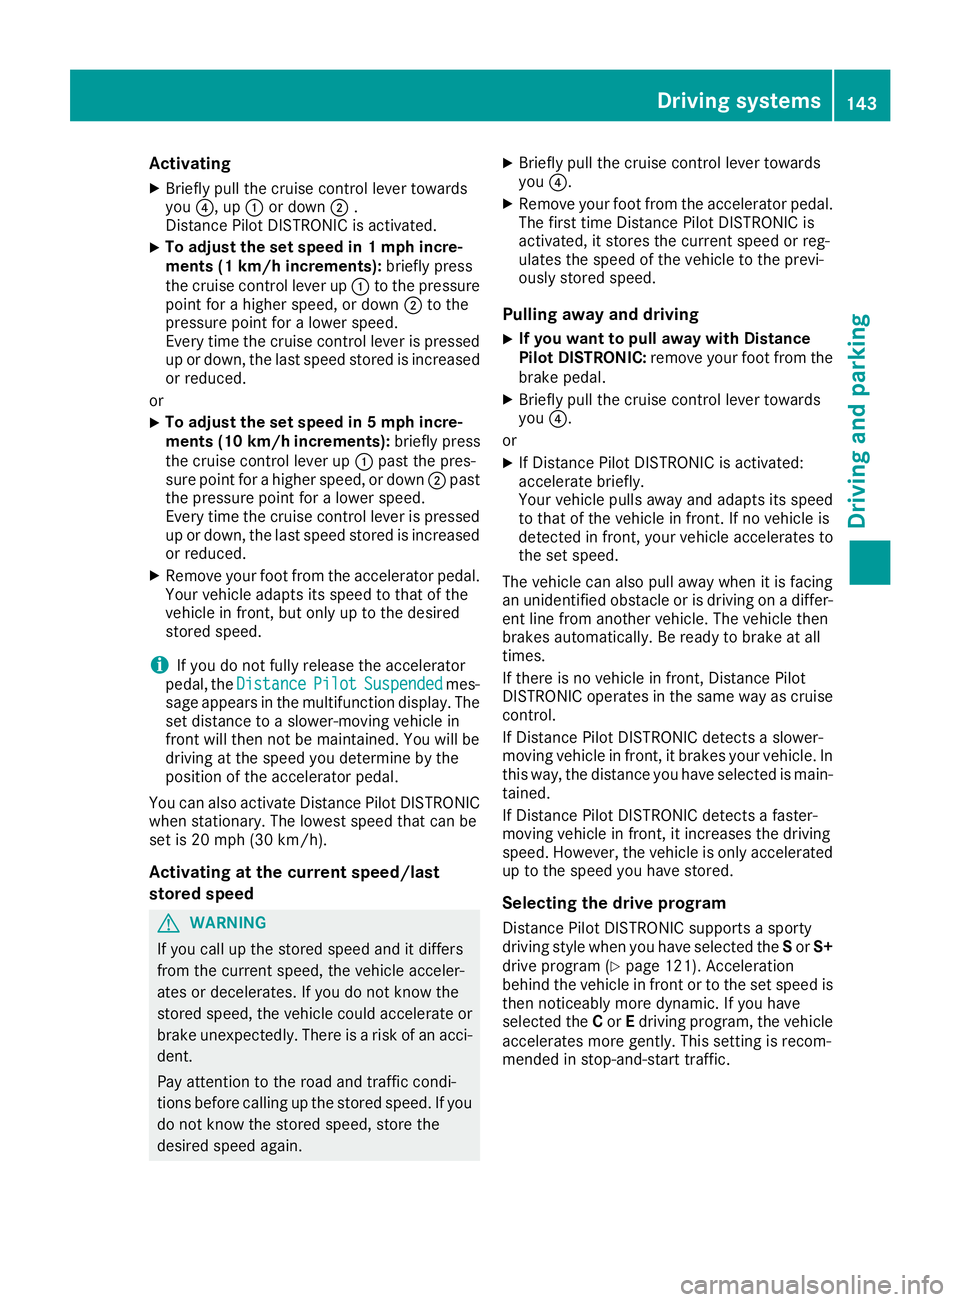
Activating
XBrieflypull th ecruise control leve rtow ards
you ?,u p: or down ;.
Distance Pilot DISTRONI Cisa ctivated.
XTo adjust th eset speed in 1mphincre-
ments (1 km/h increments): briefly press
th ec ruise control leve rup: to th epressur e
poin tfor ah igher speed, or down ;to th e
pressur epointfor alower speed.
Every tim ethe cruise control leve rispresse d
up or down ,the last spee dstoredisi ncreased
or reduced.
or
XTo adjust th eset speed in 5mphincre-
ments (10k m/h increments): briefly press
the cruise control lever up :past the pres-
sure point for ahigher speed, or down ;past
the pressure point for alower speed.
Ever ytime the cruise control lever is pressed
up or down, the last speed stored is increased or reduced.
XRemove your foot from the accelerator pedal.
Your vehicle adapts its speed to that of the
vehicle in front, but only up to the desired
stored speed.
iIf you do not fully release the accelerator
pedal, the DistancePilotSuspendedmes-
sage appears in the multifunction display. The set distanc etoaslower-moving vehicle in
frontw ill then not be maintained. You will be
driving at the speed you determine by the
position of the accelerator pedal.
You can also activate Distance Pilot DISTRONIC
when stationary. The lowest speed that can be
set is 20 mph (3 0km/ h).
Activatin gatthe curren tspeed/last
store dspeed
GWARNIN G
If you call up th estoreds pee dand it differs
from th ecurren tspeed, th evehicl eacceler -
ate sord ecelerates. If you do no tknowt he
store dspeed, th evehicl ecould accelerate or
brak eunexpectedly. Ther eisariskofana cci-
dent.
Pay attentio ntotheroad and traffic condi-
tions before calling up th estoreds peed. If you
do no tknowt he store dspeed, store th e
desired spee dagain .
XBriefl ypull th ecruise control leve rtow ards
you ?.
XRemove your foo tfro mt heaccelerato rpedal.
The first tim eDistance Pilot DISTRONI Cis
activated, it store sthe curren tspee dorr eg-
ulates th espee doft hevehicl etotheprevi-
ously store dspeed.
Pulling awa yand driving
XIf you want to pull awa ywith Distance
Pilot DISTRONIC: remove your footfro mt he
brak epedal.
XBriefl ypull th ecruise control leve rtow ards
you ?.
or
XIf Distance Pilot DISTRONI Cisactivated:
accelerate briefly.
Your vehicl epulls away and adapt sits spee d
to that of th evehicl einf ront.Ifnov ehicleis
detected in front, your vehicl eaccelerate sto
th es et speed.
The vehicl ecan also pull away when it is facing
an unidentified obstacle or is driving on adiffer-
en tlinef roma nother vehicle. The vehicl ethen
brakes automatically. Be read yt
ob ra
k eatall
times.
If there is no vehicl einfront,Distance Pilot
DISTRONI Coperate sinthesame way as cruise
control .
If Distance Pilot DISTRONI Cdetect saslower-
moving vehicl einfront,itbrakes your vehicle. In
this way, th edistanc eyou have selected is main -
tained.
If Distance Pilot DISTRONI Cdetect safaster-
moving vehicl einfront,itincreases th edriving
speed. However, th evehicl eiso nlya ccelerate d
up to th espee dyou have stored.
Selecting thed rive program
Distance Pilot DISTRONI Csupport sasporty
driving style when you have selected th eS or S+
driv eprogram (
Ypage 121). Acceleration
behind th evehicl einf rontor to th eset spee dis
then noticeably mor edynamic .Ifyou have
selected th eC or Edriving program ,the vehicl e
accelerate smoreg ently. This settin gisrecom-
mended in stop-and-star ttraffic.
Driving systems143
Driving and parking
Z
Page 147 of 298
Settingaspecified minimum distance
You can set the specified minimum distance for
Distanc ePilot DISTRONIC by varying the time
span between one and two seconds. With this
function, you can set the minimum distance that
Distanc ePilot DISTRONIC maintains to the vehi-
cle in front,d ependent on the vehicle speed. You
can see this distance in the multifunction dis-
play (
Ypage 145).
The specified minimum distance can be
changed while Distanc ePilot DISTRONIC is
switched on or off.
Make sure that you maintain asufficiently safe
distance from the vehicle in front.A djust the
distance to the vehicle in front if necessary.
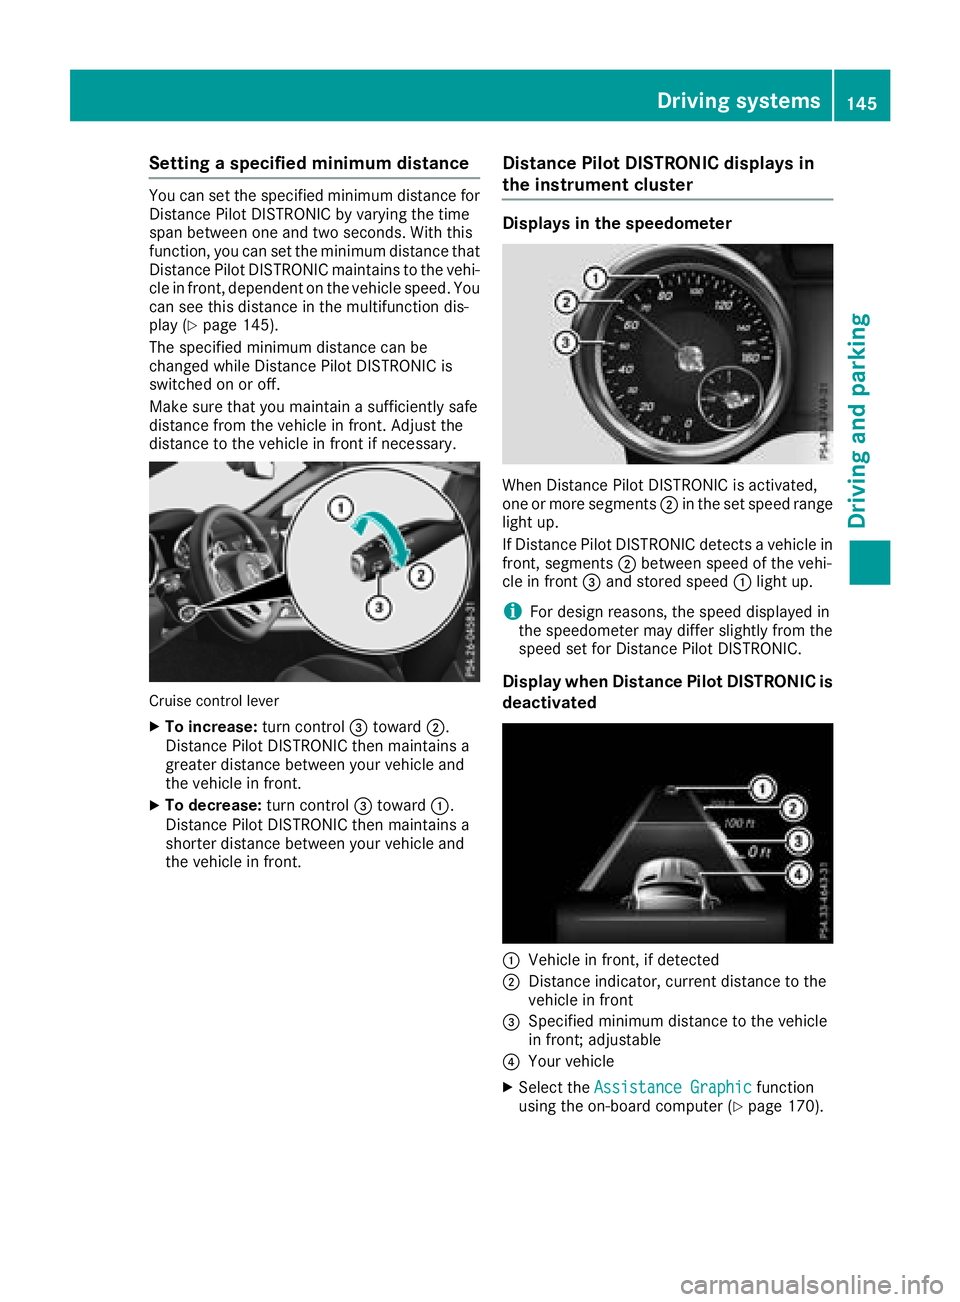
Cruise control lever
XTo increase: turn control=toward ;.
Distanc ePilot DISTRONIC then maintains a
greater distance between your vehicle and
the vehicle in front.
XTo decrease: turn control=toward :.
Distanc ePilot DISTRONIC then maintains a
shorter distance between your vehicle and
the vehicle in front.
Distance Pilot DISTRONIC displays in
the instrument cluster
Displays in the speedometer
When Distanc ePilot DISTRONIC is activated,
one or more segments ;in the set speed range
light up.
If Distanc ePilot DISTRONIC detectsav ehicle in
front,s egments ;between speed of the vehi-
cle in front =and stored speed :light up.
iFor design reasons, the speed displayed in
the speedometer may differ slightly from the
speed set for Distanc ePilot DISTRONIC.
Display when Distance Pilot DISTRONIC is
deactivated
:Vehicle in front,ifd etected
;Distanceindicator, current distance to the
vehicle in front
=Specified minimum distance to the vehicle
in front;a djustable
?Your vehicle
XSelect the Assistance Graphicfunction
using the on-board computer (Ypage 170).
Driving systems145
Driving and parking
Z