2018 MERCEDES-BENZ SLC ROADSTER reset
[x] Cancel search: resetPage 7 of 298
Assistance menu(on-boar dcom-
puter) .................................................. 170
ASSYSTP LUS
Dis playin gaservic emessage ........ 237
Hiding aservic emessage .............. 237
Resetting th eservic einterval dis-
play ................................................ 237
Se rvice message ............................ 237
Spe cial servic erequirements ........ .238
ATA (Anti-Theft Alarm system)
Activating/deactivating ................... 64
Function ...........................................6 4
Switching off the alarm .................... 64
ATTENTIO NASSIS T
Activating/deactivating ................. 171
Displa ymessage ............................ 193
Function/note s............................. 158
Audi omenu( on-board computer) .... 168
Audi osystem
see Digital Operator's Manual
Authorized Mercedes-Benz Center
see Qualifie dspecialist workshop
Authorized workshop
see Qualifie dspecialist workshop
AUTO lights
Displa ymessage ............................ 189
see Lights
Automatic car was h(care) ............... 238
Automatic engine start (ECO start/
stopf unction) .................................... 119
Automatic engine switch-off (ECO
start/stopf unction).......................... 119
Automatic headlamp mode ................ 95
Automatic transmission
Accelerator peda lposition ............. 125
Changing gea r............................... 125
Displa ymessage ............................ 198
Drive program. ............................... 125
Drive programd isplay .................... 122
Driving tip s.................................... 125
DYNAMIC SELECT button .............. 121
Emergency running mode. ............. 129
Eng
aging drive position .................. 124
Engaging neutral ............................ 123
Engaging park position automati-
cally ............................................... 123
Engaging reverse gea r................... 123 Engaging the park position ............ 123
Gearshift recommendation ............ 128
Kickdown.
...................................... 125
Manua lshifting .............................. 126
Oil temperature (on-board com-
puter, Mercedes-AMGS LC 43) ...... 175
Overview ........................................ 122
Problem (malfunction) ................... 129
Pulling away ................................... 118
Selector lever ................................ 122
Starting the engine ........................ 117
Steering wheelp addleshifters ...... 126
Transmission position display ........ 122
Transmission positions .................. 124
Automatic transmissio nemer-
gencym ode....................................... 129
B
Back button ....................................... 212
BAS (Brake Assist System) ................. 57
Battery (SmartKey)
Checking .......................................... 68
Important safety notes .................... 67
Replacing ......................................... 68
Battery (vehicle)
Charging ........................................ 253
Displa ymessage ............................ 191
Important safety notes .................. 251
Jump starting ................................. 253
Overview ........................................ 251
Belt
see Seatb elts
Bel twarning ......................................... 42
Blind SpotA ssist
Activating/deactivating ................. 171
Displa ymessage ............................ 194
Notes/function .............................. 159
Bluetooth
®
Searching for amobilephone ........ 215
Searching for amobilephone
(device manager )........................... 216
see also Digital Operator's Man-
ua l.................................................. 211
Telephony ...................................... 215
Brake Assist System
see BAS (Brake Assist System)
Index5
Page 15 of 298
Messagessee Display messages
Mirrors
see Exterior mirrors
see Rear-view mirror
Mobile phone
Connecting (Bluetooth
®inter-
face) ..............................................2 15
Connecting (device manager) ........2 16
Frequencies ................................... 288
Installatio n..................................... 288
Menu (on-board computer) ............ 169
Transmissiono utput (maximum ).... 288
Modifying the programming
(SmartKey) ...........................................6 6
MOExtended tires .............................. 247
Mountingw heels
Lowering the vehicle. ..................... 284
Mounting anew wheel. .................. 283
Preparing the vehicle. ....................281
Raising the vehicle ......................... 281
Removing awheel .......................... 283
Securing the vehicle against roll-
ing away ........................................ 281
MP3
Operation ....................................... 169
see also Digita lOperator's Man-
ua l..................................................2 11
Multifunctio ndisplay
Function/notes .............................1 65
Permanent display. ........................ 172
Multifunctio nsteering wheel
Operating the on-board computer .. 164 Overview .......................................... 33
Multimedia system
Switching on and off ......................2 12
Music files
see also Digita lOperator's Man-
ua l.................................................. 211
N
Navigation
Entering adestination .................... 213
Menu (on-board computer) ............ 167
see also Digital Operator's Man-
ua l.................................................. 211 Navigation menu
Important safety notes .................. 167
NECK-PRO hea drestraints
Important safety notes .................... 52
Operation ......................................... 52
Resetting triggered .......................... 53
Note sonb reaking-i nanewvehi-
cle ....................................................... 115
O
Occupant Classification System
(OCS)
Conditions ....................................... 46
Faults ............................................... 49
Operation ......................................... 46
System self-test ............................... 48
Occupant safety
Air bags ........................................... 43
Automati cmeasures afte ranacci-
dent ................................................. 53
Bel twarning ..................................... 42
Childre ninthe vehicl e..................... 53
Important safety notes .................... 38
Introduction to the restraint sys-
tem .................................................. 38
Occupant Classification System
(OCS) ............................................... 45
PASSENGER AIR BAG indicator
lamps ............................................... 39
Pets in the vehicl e........................... 56
PRE-SAFE
®(anticipatory occu-
pant protection) ............................... 53
Restraint system warning lamp ........ 38
Seatb elt. ......................................... 39
OCS
Conditions ....................................... 46
Faults ............................................... 49
Operation ......................................... 46
System self-test ............................... 48
Odometer ........................................... 166
Oil
see Engine oil
On-board computer
AMG menu ..................................... 175
Assistance menu ........................... 170
Audio menu ................................... 168
Convenience submenu .................. 174
Index13
Page 18 of 298
S
SafetyChildren in the vehicle ..................... 53
see Occupant safety
Safety system
see Driving safety systems
SD card
Inserting ........................................2 17
Inserting/removing ........................ 217
Removing ....................................... 217
SD memory card
see also Digita lOperator's Man-
ua l..................................................2 11
Selecting ........................................ 169
Search&S end
see also Digita lOperator's Man-
ua l..................................................2 11
Seat
Correct driver's seatp osition ........... 84
Seat belts
Adjusting the driver's and front-
passenger seatb elt......................... 42
Correct usag e.................................. 41
Fastening ......................................... 42
Important safety guideline s............. 40
Introduction ..................................... 39
Releasing ......................................... 42
Switching belt adjustment on/off
(on-board computer) ...................... 174
Warning lamp ................................. 203
Warning lamp (function) ................... 42
Seats
Adjusting (electrically) ..................... 86
Adjusting (manually) ........................ 86
Adjusting the 4-wa ylum bars up-
por t.................................................. 87
Adjusting the headr estraint ............ 86
Important safety notes .................... 84
Overview .......................................... 84
Seath eating problem ...................... 87
Storing settings (memory func-
tion) ................................................. 93
Switching AIRSCAR Fon/off. ........... 87
Switching seath eating on/off......... 87
Selecto rlever
Positions ........................................ 122
Sensors (cleaning instructions) ....... 242Servic
emenu( on-board com-
puter) .................................................. 171
Servic emessage
see ASSYST PLUS
Servic eproducts
Brake fluid ..................................... 293
Coolant (engine) ............................ 293
Engine oil. ...................................... 292
Fue l................................................ 291
Important safety notes .................. 290
Refrigerant (air-conditioning sys-
tem) ............................................... 294
Washerf lui
d ................................... 294
Settingt he air distribution ............... 110
Setting the airflow ............................ 110
Setting the date/time format
see also Digital Operator's Man-
ual.................................................. 211
Setting the language
see also Digital Operator's Man-
ual.................................................. 211
Setting the time
see also Digital Operator's Man-
ual.................................................. 211
Settings
Factory (on-board computer) ......... 175
On-board compute r....................... 172
SETUP (on-board computer,
Mercedes-AMG vehicles) .................. 175
Side impac tair bag ............................. 44
Side marker lamp
Changing bulb s(rear) .................... 101
Side marker lamp (display mes-
sage) ................................................... 189
Side windows
Cleaning ......................................... 241
Convenience closing feature ............ 76
Important safety information ........... 74
Opening/closing (all )....................... 75
Opening/closing (front) ................... 75
Overview .......................................... 74
Problem (malfunction) ..................... 76
Resetting ......................................... 76
Reversing feature ............................. 74
SIRIU Sservices
see also Digital Operator's Man-
ua l.................................................. 211
16Index
Page 21 of 298

Maximum load onatire (defini-
tion) ............................................... 279
Maximum loaded vehicle weight
(definition) .....................................2 79
Maximum permissible tire pres-
sure (definition) .............................2 79
Maximum tire load. ........................ 277
Maximum tire load( definition) ....... 279
MOExtended tires .......................... 262
Optional equipment weight (defi-
nition) ............................................ 280
Overview ........................................ 260
PSI (pounds per square inch) (def-
inition) ...........................................2 79
Replacing ....................................... 280
Service life ..................................... 261
Sidewall (definition) ....................... 279
Speed rating (definition) ................ 279
Storing ...........................................2 81
Structure and characteristics
(definition) ..................................... 278
Summer tires ................................. 262
Temperature .................................. 274
TIN (Tire Identification Number)
(definition) ..................................... 280
Tire bead( definition) ......................2 79
Tire pressure (definition) ................ 279
Tire pressure s(recommended). ..... 278
Tire size (data) ............................... 284
Tire size designation, load-bearing
capacity, speedr ating .................... 275
Tire tread ....................................... 261
Tire tread (definition) ..................... 279
Total loadl imit (definition) ............. 280
Traction ......................................... 274
Traction (definition) ....................... 280
Treadw ear..................................... 274
Uniform Tire Quality Grading
Standard s...................................... 273
Uniform Tire Quality Grading
Standard s(de finition) .................... 278
Wea rindicator (definition) ............. 280
Wheel and tire combination ........... 284
Wheel rim (definiti on) .................... 278
se
e Fla ttire
Tow-starting
Emergency engine starting ............ 258
Important safety notes .................. 256 Towin
gaway
Important safety guideline s........... 256
Installing the towing eye. ............... 256
Removing the towing eye. .............. 257
Transporting the vehicl e................ 258
With both axles on the ground ....... 257
With the reara xler aised ................ 257
Trafficr eports
see also Digital Operator's Man-
ua l.................................................. 211
Transmission
Selector lever ................................ 122
see Automati ctransmission
Transmissio nposition display ......... 122
Transporting the vehicle .................. 258
Trip computer (on-board com-
puter) .................................................. 166
Trip odometer
Calling up ....................................... 166
Resetting (on-board computer) ...... 167
Trunk
Emergency release .......................... 73
Important safety notes .................... 72
Locking separately. .......................... 73
Opening/closing (manuall yfrom
outside) ............................................ 73
Overview .......................................... 72
Trunk lid
Displa ymessage ............................ 200
Opening dimensions ...................... 295
Trunk partition
Displa ymessage ............................ 200
Generaln otes .................................. 79
Opening/closing .............................. 80
Turn signals
Displa ymessage ............................ 189
Switching on/off. ............................. 96
Two-wa yradio
Frequencie s................................... 288
Installation ..................................... 288
Transmission output( maximum) .... 288
Type identificatio nplate
see Vehicl eide ntification plate
U
Unlocking
Emergency unlocking ....................... 72
Index19
Page 29 of 298
Diagnostics connection
The diagnosticsconnectio nisonlyi ntende dfor
th ec onnectio nofdiagnostic equipmen tata
qualified specialis tworkshop .
GWARNING
If you connec tequipmen ttoadiagnostic s
connection in th evehicle, it may affec tthe
operation of vehicle systems .Asaresult,the
operatin gsafet yofthe vehicle could be affec -
ted. There is ariskofana ccident.
Only connec tequipmen ttoadiagnostic scon-
nection in th evehicle, whic hisapproved fo r
your vehicle by Mercedes-Benz.
GWARNING
Objects in th edriver's footwell may restric t
th ec learanc earound th epedals or bloc ka
depressed pedal. Thi sjeo pardizes th eoper-
atin gand road safet yofthe vehicle. There is a
ris kofana ccident.
Stow all objects securely in th evehicle so that
they do no tget into th edriver's footwell.
Whe nusingfloormat sorcarpets, mak esure
that they are properly secure dsothatthe yd o
no tslip or obstruct th epedals. Do no tplac e
severa lfloormat sorcarpetsont opof on e
another.
!If th eengineiss witched of fand equipmen t
on th ediagnostic sconnectio nisused,the
starter battery may discharge.
Connectin gequipmen ttothediagnostic scon-
nection can lead to emission smonitor ingi nfor -
mation bein greset ,for example. Thi smay lead
to th evehicle failin gtomeetthe requirements of
th en exte mission stestd urin gthe main inspec-
tion .
Qualified specialist workshop
An authorized Mercedes-Ben zCente risaq uali-
fie ds pecialis tworkshop .Ithas th eneces sary
specialis tkno wledge ,too ls and qualification sto
correctl ycarry out th eworkr equire donyour
vehicle. Thi sisespecially th ecasef or wor krel-
evant to safety.
Observ ethe note sint heMaintenance Booklet .Always hav
ethe followin gworkc arrie dout at an
authorized Mercedes-Ben zCenter:
Rwor krelevant to safet y
Rserviceand maintenance wor k
Rrepair work
Ralterations, installation wor kand modifica-
tion s
Rworkone lectronic component s
Correct use
If you remov eany warnin gstickers, you or oth-
ers could fail to recogniz ecertai ndangers.
Leave warnin gsticker sinposition .
Observ ethe followin ginformati on when drivin g
your vehicle:
Rth es afet ynotes in this manual
Rtechnical dat afor thev ehicle
Rtraffic rule sand regulation s
Rlaws and safet ystandard spertainin gtomotor
vehicles
Problem swithy ourv ehicle
If you should experience aproblem wit hyour
vehicle, particularly on ethaty ou believe may
affec tits saf eoperation ,weurgey ou to contact
an authorized Mercedes-Ben zCente rimmedi-
ately to hav ethe problem diagnosed and recti -
fied. If th eproblem is no tresolved to your sat -
isfaction ,please discus sthe problem again wit h
an authorized Mercedes-Ben zCente ror,if nec-
essary, contact us at on eofthefollowin g
addresses.
In th eUSA
Customer Assistanc eCente r
Mercedes-Ben zUSA,LLC
3M ercedes Drive
Montvale, NJ 07645-0350
In Canad a
Customer Relation sDepartmen t
Mercedes-Ben zCanada, Inc.
98 Vanderhoo fAvenu e
Toronto ,Ontar io M4 G4C9
Reporting safet ydefect s
USAo nly:
Operating safety27
Introduction
Z
Page 54 of 298
are affected and therateofd eceleratio nisnot
high.C onversely, air bags may be deployed even
though th evehicle suffers only minor deforma-
tion. This is th ecasei f, for example, ver yrigid
vehicle part ssuchasl ongitudinal body mem-
bers are hit,a nd sufficient deceleratio noccurs
as aresult.
If th erestraint system control unit detect saside
impac torift hevehicle roll sover, th eapplicable
component softherestraint system are
deployed independently of each other depend-
ing on th eapparent type of accident.
RSid eimpacta ir bag on th eside of impact,
independently of th eEme rgenc yTensioning
Devic eand th euse of th eseat belt on the
driver'ss eat
The side impac tair bag on th efront -
passenger side deploys unde rthe following
conditions:
-th eO CS system detect sthatthe front-
passenger seat is occupied or
-th es eat belt buckle tongue is engaged in
th eb elt buckle of th efront-pa ssenger seat
RHead bag on th eside of impact, independ-
ently of th euse of th eseat belt and inde-
pendently of whether th efront-pa ssenger
seat is occupied
REmergenc yTensioning Devices, if th esystem
determine sthatd eploymen tcan offer addi-
tional protection in this situation
RHead bags on th edriver'sa nd front-
passenger side in certain situations when the
vehicle roll sover, if t
h
esystem determines
that deploymen tcan offer additional protec-
tio ntot hatp rovided by th eseat belt
iNot all air bags are deployed in an accident.
The differenta ir bag systems work independ-
ently of each other.
How th eair bag system worksisd etermined
by th eseverityoft heaccidentd etected,
especially th evehicle deceleratio noraccel-
eration and th eapparent type of accident:
RFrontal collision
RSid eimpact
RRollover
NECK-PROh eadr estraints
Important safety notes
GWARNING
The function of th ehead restraint may be
impaired if you:
Rattach object ssuchasc oat hangerstot he
head restraints, for example
Ruse head restraint covers
If you do so, th ehead restraint scanno tfulfill
their intended protective function in th eevent
of an accident. In addition,o bjectsattached
to th ehead restraint scoul de ndanger other
vehicle occupants. Thereisani ncreased risk
of injury.
Do no tattach any object stothehead
restraint sand do no tuse head restraint cov-
ers.
Method of operation
NECK-PRO head restraint sreduc ethe likelihood
of head and chest injuries.T he NECK-PRO head
restraint sonthedriver'sa nd front-passenger
seatsa re moved forwards and upwards in the
eventofar ear-endcollision of acertain severity.
This provides bette rhead support.
If th eNECK-PRO head restraint shave been trig-
gered in an accident, you must reset th eNECK-
PRO head restraint sonthedriver’s and front-
passenger seat (
Ypage 53) .Otherwise, the
additional protection will no tbeavailabl einthe
eventofa nother rear-en dcollision.Y ou can rec-
ognize when NECK-PRO head restraint shave
been triggered by th efacttha tthe yh ave moved
forwards and can no longer be adjusted.
Mercedes-Ben zrecommend sthaty ou have the
NECK-PRO head restraint schecked for func-
tionalit yataq ualified specialist workshop after
ar ear-en dcollision.
52Occupant safety
Safety
Page 55 of 298
Resetting triggeredNECK-PRO head
restraints
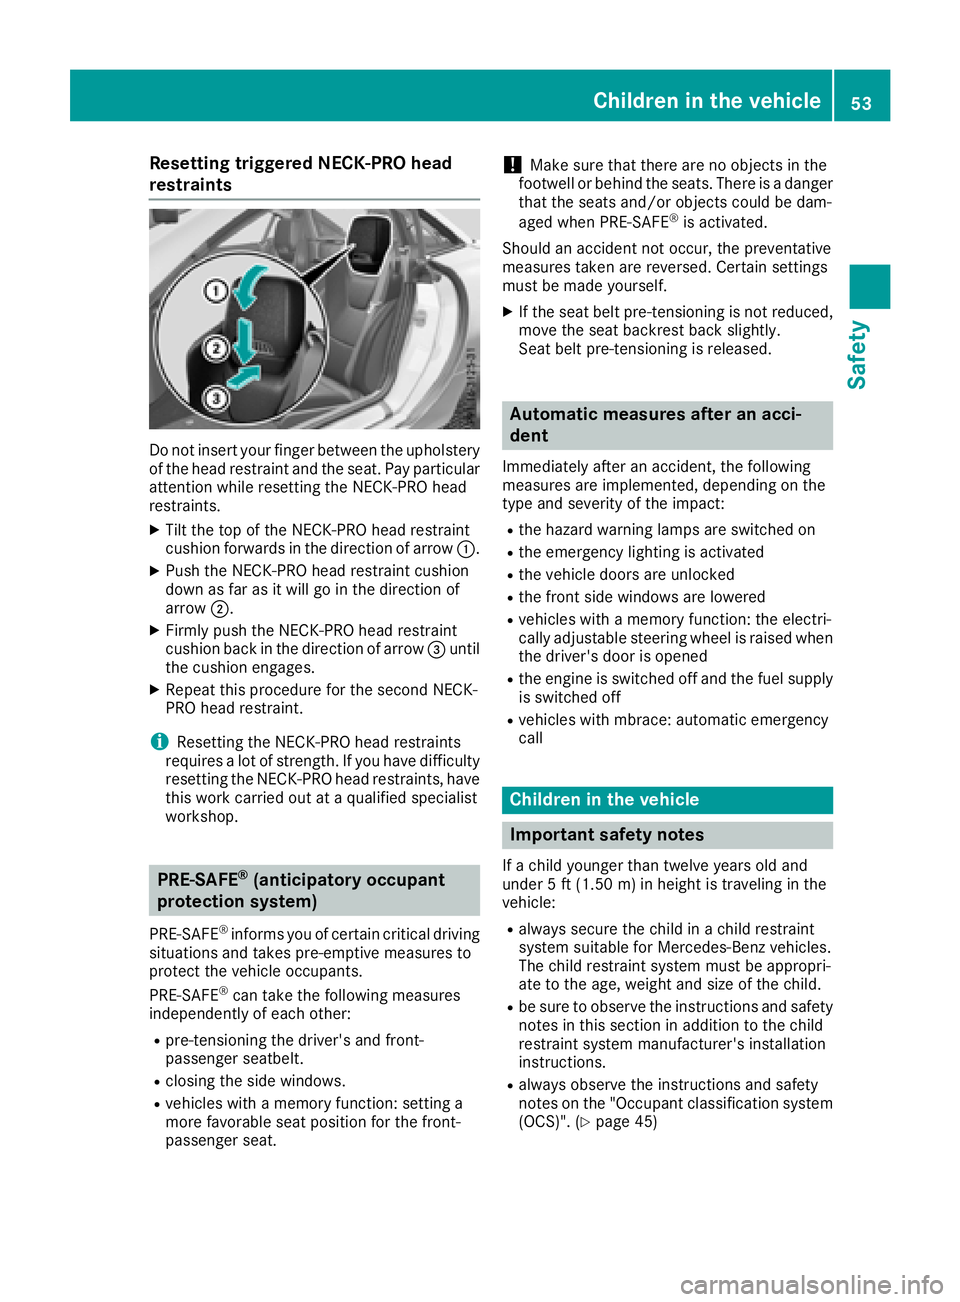
Do not insert your finger between the upholstery of the headr estraint and the seat. Payp articular
attention whil eresetting the NECK-PROh ead
restraints.
XTilt the top of the NECK-PROh eadrestraint
cushio nforward sinthe direction of arrow :.
XPush the NECK-PROh eadrestraint cushion
dow nasfar as it will go in the direction of
arrow ;.
XFirmly push the NECK-PROh eadrestraint
cushio nbackint he direction of arrow =until
the cushio nengages.
XRepea tthis procedure for the second NECK-
PROh eadrestraint.
iResetting the NECK-PROh eadrestraints
requires alot of strength. If yo uhaved ifficulty
resetting the NECK-PROh eadrestraints, have
this work carrie doutataq uali fied specialist
workshop.
PRE-SAFE®(anticipatory occupant
protection system)
PRE-SAFE®informs yo uofcertain critical driving
situations and take spre-emptive measures to
protect the vehicl eoccupants.
PRE-SAFE
®can take the following measures
independentl yofeacho ther:
Rpre-tensioning the driver'sa nd front-
passenger seatbelt.
Rclosing the sid ewindows.
Rvehicles with amemory function: setting a
more favorabl eseatp osition for the front-
passenger seat.
!Make sure that there are no objects in the
footwell or behind the seats. There is adanger
that the seats and/or objects could be dam-
aged when PRE-SAFE
®is activated.
Should an accident not occur, the preventative
measures take nare reversed. Certai nsettings
mus tbem adey ourself.
XIf the seatb eltp re-tensioning is not reduced,
move the seatb ackrest back slightly.
Seatb eltp re-tensioning is released.
Automatic measures after an acci-
dent
Immediately afte ranaccident, the following
measures are implemented, depending on the
typ eand severity of the impact:
Rthe hazard warning lamps are switched on
Rthe emergency lighting is activated
Rthe vehicl edoors are unlocked
Rthe front sid ewindow sare lowered
Rvehicles with amemory function: the electri-
cally adjustabl esteering wheel is raised when
the driver'sd ooriso pened
Rthe engine is switched off and the fue lsuppl y
is switched off
Rvehicles with mbrace: automatic emergency
call
Childrenint he vehicle
Important safety notes
Ifac hild younger than twelve years olda nd
under 5ft(1.50 m) in height is traveling in the
vehicle:
Ralways secur ethe child in achild restraint
systems uitabl efor Mercedes-Benz vehicles.
The child restraint systemm ustbea ppropri-
ate to the age, weight and size of the child.
Rbe sure to observe the instructions and safety
notesint hissectio nina dditiontot he child
restraint systemm anufacturer's installation
instructions.
Ralways observe the instructions and safety
notesont he "Occupant classification system
(OCS)". (
Ypage 45)
Children in the vehicle53
Safety
Z
Page 76 of 298
tion2.S imultaneouslyp ullthe trunk li dhan-
dle.
The trunk is unlocked.
XTurn the mechanica lkey back to position 1
and remove it.
XInsert the mechanica lkey into the SmartKey.
Emergenc yrelease fort he trunk
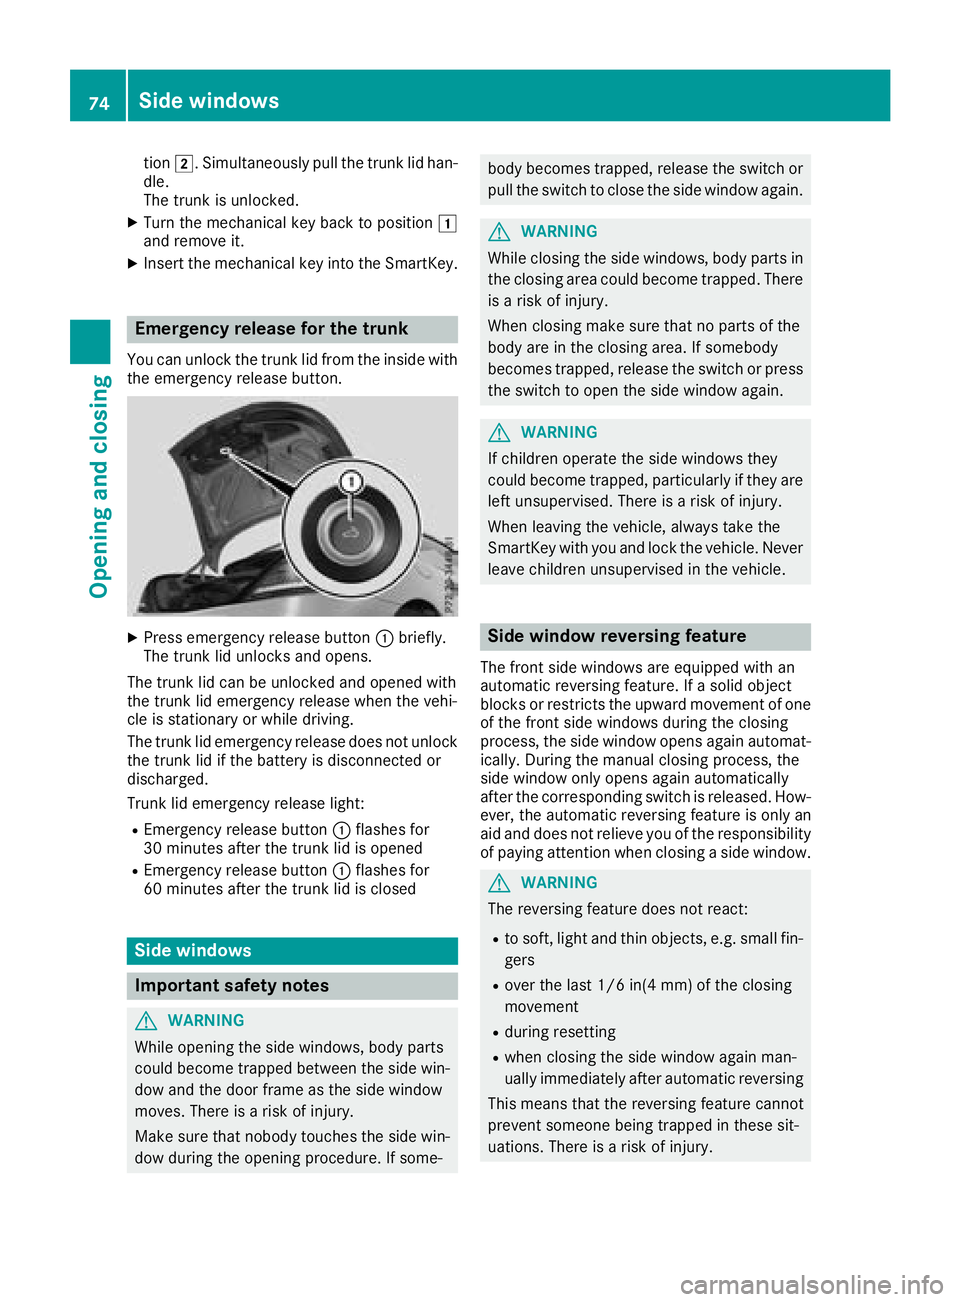
Youc an unlock the trunk li dfromt he insid ewith
the emergency release button.
XPress emergency release button :briefly.
The trunk li dunlocks and opens.
The trunk li dcan be unlocke dand opene dwith
the trunk li demergency release when the vehi-
cle is stationar yorwhiledriving.
The trunk li demergency release does not unlock
the trunk li difthe battery is disconnecte dor
discharged.
Trunk li demergency release light:
REmergency release button :flashe sfor
30 minute safter the trunk li disopened
REmergency release button :flashe sfor
60 minute safter the trunk li disclosed
Side windows
Important safety notes
GWARNING
Whil eopening the side windows ,bod yp arts
could become trapped between the side win-
do wa nd the door frame as the side window
moves .There is ariskofi njury.
Make sure thatn obodytouche sthe side win-
do wd uringt he opening procedure. If some-
body becomest rapped,release the switch or
pull the switch to close the side windo wagain .
GWARNING
Whil eclosing the side windows ,bod yp arts in
the closing area could become trapped .There
is ar iskofi njury.
When closing make sure thatnop arts of the
body ar einthe closing area .Ifsomebody
become strapped ,release the switch or press
the switch to open the side windo wagain .
GWARNING
If children operate the side windows they
could become trapped ,particularly if theya re
left unsupervised .There is ariskofi njury.
When leaving the vehicle, always take the
SmartKeyw ithy ou and lock the vehicle. Never
leav echildren unsupervised in the vehicle.
Side windo wreversin gfeature
The front side windows ar eequippe dwitha n
automatic reversing feature. If asolid object
blocks or restricts the upward movement of one
of the front side windows durin gthe closing
process, the side windo wopens agai nautomat-
ically. During the manua lclosing process, the
side windo wonlyo pens agai nautomatically
after the corresponding switch is released. How-
ever, the automatic reversing featur eisonlya n
ai da nd does not relieve yo uofthe responsibility
of paying attentio nwhenc losing asidew indow.
GWARNING
The reversing featur edoesn ot react:
Rto soft, light and thino bjects ,e.g.s mall fin-
gers
Rove rthe last 1/6 in(4 mm) of the closing
movement
Rdurin gresetting
Rwhen closing the side windo wagain man-
uall yimm ediatel yafter automatic reversing
Thi sm eans thatt he reversing featur ecannot
prevent someone being trapped in these sit-
uations. There is ariskofi njury.
74Side windows
Openin gand closing