2018 MERCEDES-BENZ SLC ROADSTER ignition
[x] Cancel search: ignitionPage 13 of 298
Google™ Local Searchsee alsoD igital Operator's Man-
ual. ................................................. 211
H
Hazard warning lamps
Displaym essage............................ 201
Switching on/off. ............................. 97
Hea dbags
Displa ymessage ............................ 186
Operation ......................................... 45
Hea dlevel heatin g(AIRSCARF) .......... 87
Hea drestraints
Adjusting ......................................... 86
see NECK-PROh eadrestraints
Headlamps
see Automati cheadlamp mode
Heating
see Climate control
Hig hbeamf lasher ............................... 96
High-beam headlamps
Displa ymessage ............................ 189
Replacing bulb s............................. 100
Switching on/off. ............................. 96
Hil lstart assist .................................. 118
HOLDf unction
Activating ....................................... 148
Activation conditions ..................... 148
Deactivating ................................... 148
Displa ymessage ............................ 193
Generaln otes ................................ 148
Home address
see also Digital Operator's Man-
ual.................................................. 211
Hood
Closing ........................................... 234
Displa ymessage ............................ 200
Important safety notes .................. 233
Opening ......................................... 233
Horn ...................................................... 31
Hydroplaning ..................................... 138
I
Ignitionlock
see Key positions
Immobilizer .......................................... 63 Indicator lamps
see Warning and indicator lamps
Indicators
see Turn signals
Instrument cluster
Overview .......................................... 32
Instrument clusterl ighting .............. 163
Interior lighting
Automati ccontrol ............................ 99
Delayed switch-off (on-board
computer) ...................................... 173
Overview .......................................... 99
Reading lamp ................................... 99
Setting the brightness of the
ambient lighting (on-board com-
puter) ............................................. 172
Setting the color of the ambient
lighting (on-board computer) ......... 173
iPod
®
see also Digital Operator's Man-
ua l.................................................. 211
J
Jack
Storage location ............................ 245
Using ............................................. 281
Jump starting (engine) ...................... 253
K
Keyp ositions
KEYLESS-GO .................................. 116
SmartKey ....................................... 116
KEYLESS-GO
Activating ......................................... 65
Convenience closing feature ............ 76
Deactivation ..................................... 65
Displa ymessage ............................ 202
Locking ............................................ 65
Removing the Start/Sto pbutton ... 117
Start/Sto pbutton .......................... 116
Starting the engine ........................ 118
Unlocking ......................................... 65
Kickdown
Driving tip s.................................... 125
Manua lgearshifting ....................... 128
Knee bag .............................................. 44
Index11
Page 19 of 298
SmartKeyChanging the battery ....................... 68
Changing the programming .............6 6
Checkin gthe battery ...................... .68
Display message ............................ 201
Doorc entral locking/unlocking ....... 65
Important safety note s.................... 65
Loss. ................................................ 69
Mechanical key ................................ 67
Opening/closing the roof. ............... 79
Overview .......................................... 65
Positions (ignition lock) ................. 116
Problem (malfunction) ..................... 69
Starting the engine ........................ 118
SMS
see also Digital Operator's Man-
ual.................................................. 211
Snowc hains...................................... 262
Sockets
Center console .............................. 223
Generaln otes ................................ 223
Sound
Switching on/off. .......................... 212
Special seat belt retractor .................. 54
Specialist workshop ............................ 27
Speed, controlling
see Cruise control
Speedometer
Digital ............................................ 167
In the Instrument cluster ................. 32
Segments ...................................... 163
Selecting the display uni t............... 172
Sport handlin gmode
Activating/deactivating
(Mercedes-AMGS LC 43) ................. 62
Warning lamp ................................. 206
Standin glamps
Displa ymessage ............................ 189
Switching on/off. ............................. 96
Start/stopf unction
see ECO start/stop function
Startin g(engine )................................ 117
Steering
Displa ymessage ............................ 200
Steering wheel
Adjusting (electrically) ..................... 89
Adjusting (manually) ........................ 88
Butto noverview ............................... 33 Buttons (on-board computer) ......... 164
Important safety notes .................... 88
Storing settings (memory func-
tion) ................................................. 93
Steering whee lpaddle shifters ........ 126
Stopwatch (RACETIMER) ................... 175
Stowag eareas ................................... 219
Stowag ecom partments
Armrest (under )............................. 219
Cente
r console .............................. 220
Cu ph olders ................................... 221
Door ............................................... 220
Eyeglasses compartment ............... 220
Glove box ....................................... 219
Important safety information ......... 219
Rear wall ........................................ 220
Stowag enet ................................... 220
Stowag enet....................................... 220
Summert ires..................................... 262
Sun visor ............................................ 222
Surround lighting (on-board com-
puter) .................................................. 173
Switchin gair-recirculatio nmode
on/off ................................................. 112
Switchin gonmediam ode
Via the device list .......................... 217
T
Tachometer ........................................ 163
Tail lamps
Displa ymessage ............................ 189
see Lights
Tank content
Fuelgauge ....................................... 32
Technical data
Capacities ...................................... 290
Emergency spare wheel. ................ 286
Information .................................... 288
Tires/wheels ................................. 284
Vehicl edata. .................................. 295
TELEAID
Call priority .................................... 227
Emergency cal l.............................. 225
Generaln otes ................................ 224
MB info cal lbutton ........................ 226
Roadsid eAssistance button .......... 226
Self-test ......................................... 224
Index17
Page 33 of 298
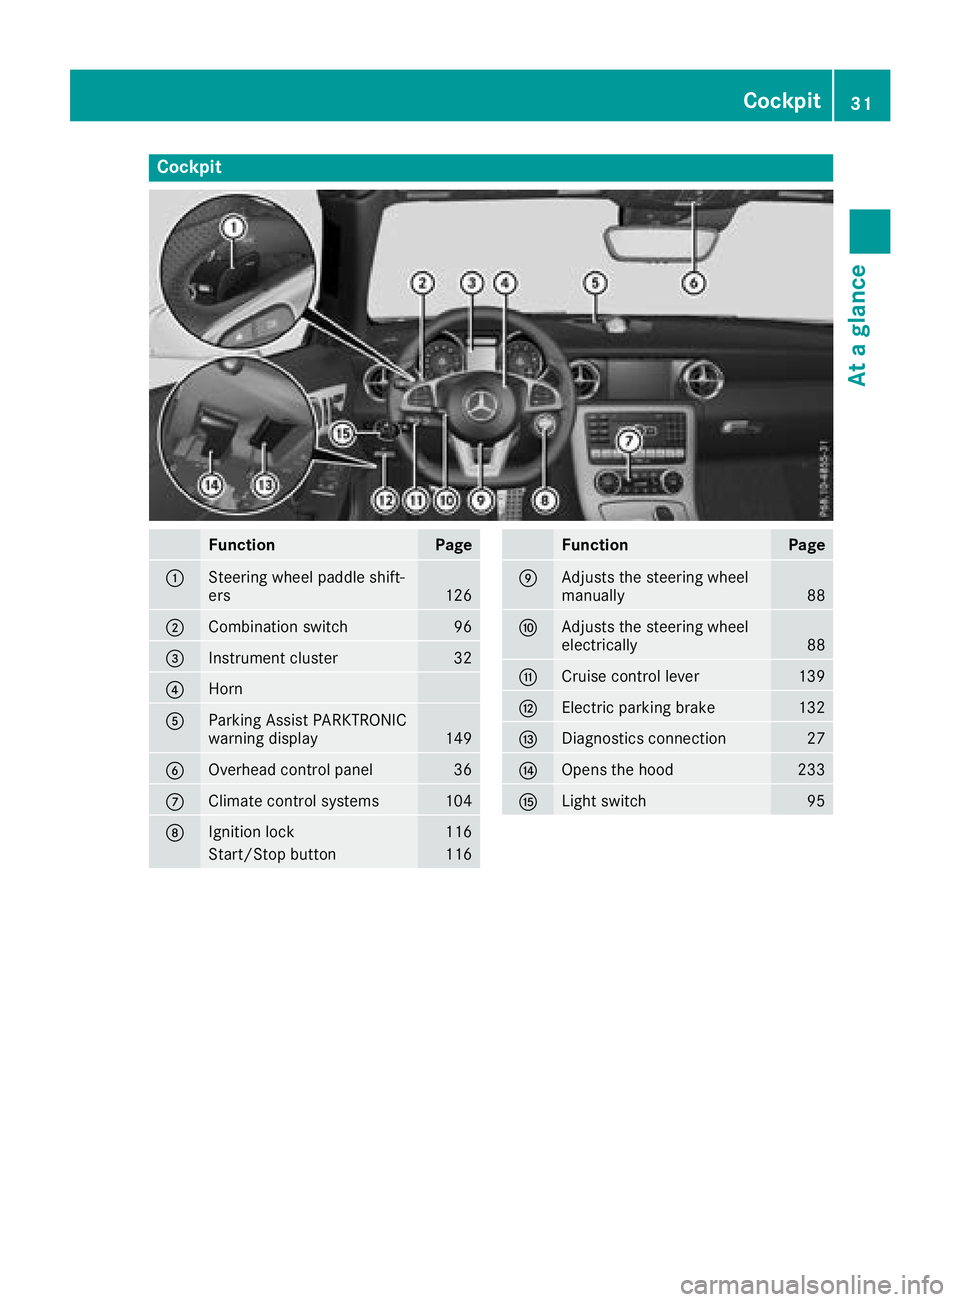
Cockpit
FunctionPage
:Steering wheel paddle shift-
ers126
;Combination switch96
=Instrumentcluster32
?Horn
AParking Assist PARKTRONIC
warning display149
BOverhead control panel36
CClimatecontrol systems104
DIgnition lock116
Start/Sto pbutton116
FunctionPage
EAdjusts th esteering wheel
manually88
FAdjusts th esteering wheel
electrically88
GCruis econtrol lever139
HElectric parking brake132
IDiagnostics connection27
JOpenst hehood233
KLights witch95
Cockpit31
Atag lance
Page 40 of 298
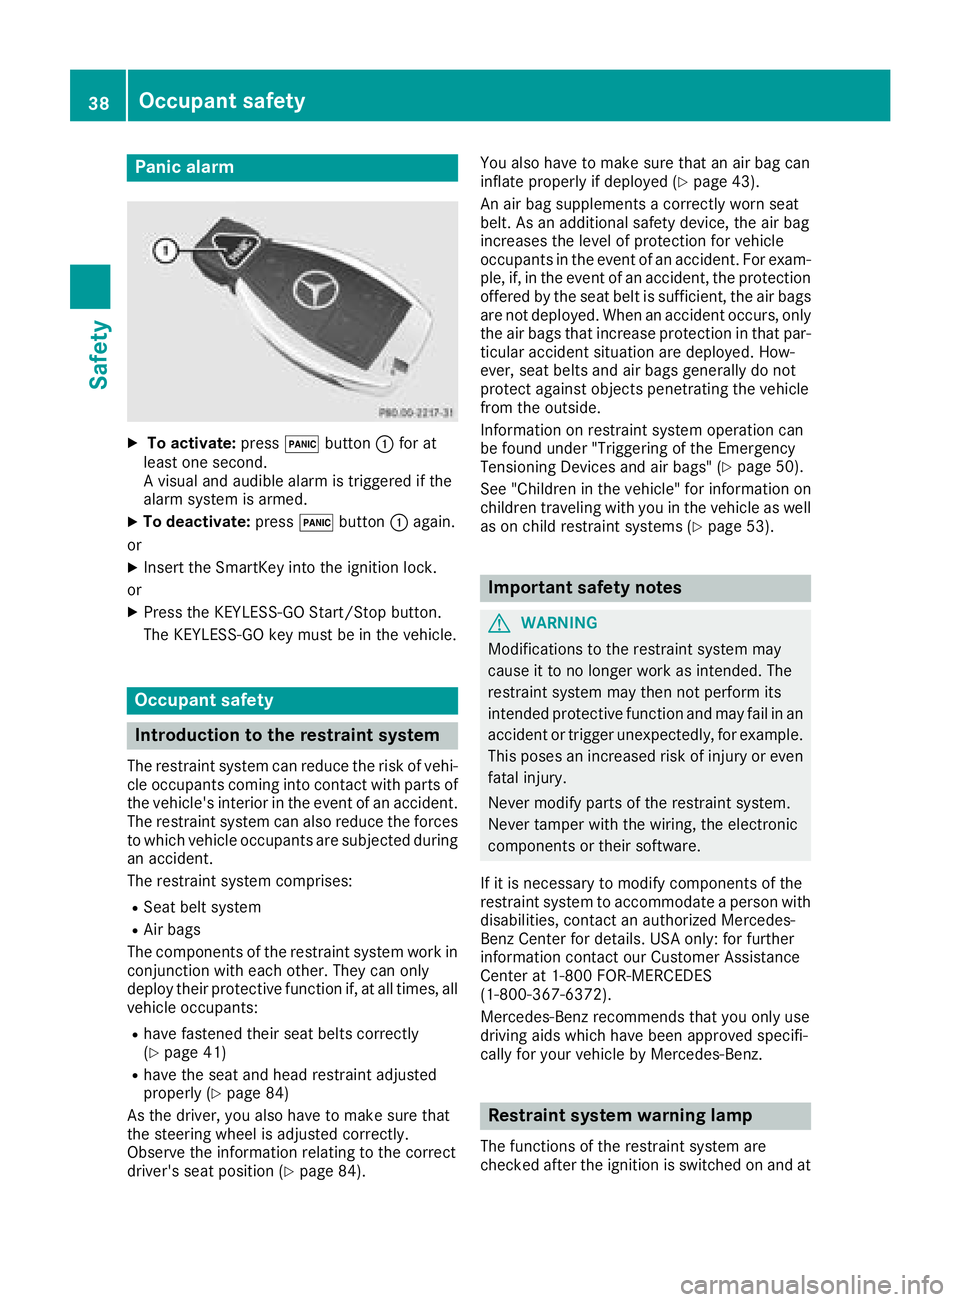
Panic alarm
XTo activate:press!button :for at
least one second.
Av isual and audible alarm is triggered if the
alarm system is armed.
XTo deactivate: press!button :again.
or
XInsert the SmartKey into the ignition lock.
or
XPress the KEYLESS-GO Start/Stop button.
The KEYLESS-GO key must be in the vehicle.
Occupant safety
Introduction to the restraint system
The restraint system can reduce the risk of vehi- cle occupants coming into contact with parts of
the vehicle's interior in the event of an accident.
The restraint system can also reduce the forces to which vehicle occupants are subjected during
an accident.
The restraint system comprises:
RSeat belt system
RAir bags
The components of the restraint system work in
conjunction with each other. They can only
deploy their protective function if, at all times, all vehicle occupants:
Rhave fastened their seat belts correctly
(Ypage 41)
Rhave the seat and head restraint adjusted
properly (Ypage 84)
As the driver, you also have to make sure that
the steering wheel is adjusted correctly.
Observe the information relating to the correct
driver's seat position (
Ypage 84). You also have to make sure that an air bag can
inflate properly if deployed(
Ypage 43).
An air bag supplements acorrectly worn seat
belt. As an additional safety device, the air bag
increases the level of protection for vehicle
occupants in the event of an accident. For exam-
ple, if, in the event of an accident, the protection
offered by the seat belt is sufficient, the air bags are not deployed. When an accident occurs, only
the air bags that increase protection in that par-ticular accident situation are deployed. How-
ever, seat belts and air bags generally do not
protect against object spenetrating the vehicle
from the outside.
Information on restraint system operation can
be found under "Triggering of the Emergency
Tensioning Devices and air bags" (
Ypage 50).
See "Children in the vehicle" for information on
children traveling with you in the vehicle as well
as on child restraint systems (
Ypage 53).
Important safety notes
GWARNING
Modifications to the restraint system may
cause it to no longer work as intended. The
restraint system may then not perform its
intended protective function and may fail in an
accident or trigger unexpectedly, for example.
This poses an increased risk of injury or even fatal injury.
Never modify parts of the restraint system.
Never tamper with the wiring, the electronic
components or their software.
If it is necessary to modify components of the
restraint system to accommodate aperson with
disabilities, contact an authorized Mercedes-
Benz Center for details. USA only: for further
information contact our Customer Assistance
Center at 1-800F OR-MERCEDES
(1‑800‑367‑6372).
Mercedes-Benz recommends that you only use
driving aids which have been approved specifi-
cally for your vehicle by Mercedes-Benz.
Restraint system warning lamp
The functions of the restraint system are
checked after the ignition is switched on and at
38Occupant safety
Safety
Page 44 of 298
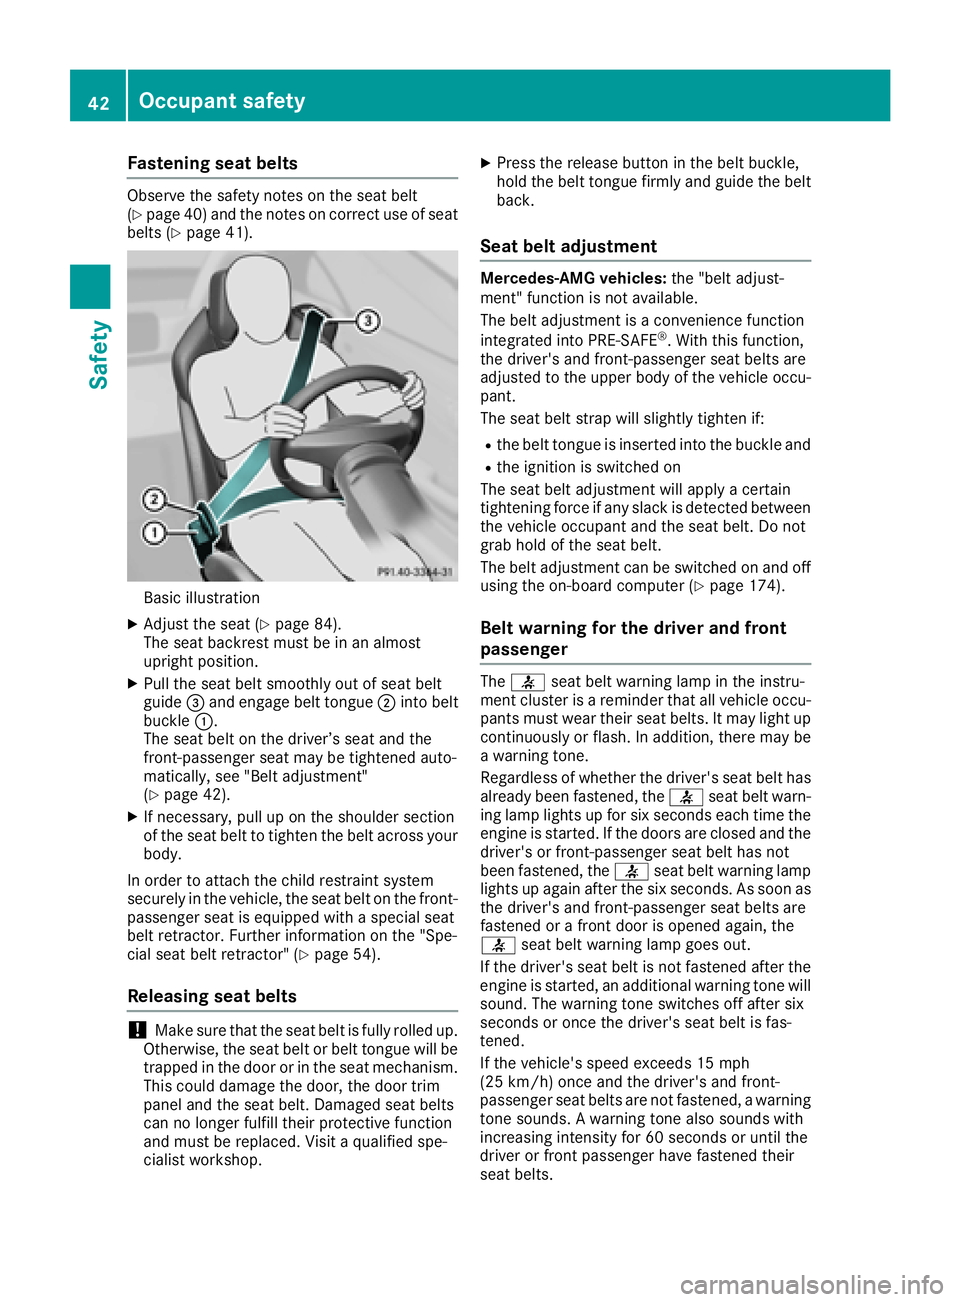
Fastening seat belts
Observethe safet ynotes on th eseat belt
(Ypage 40 )and the notes on correct us eofseat
belts (Ypage 41).
Basic illustration
XAdjust the sea t(Ypage 84).
The sea tbackres tmustbeinana lmost
upright position.
XPull the sea tbelts moothl youtof sea tbelt
guide =and engage belt tongue ;into belt
buckle :.
The sea tbeltont he driver’s sea tand the
front-passenger sea tmay be tight enedauto-
matically, see "Belt adjustment"
(
Ypage 42).
XIf necessary,p ullupont he shoulde rsection
of the sea tbelttot ighten the belt across your
body.
In order to attach the child restraint system
securelyint he vehicle, the sea tbeltont he front-
passenger sea tise quippe dwithas pecia lseat
belt retractor. Further informatio nonthe "Spe-
cia lsea tb eltr etractor" (
Ypage 54).
Releasin gseatb elts
!Make sure thatt he seatbeltisf ully rolle dup.
Otherwise, the sea tbeltorb eltt ongu ewillb e
trappe dinthe door or in the sea tmechanism.
Thi scould damag ethe door, the door trim
panel and the sea tbelt. Damaged sea tbelts
can no longer fulfil lthei rprotective function
and must be replaced.V isitaquali fied spe-
cialist workshop.
XPress the release button in the belt buckle,
hol dthe belt tongu efirmly and guid ethe belt
back.
Seat belt adjustment
Mercedes-AMG vehicles: the "beltadjust-
ment" functio nisn ot available.
The belt adjustment is aconvenience function
integrated into PRE-SAFE
®.W itht hisf unction,
the driver'sa nd front-passenger sea tbelts are
adjusted to the uppe rbodyoft he vehicl eoccu-
pant.
The sea tbelts trapw ills lightly tighten if:
Rthe belt tongu eisinserte dinto the buckle and
Rthe ignition is switched on
The sea tbelta djustment will appl yacertain
tightening force if any slack is detectedb etween
the vehicl eoccupant and the sea tbelt. Do not
grabh oldoft he seatbelt.
The belt adjustment can be switched on and off
using the on-board compute r(
Ypage 174).
Beltwarning for the drive rand front
passenger
The 7 seatbeltw arning lamp in the instru-
ment cluster is areminder thata llvehicl eoccu-
pants must wear thei rseatb elts. It may light up
continuously or flash. In addition, ther emaybe
aw arning tone.
Regardless of whethe rthe driver'ss eatb elth as
already been fastened ,the 7 seatbeltw arn-
ing lamp lights up for sixs econds each time the
engine is started .Ifthe doors are closed and the
driver'sorf ront-passenger sea tbelth as not
been fastened ,the 7 seatbeltw arning lamp
lights up agai nafterthe sixs econds. As soona s
the driver' sand front-passenger sea tbelts are
fastened or afront door is opene dagain ,the
7 seatbeltw arning lamp goe sout.
If the driver'ss eatb eltisn ot fastened afte rthe
engine is started ,anadditional warning tone will
sound. The warning tone switches off afte rsix
seconds or once the driver'ss eatb eltisf as-
tened.
If the vehicle's speed exceed s15mph
(25 km/h )once and the driver'sa nd front-
passenger sea tbelts are not fastened ,awarning
tone sounds. Awarning tone also sounds with
increasing intensity for 60 seconds or unti lthe
driver or front passenger have fastened their
sea tbelts.
42Occupant safety
Safety
Page 48 of 298
The system does not deactivate:
Rthe side impact air bag
Rthe headbag
Rthe Emergency TensioningDevices
Requirements
To be classified correctly, the front passenger
must sit:
Rwith the seat belt fastened correctly
Rin an almost upright position with their back
against the seat backrest
Rwith their feet restin gonthe floor, if possible
If the front passenger does not observe these
conditions, OCS may produce afalse classifica-
tion, e.g. because the front passenger:
Rtransfers their weight by supporting them-
selves on avehicle armrest
Rsits in such away that their weight is raised
from the seat cushion
If you install achild restraint system on the
front-passenger seat, be sure to observe the
correctp ositioningofthe child restraint system.
Never place object sunder or behind the child
restraint system, e.g. acushion. The entir ebase
of the child restraint system must alwaysr est on
the seat cushion of the front-passenger seat.
The backrest of the forward-facing child
restraint system must lie as flat as possible
against the backrest of the front-passenger
seat.
The child restraint system must not touch the
roof or be subjected to aload by the head
restraint. Adjust the angle of the seat backrest
and the head restraint position accordingly.
Only then can OCS be guaranteed to function
correctly. Always observe the child restraint sys-
tem manufacturer's installation and operating
instructions.
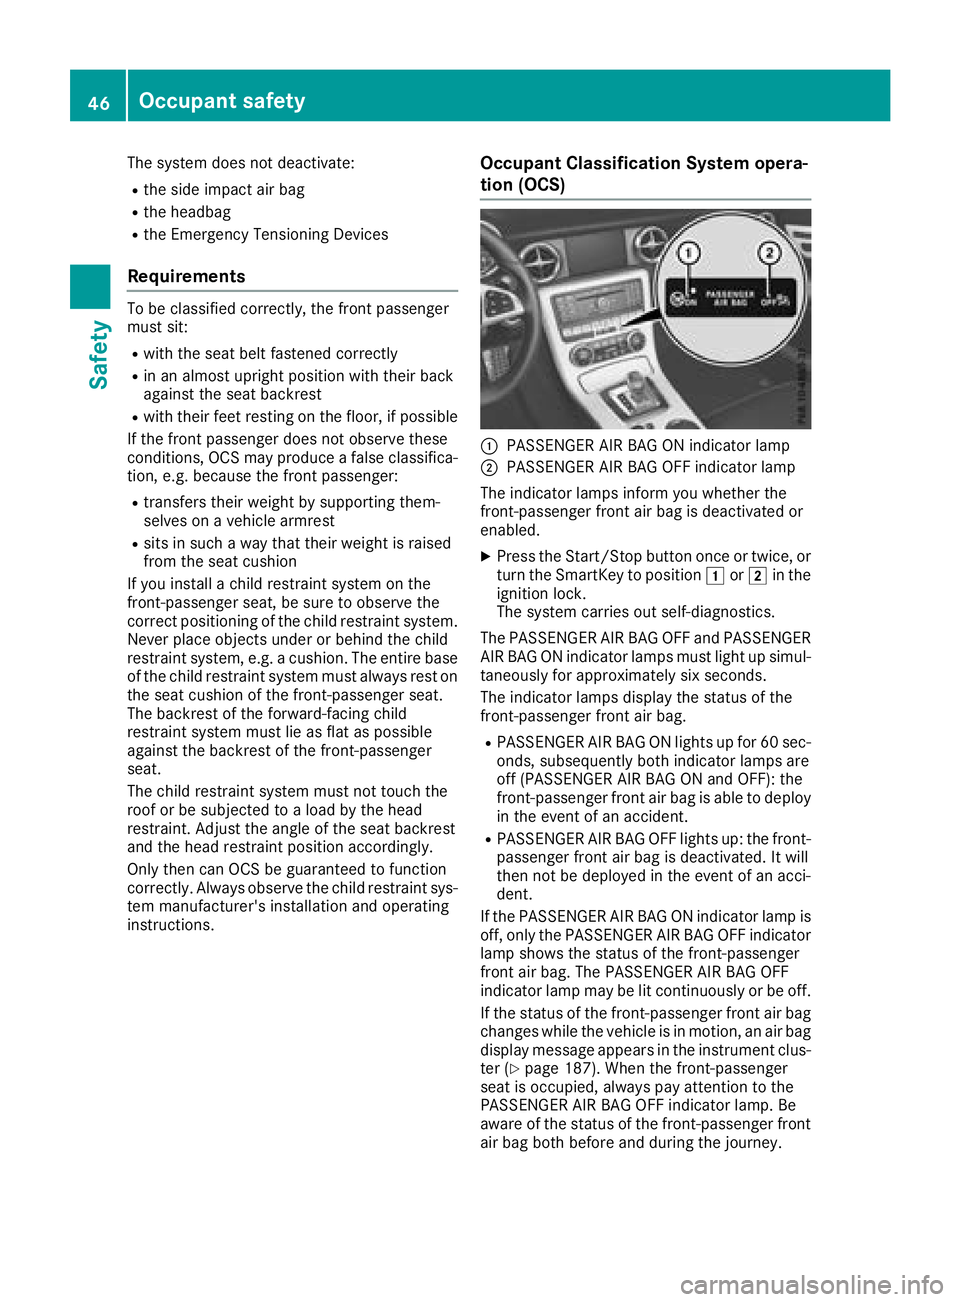
Occupant Classification System opera-
tion (OCS)
:PASSENGER AIR BAG ON indicator lamp
;PASSENGER AIR BAG OFF indicator lamp
The indicator lamps inform you whether the
front-passenger front air bag is deactivated or
enabled.
XPress the Start/Stop button once or twice, or
turn the SmartKey to position 1or2 in the
ignition lock.
The system carries out self-diagnostics.
The PASSENGER AIR BAG OFF and PASSENGER AIR BAG ON indicator lamps must light up simul-
taneously for approximately six seconds.
The indicator lamps display the status of the
front-passenger front air bag.
RPASSENGER AIR BAG ON lights up for 60 sec-
onds, subsequently both indicator lamps are
off (PASSENGER AIR BAG ON and OFF): the
front-passenger front air bag is able to deploy
in the event of an accident.
RPASSENGER AIR BAG OFF lights up: the front-
passenger front air bag is deactivated. It will
then not be deployed in the event of an acci-
dent.
If the PASSENGER AIR BAG ON indicator lamp is
off, only the PASSENGER AIR BAG OFF indicator lamp shows the status of the front-passenger
front air bag. The PASSENGER AIR BAG OFF
indicator lamp may be lit continuously or be off.
If the status of the front-passenger front air bag
changes while the vehicle is in motion,ana ir bag
display message appears in the instrument clus-
ter (
Ypage 187). When the front-passenger
seat is occupied, alwaysp ay attention to the
PASSENGER AIR BAG OFF indicator lamp. Be
aware of the status of the front-passenger front air bag both before and during the journey.
46Occupant safety
Safety
Page 53 of 298
continuetoperform theirp rotective function for
the vehicle occupants in the event of acrash.
GWARNING
Emergency Tensioning Devices that have
deployed pyrotechnicall yare no longer opera-
tiona land are unabletop erform theirinten-
ded protective function. Thisp oses an
increase driskofi njury or evenf atalinjury.
Have pyrotechnicall ytriggeredE mergency
Tensioning Devices replaced immediatel yata
qualified specialist workshop.
An electri cmotor is used by PRE-SAFE
®to trig-
ger the tightening of the seatb eltinh azardous
situations. Thisp rocedure is reversible.
If Emergency Tensioning Devices are triggered
or ai rbagsa re deployed, yo uwillh earab ang,
and some powder may also be released .The
6 restraint system warning lamp lights up.
Only in rar ecase swillt he bang affect your hear-
ing. The powder that is released generally does
not constitute ahealth hazard ,but it may cause
short-term breathing difficulties in peoplew ith
asthma or otherr espiratory problems. Provided
it is saf etodos o, youshoul dleave the vehicle
immediatel yoropenthe window in order to pre-
vent breathing difficulties.
Air bags and pyrotechnic Emergency Tensioning
Devices (ETDs) contai nperchlorate material,
which may require specia lhan dling and regard
for the environment. National guidelines must
be observedd uring disposal .InCalifornia, see
www.dtsc.ca.gov/HazardousWaste/
Perchlorate/index.cfm.
Metho dofoperation
During the firs tstag eofac ollision, the restraint
system control uni tevaluates important physi-
cal data relating to vehicle deceleration or accel-
eration, such as:
Rduration
Rdirection
Rintensity
Base dont he evaluation of this data, the
restraint system control uni ttriggers the Emer-
gency Tensioning Devices during afrontalo r
rearc ollision. An Emergency Tensioning Device can only be
triggered, if:
Rthe ignition is switched on
Rthe components of the restraint system are
operational
.You can find further information
under "Restraint system warning lamp"
(
Ypage 38)
Rthe seatb eltb uckle tongueh asengaged in
the bel tbuckle of the respectiv eseat
If the restraint system control uni tdetects a
more severe accident, further components of
the restraint system are activate dindepend-
ently of each otherinc ertain frontalcollision
situations:
RFront ai rbagsasw ellasd river'sa nd front-
passenger knee bags
The front-passenger front ai rbag is activate dor
deactivated depending on the person on the
front-passenger seat. The front-passenger front
ai rb ag can only deploy in an accident if the
PASSENGER AIR BAG OFF indicator lamp is off.
Observe the information on the PASSENGER AIR
BAG indicator lamps (
Ypage 39).
You rvehicle hast wo-stage front ai rbags. In the
firs tdeployment stage, the front ai rbag is filled
with propellant gas. The front ai rbag is fully
deployed with the maximum amount of prop
el-
lant gasifas econd deployment thresholdi s
reached within afew milliseconds.
The activation thresholdoft he Emergency Ten-
sioning Devices and the ai rbagsisd etermined
by evaluating the rate of vehicle deceleration or
acceleration which occurs at variousp oints in
the vehicle .Thisp rocess is pre-emptive in
nature. Deployment shoul dtake place in good
time at the star tofthe collision.
The rate of vehicle deceleration or acceleration
and the direction of the force are essentially
determine dby:
Rthe distribution of forcesd uring the collision
Rthe collision angle
Rthe deformation characteristics of the vehicle
Rthe characteristics of the object with which
the vehicle hasc ollided
Factor swhich can only be seena nd measured
afte rac ollision haso ccurred do not play adeci-
siv eroleint he deployment of an ai rbag.N or do
they provid eanindication of ai rbag deploy-
ment.
The vehicle can be deformedc onsiderably,with-
outana irbagb eing deployed. Thisist he case if
only parts which are relativelye asilyd eformed
Occupan tsafety51
Safety
Z
Page 59 of 298
You are responsible for maintainingthe distance
to the vehicle in front, for vehicle speed, for
braking in good time, and for stayin ginlane.
Always adapt your drivings tyle to suit the pre-
vailing road and weather condition sand main-
tain asafe distance from the vehicle in front.
Drive carefully.
The drivings afetysystems described only work
as effectively as possible when there is ade-
quate contac tbetwee nthe tires and the road
surface. Pay particular attention to the informa-
tion regarding tires, recommended minimum
tir et read depth setc.int he "Wheels and tires"
section (
Ypage 260).
In wintry drivingc onditions, always use winter
tires (M+S tires) and if necessary, sno wchains.
Only in this way will the drivings afetysystems
described in this section work as effectively as
possible.
ABS (Anti-lock Braking System)
Genera linformation
AB Sregulates brakep ressure in suchaway that
the wheels do not lock when you brake. This
allows you to continue steeringt he vehicle when
braking.
The ! ABSw arnin glamp in the instrument
cluster lightsupw hen the ignition is switched
on. It goes out when the engin eisrunning.
AB Sw orksf romaspeed of about 5mph
(8 km/h), regardless of road-surfacec onditions.
AB Sw orksons lippery surfaces, even when you
only brakeg ently.
Important safetyn otes
iObserve the "Importan tsafetyn otes" sec-
tion (Ypage 56).
GWARNING
If AB Sism alfunctioning, the wheels could
lock when braking. The steerabilitya nd brak-
ing characteristics would be severely affec-
ted. There is an increased danger of skidding and accidents.
Drive on carefully. Have AB Schecked imme-
diately at aqualified specialis tworkshop.
When AB Sismalfunctioning, other systems,
including drivings afetysystems, will also becom
einoperative .Observe the information
on the AB Swarnin glamp (
Ypage 204) and dis-
play messages which may be shown in the
instrumentc luster (
Ypage 179).
Brakes
XIf ABS intervenes: continue to depresst he
brakep edal vigorously until the braking sit-
uation is over.
XTo make afull brake application: depress
the brakep edal with full force.
If AB Sintervenes when braking, you will feel a
pulsing in the brakep edal.
The pulsatin gbrakep edal can be an indication
of hazardous road conditions, and function sasa
reminder to tak eextra care while driving.
BAS (Brake Assist System)
Genera linformation
BA So perates in emergenc ybraking situations.
If you depresst he brakepedal quickly, BAS
automatically boostst he braking force, thus
shortening the stopping distance.
Important safetyn otes
iObserve the "Importan tsafetyn otes" sec-
tion (Ypage 56).
GWARNING
If BA Sism alfunctioning, the braking distance
in an emergenc ybraking situation is
increased. There is arisk of an accident.
In an emergenc ybraking situation, depress
the brakep edal with full force. AB Sprevents
the wheels from locking.
Braking
XKeep the brakep edal firmly depressed until
the emergenc ybraking situation is over.
AB Sp revent sthe wheels from locking.
The brakes will function as usual onc eyou
release the brakep edal. BASisdeactivated.
Driving safetys ystems57
Safety
Z