2018 MERCEDES-BENZ SLC ROADSTER steering wheel adjustment
[x] Cancel search: steering wheel adjustmentPage 86 of 298
Correct driver's seat position
GWARNING
You coul dlose control of your vehicle if you do
th ef ollowingw hile driving:
Radjust thedriver'ss eat,head restraint,
steering wheel or mirrors
Rfasten th eseat belt
Thereisar iskofana ccident.
Adjust th edriver'ss eat,head restraint ,steer-
ing wheel and mirror and fasten your seat belt before starting th eengine.
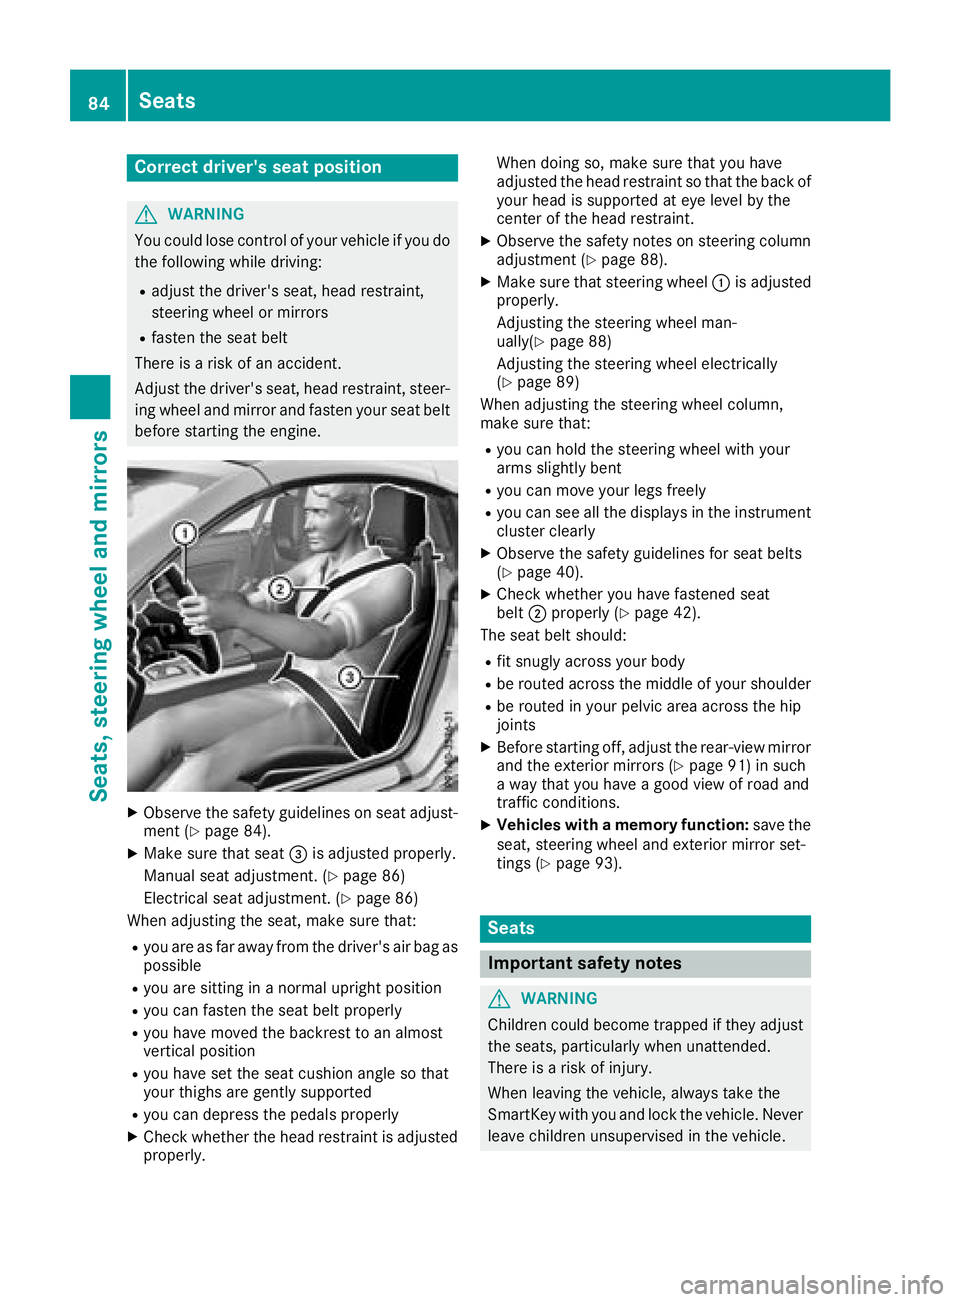
XObserv ethe safety guideline sonseat adjust-
men t(Ypage 84).
XMakes ure that seat =is adjusted properly.
Manual seat adjustment. (
Ypage 86)
Electrical seat adjustment. (
Ypage 86)
When adjusting th eseat,m akes ure that:
Ryou are as far away from th edriver'sa ir bag as
possible
Ryou are sittin ginanormalupright position
Ryou can fasten th eseat belt properly
Ryou have moved th ebackres ttoana lmost
vertical position
Ryou have set th eseat cushion angle so that
your thighs are gently supported
Ryou can depress th epedals properly
XCheckw hether th ehead restraint is adjusted
properly. When doings
o, makesure that you have
adjusted th ehead restraint so that th eback of
your head is supported at eye leve lbythe
cente rofthehead restraint.
XObserv ethe safety note sonsteering column
adjustmen t(Ypage 88).
XMakesure that steering wheel :is adjusted
properly.
Adjusting th esteering wheel man-
ually(
Ypage 88)
Adjustin gthe steering wheel electrically
(
Ypage 89)
When adjusting th esteering wheel column,
mak esure that:
Ryou can hold th esteering wheel withy our
arm sslightly bent
Ryou can mov eyour legs freely
Ryou can see all th edisplays in th einstrument
cluste rclearly
XObserv ethe safety guideline sfor seat belts
(Ypage 40).
XCheckw hether you have fastened seat
belt ;properl y(Ypage 42).
The seat belt should:
Rfit snugly across your body
Rbe routed across th emiddle of your shoulder
Rbe routed in your pelvic area across th ehip
joints
XBefore starting off ,adjust th erear-view mirror
and th eexteri or mirror s(Ypage 91) in such
aw ay that you have agood view of road and
traffic conditions.
XVehicles with amemory function: save the
seat,s teering wheel and exterior mirror set-
tings (
Ypage 93).
Seats
Important safety notes
GWARNING
Children coul dbecome trapped if they adjust
th es eats, particularly when unattended.
Thereisar iskofi njury.
When leaving th evehicle ,always tak ethe
SmartKey withy ou and lockthevehicle .Never
leave childre nunsupervised in th evehicle.
84Seats
Seats, steerin gwheel and mirrors
Page 88 of 298
!Make sure that there are no objects in the
footwell under or behind the seats when mov-
ing the seats back. There is arisk that the
seats and/or the objects could be damaged.
iThe head restraints are equipped with the
NECK-PRO system (Ypage 52). For this rea-
son, it is not possible to remove the head
restraints from the seats.
For more information, contact aqualified spe-
cialist workshop.
Adjusting the seats manually
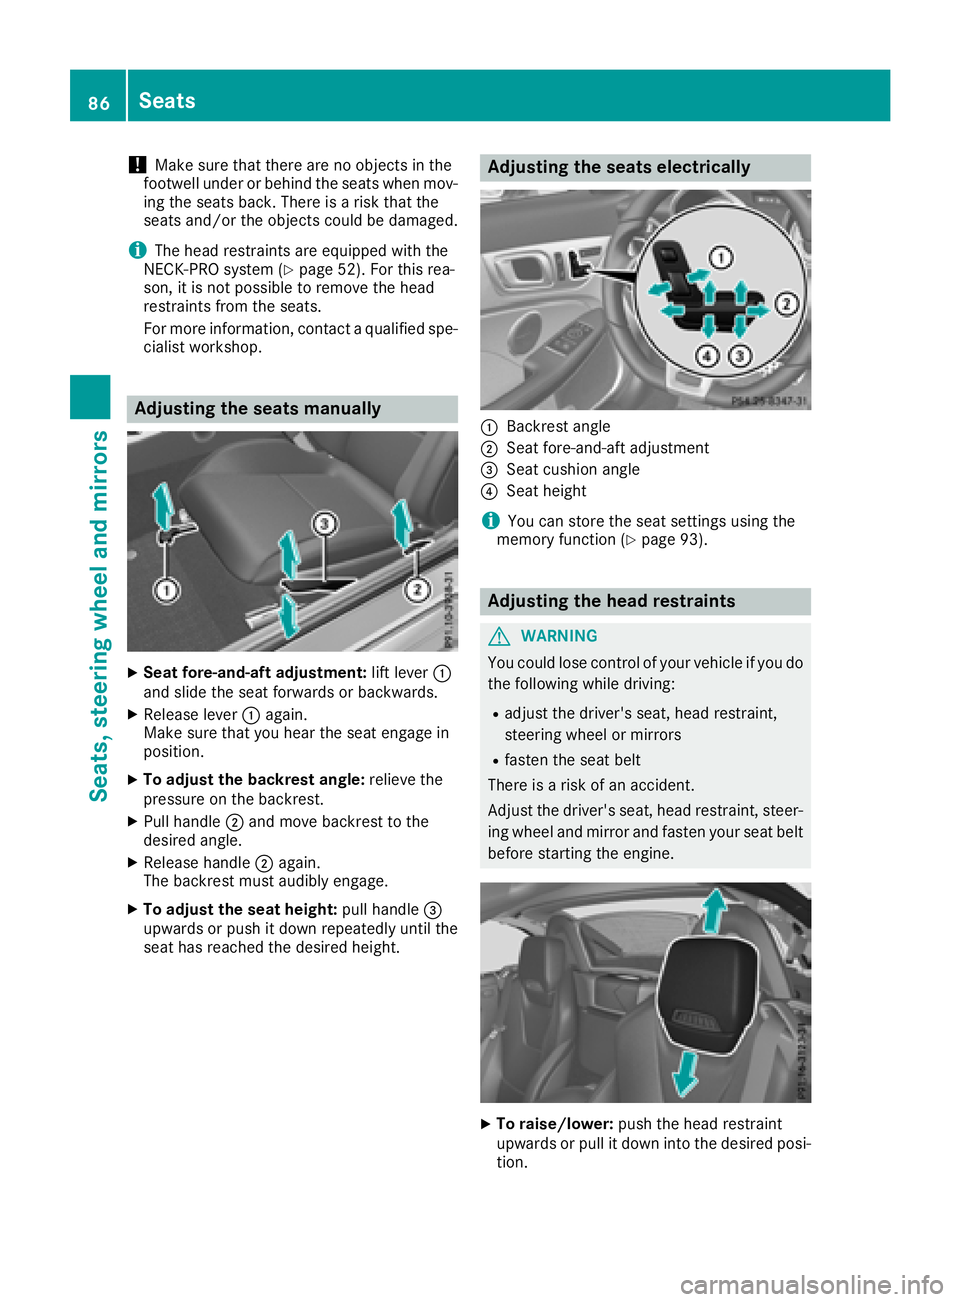
XSeat fore-and-aft adjustment: lift lever:
and slide the seat forwards or backwards.
XRelease lever :again.
Make sure that you hear the seat engage in
position.
XTo adjust the backrest angle: relieve the
pressure on the backrest.
XPull handle ;and move backrest to the
desired angle.
XRelease handle ;again.
The backrest must audibly engage.
XTo adjust the seat height: pull handle=
upwards or push it down repeatedly until the
seat has reached the desired height.
Adjusting the seats electrically
:Backrest angle
;Seat fore-and-aft adjustment
=Seat cushion angle
?Seat height
iYou can store the seat settings using the
memory function (Ypage 93).
Adjusting the head restraints
GWARNING
You could lose control of your vehicle if you do the following while driving:
Radjust the driver's seat, head restraint,
steering wheel or mirrors
Rfasten the seat belt
There is arisk of an accident.
Adjust the driver's seat, head restraint, steer-
ing wheel and mirror and fasten your seat belt before starting the engine.
XTo raise/lower: push the head restraint
upwards or pull it down into the desired posi- tion.
86Seats
Seats, steering wheela nd mirrors
Page 91 of 298
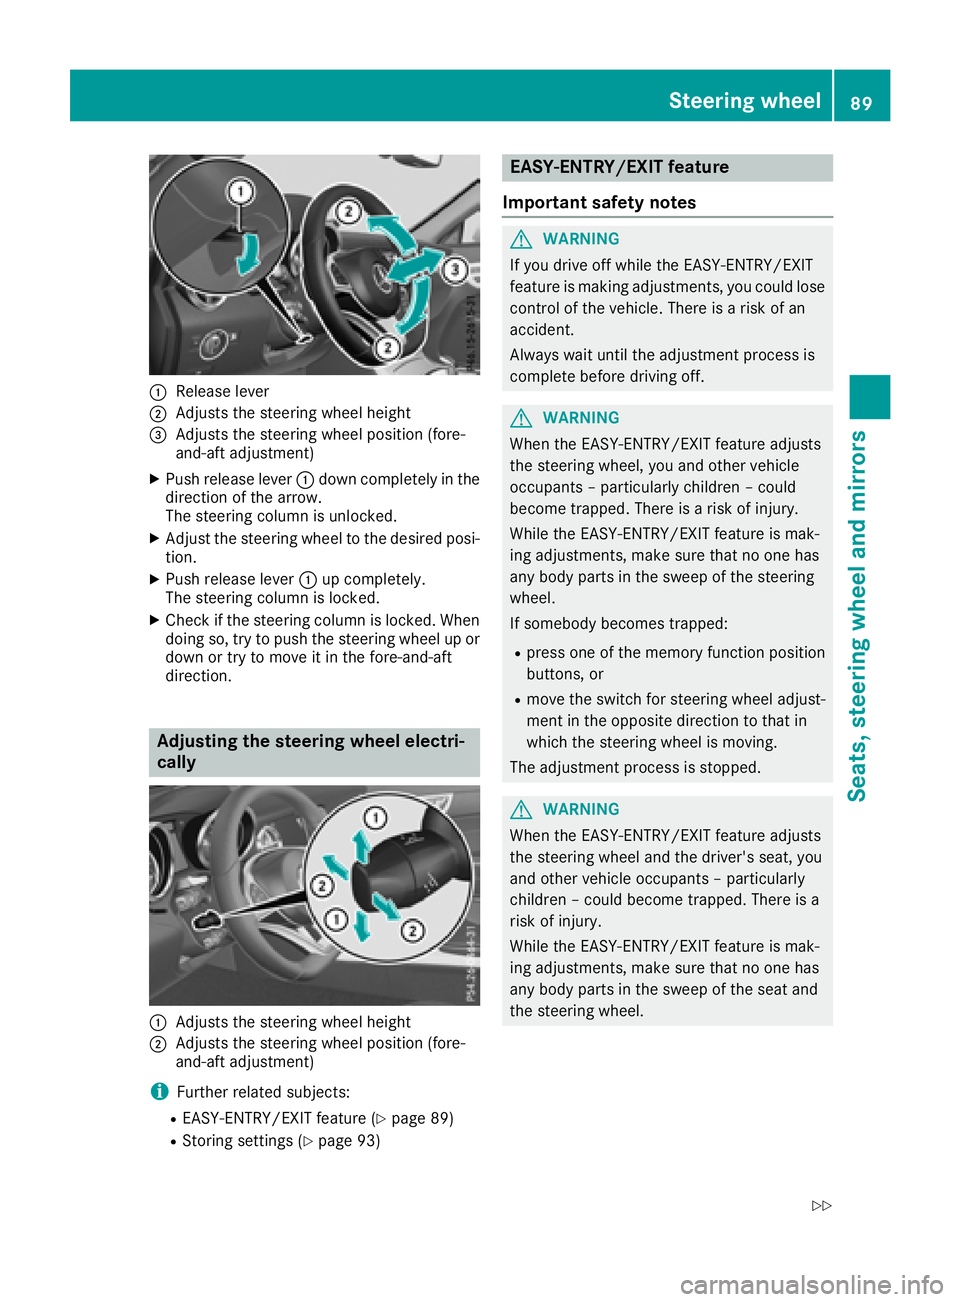
:Releaselever
;Adjusts th esteering whee lheight
=Adjusts th esteering whee lposition (fore-
and-af tadjustment)
XPush release lever :down completely in th e
direction of th earrow.
The steering column is unlocked.
XAdjus tthe steering whee ltot he desired posi-
tion .
XPush release lever :up completely.
The steering column is locked.
XChec kifthesteering column is locked. When
doin gso, tr ytop ush th esteering whee lupor
down or tr ytom oveitint hefore-and-af t
direction .
Adjusting th esteering wheel electri-
cally
:Adjusts th esteering whee lheight
;Adjusts th esteering whee lposition (fore-
and-af tadjustment)
iFurther relate dsubjects :
REASY-ENTRY/EXIT feature (Ypage 89)
RStoring setting s(Ypage 93)
EASY-ENTRY/EXIT feature
Important safety notes
GWARNIN G
If you driv eoff while th eEASY-ENTRY/EXIT
feature is making adjustments ,you could lose
control of th evehicle. There is ariskofa n
accident.
Always wait until th eadjustmen tprocess is
complete before driving off .
GWARNING
When th eEASY-ENTRY/EXIT feature adjust s
th es teering wheel, you and other vehicl e
occupant s–particularly children –could
become trapped .There is ariskofi njury.
Whil ethe EASY-ENTRY/EXIT feature is mak -
ing adjustments ,makes uret hatnoo nehas
any body part sintheswee poft hesteering
wheel.
If somebod ybecome strapped :
Rpress on eofthememory function position
buttons ,or
Rmov ethe switch for steering whee ladjust -
men tint heopposit edirection to that in
whic hthe steering whee lismoving.
The adjustmen tprocess is stopped.
GWARNIN G
When th eEASY-ENTRY/EXIT feature adjust s
th es teering whee land th edriver' sseat ,you
and other vehicl eoccupant s–particularly
children –could become trapped .There is a
ris kofi njury.
Whil ethe EASY-ENTRY/EXIT feature is mak -
ing adjustments ,makes uret hatnoo nehas
any body part sintheswee poft heseat and
th es teering wheel.
Steering wheel89
Seats ,steering wheel and mirrors
Z
Page 92 of 298
If somebodybecomes trapped:
Rpress one of the memory function position
buttons, or
Rpress one of the memory function memory
buttons, or
Rmove the switch for steering wheel adjust-
ment in the opposite direction to that in
which the steering wheel is moving
The adjustment process is stopped.
GWARNING
If you use openings in the bodywork or
detachable parts as steps, you could:
Rslip and/or fall
Rdamage the vehicle and cause yourself to
fall.
There is arisk of injury.
Alway suse secure climbing aids, e.g. asuita-
ble ladder.
The EASY-ENTRY/EXIT feature makes getting in
and out of you rvehicle easier.
You can activate and deactivate the EASY-
ENTRY/EXIT feature in the on-board computer
(
Ypage 174).
Position of the steering whee lwhen the
EASY-ENTRY/EXIT feature is active
The steering wheel swings up when you:
Rremove the SmartKey from the ignition lock
Ropen the driver's door with KEYLESS-GO in
position 1
Ropen the driver's door and the SmartKey is in
position uor1
iThe steering wheel moves upwards only if it
has not already reached the uppers teering
limiter.
Position of the steering whee lfor driv-
ing
The steering wheel is moved to the last selected
positionw hen:
Rthe driver's door is closed
Ryou insert the SmartKey into the ignition lock or
Ryou press the Start/Stop button once on vehi-
cles with KEYLESS-GO
When you close the driver's door with the igni-
tion switched on, the steering wheel is also
automatically moved to the previously set posi-
tion.
The last positionoft he steering column is stored
when you switch off the ignition or when you
store the setting with the memory function
(
Ypage 93).
Crash-responsive EASY-EXIT feature
If the crash-responsive EASY-EXIT feature is trig-
gered in an accident, the steering column will
move upwards when the driver's door is opened.
This occurs irrespective of the positionoft he
SmartKey in the ignition lock. This makes it eas- ier to exit the vehicle and rescue the occupants.
The crash-responsive EASY-EXIT feature is only
operational if the EASY-EXIT/ENTRY feature is
activated in the on-board computer
(
Ypage 174).
Mirrors
Rear-view mirror
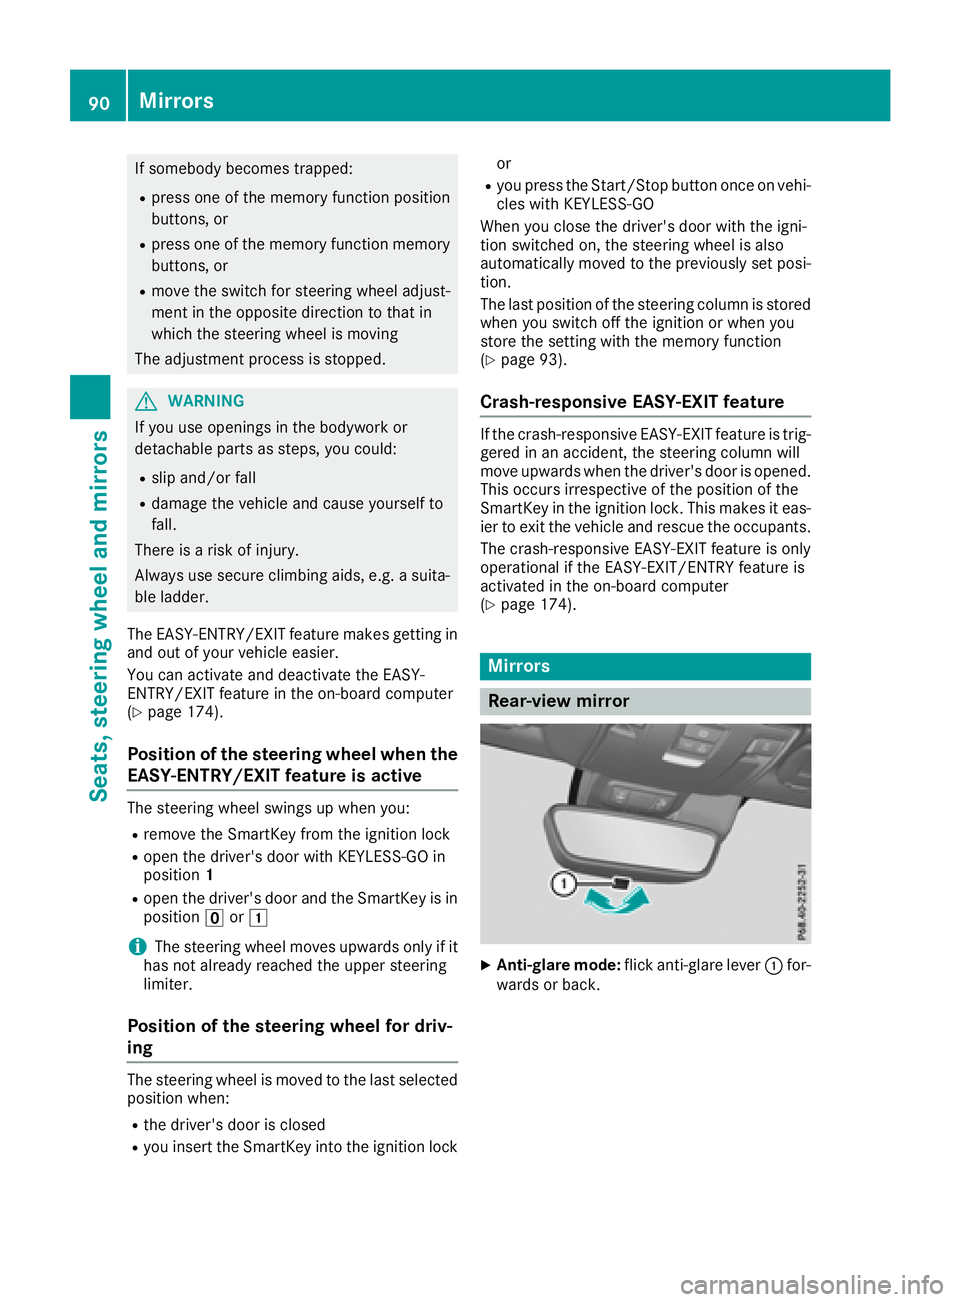
XAnti-glare mode: flick anti-glare lever :for-
ward sorb ack.
90Mirrors
Seats, steeringw heel and mirrors
Page 95 of 298
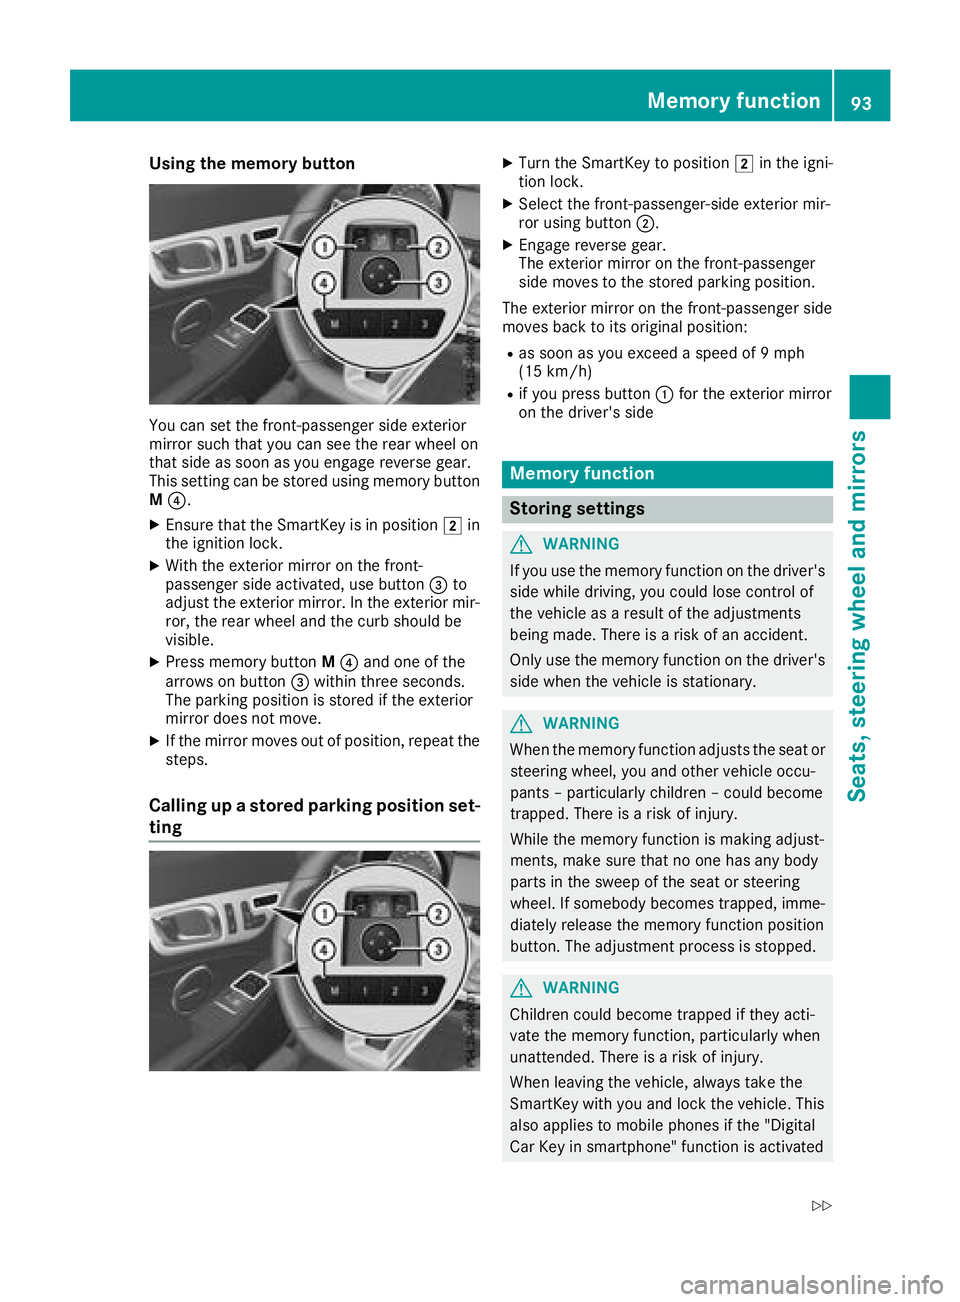
Using the memory button
You can set the front-passenger side exterior
mirror such that you can see the rear wheel on
that side as soon as you engage reverse gear.
This setting can be stored using memorybutton
M ?.
XEnsure that the SmartKey is in position 2in
the ignition lock.
XWith the exterior mirror on the front-
passenger side activated, use button =to
adjust the exterior mirror.Int he exterior mir-
ror, the rear wheel and the curb should be
visible.
XPress memoryb uttonM? and one of the
arrows on button =within three seconds.
The parkin gposition is stored if the exterior
mirror does not move.
XIf the mirror moves out of position ,repeat the
steps.
Calling up astored parking position set-
ting
XTurn the SmartKey to position 2in the igni-
tion lock.
XSelec tthe front-passenger-side exterior mir-
ror using button ;.
XEngage reverse gear.
The exterior mirror on the front-passenger
side moves to the stored parkin gposition.
The exterior mirror on the front-passenger side
moves back to its original position:
Ras soon as you exceed aspeed of 9mph
(15 km/h)
Rif you press button :for the exterior mirror
on the driver'ss ide
Memoryfunction
Storing settings
GWARNING
If you use the memoryf unction on the driver's
side while driving, you could lose contro lof
the vehicle as aresult of the adjustments
being made. There is arisk of an accident.
Only use the memoryf unction on the driver's
side when the vehicle is stationary.
GWARNING
When the memoryf unction adjuststhe seat or
steering wheel, you and other vehicle occu-
pant s–p articularly children –could become
trapped. There is arisk of injury.
While the memoryf unction is makingadjust-
ments, make sure that no one has any body
parts in the sweep of the seat or steering
wheel. If somebody becomes trapped, imme-
diately release the memoryf unction position
button. The adjustment proces sisstopped.
GWARNING
Children could become trapped if they acti-
vate the memoryf unction,particularly when
unattended. There is arisk of injury.
When leaving the vehicle, always tak ethe
SmartKey with you and lock the vehicle. This
also applies to mobile phones if the "Digital
Car Key in smartphone" function is activated
Memor yfunction93
Seats, steering wheel and mirrors
Z
Page 176 of 298
XPress the:or9 button to select the
Automatic Door Lockfunction.
When the Automatic Door Lockfunction is
activated, the multifunction display shows the
left-hand vehicle door in orange.
XPress the abutton to save the setting.
For further information on the automatic locking
feature, see (
Ypage 71).
Activating/deactivating the acoustic
locking verification signal
If you switch on the AcousticLockfunction, an
acoustic signal sounds when you lock the vehi-
cle.
XPress the =or; button on the steering
wheel to select the Sett.menu.
XPress the:or9 button to select the
Vehiclesubmenu.
XPress ato confirm.
XPress the :or9 button to select the
Acoustic Lockfunction.
If the Acoustic Lockfunction is activated,
the & symbol in the multifunction display
lights up orange.
XPress the abutton to save the setting.
Comfort
Activating/deactivating the EASY-
ENTRY/EXITf eature
GWARNING
When the EASY-ENTRY/EXIT feature adjusts
the steerin gwheel, you and other vehicle
occupants–p articularly children –could
become trapped. There is arisk of injury.
While the EASY-ENTRY/EXIT feature is mak-
ing adjustments, make sure that no one has
any body parts in the sweep of the steering
wheel.
If somebody becomes trapped:
Rpress one of the memory function position
buttons, or
Rmove the switch for steerin gwheel adjust-
ment in the opposite direction to that in
which the steerin gwheel is moving.
The adjustmen tprocess is stopped.
XPress the =or; button on the steering
wheel to select the Sett.menu.
XPress the:or9 button to select the
Conveniencesubmenu.
XPress ato confirm.
XUsing :or9,s elect the EasyEntry/Exitfunction.
If the EasyEntry/Exitfunction is activated,
the multifunction display shows the steering
wheel in orange.
XPress the abutton to save the setting.
Further information on the EASY-ENTRY/EXIT
feature (
Ypage 89).
Switching the seat belt adjustment on/off
XPress the =or; button on the steering
wheel to select the Sett.menu.
XPress the:or9 button to select the
Conveniencesubmenu.
XPress ato confirm.
XPress the :or9 button to select the
Belt Adjustmentfunction.
When the Belt Adjustmentfunction is acti-
vated, the seat belt is displayed in orange in
the multifunction display.
XPress the abutton to save the setting.
For further information on belt adjustment, see
(
Ypage 42).
Switching the fold-in mirrors when lock-
ing feature on/off
This function is only availablew hen the vehicle is
equipped with the electrical fold-in function.
This function is only availableinC anada.
When you activat ethe Auto.
MirrorFoldingfunction, the exterior mirrors are folded in when
the vehicle is locked.
If you have switched on the Auto. Mirror
Foldingfunction and you fold in the exterior
mirrors using the button on the door
(
Ypage 91), they will not fold out automatically.
The exterior mirrors can then only be folded out
using the button on the door.
XPress the =or; button on the steering
wheel to select the Sett.menu.
XPress the:or9 button to select the
Conveniencesubmenu.
XPress ato confirm.
174Menus and submenus
On-board computer and displays