2018 MERCEDES-BENZ SLC ROADSTER fuses
[x] Cancel search: fusesPage 5 of 298
ASSYST PLUS...................................... 237
Care ..................................................... 238
Breakdow nassistance ..................... 244
Where will Ifind...? .............................. 244
Fla ttire ................................................ 246
Battery (vehicle ).................................. 251
Jump-starting ....................................... 253
Towing and tow-starting ...................... 256
Fuses ................................................... 258
Wheel sand tires ............................... 260
Important safety notes. ....................... 260
Operatio n............................................ 260
Winter operatio n.................................. 262
Tire pressure ....................................... 263
Loading the vehicl e.............................. 271
All aboutw heelsand tire s...................2 73
Changing awheel ................................ 280
Wheela nd tire combinations ...............2 84
Emergency spare wheel ....................... 285
Technical data ................................... 288
Information regarding technical data ... 288
Vehicle electronics .............................. 288
Identification plates .............................2 89
Service products and filling capaci-
ties ...................................................... 290
Vehicle data ......................................... 295
Contents3
Page 12 of 298
Deactivating/activating (except
SLC 43 AMG)................................... 61
Deactivating/activating
(Mercedes-AMG SLC 43) ................. 62
Display message ............................ 179
Function/note s................................ 60
Generaln otes .................................. 60
Important safety information ........... 60
Warning lamp ................................. 205
ETS/4ETS (ElectronicT raction Sys-
tem) ...................................................... 60
Exhaustc heck................................... 134
Exhaustp ipe (cleaning instruc-
tions) .................................................. 243
Exterior lighting
Setting options ................................ 95
see Lights
Exterior mirrors
Adjusting ......................................... 91
Dipping (automatic) ......................... 92
Folding in when locking (on-board
computer) ...................................... 174
Folding in/out (automatically )......... 91
Folding in/out (electrically) ............. 91
Outofp osition (troubleshooting )..... 92
Storing settings (memory func-
tion) ................................................. 93
Storing the parking position ............. 92
Eyeglassesc ompartment ................. 220
F
Favorites
Overview ........................................ 213
Filler cap
see Refueling
Fillin gcapacitie s(Technical data) ... 290
First-aidk it......................................... 244
Flat tire
MOExtended tire s.......................... 247
Preparing the vehicl e..................... 246
TIREFIT kit ...................................... 247
see Emergency spare wheel
Floormats ........................................... 232
Frequencies
Mobil ephone ................................. 288
Two-way radio ................................ 288 Fuel
Additives ........................................ 292
Consumption statistics .................. 166
Displaying the current consump-
tion ................................................ 166
Displaying the rang e...................... 166
Driving tip s.................................... 134
Fue lgauge ....................................... 32
Grade (gasoline )............................ 291
Important safety notes .................. 291
Problem (malfunction) ................... 131
Refueling ........................................ 129
Tank content/reserve fue l............. 291
Fue lfille rflap
Opening ......................................... 130
Fue llevel
Calling up the rang e(on-board
computer) ...................................... 166
Fue ltank
Capacity ........................................ 291
Problem (malfunction) ................... 131
Fus eallocatio nchart (vehicl etool
kit) ...................................................... 245
Fuses
Allocation chart ............................. 258
Before changing ............................. 258
Fusebox in the engine compart-
ment .............................................. 259
Fus ebox in the trunk ..................... 259
Important safety notes .................. 258G
Garaged ooro pener
Clearing the memory ..................... 231
Generaln otes ................................ 228
Important safety notes .................. 228
Opening/closing the garag edoor..2 30
Problems whe nprogramming ........2 30
Programming (button in the rear-
view mirror) ................................... 229
Synchronizing the rolling code ....... 229
Gear indicator (on-board com-
puter, Mercedes-AMG SLC 43) ......... 175
Genuine parts ...................................... 23
Glove box ...........................................2 19
10Index
Page 146 of 298
Changing lanes
If when driving on multilane roads you wish to
change to theovertakin glane ,Distance Pilot
DISTRONIC support syou if:
Ryou are driving faster than 45 mph (70 km/h)
RDistance Pilo tDISTRONICi smaintaining the
distance to avehicl einf ront
Ryous witch on the appropriate tur nsignal
RDistance Pilo tDISTRONICd oesn ot currently
detect adangerofc ollision
If these conditions ar efulfilled ,you rv ehicl eis
accelerated .Acceleratio nwillbei nterrupte dif
changing lanes take stoo long or if the distance
between your vehicl eand the vehicl einfront
become stoo small.
iWhen yo uchange lanes ,Distance Pilot
DISTRONICm onitors the left lane (o nleft-
hand-driv evehicles) or the right lane (o nright-
hand-driv evehicles).
Stopping
GWARNING
If yo uleave the vehicl ewhenitiso nlyb eing
braked by Distance Pilo tDISTRONIC, it could
rol lawa yif:
Rthere is amalfunctio ninthe system or in
the voltag esupply.
RDistance Pilo tDISTRONICi sswitched off
using the cruis econtro llev er,e .g.b yav ehi-
cle occupant or fromo utside the vehicle
Rthe electrical system in the engine com-
partment, the battery or the fuses ar etam-
pered with.
Rthe battery is disconnected
Rthe vehicl eisaccelerated ,e.g.b yav ehicle
occupant.
There is ariskofana ccident.
Before leaving the vehicle, always deactivate
Distance Pilo tDISTRONICa nd securethe
vehicl eagain st rolling away.
Furtheri nformatio nondeactivating Distance
Pilo tDISTRONIC(
Ypage 146).
If Distance Pilo tDISTRONICd etects thatt he
vehicl einfront is stopping, it brakes your vehicle
unti litiss tationary. Once your vehicl
eisstationary, it remains sta-
tionar yand yo udon ot nee dtodepress the
brake.
iAfter atime ,the electri cparkin gb rake
secures the vehicl eand relieves the service
brake.
iDepending on the specifie dminimu mdis-
tance ,you rvehicl ewillc ome to astandstil lat
as ufficient distance behind the vehicl ein
front. The specifie dm
i
nimu mdistance is set
using the contro lonthe cruis econtro llev er.
When Distance Pilo tDISTRONICisa ctivated,
the transmission is shifted automaticall yto
position jif:
Rthe driver's sea tbeltisn ot fastened and the
driver's door is open.
Rthe engine is switched off ,unless it is auto-
maticall yswitched off by the ECO start/stop
function.
The electri cparkin gb rake secures the vehicle
automaticall yifDistance Pilo tDISTRONICi s
activated when the vehicl eisstationar yand:
Ras ystem malfunctio noccurs.
Rthe powe rsuppl yisn ot sufficient.
If am alfunctio noccurs, the transmission may
also shift to position jautomatically.
Settin gaspeed
Keepinm indt hatitm aytake abrief moment
unti lthe vehicl ehasaccelerated or braked to
the spee dset.
XTo adjustt he setspeed in 1mph incre-
ments (1 km/hi ncrements):briefly press
the cruise control lever up :to the pressure
point for ahigher speed, or down ;for a
lower speed.
Every time the cruise control lever is pressed
up or down, the last speed stored is increased
or reduced.
XTo adjust th eset speed in 5mph incre-
ment s(10 km/h increments): briefly
press the cruise control lever up :past the
pressurep oint forahigher speed, or down ;
for alower speed.
Every time the cruise control lever is pressed
up or down, the last speed stored is increased
or reduced.
144Driving systems
Driving and parking
Page 260 of 298
Transporting the vehicle
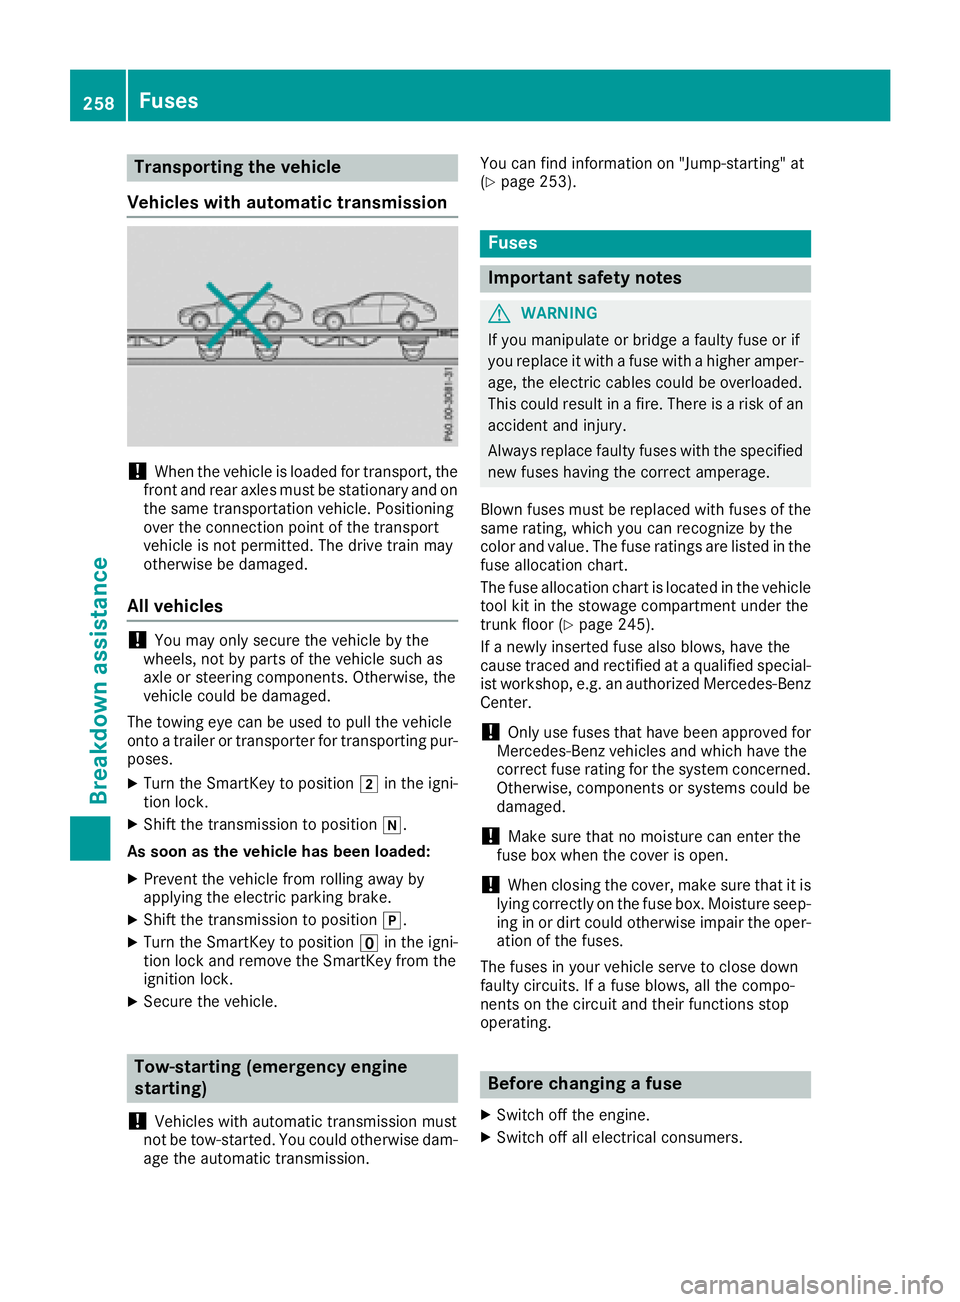
Vehicle switha utomatic transmission
!When the vehicl eisloaded for transport, the
front and rea raxles must be stationar yand on
the same transportatio nvehicle. Positioning
ove rthe connectio npoint of the transport
vehicl eisnot permitted .The drive train may
otherwis ebedamaged .
Allv eh icles
!Youm ayonl ysecur ethe vehicl ebythe
wheels ,not by parts of the vehicl esucha s
axl eors teerin gcomponents. Otherwise, the
vehicl ecould be damaged.
The towing ey ecan be used to pull the vehicle
onto atrailer or transporte rfor transporting pur-
poses.
XTurn the SmartKeytop osition 2in the igni-
tio nlock.
XShift the transmission to position i.
As soon as the vehicle has been loaded:
XPrevent the vehicl efromr olling away by
applying the electri cparkin gb rake.
XShift the transmission to position j.
XTurn the SmartKeytoposition uin the igni-
tio nlocka nd remove the SmartKeyf romthe
ignition lock.
XSecure the vehicle.
Tow-starting (emergency engine
starting)
!
Vehicles with automatic transmission must
not be tow-started .You could otherwis edam -
ag et he automatic transmission. Yo
uc an find informatio non"Jump-starting "at
(
Ypage 253).
Fuses
Important safety notes
GWARNING
If yo umanipulate or bridg eafaulty fuse or if
yo ur eplace it with afusew ithah ighe ramper -
age, the electri ccable scould be overloaded.
Thi scould resul tinafire. There is ariskofa n
accident and injury.
Alway sreplace faulty fuses with the specified
new fuses havin gthe correct amperage.
Blown fuses must be replaced with fuses of the
same rating ,which yo ucan recognize by the
color and value. The fuse rating sarelisted in the
fuse allocation chart.
The fuse allocation chart is locate dinthe vehicle
tool kit in the stowag ecompartment under the
trunk floor (
Ypage 245).
If an ewly inserte dfusea lsob lows ,havet he
cause traced and rectifie dataqualified special-
is tw orkshop ,e.g.ana uthorize dMercedes-Benz
Center.
!Onlyu sefuses thath aveb eena pproved for
Mercedes-Benz vehicles and which have the
correct fuse rating for the system concerned.
Otherwise, components or system scould be
damaged.
!Make sure thatnom oisture can enterthe
fuse bo xwhent he cove risopen.
!When closing the cover, make sure thatiti s
lying correctl yonthe fuse box. Moisture seep-
ing in or dirt could otherwis eimpai rthe oper-
atio
n of the fuses.
The fuses in your vehicl eserve to close down
faulty circuits. If afuseb lows ,allthe compo-
nents on the circui tand their functions stop
operating.
Before changin gafuse
XSwitch off the engine.
XSwitch off al lelectrical consumers.
258Fuses
Breakdow nassistance
Page 261 of 298
XMake sure that the ignition is switched off
(Ypage 116).
or
XWhen using the SmartKey, turn the SmartKey to position uin the ignition lock and remove
it (
Ypage 116).
XSecure the vehicle against rolling away
(Ypage 131).
All indicator lamps in the instrumen tcluster
must be off.
The fuses are located in various fuse boxes:
RFuse box in the engine compartmentont he
left-hand side of the vehicle, when viewed in
the direction of travel
RFuse box in the trunk
Fuse box in the engine compartment
i
Observe the "Important safety notes" sec-
tion (Ypage 258).
GWARNING
When the hood is open and the windshield
wipers are set in motion, you can be injured by
the wiper linkage. There is arisk of injury.
Always switch off the windshield wipers and
the ignition before opening the hood.
XMake sure that the windshield wipers are
turned off.
XOpen the hood.
XUse adry cloth to remove any moisture from
the fuse box.
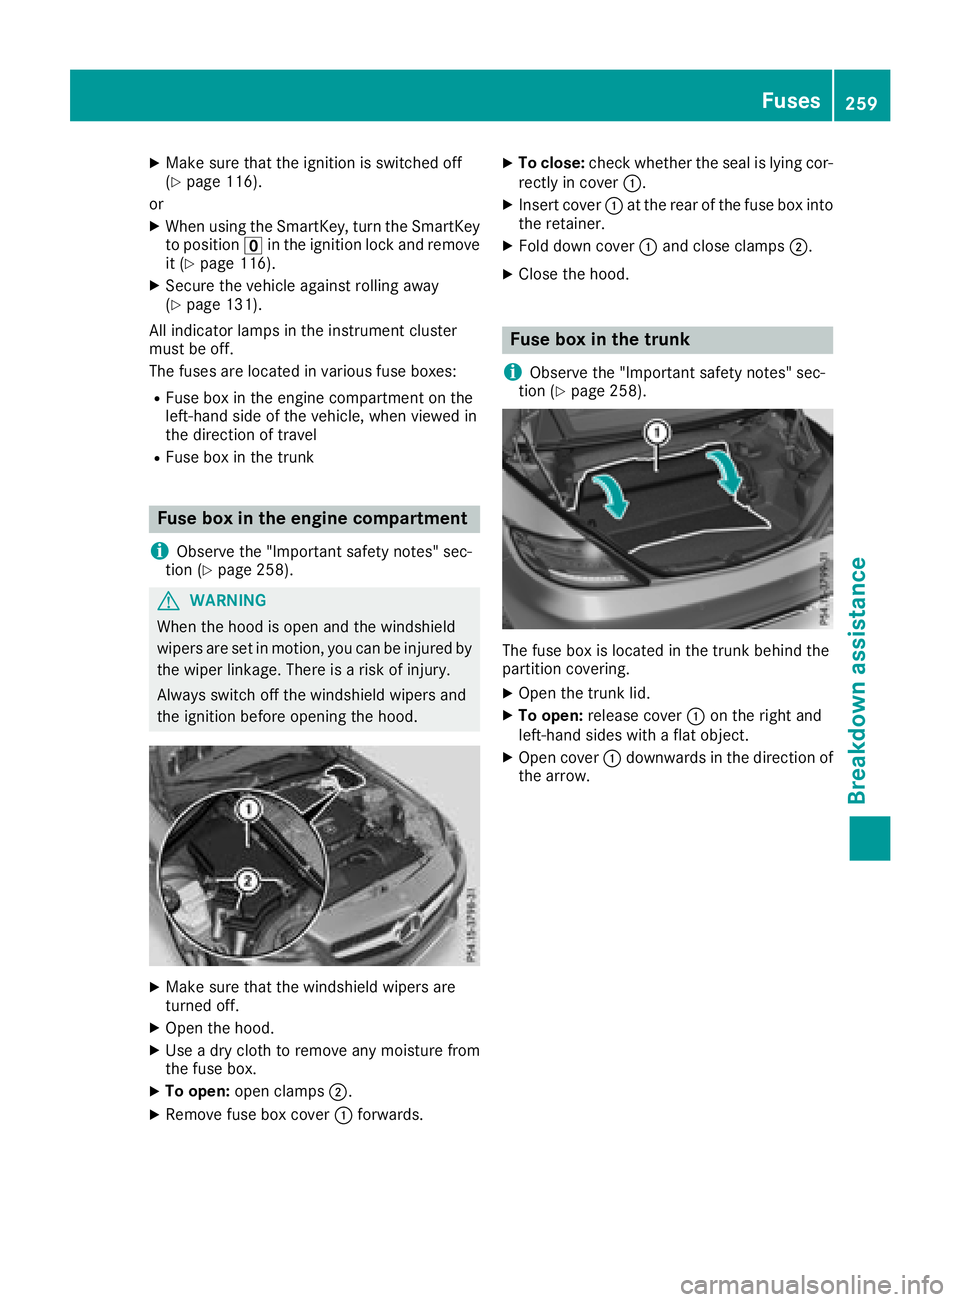
XTo open: open clamps ;.
XRemove fuse box cover :forwards.
XTo close: check whether the seal is lying cor-
rectly in cover :.
XInsert cover:at the rear of the fuse box into
the retainer.
XFold down cover :and close clamps ;.
XClose the hood.
Fuse box in the trunk
i
Observe the "Important safety notes" sec-
tion (Ypage 258).
The fuse box is located in the trunk behind the
partition covering.
XOpen the trunk lid.
XTo open: release cover :on the right and
left-hand sides with aflat object.
XOpen cover :downwards in the direction of
the arrow.
Fuses259
Breakdown assistance
Z