Page 249 of 298

General notes
With MOExtended tires (tires with run flat char-
acteristics), you can continue to drive you rvehi-
cle even if there is atotal loss of")
MOExtended tires (tires with run-flat
properties)
General notes
With MOExtended tires (tires with run flat char-
acteristics), you can continue to drive you rvehi-
cle even if there is atotal loss of pressure in one
or more tires. The affected tire must not show
any clearly visible damage.
You can recognize aMOExtended tire by the
MOExtended marking which appears on the
sidewal lofthe tire. You wil lfind this marking
next to the tire size designation, the load-bear-
ing capacity and the speedi ndex (
Ypage275).
MOExtended tires may only be use dinconjunc-
tion with an active tire pressure loss warning
system or with an active tire pressure monitor.
If ap ressure lossw arningmessagea ppears
in the multifunction display:
Robserve the instructions in the display mes-
sage s(Ypage1 96)
Rcheck the tire for damage
Rif driving on, observe the following notes
The driving distance possible in run-fla tmode is
approximately 50 mile s(80 km) when the vehi-
cle is partiall yladen and approximately 19 miles
(30 km) when the vehicleisf ullyladen.
In addition to the vehiclel oad, the driving dis-
tance possible depends upon:
Rvehicles peed
Rroad condition
Routside temperature
The driving distance possible in run-fla tmode
may be reduced by extreme driving conditions
or maneuvers, or it can be increased through a
moderate style of driving.
The driving distance possible in run-fla tmode is
counted from the moment the tire pressure loss
warning appears in the multifunction display.
You must not exceed amaximu mdesign speed
of 50 mph (80 km/h).
When replacing one or all tires, please observe
the following specifications for you rvehicle's
tires:
Rsize
Rtype and
Rthe "MOExtended "mark
If at ire has gone flat and cannot be replaced
with aMOExtended tire, astandard tire may be
use dasat emporary mea
sure. Make sure thatyou use the propers
ize and type (summer or
winter tire).
Vehicles equipped with MOExtended tires are
not equipped with aTIREFIT kit at the factory. It
is therefore recommendedt hat you additionally
equip you rvehiclew ithaTIREFIT kit if you mount
tires that do not feature run-fla tcharacteristics,
e.g. winter tires. ATIREFIT kit can be obtained
from aqualified specialist workshop, for exam-
ple.
Important safety notes
GWARNING
When driving in emergency mode, the driving
characteristics deteriorate, e.g. when corner-
ing, accelerating quickly and when braking.
There is arisk of an accident.
Do not exceed the stated maximu mspeed.
Avoid abrupt steering and driving maneuvers,
and driving over obstacles (curbs, potholes,
off-road). This appliesinp articulartoaladen
vehicle.
Stop driving in emergency mode if:
Ryou hearb anging noises.
Rthe vehicles tarts to shake.
Ryou see smoke and smell rubber.
RESP®is intervening constantly.
Rthere are tears in the sidewalls of the tire.
After driving in emergency mode, have the
wheelr ims checked at aqualified specialist
workshopw ith regard to their further use .The
defective tire must be replaced in every case.
TIREFIT kit
Important safety notes
TIREFIT is atire sealant.
You can use TIREFIT to seal puncture sofupto
0.16 in (4 mm) ,particularly those in the tire
tread. You can use TIREFIT at outside tempera-
tures downt oÒ4‡( Ò20 †).
Flat tire247
Breakdown assistance
Z
Page 250 of 298

GWARNING
In the following situations, the tire sealant is
unable to provides ufficient breakdown assis-
tance, as it is unable to seal the tire properly:
Rthere are cuts or puncture sinthe tire larger
than those mentioned above.
Rthe wheelr im is damaged.
Ryou have drivenatv ery low tire pressures or
on aflat tire.
There is arisk of an accident.
Do not drive the vehicle. Contact aqualified
specialist workshop.
GWARNING
The tire sealant is harmfu land causes irrita-
tion. It must not come into contact with your
skin, eye sorclothing or be swallowed.Don ot
inhal eTIREFIT fumes .Keep tire sealant away
from children. There is arisk of injury.
If you come into contact with the tire sealant,
observe the following:
RRinse off the tire sealant from you rskin
immediatel ywith water.
RIf the tire sealant comes into contact with
you reyes, immediatel yrinse them thor-
oughly with cleanw ater.
RIf tire sealant is swallowed,i mmediately
rinse you rmouth out thoroughly and drink
plenty of water. Do not induce vomiting,
and seek medical attention immediately.
RImmediately change out of clothing which
has come into contact with tire sealant.
RIf an allergic reactio noccurs, seek medical
attention immediately.
!Do not operate the tire inflation compressor
for longer than eightm inutes atatime without
ab reak. It may otherwise overheat.
The tire inflation compressor can be operated
again once it has cooledd own.
Comply with the manufacturer’s safety instruc-
tions on the sticker on the tire inflation com-
pressor.
Using the TIREFIT kit
XDo not remove any foreigno bjects which have
penetrated the tire, e.g. screws or nails.
XRemove the tire sealant bottle, the accompa-
nying TIREFIT sticker and the tire inflation
compressor from the stowage wellu nder-
neath the trunk floor (
Ypag e245).
XAffix part :of the TIREFIT sticker to the
instrument cluster withi nthe driver's fieldo f
vision.
XAffix part ;of the TIREFIT sticker near the
valve on the wheelw ith the defective tire.
XRemove filler hoseBand plug =from the
bottom section of the tire inflation compres-
sor housing.
XSlide the yellow filler hose connector into the
mounting on yellow cap Aof tire sealant bot-
tle : until the pluge ngages.
XWith the sealing rings in front, slidey ellow cap
A of tire sealant bottle :into the mounting
of tire inflation compressor ;.
The cap must engag einboth hooks.
248Flat tire
Breakdown assistance
Page 251 of 298
 or int oa12Vpower socke tin
your vehicl e(Ypage 223).")
XRemove thecap from valv eC on th efault y
tire.
XScrew filler hos eD onto th evalve.
XInser tplug =intothe cigarette lighte rsocke t
(Ypage 223) or int oa12Vpower socke tin
your vehicl e(Ypage 223).
XTurn theSma rtKey to position 1in th eignition
loc k(Ypage 116).
XPress on and off switch ?on th etirei nflation
compressor to ON.
The tire inflation compressor is switched on .
The tire is inflated.
First ,tires ealan tispumped int othe tire. The
pressur emay briefly ris etoapproximately
50 0k Pa(5.0b ar/7 3psi).
Do not switch off th etirei nflation com -
pressor during this phase .
XLet thetirei nflation compressor run for a
maximum of te nminutes. The tire should then
hav eattained apressur eofatl east 200kPa
(2. 0b ar/29 psi) .
If at irep ressur eof200 kPa( 2.0b ar/29 psi) is
achieved after amaximum of te nminutes, see
(
Ypage 249).
If at irep ressur eof200 kPa( 2.0b ar/29 psi) is
no ta chieved after amaximum of te nminutes,
see (
Ypage 249).
If tire sealan thas escaped, clean it off affecte d
areas as quickly as possible. Use plain water if
possible.
If your clothes are soiled wit htires ealant, hav e
them cleane dwithp erchloroethylen eatadry
cleane rassoo
nasp o
ssible.
Tire pressure not reached
Ifat irep ressur eof200 kPa(2.0 bar/29 psi) has
beena chieved after ten minutes:
XSwitch off the tire inflation compressor.
XUnscrew the filler hose from the valve of the
faulty tire.
Note that tire sealant may escap ewheny ou
unscrew the filler hose.
XVery slowly drive forwards or reverse approx- imately 30 ft (10 m).
XPump up the tire again.
After amaximu moften minutes ,the tire pres-
sure must be at least 200 kPa (2.0 bar/
29 psi).
GWARNING
If the required tire pressure is not reached
after the specified time, the tire is too badly
damaged. The tire sealant cannot repair the
tire in this instance. Damaged tires and atire
pressure that is too low can significantly
impair the vehicle's braking and driving char-
acteristics. There is arisk of accident.
Do not continue driving. Contact aqualified
specialist workshop.
Tire pressure reached
GWARNING
At ire temporarily sealed with tire sealant
impairs the driving characteristics and is not
suitabl efor higher speeds. There is arisk of
accident.
You should thereforea dapt yourdriving style
accordingly and drive carefully .Donot exceed
the specified maximu mspeedw ithatire that
has beenr epaired using tire sealant.
The maximu mspeedf oratire sealed with tire
sealant is 50 mph (80 km/h). The upper part of
the TIREFIT sticker must be affixed to the instru-
ment cluster in the driver's fieldofv ision.
!Residuefrom the tire sealant may come out
of the filler hose after use .This coul dcause
stains.
Therefore, place the filler hose in the plastic
bag which contained the TIREFIT kit.
Flat tire249
Breakdowna ssistance
Z
Page 252 of 298
has
beena chieved after amaximu mpe")
HEnvironmentalnote
Hav ethe used tir esealantb ottle disposed of
professionally, e.g .ataqualifieds pecialist
workshop.
If tir epressure of 20 0kPa(2.0 ba r/29 psi )has
beena chieved after amaximu mperiod of ten
minutes:
XSwitch off the tire inflation compressor.
XUnscrew the filler hose from the valve of the
faulty tire.
XStow the tire sealant bottle and the tire infla- tion compressor.
XPull away immediately.
XStop after driving for approximately ten
minutes and check the tire pressure with the
tire inflation compressor.
The tire pressure must now be at least
130 kPa (1.3 bar/19 psi).
GWARNING
If the required tire pressure is not reached
after driving for ashort period, the tire is too
badly damaged. The tire sealant cannot repair
the tire in this instance. Damaged tires and a
tire pressure that is too low can significantly
impair the vehicle's braking and driving char-
acteristics. There is arisk of accident.
Do not continue driving. Contact aqualified
specialist workshop.
iIn cases such as the one mentioned above,
contact an authorized Mercedes-Benz Cen-
ter. Or call 1-800-FOR-MERCedes( in the
USA) or 1-800-387-0100 (in Canada).
XCorrect the tire pressure if it is still at least
130 kPa (1.3 bar/19 psi).S ee the Tire and
Loading Information placard on the driver's
side B-pillar or the tire pressure tabl einthe
fuel filler flapf or values.
XTo increase the tire pressure: switch on the
tire inflation compressor.
XTo reduce the tire pressure: depress pres-
sure release button :next to pressure
gauge ;.
XWhen the tire pressure is correct, unscrew the
filler hose from the valve of the sealed tire.
XScrew the valve cap onto the tire valve of the
sealed tire.
XTo remove the tire sealant bottle from the tire
inflation compressor, press together the lock-
ing tabs on the yellow cap.
XPullthe tire sealant bottle out of the tire infla-
tion compressor.
The filler hose remains attache dtothe tire
sealant bottle.
XDrive to the nearest qualified specialist work-
shop and have the tire change dthere.
XHave the tire sealant bottle and the filler hose
replaced as soon as possibleataq ualified
specialist workshop.
XHave the tire sealant bottle replaced every
four years at aqualified specialist workshop.
250Flat tire
Breakdowna ssistance
Page 253 of 298

Important safety notes
Specialtool sand expert knowledg eare required
when working on the battery ,e.g.r emovala nd
installation. Yo ushoul dtherefore have al lwork
involving the bat")
Battery (vehicle)
Important safety notes
Specialtool sand expert knowledg eare required
when working on the battery ,e.g.r emovala nd
installation. Yo ushoul dtherefore have al lwork
involving the battery carrie doutataq uali fied
specialist workshop.
GWARNING
Wor kcarrie doutincorrectly on the battery
can lead ,for example, to ashort circui tand
thusd amagethe vehicl eelectronics .Thisc an
lead to functio nrestrictions applying to
safety-relevant systems, e.g .the lighting sys-
tem, the ABS (anti-lock braking system )orthe
ESP
®(Electronic Stability Program). The oper-
ating safety of your vehicl emaybe restricted.
Yo uc ould lose controloft he vehicle, for
example:
Rwhen braking
Rin the event of abrupt steering maneuvers
and/or when the vehicle's speed is not
adapted to the roadc onditions
There is ariskofana ccident.
In the event of ashort circui torasimilar inci-
dent, contact aquali fied specialist workshop
immediately. Do not drive any further .You
shoul dhavea llwork involving the battery car-
rie do utataq uali fied specialist workshop.
For further informatio nabout ABS and ESP
®,
see (Ypage 57 )and (Ypage 60).
GWARNING
Electrostati cbuild -upc an lead to the creation
of sparks, which could ignite the highl yexplo-
sive gases of abattery.T here is ariskofa n
explosion.
Before handling the battery ,touch the vehicle
body to remove any existing electrostatic
build-up.
The highl yflammabl egasmixture form swhen
charging the battery as well as when jump-start-
ing. Alway
smakes uret hatn either yo unor the bat-
tery is electrostaticall ycharged. Abuild -upo f
electrostatic charge can be caused ,for exam-
ple:
Rby wearing clothing made from synthetic
fibers
Rdu etof rictionbetween clothing and seats
Rif yo upushorp ullt he battery across the car-
pe toro thersyntheti cmaterials
Rif yo uwipet he battery with acloth
GWARNING
During the charging process ,abattery produ-
ces hydrogen gas. If ashort circui toccurs or
sparks are created,t he hydrogen gascan
ignite .There is ariskofane xplosion.
RMake sure thatt he positive terminal of a
connected battery does not come into con- tact with vehicl eparts.
RNever place meta lobjects or tool sonabat-
tery.
RIt is important thaty ouobserve the descri-
be do rder of the battery terminal swhen
connecting and disconnecting abattery.
RWhe njump-starting ,makes uret hatt he
battery pole swithi de ntical polarity are
connected.
RIt is particularly important to observe the
describe dorder when connecting and dis-
connecting the jumper cables.
RNever connect or disconnect the battery
terminal swhile the engine is running.
GWARNING
Battery aci discaustic .There is ariskofi njury.
Avoidc ontact with skin, eyes or clothing. Do
not inhal eany battery gases .Donot lean over
the battery .Keepc hildren away from batter-
ies. Wash away battery aci dimmediatelyw ith
plenty of clean water and see kmedica latten-
tion.
HEnvironmental note
Batterie scontain pollu-
tants .Itisi llegalto dispose
of them with the household
Battery (vehicle)251
Breakdo wn assis tance
Z
Page 254 of 298

rubbish. They must be col-
lected separately and dis-
posed of in an environmen-
tallyresponsible recycling
system.
Dispose of batterie sinan
environmentally responsi-
ble manner. Take dis-
charge dbatterie stoaq uali-
fied specialist workshop or
to ac ollection point for
used batteries.
!Have the battery checked regularl yata
qualified specialist workshop.
Observe the service interval sinthe Mainte-
nance Booklet or contact aqualified specialist
workshop for more information.
!Always have work on batterie scarrie dout at
aq ualified specialist workshop.
Shoul dit, in exceptionalc ircumstances, be
absolutel ynecessary to disconnect the 12-
volt battery yourself, please observe the fol-
lowing:
RSecure the vehicletop revent it from rolling
away.
RSwitch off the ignition.
RDisconnect the negative terminal first and
then the positive terminal.
The transmission is locked in position j
after disconnecting the battery.
After the work has been done, install the bat- tery and replace the cover of the positive ter-
minal clamp firmly.
Comply with safety precautions and take pro-
tective measures when handling batteries.
Ris kofe xplosion.
Fire, open flame sand smoking are
prohibited when handling the bat-
tery. Avoid creating sparks.
Battery acid is caustic. Avoid contact
with skin, eye sorclothing.
Wears uitable protective clothing,
especially gloves, apro nand face-
guard. Rinse any acid spills immediately
with clearw
ater. Contact aphysician
if necessary.
Weare ye protection.
Keep children away.
Observe this Operator's Manual.
For safety reasons, Mercedes-Benz recom-
mends that you only use batterie swhich have
been tested and approved for you rvehicleb y
Mercedes-Benz. These batterie sprovide
increase dimpact protection to prevent vehicle
occupants from suffering acid burns should the
battery be damaged in the event of an accident.
In order for the battery to achieve the maximum
possible service life,itm ust alwaysbesuffi-
ciently charged.
Like other batteries, the vehicleb attery may
discharge over time if you do not use the vehicle.
In this case, have the battery disconnected at a
qualified specialist workshop.Y ou can also
charge the battery with acharge rrecommended
by Mercedes-Benz. Contact aqualified special-
ist workshop for further information.
Have the battery condition of charge checked
more frequently if you use the vehiclem ainlyfor
short trips or if you leave it standing idlef or a
lengthy period. Consult aqualified specialist
workshop if you wis htoleave you rvehicle
parked for along periodoft ime.
Remove the SmartKey if you park the vehicle
and do not require any electricalc onsumers.
The vehiclew illt hen use very little energy,t hus
conserving battery power.
If the powers upply has been interrupted ,e.g. if
you reconnect the battery ,you wil lhave to:
Rreset the function for automatically folding
the exterior mirrors in/out by folding the mir-
rors out once (
Ypag e91)
Rset the clock
On vehicles with amultimedia system, the
time is set automatically.
252Battery (vehicle)
Breakdown assistance
Page 255 of 298

Charging thebattery
GWARNING
During chargin gand jump-starting, explosive
gases can escape from th ebattery. Thereisa
ris kofane xplosion.
Particularly avoid fire, open flames, creating
sparks and smoking. Ensure there is sufficient
ventilatio nwhile chargin gand jump-starting.
Do no tlean ove rabattery.
GWARNING
Battery acid is caustic .Thereisar iskofi njury.
Avoid contac twiths kin, eyes or clothing .Do
no tinhale any battery gases.Don otlean over
th eb attery. Keep childre naway from batter-
ies. Wash away battery acid immediately with
plenty of clean wate rand seek medical atten-
tion.
GWARNING
Ad ischarged battery can freezeatt empera-
tures below freezing point. When jump-start-
ing th evehicle or chargin gthe battery, gases
can escape from th ebattery. Thereisar isko f
an explosion.
Allow th efroze nbattery to thaw out before
chargin gitorjump-starting.
!Only use battery chargers witham aximum
chargin gvoltage of 14.8 V.
!Only charge th ebattery usingt hejump-
starting connection point.
The jump-startin gconnection pointisint he
enginec ompartment.
If th eindicator/warning lamps do no tlight up at
low temperatures, it is ver ylikely that th edis-
charge dbattery has frozen.Int hisc ase, you
may neither charge th ebattery no rjump-start
th ev ehicle .The servic elife of athawed-out bat-
tery may be shorter. The starting characteristics
can be impaired, particularly at low tempera-
tures. Hav ethe thawed-out battery checked at a
qualified specialist workshop.
Read th ebattery charger's operatin ginstruc-
tions before chargin gthe battery.
XOpen th ehood.
XConnect th ebattery charge rtothepositive
terminal and ground pointint hesame order
as when connecting th edonor battery in the
jump-startin gprocedure (
Ypage 253).
Jump-starting
For th ejump-startin gprocedure, use only th ejump-startin gconnection pointint heenginec om-
partment, consisting of apositiv etermi nal and aground point.
GWARNING
Battery acid is caustic .Thereisar iskofi njury.
Avoid contac twiths kin, eyes or clothing .Donotinhale any battery gases.Don otlean ove rthe
battery. Keep childre naway from batteries .Wash away battery acid immediately withp lenty of
clean wate rand seek medical attention.
GWARNING
During chargin gand jump-starting, explosive gases can escape from th ebattery. Thereisar isk
of an explosion.
Particularly avoid fire, open flames, creating sparks and smoking. Ensure there is sufficient ven-
tilatio nwhile chargin gand jump-starting. Do no tlean ove rabattery.
Jump-starting253
Breakdown assistance
Z
Page 256 of 298

GWARNING
During the charging process,ab attery produces hydrogen gas. If ashort circui toccurs or sparks
are created ,the hydrogen gas can ignite. There is arisk of an explosion.
RMake sure that the positive terminal of aconnected battery does not come into contact with
vehiclep arts.
RNever place metal objects or tools on abattery.
RIt is important that you observe the described order of the battery terminal swhen connecting
and disconnecting abattery.
RWhen jump-starting, make sure that the battery polesw ith identical polarity are connected.
RIt is particularlyimportant to observe the described order when connecting and disconnecting
the jumper cables.
RNever connect or disconnect the battery terminal swhile the engine is running.
GWARNING
Ad ischarged battery can freeze at temperatures below freezing point. When jump-starting the
vehicleorc harging the battery,g asescan escap efrom the battery.T here isarisk of an explosion.
Allow the frozen battery to thaw out before charging it or jump-starting.
!Avoid repeated and lengthy starting attempts. Otherwise, the catalytic converter coul dbe
damaged by the non-combusted fuel.
If the indicator/warning lamp sdonot light up at low temperatures, it is very likelyt hat the dis-
charge dbattery has frozen. In this case, you may neither charge the battery nor jump-start the
vehicle. The service life of athawed-out battery may be shorter. The starting characteristics can be
impaired,p articularlyatlow temperatures. Have the thawed-out battery checked at aqualified
specialist workshop.
Do not start the vehicleu singarapi dc harging device. If you rvehicle's battery is discharged, the
engine can be jump-started from another vehicleorf romasecond battery using jumper cables.
Observe the following points:
RThe battery is not accessible in all vehicles. If the other vehicle's battery is not accessible,j ump-
start the vehicleu singasecond battery or ajump-starting device.
RYou may only jump-start the vehiclew hen the engine and exhaust system are cold.
RDo not start the engine if the battery is frozen. Let the battery thaw first.
ROnly jump-start from batterieswitha12Vv oltagerating.
ROnly use jumper cables which have asufficient cross-section and insulated terminal clamps.
RIf the battery is full ydischarged, leave the battery that is being used to jump-start connected for
af ew minutes before attempting to start. This charge sthe battery slightly.
RMake sure that the two vehicles do not touch.
Make sure that:
RThe jumper cables are not damaged.
RBare parts of the terminal clamp do not come into contact with other metal parts while the jumper
cables are connected to the battery.
RThe jumper cables cannot come into contact with parts which can move when the engine is
running, such as the V-belt pulley or the fan.
XSecure the vehiclebyapplying the electric parking brake.
XShift the transmission to position j.
254Jump-starting
Breakdown assistance
 1
1 2
2 3
3 4
4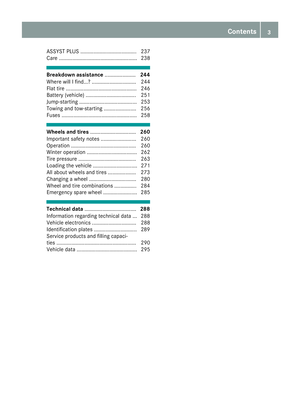 5
5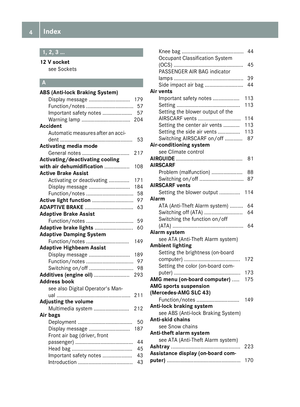 6
6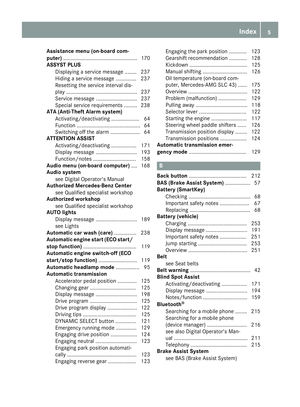 7
7 8
8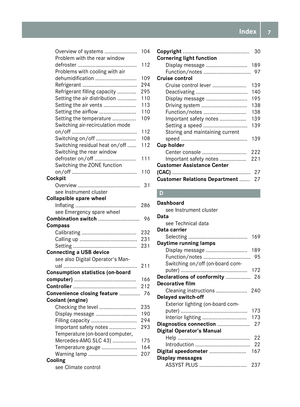 9
9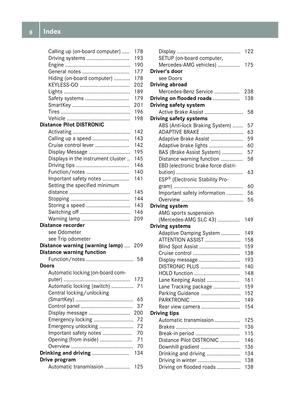 10
10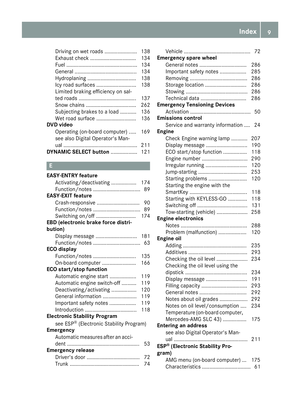 11
11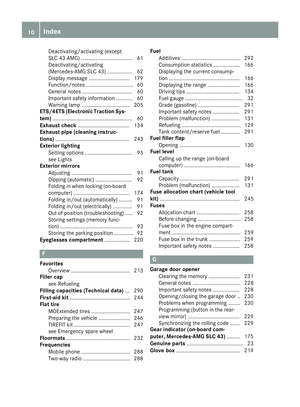 12
12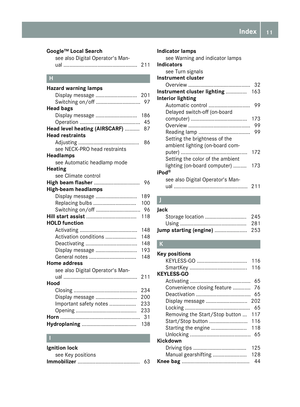 13
13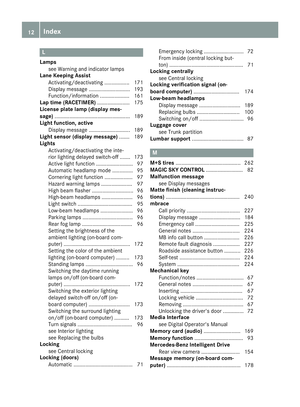 14
14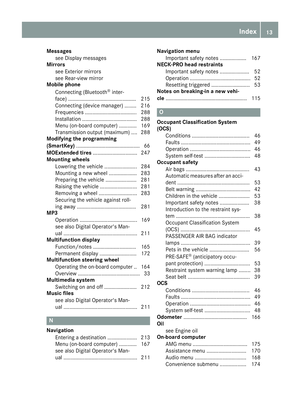 15
15 16
16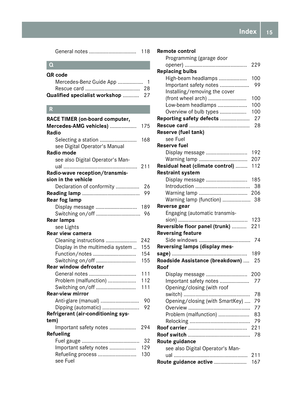 17
17 18
18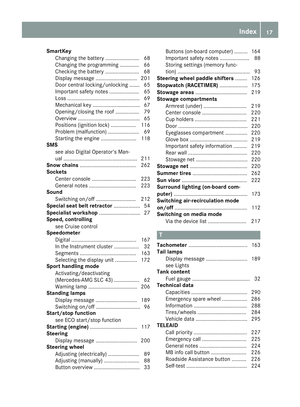 19
19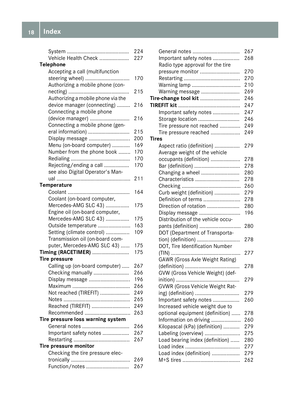 20
20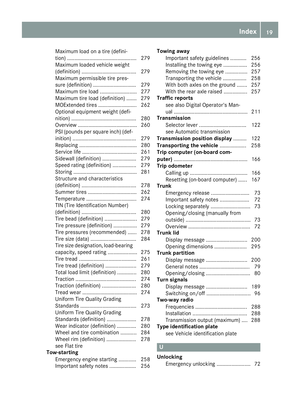 21
21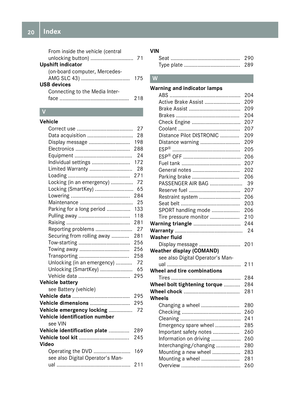 22
22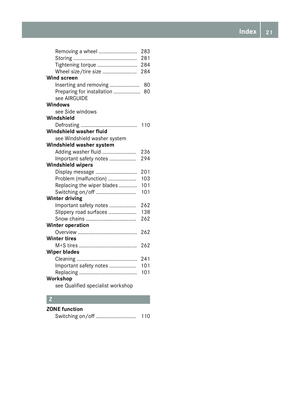 23
23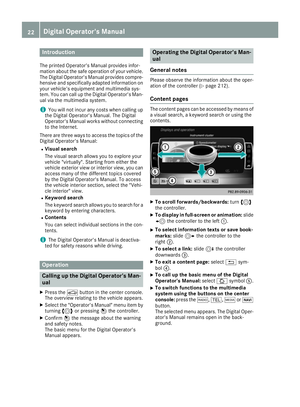 24
24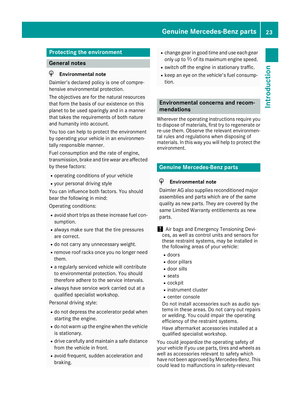 25
25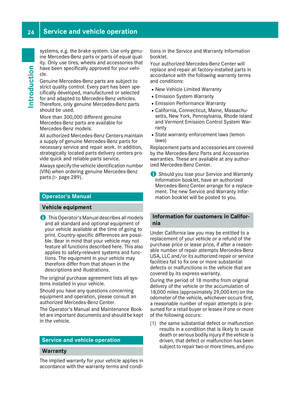 26
26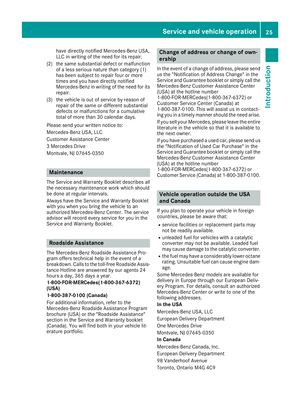 27
27 28
28 29
29 30
30 31
31 32
32 33
33 34
34 35
35 36
36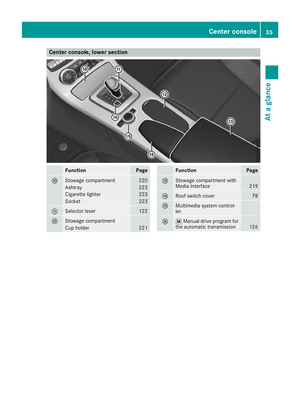 37
37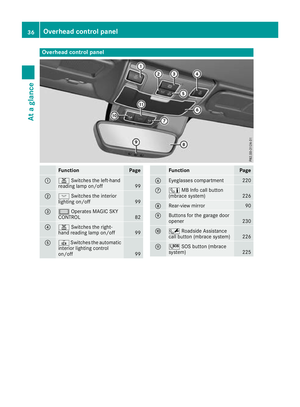 38
38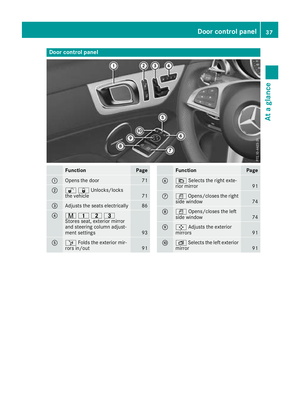 39
39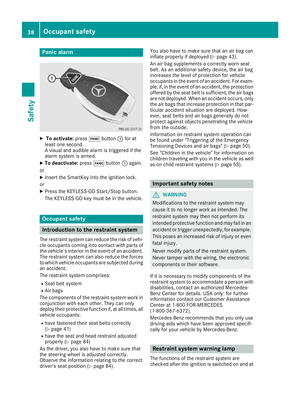 40
40 41
41 42
42 43
43 44
44 45
45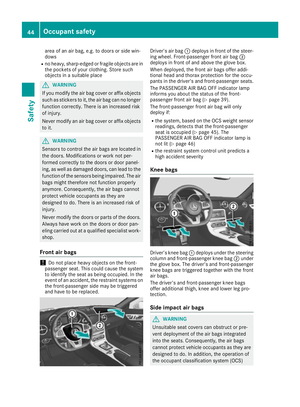 46
46 47
47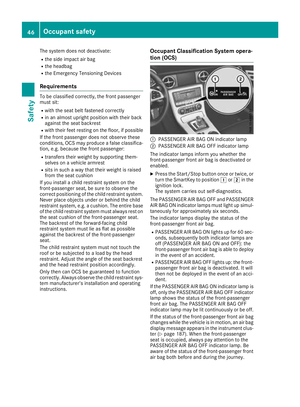 48
48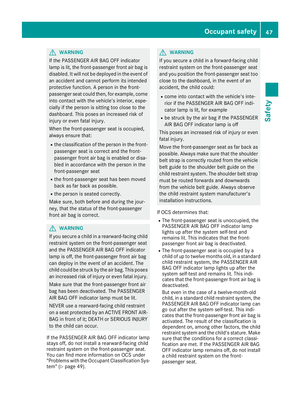 49
49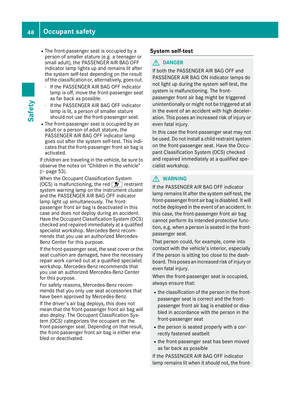 50
50 51
51 52
52 53
53 54
54 55
55 56
56 57
57 58
58 59
59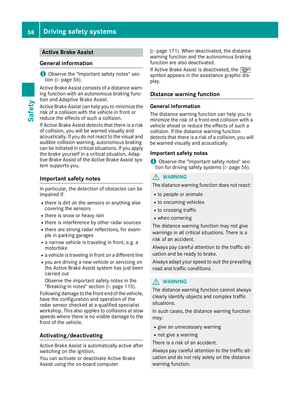 60
60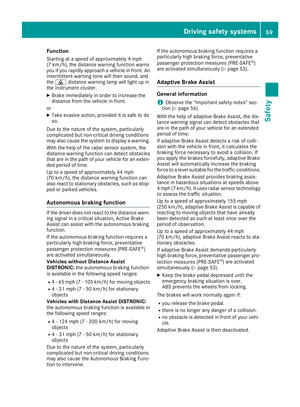 61
61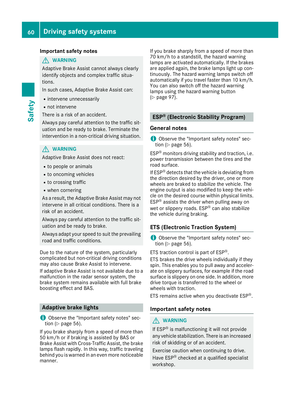 62
62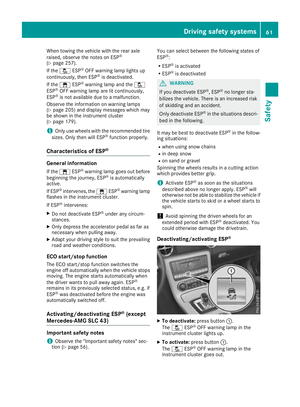 63
63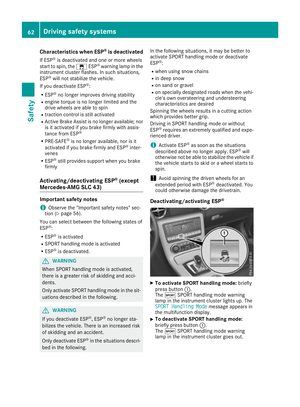 64
64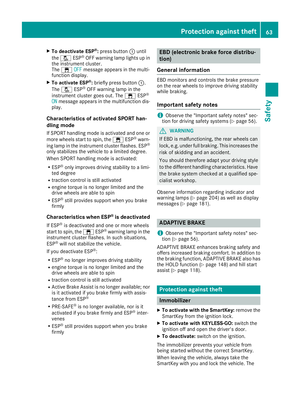 65
65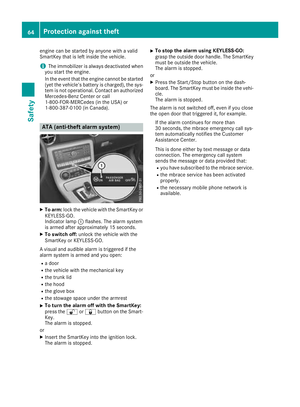 66
66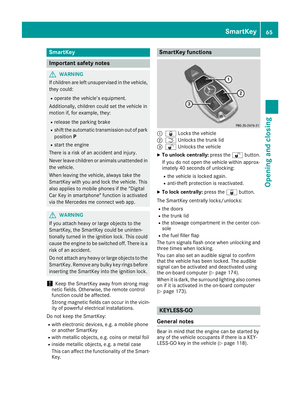 67
67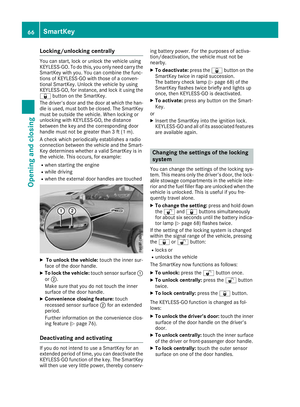 68
68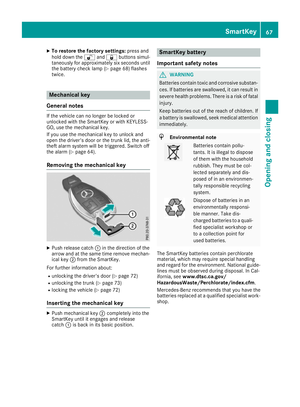 69
69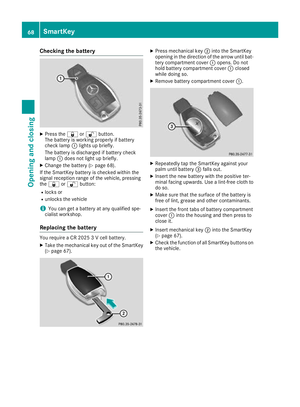 70
70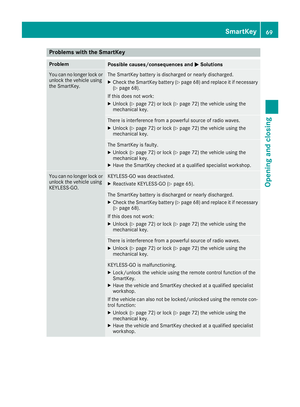 71
71 72
72 73
73 74
74 75
75 76
76 77
77 78
78 79
79 80
80 81
81 82
82 83
83 84
84 85
85 86
86 87
87 88
88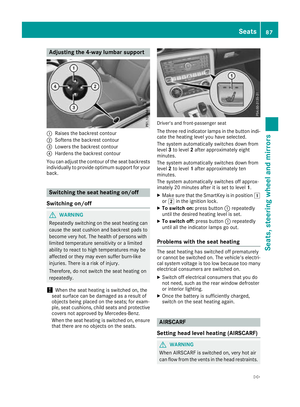 89
89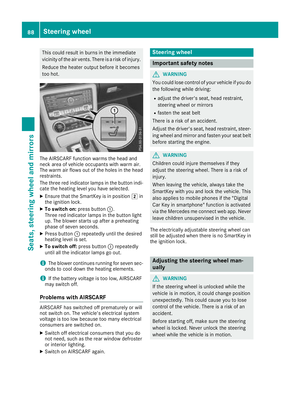 90
90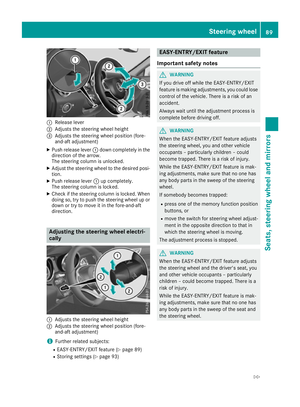 91
91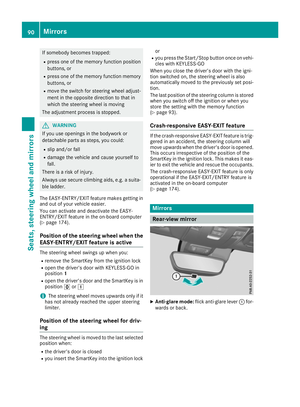 92
92 93
93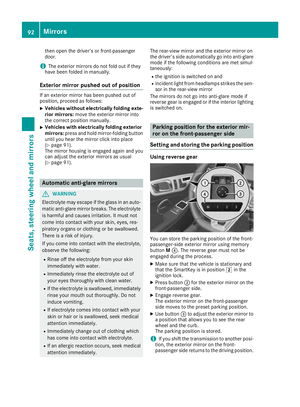 94
94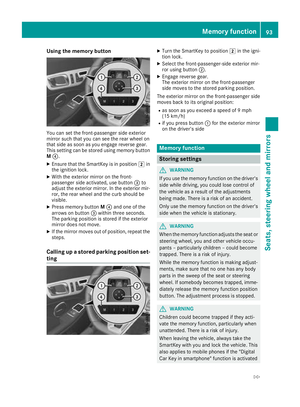 95
95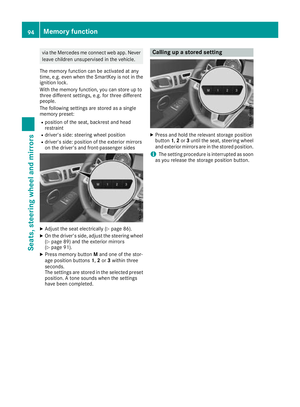 96
96 97
97 98
98 99
99 100
100 101
101 102
102 103
103 104
104 105
105 106
106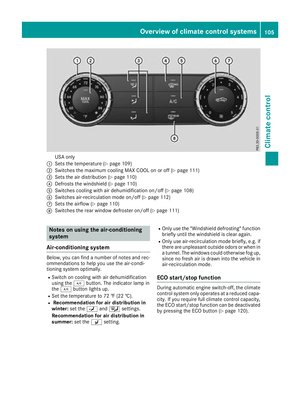 107
107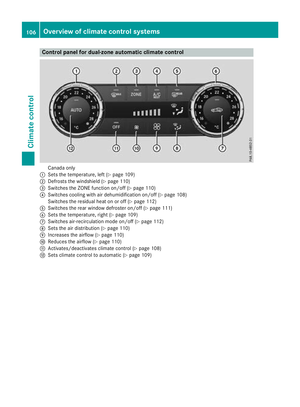 108
108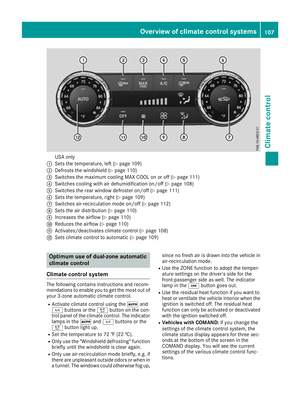 109
109 110
110 111
111 112
112 113
113 114
114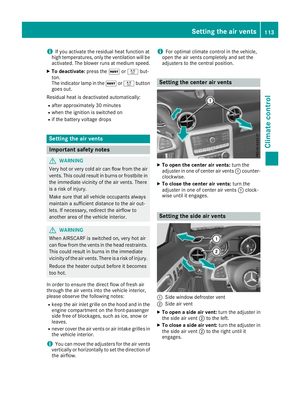 115
115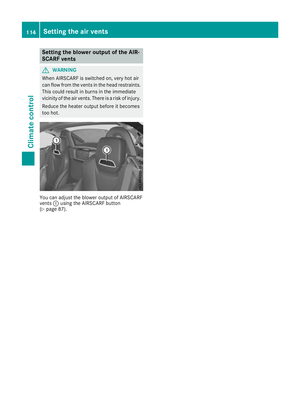 116
116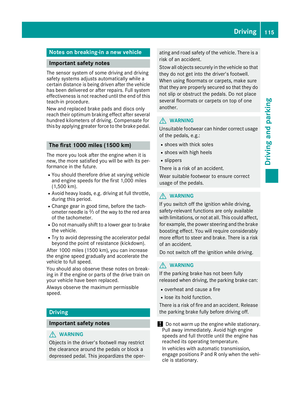 117
117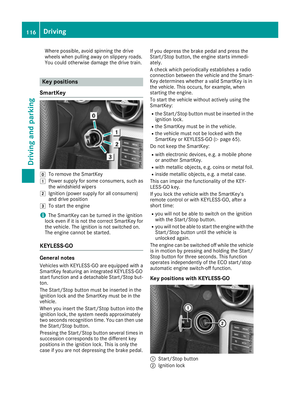 118
118 119
119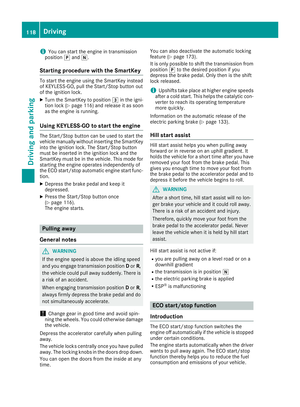 120
120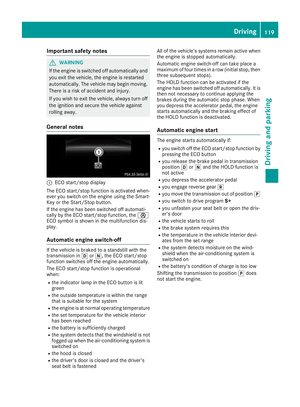 121
121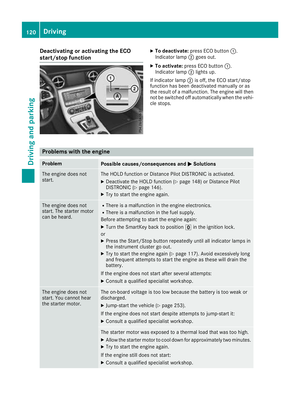 122
122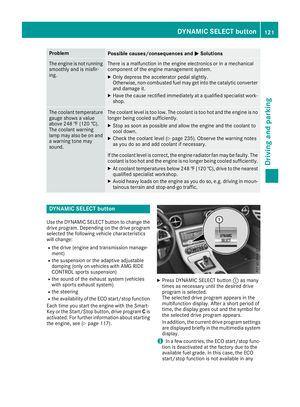 123
123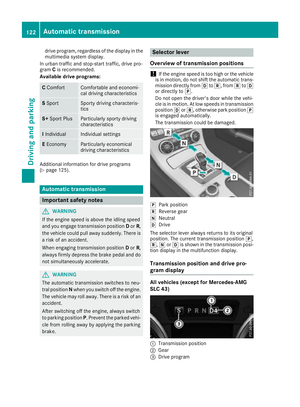 124
124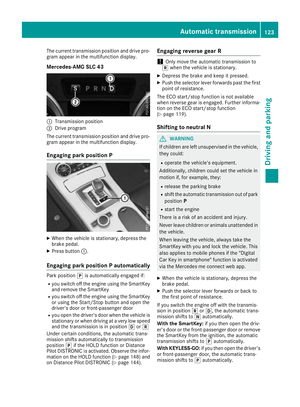 125
125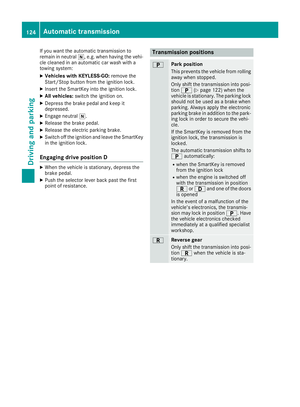 126
126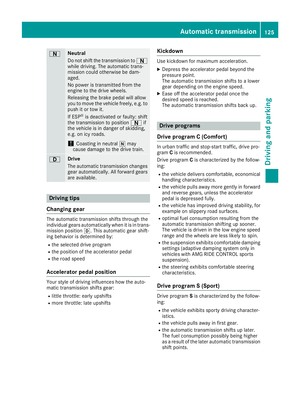 127
127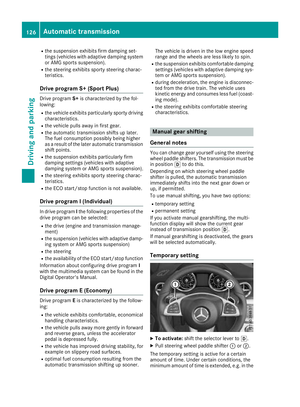 128
128 129
129 130
130 131
131 132
132 133
133 134
134 135
135 136
136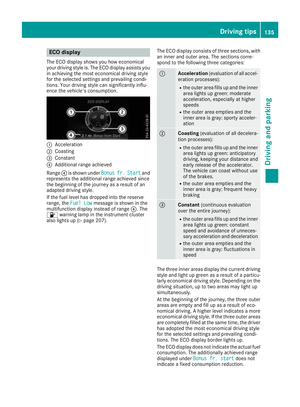 137
137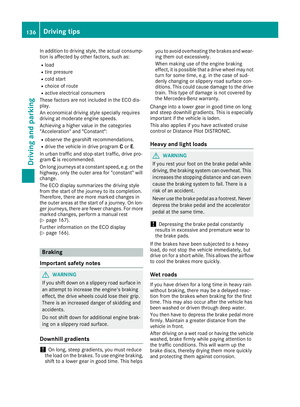 138
138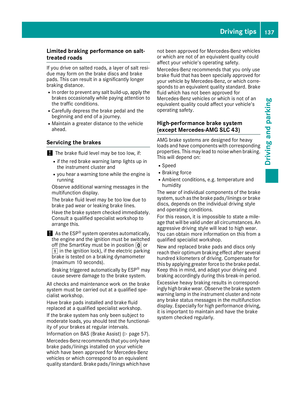 139
139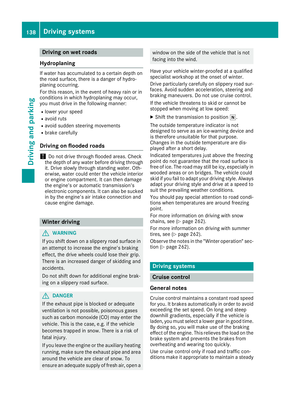 140
140 141
141 142
142 143
143 144
144 145
145 146
146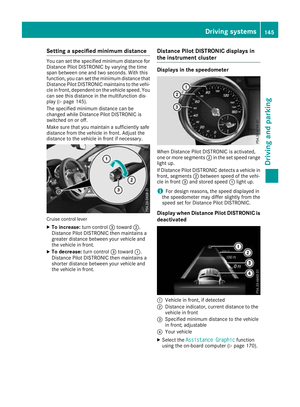 147
147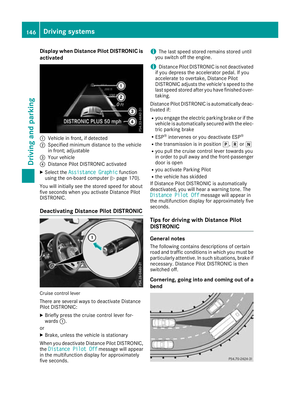 148
148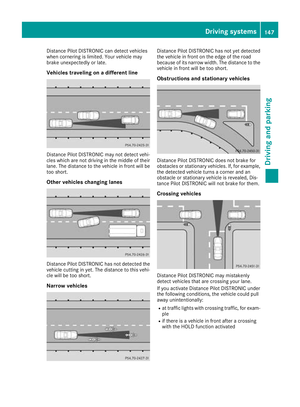 149
149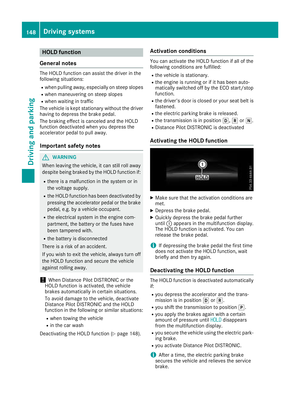 150
150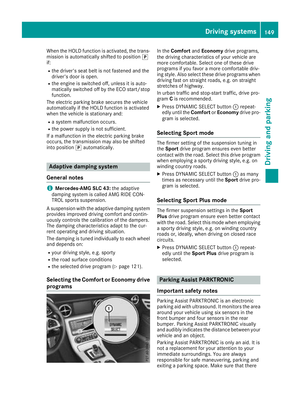 151
151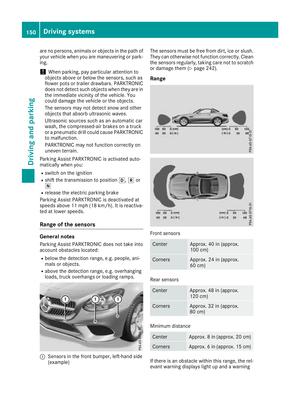 152
152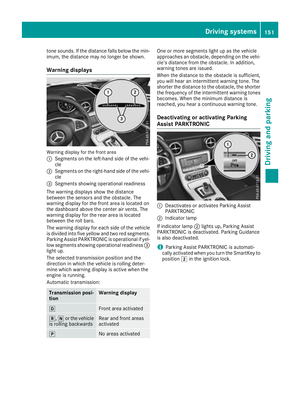 153
153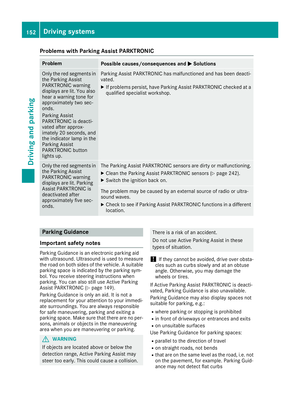 154
154 155
155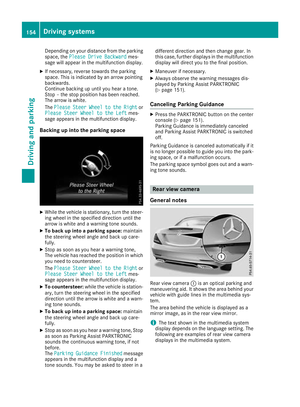 156
156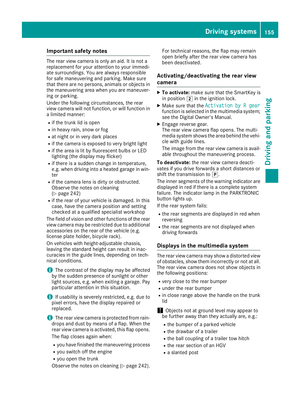 157
157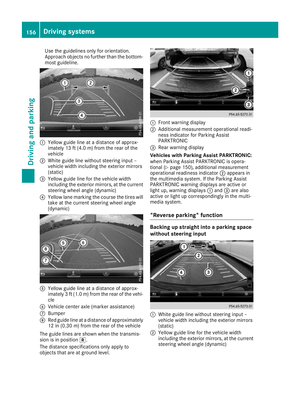 158
158 159
159 160
160 161
161 162
162 163
163 164
164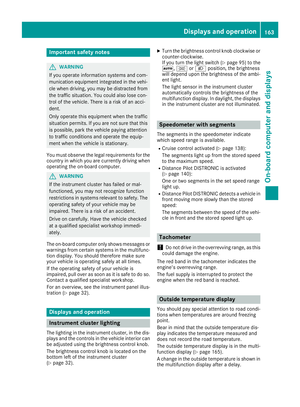 165
165 166
166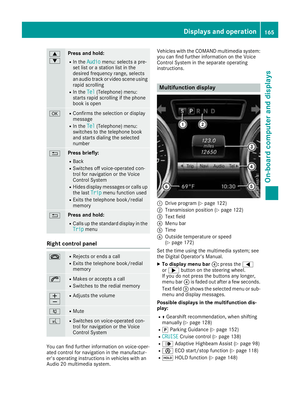 167
167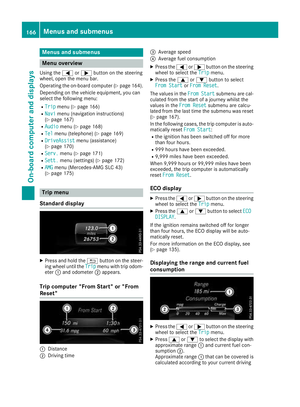 168
168 169
169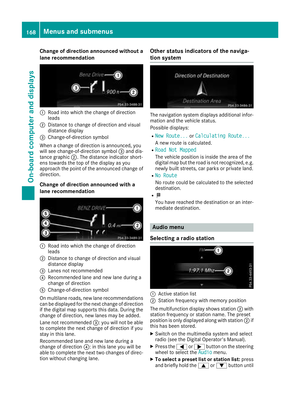 170
170 171
171 172
172 173
173 174
174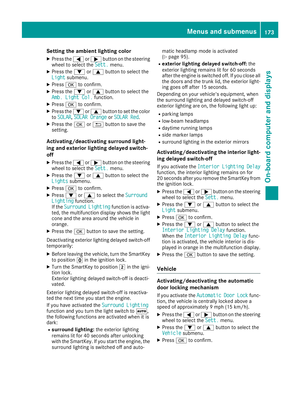 175
175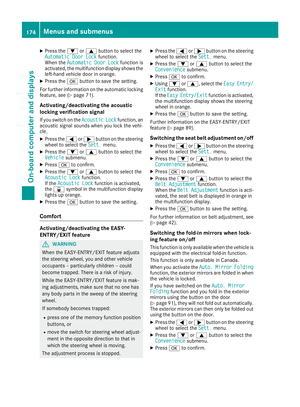 176
176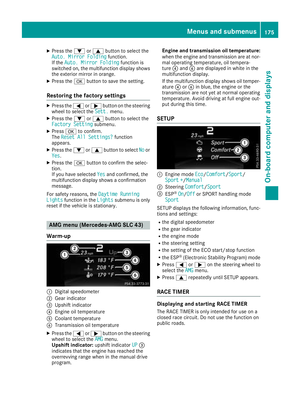 177
177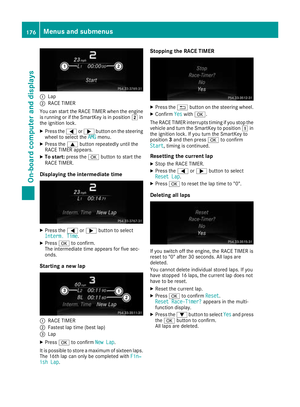 178
178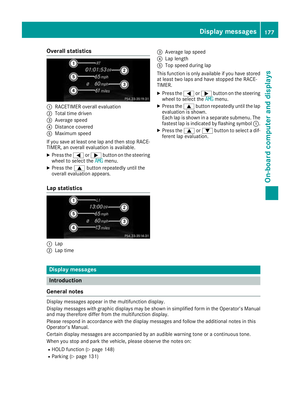 179
179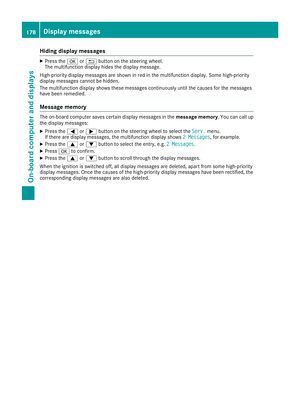 180
180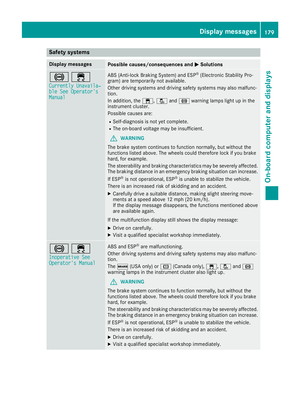 181
181 182
182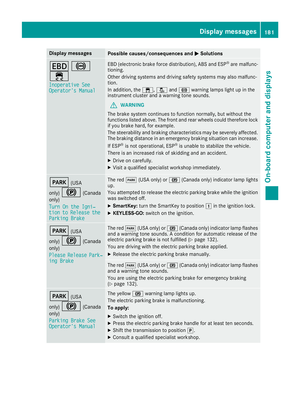 183
183 184
184 185
185 186
186 187
187 188
188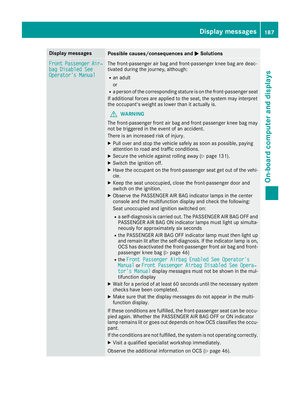 189
189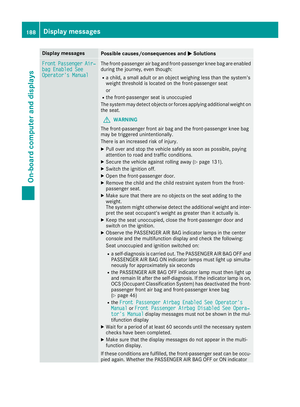 190
190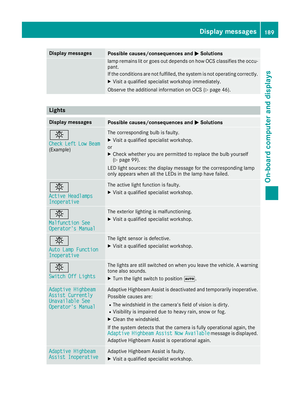 191
191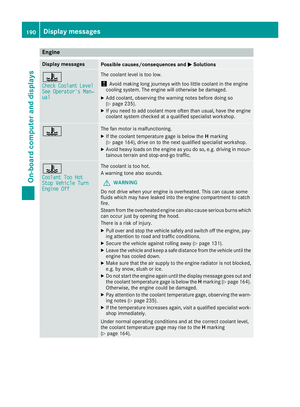 192
192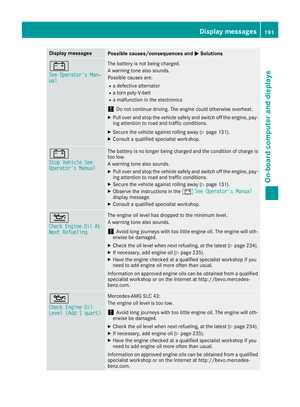 193
193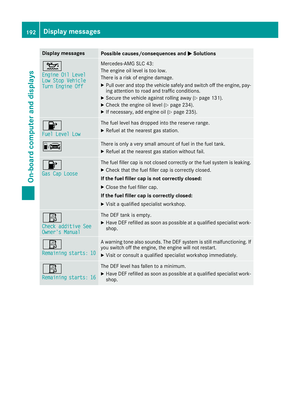 194
194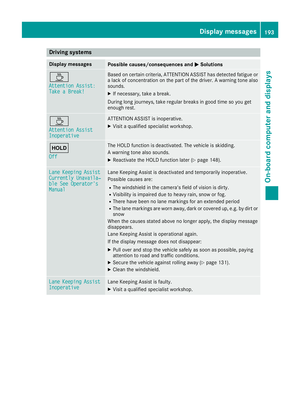 195
195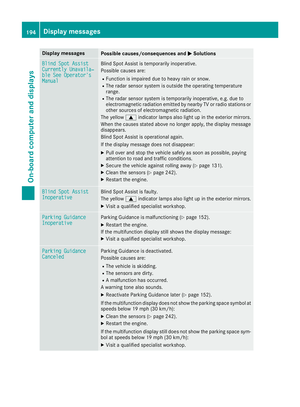 196
196 197
197 198
198 199
199 200
200 201
201 202
202 203
203 204
204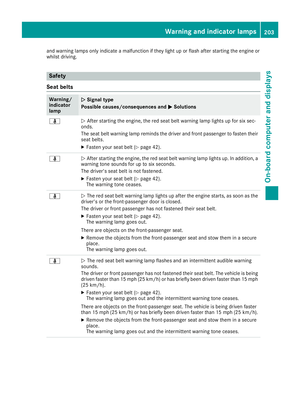 205
205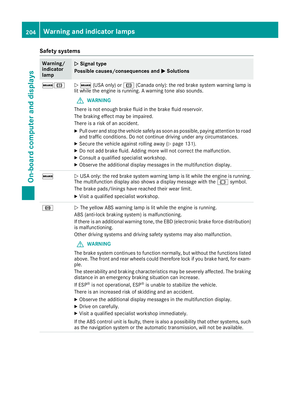 206
206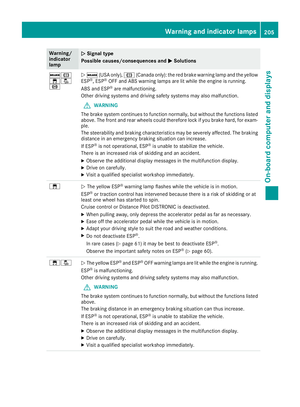 207
207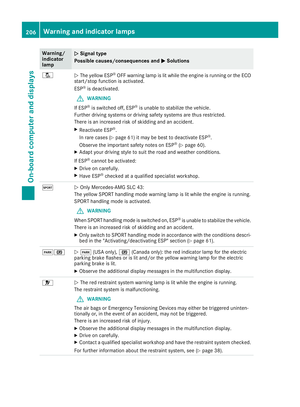 208
208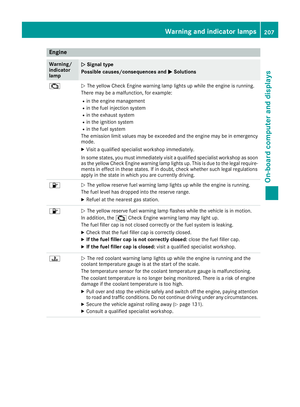 209
209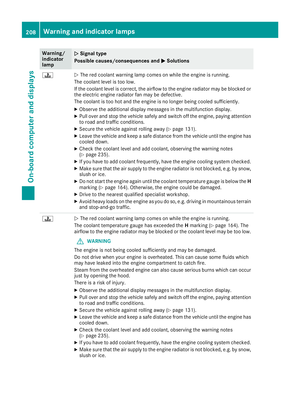 210
210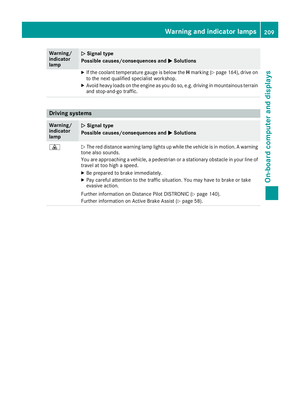 211
211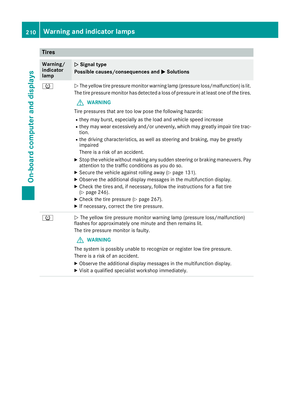 212
212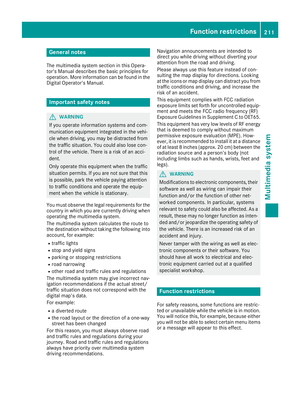 213
213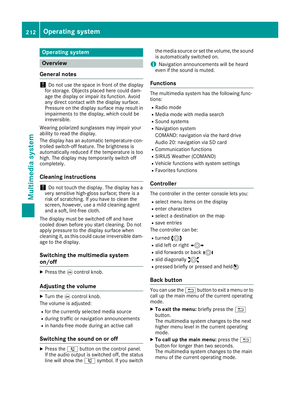 214
214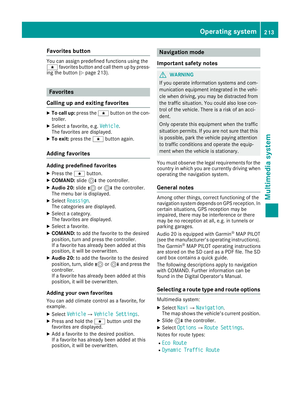 215
215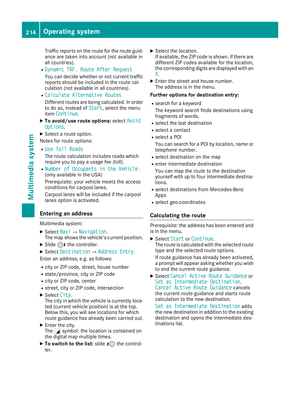 216
216 217
217 218
218 219
219 220
220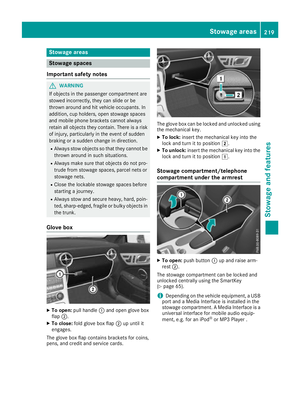 221
221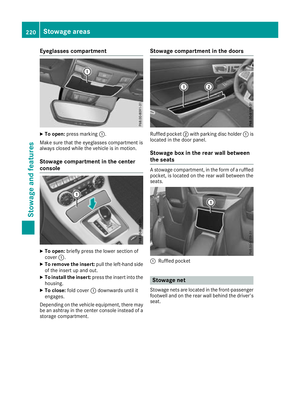 222
222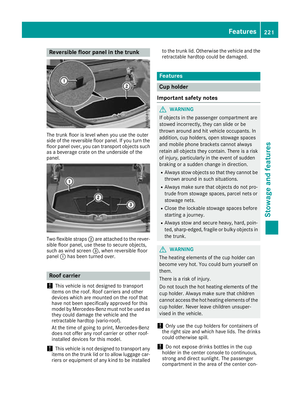 223
223 224
224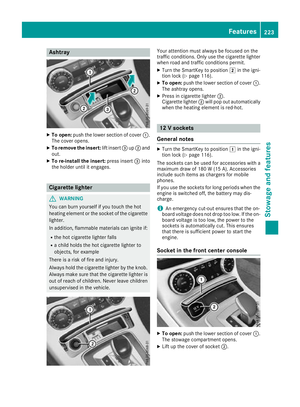 225
225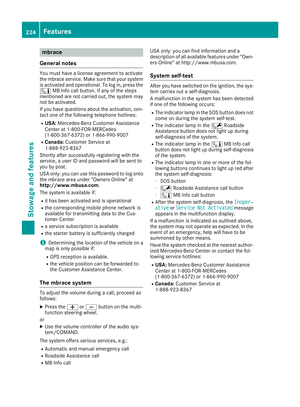 226
226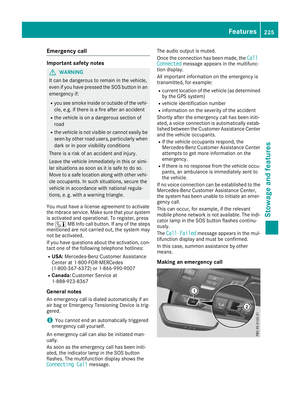 227
227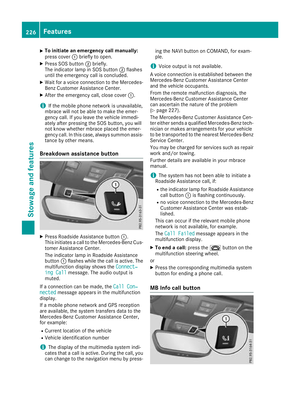 228
228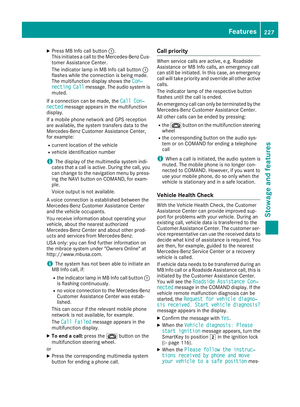 229
229 230
230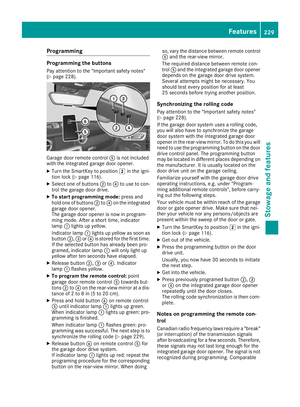 231
231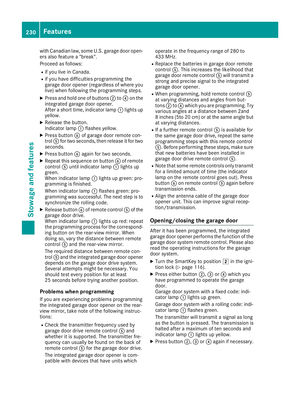 232
232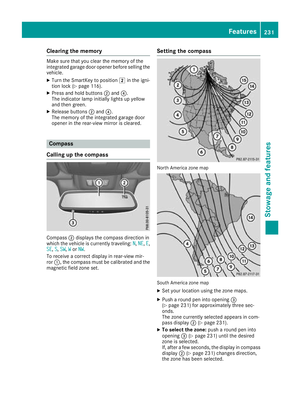 233
233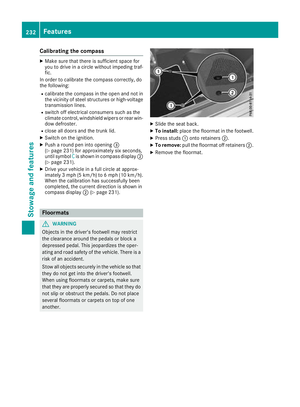 234
234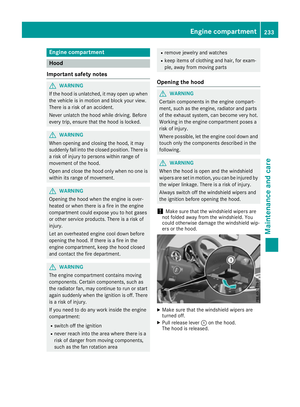 235
235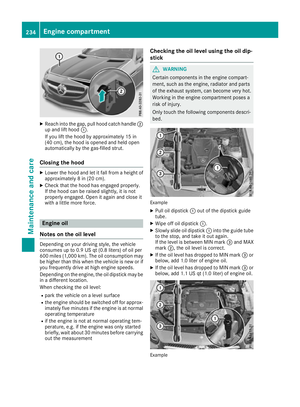 236
236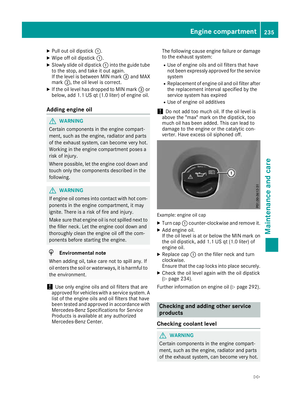 237
237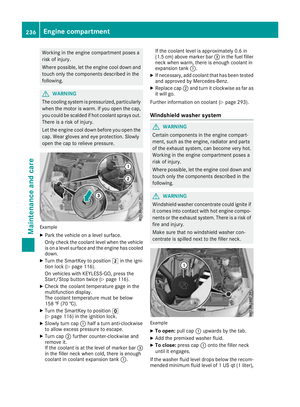 238
238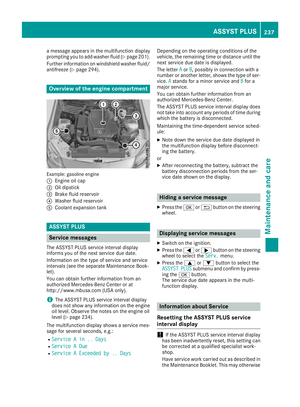 239
239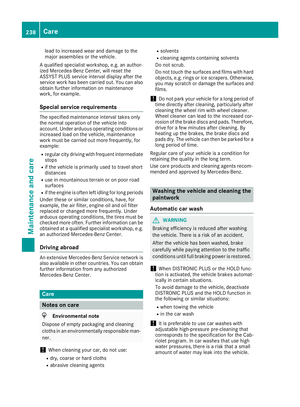 240
240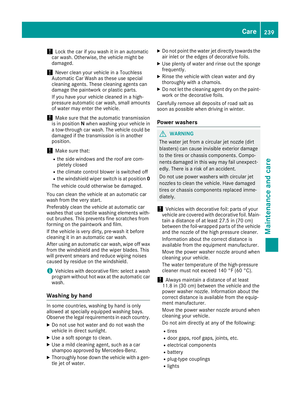 241
241 242
242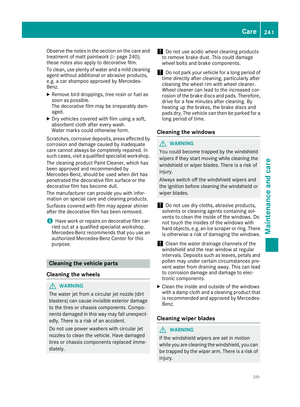 243
243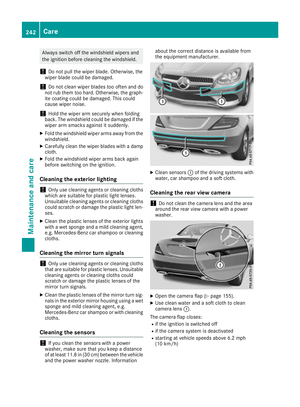 244
244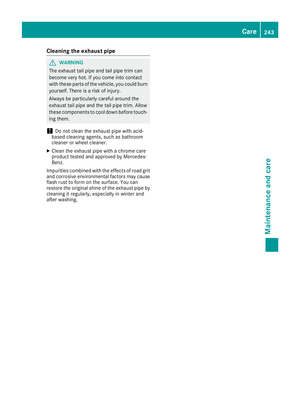 245
245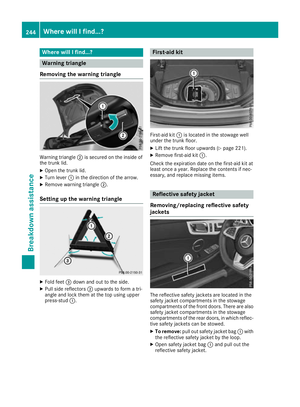 246
246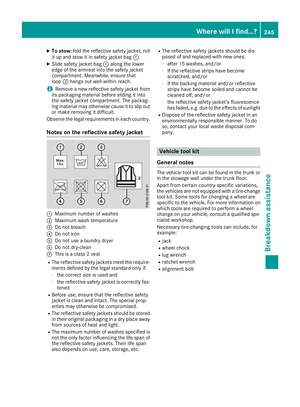 247
247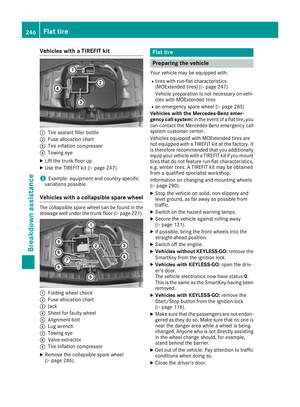 248
248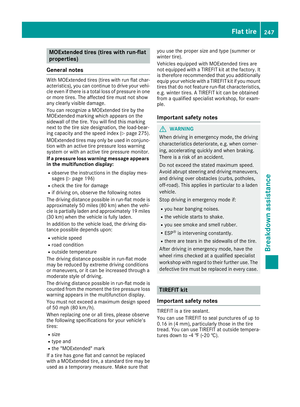 249
249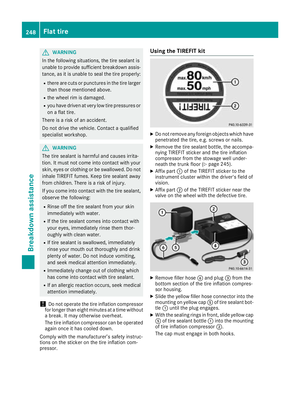 250
250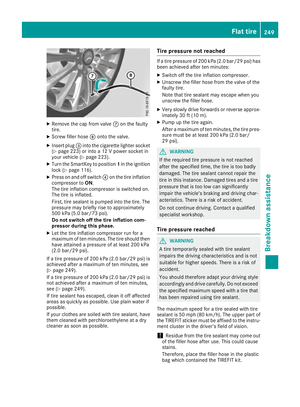 251
251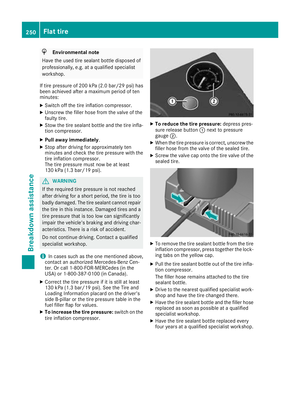 252
252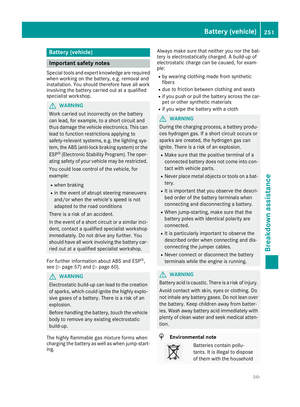 253
253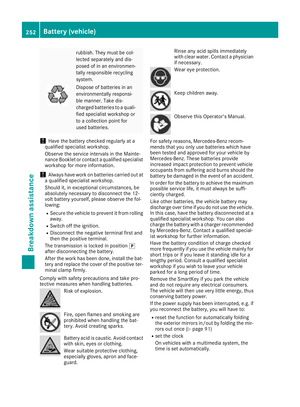 254
254 255
255 256
256 257
257 258
258 259
259 260
260 261
261 262
262 263
263 264
264 265
265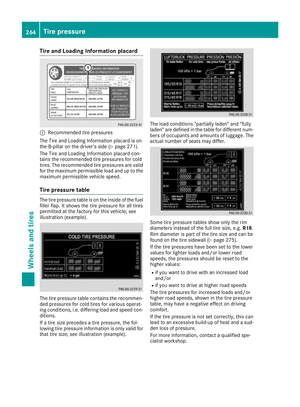 266
266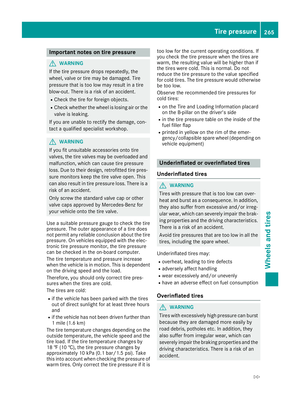 267
267 268
268 269
269 270
270 271
271 272
272 273
273 274
274 275
275 276
276 277
277 278
278 279
279 280
280 281
281 282
282 283
283 284
284 285
285 286
286 287
287 288
288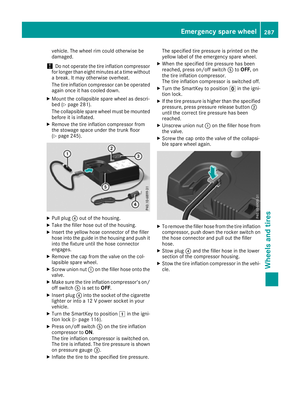 289
289 290
290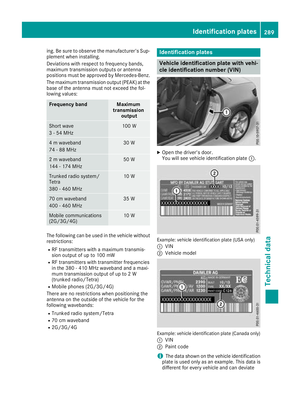 291
291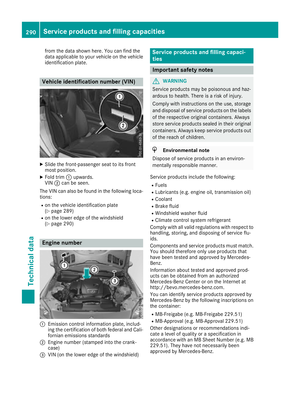 292
292 293
293 294
294 295
295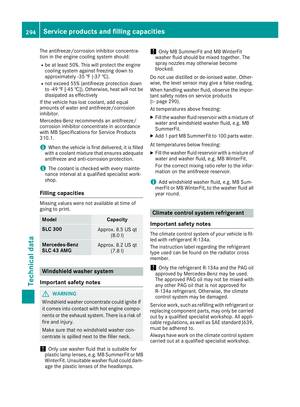 296
296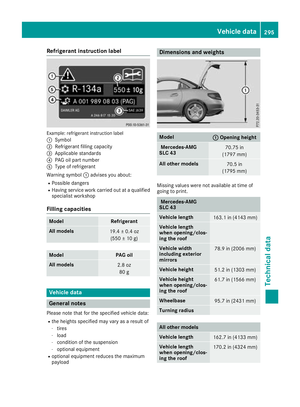 297
297