2018 MERCEDES-BENZ SLC ROADSTER lock
[x] Cancel search: lockPage 288 of 298

Snow chains mustnot be mounted on emer-
gency spare wheels.
General notes
You can as kfor information regarding permitted
emergency spare wheel satanauthorized
Mercedes-Benz Center.
You shoul dregularl ycheck the pressure of the
emergency spare wheel ,particularly prior to
long trips, and correct the pressure as neces-
sary (
Ypage 263). The value on the wheel is
valid.
An emergency spare wheel may also be moun-
ted against the direction of rotation. Observe
the time restriction on us easwellast he speed
limitation specified on the emergency spare
wheel.
Replace the tire saftersix years at the latest,
regardless of wear. Thisa lsoa pplies to the
emergency spare wheel.
Wheny ouare driving with the collapsibl espare
wheel mounted, the tire pressure loss warning
system or the tire pressure monitor canno tfunc-
tion reliably. Only restart the tire pressure loss
warning system or tire pressure monitor when
the defectiv ewheel hasb eenr eplaced with a
new wheel.
Vehicles with tire pressure monitor: after
mounting an emergency spare wheel ,the sys-
tem may stil ldisplay the tire pressure of the
removed wheel for afew minutes. The value dis-
played for the mounted emergency spare wheel
is not the same as the current tire pressure of
the emergency spare wheel.
Removin gthe emergencys pare wheel
Vehicles with acolla psibles pare wheel
The collapsibl espare wheel can be found in the
stowag ewellu nder the trunk floor (Ypage 221).
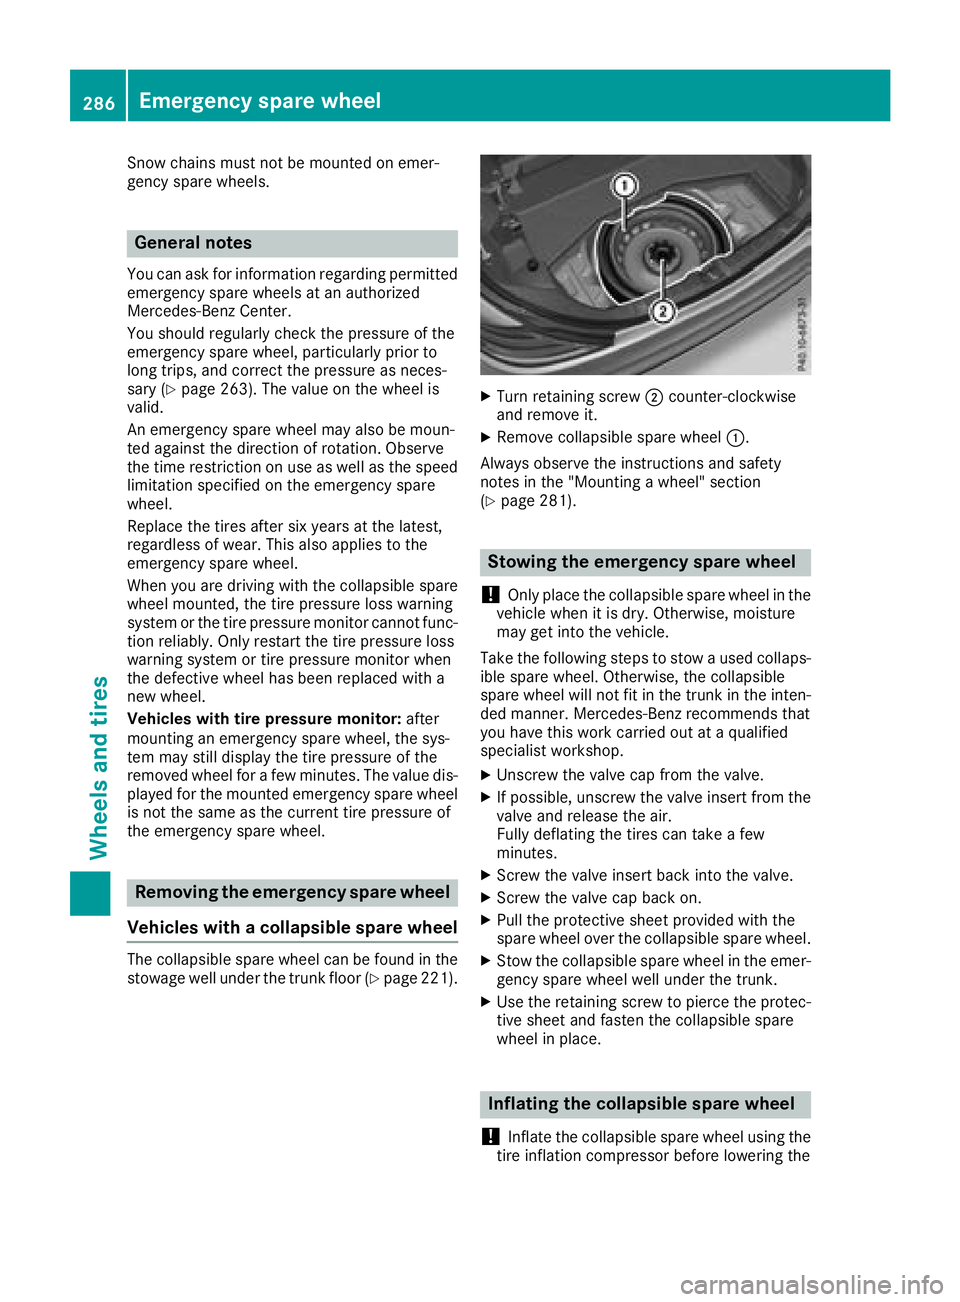
XTurn retaining screw ;counter-clockwise
and remove it.
XRemove collapsibl espare wheel :.
Alway sobserve the instructions and safety
notes in the "Mounting awheel"s ection
(
Ypage 281).
Stowin gthe emergencys pare wheel
!
Only place the collapsibl espare wheel in the
vehicl ewhenitisd ry.O therwise, moisture
may get into the vehicle.
Take the following stepstos towausedc ollaps-
ible spare wheel .Otherwise, the collapsible
spare wheel will not fit in the trunk in the inten-
ded manner. Mercedes-Benz recommendst hat
yo uh avet his work carrie doutataq uali fied
specialist workshop.
XUnscrewt he valve cap from the valve.
XIf possible ,unscrew the valve insert from the
valve and release the air.
Fully deflating the tire scan take afew
minutes.
XScrew the valve insert back into the valve.
XScrew the valve cap back on.
XPull the protectiv esheet provided with the
spare wheel overt he collapsiblespare wheel.
XStow the collapsibl espare wheel in the emer-
gency spare wheel well under the trunk.
XUse the retaining screwtop ierce the protec-
tive sheet and fasten the collapsibl espare
wheel in place.
Inflating the collapsibles pare wheel
!
Inflate the collapsibl espare wheel using the
tire inflation compressor before lowering the
286Emergencys pare wheel
Wheels and tires
Page 289 of 298

vehicle. The wheelrim could otherwise be
damaged.
!Do not operate the tire inflation compressor
for longer than eightm inutes atatime without
ab reak. It may otherwise overheat.
The tire inflation compressorc an be operated
again once it has cooled down.
XMount the collapsible spare wheelasd escri-
bed (Ypag e281).
The collapsible spare wheelm ust be mounted
before it is inflated.
XRemove the tire inflation compressorf rom
the stowage space under the trunk floor
(
Ypag e245).
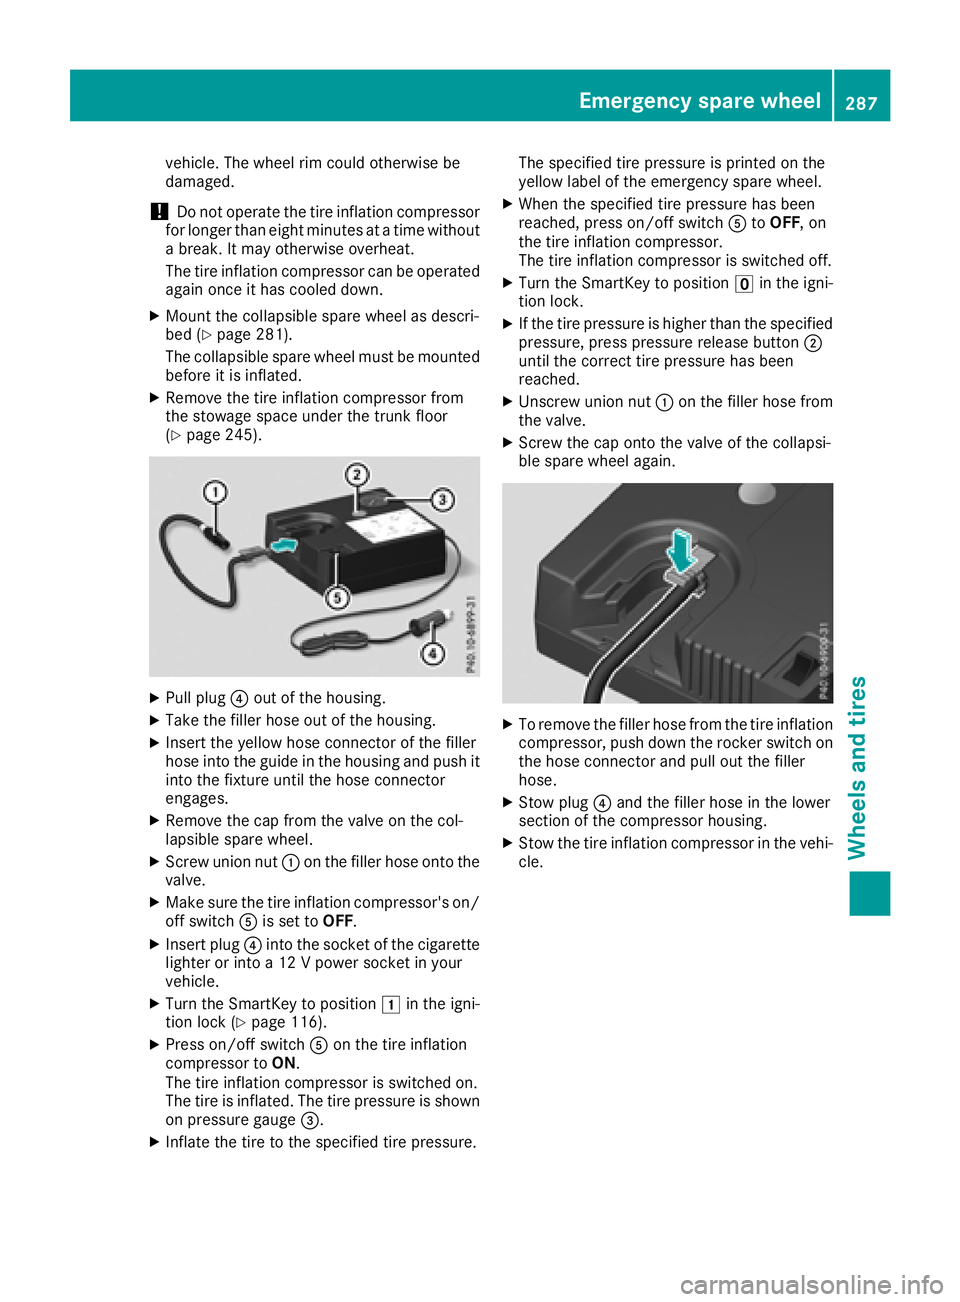
XPullplug ?out of the housing.
XTake the filler hose out of the housing.
XInsert the yellow hose connector of the filler
hose into the guide in the housing and push it
into the fixture until the hose connector
engages.
XRemove the cap from the valve on the col-
lapsibles pare wheel.
XScrew union nut :on the filler hose onto the
valve.
XMake sure the tire inflation compressor's on/
off switch Ais set to OFF.
XInsert plug ?into the socket of the cigarette
lighter or into a12Vpowers ocket in your
vehicle.
XTurn the SmartKey to position 1in the igni-
tion lock (Ypag e116).
XPress on/off switch Aon the tire inflation
compressort oON.
The tire inflation compressoriss witched on.
The tire is inflated. The tire pressure is shown
on pressure gauge =.
XInflate the tire to the specified tire pressure. The specified tire pressure is printed on the
yellow label of the emergency spare wheel.
XWhen the specified tire pressure has been
reached, press on/off switch
AtoOFF,o n
the tire inflation compressor.
The tire inflation compressoriss witched off.
XTurn the SmartKey to positionuin the igni-
tion lock.
XIf the tire pressure is highert han the specified
pressure, press pressure release button ;
until the correct tire pressure has been
reached.
XUnscrew union nut :on the filler hose from
the valve.
XScrew the cap onto the valve of the collapsi-
ble spare wheela gain.
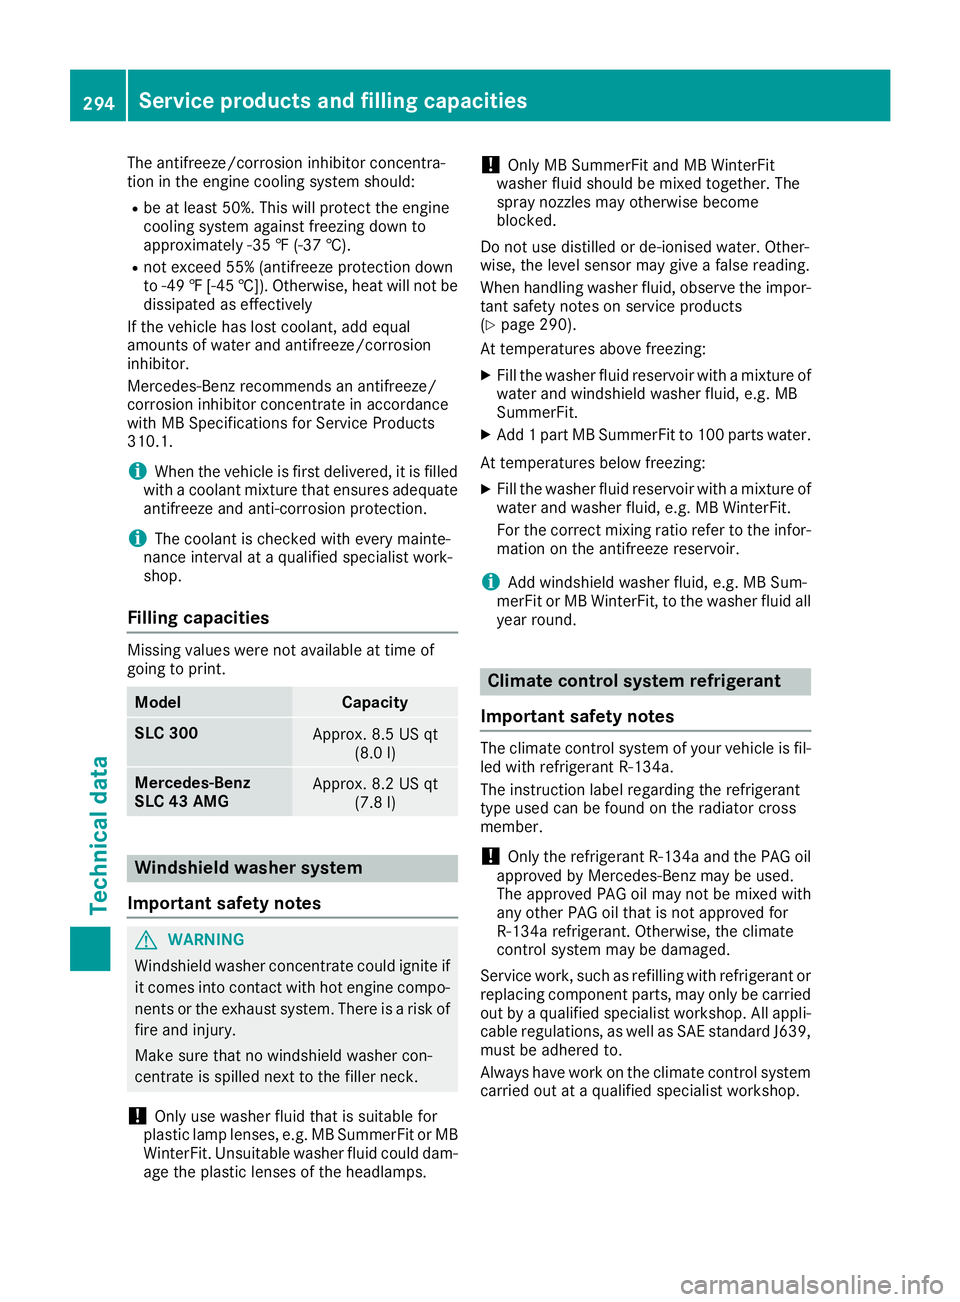
XTo remove the filler hose from the tire inflation
compressor, push down the rocker switch on
the hose connector and pul lout the filler
hose.
XStow plug ?and the filler hose in the lower
section of the compressorh ousing.
XStow the tire inflation compressorint he vehi-
cle.
Emergency spare wheel287
Wheels and tires
Z
Page 296 of 298

The antifreeze/corrosion inhibitor concentra-
tion in the engine cooling system should:
Rbe at least 50%. This will protectthe engine
cooling system against freezin gdown to
approximately -35 ‡(-37 †).
Rnot exceed 55% (antifreez eprotection down
to -49 ‡[-45 †]). Otherwise, heat will not be
dissipated as effectively
If the vehicle has lost coolant, add equal
amounts of water and antifreeze/corrosion
inhibitor.
Mercedes-Benz recommends an antifreeze/
corrosion inhibitor concentrate in accordance
with MB Specifications for ServiceP roducts
310.1.
iWhen the vehicle is first delivered, it is filled
with acoolant mixture that ensures adequate
antifreeze and anti-corrosion protection.
iThe coolant is checked with every mainte-
nancei nterval at aqualified specialist work-
shop.
Fillingc apacities
Missing values were not availableatt ime of
going to print.
ModelCapacity
SLC 300Approx.8 .5 US qt
(8.0 l)
Mercedes ‑Benz
SLC 43 AMGApprox.8 .2 US qt
(7.8 l)
Windshield washer system
Important safety notes
GWARNING
Windshield washer concentrate could ignite if it comes into contact with hot engine compo-
nentsort he exhaust system. There is arisk of
fire and injury.
Make sure that no windshield washer con-
centrate is spilled next to the filler neck.
!Only use washer fluid that is suitable for
plastic lamp lenses, e.g. MB SummerFit or MB WinterFit. Unsuitable washer fluid could dam-
age the plastic lenses of the headlamps.
!Only MB SummerFit and MB WinterFit
washer fluid should be mixed together. The
spray nozzles may otherwise become
blocked.
Do not use distilled or de-ionised water. Other-
wise, the level sensor may give afalse reading.
When handling washer fluid, observe the impor-
tant safety notes on service products
(
Ypage 290).
At temperatures above freezing:
XFill the washer fluid reservoir with amixture of
water and windshield washer fluid, e.g. MB
SummerFit.
XAdd 1part MB SummerFit to 100 parts water.
At temperatures below freezing:
XFill the washer fluid reservoir with amixture of
water and washer fluid, e.g. MB WinterFit.
For the correctm ixing ratio refer to the infor-
mation on the antifreeze reservoir.
iAdd windshield washer fluid, e.g. MB Sum-
merFit or MB WinterFit, to the washer fluid all
year round.
Climate control system refrigerant
Important safety notes
The climate control system of your vehicle is fil-
led with refrigerant R‑ 134a.
The instruction label regarding the refrigerant
type used can be found on the radiator cross
member.
!Only the refrigerant R‑134a and the PAG oil
approved by Mercedes-Benz may be used.
The approved PAG oil may not be mixed with
any other PAG oil that is not approved for
R-134a refrigerant.O therwise, the climate
control system may be damaged.
Servicew ork, such as refilling with refrigerant or
replacing component parts, may only be carried
out by aqualified specialist workshop. All appli-
cable regulations, as well as SAE standard J639,
must be adhered to.
Always have work on the climate control system
carried out at aqualified specialist workshop.
294Service products and filling capacities
Technical data