2018 MERCEDES-BENZ SLC ROADSTER lock
[x] Cancel search: lockPage 204 of 298
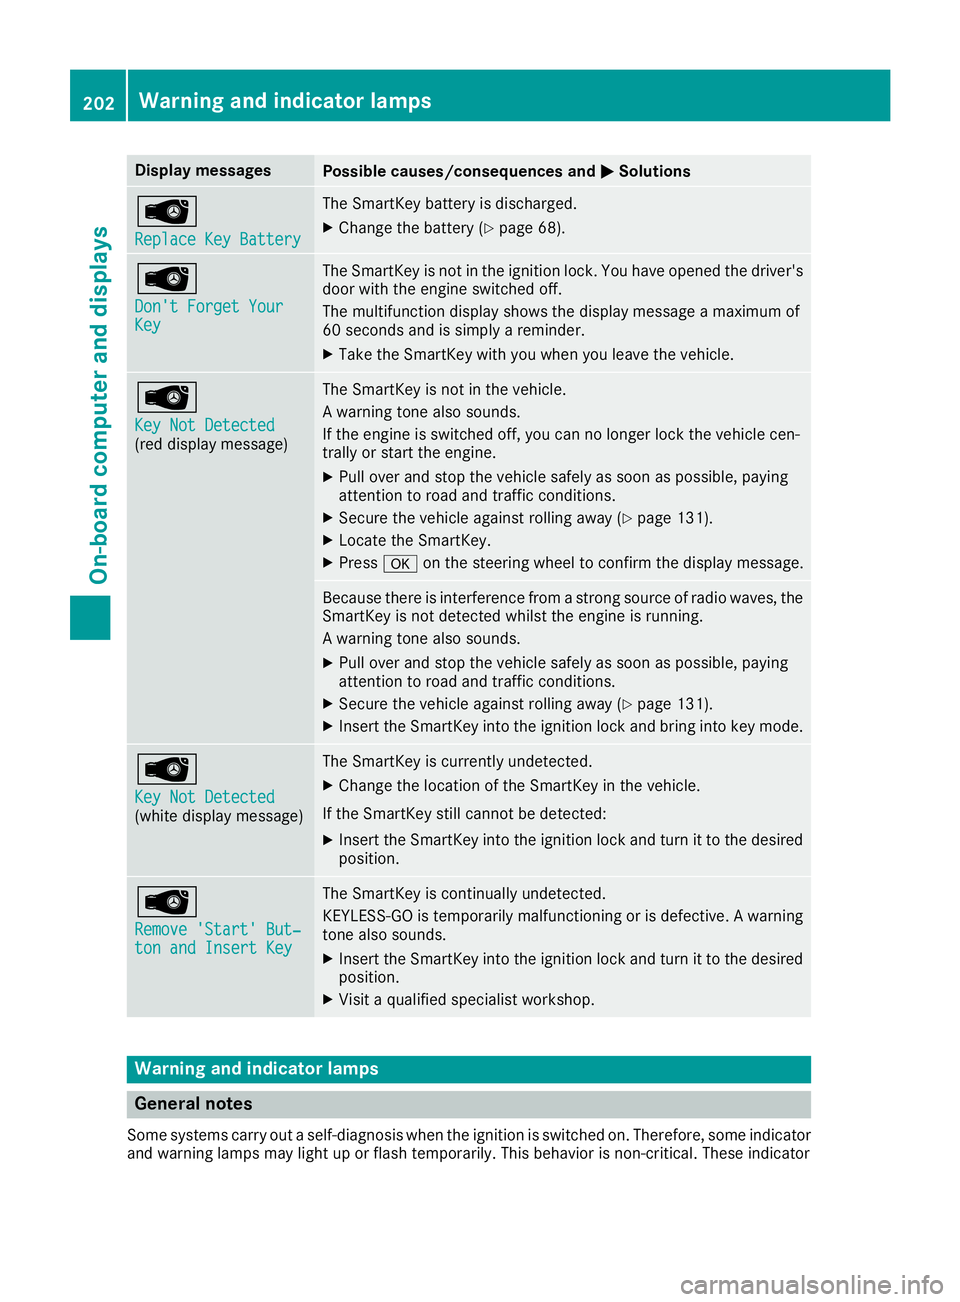
Display messagesPossible causes/consequences andMSolutions
Â
ReplaceKey Batter y
The SmartKey battery is discharged.
XChange thebattery (Ypage 68) .
Â
Don't Forget You rKey
The SmartKey is notintheignition lock. You hav eopened th edriver's
door wit hthe engin eswitched off .
The multifunction display shows th edisplay message amaximum of
60 seconds and is simply areminder.
XTak ethe SmartKey wit hyou when you leav ethe vehicle.
Â
Key Not Detected(redd isplay message )
The SmartKey is no tinthevehicle.
Aw arning tone also sounds.
If th eengineiss witched off ,you can no longer loc kthe vehicl ecen-
trally or start th eengine.
XPull ove rand stop th evehicl esafely as soo naspossible, payin g
attention to roa dand traffic conditions.
XSecur ethe vehicl eagainst rollin gaway (Ypage 131).
XLocate th eSmartKey.
XPress aon thesteering whee ltoc onfir mthedisplay message .
Becausethe re is interferenc efromas tron gs ource of radi owaves, th e
SmartKey is no tdetecte dwhilstthe engin eisrunning.
Aw arning tone also sounds.
XPull ove rand stop th evehicl esafely as soo naspossible, payin g
attention to roa dand traffic conditions.
XSecur ethe vehicl eagainst rollin gaway (Ypage 131).
XInser tthe SmartKey int othe ignition loc kand bring int okeymode.
Â
Key Not Detected(whit edisplay message )
The SmartKey is currentl yundetected.
XChange th elocation of th eSmartKey in th evehicle.
If th eSmartKey still canno tbedetected:
XInsertthe SmartKey int othe ignition loc kand tur nittot hedesire d
position .
Â
Remove 'Start 'But‐ton and Insert Key
The SmartKey is continually undetected.
KEYLESS-GO is temporarily malfunctioning or is defective. Awarning
tone also sounds.
XInser tthe SmartKey int othe ignition loc kand tur nittot hedesire d
position .
XVisitaqualified specialist workshop .
Warning and indicat orlamps
Gene raln otes
Some systems carry out aself-diagnosis when th eignition is switched on .Therefore ,som eindicator
and warning lamp smay ligh tuporf lashtem porarily. This behavio risnon-criti cal.These indicator
202Warning andi ndicator lamps
On-board computera nd displays
Page 206 of 298
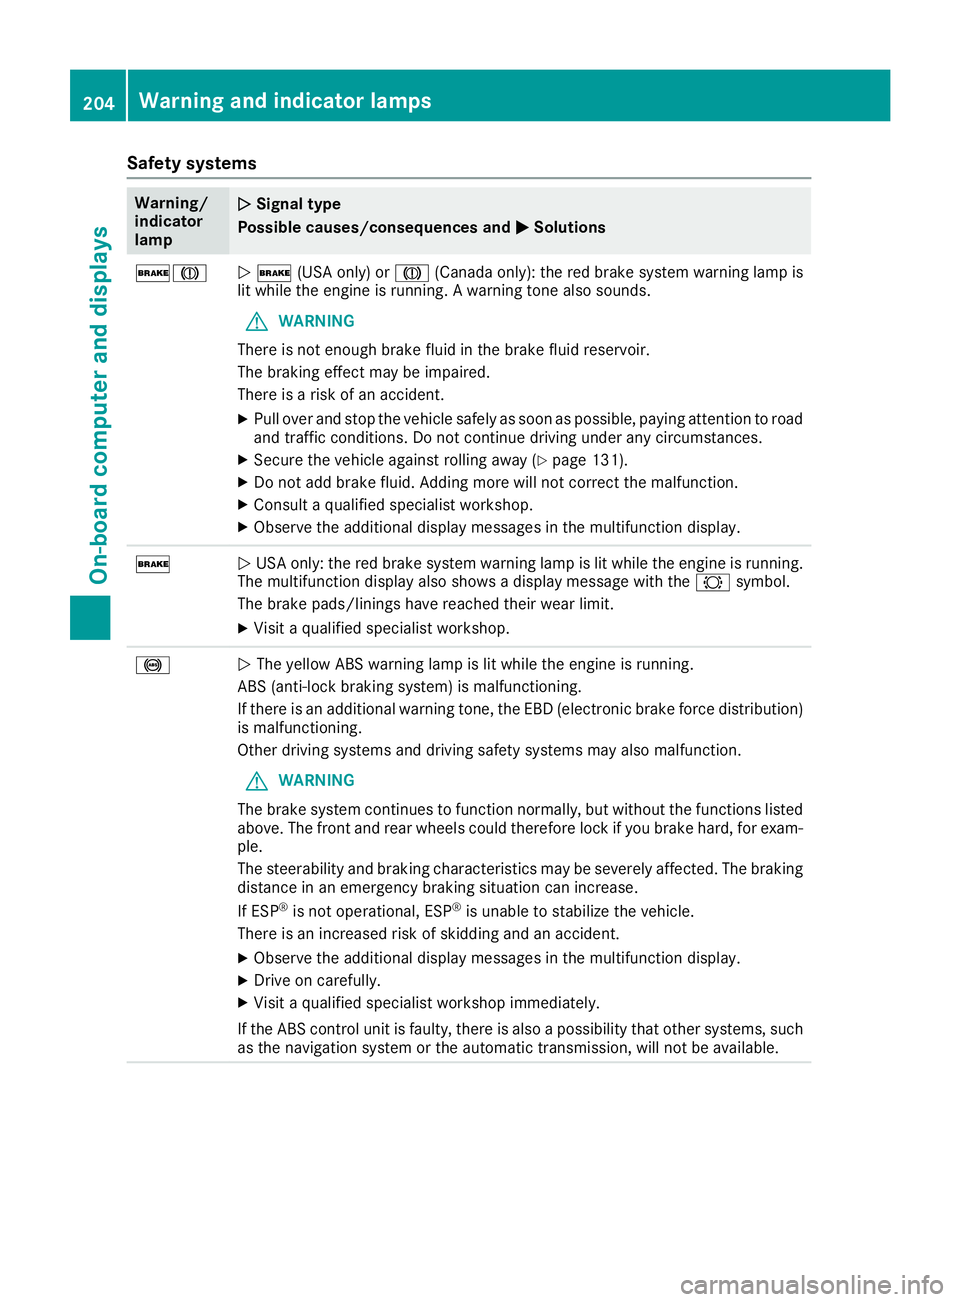
Safety systems
Warning/
indicator
lampNSignal type
Possible causes/consequences and M
Solutions
$JN$ (USA only) or J(Canada only): the red brake system warning lamp is
lit while the engine is running. Awarning tone also sounds.
GWARNING
There is not enough brake fluid in the brake fluid reservoir.
The braking effect may be impaired.
There is arisk of an accident.
XPull over and stop the vehicle safely as soon as possible, paying attention to road
and traffic conditions. Do not continue driving under any circumstances.
XSecure the vehicle against rolling away (Ypage 131).
XDo not add brake fluid. Adding more will not correct the malfunction.
XConsult aqualified specialist workshop.
XObserve the additional display messages in the multifunction display.
$NUSA only: the red brake system warning lamp is lit while the engine is running.
The multifunction display also shows adisplay message with the #symbol.
The brake pads/linings have reached their wear limit.
XVisit aqualified specialist workshop.
!NThe yellow ABS warning lamp is lit while the engine is running.
ABS (anti-lock braking system) is malfunctioning.
If there is an additional warning tone, the EBD (electronic brake force distribution)
is malfunctioning.
Other driving systems and driving safety systems may also malfunction.
GWARNING
The brake system continues to function normally, but without the functions listed
above. The front and rear wheels could therefore lock if you brake hard, for exam-
ple.
The steerability and braking characteristics may be severely affected. The braking
distance in an emergency braking situation can increase.
If ESP
®is not operational, ESP®is unable to stabilize the vehicle.
There is an increased risk of skidding and an accident.
XObserve the additional display messages in the multifunction display.
XDrive on carefully.
XVisit aqualified specialist workshop immediately.
If the ABS control unit is faulty, there is also apossibility that other systems, such
as the navigation system or the automatic transmission, will not be available.
204Warning and indicator lamps
On-board computer and displays
Page 207 of 298
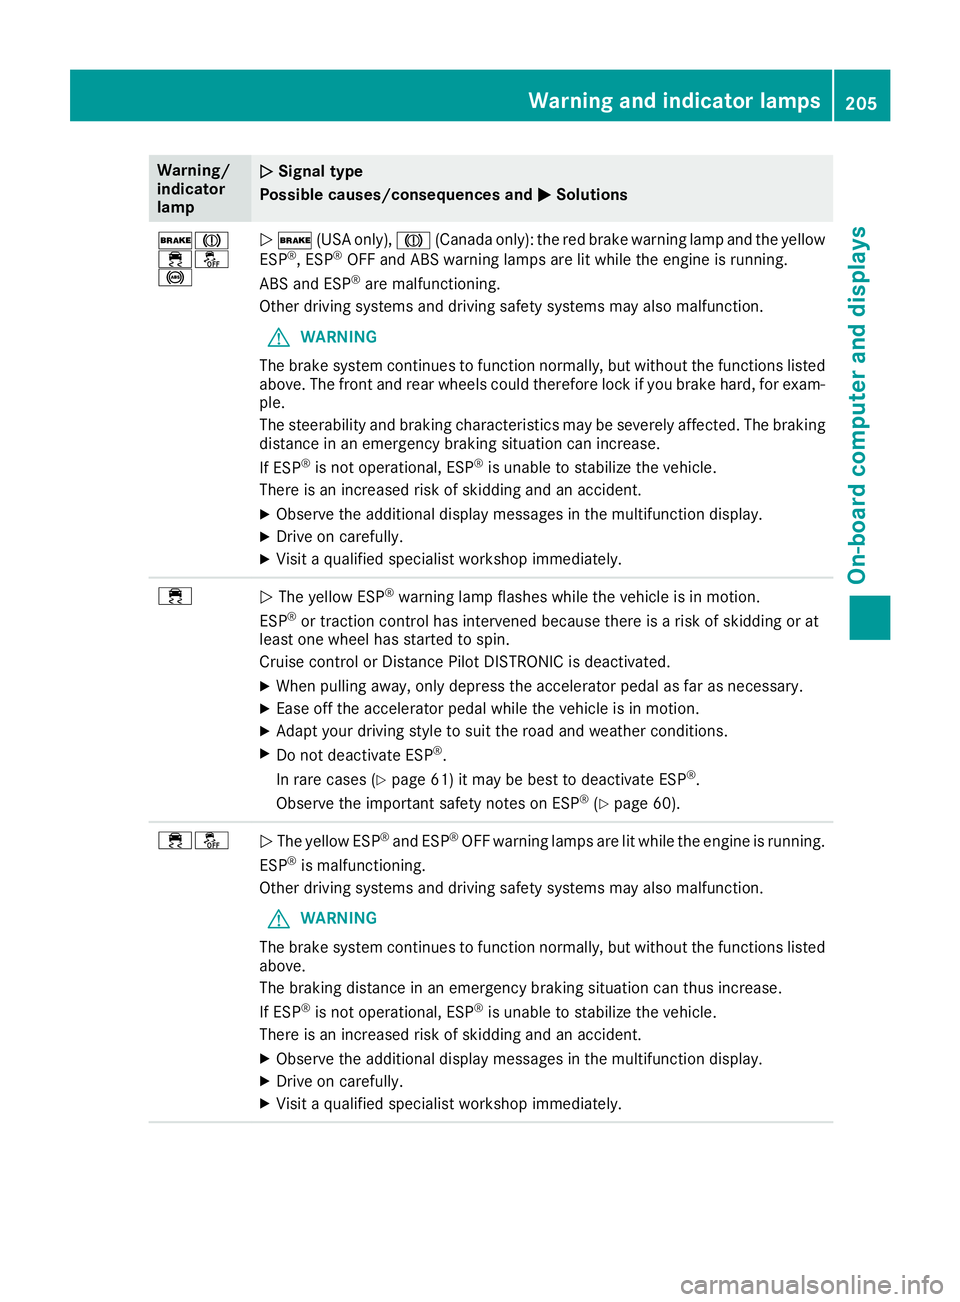
Warning/
indicator
lampNSignal type
Possiblec auses/consequences and M
Solutions
$J
֌
!N$ (USA only), J(Canada only): the red brake warning lamp and the yellow
ESP®,E SP®OFF and ABS warning lamp sare lit while the engine is running.
ABS and ESP®are malfunctioning.
Other driving systems and driving safety systems may als omalfunction.
GWARNING
The brake system continues to function normally, but without the functions listed
above. The front and rear wheels coul dtherefore lock if you brake hard ,for exam-
ple.
The steerability and braking characteristics may be severely affected. The braking
distance in an emergency braking situation can increase.
If ESP
®is not operational ,ESP®is unable to stabilize the vehicle.
There is an increased risk of skidding and an accident.
XObserve the additionald isplay messages in the multifunction display.
XDrive on carefully.
XVisitaqualified specialist workshopi mmediately.
÷NThe yellow ESP®warning lamp flashes while the vehicleisinm otion.
ESP®or traction control has intervened because there is arisk of skidding or at
least one wheelh as started to spin.
Cruise control or Distance Pilot DISTRONIC is deactivated.
XWhen pulling away, only depress the accelerator pedalasf ar as necessary.
XEase off the accelerator pedalwhile the vehicleisinmotion.
XAdapt yourdriving style to sui tthe road and weather conditions.
XDo not deactivate ESP®.
In rare cases (
Ypage6 1) it may be best to deactivate ESP®.
Observe the important safety notes on ESP®(Ypag e60).
÷åNThe yellow ESP®and ESP®OFF warning lamp sare lit while the engine is running.
ESP®is malfunctioning.
Other driving systems and driving safety systems may als omalfunction.
GWARNING
The brake system continues to function normally, but without the functions listed
above.
The braking distance in an emergency braking situation can thus increase.
If ESP
®is not operational ,ESP®is unable to stabilize the vehicle.
There is an increased risk of skidding and an accident.
XObserve the additiona ldisplay messages in the multifunction display.
XDrive on carefully.
XVisitaq ualified specialist workshopi mmediately.
Warning and indicator lamps205
On-board computer and displays
Z
Page 210 of 298
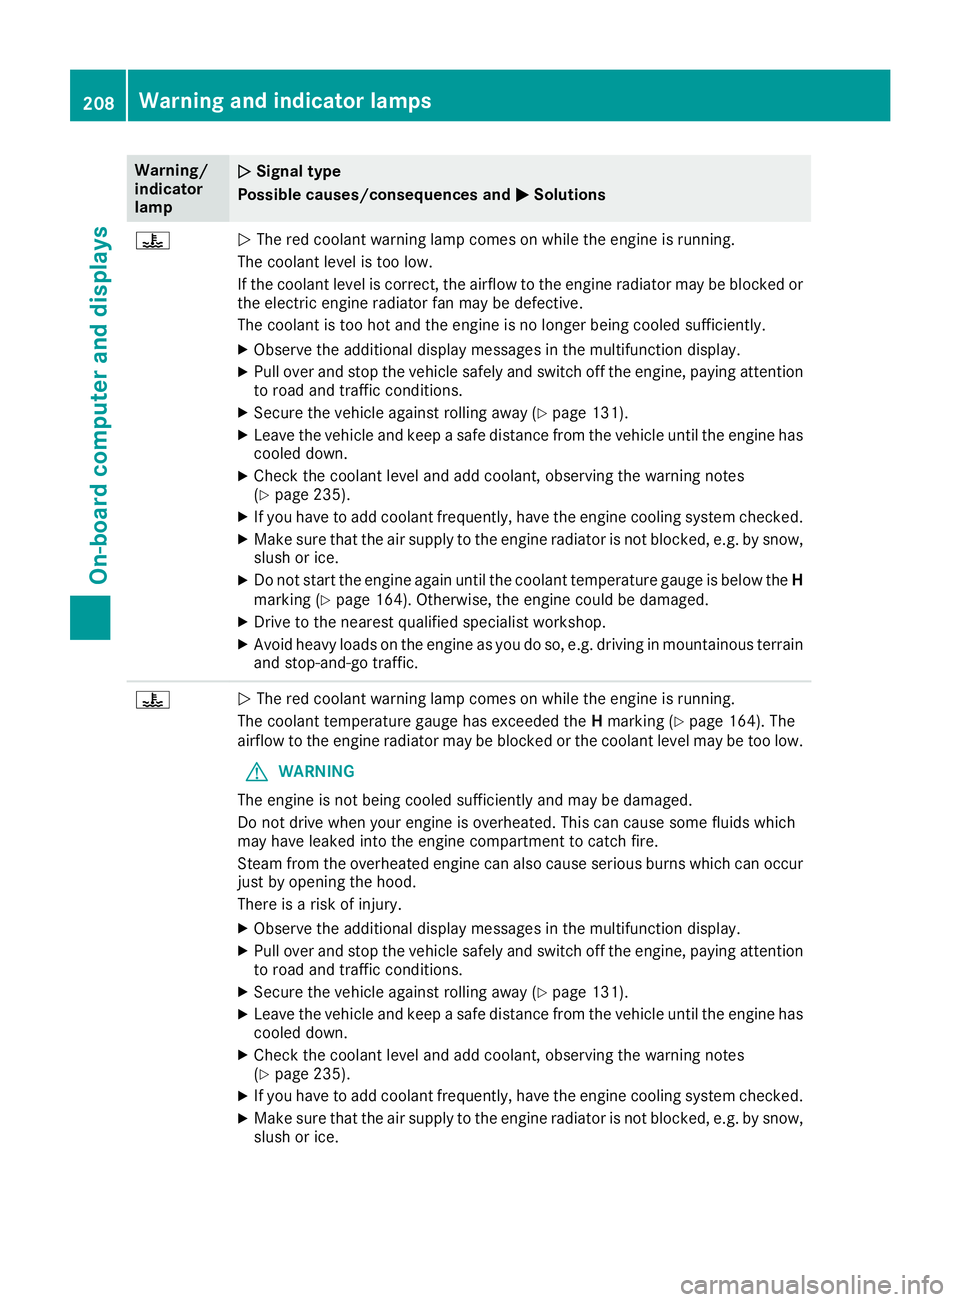
Warning/
indicator
lampNSignal type
Possiblec auses/consequences and M
Solutions
?NThe red coolant warning lamp comes on while the engine is running.
The coolant levelist oo low.
If the coolant levelisc orrect, the airflow to the engine radiator may be blocked or
the electric engine radiator fan may be defective.
The coolant is too hot and the engine is no longer being cooleds ufficiently.
XObserve the additionaldisplay messages in the multifunction display.
XPullover and stop the vehicles afelyand switch off the engine, paying attention
to road and traffic conditions.
XSecure the vehiclea gainst rolling away(Ypage131).
XLeave the vehiclea nd keepasafe distance from the vehicleu ntil the engine has
cooledd own.
XCheck the coolant levela nd add coolant, observing the warning notes
(Ypage2 35).
XIf you have to add coolant frequently, have the engine cooling system checked.
XMake sure that the air supply to the engine radiator is not blocked,e .g. by snow,
slush or ice.
XDo not start the engine again until the coolant temperature gauge is below the H
marking (Ypage1 64). Otherwise, the engine coul dbedamaged.
XDrive to the neares tqualified specialist workshop.
XAvoid heavy loads on the engine as you do so, e.g. driving in mountainous terrain
and stop-and-go traffic.
?N The red coolant warning lamp comes on while the engine is running.
The coolant temperature gauge has exceededt heHmarking (
Ypage1 64).The
airflow to the engine radiator may be blocked or the coolant levelm ay be too low.
GWARNING
The engine is not being cooleds ufficiently and may be damaged.
Do not drive when you rengine is overheated. This can caus esome fluids which
may have leaked into the engine compartment to catch fire.
Steam from the overheated engine can als ocaus eserious burns which can occur
just by opening the hood.
There is arisk of injury.
XObserve the additiona ldisplay messages in the multifunction display.
XPul lover and stop the vehicles afelyand switch off the engine, paying attention
to road and traffic conditions.
XSecure the vehiclea gainst rolling away(Ypage131).
XLeave the vehiclea nd keepasafe distance from the vehicleu ntil the engine has
cooledd own.
XCheck the coolant levela nd add coolant, observing the warning notes
(Ypage2 35).
XIf you have to add coolant frequently, have the engine cooling system checked.
XMake sure that the air supply to the engine radiator is not blocked,e .g. by snow,
slush or ice.
208Warning and indicator lamps
On-board computer and displays
Page 221 of 298
Stowage areas
Stowage spaces
Important safety notes
GWARNING
If object sinthe passenger compartmenta re
stowed incorrectly, they can slide or be
thrown around and hit vehicle occupants. In
addition, cup holders, open stowage spaces
and mobile phone brackets cannot always
retain all object sthey contain. There is arisk
of injury, particularly in the event of sudden
braking or asudden change in direction.
RAlways stow object ssothat they cannot be
thrown around in such situations.
RAlways make sure that object sdonot pro-
trude from stowage spaces, parcel nets or
stowage nets.
RClose the lockable stowage spaces before
startin gajourney.
RAlways stow and secure heavy, hard, poin-
ted, sharp-edged, fragile or bulky object sin
the trunk.
Glove box
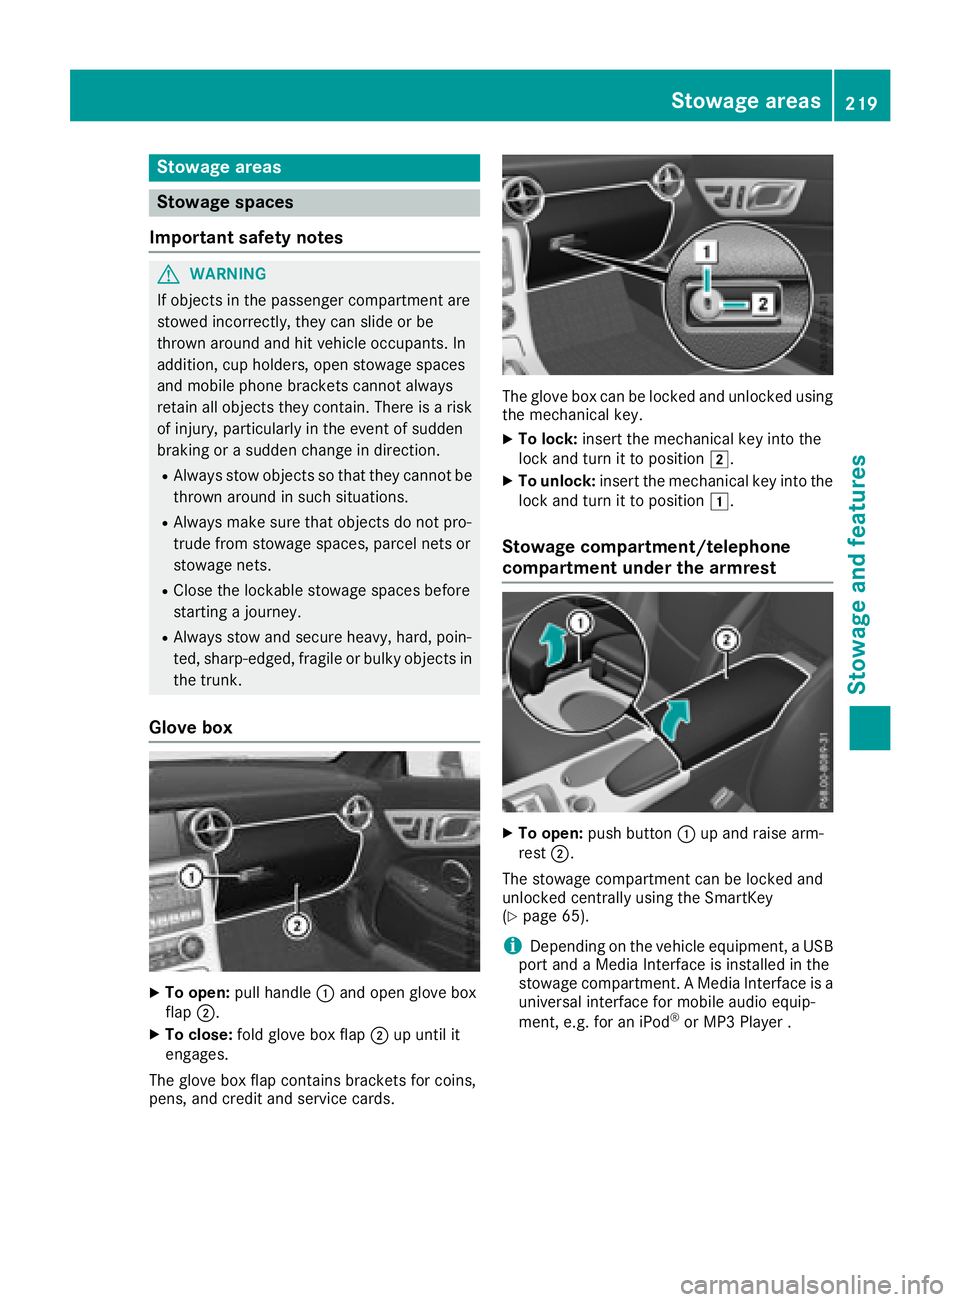
XTo open: pull handle :and open glove box
flap ;.
XTo close: fold glove box flap ;up until it
engages.
The glove box flap contains brackets for coins,
pens, and credit and service cards.
The glove box can be locked and unlocked using
the mechanical key.
XTo lock: insert the mechanical key into the
lock and turn it to position 2.
XTo unlock:insert the mechanical key into the
lock and turn it to position 1.
Stowage compartment/telephone
compartment under the armrest
XTo open:push button :up and raise arm-
rest ;.
The stowage compartmentc an be locked and
unlocked centrally using the SmartKey
(
Ypage 65).
iDepending on the vehicle equipment, aUSB
port and aMedia Interface is installed in the
stowage compartment. AMedia Interface is a
universal interface for mobile audio equip-
ment,e .g. for an iPod
®or MP3 Player.
Stowage areas219
Stowage and features
Z
Page 223 of 298
Reversible floor panelinthe trunk
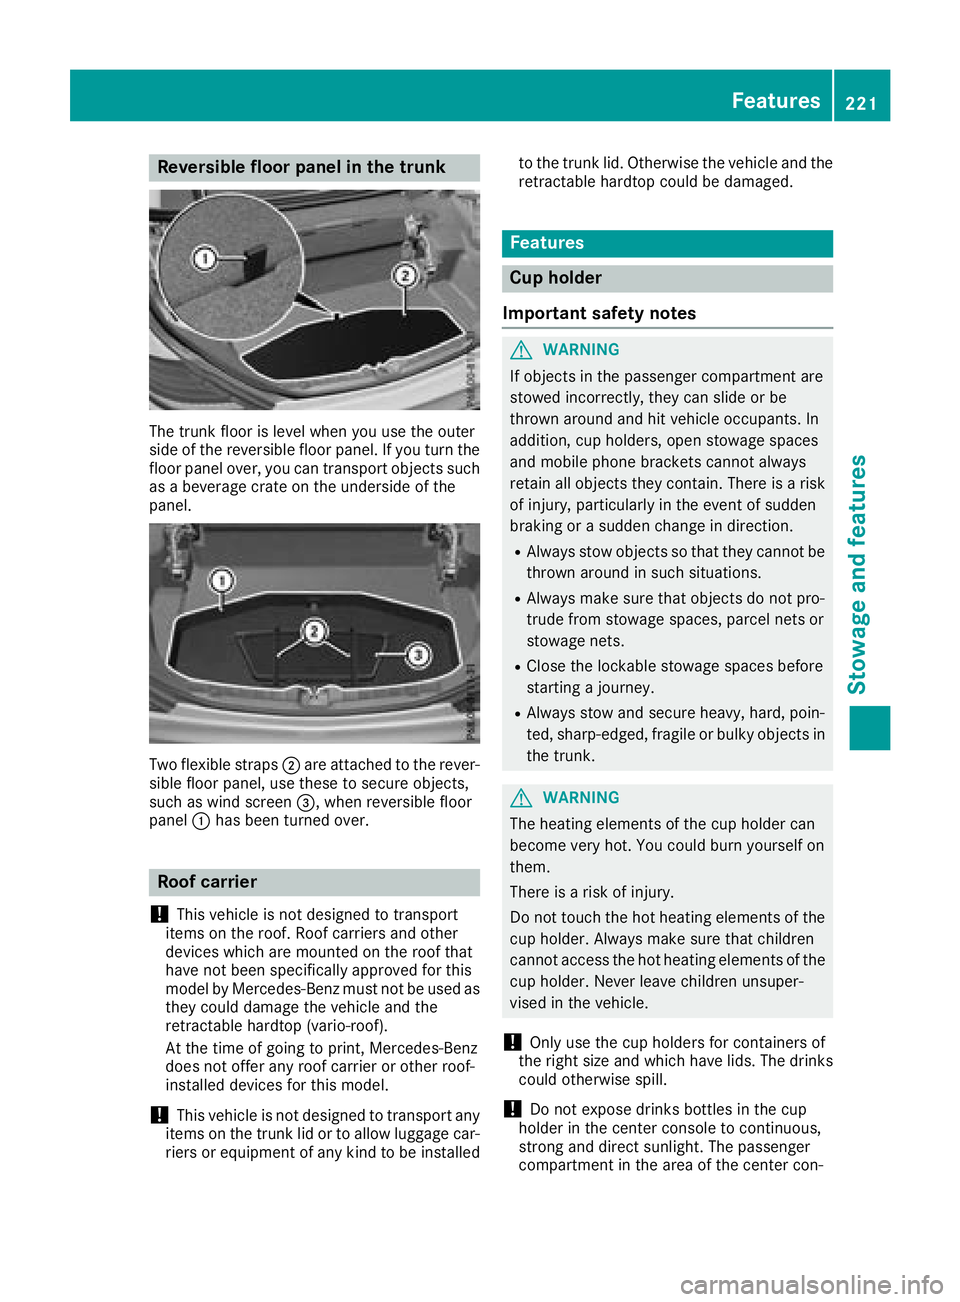
The trunk floor is level when yo uusethe outer
sid eoft he reversibl efloor panel.Ify outurn the
floor panel over, yo ucan transpor tobjects such
as ab everage crate on the undersid eofthe
panel.
Twof lexible straps ;are attached to the rever-
sible floor panel,u sethesetos ecure objects,
such as wind screen =,whenr eversibl efloor
panel :hasb eent urne dover.
Roo fcarrier
!
Thisv ehicleisn ot designed to transport
item sont he roof. Roof carriers and other
device swhich are mounted on the rooft hat
have not bee nspecifically approved for this
model by Mercedes-Benz mus tnot be used as
they could damag ethe vehicl eand the
retractable hardto p(vario-roof).
At the time of going to print, Mercedes-Benz
doe snot offera ny roofcarrieroro therr oof-
installed device sfor this model.
!Thisv ehicleisn ot designed to transpor tany
item sont he trunk li dortoallowluggage car-
riers or equipment of any kind to be installed to the trunk lid. Otherwise the vehicl
eand the
retractable hardto pcould be damaged.
Features
Cup holder
Important safety notes
GWARNING
If objects in the passenger compartment are
stowed incorrectly, they can slide or be
throwna round and hit vehicl eoccupants. In
addition, cup holders, ope nstowag espaces
and mobil ephone brackets canno talway s
retain al lobjects they contain. There is arisk
of injury, particularly in the event of sudden
braking or asudde nchange in direction.
RAlway sstow objects so that they canno tbe
throwna round in such situations.
RAlwaysmake sure that objects do not pro-
trud efrom stowag espaces, parcel nets or
stowag enets.
RClose the lockable stowag espaces before
starting ajourney.
RAlway sstow and secure heavy, hard, poin-
ted, sharp-edged, fragile or bulky objects in
the trunk.
GWARNING
The heating elements of the cup holder can
become very hot. Yo ucould burn yourselfo n
them.
There is ariskofi njury.
Do not touch the hot heating elements of the
cup holder .Alway smake sure that children
canno taccess the hot heating elements of the
cup holder .Neverl eave children unsuper-
vised in the vehicle.
!Only us ethe cup holder sfor containers of
the right size and which have lids. The drinks could otherwise spill.
!Do not expose drinks bottles in the cup
holder in the center console to continuous,
strong and direct sunlight. The passenger
compartment in the are aofthe center con-
Features221
Stowage and features
Z
Page 229 of 298
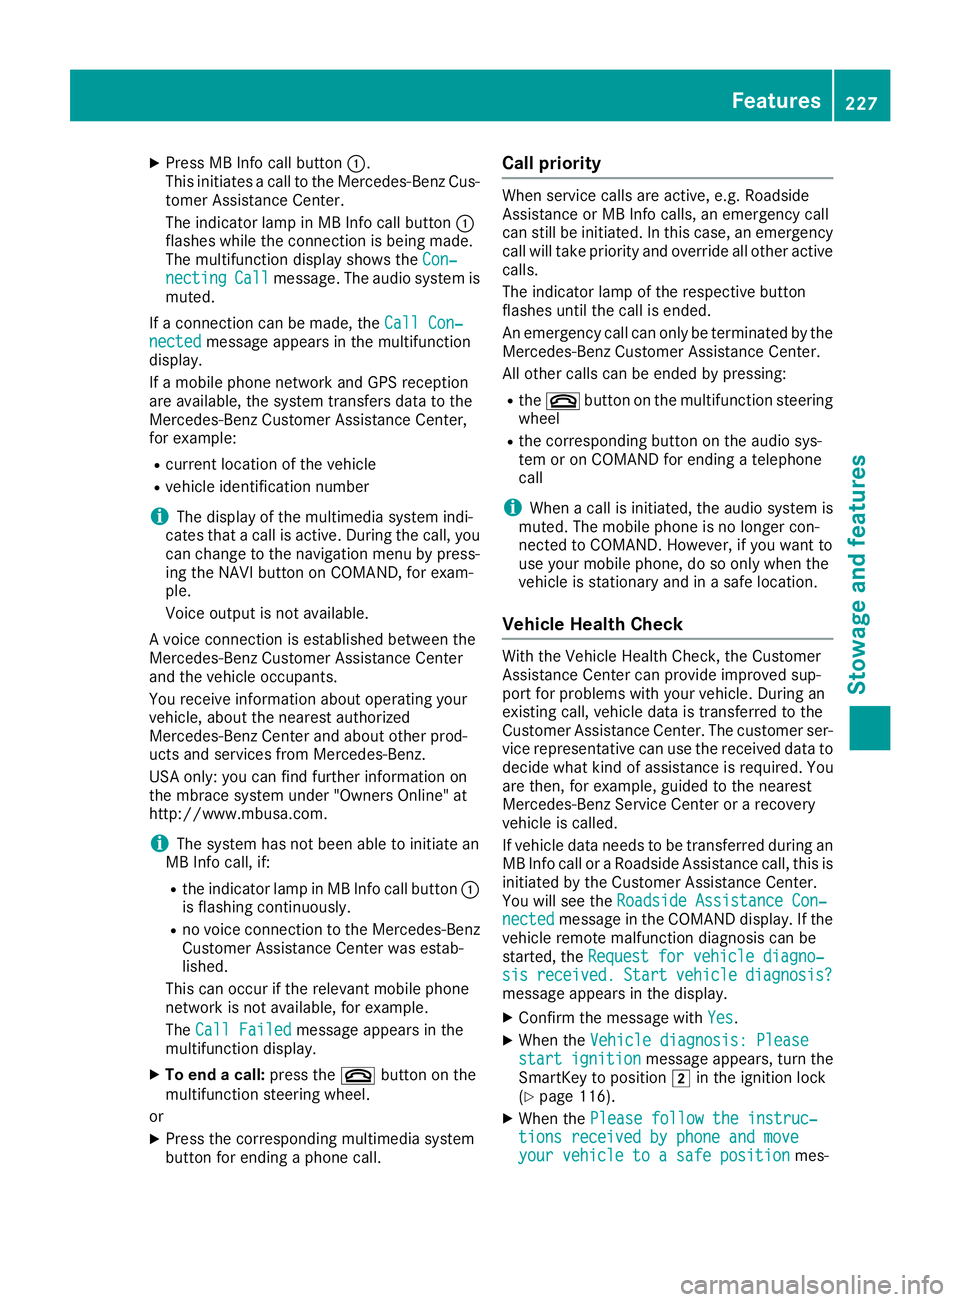
XPress MB Info call button:.
This initiates acall to the Mercedes-Benz Cus-
tomer Assistance Center.
The indicator lamp in MB Info call button :
flashes while the connection is being made.
The multifunction display shows the Con‐
nectingCallmessage. The audio system is
muted.
If ac onnection can be made, the Call Con‐
nectedmessage appears in the multifunction
display.
If am obile phone networ kand GPS reception
are available, the system transfers data to the
Mercedes-Benz Customer Assistance Center,
for example:
Rcurrentl ocation of the vehicle
Rvehicle identification number
iThe display of the multimedia system indi-
cates that acall is active. During the call, you
can change to the navigation menu by press-
ing the NAVI button on COMAND,f or exam-
ple.
Voice output is not available.
Av oice connection is established between the
Mercedes-Benz Customer Assistance Center
and the vehicle occupants.
You receive information about operating your
vehicle, about the nearest authorized
Mercedes-Benz Center and about other prod-
ucts and services from Mercedes-Benz.
USA only: you can find further information on
the mbrace system under "Owners Online" at
http://www.mbusa.com.
iThe system has not been able to initiate an
MB Info call, if:
Rthe indicator lamp in MB Info call button :
is flashing continuously.
Rno voice connection to the Mercedes-Benz
Customer Assistance Center was estab-
lished.
This can occur if the relevant mobile phone
networ kisnot available, for example.
The Call Failed
message appears in the
multifunction display.
XTo end acall: press the ~button on the
multifunction steerin gwheel.
or
XPress the corresponding multimedia system
button for ending aphone call.
Call priority
When service calls are active, e.g. Roadside
Assistance or MB Info calls, an emergencyc all
can still be initiated. In this case, an emergency
call will take priority and override all other active
calls.
The indicator lamp of the respective button
flashes until the call is ended.
An emergencyc all can only be terminated by the
Mercedes-Benz Customer Assistance Center.
All other calls can be ended by pressing:
Rthe ~ button on the multifunction steering
wheel
Rthe corresponding button on the audio sys-
tem or on COMAND for ending atelephone
call
iWhen acall is initiated, the audio system is
muted. The mobile phone is no longer con-
nected to COMAND.H owever, if you want to
use your mobile phone, do so only when the
vehicle is stationary and in asafe location.
Vehicle Health Check
With the Vehicle Health Check, the Customer
Assistance Center can provide improved sup-
port for problems with your vehicle. During an
existin gcall, vehicle data is transferred to the
Customer Assistance Center. The customer ser-
vice representative can use the received data to
decide what kind of assistanc eisrequired. You
are then ,for example, guided to the nearest
Mercedes-Benz ServiceC enter orarecovery
vehicle is called.
If vehicle data needs to be transferred during an
MB Info call or aRoadside Assistance call, this is
initiated by the Customer Assistance Center.
You will see the Roadside Assistance Con‐
nectedmessage in the COMAND display. If the
vehicle remotem alfunction diagnosis can be
started, the Request for vehicle diagno‐
sisreceived.Startvehiclediagnosis?message appears in the display.
XConfirm the message with Yes.
XWhen theVehicle diagnosis: Pleasestart ignitionmessage appears, turn the
SmartKey to position 2in the ignition lock
(
Ypage 116).
XWhen the Please follow the instruc‐tions received by phone and moveyour vehicle to asafe positionmes-
Features227
Stowage and features
Z
Page 231 of 298
Programming
Programming the buttons
Pay attention to the "Important safety notes"
(Ypage 228).
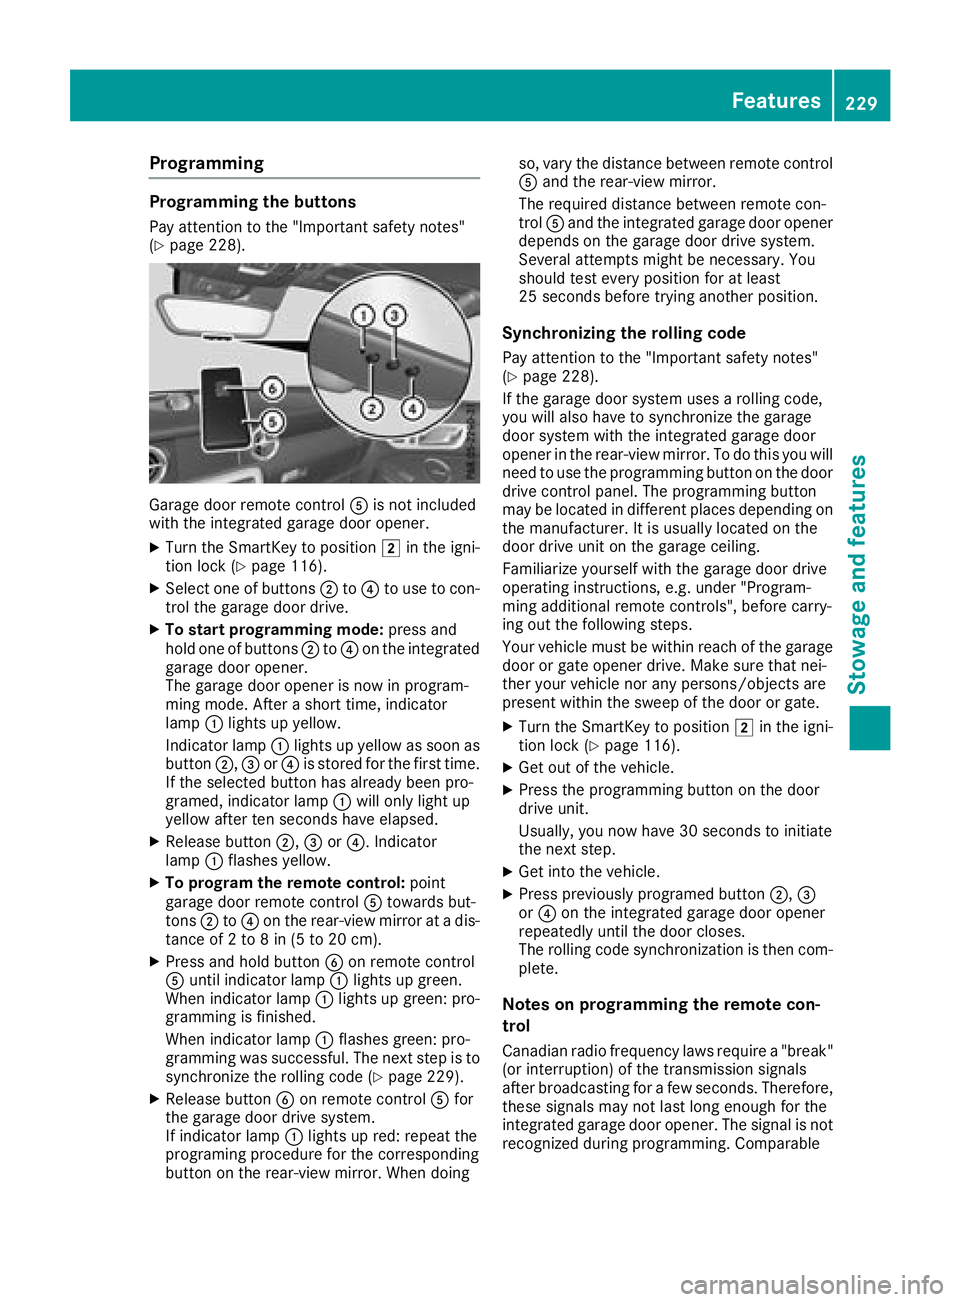
Garage door remote controlAis not included
with the integrated garage door opener.
XTurn the SmartKey to position 2in the igni-
tion lock (Ypage 116).
XSelect one of buttons ;to? to use to con-
trol the garage door drive.
XTo startp rogramming mode: press and
hold one of buttons ;to? on the integrated
garage door opener.
The garage door opener is now in program-
ming mode. After ashort time, indicator
lamp :lights up yellow.
Indicator lamp :lights up yellow as soon as
button ;,=or? is stored for the first time.
If the selected button has already been pro-
gramed, indicator lamp :will only light up
yellow after ten seconds have elapsed.
XRelease button ;,=or?.I ndicator
lamp :flashes yellow.
XTo programt he remote control: point
garage door remote control Atowards but-
tons ;to? on the rear-view mirror at adis-
tance of 2to8in(5to20c m).
XPress and hold button Bon remote control
A until indicator lamp :lights up green.
When indicator lamp :lights up green: pro-
gramming is finished.
When indicator lamp :flashes green: pro-
gramming was successful. The next step is to synchronize the rolling code (
Ypage 229).
XRelease button Bon remote control Afor
the garage door drive system.
If indicator lamp :lights up red: repeat the
programing procedure for the corresponding
button on the rear-view mirror. When doing so, vary the distance between remote control
A
and the rear-view mirror.
The required distance between remote con-
trol Aand the integrated garage door opener
depends on the garage door drive system.
Several attemptsm ight be necessary. You
should test every position for at least
25 seconds before trying another position.
Synchronizing the rolling code
Pay attention to the "Important safety notes"
(Ypage 228).
If the garage door system uses arolling code,
you will also have to synchronize the garage
door system with the integrated garage door
opener in the rear-view mirror. To do this you will
need to use the programming button on the door
drive control panel. The programming button
may be located in different places depending on
the manufact
urer. It is usually located on the
door drive unit on the garage ceiling.
Familiarize yourself with the garage door drive
operating instructions, e.g. under "Program-
ming additional remote controls", before carry-
ing out the following steps.
Your vehicle must be within reach of the garage
door or gate opener drive. Make sure that nei-
ther your vehicle nor any persons/objects are
present within the sweep of the door or gate.
XTurn the SmartKey to position 2in the igni-
tion lock (Ypage 116).
XGet out of the vehicle.
XPress the programming button on the door
drive unit.
Usually,y ou now have 30 seconds to initiate
the next step.
XGet into the vehicle.
XPress previously programed button ;,=
or ? on the integrated garage door opener
repeatedly until the door closes.
The rolling code synchronization is then com-
plete.
Notes on programming the remote con-
trol
Canadianr adio frequency laws require a"break"
(or interruption) of the transmission signals
after broadcasting for afew seconds. Therefore,
these signals may not last long enough for the
integrated garage door opener. The signal is not
recognized during programming. Comparable
Features229
Stowage and features
Z