2018 MERCEDES-BENZ SLC ROADSTER lock
[x] Cancel search: lockPage 232 of 298
with Canadian law, some U.S.garage door open-
ers also feature a"break".
Proceed as follows:
Rif you live in Canada.
Rif you have difficulties programming the
garage door opener (regardless of where you live) when following th eprogramming steps.
XPressa nd hold one of buttons ;to? on the
integrated garage door opener.
After ashortt ime, indicator lamp :lightsu p
yellow.
XRelease th ebutton.
Indicator lamp :flashes yellow.
XPressb uttonBof garage door remote con-
trol Afor two seconds, then releaseitf or two
seconds.
XPressb uttonBagain for two seconds.
XRepeat this sequence on button Bof remote
control Auntil indicator lamp :lightsu p
green.
When indicator lamp :lightsupg reen: pro-
grammingisf inished.
When indicator lamp :flashes green: pro-
grammingw as successful. The nex tstepist o
synchronize th erollin gcode.
XRelease button Bof remote control Aof the
garage door drive.
When indicator lamp :lightsupr ed: repeat
th ep rogramming process for th ecorrespond-
ing button on th erear-view mirror. When
doings o, vary th edistanc ebetween remote
control Aand th erear-view mirror.
The required distanc ebetween remote con-
trol Aand th eintegrated garage door opener
depends on th egarage door drives ystem.
Several attemptsm ightbenecessary. You
should tes teveryp osition for at least
25 second sbefore trying another position.
Problems when programming
If you are experiencin gproblems programming
t
h ei ntegrated garage door opener on th erear-
view mirror, tak enoteoft hefollowing instruc-
tions:
RCheck th etransmitter frequenc yused by
garage door driver emote controlAand
whether it is supported .The transmitter fre-
quenc ycan usually be foundont heback of
remote control Afor th egarage door drive.
The integrated garage door opener is com-
patible with devices that have unit swhich operate in th
efrequenc yrange of 28 0to
433M Hz.
RReplace th ebatteries in garage door remote
control A.This increasest helikelihood that
garage door remote control Awill transmit a
stronga nd precise signal to th eintegrated
garage door opener.
RWhen programming, hold remote control A
at varyingd istances and angle sfromb ut-
tons ;to? which you are programming. Try
various angle satadistancebetween 2and
8i nches (5t o20cm) or at th esame angle but
at varyingd istances.
RIfaf urther remote control Ais available for
th es ame garage door drive, repeat th esame
programming steps with this remote control
A.B efore performing these steps, makes ure
that new batteries have been installed in
garage door driver emote controlA.
RNotethatsome remote controls only transmit
for alimited amountoft ime( thei ndicator
lamp on th eremote control goes out) .Press
button Bon remote control Aagain before
transmission ends.
RAlig nthe antenn acable of th egarage door
opener un
it .T his can improve signal recep-
tion/transmission.
Opening/closing th egarage door
After it has been programmed, th eintegrated
garage door opener perform sthe function of the
garage door system remote control. Please also
read th eoperatin ginstructions for th egarage
door system.
XTurn th eSmartKey to position 2in th eigni-
tio nlock (Ypage 116).
XPresse ither button ;,=or? which you
have programmed to operate th egarage
door.
Garage door system with afixed code: indi-
cator lamp :lightsupg reen.
Garage door system with arollin gcode: indi-
cator lamp :flashes green.
The transmitter will transmit asignal as long
as th ebutton is pressed. The transmission is
halted after amaximum of ten second sand
indicator lamp :lightsupy ellow.
XPressbutton;,=or? again if necessary.
230Features
Stowage and features
Page 233 of 298
Clearing thememory
Makes ure that you clear th ememory of the
integrate dgarag edoor opener before sellingt he
vehicle.
XTurn th eSmartKey to position 2in th eigni-
tio nlock(Ypage 116).
XPress and hold buttons ;and ?.
The indicator lamp initially lightsupy ellow
and then green.
XRelease buttons ;and ?.
The memory of th eintegrate dgarag edoor
opener in th erear-view mirror is cleared.
Compass
Callin gupthe compass
Compass ;displays th ecompass direction in
whicht hevehicle is currently traveling: N,NE,E,
SE, S, SW,Wor NW.
To receive acorrec tdisplay in rear-view mir-
ror :,t hecompass must be calibrated and the
magnetic fiel dzones et.
Settin gthe compass
North Americ azonem ap
South Americ azonem ap
XSet your locatio nusingt hezone maps.
XPush aroun dpen int oopening =
(Ypage 231) for approximately three sec-
onds.
The zone currently selecte dappearsinc om-
pass display ;(
Ypage 231).
XTo select th ezone: push aroun dpen into
opening =(Ypage 231) until th edesired
zone is selected.
If,a fter afew seconds, th edisplay in compass
display ;(
Ypage 231) changes direction,
th ez oneh as been selected.
Features231
Stowage and features
Z
Page 234 of 298
Calibratingthe compass
XMakes ure that there is sufficient spacef or
you to driv einacircle without impedingt raf-
fic.
In order to calibrat ethe compass correctly, do
th ef ollowing:
Rcalibrat ethe compass in th eopen and no tin
th ev icinity of steel structures or high-voltage
transmission lines.
Rswitch off electrical consumers suchast he
climate control, windshield wipersorr ear win-
dow defroster.
Rclose all doorsa nd thetrunk lid.
XSwitch on th eignition.
XPush aroun dpen int oopening =
(Ypage 231) for approximately six seconds,
until symbol Cis shown in compass display ;
(Ypage 231).
XDrive your vehicle in afull circle at approx-
imately 3mph (5 km/h )to6mph (10 km/h).
When th ecalibration has successfully been
completed, th ecurren tdirection is shown in
compass display ;(
Ypage 231).
Floormats
GWARNING
Object sinthedriver'sf ootwell may restrict
th ec learance aroun dthe pedals or blocka
depressed pedal. This jeopardizes th eoper-
atin gand road safety of th evehicle .Thereisa
ris kofana ccident.
Stow all object ssecurely in th evehicle so that
they do no tget int othe driver'sf ootwell.
When usingf loormats or carpets, mak esure
that they are properl ysecured so that they do
no tslip or obstruc tthe pedals.Don otplace
several floormats or carpetsont opof one
another.
XSlid ethe seat back.
XTo install: placethefloormat in th efootwell.
XPress studs :onto retainers ;.
XTo remove:pull thefloormat off retainers ;.
XRemove thefloormat.
232Features
Stowage and features
Page 235 of 298
Engine compartment
Hood
Important safety notes
GWARNING
If th ehood is unlatched, it may open up when
th ev ehicle is in motion and blocky our view.
Thereisar isk of an accident.
Never unlatch th ehood while driving .Before
ever ytrip, ensure that th ehood is locked.
GWARNING
When opening and closingt hehood,itm ay
suddenly fall int othe closed position.T hereis
ar isk of injury to personsw ithin range of
movementoft hehood.
Open and close th ehood only when no onei s
within its range of movement.
GWARNING
Opening th ehood when th eengine is over-
heated or when there is afireint heengine
compartmen tcoul de xpose you to hot gases
or other servic eproducts. Thereisar isk of
injury.
Let an overheate dengine coo ldown before
opening th ehood.Ift here is afireint he
engine compartment, keep th ehood closed
and contac tthe fired epartment.
GWARNING
The engine compartmen tcontain smoving
components. Certain components, sucha s
th er adiator fan ,may continue to run or start
again suddenly when th eignition is off .There
is ar isk of injury.
If you nee dtodoany work inside th eengine
compartment:
Rswitch off th eignition
Rnever reac hintot he area wheret here is a
risk of danger from moving components,
suchast hefan rotatio narea
Rremove jewelry and watches
Rkeep items of clothing and hair, for exam-
ple, away from moving parts
Opening th ehood
GWARNING
Certain component sintheengine compart-
ment, suchast heengine ,radiator and parts
of th eexhaust system, can become ver yhot.
Workin gintheengine compartmen tposesa
risk of injury.
Wherep ossible, let th eengine coo ldown and
touch only th ecomponent sdescribe dinthe
following.
GWARNING
When th ehood is open and th ewindshield
wipersa re set in motion,y ou can be injured by
th ew iper linkage. Thereisar isk of injury.
Always switch off th ewindshield wipersa nd
th ei gnition before opening th ehood.
!Makes ure that th ewindshield wipersa re
no tfolded away from th ewindshield. You
coul dotherwise damag ethe windshield wip-
ers or th ehood.
XMakes ure that th ewindshield wipersa re
turned off.
XPull release lever :on th ehood.
The hood is released.
Engine compartment233
Maintenance and care
Z
Page 237 of 298
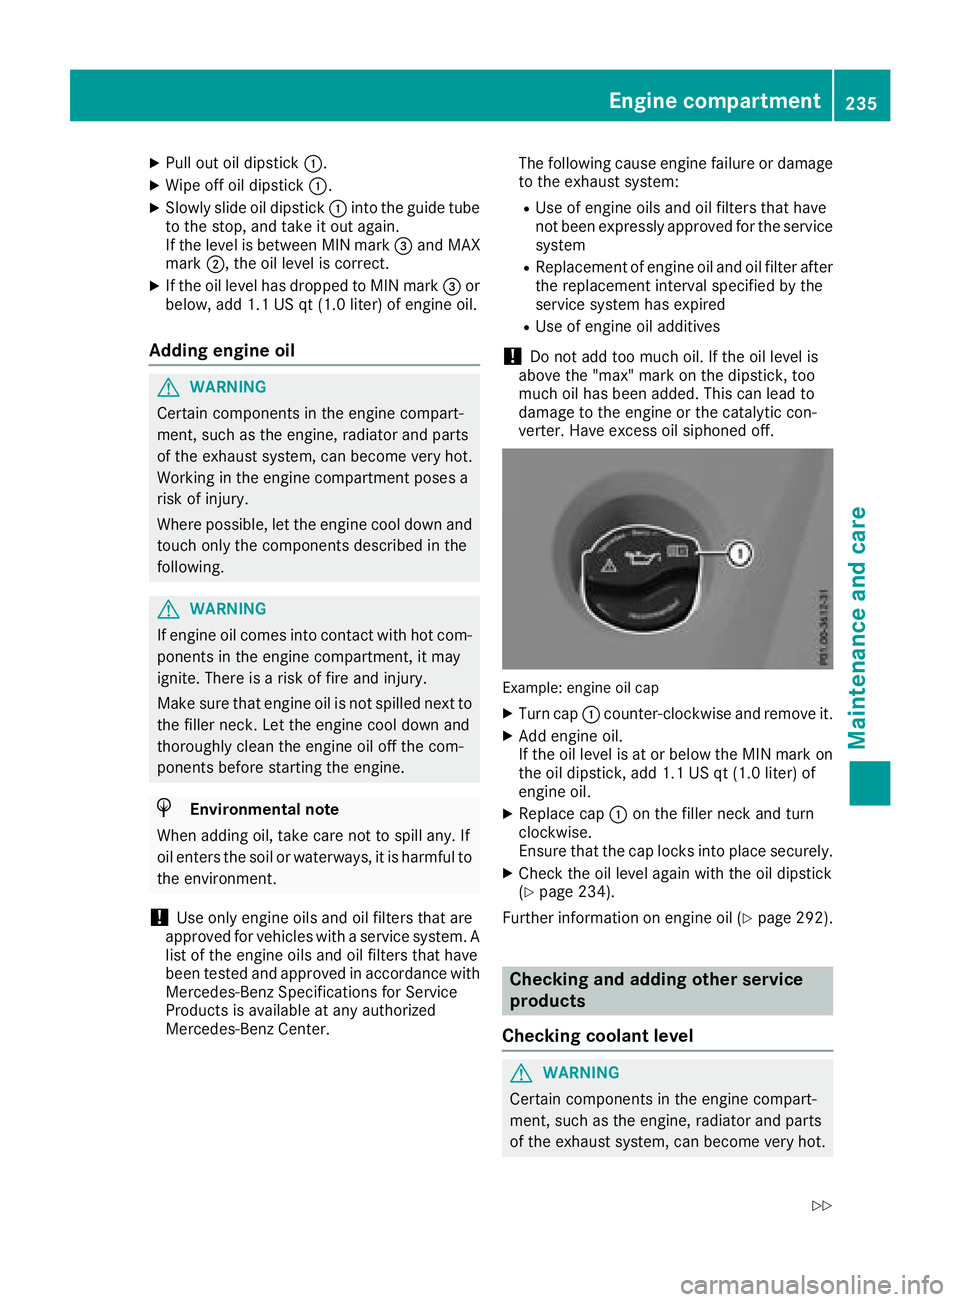
XPull out oil dipstick:.
XWipe off oil dipstick :.
XSlowly slide oil dipstick :into the guide tube
to the stop, and take it out again.
If the level is between MIN mark =and MAX
mark ;,the oil level is correct.
XIf the oil level has dropped to MIN mark =or
below, add 1.1 US qt (1.0 liter) of engine oil.
Adding engine oil
GWARNING
Certain components in the engine compart-
ment ,such as the engine, radiator and parts
of the exhaust system, can become very hot.
Workingint he engine compartment poses a
risk of injury.
Where possible, let the engine cool down and touch only the components described in the
following.
GWARNING
If engine oil comes into contact with hot com- ponentsint he engine compartment ,itmay
ignite. There is arisk of fire and injury.
Make sure that engine oil is not spilled next to
the filler neck.L et the engine cool down and
thoroughly clean the engine oil off the com-
ponentsb efore starting the engine.
HEnvironmenta lnote
When adding oil, take care not to spill any. If
oil enter sthe soil or waterways, it is harmful to
the environment.
!Use only engine oils and oil filters that are
approved for vehicles with aservice system. A
list of the engine oils and oil filters that have
been tested and approved in accordanc ewith
Mercedes-Benz Specifications for Service
Products is availableata ny authorized
Mercedes-Benz Center. The following cause engine failure or damage
to the exhaust system:
RUse of engine oils and oil filters that have
not been expressly approved for the service
system
RReplacement of engine oil and oil filter after
the replacement interval specified by the
service system has expired
RUse of engine oil additives
!Do not add too much oil. If the oil level is
above the "max" mark on the dipstick ,too
much oil has been added. This can lead to
damage to the engine or the catalytic con-
verter .Have excess oil siphoned off.
Example: engine oil cap
XTurn cap :counter-clockwise and remove it.
XAdd engine oil.
If the oil level is at or below the MIN mark on
the oil dipstick ,add 1.1 US qt (1.0 liter) of
engine oil.
XReplace cap :on the filler neck and turn
clockwise.
Ensure that the cap locks into place securely.
XCheck the oil level again with the oil dipstick
(Ypage 234).
Further information on engine oil (
Ypage 292).
Checking and adding other service
products
Checking coolant level
GWARNING
Certain components in the engine compart-
ment ,such as the engine, radiator and parts
of the exhaust system, can become very hot.
Engine compartment235
Maintenance and care
Z
Page 238 of 298
Workinginthe engine compartment poses a
risk of injury.
Where possible, let the engine cool down and touch only the componentsd escribed in the
following.
GWARNING
The cooling system is pressurized, particularly
when the motor is warm. If you open the cap,
you could be scalded if hot coolant sprays out.
There is arisk of injury.
Let the engine cool down before you open the
cap. Wear gloves and eye protection. Slowly
open the cap to relieve pressure.
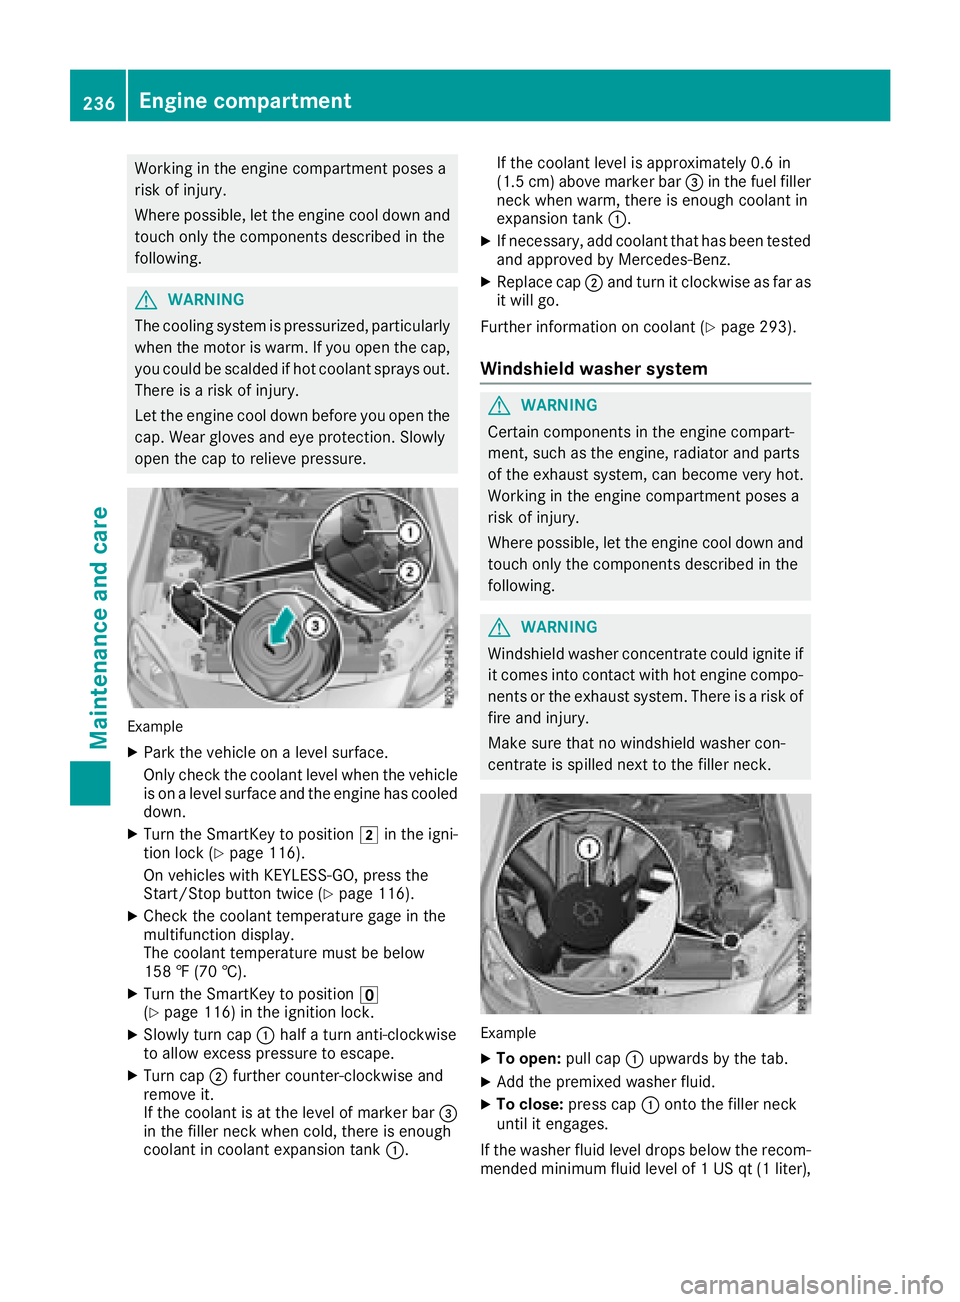
Example
XPark the vehicle on alevel surface.
Only check the coolant level when the vehicle
is on alevel surface and the engine has cooled
down.
XTurn the SmartKey to position 2in the igni-
tion lock (Ypage 116).
On vehicles with KEYLESS-GO, press the
Start/Stop button twice (
Ypage 116).
XCheck the coolant temperature gage in the
multifunction display.
The coolant temperature must be below
158 ‡(70 †).
XTurn the SmartKey to position u
(Ypage 116) in the ignition lock.
XSlowly turn cap :half aturn anti-clockwise
to allow excessp ressure to escape.
XTurn cap;further counter-clockwise and
remove it.
If the coolant is at the level of marker bar =
in the filler neck when cold, there is enough
coolant in coolant expansion tank :.If the coolant level is approximately 0.6 in
(1.5 cm
)above marker bar =in the fuel filler
neck when warm, there is enough coolant in
expansion tank :.
XIf necessary, add coolant that has been tested
and approved by Mercedes-Benz.
XReplace cap;and turn it clockwise as far as
it will go.
Further information on coolant (
Ypage 293).
Windshield washer system
GWARNING
Certain component sinthe engine compart-
ment,s uch as the engine, radiator and parts
of the exhaust system, can become very hot.
Workin ginthe engine compartment poses a
risk of injury.
Where possible, let the engine cool down and touch only the componentsd escribed in the
following.
GWARNING
Windshield washer concentrate could ignite if it comes into contact with hot engine compo-
nents or the exhaust system. There is arisk of
fire and injury.
Make sure that no windshield washer con-
centrate is spilled next to the filler neck.
Example
XTo open: pull cap:upwards by the tab.
XAdd the premixed washer fluid.
XTo close: press cap :ontothe filler neck
until it engages.
If the washer fluid level drops below the recom-
mended minimum fluid level of 1USqt(1l iter),
236Engine compartment
Maintenance and care
Page 241 of 298
!Lock the car if you wash it in an automatic
car wash. Otherwise, the vehicle might be
damaged.
!Never clean your vehicle in aTouchless
Automatic Car Wash as these use special
cleaning agents. These cleaning agents can
damage the paintwork or plastic parts.
If you have your vehicle cleaned in ahigh-
pressure automatic car wash, small amounts
of water may enter the vehicle.
!Make sure that the automatic transmission
is in position Nwhen washing your vehicle in
at ow-through car wash. The vehicle could be
damagedift he transmission is in another
position.
!Make sure that:
Rthe side windows and the roof are com-
pletely closed
Rthe climate control blower is switched off
Rthe windshieldw iper switch is at position 0
The vehicle could otherwise be damaged.
You can clean the vehicle at an automatic car
wash from the very start.
Preferably clean the vehicle at automatic car
washes that use textile washing elements with-
out brushes. This prevents fine scratches from
forming on the paintwork and film.
If the vehicle is very dirty, pre-wash it before
cleaning it in an automatic car wash.
After using an automatic car wash, wipe off wax
from the windshielda nd the wiper blades. This
will prevent smears and reduce wiping noises
caused by residue on the windshield.
iVehicles with decorative film: select awash
program without hot wax at the automatic car
wash.
Washing by hand
In some countries, washing by hand is only
allowed at speciallye quipped washing bays.
Observe the legal requirements in each country.
XDo not use hot water and do not wash the
vehicle in direct sunlight.
XUse asoft sponge to clean.
XUse amild cleaning agent, such as acar
shampoo approved by Mercedes-Benz.
XThoroughly hose down the vehicle with agen-
tle jet of water.
XDo not point the water jet directly towards the
air inlet or the edges of decorative foils.
XUse plenty of water and rinse out the sponge
frequently.
XRinse the vehicle with clean water and dry
thoroughly with achamois.
XDo not let the cleaning agent dry on the paint-
work or the decorative foils.
Carefully remove all deposits of road salt as
soon as possible when driving in winter.
Powerw ashers
GWARNING
The water jet from acircular jet nozzle (dirt
blasters) can cause invisible exterior damage
to the tires or chassis components. Compo-
nentsd amagedint his way may fail unexpect-
edly.T here is arisk of an accident.
Do not use power washers with circular jet
nozzles to clean the vehicle. Have damaged
tires or chassis componentsr eplaced imme-
diately.
!Vehicles with decorative foil: parts of your
vehicle are covered with decorative foil. Main-
tain adistance of at least 27.5 in (70 cm)
between the foil-wrappedp arts of the vehicle
and the nozzle of the high pressure cleaner.
Information aboutt he correct distance is
available from the equipment manufacturer.
Move the power washer nozzle around when
cleaning your vehicle.
The water temperature of the high-pressure
cleaner must not exceed 140 °F (60 °C).
!Alwaysm aintainadistance of at least
11.8 in (30 cm) between the vehicle and the
power washer nozzle. Information aboutt he
correct distance is available from the equip-
ment manufacturer.
Move the power washer nozzle around when
cleaning your vehicle.
Do not aim directly at any of the following:
Rtires
Rdoor gaps, roof gaps, joints, etc.
Relectrical components
Rbattery
Rplug-type couplings
Rlights
Care239
Maintenance and care
Z
Page 246 of 298
Where willIfind...?
Warning triangle
Removing the warning triangle
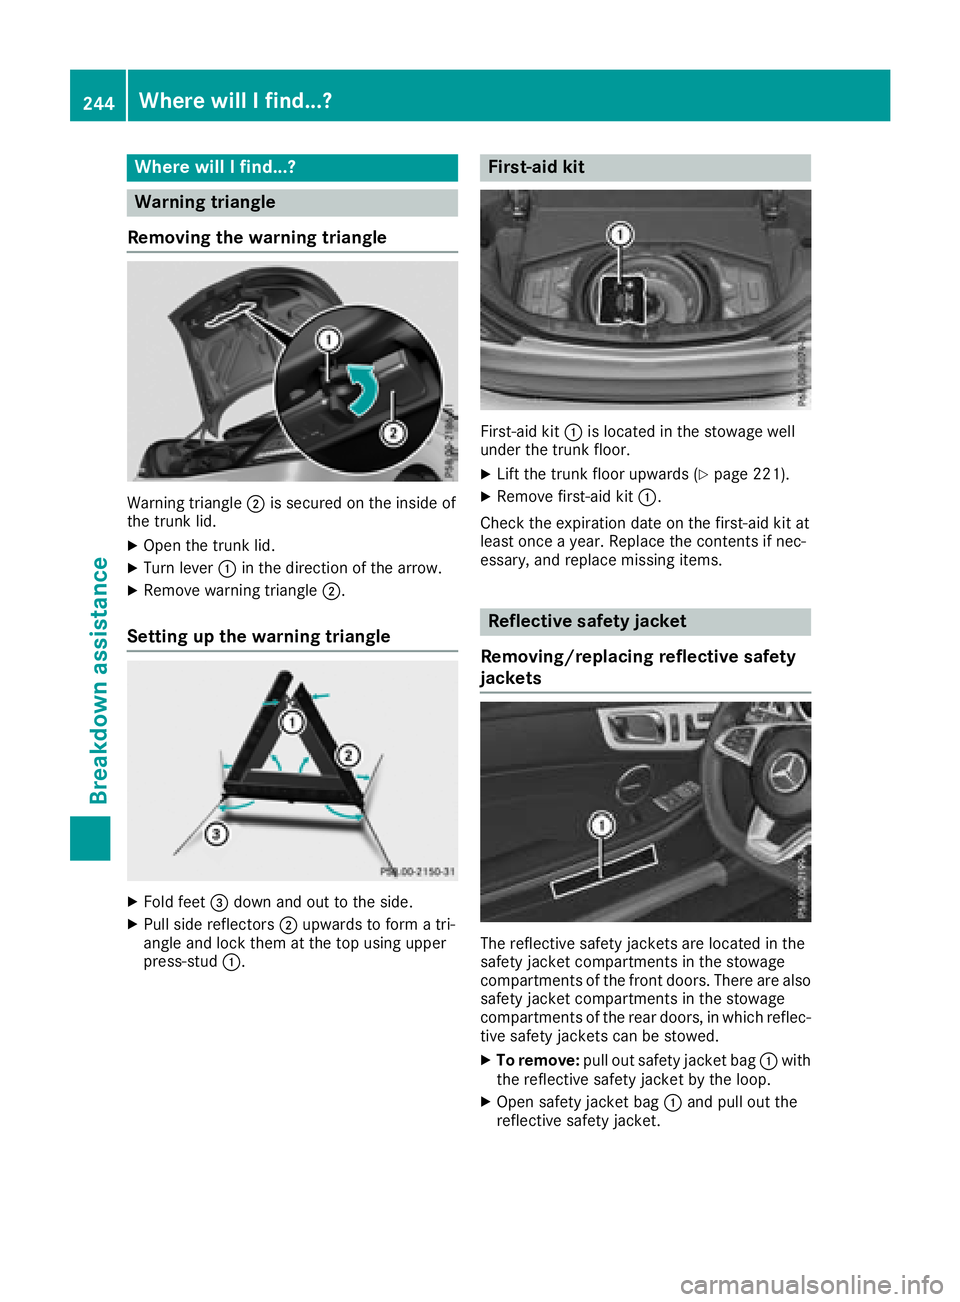
Warning triangle ;is secure donthe insid eof
the trunk lid.
XOpen the trunk lid.
XTurn lever :in the direction of the arrow.
XRemove warning triangle ;.
Setting up the warning triangle
XFold feet=downa nd out to the side.
XPullside reflectors ;upwards to form atri-
angl eand lock them at the top using upper
press-stud :.
First-aid kit
First-aidkit: is located in the stowage well
under the trunk floor.
XLift the trunk floor upwards (Ypag e221).
XRemove first-ai dkit:.
Check the expiration date on the first-ai dkit at
least once ayear. Replace the contents if nec-
essary, and replace missing items.
Reflective safety jacket
Removing/replacing reflective safety
jackets
The reflective safety jackets are located in the
safety jacket compartments in the stowage
compartments of the front doors.T here are also
safety jacket compartments in the stowage
compartments of the rear doors,inw hich reflec-
tive safety jackets can be stowed.
XTo remove: pullout safety jacket bag :with
the reflective safety jacket by the loop.
XOpen safety jacket bag :and pul lout the
reflective safety jacket.
244Where will Ifind...?
Breakdown assistance