2018 MERCEDES-BENZ SL ROADSTER instrument cluster
[x] Cancel search: instrument clusterPage 197 of 322
XPress the=or; button on the steering
wheel to select the Sett.menu.
XPress the:or9 button to select the
Instrument Clustersubmenu.
XPress ato confirm.
XPress the :or9 button to select the
Permanent Display:function.
The current setting, Outside Temperature
orSpeedometer [km/h]orSpeedometer[mph], appears.
XTo change the setting: pressaagain.
Lights
Setting the daytime running lamps
This function is not available in Canada.
XPress the =or; button on the steering
wheel to select the Sett.menu.
XPress the:or9 button to select the
Lightsubmenu.
XPress ato confirm.
XPress the :or9 button to select the
Daytime Running Lightsfunction.
If the DaytimeRunningLightsfunction has
been switched on, the cone of light and the
W symbol in the multifunction display are
shown in orange.
XPress the abutton to save the setting.
Further information on daytime running lamps
(
Ypage 106).
Setting the brightness of the ambient
lighting
XPress the =or; button on the steering
wheel to select the Sett.menu.
XPress the:or9 button to select the
Lightsubmenu.
XPress ato confirm.
XPress the :or9 button to select the
Amb. Light +/-function.
The current setting appears.
XPress ato confirm.
XPress the :or9 button to adjust the
brightness to any level from OfftoLevel 5(bright).
XPress the aor% button to save the
setting.
Setting the ambient lighting color
XPress the =or; button on the steering
wheel to select the Sett.menu.
XPress the:or9 button to select the
Lightsubmenu.
XPress ato confirm.
XPress the :or9 button to select the
Amb. Light Col.function.
XPress ato confirm.
XPress the :or9 button to set the color
to SOLAR,SOLAR Orangeor SOLAR Red.
XPress the aor% button to save the
setting.
Activating/deactivating surround light-
ing and exterior lighting delayed switch-
off
XPress the =or; button on the steering
wheel to select the Sett.menu.
XPress the:or9 button to select the
Lightssubmenu.
XPress ato confirm.
XPress :or9 to select the SurroundLightingfunction.
If the SurroundLightingfunction is activa-
ted, the multifunction display shows the light
cone and the area around the vehicle in
orange.
XPress the abutton to save the setting.
Deactivating exterior lighting delayed switch-off
temporarily:
XBefore leaving the vehicle, turn the SmartKey to position uin the ignition lock.
XTurn the SmartKey to position 2in the igni-
tion lock.
Exterior lighting delayed switch-off is deacti-
vated.
Exterior lighting delayed switch-off is reactiva-
ted the next time you start the engine.
If you have activated the Surround Lighting
function and you turn the light switch to Ã,
the following functions are activated when it is
dark:
Rsurround lighting: the exterior lighting
remains lit for 40 seconds after unlocking
with the SmartKey. If you start the engine, the
surround lighting is switched off and auto-
Menus and submenus195
On-board computer and displays
Z
Page 203 of 322
Safety systems
Display messagesPossible causes/consequences andMSolutions
!÷
Currently Unavaila‐ble See Operator'sManual
ABS (Anti-lock Braking System) and ESP®(Electronic Stability Pro-
gram) are temporarily not available.
Other driving systems and driving safety systems may also malfunc-
tion.
In addition, the ÷,åand! warning lamps light up in the
instrument cluster.
Possible causes are:
RSelf-diagnosis is not yet complete.
RThe on-board voltage may be insufficient.
GWARNING
The brake system continues to function normally, but without the
functions listed above. The wheels could therefore lock if you brake
hard, for example.
The steerability and braking characteristics may be severely affected.
The braking distance in an emergency braking situation can increase.
If ESP
®is not operational, ESP®is unable to stabilize the vehicle.
There is an increased risk of skidding and an accident.
XCarefully drive a suitable distance, making slight steering move-
ments at a speed above 12 mph (20 km/h).
If the display message disappears, the functions mentioned above are available again.
If the multifunction display still shows the display message:
XDrive on carefully.
XVisit a qualified specialist workshop immediately.
!÷
Inoperative SeeOperator's Manual
ABS and ESP®are malfunctioning.
Other driving systems and driving safety systems may also malfunc-
tion.
The $ (USA only) or J(Canada only), ÷,åand!
warning lamps in the instrument cluster also light up.
GWARNING
The brake system continues to function normally, but without the
functions listed above. The wheels could therefore lock if you brake
hard, for example.
The steerability and braking characteristics may be severely affected.
The braking distance in an emergency braking situation can increase.
If ESP
®is not operational, ESP®is unable to stabilize the vehicle.
There is an increased risk of skidding and an accident.
XDrive on carefully.
XVisit a qualified specialist workshop immediately.
Display messages201
On-board computer and displays
Z
Page 275 of 322
inhale TIREFIT fumes. Keep tire sealant away
from children. There is a risk of injury.
If you come into contact with the tire sealant,observe the following:
RRinse off the tire sealant from your skin
immediately with water.
RIf the tire sealant comes into contact with
your eyes, immediately rinse them thor-
oughly with clean water.
RIf tire sealant is swallowed, immediately
rinse your mouth out thoroughly and drink
plenty of water. Do not induce vomiting,
and seek medical attention immediately.
RImmediately change out of clothing which
has come into contact with tire sealant.
RIf an allergic reaction occurs, seek medical
attention immediately.
!Do not operate the tire inflation compressor
for longer than eight minutes at a time without a break. It may otherwise overheat.
The tire inflation compressor can be operated
again once it has cooled down.
Comply with the manufacturer’s safety instruc-
tions on the sticker on the tire inflation com-
pressor.
Using the TIREFIT kit
XDo not remove any foreign objects which have
penetrated the tire, e.g. screws or nails.
XRemove the tire sealant bottle, the accompa-
nying TIREFIT sticker and the tire inflation
compressor from the stowage well under-
neath the trunk floor (
Ypage 270).
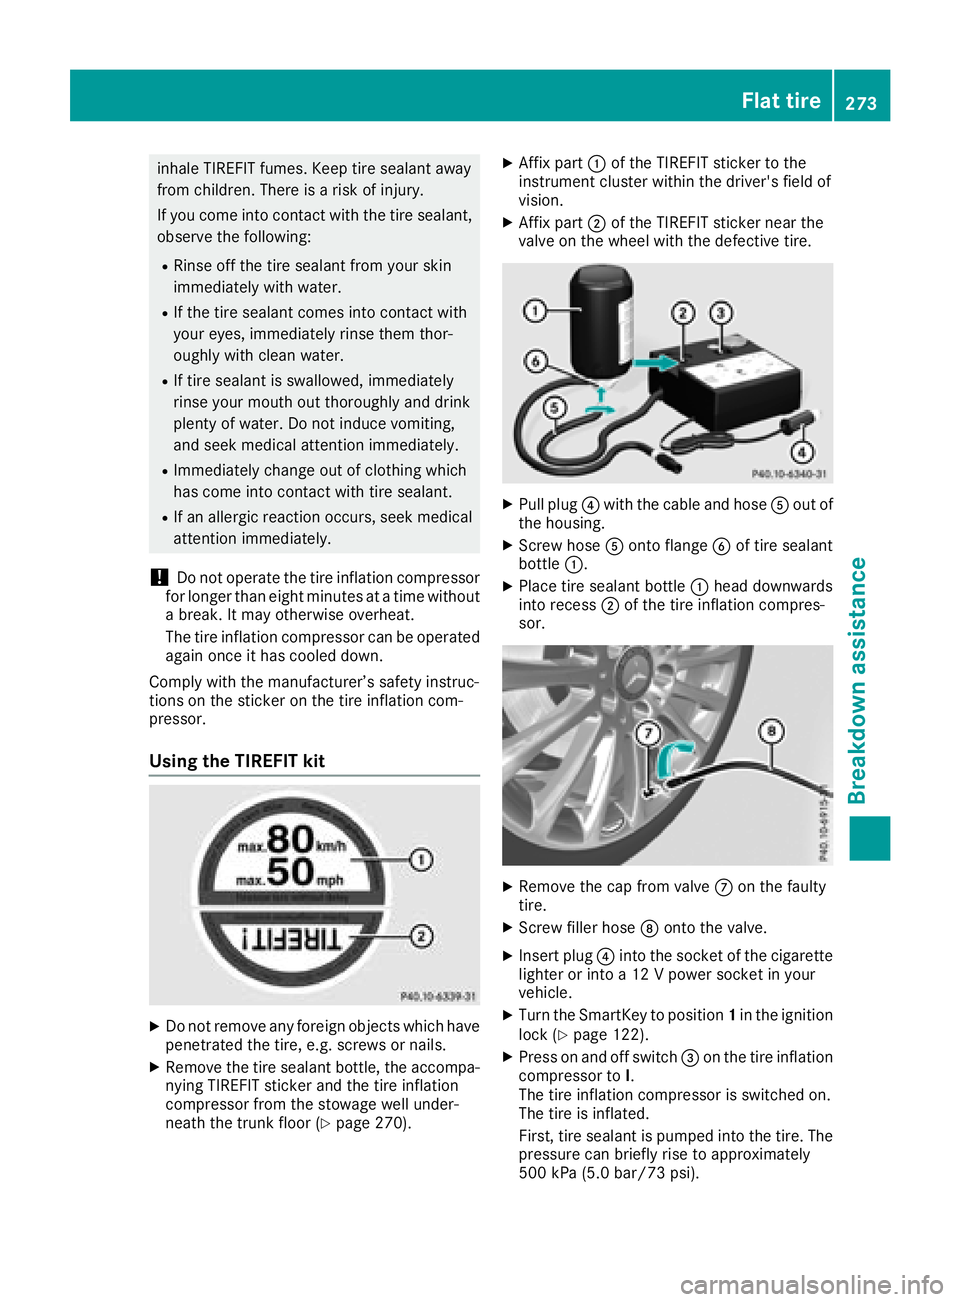
XAffix part :of the TIREFIT sticker to the
instrument cluster within the driver's field of
vision.
XAffix part ;of the TIREFIT sticker near the
valve on the wheel with the defective tire.
XPull plug ?with the cable and hose Aout of
the housing.
XScrew hose Aonto flange Bof tire sealant
bottle :.
XPlace tire sealant bottle :head downwards
into recess ;of the tire inflation compres-
sor.
XRemove the cap from valve Con the faulty
tire.
XScrew filler hose Donto the valve.
XInsert plug ?into the socket of the cigarette
lighter or into a 12 V power socket in your
vehicle.
XTurn the SmartKey to position 1in the ignition
lock (Ypage 122).
XPress on and off switch =on the tire inflation
compressor to I.
The tire inflation compressor is switched on.
The tire is inflated.
First, tire sealant is pumped into the tire. The
pressure can briefly rise to approximately
500 kPa (5.0 bar/73 psi).
Flat tire273
Breakdown assistance
Z
Page 281 of 322
Do not start the vehicle using a rapid charging device. If your vehicle's battery is discharged, the
engine can be jump-started from another vehicle or from a second battery using jumper cables.
Observe the following points:
RThe battery is not accessible in all vehicles. If the other vehicle's battery is not accessible, jump-
start the vehicle using a second battery or a jump-starting device.
RYou may only jump-start the vehicle when the engine and exhaust system are cold.
RDo not start the engine if the battery is frozen. Let the battery thaw first.
ROnly jump-start from batteries with a 12 V voltage rating.
ROnly use jumper cables which have a sufficient cross-section and insulated terminal clamps.
RIf the battery is fully discharged, leave the battery that is being used to jump-start connected for
a few minutes before attempting to start. This charges the battery slightly.
RMake sure that the two vehicles do not touch.
Make sure that:
RThe jumper cables are not damaged.
RBare parts of the terminal clamp do not come into contact with other metal parts while the jumper
cables are connected to the battery.
RThe jumper cables cannot come into contact with parts which can move when the engine is
running, such as the V-belt pulley or the fan.
XSecure the vehicle by applying the electric parking brake.
XShift the transmission to position j.
XMake sure that the ignition is switched off. All indicator lamps in the instrument cluster must be
off. When using the SmartKey, turn the SmartKey to position uin the ignition lock and remove it
(
Ypage 122).
XSwitch off all electrical consumers, e.g. rear window defroster, lighting, etc.
XOpen the hood.
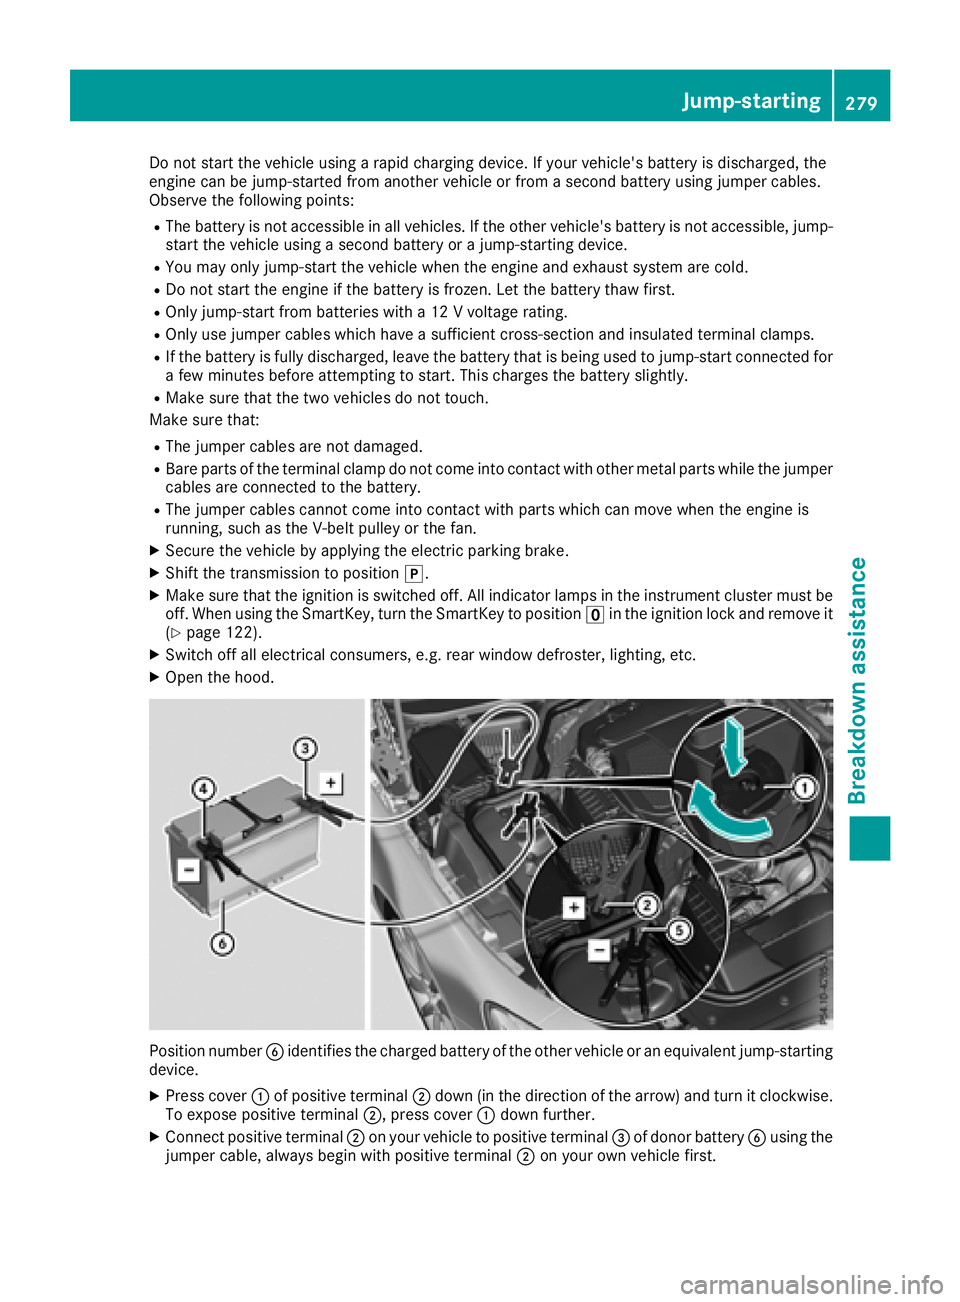
Position number Bidentifies the charged battery of the other vehicle or an equivalent jump-starting
device.
XPress cover :of positive terminal ;down (in the direction of the arrow) and turn it clockwise.
To expose positive terminal ;, press cover:down further.
XConnect positive terminal ;on your vehicle to positive terminal =of donor battery Busing the
jumper cable, always begin with positive terminal ;on your own vehicle first.
Jump-starting279
Breakdown assistance
Z
Page 285 of 322
The fuse allocation chart is located in the vehicle
tool kit in the stowage compartment under the
trunk floor (
Ypage 270).
If a newly inserted fuse also blows, have the
cause traced and rectified at a qualified special-
ist workshop, e.g. an authorized Mercedes-Benz Center.
!Only use fuses that have been approved for
Mercedes-Benz vehicles and which have the
correct fuse rating for the system concerned.
Otherwise, components or systems could be
damaged.
!Make sure that no moisture can enter the
fuse box when the cover is open.
!When closing the cover, make sure that it is
lying correctly on the fuse box. Moisture seep-
ing in or dirt could otherwise impair the oper-
ation of the fuses.
The fuses in your vehicle serve to close down
faulty circuits. If a fuse blows, all the compo-
nents on the circuit and their functions stop
operating.
Before changing a fuse
XSwitch off the engine.
XSwitch off all electrical consumers.
XMake sure that the ignition is switched off
(Ypage 122).
or
XWhen using the SmartKey, turn the SmartKey to position uin the ignition lock and remove
it (
Ypage 122).
XSecure the vehicle against rolling away
(Ypage 142).
All indicator lamps in the instrument cluster
must be off.
The fuses are located in various fuse boxes:
RFuse box in the engine compartment on the
right-hand side of the vehicle, when viewed in
the direction of travel
RDashboard fuse box
RFuse box in the rear compartment on the
right-hand side of the vehicle, when viewed in
the direction of travel
Dashboard fuse box
i
Observe the "Important safety notes" sec-
tion (Ypage 282).
!Do not use a pointed object such as a screw-
driver to open the cover in the dashboard. You
could damage the dashboard or the cover.
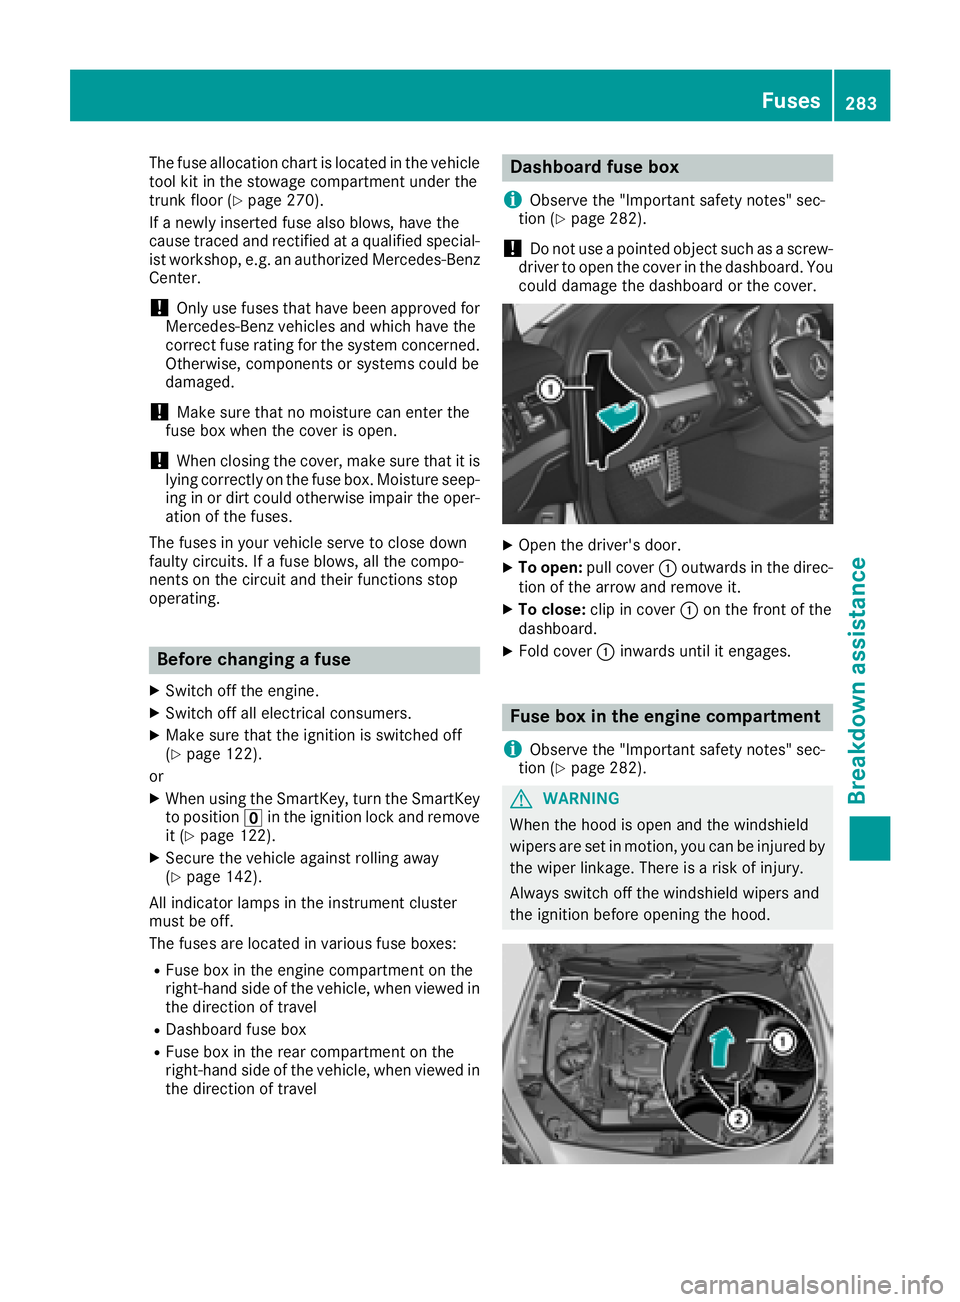
XOpen the driver's door.
XTo open: pull cover :outwards in the direc-
tion of the arrow and remove it.
XTo close: clip in cover :on the front of the
dashboard.
XFold cover :inwards until it engages.
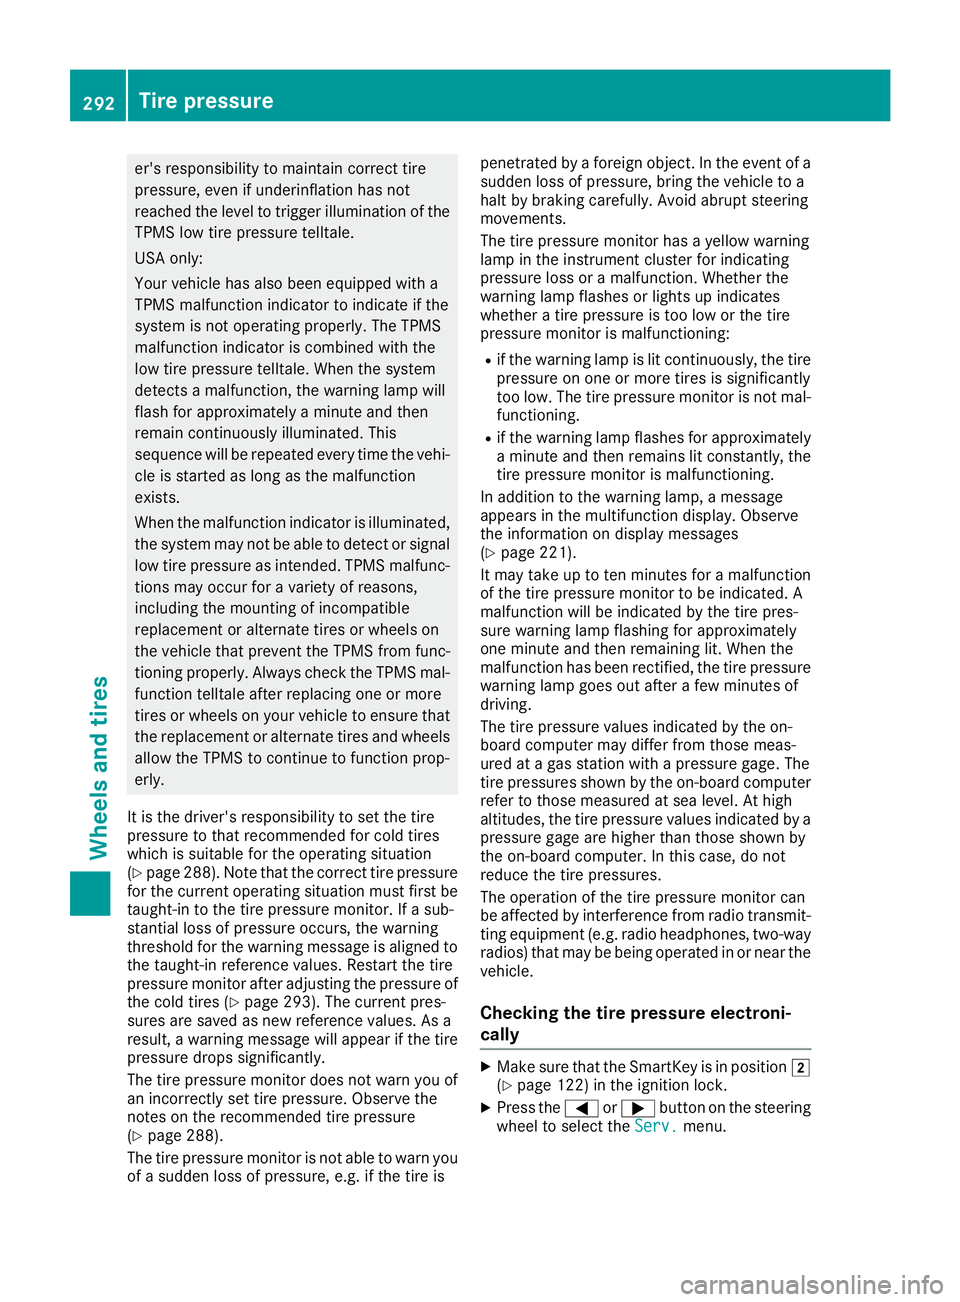
Fuse box in the engine compartment
i
Observe the "Important safety notes" sec-
tion (Ypage 282).
GWARNING
When the hood is open and the windshield
wipers are set in motion, you can be injured by
the wiper linkage. There is a risk of injury.
Always switch off the windshield wipers and
the ignition before opening the hood.
Fuses283
Breakdown assistance
Z
Page 294 of 322
er's responsibility to maintain correct tire
pressure, even if underinflation has not
reached the level to trigger illumination of theTPMS low tire pressure telltale.
USA only:
Your vehicle has also been equipped with a
TPMS malfunction indicator to indicate if the
system is not operating properly. The TPMS
malfunction indicator is combined with the
low tire pressure telltale. When the system
detects a malfunction, the warning lamp will
flash for approximately a minute and then
remain continuously illuminated. This
sequence will be repeated every time the vehi-
cle is started as long as the malfunction
exists.
When the malfunction indicator is illuminated,
the system may not be able to detect or signal
low tire pressure as intended. TPMS malfunc-
tions may occur for a variety of reasons,
including the mounting of incompatible
replacement or alternate tires or wheels on
the vehicle that prevent the TPMS from func-
tioning properly. Always check the TPMS mal-
function telltale after replacing one or more
tires or wheels on your vehicle to ensure that
the replacement or alternate tires and wheels
allow the TPMS to continue to function prop-
erly.
It is the driver's responsibility to set the tire
pressure to that recommended for cold tires
which is suitable for the operating situation
(
Ypage 288). Note that the correct tire pressure
for the current operating situation must first be
taught-in to the tire pressure monitor. If a sub-
stantial loss of pressure occurs, the warning
threshold for the warning message is aligned to
the taught-in reference values. Restart the tire
pressure monitor after adjusting the pressure of
the cold tires (
Ypage 293). The current pres-
sures are saved as new reference values. As a
result, a warning message will appear if the tire
pressure drops significantly.
The tire pressure monitor does not warn you of
an incorrectly set tire pressure. Observe the
notes on the recommended tire pressure
(
Ypage 288).
The tire pressure monitor is not able to warn you
of a sudden loss of pressure, e.g. if the tire ispenetrat
ed by a foreign object. In the event of a
sudden loss of pressure, bring the vehicle to a
halt by braking carefully. Avoid abrupt steering
movements.
The tire pressure monitor has a yellow warning
lamp in the instrument cluster for indicating
pressure loss or a malfunction. Whether the
warning lamp flashes or lights up indicates
whether a tire pressure is too low or the tire
pressure monitor is malfunctioning:
Rif the warning lamp is lit continuously, the tire
pressure on one or more tires is significantly
too low. The tire pressure monitor is not mal- functioning.
Rif the warning lamp flashes for approximately
a minute and then remains lit constantly, the
tire pressure monitor is malfunctioning.
In addition to the warning lamp, a message
appears in the multifunction display. Observe
the information on display messages
(
Ypage 221).
It may take up to ten minutes for a malfunction
of the tire pressure monitor to be indicated. A
malfunction will be indicated by the tire pres-
sure warning lamp flashing for approximately
one minute and then remaining lit. When the
malfunction has been rectified, the tire pressure
warning lamp goes out after a few minutes of
driving.
The tire pressure values indicated by the on-
board computer may differ from those meas-
ured at a gas station with a pressure gage. The
tire pressures shown by the on-board computer
refer to those measured at sea level. At high
altitudes, the tire pressure values indicated by a
pressure gage are higher than those shown by
the on-board computer. In this case, do not
reduce the tire pressures.
The operation of the tire pressure monitor can
be affected by interference from radio transmit-
ting equipment (e.g. radio headphones, two-way
radios) that may be being operated in or near the
vehicle.
Checking the tire pressure electroni-
cally
XMake sure that the SmartKey is in position 2
(Ypage 122) in the ignition lock.
XPress the =or; button on the steering
wheel to select the Serv.menu.
292Tire pressure
Wheels and tires