2018 MERCEDES-BENZ SL ROADSTER instrument cluster
[x] Cancel search: instrument clusterPage 150 of 322
Mercedes-Benz recommends that you only have
brake pads/linings installed on your vehicle
which have been approved for Mercedes-Benz
vehicles or which correspond to an equivalent
quality standard. Brake pads/linings which have
not been approved for Mercedes-Benz vehicles
or which are not of an equivalent quality could
affect your vehicle's operating safety.
Mercedes-Benz recommends that you only use
brake fluid that has been specially approved for
your vehicle by Mercedes-Benz, or which corre-
sponds to an equivalent quality standard. Brake
fluid which has not been approved for
Mercedes-Benz vehicles or which is not of an
equivalent quality could affect your vehicle's
operating safety.
High-performance and ceramic brake
system (Mercedes-AMG vehicles)
The AMG brake systems are designed for heavy
loads. This may lead to noise when braking. This will depend on:
RSpeed
RBraking force
RAmbient conditions, e.g. temperature and
humidity
The wear of individual components of the brake
system, such as the brake pads/linings or brake
discs, depends on the individual driving style
and operating conditions.
For this reason, it is impossible to state a mile-
age that will be valid under all circumstances. An aggressive driving style will lead to high wear.
You can obtain more information on this from a
qualified specialist workshop.
New and replaced brake pads and discs only
reach their optimum braking effect after several
hundred kilometers of driving. Compensate for
this by applying greater force to the brake pedal.
Keep this in mind, and adapt your driving and
braking accordingly during this break-in period.
Excessive heavy braking results in correspond-
ingly high brake wear. Observe the brake system
warning lamp in the instrument cluster and note
any brake status messages in the multifunction
display. Especially for high performance driving,it is important to maintain and have the brake
system checked regularly.
Driving on wet roads
Hydroplaning
If water has accumulated to a certain depth on
the road surface, there is a danger of hydro-
planing occurring.
For this reason, in the event of heavy rain or in
conditions in which hydroplaning may occur,
you must drive in the following manner:
Rlower your speed
Ravoid ruts
Ravoid sudden steering movements
Rbrake carefully
Driving on flooded roads
!Do not drive through flooded areas. Check
the depth of any water before driving through it. Drive slowly through standing water. Oth-
erwise, water could enter the vehicle interior
or engine compartment. It can then damage
the engine's or automatic transmission's
electronic components. It can also be sucked
in by the engine's air intake connection and
cause engine damage.
Winter driving
GWARNING
If you shift down on a slippery road surface in an attempt to increase the engine's braking
effect, the drive wheels could lose their grip.
There is an increased danger of skidding and
accidents.
Do not shift down for additional engine brak-
ing on a slippery road surface.
GDANGER
If the exhaust pipe is blocked or adequate
ventilation is not possible, poisonous gases
such as carbon monoxide (CO) may enter the vehicle. This is the case, e.g. if the vehicle
becomes trapped in snow. There is a risk of
fatal injury.
If you leave the engine or the auxiliary heating
running, make sure the exhaust pipe and area
around the vehicle are clear of snow. To
ensure an adequate supply of fresh air, open a
148Driving tips
Driving and parking
Page 153 of 322
Cruise controlisautomatically deactivated if:
Ryou engage the electr icparking brake
Ryou are driving at less than 20 mph (30 km/h)
RESP®intervenes or you deactivate ESP®
RBrake Assist intervenes
Ryou move out of transmission position h
If cruise control isdeactivate d,you willhear a
warning tone. You willsee the Cruise Con‐
trol Offmessage inthe multifunction display
for approximate lyfive seconds.
iWhen you switch off the engine, the last
speed stored iscleared.
Distance Pilot DISTRONIC
General notes
Distance Pilot DI STRONIC regulates the speed
and automatically helps you maintain the dis-
tance to the veh icledetected infront. Vehicle s
are detected with the aid of the radar sensor
system. Distance Pilot DI STRONIC brakes auto-
matically to avoid excee ding the set speed or to
maintain the designated distance from the veh i-
cle infront.
You must select a lower gear ingood time on
long and steep downhillgradients, especially if
the veh icle isladen. By doing so, you willmake
use of the braking effect of the engine. This
relieves the load on the brake system and pre-
vents the brakes from overheating and wearing
too quic kly.
If Distance Pilot DI STRONIC detects that there is
a risk of a co llision, you will be warned visually
and acoustically. Without your intervention, Dis-
tance Pilot DI STRONIC cannot prevent a co lli-
sion. An intermittent warning tone willthen
sound and the distance warning lamp willlight
up inthe instrument cluster. Brake immediately
in order to increase the distance from the veh i-
cle infront, or take evasive action, pro videdit is
safe to doso.
For Distance Pilot DI STRONIC to assist you
when driving, the radar sensor system must be
operational.
Distance Pilot DI STRONIC operates inthe range
between 0 mph (0 km/h) an
d 120 mph
(200 km/h).
Do not u
se Distance Pilot DISTRONIC while driv-
ing on roads with steep gradients. Since Distance Pilot DISTRONIC transmits radar
waves, it can resemble the radar detectors of
the responsible authorities. You can refer to the
relevant chapter in the Operator's Manual if
questions are asked about this.
iUSA only:
This device has been approved by the FCC as
a "Vehicular Radar System". The radar sensor
is intended for use in an automotive radar
system only. Removing, tampering with, or
altering the device will void any warranties,
and is not permitted by the FCC. Do not tam-
per with, alter, or use in any non-approved
way.
Any unauthorized modification to this device
could void the user’s authority to operate the
equipment.
iCanada only: This device complies with
RSS-210 of Industry Canada. Operation is
subject to the following two conditions:
1. This device may not cause interference,
and
2. This device must accept any interference
received, including interference that may
cause undesired operation of the device.
Removal, tampering, or altering of the device
will void any warranties, and is not permitted.
Do not tamper with, alter, or use in any non-
approved way.
Any unauthorized modification to this device
could void the user's authority to operate the equipment.
Important safety notes
GWARNING
Distance Pilot DISTRONIC does not react to:
Rpeople or animals
Rstationary objects on the road, e.g. stopped
or parked vehicles
Roncoming vehicles and crossing traffic
As a result, Distance Pilot DISTRONIC may
neither give warnings nor intervene in such
situations. There is a risk of an accident.
Always pay careful attention to the traffic sit- uation and be ready to brake.
Driving systems151
Driving and parking
Z
Page 157 of 322
If a malfunction in the electric parking brake
occurs, then the transmission may also be shif-
ted into positionjautomatically.
Setting a speed
Keep in mind that it may take a brief moment
until the vehicle has accelerated or braked to
the speed set.
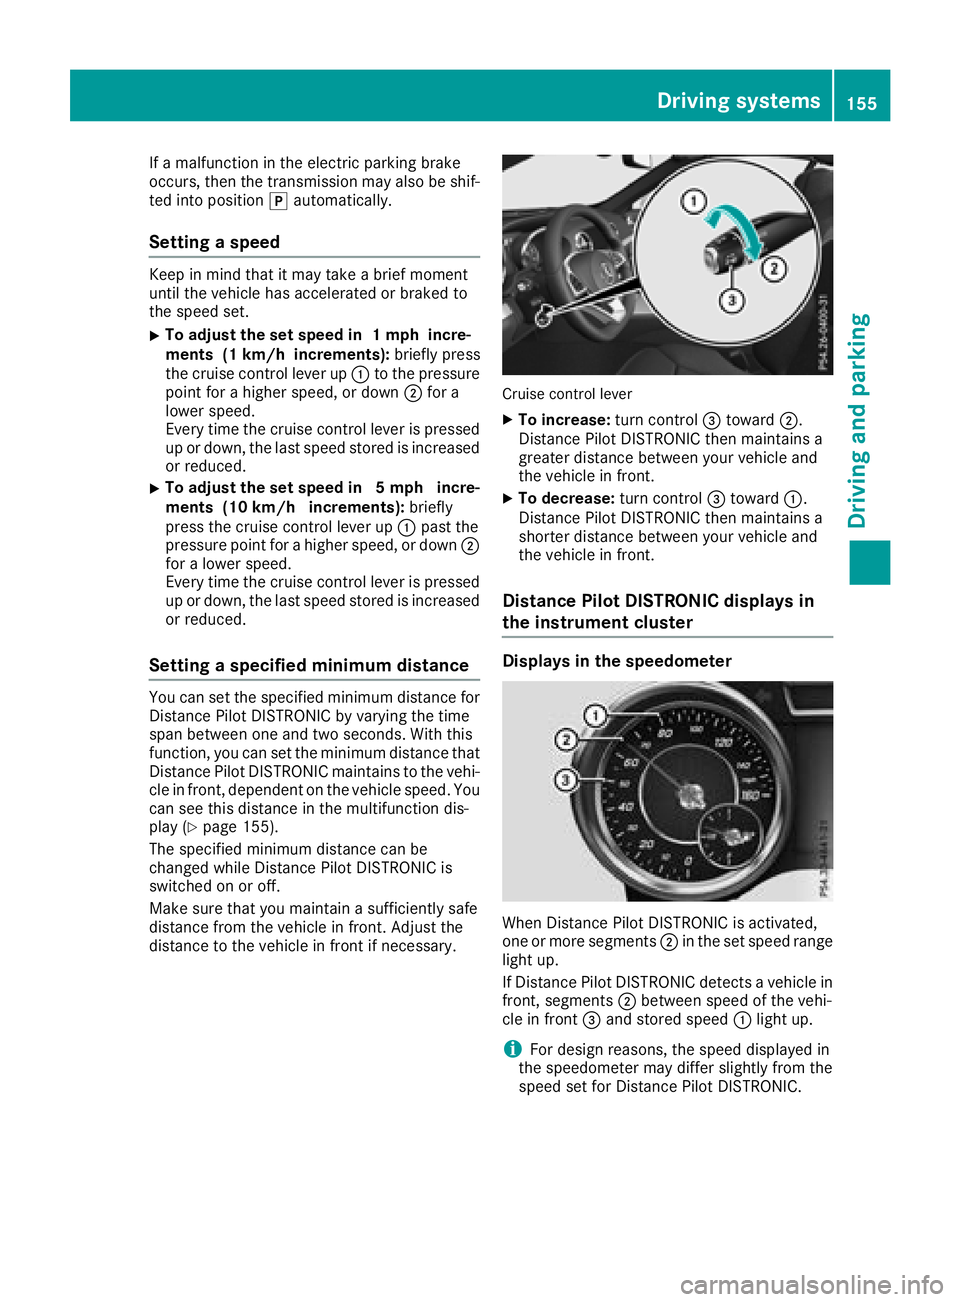
XTo adjust the set speed in 1 mph incre-
ments (1 km/h increments): briefly press
the cruise control lever up :to the pressure
point for a higher speed, or down ;for a
lower speed.
Every time the cruise control lever is pressed
up or down, the last speed stored is increased
or reduced.
XTo adjust the set speed in 5 mph incre-
ments (10 km/h increments): briefly
press the cruise control lever up :past the
pressure point for a higher speed, or down ;
for a lower speed.
Every time the cruise control lever is pressed
up or down, the last speed stored is increased or reduced.
Setting a specified minimum distance
You can set the specified minimum distance for
Distance Pilot DISTRONIC by varying the time
span between one and two seconds. With this
function, you can set the minimum distance that
Distance Pilot DISTRONIC maintains to the vehi-
cle in front, dependent on the vehicle speed. You
can see this distance in the multifunction dis-
play (
Ypage 155).
The specified minimum distance can be
changed while Distance Pilot DISTRONIC is
switched on or off.
Make sure that you maintain a sufficiently safe
distance from the vehicle in front. Adjust the
distance to the vehicle in front if necessary.
Cruise control lever
XTo increase: turn control=toward ;.
Distance Pilot DISTRONIC then maintains a
greater distance between your vehicle and
the vehicle in front.
XTo decrease: turn control=toward :.
Distance Pilot DISTRONIC then maintains a
shorter distance between your vehicle and
the vehicle in front.
Distance Pilot DISTRONIC displays in
the instrument cluster
Displays in the speedometer
When Distance Pilot DISTRONIC is activated,
one or more segments ;in the set speed range
light up.
If Distance Pilot DISTRONIC detects a vehicle in
front, segments ;between speed of the vehi-
cle in front =and stored speed :light up.
iFor design reasons, the speed displayed in
the speedometer may differ slightly from the
speed set for Distance Pilot DISTRONIC.
Driving systems155
Driving and parking
Z
Page 173 of 322
Parking tips:
ROn narrow roads, drive as close to the parkingspace as possible.
RParking spaces that are littered or overgrown
might be identified or measured incorrectly.
RParking spaces that are partially occupied by
trailer drawbars might not be identified as
such or be measured incorrectly.
RSnowfall or heavy rain may lead to a parking
space being measured inaccurately.
RPay attention to the warning messages of
Parking Assist PARKTRONIC during the park-
ing procedure (
Ypage 169).
RYou can intervene to correct the steering pro-
cedure at any time. Parking Pilot will then be
canceled.
RWhen transporting a load that protrudes from
your vehicle, you should not use Parking Pilot-
RNever use Parking Pilot when snow chains are
mounted.
RMake sure that the tire pressures are always
correct. This has a direct influence on the
parking characteristics of the vehicle.
Use Parking Pilot for parking spaces that are:
Rparallel or at right angles to the direction of
travel
Ron straight roads, not bends
Ron the same level as the road, e.g. not on the
pavement
Detecting parking spaces
Objects located above the detection range of
Parking Pilot will not be detected when the park- ing space is measured. These are not taken into
account when the parking procedure is calcula-
ted, e.g. overhanging loads, tail sections or load-
ing ramps of trucks. Parking Pilot may therefore
guide you into the parking space too early.
GWARNING
If there are objects above the detection range, Active Parking Assist may turn prematurely.
You may cause a collision as a result. There is
a risk of an accident.
If there are objects above the detection range,
stop and deactivate Active Parking Assist.
Further information on the detection range
(
Ypage 168). Parking Pilot does not assist you parking in
spaces at a right angle to the direction of travel
if:
Rtwo parking spaces are located directly next
to one another
Rthe parking space is directly next to a low
obstacle such as a low curb
Ryou park forwards
Parking Pilot does not assist you parking in
spaces parallel with or at a right angle to the
direction of travel if:
Rthe parking space is on a curb
Rthe system reads the parking space as being
blocked, for example by foliage or grass pav-
ing blocks
Rthe area is too small for the vehicle to maneu-
ver into
Rthe parking space is bordered by an obstacle,
e.g. a tree, a post or a trailer
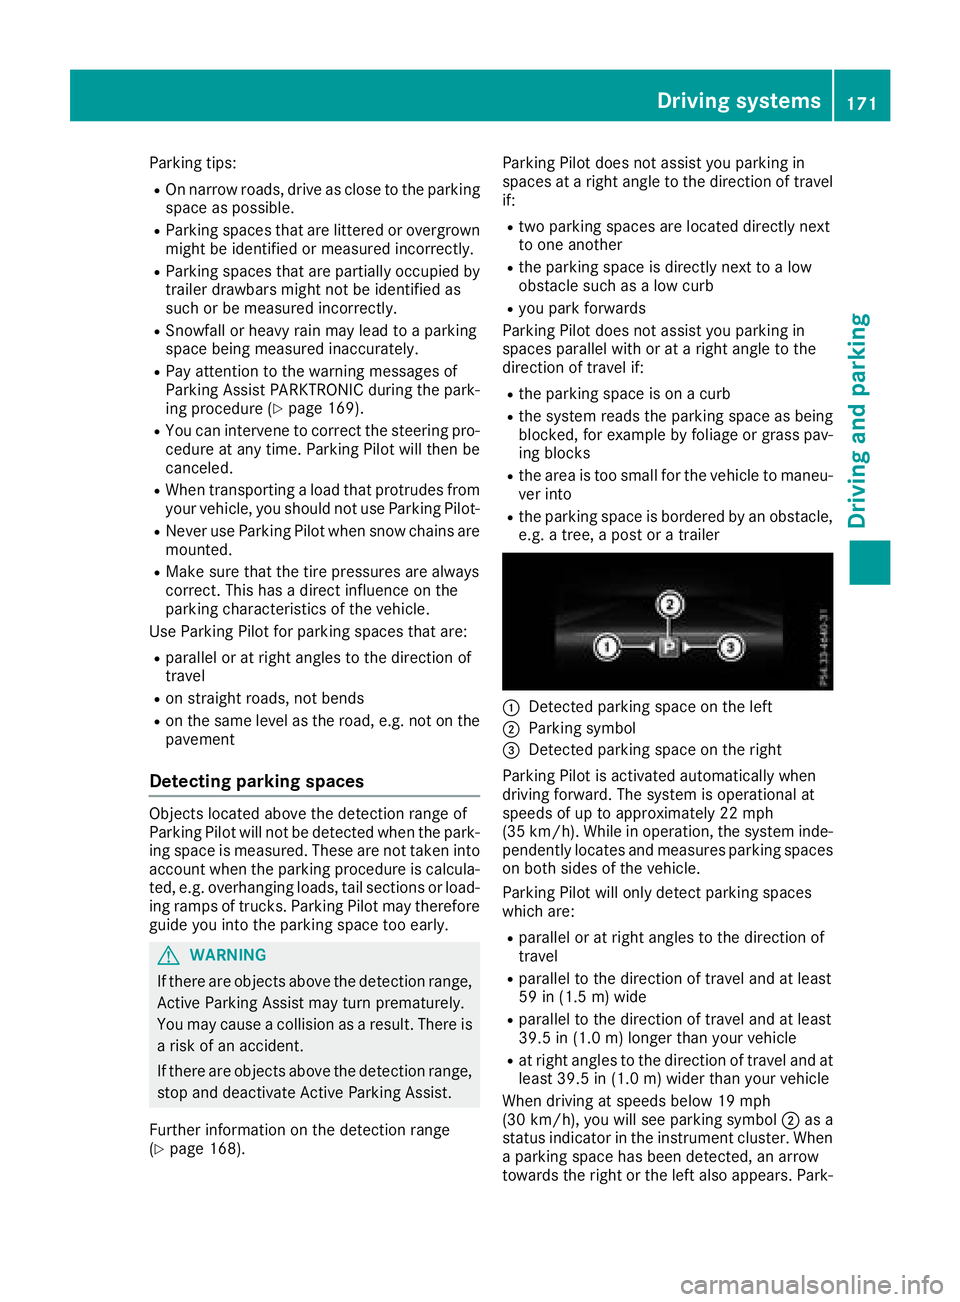
:Detected parking space on the left
;Parking symbol
=Detected parking space on the right
Parking Pilot is activated automatically when
driving forward. The system is operational at
speeds of up to approximately 22 mph
(35 km/h). While in operation, the system inde-
pendently locates and measures parking spaces on both sides of the vehicle.
Parking Pilot will only detect parking spaces
which are:
Rparallel or at right angles to the direction of
travel
Rparallel to the direction of travel and at least
59 in (1.5 m) wide
Rparallel to the direction of travel and at least
39.5 in (1.0 m) longer than your vehicle
Rat right angles to the direction of travel and at
least 39.5 in (1.0 m) wider than your vehicle
When driving at speeds below 19 mph
(30 km/ h), you will see parking symbol ;as a
status indicator in the instrument cluster. When
a parking space has been detected, an arrow
towards the right or the left also appears. Park-
Driving systems171
Driving and parking
Z
Page 174 of 322
ing Pilot displays only parking spaces on the
front-passenger side as standard. Parking
spaces on the driver's side are displayed as
soon as the turn signal on the driver's side is
activated. When parking on the driver's side,
this must remain activated until you confirm the
use of Parking Pilot by pressing theabutton
on the multifunction steering wheel. The system
automatically determines whether the parking
space is parallel or at right angles to the direc-
tion of travel.
A parking space is displayed while you are driv-
ing past it, and until you are approximately 50 ft
(15 m) away from it.
Parking
GWARNING
Active Parking Assist merely aids you by inter- vening actively in the steering. If you do not
brake there is a risk of an accident.
Always apply the brakes yourself when
maneuvering and parking.
XStop the vehicle when the parking space sym-bol shows the desired parking space in the
instrument cluster.
XShift the transmission to position k.
The Start Parking Pilot? Yes: OK No:
% message appears in the multifunction
display.
XTo cancel the procedure: press the%
button on the multifunction steering wheel or
pull away.
or
XTo park using Parking Pilot: press thea
button on the multifunction steering wheel.
The Parking Pilot Active Accelerate
and Brake Observe Surroundingsmes-
sage appears in the multifunction display.
XLet go of the multifunction steering wheel.
XBack up the vehicle, being ready to brake at all
times. When backing up, drive at a speed
below approximately 6 mph (10 km/h). Oth-
erwise, Parking Pilot is canceled immediately.
XStop as soon as Parking Assist PARKTRONIC
sounds the continuous warning tone, if not
before.
Maneuvering may be required in tight parking
spaces. The
Parking Pilot Active Select D
Observe Surroundingsmessage appears in
the multifunction display.
XShift the transmission to position hwhile
the vehicle is stationary.
Parking Pilot immediately steers in the other
direction.
The Parking Pilot Active Accelerate
and Brake Observe Surroundingsmes-
sage appears in the multifunction display.
iYou will achieve the best results by waiting
for the steering procedure to complete before
pulling away.
XDrive forwards and be ready to brake at all
times.
XStop as soon as Parking Assist PARKTRONIC
sounds the continuous warning tone, if not
before.
The Parking Pilot Active Select R
Observe Surroundingsmessage appears in
the multifunction display.
As soon as the parking procedure is complete,
the Parking Pilot Finished
message
appears and a warning tone sounds. The vehicle
is now parked.
Parking Pilot no longer supports you with steer-
ing interventions. When Parking Pilot has been
switched off, you must steer again yourself.
Parking Assist PARKTRONIC is still available.
Parking tips:
RThe way your vehicle is positioned in the park-
ing space after parking is dependent on vari-
ous factors. These include the position and
shape of the vehicles parked in front and
behind it and the conditions of the location. It
may be the case that Parking Pilot guides you too far into a parking space, or not far enough
into it. In some cases, it may also lead you
across or onto the curb. Cancel the parking
procedure with Parking Pilot if necessary.
RYou can also preselect transmission position
h. The vehicle redirects and does not drive
as far into the parking space. Should the
transmission change take place too early, the
parking procedure is canceled. A sensible
parking position can no longer be achieved
from this position.
172Driving systems
Driving and parking
Page 175 of 322
Exiting a parking space
In order for Parking Pilot to assist you:
Rthe border of the parking space must be highenough at the front and the rear. A curb is too
small, for example.
Rthe border of the parking space must not be
too wide. Your vehicle can be maneuvered
into a position at a maximum of 45° to the
starting position in the parking space.
Ra maneuvering distance of at least 3.3 ft
(1.0 m) must be available.
Parking Pilot can assist you with exiting a park-
ing space only if you have parked the vehicle
parallel to the direction of travel using Parking
Pilot.
XStart the engine.
XRelease the electric parking brake.
XSwitch on the turn signal in the direction you
will drive out of the parking space.
XShift the transmission to position hork.
The Start Parking Pilot? Yes: OK No:
% message appears in the multifunction
display.
XTo cancel the procedure: press the%
button on the multifunction steering wheel or
pull away.
or
XTo exit a parking space using Parking
Pilot: press the abutton on the multi-
function steering wheel.
The Parking Pilot Active Accelerate
and Brake Observe Surroundingsmes-
sage appears in the multifunction display.
XLet go of the multifunction steering wheel.
XPull away, being ready to brake at all times. Do
not exceed a maximum speed of approx-
imately 6 mph (10 km/h) when exiting a park-
ing space. Otherwise, Parking Pilot is can-
celed immediately.
XDepending on the message or as required,
shift the transmission to position hork
when the vehicle is stationary.
Parking Pilot immediately steers in the other
direction. The Parking Pilot Active
Accelerate and Brake Observe Sur‐roundingsmessage appears in the multi-
function display.
iYou will achieve the best results by waiting
for the steering procedure to complete before
pulling away. If you back up after activation, the steering
wheel is moved to the straight-ahead posi-
tion.
XDrive forwards and reverse as prompted by
the Parking Assist PARKTRONIC warning dis-
plays, several times if necessary.
Once you have exited the parking space com-
pletely, the steering wheel is moved to the
straight-ahead position. You hear a tone and the
Parking
PilotFinishedmessage appears in
the multifunction display. You will then have to
steer and merge into traffic on your own. Park-
ing Assist PARKTRONIC is still available. You can
take over the steering before the vehicle has
exited the parking space completely. This is
useful, for example when you recognize that it is
already possible to pull out of the parking space.
Canceling Parking Pilot
You can cancel Parking Pilot at any time.
XStop the movement of the multifunction
steering wheel or steer yourself.
Parking Pilot is canceled immediately. The
Parking
PilotCanceledmessage appears
in the multifunction display.
or
XPress the "Park Assist PARKTRONIC" button
on the center console (Ypage 169).
Parking Assist PARKTRONIC is switched off
and Parking Pilot is immediately canceled.
The Parking Pilot Canceled
message
appears in the multifunction display.
Parking Pilot is canceled automatically when:
Rparking using Parking Pilot is no longer pos-
sible
Ryou are driving faster than 6 mph (10 km/h)
Ra wheel spins, ESP®intervenes or fails. The
÷ ESP®warning lamp lights up in the
instrument cluster
A warning tone sounds. The parking symbol dis-
appears and the multifunction display shows the
Parking Pilot Canceled
message.
When Parking Pilot is canceled, you must steer
again yourself.
Driving systems173
Driving and parking
Z
Page 187 of 322
Important safety notes
GWARNING
If you operate information systems and com-
munication equipmen tintegrate din th evehi-
cle when driving ,you may be distracte dfrom
th etraffic situation .You could also lose con-
trol of th evehicle. Ther eis aris kof an acci-
dent.
Only operate this equipmen twhen th etraffic
situation permits. If you are no tsur ethat this
is possible ,park th evehicl epayin gattention
to traffic condition sand operate th eequip-
men twhen th evehicl eis stationary.
You must observ eth elegal requirements for th e
country in whic hyou are currentl ydriving when
operating th eon-board computer.
GWARNIN G
If th einstrumen tcluste rhas faile dor mal-
functioned, you may no trecognize function
restriction sin systems relevan tto safety. The
operating safet yof your vehicl emay be
impaired .Ther eis aris kof an accident.
Drive on carefully. Hav eth evehicl echecke d
at aqualified specialist workshop immedi-
ately.
The on-board computer only shows message sor
warning sfrom certain systems in th emultifunc-
tion display. You should therefor emak esur e
your vehicl eis operating safely at all times .
If th eoperating safet yof your vehicl eis
impaired ,pull ove ras soo nas it is saf eto do so.
Contac t aqualified specialist workshop.
Fo ran overview, see th einstrumen tpanel illus-
tration (
Ypage 33).
Displays and operation
Instrument cluster lighting
The lighting in th einstrumen tcluster, in th edis-
plays and th econtrol sin th evehicl einterior can
be adjusted usin gth ebrightness control knob.
The brightness control knob is locate don th e
botto mleftof th einstrumen tcluste r
(
Ypage 33).
XTurn th ebrightness control knob clockwise or
counter-clockwise.
If you tur nth eligh tswitch (
Ypage 106) to th e
Ã, TorL position ,th ebrightness
will depend upon th ebrightness of th eambi -
en tlight.
The ligh tsensor in th einstrumen tcluste r
automatically control sth ebrightness of th e
multifunction display. In daylight, th edisplays
in th einstrumen tcluste rare no tilluminated.
Speedometer with segments
The segments in th espeedometer indicat e
whic hspee drange is available.
RCruis econtrol activated (Ypage 149):
The segments ligh tup from th estore dspee d
to th emaximum speed.
RDistanc ePilot DISTRONI Cis activated
(Ypage 151):
On eor two segments in th eset spee drange
ligh tup.
RDistanc ePilot DISTRONI Cdetects avehicl ein
fron tmoving mor eslowly than th estore d
speed:
The segments between th espee dof th evehi-
cle in fron tand th estore dspee dligh tup.
Tachometer
!
Do no tdriv ein th eoverrevving range, as this
could damag eth eengine.
The red ban din th etachometer indicates th e
engine's overrevving range.
The fuel suppl yis interrupted to protect th e
engin ewhen th ered ban dis reached.
Outside temperature display
You should pay special attention to road condi-
tion swhen temperatures are aroun dfreezing
point.
Bea rin min dthat th eoutside temperature dis-
play indicates th etemperature measured and
does no trecord th eroad temperature.
The outside temperature display is in th emulti-
function display (
Ypage 187).
A chang ein th eoutside temperature is shown in
th emultifunction display after adelay.
Displays and operation185
On-board computer and displays
Z
Page 196 of 322
Activating/deactivating Active Blind
SpotAssist
XPress th e= or; buttonon th esteering
whee lto select th eDriveAssistmenu.
XPress th e9 or: buttonto select
Blind Spo tAssist.
XPress ato confirm your selection .
The curren tselection appears.
XTo activate/deactivate: press thea but-
to nagain .
Further information on Active Blind Spot Assis t
(
Ypage 179).
Activating/deactivating Active Lane
Keeping Assist
XPress th e= or; buttonon th esteering
whee lto select th eDriveAssistmenu.
XPress th e9 or: buttonto select
Lan eKeepin gAssist.
XPress ato confirm your selection .
The curren tselection appears.
XPress aagain.
XPress :or9 to set Off,Standardor
Adaptive.
XPress th ea buttonto sav eth esetting .
When Active Lan eKeepin gAssis tis activated,
th emultifunction display shows th elan e
marking sas bright lines in th eassistanc e
graphic .
Further information on Active Lan eKeepin g
Assis t (
Ypage 181).
Service menu
Dependin gon th eequipmen tinstalled in th e
vehicle, you hav eth efollowin goption sin th e
Serv.
menu:
RCallin gup display message s (Ypage 200)
RChecking thetire pressur eelectronically
(Ypage 291)
RCallin gup th eservic edue dat e
(Ypage 262)
Settings menu
Introd uction
Dependin gon th eequipmen tinstalled in th e
vehicle, in th eSett.men uyou hav eth efollow-
ing options:
RChangin gth einstrumen tcluste rsetting s
(Ypage 194)
RChangin gth eligh tsetting s (Ypage 195)
RChangin gth evehicl esetting s (Ypage 196)
RChangin gth econvenience setting s
(Ypage 196)
RRestoring th efactory setting s (Ypage 197)
Instrument cluster
Selecting th edistance uni t
TheDispla yUni tSpeed-/Odometer :func-
tion allows you to choos ewhether certain dis-
plays appear in kilometers or mile sin th emul-
tifunction display.
XPress th e= or; buttonon th esteering
whee lto select th eSett.menu.
XPress th e: or9 buttonto select th e
Instrumen tCluste rsubmenu.
XPressato confirm .
XPress the: or9 buttonto select th e
Displa yUni tSpeed-/Odometerfunction .
The curren tsetting kmormilesappears.
XPress th ea buttonto sav eth esetting .
The selected uni tof measuremen tfor distanc e
applie sto :
Rthedigital speedometer in th eTri pmen u
Rtheodometer and trip odometer
Rth etrip computer
Rth ecurren tconsumption and th erange
Rnavigation instruction sin th eNav imen u
Rcruise control
RDistanc ePilo tDISTRONI C
RASSYSTPLU Sservic einterval display
Selecting permanent displa y
ThePermanent Display:function allows you
to choos ewhether th emultifunction display
always shows th eoutside temperature or th e
speed.
The spee ddisplay is invers eto th espeedome-
ter.
194Menus and submenus
On-board computer and displays