2018 MERCEDES-BENZ SL ROADSTER dimensions
[x] Cancel search: dimensionsPage 22 of 322
Load index .....................................300
Load index (definition) ................... 302
M+S tires ....................................... 287
Maximum load on a tire (defini-
tion) ............................................... 303
Maximum loaded vehicle weight
(definition) ..................................... 302
Maximum permissible tire pres-
sure (definition) .............................3 03
Maximum tire load ......................... 301
Maximum tire load (definition) ....... 303
MOExtended tires .......................... 287
Optional equipment weight (defi-
nition) ............................................ 303
Overview ........................................ 285
PSI (pounds per square inch) (def-
inition) ...........................................3 03
Replacing ....................................... 304
Service life ..................................... 286
Sidewall (definition) ....................... 303
Speed rating (definition) ................ 302
Storing ...........................................3 04
Structure and characteristics
(definition) ..................................... 302
Summer tires ................................. 287
Temperature .................................. 298
TIN (Tire Identification Number)
(definition) ..................................... 303
Tire bead (definition) ......................3 03
Tire pressure (definition) ................ 303
Tire pressures (recommended) ...... 302
Tire size (data) ............................... 308
Tire size designation, load-bearing
capacity, speed rating .................... 298
Tire tread ....................................... 286
Tire tread (definition) ..................... 303
Total load limit (definition) ............. 303
Traction ......................................... 297
Traction (definition) ....................... 303
Tread wear ..................................... 297
Uniform Tire Quality Grading
Standards ...................................... 297
Uniform Tire Quality Grading
Standards (definition) .................... 302
Wear indi
cator (definition) ............. 303
Wheel and tire combination ........... 308
Wheel rim (definition) .................... 302
see Flat tire Tow-starting
Emergency engine starting ............ 282
Important safety notes .................. 280
Towing away
Important safety guidelines ........... 280
Installing the towing eye ................ 281
Removing the towing eye ............... 281
Transporting the vehicle ................ 282
With both axles on the ground ....... 281
With the rear axle raised ................ 282
Traffic reports
see also Digital Operator's Man-
ual .................................................. 236
Traffic Sign Assist
Display message ............................ 216
Transmission
Selector lever ................................ 130
see Automatic transmission
Transmission position display ......... 131
Transporting the vehicle .................. 282
Trip computer (on-board com-
puter) .................................................. 188
Trip odometer
Calling up ....................................... 188
Resetting (on-board computer) ...... 189
Trunk
Emergency release .......................... 85
Important safety notes .................... 80
Locking separately ........................... 84
Opening/closing (automatically
from inside) ...................................... 84
Opening/closing (automatically
from outside) ................................... 82
Opening/closing (from outside,
HANDS-FREE ACCESS) .................... 82
Opening/closing (manually from
outside) ............................................ 81
Overview .......................................... 80
Power closing .................................. 80
Trunk lid
Display message ............................ 224
Opening dimensions ...................... 317
Trunk partition
Display message ............................ 224
General notes .................................. 91
Installing .......................................... 91
Opening/closing .............................. 91
Removing ......................................... 91
20Index
Page 23 of 322
Turn signalsDisplay message ............................ 212
Switching on/off ........................... 107
Two-way radio
Frequencies ................................... 310
Installation ..................................... 310
Transmission output (maximum) .... 310
Type identification plate
see Vehicle identification plate
U
Umbrella holder ................................. 243
Unlocking
Emergency unlocking ....................... 80
From inside the vehicle (central
unlocking button) ............................. 79
Upshift indicator (on-board com-
puter, Mercedes-AMG vehicles) ....... 197
USB devices
Connecting to the Media Inter-
face ...............................................2 41
V
Vehicle
Correct use ...................................... 28
Data acquisition ............................... 29
Display message ............................ 222
Electronics ..................................... 310
Equipment ....................................... 25
Individual settings .......................... 194
Limited Warranty .............................2 9
Loading .......................................... 295
Locking (in an emergency) ............... 80
Locking (SmartKey) .......................... 73
Lowering ........................................ 308
Maintenance .................................... 26
Parking for a long period ................ 144
Pulling away ................................... 124
Raising ........................................... 305
Reporting problems ......................... 28
Securing from rolling away ............ 305
Tow-starting ................................... 280
Towing away .................................. 280
Transporting .................................. 282
Unlocking (in an emergency) ........... 80
Unlocking (SmartKey) ...................... 73
Vehicle data ................................... 317 Vehicle battery
see Battery (vehicle)
Vehicle data ....................................... 317
Vehicle dimensions ........................... 317
Vehicle emergency locking ................ 80
Vehicle identification number
see VIN
Vehicle identification plate .............. 311
Vehicle level
Active Body Control (ABC) (except
Mercedes-AMG vehicles) ............... 163
Active Body Control (ABC)
(Mercedes-AMG vehicles) .............. 165
Display message ............................ 215
Vehicle tool kit .................................. 270
Video
Operating the DVD ......................... 191
see also Digital Operator's Man-
ual .................................................. 236
VIN
Seat ............................................... 312
Type plate ...................................... 311W
Warning and indicator lampsABS ................................................ 229
Active Brake Assist ........................ 234
Brake Assist ................................... 234
Brakes ........................................... 228
Check Engine ................................. 232
Coolant .......................................... 232
Distance Pilot DISTRONIC ............. 234
Distance warning ........................... 234
ESP
®.............................................. 229
ESP®OFF ....................................... 230
Fuel tank ........................................ 232
General notes ................................ 227
Parking brake ................................ 231
PASSENGER AIR BAG ...................... 41
Reserve fuel ................................... 232
Restraint system ............................ 231
Seat belt ........................................ 227
SPORT handling mode ................... 231
Tire pressure monitor .................... 235
Warning triangle ................................ 269
Warranty .............................................. 25
Index21
Page 67 of 322
As a result, the Adaptive Brake Assist may not
intervene in all critical conditions. There is a
risk of an accident.
Always pay careful attention to the traffic sit-uation and be ready to brake.
Always adapt your speed to suit the prevailing
road and traffic conditions.
Due to the nature of the system, particularly
complicated but non-critical driving conditions
may also cause Brake Assist to intervene.
If adaptive Brake Assist is not available due to a
malfunction in the radar sensor system, the
brake system remains available with full brake
boosting effect and BAS.
Adaptive brake lights
i
Observe the "Important safety notes" sec-
tion (Ypage 60).
If you brake sharply from a speed of more than
50 km/h or if braking is assisted by BAS or
Brake Assist with Cross-Traffic Assist, the brake
lamps flash rapidly. In this way, traffic traveling
behind you is warned in an even more noticeable
manner.
If you brake sharply from a speed of more than
70 km/h to a standstill, the hazard warning
lamps are activated automatically. If the brakes
are applied again, the brake lamps light up con-
tinuously. The hazard warning lamps switch off
automatically if you travel faster than 10 km/h.
You can also switch off the hazard warning
lamps using the hazard warning button
(
Ypage 108).
ESP®(Electronic Stability Program)
General notes
iObserve the "Important safety notes" sec-
tion (Ypage 60).
ESP
®monitors driving stability and traction, i.e.
power transmission between the tires and the
road surface.
If ESP
®detects that the vehicle is deviating from
the direction desired by the driver, one or more
wheels are braked to stabilize the vehicle. The
engine output is also modified to keep the vehi-
cle on the desired course within physical limits. ESP
®assists the driver when pulling away on
wet or slippery roads. ESP®can also stabilize
the vehicle during braking.
ETS (Electronic Traction System)
iObserve the "Important safety notes" sec-
tion (Ypage 60).
ETS traction control is part of ESP
®.
ETS brakes the drive wheels individually if they
spin. This enables you to pull away and acceler-
ate on slippery surfaces, for example if the road
surface is slippery on one side. In addition, more
drive torque is transferred to the wheel or
wheels with traction.
ETS remains active when you deactivate ESP
®.
iMercedes-AMG vehicles: your vehicle may
be equipped with 20-inch tires on the rear
axle. After changing to 19 inch wheels, ETS
may intervene noticeably earlier during the
first few kilometers. After approximately
10 km ETS will function as usual again. Infor-
mation on the dimensions and types of
wheels and tires for your vehicle can be found
in the "Wheel/tire combinations" section
(
Ypage 308).
Important safety notes
GWARNING
If ESP
®is malfunctioning it will not provide
any vehicle stabilization. There is an increased
risk of skidding or of an accident.
Exercise caution when continuing to drive.
Have ESP
®checked at a qualified specialist
workshop.
When towing the vehicle with the rear axle
raised, observe the notes on ESP
®
(Ypage 282).
If the å ESP®OFF warning lamp lights up
continuously, then ESP®is deactivated.
If the ÷ ESP®warning lamp and the å
ESP®OFF warning lamp are lit continuously,
ESP®is not available due to a malfunction.
Observe the information on warning lamps
(
Ypage 229) and display messages which may
be shown in the instrument cluster
(
Ypage 201).
Driving safety systems65
Safety
Z
Page 82 of 322
XTo deactivate:press and hold button :for
about five seconds until a tone sounds.
XTo activate: press and hold button ;for
about five seconds until a tone sounds.
If you press one of the two buttons and do not
hear a tone, the relevant setting has already
been selected.
The vehicle is locked automatically when the
ignition is switched on and the wheels are turn-
ing.
You could therefore lock yourself out if:
Rthe vehicle is being pushed.
Rthe vehicle is being towed.
Rthe vehicle is on a roller dynamometer.
You can also switch the automatic locking func-
tion on and off using the on-board computer
(
Ypage 196).
Power closing
Power closing pulls the doors and trunk lid into
their locks automatically even if they are only
partly closed.
XPower closing feature (doors): push the
door past the first detent position into the
lock.
Power closing will pull the door fully closed.
XTo power close the trunk lid: lightly push
the trunk lid closed.
The power closing function pulls the trunk lid
closed.
Unlocking/locking the driver's door
using the mechanical key
i
If you want to centrally lock the vehicle using
the mechanical key, begin by pressing the
locking button for the interior locking mech-
anism while the driver's door is open. Then
lock the driver's door using the mechanical
key.
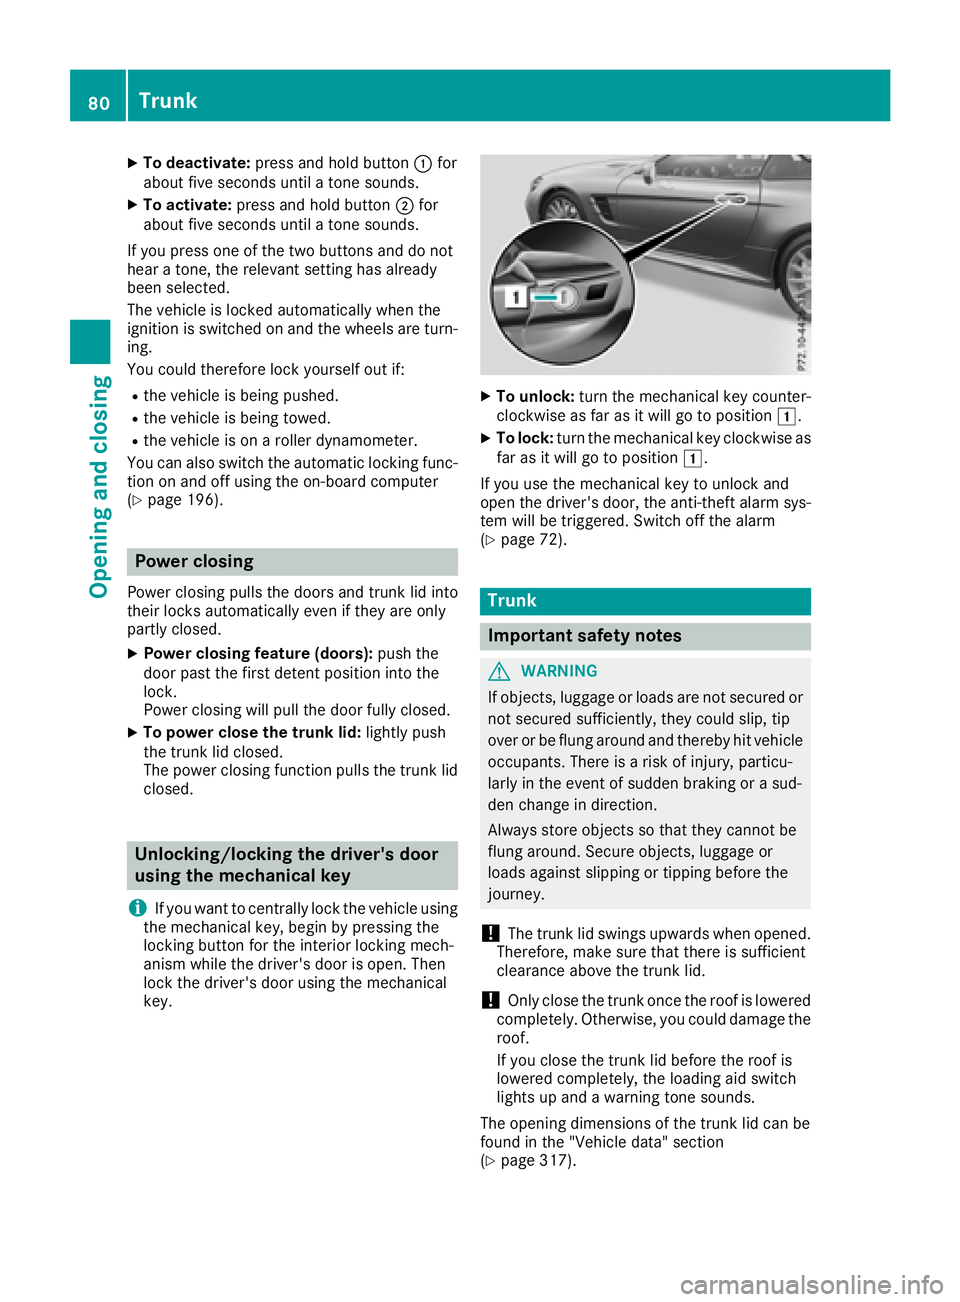
XTo unlock: turn the mechanical key counter-
clockwise as far as it will go to position 1.
XTo lock:turn the mechanical key clockwise as
far as it will go to position 1.
If you use the mechanical key to unlock and
open the driver's door, the anti-theft alarm sys-
tem will be triggered. Switch off the alarm
(
Ypage 72).
Trunk
Important safety notes
GWARNING
If objects, luggage or loads are not secured or
not secured sufficiently, they could slip, tip
over or be flung around and thereby hit vehicle
occupants. There is a risk of injury, particu-
larly in the event of sudden braking or a sud-
den change in direction.
Always store objects so that they cannot be
flung around. Secure objects, luggage or
loads against slipping or tipping before the
journey.
!The trunk lid swings upwards when opened.
Therefore, make sure that there is sufficient
clearance above the trunk lid.
!Only close the trunk once the roof is lowered
completely. Otherwise, you could damage the
roof.
If you close the trunk lid before the roof is
lowered completely, the loading aid switch
lights up and a warning tone sounds.
The opening dimensions of the trunk lid can be
found in the "Vehicle data" section
(
Ypage 317).
80Trunk
Opening and closing
Page 84 of 322
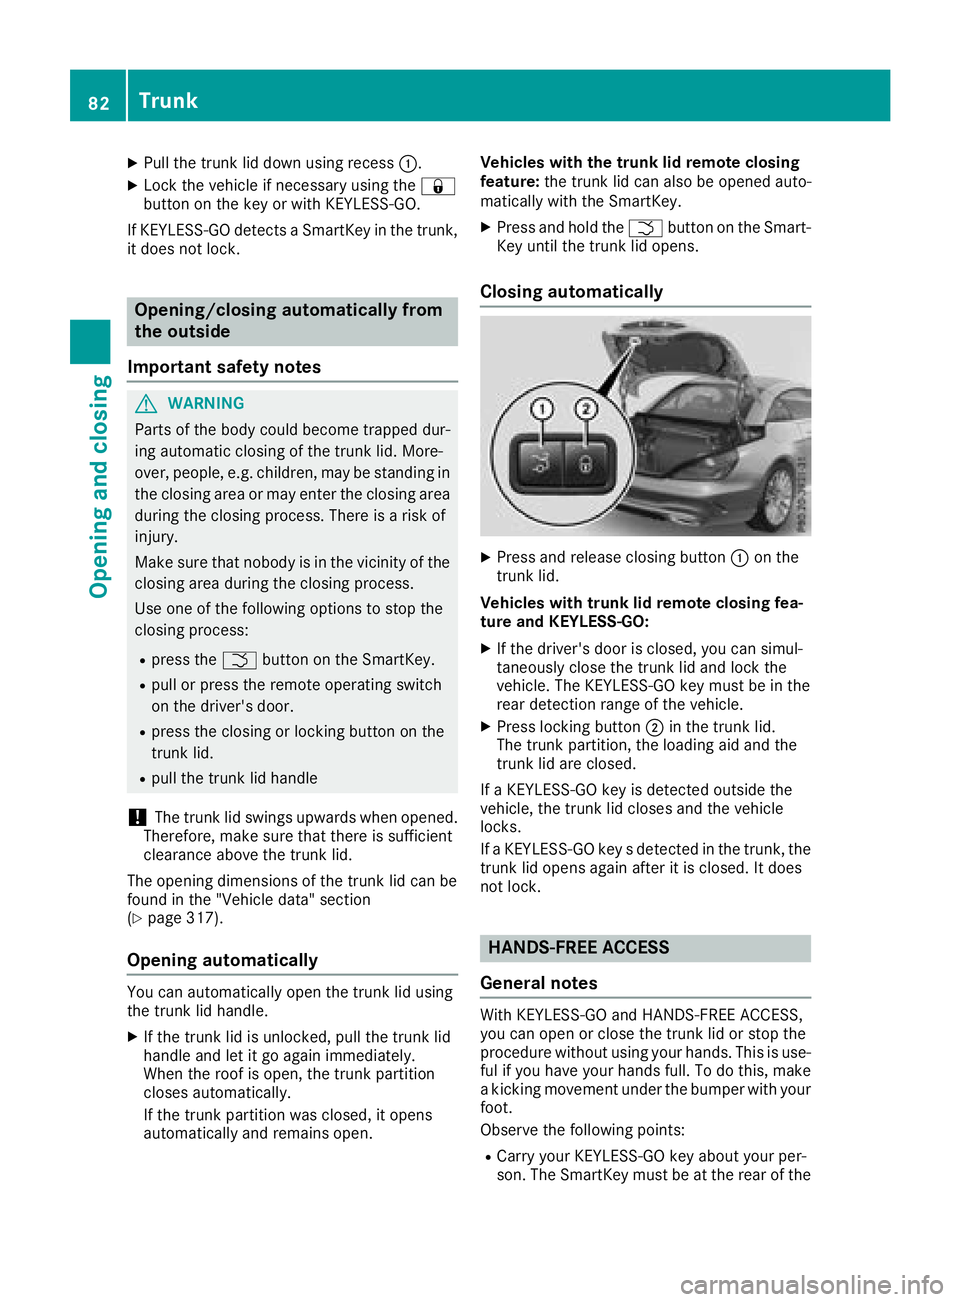
XPull the trunk lid down using recess:.
XLock the vehicle if necessary using the &
button on the key or with KEYLESS-GO.
If KEYLESS-GO detects a SmartKey in the trunk,
it does not lock.
Opening/closing automatically from
the outside
Important safety notes
GWARNING
Parts of the body could become trapped dur-
ing automatic closing of the trunk lid. More-
over, people, e.g. children, may be standing in the closing area or may enter the closing area
during the closing process. There is a risk of
injury.
Make sure that nobody is in the vicinity of the
closing area during the closing process.
Use one of the following options to stop the
closing process:
Rpress the Fbutton on the SmartKey.
Rpull or press the remote operating switch
on the driver's door.
Rpress the closing or locking button on the
trunk lid.
Rpull the trunk lid handle
!The trunk lid swings upwards when opened.
Therefore, make sure that there is sufficient
clearance above the trunk lid.
The opening dimensions of the trunk lid can be
found in the "Vehicle data" section
(
Ypage 317).
Opening automatically
You can automatically open the trunk lid using
the trunk lid handle.
XIf the trunk lid is unlocked, pull the trunk lid
handle and let it go again immediately.
When the roof is open, the trunk partition
closes automatically.
If the trunk partition was closed, it opens
automatically and remains open. Vehicles with the trunk lid remote closing
feature:
the trunk lid can also be opened auto-
matically with the SmartKey.
XPress and hold the Fbutton on the Smart-
Key until the trunk lid opens.
Closing automatically
XPress and release closing button :on the
trunk lid.
Vehicles with trunk lid remote closing fea-
ture and KEYLESS-GO:
XIf the driver's door is closed, you can simul-
taneously close the trunk lid and lock the
vehicle. The KEYLESS-GO key must be in the
rear detection range of the vehicle.
XPress locking button ;in the trunk lid.
The trunk partition, the loading aid and the
trunk lid are closed.
If a KEYLESS-GO key is detected outside the
vehicle, the trunk lid closes and the vehicle
locks.
If a KEYLESS-GO key s detected in the trunk, the
trunk lid opens again after it is closed. It does
not lock.
HANDS-FREE ACCESS
General notes
With KEYLESS-GO and HANDS-FREE ACCESS,
you can open or close the trunk lid or stop the
procedure without using your hands. This is use-
ful if you have your hands full. To do this, make
a kicking movement under the bumper with your
foot.
Observe the following points:
RCarry your KEYLESS-GO key about your per-
son. The SmartKey must be at the rear of the
82Trunk
Opening and closing
Page 86 of 322
If the trunk lid closing procedure has been stop-
ped:
RMove your foot under the bumper again and
the trunk lid will open.
If the trunk lid opening procedure has been
stopped:
RMove your foot under the bumper again and
the trunk lid will close.
Opening/closing automatically from
inside
Important safety notes
GWARNING
Parts of the body could become trapped dur-
ing automatic closing of the trunk lid. In addi-
tion, people may be standing in the closing
area or may enter the closing area, e.g. chil-
dren, during the closing procedure. There is a
risk of injury.
Make sure that nobody is in the vicinity of the
closing area during the closing process.
Release the remote operating switch imme-
diately if somebody becomes trapped. To re-
open the trunk lid, pull on the remote operat-
ing switch.
GWARNING
The trunk lid can be automatically opened or
closed even if the SmartKey is not in the vehi- cle. If children are left unsupervised in the
vehicle, they could activate the functions.
There is a risk of injury.
When leaving the vehicle, always take the
SmartKey with you and lock the vehicle. Never
leave children unsupervised in the vehicle.
!The trunk lid swings upwards when opened.
Therefore, make sure that there is sufficient
clearance above the trunk lid.
The opening dimensions of the trunk lid can be
found in the "Vehicle data" section
(
Ypage 317).
Opening and closing
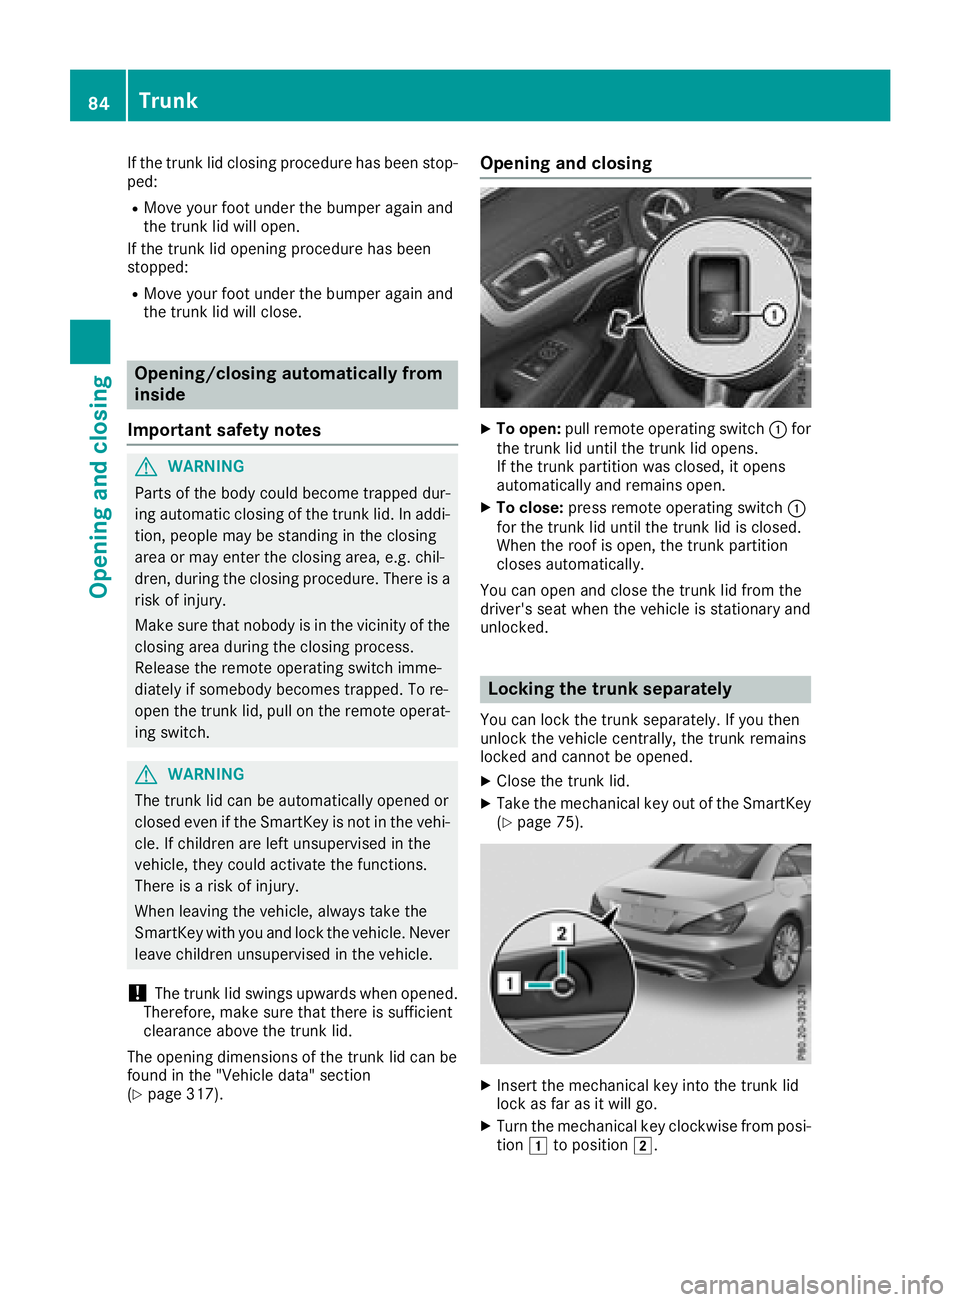
XTo open: pull remote operating switch :for
the trunk lid until the trunk lid opens.
If the trunk partition was closed, it opens
automatically and remains open.
XTo close: press remote operating switch :
for the trunk lid until the trunk lid is closed.
When the roof is open, the trunk partition
closes automatically.
You can open and close the trunk lid from the
driver's seat when the vehicle is stationary and
unlocked.
Locking the trunk separately
You can lock the trunk separately. If you then
unlock the vehicle centrally, the trunk remains
locked and cannot be opened.
XClose the trunk lid.
XTake the mechanical key out of the SmartKey
(Ypage 75).
XInsert the mechanical key into the trunk lid
lock as far as it will go.
XTurn the mechanical key clockwise from posi-
tion 1to position 2.
84Trunk
Opening and closing
Page 91 of 322
Roof
Important safety notes
GWARNING
If you do not fully open/close the soft top, the
soft-top hydraulics depressurize after a short
time. This causes the soft top to lower unex-
pectedly and may cause you or others to be
trapped. There is a risk of injury.
Always open or close the soft top completely.
GWARNING
Closing the roof manually is a complicated
and technically demanding procedure, which
requires a lot of strength. You or others can
become trapped. There is a risk of injury.
Only have the soft top closed manually at a
qualified specialist workshop.
!Never sit on the rear compartment trim or
stow heavy objects there. You will otherwise
damage the roof and rear compartment trim
of the vehicle.
!Do not forget that the weather can change
abruptly. Make certain that the roof is closed
when you leave the vehicle. The vehicle elec-
tronics can be damaged if water enters the
vehicle interior.
!When opening and closing the roof, make
sure that:
Rthere is sufficient clearance, as the roof
swings upwards.
Rthere is sufficient clearance behind the
vehicle, as the trunk lid swings backwards
beyond the bumper.
Rthe trunk is only loaded to below the trunk
partition.
Rthe trunk partition is not pushed up by the
load.
Rthe trunk partition is closed.
Rthe trunk lid is closed.
Rthe outside temperature is above 5 ‡
( Ò15 †).
You could otherwise damage the roof, trunk
and other parts of the vehicle.
The vehicle dimensions for opening/closing the
roof can be found in the "Vehicle data" section
(
Ypage 317). Make sure that the roof and rear window are
clean and d
ry before opening the roof. Other-
wise, water or dirt could enter the vehicle inte-
rior or trunk.
Opening and closing using the roof
switch
Important safety notes
GWARNING
When opening or closing the roof, body parts
could be trapped by, for example, the roof
mechanism, trunk lid or side windows. There
is a risk of injury.
When raising or lowering the roof, make sure
that no body parts are in the vicinity of moving
components. If someone becomes trapped,
release the button.
For safety reasons, you can only open or close
the roof when the vehicle is stationary.
!Operating the roof while pulling away:
RObserve the following traffic carefully.
RDo not drive faster than 25 mph (40 km/h).
RAvoid abrupt braking and swerving maneu-
vers.
Do not operate the roof when cornering, driv-
ing on uneven surfaces or during strong
winds. The vehicle may otherwise be dam-
aged.
iIf the traffic conditions mean that you have
to drive off while opening/closing the roof,
the procedure which was started while sta-
tionary can be continued at speeds of up to
approximately 25 mph (40 km/h).
Roof89
Opening and closing
Z
Page 306 of 322
tire can be found under "MOExtended tires (tires
with run-flat characteristics" (Ypage 271).
Rotating the wheels
GWARNING
Interchanging the front and rear wheels may
severely impair the driving characteristics if
the wheels or tires have different dimensions. The wheel brakes or suspension components
may also be damaged. There is a risk of acci-
dent.
Rotate front and rear wheels only if the wheels and tires are of the same dimensions.
!On vehicles equipped with a tire pressure
monitor, electronic components are located
in the wheel.
Tire-mounting tools should not be used near
the valve. This could damage the electronic
components.
Only have tires changed at a qualified spe-
cialist workshop.
Always pay attention to the instructions and
safety notes when changing a wheel
(
Ypage 304).
The wear patterns on the front and rear tires
differ, depending on the operating conditions.
Rotate the wheels before a clear wear pattern
has formed on the tires. Front tires typically
wear more on the shoulders and the rear tires in
the center.
On vehicles that have the same size front and
rear wheels, you can rotate the wheels accord-
ing to the intervals in the tire manufacturer's
warranty book in your vehicle documents. If no
warranty book is available, the tires s
hould be
rotated every 3,000 to 6,000 miles (5,000 to
10,000 km). Depending on tire wear, this may
be required earlier. Do not change the direction
of wheel rotation.
Clean the contact surfaces of the wheel and the
brake disc thoroughly every time a wheel is rota- ted. Check the tire pressure and reactivate the
tire pressure monitor if necessary.
Direction of rotation
Tires with a specified direction of rotation have
additional benefits, e.g. if there is a risk of hydro- planing. These advantages can only be gained if
the tires are installed corresponding to the
direction of rotation.
An arrow on the sidewall of the tire indicates its
correct direction of rotation.
Storing wheels
Store wheels that are not being used in a cool,
dry and preferably dark place. Protect the tires
from oil, grease, gasoline and diesel.
Mounting a wheel
Preparing the vehicle
XStop the vehicle on solid, non-slippery and
level ground.
XUnload the vehicle. The jack can only be used
when the vehicle is unladen.
XApply the electric parking brake manually.
XBring the front wheels into the straight-ahead
position.
XShift the transmission to position j.
XSwitch off the engine.
XVehicles without KEYLESS-GO:remove the
SmartKey from the ignition lock.
XVehicles with KEYLESS-GO: open the driv-
er's door.
The vehicle electronics now have status 0.
This is the same as the SmartKey having been
removed.
XVehicles with KEYLESS-GO: remove the
Start/Stop button from the ignition lock
(
Ypage 122).
XIf included in the vehicle equipment, remove
the tire-change tool kit from the vehicle.
XSafeguard the vehicle against rolling away.
304Changing a wheel
Wheels an d tires