2018 MERCEDES-BENZ SL ROADSTER air conditioning
[x] Cancel search: air conditioningPage 7 of 322

Head bag ......................................... 47
Important safety notes .................... 45
Introduction .....................................45
Knee bag .......................................... 46
Occupant Classification System
(OCS) ............................................... 47
PASSENGER AIR BAG indicator
lamps ............................................... 41
Side impact air bag .......................... 46
AIR FLOW ........................................... 116
Air vents
Glove box ....................................... 120
Important safety notes .................. 119
Setting ........................................... 119
Setting the blower output of the
AIRSCARF vents .............................1 20
Setting the center air vents ........... 120
Setting the side air vents ...............1 20
Switching AIRSCARF on/off .......... 100
Air-conditioning system
see Climate control
AIRSCARF
Switching on/off ........................... 100
AIRSCARF vents
Setting the blower output .............. 120
Alarm
ATA (Anti-Theft Alarm system) ......... 72
Switching off (ATA) .......................... 72
Switching the function on/off
(ATA) ................................................ 72
Alarm system
see ATA (Anti-Theft Alarm system)
Ambient lighting
Setting the brightness (on-board
computer) ...................................... 195
Setting the color (on-board com-
puter) ............................................. 195
AMG menu (on-board computer) ..... 197
Anti-lock braking system
see ABS (Anti-lock Braking System)
Anti-skid chains
see Snow chains
Anti-theft alarm system
see ATA (Anti-Theft Alarm system)
Ashtray ............................................... 247
Assistance display (on-board com-
puter) ..................................................1 93Assistance menu (on-board com-
puter)
..................................................1 92
ASSYST PLUS
Displaying a service message ........2
62
Hi
ding a service message .............. 262
Resetting the service interval dis-
play ................................................ 262
Service message ............................ 262
Special service requirements ......... 262
ATA (Anti-Theft Alarm system)
Activating/deactivating ................... 72
Function ...........................................7 2
Switching off the alarm .................... 72
ATTENTION ASSIST
Activating/deactivating ................. 193
Display message ............................ 216
Function/notes ............................. 177
Audio menu (on-board computer) .... 190
Audio system
see Digital Operator's Manual
Authorized Mercedes-Benz Center
see Qualified specialist workshop
Authorized workshop
see Qualified specialist workshop
AUTO lights
Display message ............................ 212
see Lights
Automatic car wash (care) ............... 263
Automatic engine start (ECO start/
stop function) .................................... 126
Automatic engine switch-off (ECO
start/stop function) .......................... 125
Automatic headlamp mode .............. 106
Automatic transmission
Accelerator pedal position ............. 133
Changing gear ............................... 133
Display message ............................ 222
Drive program ................................ 134
Drive program display .................... 131
Driving tips .................................... 133
DYNAMIC SELECT button (all vehi-
cles except Mercedes-AMG vehi-
cles) ............................................... 128
DYNAMIC SELECT controller
(Mercedes-AMG vehicles) .............. 129
Emergency running mode .............. 139
Engaging drive position .................. 132
Index5
Page 18 of 322
RACE START (Mercedes-AMG vehi-
cles).................................................... 161
RACE TIMER (on-board computer,
Mercedes-AMG vehicles) .................. 198
Radio
Selecting a station ......................... 190
see Digital Operator's Manual
Radio mode
see also Digital Operator's Man-
ual .................................................. 236
Radio-wave reception/transmis-
sion in the vehicle
Declaration of conformity ................ 27
Reading lamp ..................................... 109
Rear fog lamp
Display message ............................ 212
Rear lamps
see Lights
Rear view camera
Cleaning instructions ..................... 267
Display in the multimedia system .. 175
Function/notes ............................. 174
Switching on/off ........................... 174
Rear window defroster
General notes ................................ 118
Problem (malfunction) ................... 118
Switching on/off ........................... 118
Rear-view mirror
Dipping (automatic) ....................... 103
Refrigerant (air-conditioning sys-
tem)
Important safety notes .................. 316
Refueling
Fuel gauge ....................................... 33
Important safety notes .................. 140
Refueling process .......................... 140
see Fuel
Remote control
Programming (garage door
opener) .......................................... 253
Replacing bulbs
General notes ................................ 110
Reporting safety defects .................... 28
Rescue card ......................................... 29
Reserve (fuel tank)
see Fuel Reserve fuel
Display message ............................ 215
Warning lamp ................................. 232
Residual heat (climate control) ........ 119
Restraint system
Display message ............................ 208
Introduction ..................................... 40
Warning lamp ................................. 231
Warning lamp (function) ................... 40
Reverse gear (selector lever) ........... 132
Reversing feature
Side windows ................................... 86
Trunk lid ........................................... 81
Reversing lamps (display mes-
sage) ................................................... 212
Ro
adside Assistance (breakdown) .... 26
Roll bar
Display message ............................ 208
Operation ......................................... 52
Roller sunblind .................................... 93
Roof
Display message ............................ 224
Important safety notes .................... 89
Opening/closing (with roof
switch) ............................................. 90
Opening/closing (with SmartKey) .... 90
Overview .......................................... 89
Problem (malfunction) ..................... 94
Relocking ......................................... 90
Roof switch .......................................... 89
Route guidance
see also Digital Operator's Man-
ual .................................................. 236
Route guidance active ...................... 189
S
Safety
Children in the vehicle ..................... 56
see Occupant safety
Safety system
see Driving safety systems
SD card
Inserting ........................................ 241
Inserting/removing ........................ 241
Removing ....................................... 241
16Index
Page 19 of 322
SD memory cardsee also Digital Operator's Man-
ual .................................................. 236
Selecting ........................................1 91
Search & Send
see also Digital Operator's Man-
ual ..................................................2 36
Seat
Correct driver's seat position ........... 95
Seat belts
Adjusting the driver's and front-
passenger seat belt ......................... 44
Correct usage .................................. 43
Fastening ......................................... 44
Important safety guidelines ............. 42
Introduction ..................................... 41
Releasing ......................................... 44
Seat belt guide ................................. 97
Switching belt adjustment on/off
(on-board computer) ...................... 197
Warning lamp ................................. 227
Warning lamp (function) ................... 44
Seats
Adjusting (electrically) ..................... 97
Adjusting the head restraint ............ 98
Belt guide ......................................... 97
Important safety notes .................... 95
Overview .......................................... 95
Seat heating problem ...................... 99
Seat ventilation problem ................ 100
Sliding forward/back ....................... 98
Storing settings (memory func-
tion) ............................................... 105
Switching AIRSCARF on/off .......... 100
Switching seat heating on/off ......... 99
Switching seat ventilation on/off .... 99
Selector lever
Positions ........................................ 130
Sensors (cleaning instructions) ....... 267
Service menu (on-board com-
puter) .................................................. 194
Service message
see ASSYST PLUS
Service products
Brake fluid ..................................... 315
Coolant (engine) ............................ 315
Engine oil ....................................... 314
Fuel ................................................ 313 Important safety notes .................. 312
Refrigerant (air-conditioning sys-
tem) ............................................... 316
Washer fluid ................................... 316
Setting the air distribution ............... 117
Setting the airflow ............................ 117
Se
tting the date/time format
see also Digital Operator's Man-
ual .................................................. 236
Setting the language
see also Digital Operator's Man-
ual .................................................. 236
Setting the time
see also Digital Operator's Man-
ual .................................................. 236
Settings
Factory (on-board computer) ......... 197
On-board computer ....................... 194
SETUP (on-board computer,
Mercedes-AMG vehicles) .................. 198
Side impact air bag ............................. 46
Side marker lamp (display mes-
sage) ................................................... 212
Side windows
Cleaning ......................................... 266
Convenience closing feature ............ 87
Important safety information ........... 85
Opening/closing (all) ....................... 87
Opening/closing (front) ................... 86
Opening/closing (rear) .................... 86
Overview .......................................... 85
Problem (malfunction) ..................... 88
Resetting ......................................... 88
Reversing feature ............................. 86
SIRIUS services
see also Digital Operator's Man-
ual .................................................. 236
SmartKey
Changing the battery ....................... 76
Changing the programming ............. 74
Checking the battery ....................... 76
Display message ............................ 225
Door central locking/unlocking ....... 73
Important safety notes .................... 73
Loss ................................................. 77
Mechanical key ................................ 75
Opening/closing the roof ................ 90
Index17
Page 115 of 322
Overview of climate control systems
General notes
Observe the settings recommended on the fol-
lowing pages. The windows could otherwise fog
up.
To prevent the windows from fogging up:
Rswitch off climate control only briefly
Rswitch on air-recirculation mode only briefly
Rswitch on the cooling with air dehumidifica-
tion function
Rswitch on the defrost windshield function
briefly, if required
Climate control regulates the temperature and
the humidity in the vehicle interior and filters
undesirable substances out of the air. Climate control can only be operated when the
engine is running. Optimum operation is only
achieved with the side windows and roof closed.
iWhen the weather is warm, ventilate the
vehicle for a brief period. This will speed up
the cooling process and the desired vehicle
interior temperature will be reached more
quickly.
iIt is possible that the dehumidification func-
tion of the climate control system may be
activated automatically an hour after the
SmartKey has been removed. The vehicle is
then ventilated for 30 minutes to dry the air-
conditioning system.
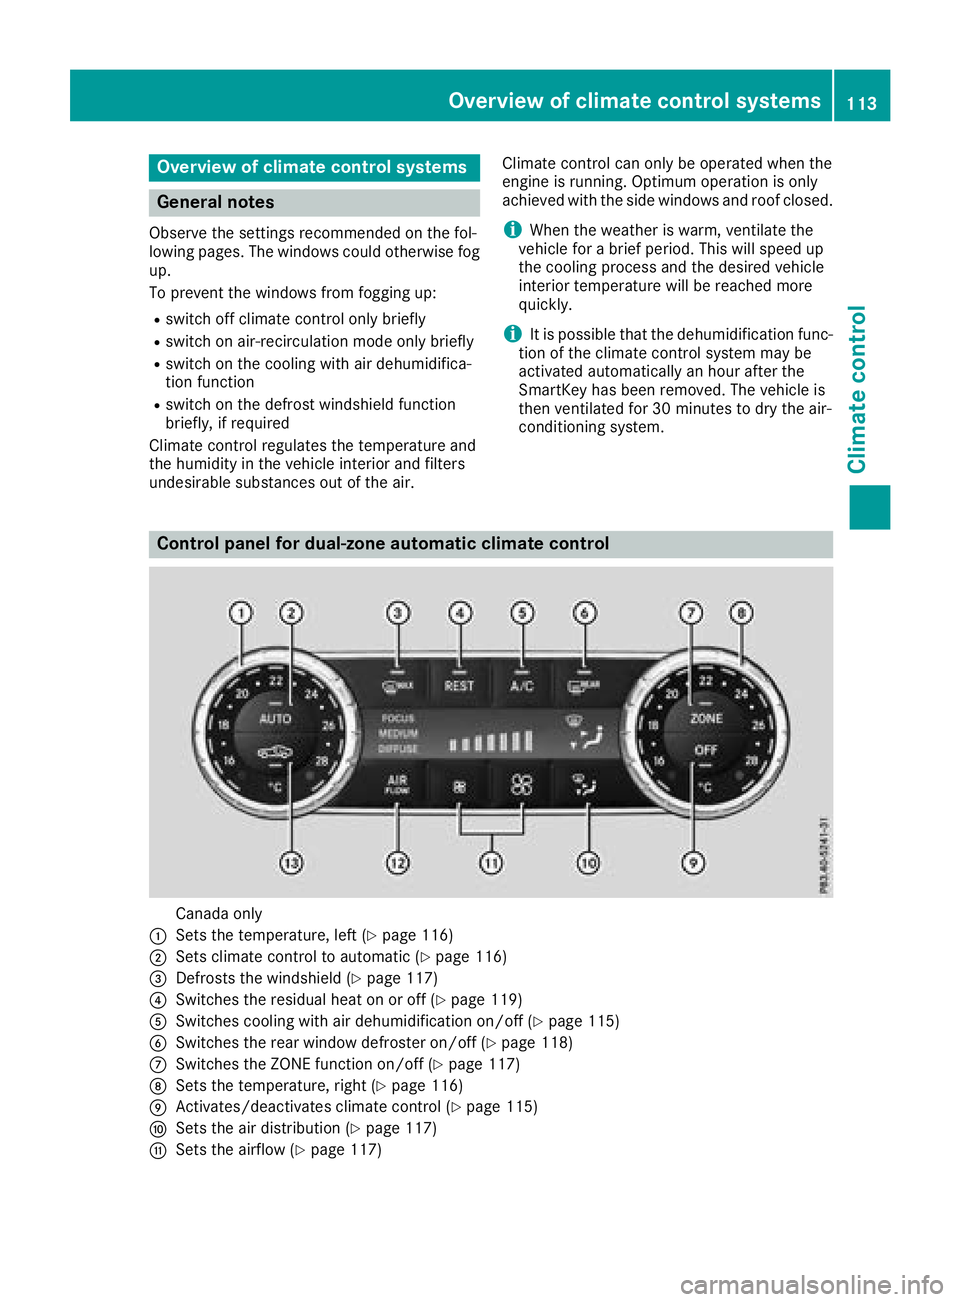
Control panel for dual-zone automatic climate control
Canada only
:Sets the temperature, left (Ypage 116)
;Sets climate control to automatic (Ypage 116)
=Defrosts the windshield (Ypage 117)
?Switches the residual heat on or off (Ypage 119)
ASwitches cooling with air dehumidification on/off (Ypage 115)
BSwitches the rear window defroster on/off (Ypage 118)
CSwitches the ZONE function on/off (Ypage 117)
DSets the temperature, right (Ypage 116)
EActivates/deactivates climate control (Ypage 115)
FSets the air distribution (Ypage 117)
GSets the airflow (Ypage 117)
Overview of climate control systems113
Climate control
Page 127 of 322
iUpshifts take place at higher engine speeds
after a cold start. This helps the catalytic con-
verter to reach its operating temperature
more quickly.
Information on the automatic release of the
electric parking brake (
Ypage 143).
Hill start assist
Hill start assist helps you when pulling away
forward or in reverse on an uphill gradient. It
holds the vehicle for a short time after you have
removed your foot from the brake pedal. This
gives you enough time to move your foot from
the brake pedal to the accelerator pedal and to
depress it before the vehicle begins to roll.
GWARNING
After a short time, hill start assist will no lon-
ger brake your vehicle and it could roll away.
There is a risk of an accident and injury.
Therefore, quickly move your foot from the
brake pedal to the accelerator pedal. Never
leave the vehicle when it is held by hill start
assist.
Hill start assist is not active if:
Ryou are pulling away on a level road or on a
downhill gradient
Rthe transmission is in position i
Rthe electric parking brake is applied
RESP®is malfunctioning
ECO start/stop function
Introduction
The ECO start/stop function switches the
engine off automatically if the vehicle is stopped
under certain conditions.
The engine starts automatically when the driver
wants to pull away again. The ECO start/stop
function thereby helps you to reduce the fuel
consumption and emissions of your vehicle.
Important safety notes
GWARNING
If the engine is switched off automatically and
you exit the vehicle, the engine is restarted
automatically. The vehicle may begin moving.
There is a risk of accident and injury.
If you wish to exit the vehicle, always turn off
the ignition and secure the vehicle against
rolling away.
General notes
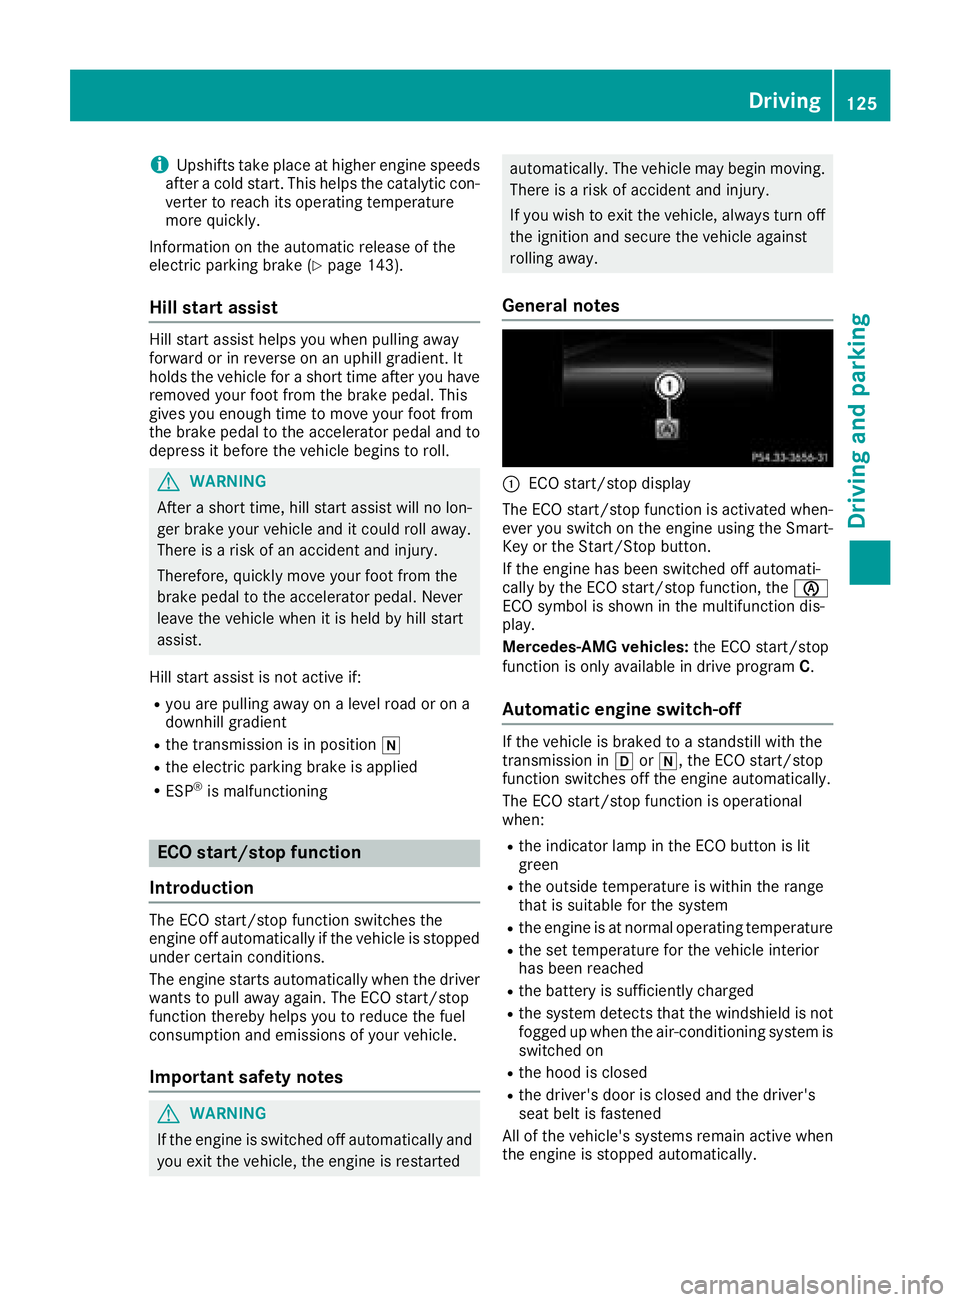
:ECO start/stop display
The ECO start/stop function is activated when- ever you switch on the engine using the Smart-
Key or the Start/Stop button.
If the engine has been switched off automati-
cally by the ECO start/stop function, the è
ECO symbol is shown in the multifunction dis-
play.
Mercedes-AMG vehicles: the ECO start/stop
function is only available in drive program C.
Automatic engine switch-off
If the vehicle is braked to a standstill with the
transmission inhori, the ECO start/stop
function switches off the engine automatically.
The ECO start/stop function is operational
when:
Rthe indicator lamp in the ECO button is lit
green
Rthe outside temperature is within the range
that is suitable for the system
Rthe engine is at normal operating temperature
Rthe set temperature for the vehicle interior
has been reached
Rthe battery is sufficiently charged
Rthe system detects that the windshield is not
fogged up when the air-conditioning system is switched on
Rthe hood is closed
Rthe driver's door is closed and the driver's
seat belt is fastened
All of the vehicle's systems remain active when
the engine is stopped automatically.
Driving125
Driving and parking
Z
Page 128 of 322
All vehicles (except Mercedes-AMG vehi-
cles):automat icengine switch-off can take
plac e a maximum of four times ina row (initial
stop, then three subsequent stops).
Mercedes-AMG vehicles: the number of con-
secutive automat icengine switch-offs isunlimi-
te d.
The HOLD function can beactivated ifthe
engine has been switched off automatically. It is
then not necessary to continue applying the
brakes during the automat icstop phase. When
you depr ess the accelerator pedal,the engine
starts automatically and the braking effect of
the HOLD function isdeactivate d.
Automatic engine start
The engine starts automatically if:
Ryouswitch off the ECO start /stop function by
pressing the ECO button
Rin transmission position hori, the brake
pedal isreleased and the HOLD function isnot
active
Ryou depr ess the accelerator pedal
Ryou engage reverse gear k
Ryou move the transmission out of position j
Ryouswitch to drive program S+
Ryouswitch to drive program Sor M
(Mercedes-AMG veh icles)
Ryou unfasten your seat beltor open the driv-
er's door
Rthe veh iclestarts to roll
Rthe brake system requires th is
Rthe temperatureinthe veh icleinterior devi-
ates from the set range
Rthe system detects moisture on the wind-
shield when the air-conditioning system is
swit ched on
Rthe battery's condition of charge istoo low
Sh ifting the transmission to position jdoes
not start the engine.
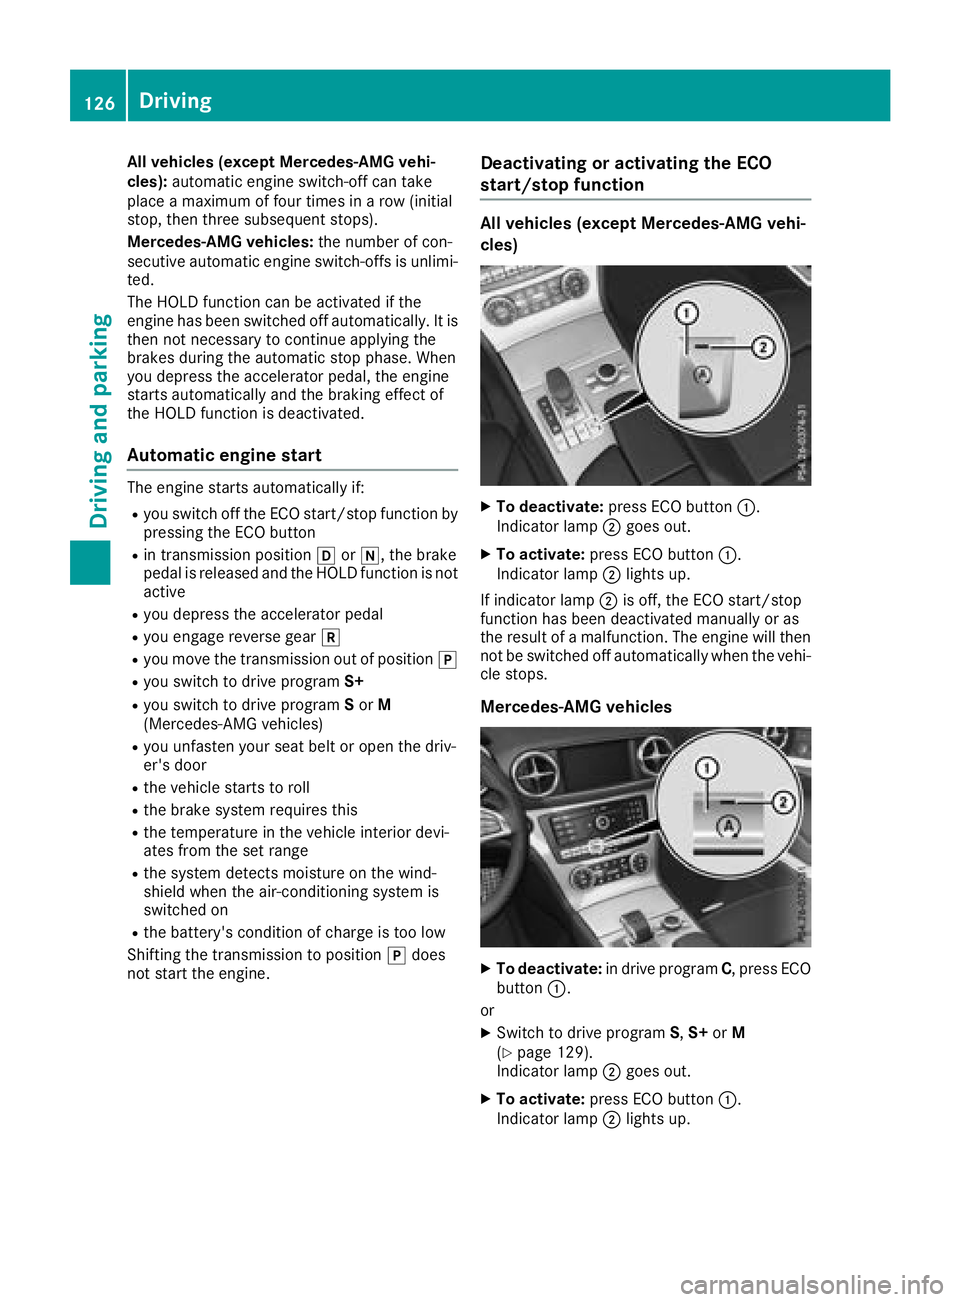
Deactivating or activating the ECO
start/stop function
All vehicles (except Mercedes-AMG vehi-
cles)
XTo deactivate: press ECO button :.
In dicator lamp ;goes out.
XTo activate: press ECO button :.
In dicator lamp ;lights up.
If indicator lamp ;is off, the ECO start/stop
function has been deactivated manually or as
the result of a malfunction. The engine willthen
not be switched off automatically when the vehi-
cle stops.
Mercedes-AMG vehicles
XTo deactivate: indrive program C, press ECO
button :.
or
XSwit ch to drive program S,S+ orM
(Ypage 129).
In dicator lamp ;goes out.
XTo activate: press ECO button :.
Indicator lamp ;lights up.
126Driving
Driving and parking
Page 305 of 322
Curb weight
The weight of a vehicle with standard equipment
including the maximum capacity of fuel, oil and
coolant. It also includes the air-conditioning sys-
tem and optional equipment if these are instal-
led in the vehicle, but does not include passen-
gers or luggage.
Maximum load rating
The maximum load rating is the maximum per-
missible weight in kilograms or lbs for which a
tire is approved.
Maximum permissible tire pressure
Maximum permissible tire pressure for one tire.
Maximum load on one tire
Maximum load on one tire. This is calculated by
dividing the maximum axle load of one axle by
two.
PSI (pounds per square inch)
A standard unit of measure for tire pressure.
Aspect ratio
Relationship between tire height and tire width
in percent.
Tire pressure
This is pressure inside the tire applying an out-
ward force to each square inch of the tire's sur-
face. The tire pressure is specified in pounds per
square inch (psi), in kilopascal (kPa) or in bar.
The tire pressure should only be corrected when
the tires are cold.
Cold tire pressure
The tires are cold:
Rif the vehicle has been parked with the tires
out of direct sunlight for at least three hours
and
Rif the vehicle has not been driven further than
1 mile (1.6 km)
Tread
The part of the tire that comes into contact with
the road.
Bead
The tire bead ensures that the tire sits securely
on the wheel. There are several steel wires in the
bead to prevent the tire from coming loose from the wheel rim.
Sidewall
The part of the tire between the tread and the
bead.
Weight of optional extras
The combined weight of those optional extras
that weigh more than the replaced standard
parts and more than 2.3 kg (5 lbs).Thes e
option al extras, such as high-performance
brakes, level control, a roof rack or a high-per-
formance battery, are not included in the curb
weight and the weight of the accessories.
TIN (Tire Identification Number)
This is a unique identifier which can be used by
a tire manufacturer to identify tires, for example
for a product recall, and thus identify the pur-
chasers. The TIN is made up of the manufactur-
er's identity code, tire size, tire type code and
the manufacturing date.
Load bearing index
The load bearing index (also load index) is a code
that contains the maximum load bearing capa-
city of a tire.
Traction
Traction is the result of friction between the tires
and the road surface.
Treadwear indicators
Narrow bars (tread wear bars) that are distrib-
uted over the tire tread. If the tire tread is level
with the bars, the wear limit of áin (1.6 mm)
has been reached.
Occupant distribution
The distribution of occupants in a vehicle at their
designated seating positions.
Total load limit
Nominal load and luggage load plus 68 kg
(150 lbs) multiplied by the number of seats in
the vehicle.
Changing a wheel
Flat tire
The "Breakdown assistance" section
(Ypage 271) contains information and notes on
how to deal with a flat tire. Information on driv-
ing with MOExtended tires in the event of a flat
Changing a wheel303
Wheels and tires
Z