2018 MERCEDES-BENZ SL ROADSTER tire size
[x] Cancel search: tire sizePage 22 of 322
Load index .....................................300
Load index (definition) ................... 302
M+S tires ....................................... 287
Maximum load on a tire (defini-
tion) ............................................... 303
Maximum loaded vehicle weight
(definition) ..................................... 302
Maximum permissible tire pres-
sure (definition) .............................3 03
Maximum tire load ......................... 301
Maximum tire load (definition) ....... 303
MOExtended tires .......................... 287
Optional equipment weight (defi-
nition) ............................................ 303
Overview ........................................ 285
PSI (pounds per square inch) (def-
inition) ...........................................3 03
Replacing ....................................... 304
Service life ..................................... 286
Sidewall (definition) ....................... 303
Speed rating (definition) ................ 302
Storing ...........................................3 04
Structure and characteristics
(definition) ..................................... 302
Summer tires ................................. 287
Temperature .................................. 298
TIN (Tire Identification Number)
(definition) ..................................... 303
Tire bead (definition) ......................3 03
Tire pressure (definition) ................ 303
Tire pressures (recommended) ...... 302
Tire size (data) ............................... 308
Tire size designation, load-bearing
capacity, speed rating .................... 298
Tire tread ....................................... 286
Tire tread (definition) ..................... 303
Total load limit (definition) ............. 303
Traction ......................................... 297
Traction (definition) ....................... 303
Tread wear ..................................... 297
Uniform Tire Quality Grading
Standards ...................................... 297
Uniform Tire Quality Grading
Standards (definition) .................... 302
Wear indi
cator (definition) ............. 303
Wheel and tire combination ........... 308
Wheel rim (definition) .................... 302
see Flat tire Tow-starting
Emergency engine starting ............ 282
Important safety notes .................. 280
Towing away
Important safety guidelines ........... 280
Installing the towing eye ................ 281
Removing the towing eye ............... 281
Transporting the vehicle ................ 282
With both axles on the ground ....... 281
With the rear axle raised ................ 282
Traffic reports
see also Digital Operator's Man-
ual .................................................. 236
Traffic Sign Assist
Display message ............................ 216
Transmission
Selector lever ................................ 130
see Automatic transmission
Transmission position display ......... 131
Transporting the vehicle .................. 282
Trip computer (on-board com-
puter) .................................................. 188
Trip odometer
Calling up ....................................... 188
Resetting (on-board computer) ...... 189
Trunk
Emergency release .......................... 85
Important safety notes .................... 80
Locking separately ........................... 84
Opening/closing (automatically
from inside) ...................................... 84
Opening/closing (automatically
from outside) ................................... 82
Opening/closing (from outside,
HANDS-FREE ACCESS) .................... 82
Opening/closing (manually from
outside) ............................................ 81
Overview .......................................... 80
Power closing .................................. 80
Trunk lid
Display message ............................ 224
Opening dimensions ...................... 317
Trunk partition
Display message ............................ 224
General notes .................................. 91
Installing .......................................... 91
Opening/closing .............................. 91
Removing ......................................... 91
20Index
Page 24 of 322
Washer fluidDisplay message ............................ 225
Weather display (COMAND)
see also Digital Operator's Man-
ual .................................................. 236
Wheel and tire combinations
Tires ............................................... 308
Wheel bolt tightening torque ........... 308
Wheel chock ...................................... 305
Wheels
Changing a wheel .......................... 303
Checking ........................................ 285
Cleaning ......................................... 266
Important safety notes .................. 285
Information on driving .................... 285
Interchanging/changing ................ 304
Mounting a new wheel ...................3 07
Mounting a wheel .......................... 304
Overview ........................................ 285
Removing a wheel .......................... 307
Storing ...........................................3 04
Tightening torque ........................... 308
Wheel size/tire size ....................... 308
Wind screen
Electrical wind screen ......................9 2
Windows
see Side windows
Windshield
Defrosting ...................................... 117
Windshield washer fluid
see Windshield washer system
Windshield washer system
Adding washer fluid ....................... 261
Important safety notes .................. 316
Windshield wipers
Display message ............................ 225
Problem (malfunction) ................... 112
Replacing the wiper blades ............ 111
Switching on/off ........................... 110
Winter driving
Important safety notes .................. 287
Slippery road surfaces ................... 148
Snow chains .................................. 287
Winter operation
Overview ........................................ 287
Winter tires
M+S tires ....................................... 287 Wiper blades
Cleaning ......................................... 267
Important safety notes .................. 111
Replacing ....................................... 111
Workshop
see Qualified specialist workshop
Z
ZONE functionSwitching on/off ........................... 117
22Index
Page 68 of 322
iOnly use wheels with the recommended tire
sizes. Only then will ESP®function properly.
Characteristics of ESP®
General information
If the ÷ ESP®warning lamp goes out before
beginning the journey, ESP®is automatically
active.
If ESP
®intervenes, the ÷ESP®warning lamp
flashes in the instrument cluster. If ESP
®intervenes:
XDo not deactivate ESP®under any circum-
stances.
XOnly depress the accelerator pedal as far as
necessary when pulling away.
XAdapt your driving style to suit the prevailing
road and weather conditions.
The influence of drive programs on ESP®
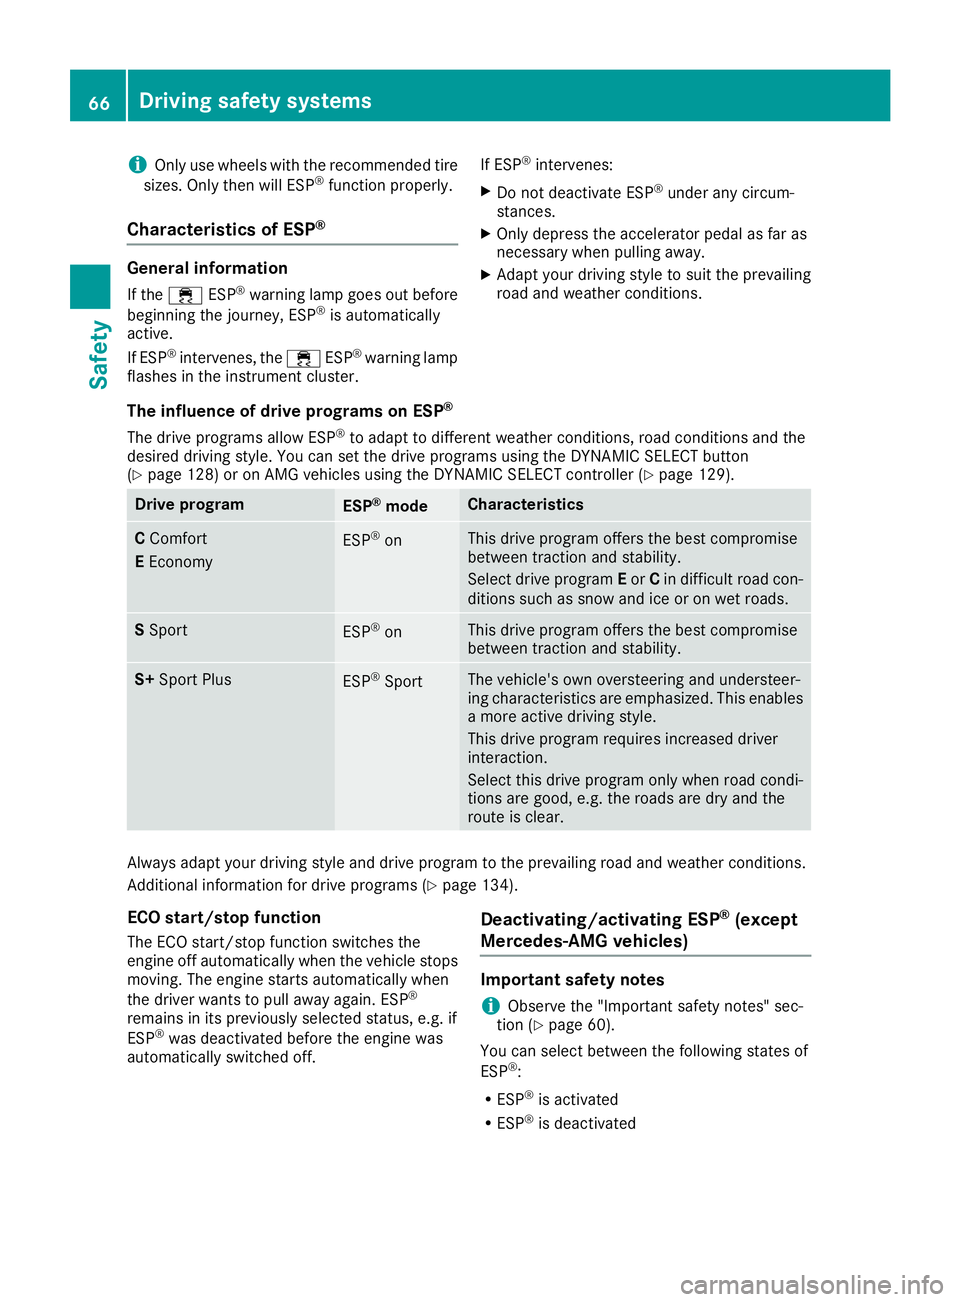
The drive programs allow ESP®to adapt to different weather conditions, road conditions and the
desired driving style. You can set the drive programs using the DYNAMIC SELECT button
(
Ypage 128) or on AMG vehicles using the DYNAMIC SELECT controller (Ypage 129).
Drive programESP®modeCharacteristics
C Comfort
E EconomyESP®onThis drive program offers the best compromise
between traction and stability.
Select drive program Eor Cin difficult road con-
ditions such as snow and ice or on wet roads.
S SportESP®onThis drive program offers the best compromise
between traction and stability.
S+ Sport PlusESP®SportThe vehicle's own oversteering and understeer-
ing characteristics are emphasized. This enables
a more active driving style.
This drive program requires increased driver
interaction.
Select this drive program only when road condi-
tions are good, e.g. the roads are dry and the
route is clear.
Always adapt your driving style and drive program to the prevailing road and weather conditions.
Additional information for drive programs (
Ypage 134).
ECO start/stop function
The ECO start/stop function switches the
engine off automatically when the vehicle stops
moving. The engine starts automatically when
the driver wants to pull away again. ESP
®
remains in its previously selected status, e.g. if
ESP®was deactivated before the engine was
automatically switched off.
Deactivating/activating ESP®(except
Mercedes ‑AMG vehicles)
Important safety notes
iObserve the "Important safety notes" sec-
tion (Ypage 60).
You can select between the following states of
ESP
®:
RESP®is activated
RESP®is deactivated
66Driving safety systems
Safety
Page 247 of 322
the loading aid rises automatically. When the
roof is closed, the trunk partition remains in
the open position. The trunk partition movesto the closed position automatically when the
roof is lowered.
Problems with the loading aid
ProblemPossible causes/consequences and
MSolutions
It is no longer possible to
lower the stowed roof in
the trunk using the load-
ing aid.You cannot close the trunk any more.
XCall a qualified specialist workshop.
Stowage well under the trunk floor
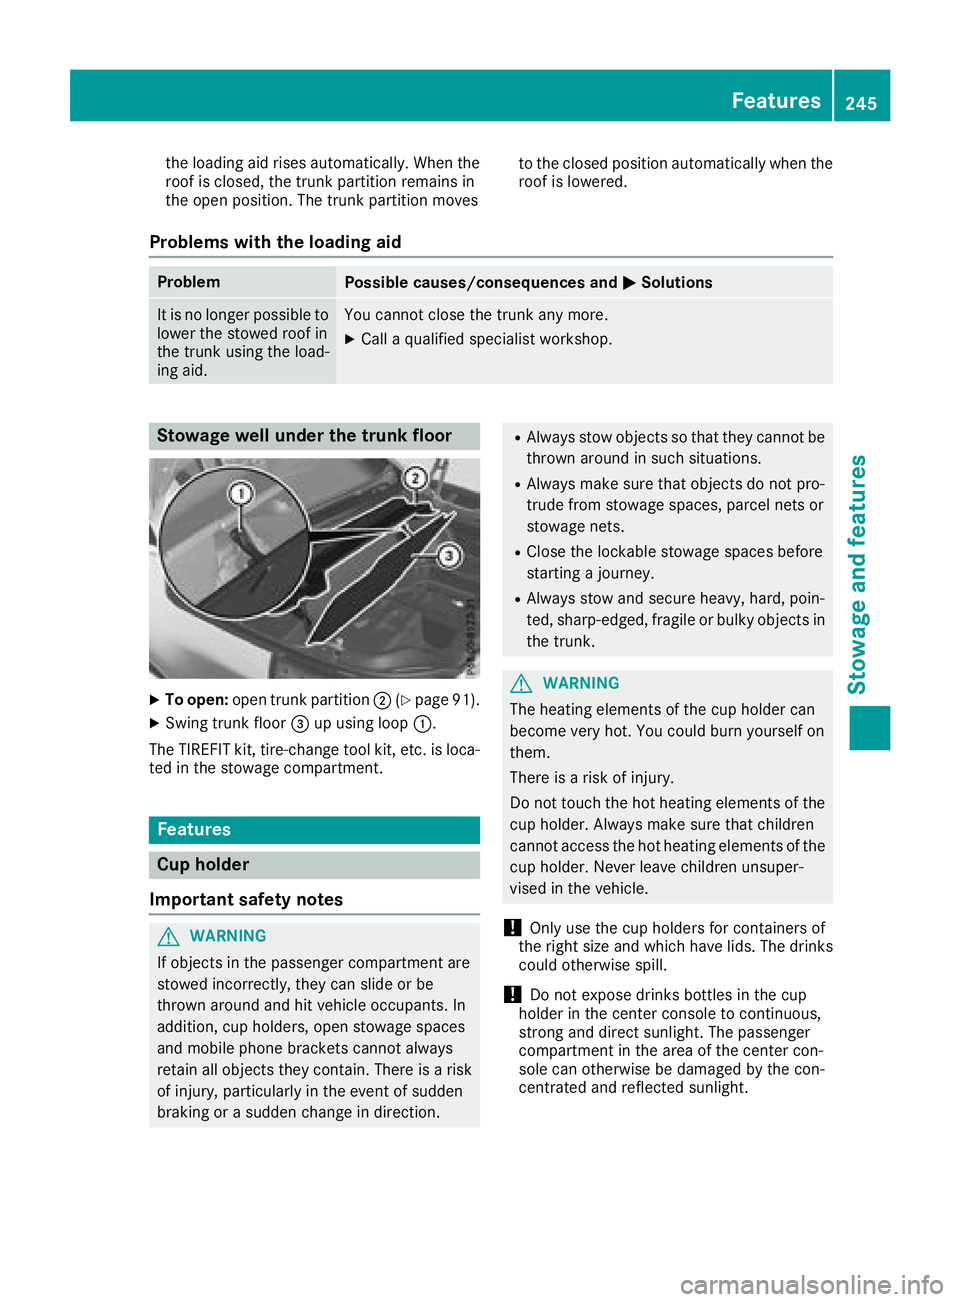
XTo open:open trunk partition ;(Ypage 91).
XSwing trunk floor =up using loop :.
The TIREFIT kit, tire-change tool kit, etc. is loca- ted in the stowage compartment.
Features
Cup holder
Important safety notes
GWARNING
If objects in the passenger compartment are
stowed incorrectly, they can slide or be
thrown around and hit vehicle occupants. In
addition, cup holders, open stowage spaces
and mobile phone brackets cannot always
retain all objects they contain. There is a risk of injury, particularly in the event of sudden
braking or a sudden change in direction.
RAlways stow objects so that they cannot be
thrown around in such situations.
RAlways make sure that objects do not pro-
trude from stowage spaces, parcel nets or
stowage nets.
RClose the lockable stowage spaces before
starting a journey.
RAlways stow and secure heavy, hard, poin-
ted, sharp-edged, fragile or bulky objects in
the trunk.
GWARNING
The heating elements of the cup holder can
become very hot. You could burn yourself on
them.
There is a risk of injury.
Do not touch the hot heating elements of the
cup holder. Always make sure that children
cannot access the hot heating elements of the
cup holder. Never leave children unsuper-
vised in the vehicle.
!Only use the cup holders for containers of
the right size and which have lids. The drinks could otherwise spill.
!Do not expose drinks bottles in the cup
holder in the center console to continuous,
strong and direct sunlight. The passenger
compartment in the area of the center con-
sole can otherwise be damaged by the con-
centrated and reflected sunlight.
Features245
Stowag ean d features
Z
Page 272 of 322
XTo stow:fold the reflective safety jacket, roll
it up and stow it in safety jacket bag :.
XSlide safety jacket bag:along the lower
edge of the armrest into the safety jacket
compartment. Meanwhile, ensure that
loop ;hangs out well within reach.
iRemove a new reflective safety jacket from
its packaging material before sliding it into
the safety jacket compartment. The packag-
ing material may otherwise cause it to slip out
or make removing it difficult.
Observe the legal requirements in each country.
Notes on the reflective safety jacket
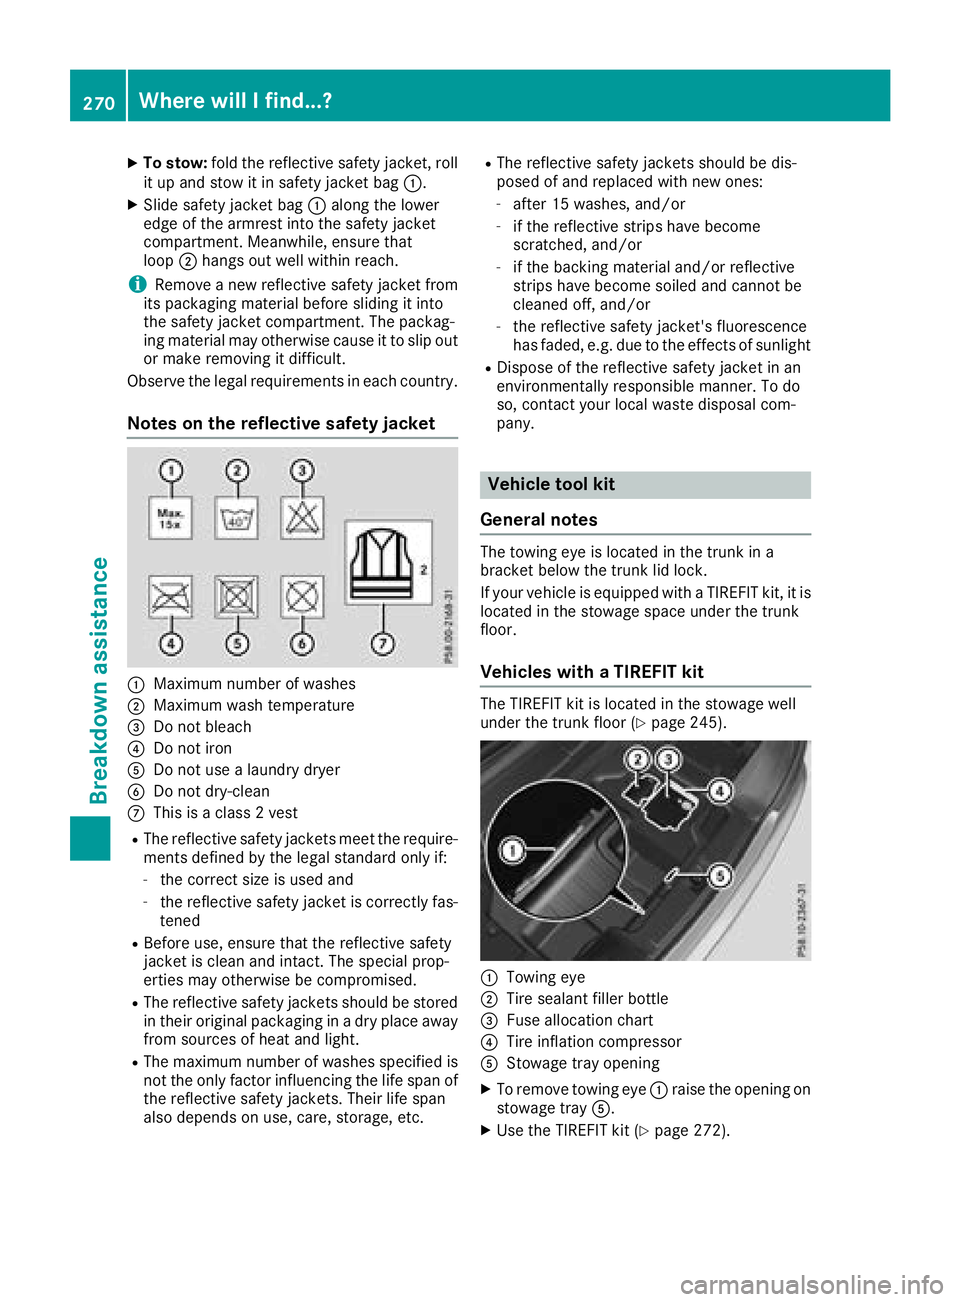
:Maximum number of washes
;Maximum wash temperature
=Do not bleach
?Do not iron
ADo not use a laundry dryer
BDo not dry-clean
CThis is a class 2 vest
RThe reflective safety jackets meet the require-
ments defined by the legal standard only if:
-the correct size is used and
-the reflective safety jacket is correctly fas-
tened
RBefore use, ensure that the reflective safety
jacket is clean and intact. The special prop-
erties may otherwise be compromised.
RThe reflective safety jackets should be stored
in their original packaging in a dry place away
from sources of heat and light.
RThe maximum number of washes specified is not the only factor influencing the life span of
the reflective safety jackets. Their life span
also depends on use, care, storage, etc.
RThe reflective safety jackets should be dis-
posed of and replaced with new ones:
-after 15 washes, and/or
-if the reflective strips have become
scratched, and/or
-if the backing material and/or reflective
strips have become soiled and cannot be
cleaned off, and/or
-the reflective safety jacket's fluorescence
has faded, e.g. due to the effects of sunlight
RDispose of the reflective safety jacket in an
environmentally responsible manner. To do
so, contact yo ur l
ocal waste disposal com-
pany.
Vehicle tool kit
General notes
The towing eye is located in the trunk in a
bracket below the trunk lid lock.
If your vehicle is equipped with a TIREFIT kit, it is
located in the stowage space under the trunk
floor.
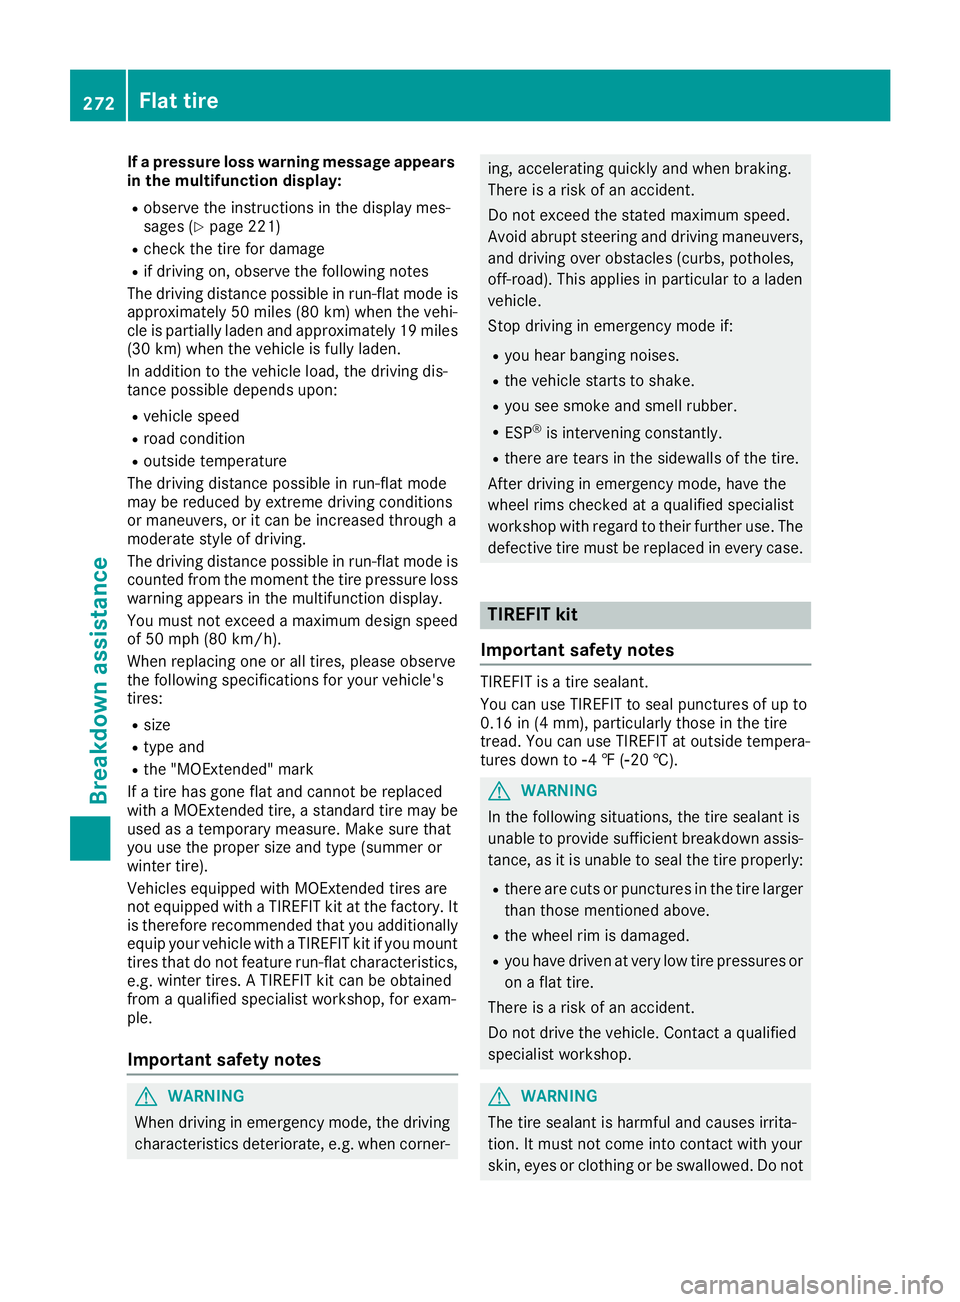
Vehicles with a TIREFIT kit
The TIREFIT kit is located in the stowage well
under the trunk floor (Ypage 245).
:Towing eye
;Tire sealant filler bottle
=Fuse allocation chart
?Tire inflation compressor
AStowage tray opening
XTo remove towing eye :raise the opening on
stowage tray A.
XUse the TIREFIT kit (Ypage 272).
270Where will I find...?
Breakdown assis tance
Page 273 of 322
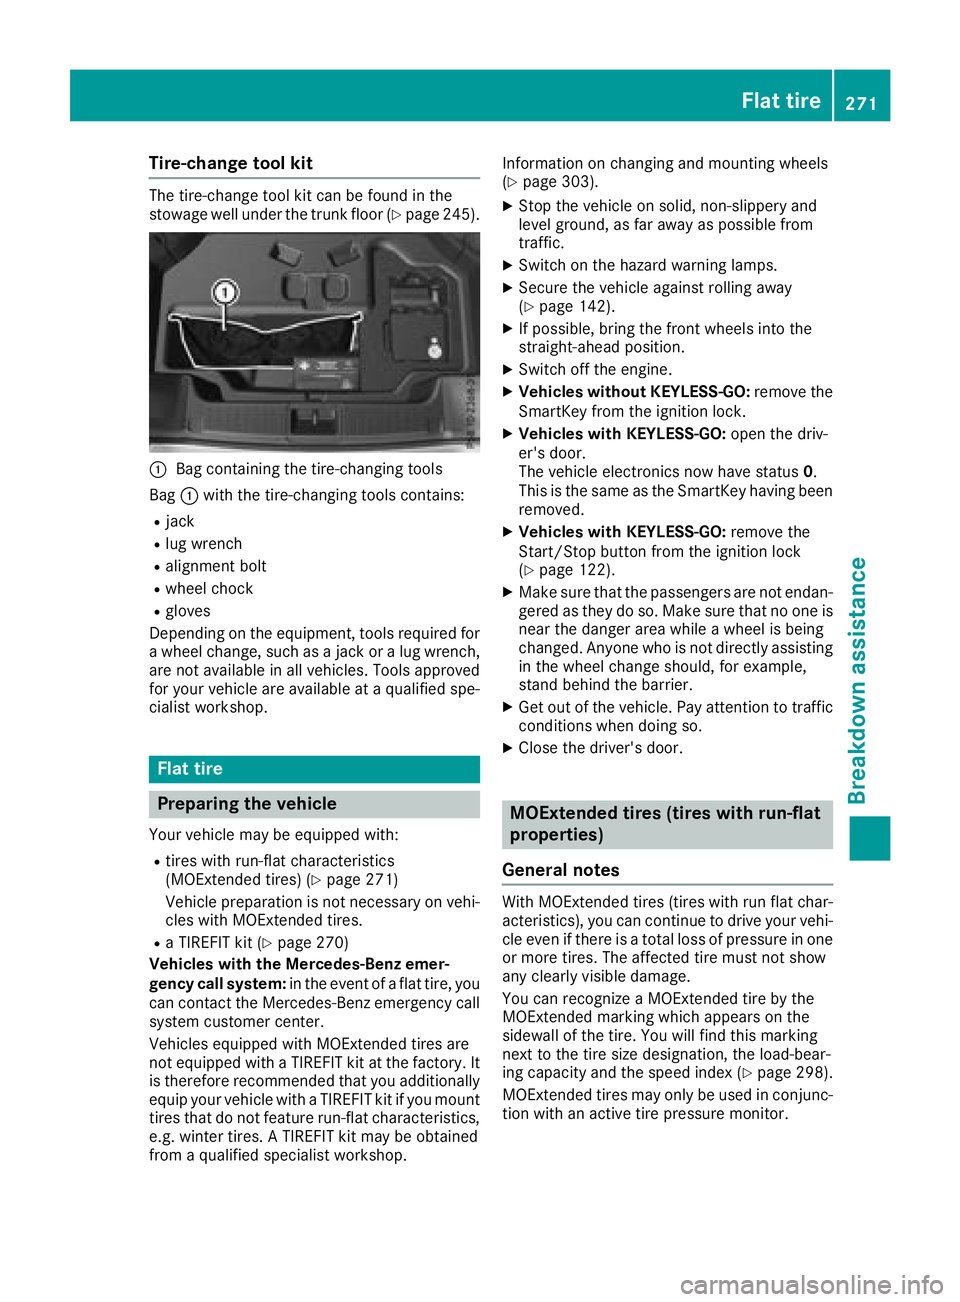
Tire-change tool kit
The tire-change tool kit can be found in the
stowage well under the trunk floor (Ypage 245).
:Bag containing the tire-changing tools
Bag :with the tire-changing tools contains:
Rjack
Rlug wrench
Ralignment bolt
Rwheel chock
Rgloves
Depending on the equipment, tools required for
a wheel change, such as a jack or a lug wrench, are not available in all vehicles. Tools approved
for your vehicle are available at a qualified spe-
cialist workshop.
Flat tire
Preparing the vehicle
Your vehicle may be equipped with:
Rtires with run-flat characteristics
(MOExtended tires) (Ypage 271)
Vehicle preparation is not necessary on vehi-
cles with MOExtended tires.
Ra TIREFIT kit (Ypage 270)
Vehicles with the Mercedes-Benz emer-
gency call system: in the event of a flat tire, you
can contact the Mercedes-Benz emergency call
system customer center.
Vehicles equipped with MOExtended tires are
not equipped with a TIREFIT kit at the factory. It
is therefore recommended that you additionally
equip your vehicle with a TIREFIT kit if you mount tires that do not feature run-flat characteristics,
e.g. winter tires. A TIREFIT kit may be obtained
from a qualified specialist workshop. Information on changing and mounting wheels
(
Ypage 303).
XStop the vehicle on solid, non-slippery and
level ground, as far away as possible from
traffic.
XSwitch on the hazard warning lamps.
XSecure the vehicle against rolling away
(Ypage 142).
XIf possible, bring the front wheels into the
straight-ahead position.
XSwitch off the engine.
XVehicles without KEYLESS-GO:
remove the
SmartKey from the igniti on lock.
XVehicles with KEYLESS-GO: open the driv-
er's door.
The vehicle electronics now have status 0.
This is the same as the SmartKey having been
removed.
XVehicles with KEYLESS-GO: remove the
Start/Stop button from the ignition lock
(
Ypage 122).
XMake sure that the passengers are not endan-
gered as they do so. Make sure that no one is near the danger area while a wheel is being
changed. Anyone who is not directly assisting
in the wheel change should, for example,
stand behind the barrier.
XGet out of the vehicle. Pay attention to traffic
conditions when doing so.
XClose the driver's door.
MOExtended tires (tires with run-flat
properties)
General notes
With MOExtended tires (tires with run flat char-
acteristics), you can continue to drive your vehi-
cle even if there is a total loss of pressure in one
or more tires. The affected tire must not show
any clearly visible damage.
You can recognize a MOExtended tire by the
MOExtended marking which appears on the
sidewall of the tire. You will find this marking
next to the tire size designation, the load-bear-
ing capacity and the speed index (
Ypage 298).
MOExtended tires may only be used in conjunc-
tion with an active tire pressure monitor.
Flat tire271
Breakdown assistance
Page 274 of 322
If a pressure loss warning message appears
in the multifunction display:
Robserve the instructions in the display mes-
sages (Ypage 221)
Rcheck the tire for damage
Rif driving on, observe the following notes
The driving distance possible in run-flat mode is
approximately 50 miles (80 km) when the vehi-
cle is partially laden and approximately 19 miles
(30 km) when the vehicle is fully laden.
In addition to the vehicle load, the driving dis-
tance possible depends upon:
Rvehicle speed
Rroad condition
Routside temperature
The driving distance possible in run-flat mode
may be reduced by extreme driving conditions
or maneuvers, or it can be increased through a
moderate style of driving.
The driving distance possible in run-flat mode is
counted from the moment the tire pressure loss
warning appears in the multifunction display.
You must not exceed a maximum design speed
of 50 mph (80 km/h).
When replacing one or all tires, please observe
the following specifications for your vehicle's
tires:
Rsize
Rtype and
Rthe "MOExtended" mark
If a tire has gone flat and cannot be replaced
with a MOExtended tire, a standard tire may be
used as a temporary measure. Make sure that
you use the proper size and type (summer or
winter tire).
Vehicles equipped with MOExtended tires are
not equipped with a TIREFIT kit at the factory. It
is therefore recommended that you additionally
equip your vehicle with a TIREFIT kit if you mount
tires that do not feature run-flat characteristics,
e.g. winter t
ires. A TIREFIT kit can be obtained
from a qualified specialist workshop, for exam-
ple.
Important safety notes
GWARNING
When driving in emergency mode, the driving
characteristics deteriorate, e.g. when corner-
ing, accelerating quickly and when braking.
There is a risk of an accident.
Do not exceed the stated maximum speed.
Avoid abrupt steering and driving maneuvers, and driving over obstacles (curbs, potholes,
off-road). This applies in particular to a laden
vehicle.
Stop driving in emergency mode if:
Ryou hear banging noises.
Rthe vehicle starts to shake.
Ryou see smoke and smell rubber.
RESP®is intervening constantly.
Rthere are tears in the sidewalls of the tire.
After driving in emergency mode, have the
wheel rims checked at a qualified specialist
workshop with regard to their further use. The
defective tire must be replaced in every case.
TIREFIT kit
Important safety notes
TIREFIT is a tire sealant.
You can use TIREFIT to seal punctures of up to
0.16 in (4 mm), particularly those in the tire
tread. You can use TIREFIT at outside tempera-
tures down to Ò4 ‡ (Ò20 †).
GWARNING
In the following situations, the tire sealant is
unable to provide sufficient breakdown assis-
tance, as it is unable to seal the tire properly:
Rthere are cuts or punctures in the tire larger
than those mentioned above.
Rthe wheel rim is damaged.
Ryou have driven at very low tire pressures or on a flat tire.
There is a risk of an accident.
Do not drive the vehicle. Contact a qualified
specialist workshop.
GWARNING
The tire sealant is harmful and causes irrita-
tion. It must not come into contact with your
skin, eyes or clothing or be swallowed. Do not
272Flat tire
Breakdown assistance
Page 288 of 322
Check wheels and tires for damage at least once
a month. Check wheels and tires afterdriving
off-road or on rough roads. Damaged wheels
can cause a loss of tire pressure. Pay particular
attention to damage such as:
Rcuts inthe tires
Rpunctures inthe tires
Rtears inthe tires
Rbulges on tires
Rdeformation or severe corrosion on wheels
Regularly check the tire tread depth and the
condition of the tread across the whole width of
the tire (
Ypage 286). Ifnecessary, turn the
front wheels to full lock inorder to inspect the
inner sideof the tire surface.
All wheels must have a valve cap to protect the valve against dirtand moisture. Do not mount
anything onto the valve other than the standard
valve cap or other valve caps approved by
Mercedes-Benz for your veh icle. Do not use any
other valve caps or systems, e.g. tire pressure
monitoring systems.
Regularly check the pressure of all the tires par-
ticularly prior to long tr ips.Adjust the tire pres-
sure as necessary (
Ypage 288).
The service lifeof tires depends, among other
things, on the foll owing factors:
Rdriving style
Rtire pressure
Rdistance covered
Notes on tire tread
GWAR NING
In suff icient tire tread willreduce tire traction.
The tire isno longer abletodissipat e water.
This means that on wet road surfaces, the risk
of hydroplaning increases, inparticular where
speed isnot adapted to suit the driving con-
dit ions. There isa risk of acc ident.
If the tire pressure istoo high or too low,tires
may exhibit diff erent levelsof wear at differ-
ent locations on the tire tread. Thus, you
should regularly check the tread depth and
the condition of the tread across the entire
widt h of all tires.
Minimum tire tread depth for:
RSummer tires: âin(3 mm)
RM+S tires: ãin(4 mm)
For safety reasons, replace the tires before
the legally prescribe d limit for the minimum
tire tread depth is reached.
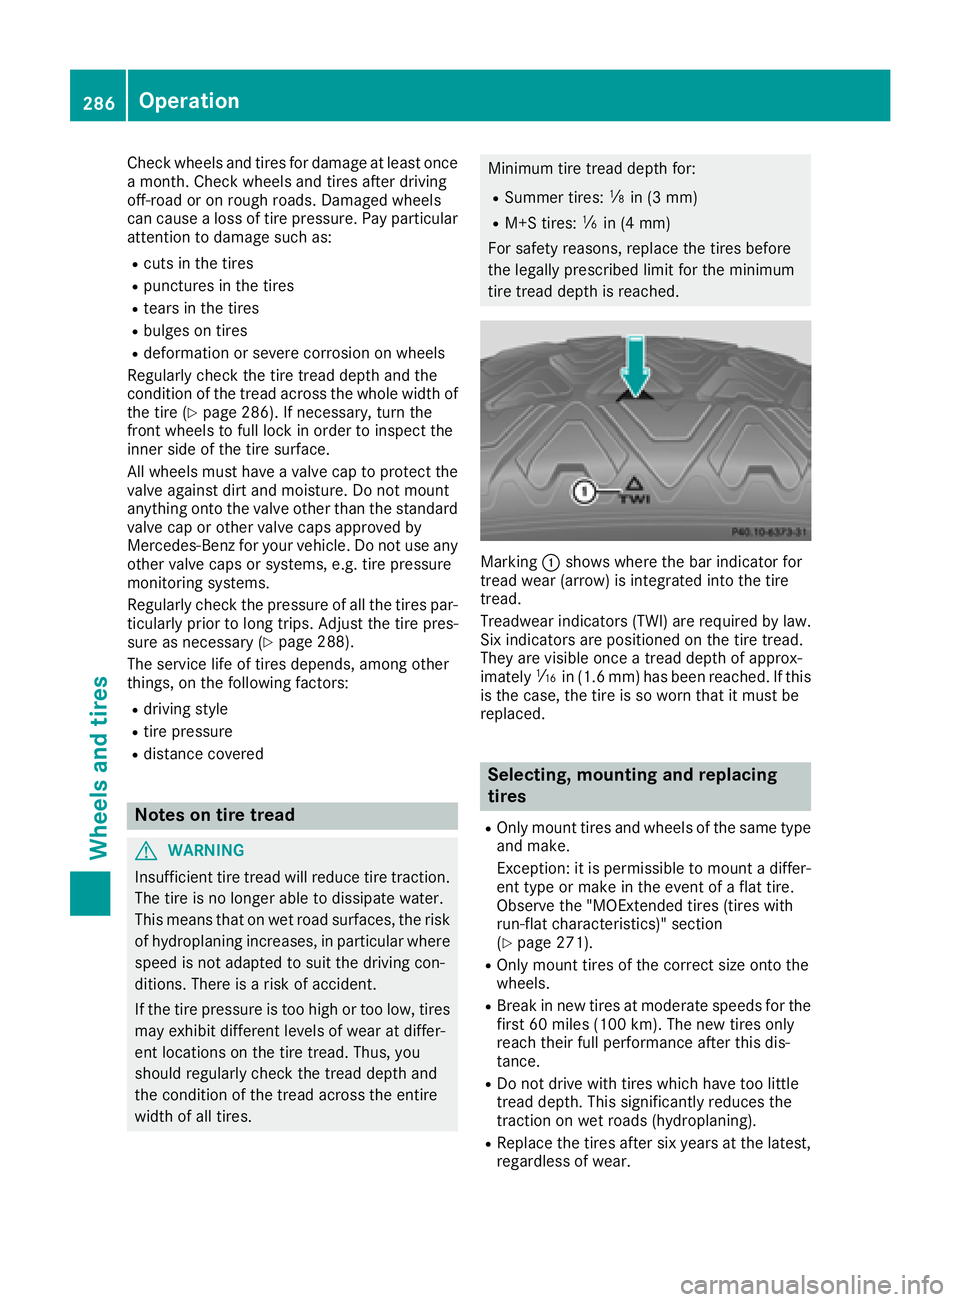
Marking :shows where the bar indicator for
tread wear (arrow) is integrated into the tire
tread.
Treadwear indicators (TWI) are required by law.
Six indicators are positioned on the tire tread.
They are vis ibleonce a tread depth of approx-
imately áin(1.6 mm) has been reached. Ifthis
is the case, the tire isso worn that it must be
replace d.
Selecting, mounting and replacing
tires
ROnly mount tires and wheels of the same type
and make.
Exception: it is permissible to mount a differ- ent type or make in the event of a flat tire.
Observe the "MOExtended tires (tires with
run-flat characteristics)" section
(
Ypage 271).
ROnly mount tires of the correct size onto the
wheels.
RBreak in new tires at moderate speeds for the
first 60 miles (100 km). The new tires only
reach their full performance after this dis-
tance.
RDo not drive with tires which have too little
tread depth. This significantly reduces the
traction on wet roads (hydroplaning).
RReplace the tires after six years at the latest,
regardless of wear.
286Operation
Wheels and tires