2018 MERCEDES-BENZ SL ROADSTER instrument cluster
[x] Cancel search: instrument clusterPage 69 of 322
GWARNING
If you deactivate ESP
®, ESP®no longer sta-
bilizes the vehicle. There is an increased risk
of skidding and an accident.
Only deactivate ESP
®in the situations descri-
bed in the following.
It may be best to deactivate ESP
®in the follow-
ing situations:
Rwhen using snow chains
Rin deep snow
Ron sand or gravel
Spinning the wheels results in a cutting action
which provides better grip.
iActivate ESP®as soon as the situations
described above no longer apply. ESP®will
otherwise not be able to stabilize the vehicle if
the vehicle starts to skid or a wheel starts to
spin.
!Avoid spinning the driven wheels for an
extended period with ESP®deactivated. You
could otherwise damage the drivetrain.
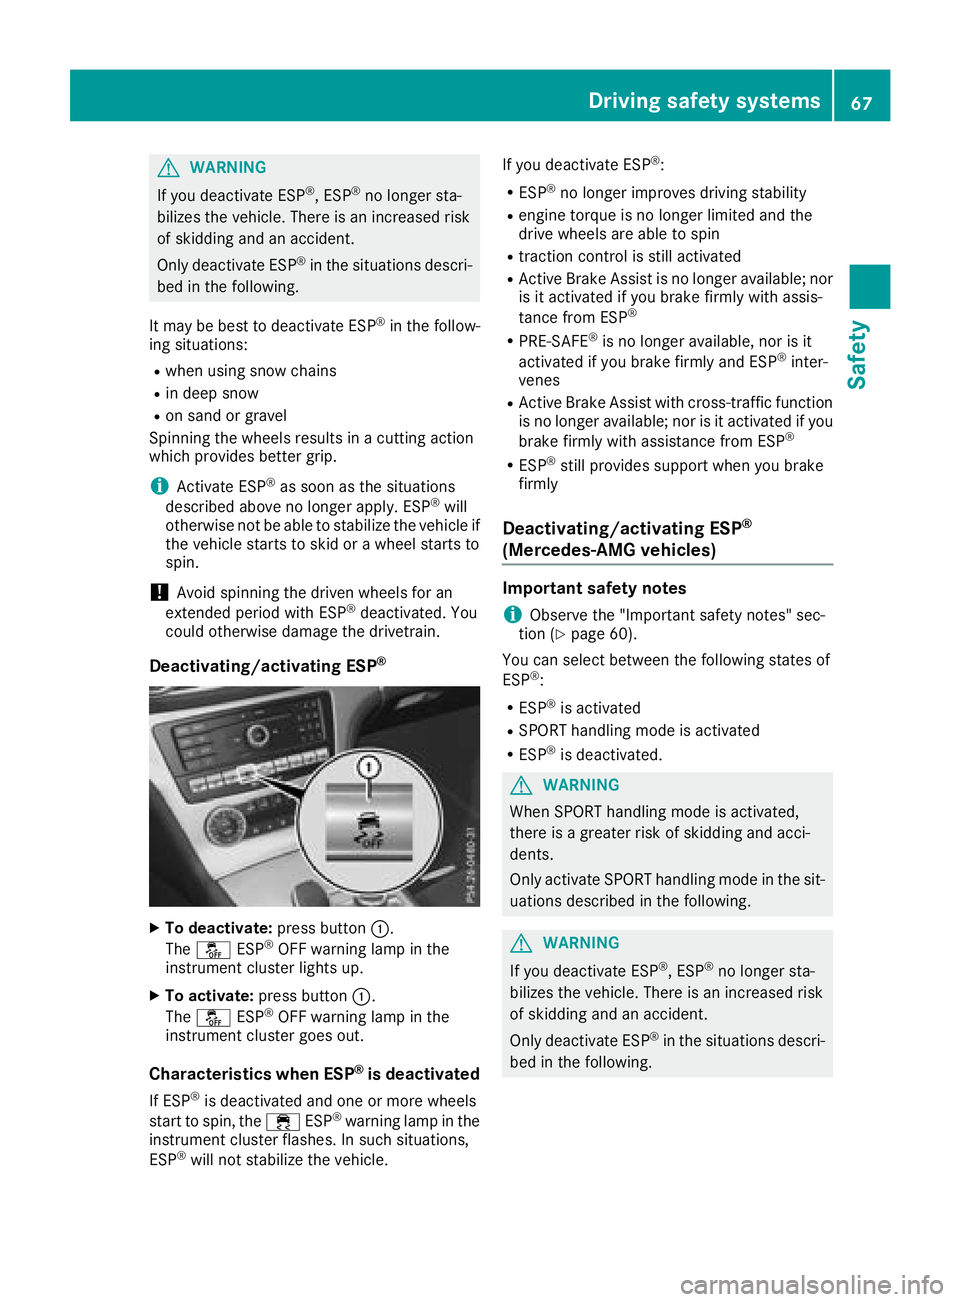
Deactivating/activating ESP®
XTo deactivate: press button:.
The å ESP®OFF warning lamp in the
instrument cluster lights up.
XTo activate: press button :.
The å ESP®OFF warning lamp in the
instrument cluster goes out.
Characteristics when ESP®is deactivated
If ESP®is deactivated and one or more wheels
start to spin, the ÷ESP®warning lamp in the
instrument cluster flashes. In such situations,
ESP
®will not stabilize the vehicle. If you deactivate ESP
®:
RESP®no longer improves driving stability
Rengine torque is no longer limited and the
drive wheels are able to spin
Rtraction control is still activated
RActive Brake Assist is no longer available; nor
is it activated if you brake firmly with assis-
tance from ESP
®
RPRE-SAFE®is no longer available, nor is it
activated if you brake firmly and ESP®inter-
venes
RActive Brake Assist with cross-traffic function
is no longer available; nor is it activated if you
brake firmly with assistance from ESP
®
RESP®still provides support when you brake
firmly
Deactivating/activating ESP®
(Mercedes‑AMG vehicles)
Important safety notes
iObserve the "Important safety notes" sec-
tion (Ypage 60).
You can select between the following states of
ESP
®:
RESP®is activated
RSPORT handling mode is activated
RESP®is deactivated.
GWARNING
When SPORT handling mode is activated,
there is a greater risk of skidding and acci-
dents.
Only activate SPORT handling mode in the sit-
uations described in the following.
GWARNING
If you deactivate ESP
®, ESP®no longer sta-
bilizes the vehicle. There is an increased risk
of skidding and an accident.
Only deactivate ESP
®in the situations descri-
bed in the following.
Driving safety systems67
Safety
Z
Page 70 of 322
In the following situations, it may be better to
activate SPORT handling mode or deactivate
ESP
®:
Rwhen using snow chains
Rin deep snow
Ron sand or gravel
Ron specially designated roads when the vehi-
cle's own oversteering and understeering
characteristics are desired
Spinning the wheels results in a cutting action
which provides better grip.
Driving in SPORT handling mode or without
ESP
®requires an extremely qualified and expe-
rienced driver.
iActivate ESP®as soon as the situations
described above no longer apply. ESP®will
otherwise not be able to stabilize the vehicle if
the vehicle starts to skid or a wheel starts to
spin.
!Avoid spinning the driven wheels for an
extended period with ESP®deactivated. You
could otherwise damage the drivetrain.
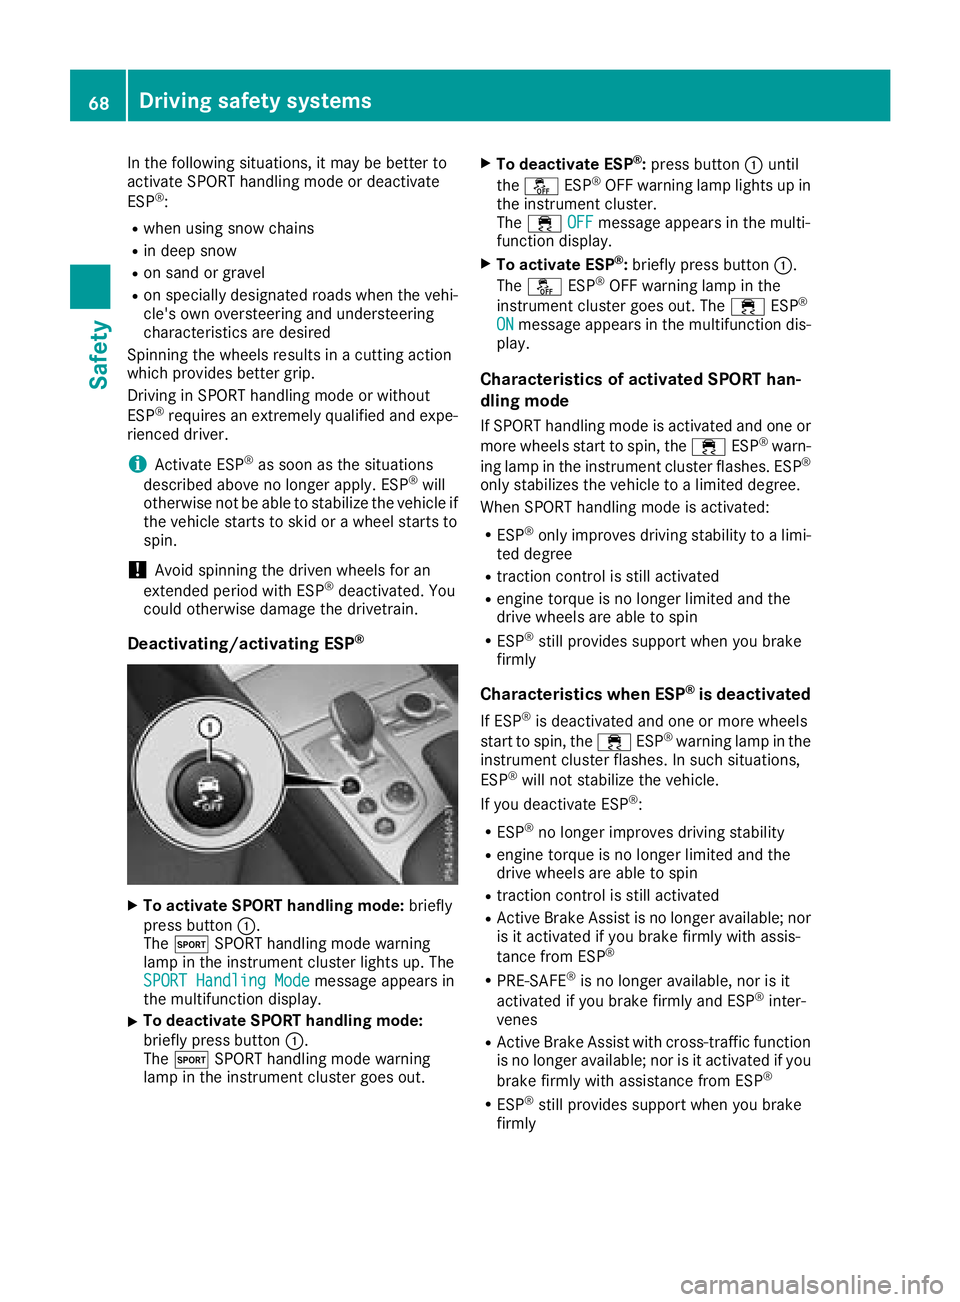
Deactivating/activating ESP®
XTo activate SPORT handling mode: briefly
press button :.
The M SPORT handling mode warning
lamp in the instrument cluster lights up. The
SPORT Handling Mode
message appears in
the multifunction display.
XTo deactivate SPORT handling mode:
briefly press button :.
The M SPORT handling mode warning
lamp in the instrument cluster goes out.
XTo deactivate ESP®: press button :until
the å ESP®OFF warning lamp lights up in
the instrument cluster.
The ÷ OFF
message appears in the multi-
function display.
XTo activate ESP®: briefly press button :.
The å ESP®OFF warning lamp in the
instrument cluster goes out. The ÷ESP®
ONmessage appears in the multifunction dis-
play.
Characteristics of activated SPORT han-
dling mode
If SPORT handling mode is activated and one or
more wheels start to spin, the ÷ESP®warn-
ing lamp in the instrument cluster flashes. ESP®
only stabilizes the vehicle to a limited degree.
When SPORT handling mode is activated:
RESP®only improves driving stability to a limi-
ted degree
Rtraction control is still activated
Rengine torque is no longer limited and the
drive wheels are able to spin
RESP®still provides support when you brake
firmly
Characteristics when ESP®is deactivated
If ESP®is deactivated and one or more wheels
start to spin, the ÷ESP®warning lamp in the
instrument cluster flashes. In such situations,
ESP
®will not stabilize the vehicle.
If you deactivate ESP®:
RESP®no longer improves driving stability
Rengine torque is no longer limited and the
drive wheels are able to spin
Rtraction control is still activated
RActive Brake Assist is no longer available; nor
is it activated if you brake firmly with assis-
tance from ESP
®
RPRE-SAFE®is no longer available, nor is it
activated if you brake firmly and ESP®inter-
venes
RActive Brake Assist with cross-traffic function is no longer available; nor is it activated if you
brake firmly with assistance from ESP
®
RESP®still provides support when you brake
firmly
68Driving safety systems
Safety
Page 72 of 322
In such cases, Active Brake Assist with cross-
traffic function might:
Rgive an unnecessary warning and then
brake the vehicle
Rneither give a warning nor intervene
There is a risk of an accident.
Always pay particular attention to the traffic
situation and be prepared to brake, especially
if Active Brake Assist with cross-traffic func-
tion alerts you. Terminate the intervention in a
non-critical driving situation.
GWARNING
Active Brake Assist with cross-traffic function cannot always clearly identify people, partic-
ularly if they are moving. Active Brake Assist
with cross-traffic function cannot intervene in
these cases. There is a risk of an accident.
Always pay particular attention to the traffic
situation and be prepared to brake, especially
if Active Brake Assist with cross-traffic func-
tion alerts you.
In order to maintain the appropriate distance to
the vehicle in front and thus prevent a collision,
you must apply the brakes yourself.
GWARNING
Active Brake Assist with cross-traffic function does not react:
Rto small people, e.g. children
Rto animals
Rto oncoming vehicles
Rwhen cornering
As a result, Active Brake Assist with cross-
traffic function may not warn you or engage in
all critical situations. There is a risk of an acci-
dent.
Always pay careful attention to the traffic sit- uation and be ready to brake.
In the event of snowfall or heavy rain, the rec-
ognition can be impaired. Recognition by the radar sensor system is also
impaired if:
Rthere is dirt on the sensors or anything else
covering the sensors
Rthere is interference by other radar sources
Rthere are strong radar reflections, for exam-
ple in parking garages
Ra narrow vehicle is traveling in front, e.g. a
motorbike
Ra vehicle is traveling in front on a different line
Recognition by the camera system is also
impaired in the event of:
Rdirt on the camera or if the camera is covered
Rglare on the camera system, e.g. from the sun being low in the sky
Rdarkness
Ror if:
-pedestrians move quickly, e.g. into the path
of the vehicle
-the camera system no longer recognizes a
pedestrian as a person due to special cloth-ing or other objects
-a pedestrian is concealed by other objects
-the typical outline of a pedestrian is not
distinguishable from the background
Following damage to the front end of the vehicle,
have the configuration and operation of the
radar sensors checked at a qualified specialist
workshop. This also applies to collisions at slow
speeds where there is no visible damage to the
front of the vehicle.
Following damage to the windshield, have the
configuration and operation of the camera sys-
tem checked at a qualified specialist workshop.
Function
XTo activate or deactivate: activate or deac-
tivate Active Brake Assist with cross-traffic
function using the on-board computer
(
Ypage 193).
When Active Brake Assist with cross-traffic
function is deactivated, the æsymbol
appears in the assistance graphic display of
the multifunction display.
Starting at a speed of around 4 mph (7 km/h),
this function warns you if you rapidly approach a
vehicle in front. An intermittent warning tone
will then sound and the ·distance warning
lamp will light up in the instrument cluster.
70Driving safety systems
Safety
Page 97 of 322
Correct driver's seat position
GWARNING
You could lose control of your vehicle if you do the following while driving:
Radjust the driver's seat, head restraint,
steering wheel or mirrors
Rfasten the seat belt
There is a risk of an accident.
Adjust the driver's seat, head restraint, steer-
ing wheel and mirror and fasten your seat belt before starting the engine.
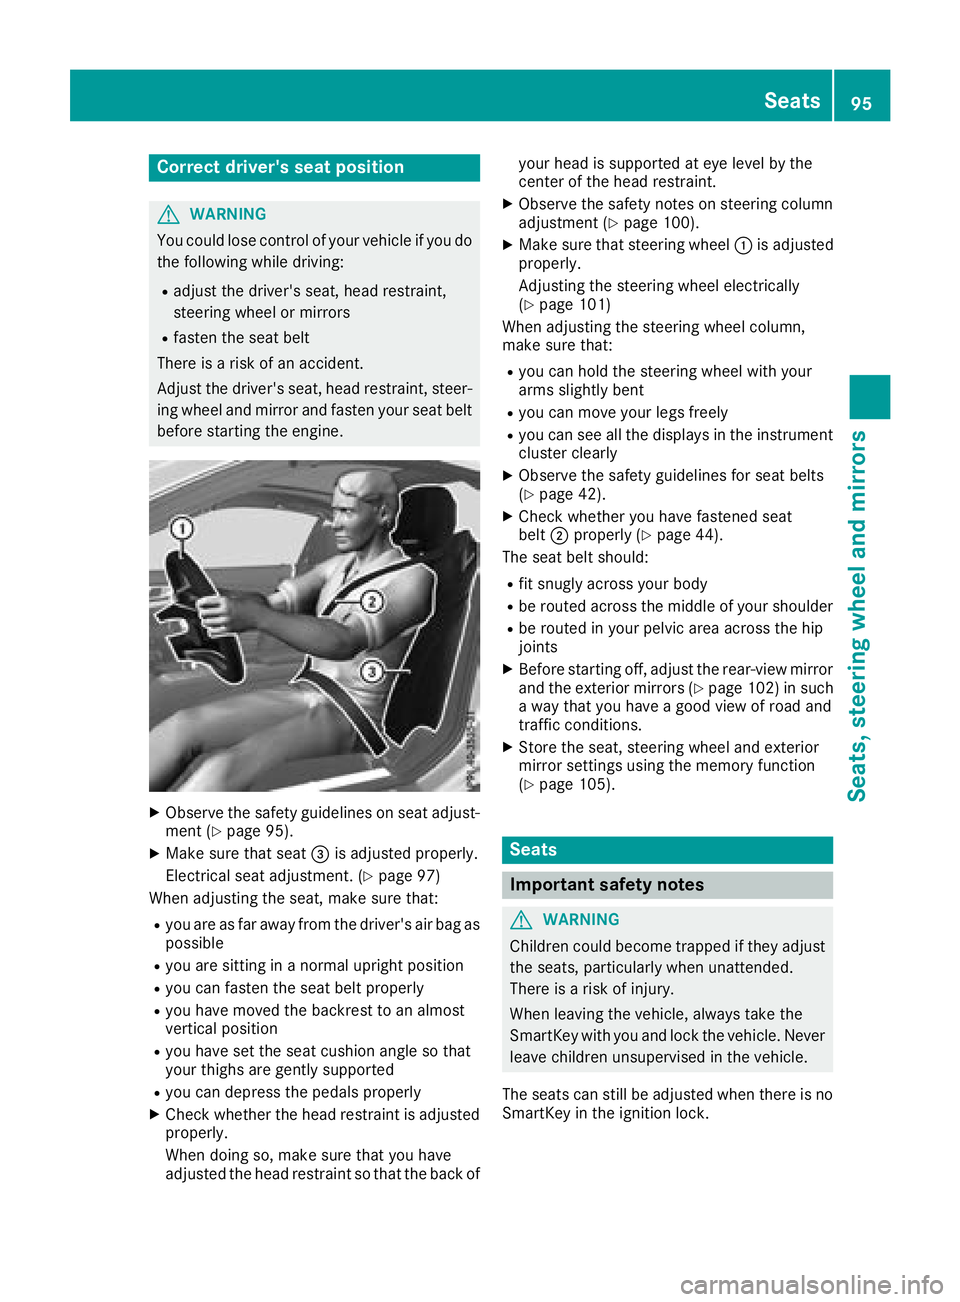
XObserve the safety guidelines on seat adjust-
ment (Ypage 95).
XMake sure that seat =is adjusted properly.
Electrical seat adjustment. (
Ypage 97)
When adjusting the seat, make sure that:
Ryou are as far away from the driver's air bag as
possible
Ryou are sitting in a normal upright position
Ryou can fasten the seat belt properly
Ryou have moved the backrest to an almost
vertical position
Ryou have set the seat cushion angle so that
your thighs are gently supported
Ryou can depress the pedals properly
XCheck whether the head restraint is adjusted
properly.
When doing so, make sure that you have
adjusted the head restraint so that the back of your head is supported at eye level by the
center of the head restraint.
XObserve the safety notes on steering column
adjustment (Ypage 100).
XMake sure that steering wheel
:is adjusted
properly.
Adjusting the steering wheel electrically
(
Ypage 101)
When adjusting the steering wheel column,
make sure that:
Ryou can hold the steering wheel with your
arms slightly bent
Ryou can move your legs freely
Ryou can see all the displays in the instrument cluster clearly
XObserve the safety guidelines for seat belts
(Ypage 42).
XCheck whether you have fastened seat
belt ;properly (Ypage 44).
The seat belt should:
Rfit snugly across your body
Rbe routed across the middle of your shoulder
Rbe routed in your pelvic area across the hip
joints
XBefore starting off, adjust the rear-view mirror
and the exterior mirrors (Ypage 102) in such
a way that you have a good view of road and
traffic conditions.
XStore the seat, steering wheel and exterior
mirror settings using the memory function
(
Ypage 105).
Seats
Important safety notes
GWARNING
Children could become trapped if they adjust
the seats, particularly when unattended.
There is a risk of injury.
When leaving the vehicle, always take the
SmartKey with you and lock the vehicle. Never
leave children unsupervised in the vehicle.
The seats can still be adjusted when there is no
SmartKey in the ignition lock.
Seats95
Seats, steering wheel and mirrors
Z
Page 108 of 322
Exterior lighting
General notes
For reasons of safety, Mercedes-Benz recom-
mends that you drive with the lights switched on
even during the daytime. In some countries,
operation of the headlamps varies due to legal
requirements and self-imposed obligations.
Setting the exterior lighting
Setting options
Exterior lighting can be set using:
Rthe light switch
Rthe combination switch (Ypage 107)
Rthe on-board computer (Ypage 195)
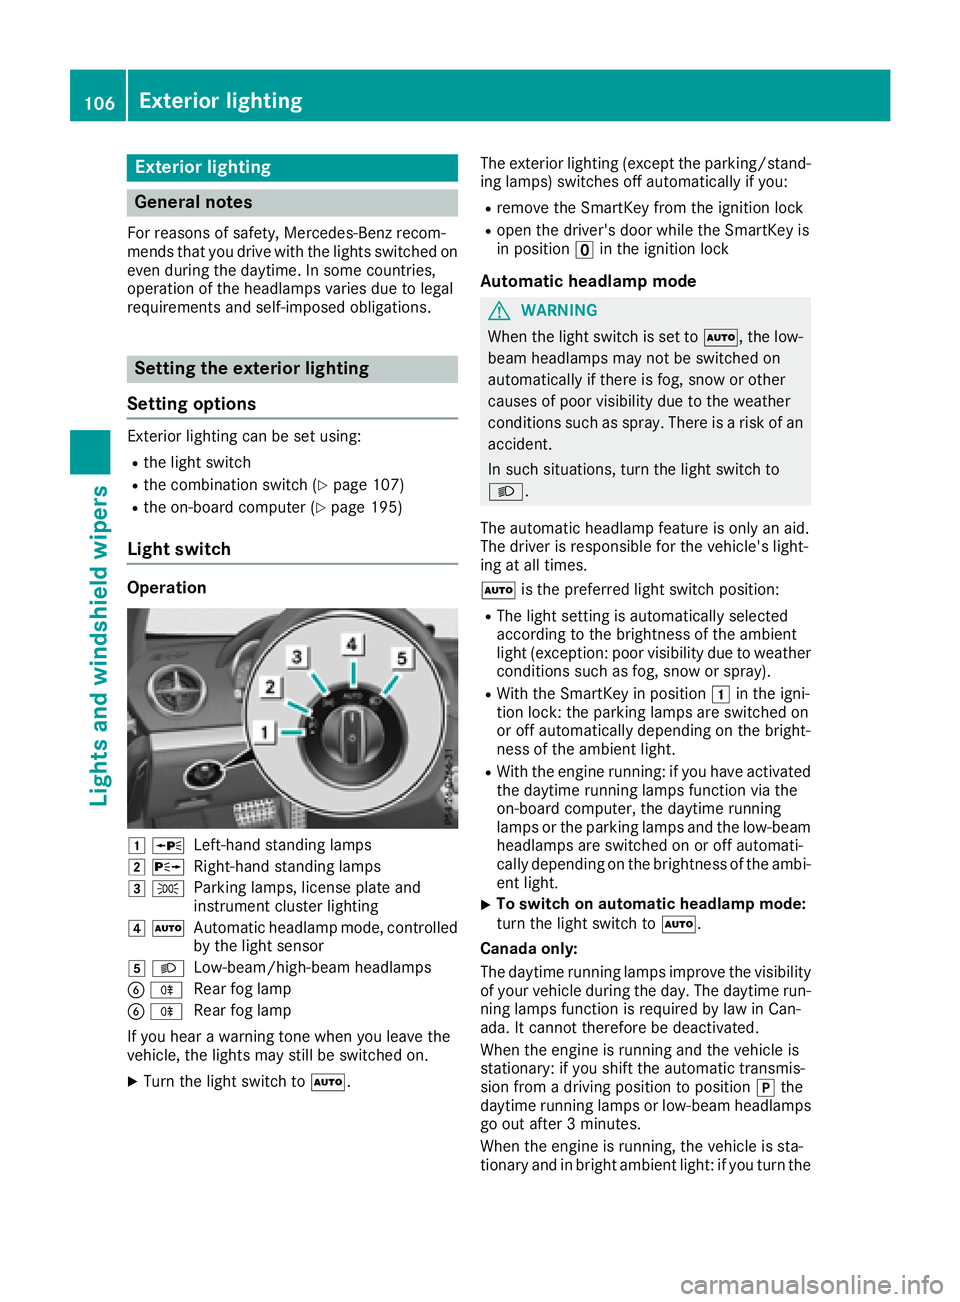
Light switch
Operation
1 WLeft-hand standing lamps
2XRight-hand standing lamps
3TParking lamps, license plate and
instrument cluster lighting
4ÃAutomatic headlamp mode, controlled
by the light sensor
5 LLow-beam/high-beam headlamps
BRRear fog lamp
BRRear fog lamp
If you hear a warning tone when you leave the
vehicle, the lights may still be switched on.
XTurn the light switch to Ã. The exterior lighting (except the parking/stand-
ing lamps) switches off automatically if you:
Rremove the SmartKey from the ignition lock
Ropen the driver's door while the SmartKey is
in position uin the ignition lock
Automatic headlamp mode
GWARNING
When the light switch is set to Ã, the low-
beam headlamps may not be switched on
automatically if there is fog, snow or other
causes of poor visibility due to the weather
conditions such as spray. There is a risk of an
accident.
In such situations, turn the light switch to
L.
The automatic headlamp feature is only an aid.
The driver is responsible for the vehicle's light-
ing at all times.
à is the preferred light switch position:
RThe light setting is automatically selected
according to the brightness of the ambient
light (exception: poor visibility due to weather
conditions such as fog, snow or spray).
RWith the SmartKey in position 1in the igni-
tion lock: the parking lamps are switched on
or off automatically depending on the bright-
ness of the ambient light.
RWith the engine running: if you have activated
the daytime running lamps function via the
on-board computer, the daytime running
lamps or the parking lamps and the low-beam
headlamps are switched on or off automati-
cally depending on the brightness of the ambi-
ent light.
XTo switch on automatic headlamp mode:
turn the light switch to Ã.
Canada only:
The daytime running lamps improve the visibility of your vehicle during the day. The daytime run-
ning lamps function is required by law in Can
-
ada. It cannot therefore be deactivated.
When the engine is running and the vehicle is
stationary: if you shift the automatic transmis-
sion from a driving position to position jthe
daytime running lamps or low-beam headlamps
go out after 3 minutes.
When the engine is running, the vehicle is sta-
tionary and in bright ambient light: if you turn the
106Exterior lighting
Lights and windshield wipers
Page 111 of 322
detects any other vehicles, it reactivates the
high-beam headlamps.
The system's optical sensor is located behind
the windshield near the overhead control panel.
Important safety notes
GWARNING
Adaptive Highbeam Assist does not recognize
road users:
Rwho have no lights, e.g. pedestrians
Rwho have poor lighting, e.g. cyclists
Rwhose lighting is blocked, e.g. by a barrier
On very rare occasions, Adaptive Highbeam
Assist may fail to recognize other road users
that have lights, or may recognize them too
late. In this, or in similar situations, the auto-
matic high-beam headlamps will not be deac-
tivated or will be activated regardless. There is a risk of an accident.
Always carefully observe the traffic conditions
and switch off the high-beam headlamps in
good time.
Adaptive Highbeam Assist cannot take into
account road, weather or traffic conditions.
Adaptive Highbeam Assist is only an aid. You are responsible for adjusting the vehicle's lighting
to the prevailing light, visibility and traffic con-
ditions.
In particular, the detection of obstacles can be
restricted if there is:
Rpoor visibility, e.g. due to fog, heavy rain or
snow
Rdirt on the sensors or the sensors are
obscured
Switching Adaptive Highbeam Assist
on/off
XTo switch on: turn the light switch to Ã.
XPress the combination switch beyond the
pressure point in the direction of arrow :.
The _ indicator lamp in the multifunction
display lights up when it is dark and the light
sensor activates the low-beam headlamps.
If you are driving at speeds above approx-
imately 16 mph (25 km/h): The headlamp range is set automatically
depending on the distance between the vehi-
cle and other road users.
If you are driving at speeds above approx-
imately 19 mph (30 km/
h)and no other road
users have been detected:
The high-beam headlamps are switched on
automatically. The Kindicator lamp in the
instrument cluster also lights up.
If you are driving at speeds below approx-
imately 16 mph (25 km/h) or other road users
have been detected or the roads are ade-
quately lit:
The high-beam headlamps are switched off
automatically. The Kindicator lamp in the
instrument cluster goes out. The _indi-
cator lamp in the multifunction display
remains lit.
XTo switch off: move the combination switch
back to its normal position or move the light
switch to another position.
The _ indicator lamp in the multifunction
display goes out.
Interior lighting
Overview of interior lighting
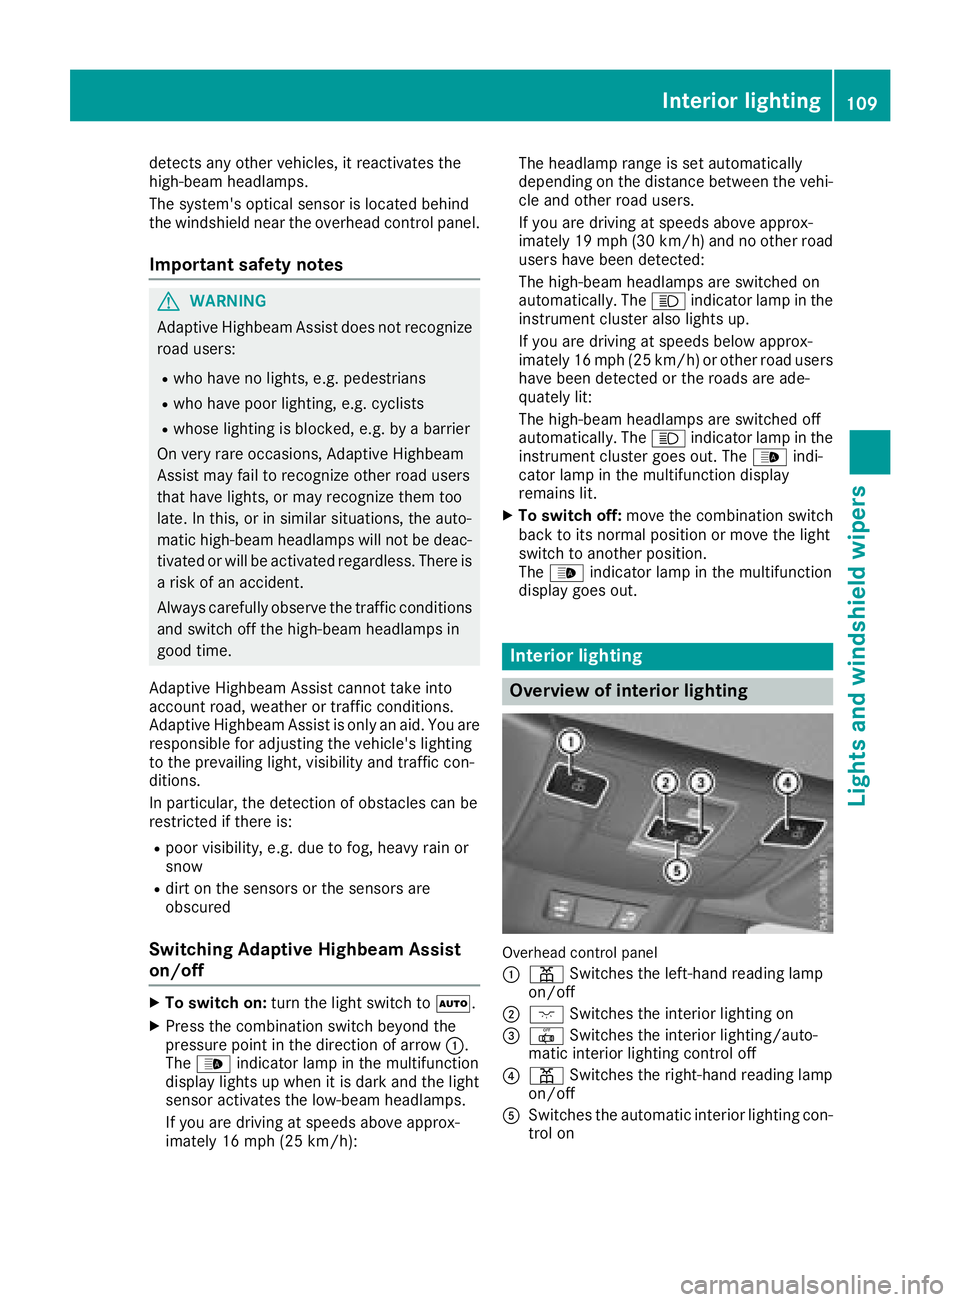
Overhead control panel
:
p Switches the left-hand reading lamp
on/off
;c Switches the interior lighting on
=|Switches the interior lighting/auto-
matic interior lighting control off
?p Switches the right-hand reading lamp
on/off
ASwitches the automatic interior lighting con-
trol on
Interior lighting109
Lights and windshield wipers
Z
Page 125 of 322
the vehicle. This occurs, for example, when
starting the engine.
To start the vehicle without actively using the
SmartKey:
Rthe Start/Stop button must be inserted in the
ignition lock.
Rthe SmartKey must be in the vehicle.
Rthe vehicle must not be locked with the
SmartKey or KEYLESS-GO (Ypage 73).
Do not keep the SmartKey:
Rwith electronic devices, e.g. a mobile phone
or another SmartKey.
Rwith metallic objects, e.g. coins or metal foil.
Rinside metallic objects, e.g. a metal case.
This can impair the functionality of the KEY-
LESS-GO key.
If you lock the vehicle with the SmartKey's
remote control or with KEYLESS-GO, after a
short time:
Ryou will not be able to switch on the ignition
with the Start/Stop button.
Ryou will not be able to start the engine with the
Start/Stop button until the vehicle is
unlocked again.
The engine can be switched off while the vehicle
is in motion by pressing and holding the Start/
Stop button for three seconds. This function
operates independently of the ECO start/stop
automatic engine switch-off function.
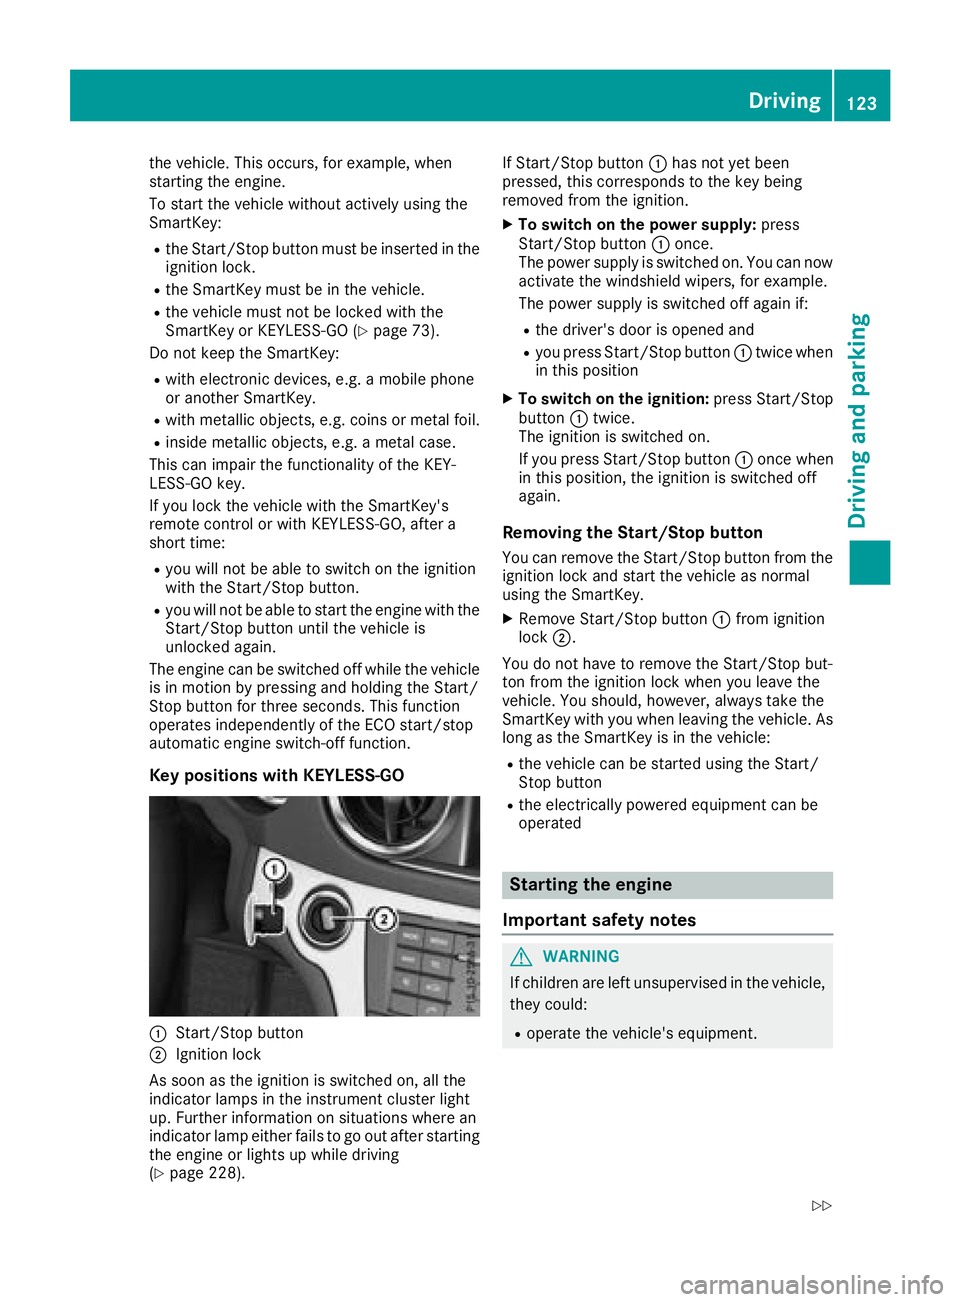
Key positions with KEYLESS-GO
:Start/Stop button
;Ignition lock
As soon as the ignition is switched on, all the
indicator lamps in the instrument cluster light
up. Further information on situations where an
indicator lamp either fails to go out after starting
the engine or lights up while driving
(
Ypage 228). If Start/Stop button
:has not yet been
pressed, this corresponds to the key being
removed from the ignition.
XTo switch on the power supply: press
Start/Stop button :once.
The power supply is switched on. You can now activate the windshield wipers, for example.
The power supply is switched off again if:
Rthe driver's door is opened and
Ryou press Start/Stop button :twice when
in this position
XTo switch on the ignition: press Start/Stop
button :twice.
The ignition is switched on.
If you press Start/Stop button :once when
in this position, the ignition is switched off
again.
Removing the Start/Stop button
You can remove the Start/Stop button from the
ignition lock and start the vehicle as normal
using the SmartKey.
XRemove Start/Stop button :from ignition
lock ;.
You do not have to remove the Start/Stop but-
ton from the ignition lock when you leave the
vehicle. You should, howe
ver, always take the
SmartKey with you when leaving the vehicle. As
long as the SmartKey is in the vehicle:
Rthe vehicle can be started using the Start/
Stop button
Rthe electrically powered equipment can be
operated
Starting the engine
Important safety notes
GWARNING
If children are left unsupervised in the vehicle,
they could:
Roperate the vehicle's equipment.
Driving123
Dr iving an d parking
Z
Page 129 of 322
If drive programS,S+ orMis active, the auto-
matic transmission switches to drive program
C.
If indicator lamp ;is off, the ECO start/stop
function has been deactivated manually or as the result of a malfunction. The engine will then
not be switched off automatically when the vehi-
cle stops.
Problems with the engine
ProblemPossible causes/consequences and
MSolutions
The engine does not
start.The HOLD function or Distance Pilot DISTRONIC is activated.
XDeactivate the HOLD function (Ypage 159) or Distance Pilot
DISTRONIC (Ypage 156).
XTry to start the engine again.
The engine does not
start. The starter motor
can be heard.RThere is a malfunction in the engine electronics.
RThere is a malfunction in the fuel supply.
Before attempting to start the engine again:
XTurn the SmartKey back to position uin the ignition lock.
or
XPress the Start/Stop button repeatedly until all indicator lamps in
the instrument cluster go out.
XTry to start the engine again (Ypage 123). Avoid excessively long
and frequent attempts to start the engine as these will drain the
battery.
If the engine does not start after several attempts:
XConsult a qualified specialist workshop.
The engine does not
start. You cannot hear
the starter motor.The on-board voltage is too low because the battery is too weak or
discharged.
XJump-start the vehicle (Ypage 278).
If the engine does not start despite attempts to jump-start it:
XConsult a qualified specialist workshop.
The starter motor was exposed to a thermal load that was too high.
XAllow the starter motor to cool down for approximately two minutes.
XTry to start the engine again.
If the engine still does not start:
XConsult a qualified specialist workshop.
The engine is not running
smoothly and is misfir-
ing.There is a malfunction in the engine electronics or in a mechanical
component of the engine management system.
XOnly depress the accelerator pedal slightly.
Otherwise, non-combusted fuel may get into the catalytic converter
and damage it.
XHave the cause rectified immediately at a qualified specialist work-
shop.
Driving127
Driving and parking
Z