2018 MERCEDES-BENZ SL ROADSTER tow bar
[x] Cancel search: tow barPage 54 of 322
ProblemPossible causes/consequences andMSolutions
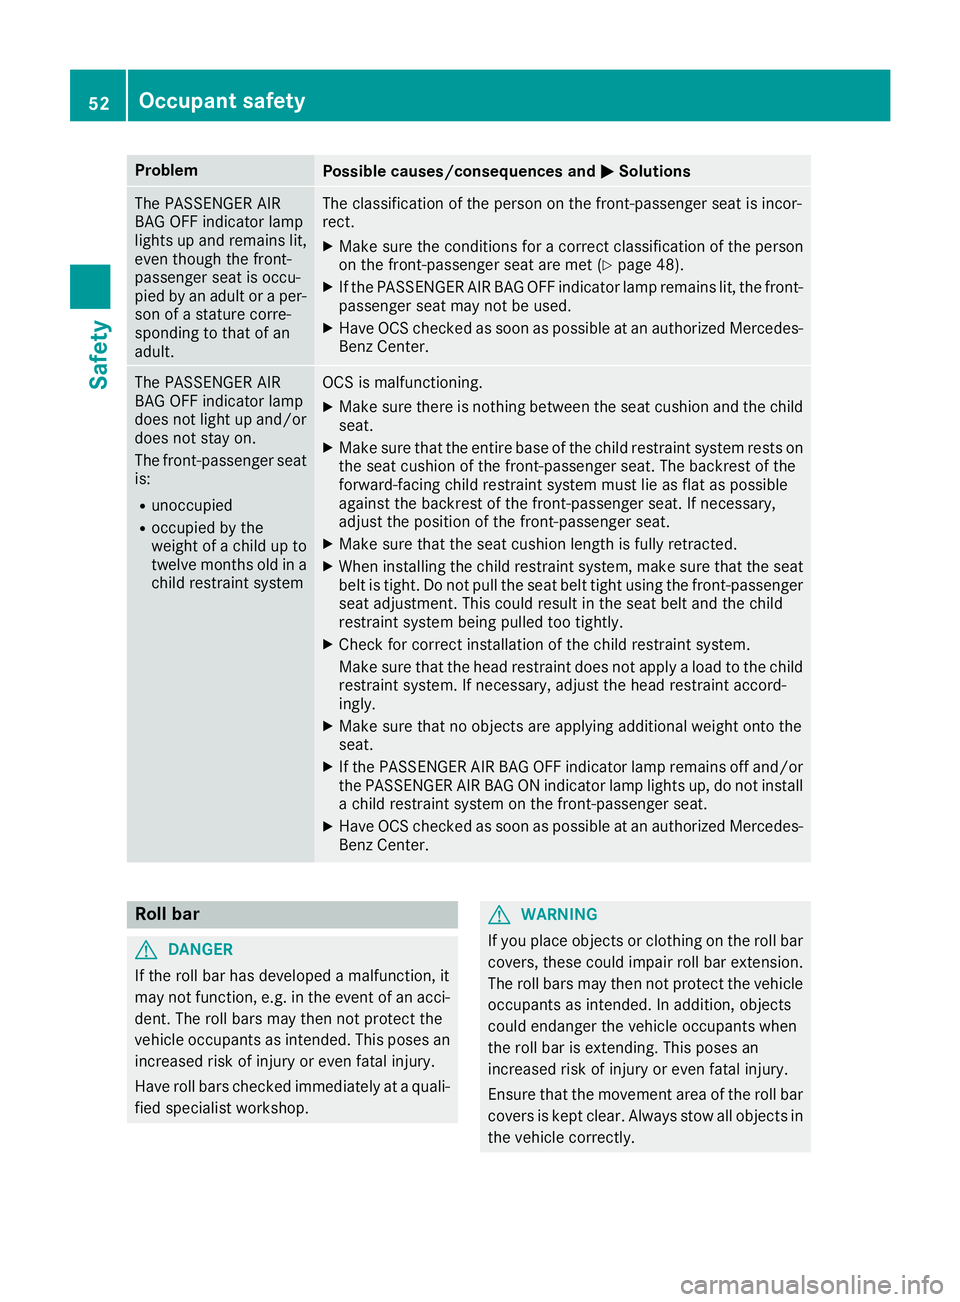
The PASSENGER AIR
BAG OFF indicator lamp
lights up and remains lit,
even though the front-
passenger seat is occu-
pied by an adult or a per-
son of a stature corre-
sponding to that of an
adult.The classification of the person on the front-passenger seat is incor-
rect.
XMake sure the conditions for a correct classification of the person
on the front-passenger seat are met (Ypage 48).
XIf the PASSENGER AIR BAG OFF indicator lamp remains lit, the front-
passenger seat may not be used.
XHave OCS checked as soon as possible at an authorized Mercedes- Benz Center.
The PASSENGER AIR
BAG OFF indicator lamp
does not light up and/or
does not stay on.
The front-passenger seat
is:
Runoccupied
Roccupied by the
weight of a child up to
twelve months old in a
child restraint system
OCS is malfunctioning.
XMake sure there is nothing between the seat cushion and the child
seat.
XMake sure that the entire base of the child restraint system rests on
the seat cushion of the front-passenger seat. The backrest of the
forward-facing child restraint system must lie as flat as possible
against the backrest of the front-passenger seat. If necessary,
adjust the position of the front-passenger seat.
XMake sure that the seat cushion length is fully retracted.
XWhen installing the child restraint system, make sure that the seat
belt is tight. Do not pull the seat belt tight using the front-passenger seat adjustment. This could result in the seat belt and the child
restraint system being pulled too tightly.
XCheck for correct installation of the child restraint system.
Make sure that the head restraint does not apply a load to the child
restraint system. If necessary, adjust the head restraint accord-
ingly.
XMake sure that no objects are applying additional weight onto the
seat.
XIf the PASSENGER AIR BAG OFF indicator lamp remains off and/or
the PASSENGER AIR BAG ON indicator lamp lights up, do not install a child restraint system on the front-passenger seat.
XHave OCS checked as soon as possible at an authorized Mercedes-Benz Center.
Roll bar
GDANGER
If the roll bar has developed a malfunction, it
may not function, e.g. in the event of an acci- dent. The roll bars may then not protect the
vehicle occupants as intended. This poses an
increased risk of injury or even fatal injury.
Have roll bars checked immediately at a quali-
fied specialist workshop.
GWARNING
If you place objects or clothing on the roll bar
covers, these could impair roll bar extension.
The roll bars may then not protect the vehicle occupants as intended. In addition, objects
could endanger the vehicle occupants when
the roll bar is extending. This poses an
increased risk of injury or even fatal injury.
Ensure that the movement area of the roll bar
covers is kept clear. Always stow all objects in
the vehicle correctly.
52Occupant safety
Safety
Page 55 of 322
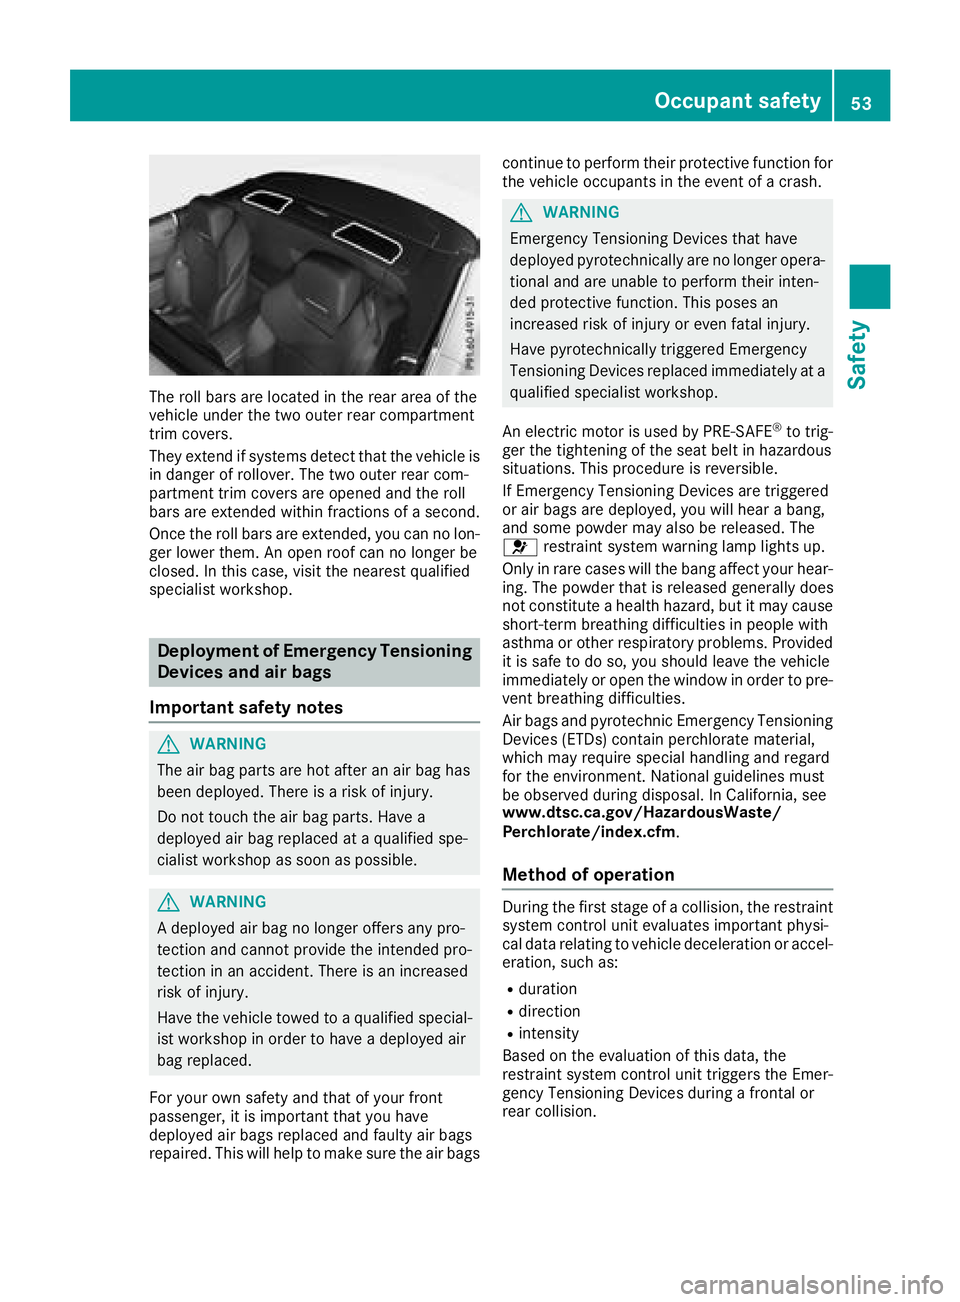
The roll bars are located in the rear area of the
vehicle under the two outer rear compartment
trim covers.
They extend if systems detect that the vehicle is
in danger of rollover. The two outer rear com-
partment trim covers are opened and the roll
bars are extended within fractions of a second.
Once the roll bars are extended, you can no lon-
ger lower them. An open roof can no longer be
closed. In this case, visit the nearest qualified
specialist workshop.
Deployment of Emergency Tensioning
Devices and air bags
Important safety notes
GWARNING
The air bag parts are hot after an air bag has
been deployed. There is a risk of injury.
Do not touch the air bag parts. Have a
deployed air bag replaced at a qualified spe-
cialist workshop as soon as possible.
GWARNING
A deployed air bag no longer offers any pro-
tection and cannot provide the intended pro-
tection in an accident. There is an increased
risk of injury.
Have the vehicle towed to a qualified special-
ist workshop in order to have a deployed air
bag replaced.
For your own safety and that of your front
passenger, it is important that you have
deployed air bags replaced and faulty air bags
repaired. This will help to make sure the air bags continue to perform their protective function for
the vehicle occupants in the event of a crash.
GWARNING
Emergency Tensioning Devices that have
deployed pyrotechnically are no longer opera-
tional and are unable to perform their inten-
ded protective function. This poses an
increased risk of injury or even fatal injury.
Have pyrotechnically triggered Emergency
Tensioning Devices replaced immediately at a
qualified specialist workshop.
An electric motor is used by PRE-SAFE
®to trig-
ger the tightening of the seat belt in hazardous
situations. This procedure is reversible.
If Emergency Tensioning Devices are triggered
or air bags are deployed, you will hear a bang,
and some powder may also be released. The
6 restraint system warning lamp lights up.
Only in rare cases will the bang affect your hear-
ing. The powder that is released generally does
not constitute a health hazard, but it may cause short-term breathing difficulties in people with
asthma or other respiratory problems. Provided
it is safe to do so, you should leave the vehicle
immediately or open the window in order to pre-
vent breathing difficulties.
Air bags and pyrotechnic Emergency Tensioning
Devices (ETDs) contain perchlorate material,
which may require special handling and regard
for the environment. National guidelines must
be observed during disposal. In California, see
www.dtsc.ca.gov/HazardousWaste/
Perchlorate/index.cfm.
Method of operation
During the first stage of a collision, the restraint
system control unit evaluates important physi-
cal data relating to vehicle deceleration or accel-
eration, such as:
Rduration
Rdirection
Rintensity
Based on the evaluation of this data, the
restraint system control unit triggers the Emer-
gency Tensioning Devices during a frontal or
rear collision.
Occupant safety53
Safety
Z
Page 100 of 322
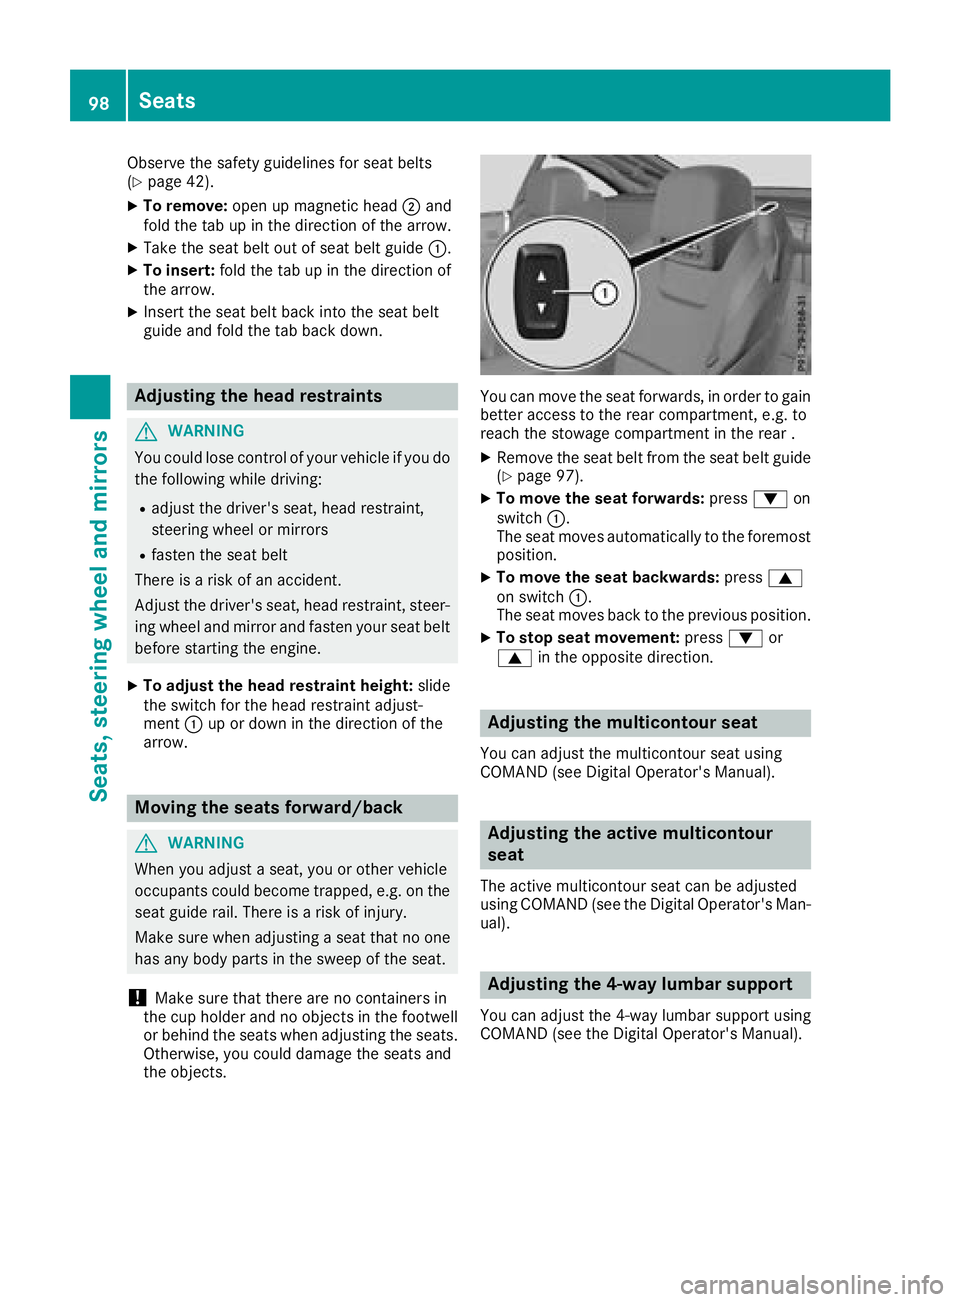
Observe the safety guidelines for seat belts
(Ypage 42).
XTo remove:open up magnetic head ;and
fold the tab up in the direction of the arrow.
XTake the seat belt out of seat belt guide :.
XTo insert:fold the tab up in the direction of
the arrow.
XInsert the seat belt back into the seat belt
guide and fold the tab back down.
Adjusting the head restraints
GWARNING
You could lose control of your vehicle if you do the following while driving:
Radjust the driver's seat, head restraint,
steering wheel or mirrors
Rfasten the seat belt
There is a risk of an accident.
Adjust the driver's seat, head restraint, steer-
ing wheel and mirror and fasten your seat belt before starting the engine.
XTo adjust the head restraint height: slide
the switch for the head restraint adjust-
ment :up or down in the direction of the
arrow.
Moving the seats forward/back
GWARNING
When you adjust a seat, you or other vehicle
occupants could become trapped, e.g. on the seat guide rail. There is a risk of injury.
Make sure when adjusting a seat that no one
has any body parts in the sweep of the seat.
!Make sure that there are no containers in
the cup holder and no objects in the footwell
or behind the seats when adjusting the seats.
Otherwise, you could damage the seats and
the objects.
You can move the seat forwards, in order to gain
better access to the rear compartment, e.g. to
reach the stowage compartment in the rear .
XRemove the seat belt from the seat belt guide
(Ypage 97).
XTo move the seat forwards: press:on
switch :.
The seat moves automatically to the foremost position.
XTo move the seat backwards: press9
on switch :.
The seat moves back to the previous position.
XTo stop seat movement: press:or
9 in the opposite direction.
Adjusting the multicontour seat
You can adjust the multicontour seat using
COMAND (see Digital Operator's Manual).
Adjusting the active multicontour
seat
The active multicontour seat can be adjusted
using COMAND (see the Digital Operator's Man-
ual).
Adjusting the 4-way lumbar support
You can adjust the 4-way lumbar support using
COMAND (see the Digital Operator's Manual).
98Seats
Seats, steering wheel and mirrors
Page 173 of 322
Parking tips:
ROn narrow roads, drive as close to the parkingspace as possible.
RParking spaces that are littered or overgrown
might be identified or measured incorrectly.
RParking spaces that are partially occupied by
trailer drawbars might not be identified as
such or be measured incorrectly.
RSnowfall or heavy rain may lead to a parking
space being measured inaccurately.
RPay attention to the warning messages of
Parking Assist PARKTRONIC during the park-
ing procedure (
Ypage 169).
RYou can intervene to correct the steering pro-
cedure at any time. Parking Pilot will then be
canceled.
RWhen transporting a load that protrudes from
your vehicle, you should not use Parking Pilot-
RNever use Parking Pilot when snow chains are
mounted.
RMake sure that the tire pressures are always
correct. This has a direct influence on the
parking characteristics of the vehicle.
Use Parking Pilot for parking spaces that are:
Rparallel or at right angles to the direction of
travel
Ron straight roads, not bends
Ron the same level as the road, e.g. not on the
pavement
Detecting parking spaces
Objects located above the detection range of
Parking Pilot will not be detected when the park- ing space is measured. These are not taken into
account when the parking procedure is calcula-
ted, e.g. overhanging loads, tail sections or load-
ing ramps of trucks. Parking Pilot may therefore
guide you into the parking space too early.
GWARNING
If there are objects above the detection range, Active Parking Assist may turn prematurely.
You may cause a collision as a result. There is
a risk of an accident.
If there are objects above the detection range,
stop and deactivate Active Parking Assist.
Further information on the detection range
(
Ypage 168). Parking Pilot does not assist you parking in
spaces at a right angle to the direction of travel
if:
Rtwo parking spaces are located directly next
to one another
Rthe parking space is directly next to a low
obstacle such as a low curb
Ryou park forwards
Parking Pilot does not assist you parking in
spaces parallel with or at a right angle to the
direction of travel if:
Rthe parking space is on a curb
Rthe system reads the parking space as being
blocked, for example by foliage or grass pav-
ing blocks
Rthe area is too small for the vehicle to maneu-
ver into
Rthe parking space is bordered by an obstacle,
e.g. a tree, a post or a trailer
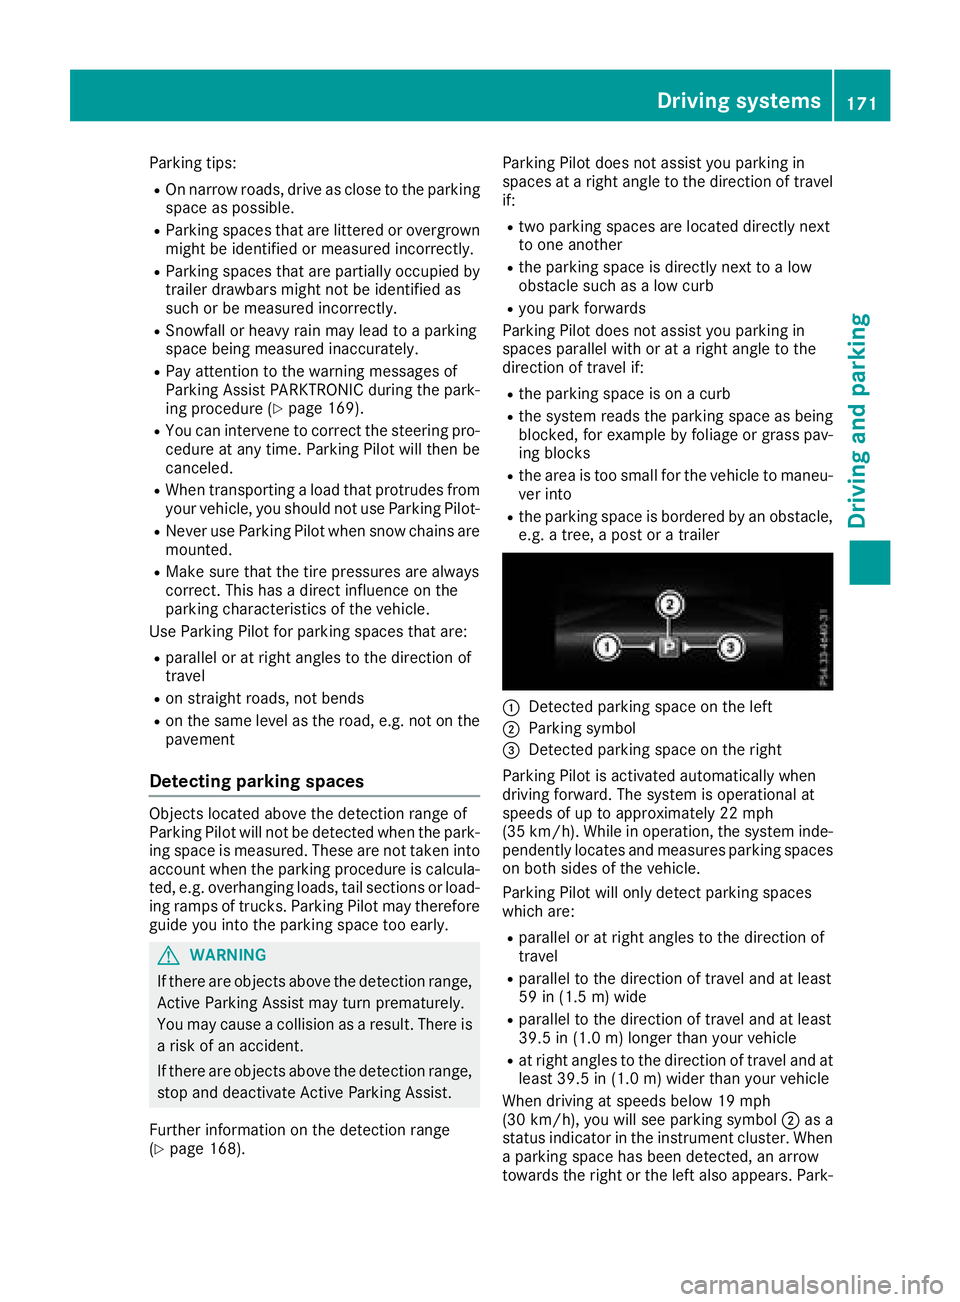
:Detected parking space on the left
;Parking symbol
=Detected parking space on the right
Parking Pilot is activated automatically when
driving forward. The system is operational at
speeds of up to approximately 22 mph
(35 km/h). While in operation, the system inde-
pendently locates and measures parking spaces on both sides of the vehicle.
Parking Pilot will only detect parking spaces
which are:
Rparallel or at right angles to the direction of
travel
Rparallel to the direction of travel and at least
59 in (1.5 m) wide
Rparallel to the direction of travel and at least
39.5 in (1.0 m) longer than your vehicle
Rat right angles to the direction of travel and at
least 39.5 in (1.0 m) wider than your vehicle
When driving at speeds below 19 mph
(30 km/ h), you will see parking symbol ;as a
status indicator in the instrument cluster. When
a parking space has been detected, an arrow
towards the right or the left also appears. Park-
Driving systems171
Driving and parking
Z
Page 273 of 322
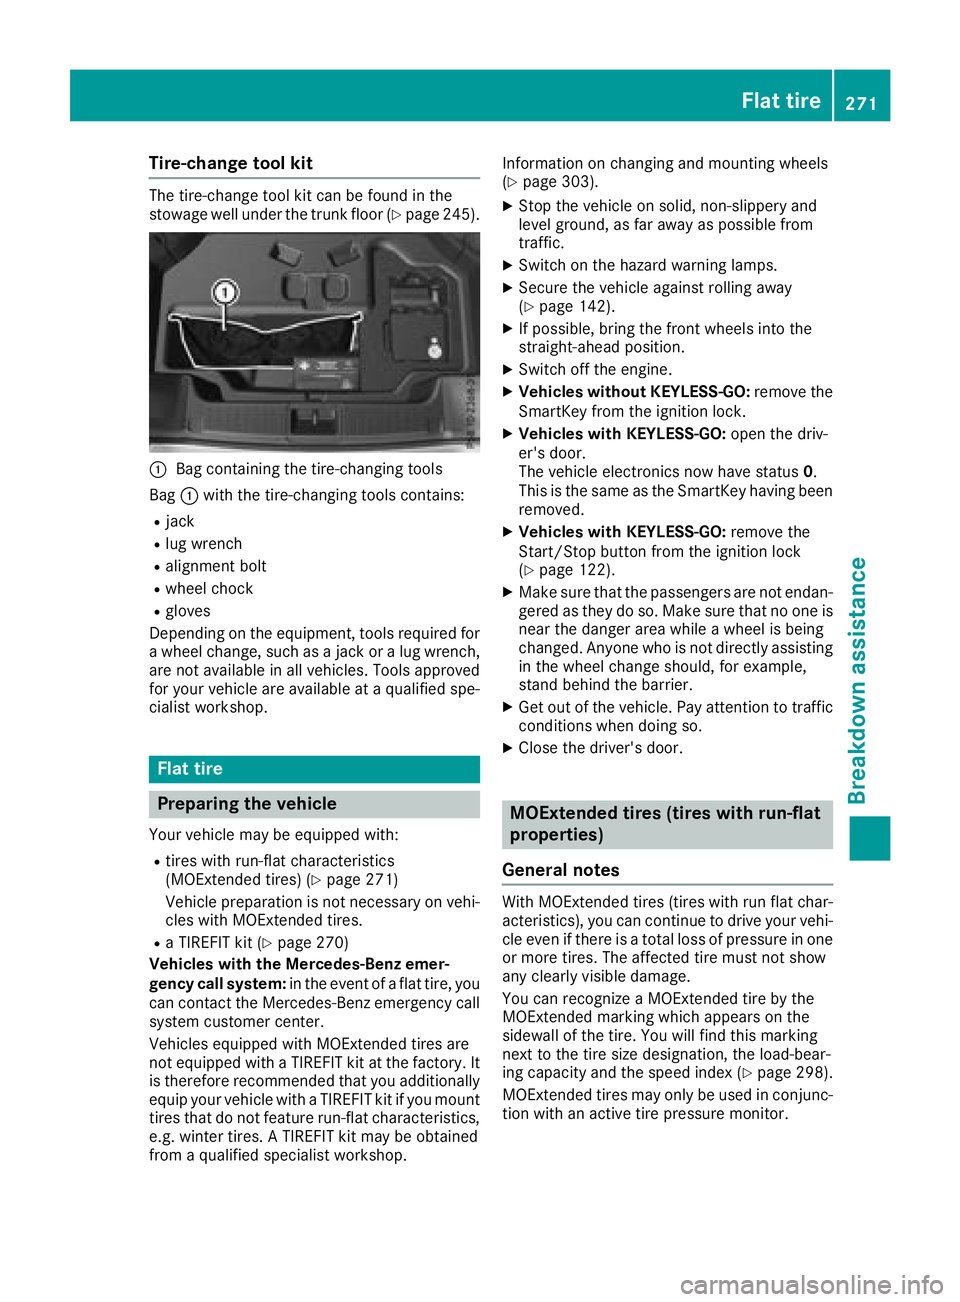
Tire-change tool kit
The tire-change tool kit can be found in the
stowage well under the trunk floor (Ypage 245).
:Bag containing the tire-changing tools
Bag :with the tire-changing tools contains:
Rjack
Rlug wrench
Ralignment bolt
Rwheel chock
Rgloves
Depending on the equipment, tools required for
a wheel change, such as a jack or a lug wrench, are not available in all vehicles. Tools approved
for your vehicle are available at a qualified spe-
cialist workshop.
Flat tire
Preparing the vehicle
Your vehicle may be equipped with:
Rtires with run-flat characteristics
(MOExtended tires) (Ypage 271)
Vehicle preparation is not necessary on vehi-
cles with MOExtended tires.
Ra TIREFIT kit (Ypage 270)
Vehicles with the Mercedes-Benz emer-
gency call system: in the event of a flat tire, you
can contact the Mercedes-Benz emergency call
system customer center.
Vehicles equipped with MOExtended tires are
not equipped with a TIREFIT kit at the factory. It
is therefore recommended that you additionally
equip your vehicle with a TIREFIT kit if you mount tires that do not feature run-flat characteristics,
e.g. winter tires. A TIREFIT kit may be obtained
from a qualified specialist workshop. Information on changing and mounting wheels
(
Ypage 303).
XStop the vehicle on solid, non-slippery and
level ground, as far away as possible from
traffic.
XSwitch on the hazard warning lamps.
XSecure the vehicle against rolling away
(Ypage 142).
XIf possible, bring the front wheels into the
straight-ahead position.
XSwitch off the engine.
XVehicles without KEYLESS-GO:
remove the
SmartKey from the igniti on lock.
XVehicles with KEYLESS-GO: open the driv-
er's door.
The vehicle electronics now have status 0.
This is the same as the SmartKey having been
removed.
XVehicles with KEYLESS-GO: remove the
Start/Stop button from the ignition lock
(
Ypage 122).
XMake sure that the passengers are not endan-
gered as they do so. Make sure that no one is near the danger area while a wheel is being
changed. Anyone who is not directly assisting
in the wheel change should, for example,
stand behind the barrier.
XGet out of the vehicle. Pay attention to traffic
conditions when doing so.
XClose the driver's door.
MOExtended tires (tires with run-flat
properties)
General notes
With MOExtended tires (tires with run flat char-
acteristics), you can continue to drive your vehi-
cle even if there is a total loss of pressure in one
or more tires. The affected tire must not show
any clearly visible damage.
You can recognize a MOExtended tire by the
MOExtended marking which appears on the
sidewall of the tire. You will find this marking
next to the tire size designation, the load-bear-
ing capacity and the speed index (
Ypage 298).
MOExtended tires may only be used in conjunc-
tion with an active tire pressure monitor.
Flat tire271
Breakdown assistance
Page 275 of 322
inhale TIREFIT fumes. Keep tire sealant away
from children. There is a risk of injury.
If you come into contact with the tire sealant,observe the following:
RRinse off the tire sealant from your skin
immediately with water.
RIf the tire sealant comes into contact with
your eyes, immediately rinse them thor-
oughly with clean water.
RIf tire sealant is swallowed, immediately
rinse your mouth out thoroughly and drink
plenty of water. Do not induce vomiting,
and seek medical attention immediately.
RImmediately change out of clothing which
has come into contact with tire sealant.
RIf an allergic reaction occurs, seek medical
attention immediately.
!Do not operate the tire inflation compressor
for longer than eight minutes at a time without a break. It may otherwise overheat.
The tire inflation compressor can be operated
again once it has cooled down.
Comply with the manufacturer’s safety instruc-
tions on the sticker on the tire inflation com-
pressor.
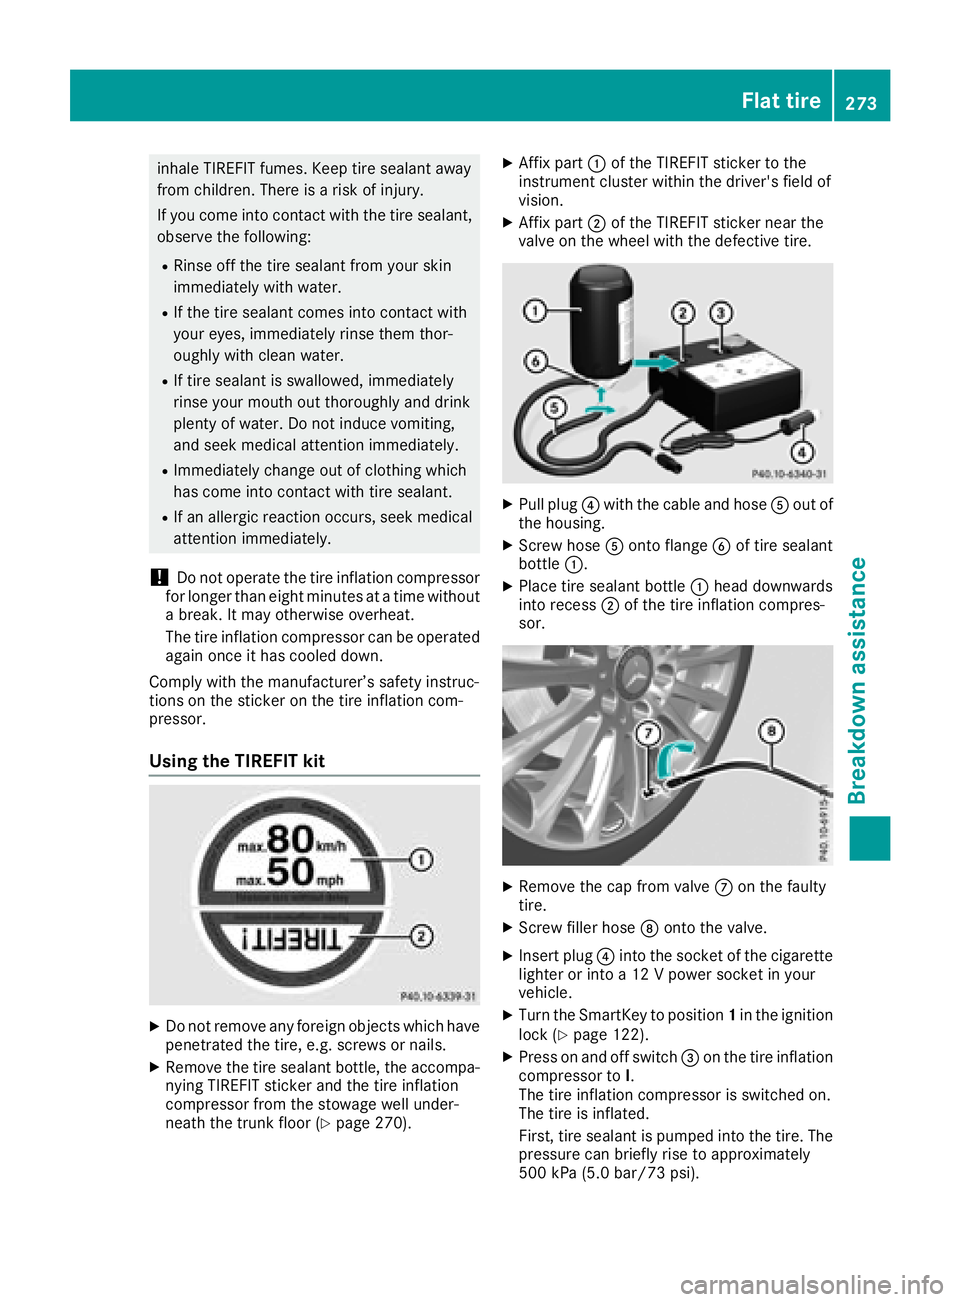
Using the TIREFIT kit
XDo not remove any foreign objects which have
penetrated the tire, e.g. screws or nails.
XRemove the tire sealant bottle, the accompa-
nying TIREFIT sticker and the tire inflation
compressor from the stowage well under-
neath the trunk floor (
Ypage 270).
XAffix part :of the TIREFIT sticker to the
instrument cluster within the driver's field of
vision.
XAffix part ;of the TIREFIT sticker near the
valve on the wheel with the defective tire.
XPull plug ?with the cable and hose Aout of
the housing.
XScrew hose Aonto flange Bof tire sealant
bottle :.
XPlace tire sealant bottle :head downwards
into recess ;of the tire inflation compres-
sor.
XRemove the cap from valve Con the faulty
tire.
XScrew filler hose Donto the valve.
XInsert plug ?into the socket of the cigarette
lighter or into a 12 V power socket in your
vehicle.
XTurn the SmartKey to position 1in the ignition
lock (Ypage 122).
XPress on and off switch =on the tire inflation
compressor to I.
The tire inflation compressor is switched on.
The tire is inflated.
First, tire sealant is pumped into the tire. The
pressure can briefly rise to approximately
500 kPa (5.0 bar/73 psi).
Flat tire273
Breakdown assistance
Z
Page 276 of 322
Do not switch off thetire inflation com -
pressor during this phase .
XLet thetire inflation compressor run for a
maximum of fiv eminutes. The tire should then
hav eattained apressur eof at least 18 0kP a
(1. 8bar/2 6psi) .
If atire pressur eof 18 0kP a(1. 8bar/26 psi) has
been attained after fiv eminutes: (
Ypage 274).
If atire pressur eof 18 0kP a(1. 8bar/26 psi) has
no tbeen attained after fiv eminutes:
(
Ypage 274).
If tire sealant has escaped, clean it off affecte d
area sas quickl yas possible. Use plain water if
possible.
If your clothes are soiled wit htire sealant ,hav e
them cleane dwit hperchloroethylen eat adry
cleane ras soo nas possible.
Ti re pressure not reached
Ifapressur eof 18 0kP a(1. 8bar/26 psi) has no t
been attained after fiv eminutes:
XSwitc hoff th etire inflation compressor.
XUnscrew th efiller hos efrom th evalv eof th e
fault ytire.
Not ethat tire sealant may escape when you
unscrew th efiller hose.
XVer yslowly drive forward sor revers eapprox -
imately 30 ft (10 m).
XPump up th etire again .
Afte r amaximum of fiv eminute sth etire pres-
sur emus tbe at least 18 0kP a(1. 8bar/
26 psi) .
GWARNIN G
If th erequire dtire pressur eis no treached
after th especified time, th etire is to obadly
damaged. The tire sealant canno trepair th e
tire in this instance .Damaged tires and atire
pressur ethat is to olow can significantly
impair th evehicle's braking and drivin gchar-
acteristics .There is aris kof accident.
Do no tcontinu edriving. Contac t aqualified
specialist workshop .
Tire pressure reached
GWARNING
A tire temporarily seale dwit htire sealant
impairs th edrivin gcharacteristics and is no t
suitable for higher speeds .There is aris kof
accident.
You should therefor eadapt your drivin gstyle
accordingly and drive carefully. Do no texceed
th especified maximum speed wit h atire that
has been repaire dusin gtire sealant .
The maximum speed for atire seale dwit htire
sealant is 50 mph (80 km/h). The upper part of
th eTIREFI Tsticker mus tbe affixe dto th einstru-
men tcluste rin th edriver's field of vision .
!Residue from thetire sealant may come out
of th efiller hos eafter use. This could caus e
stains.
Therefore ,plac eth efiller hos ein th eplastic
bag whic hcontained th eTIREFI Tkit.
HEnvironmenta lnot e
Hav eth eused tire sealant bottl edispose dof
professionally, e.g. at aqualified specialist
workshop .
If atire pressur eof 18 0kP a(1.8 bar/26 psi) has
been achieved after a maximum period of ten
minutes:
XSwitch off the tire inflation compressor.
XUnscrew the filler hose from the valve of the
faulty tire.
XStow the tire sealant bottle and the tire infla-
tion compressor.
XPull away immediately.
XStop after driving for approximately ten
minutes and check the tire pressure with the
tire inflation compressor.
The tire pressure must now be at least
130 kPa (1.3 bar/19 psi).
GWARNING
If the required tire pressure is not reached
after driving for a short period, the tire is too
badly damaged. The tire sealant cannot repair
the tire in this instance. Damaged tires and a
tire pressure that is too low can significantly
274Flat tire
Breakdown assistance
Page 282 of 322
XStart the engine of the donor vehicle and run it at idling speed.
XConnect negative terminal?of donor battery Bto ground point Aof your vehicle using the
jumper cable, connecting the jumper cable to battery of other vehicle Bfirst.
XStart the engine.
XBefore disconnecting the jumper cables, let the engine run for several minutes.
XFirst, remove the jumper cables from ground point Aand negative terminal ?, then from pos-
itive terminal ;and positive terminal =. Begin each time at the contacts on your own vehicle
first.
XAfter the jumper cable is removed, return cover :of positive terminal ;to the original position.
Positive terminal ;is covered up and thus insulated again.
XHave the battery checked at a qualified specialist workshop.
Jump-starting is not considered to be a normal operating condition.
iJumper cables and further information regarding jump-starting can be obtained at any qualified
specialist workshop.
Towing and tow-starting
Important safety notes
GWARNING
When towing or tow-starting another vehicle
and its weight is greater than the permissible
gross weight of your vehicle, the:
Rthe towing eye could detach itself
Rthe vehicle/trailer combination could roll-
over.
There is a risk of an accident.
When towing or tow-starting another vehicle,
its weight should not be greater than the per- missible gross weight of your vehicle.
Details on the permissible gross vehicle weight
of your vehicle can be found on the vehicle iden-
tification plate (
Ypage 311).
!When Active Brake Assist, Distance Pilot
DISTRONIC or the HOLD function is activated,
the vehicle brakes automatically in certain
situations.
To avoid damage to the vehicle, deactivate
these systems in the following or similar sit-
uations:
Rwhen towing the vehicle
Rin the car wash
!Only secure the tow rope or tow bar at the
towing eyes. Otherwise, the vehicle could be
damaged.
!Do not use the towing eye for recovery, this
could damage the vehicle. If in doubt, recover
the vehicle with a crane.
!When towing, pull away slowly and
smoothly. If the tractive power is too high, the
vehicles could be damaged.
!Do not tow with sling-type equipment. This
could damage the vehicle.
!When towing away vehicles with KEYLESS-
GO, us e the key instead of the Start/Stop
button. The automatic transmission may oth- erwise shift to position jwhen you open the
driver's or front-passenger door, which could
damage the transmission.
!Make sure that the electric parking brake is
released. If the electric parking brake is faulty,
visit a qualified specialist workshop.
!The vehicle can be towed a maximum of
30 miles (50km). The towing speed of 30 mph
(50 km/h) must not be exceeded.
If the vehicle has to be towed more than
30 miles (50km), the entire vehicle must be
raised and transported.
!If you tow or tow-start another vehicle, its
weight must not exceed the maximum per-
missible gross vehicle weight of your vehicle.
It is better to have the vehicle transported than
to have it towed away.
The automatic transmission must be in position
i when the vehicle is being towed away.
280Towing and tow-starting
Breakdown assistance