2018 MERCEDES-BENZ SL ROADSTER oil change
[x] Cancel search: oil changePage 21 of 322
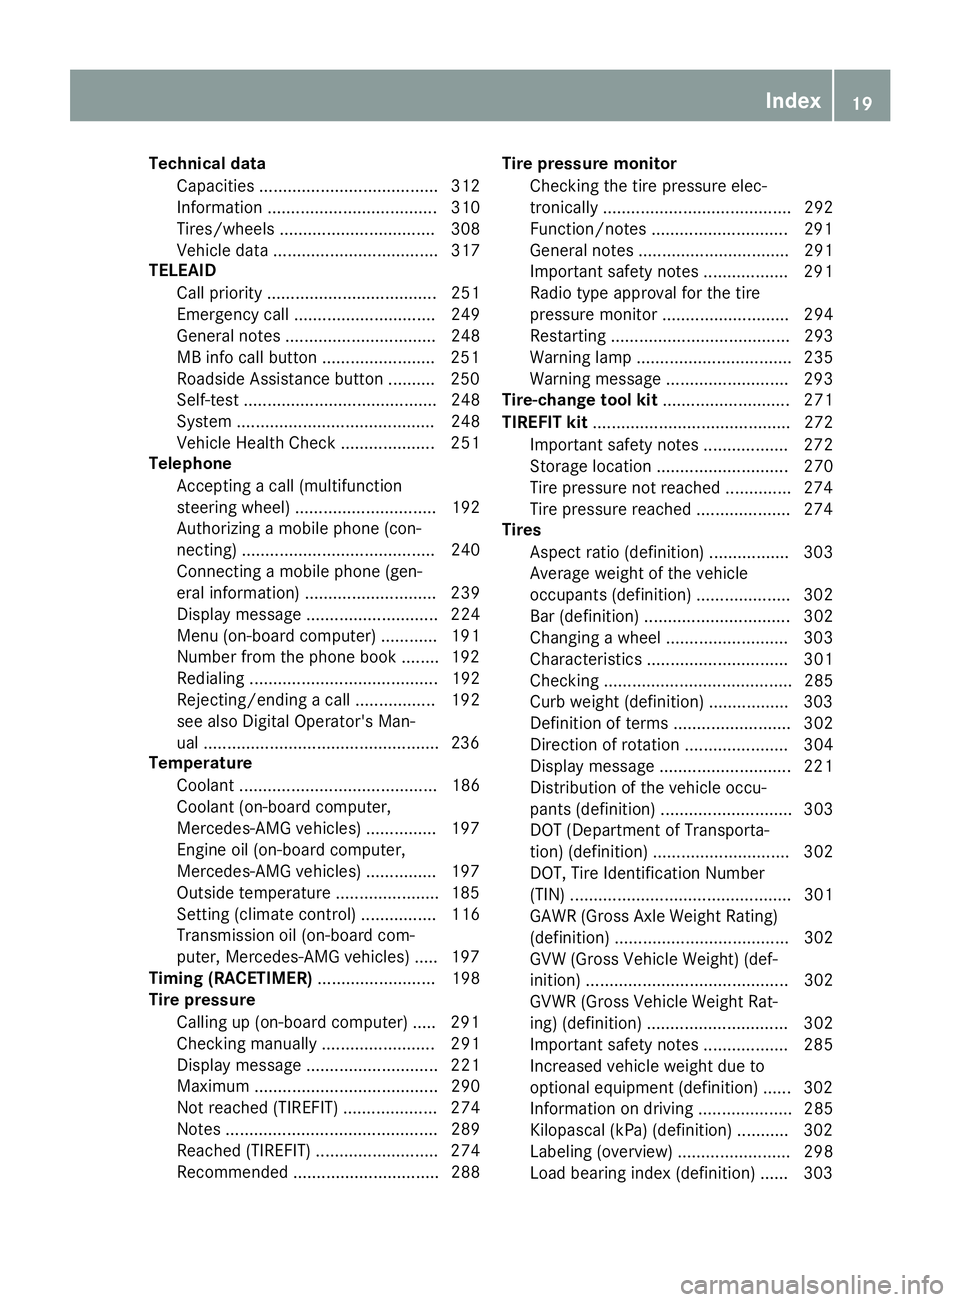
Technical dataCapacities ...................................... 312
Information .................................... 310
Tires/wheels ................................. 308
Vehicle data ................................... 317
TELEAID
Call priority .................................... 251
Emergency call .............................. 249
General notes ................................ 248
MB info call button ........................2 51
Roadside Assistance button .......... 250
Self-test ......................................... 248
System .......................................... 248
Vehicle Health Check .................... 251
Telephone
Accepting a call (multifunction
steering wheel) .............................. 192
Authorizing a mobile phone (con-
necting) ......................................... 240
Connecting a mobile phone (gen-
eral information) ............................ 239
Display message ............................ 224
Menu (on-board computer) ............ 191
Number from the phone book ........1 92
Redialing ........................................ 192
Rejecting/ending a call ................. 192
see also Digital Operator's Man-
ual ..................................................2 36
Temperature
Coolant .......................................... 186
Coolant (on-board computer,
Mercedes-AMG vehicles) ...............1 97
Engine oil (on-board computer,
Mercedes-AMG vehicles) ...............1 97
Outside temperature ......................1 85
Setting (climate control) ................ 116
Transmission oil (on-board com-
puter, Mercedes-AMG vehicles) ..... 197
Timing (RACETIMER) ......................... 198
Tire pressure
Calling up (on-board computer) ..... 291
Checking manually ........................ 291
Display message ............................ 221
Maximum ....................................... 290
Not reached (TIREFIT) .................... 274
Notes ............................................. 289
Reached (TIREFIT) .......................... 274
Recommended ............................... 288 Tire pressure monitor
Checking the tire pressure elec-
tronically ........................................ 292
Function/notes .............................2 91
Genera
l notes ................................ 291
Important safety notes .................. 291
Radio type approval for the tire
pressure monitor ........................... 294
Restarting ...................................... 293
Warning lamp ................................. 235
Warning message .......................... 293
Tire-change tool kit ........................... 271
TIREFIT kit .......................................... 272
Important safety notes .................. 272
Storage location ............................ 270
Tire pressure not reached .............. 274
Tire pressure reached .................... 274
Tires
Aspect ratio (definition) ................. 303
Average weight of the vehicle
occupants (definition) .................... 302
Bar (definition) ............................... 302
Changing a wheel .......................... 303
Characteristics .............................. 301
Checking ........................................ 285
Curb weight (definition) ................. 303
Definition of terms ......................... 302
Direction of rotation ...................... 304
Display message ............................ 221
Distribution of the vehicle occu-
pants (definition) ............................ 303
DOT (Department of Transporta-
tion) (definition) ............................. 302
DOT, Tire Identification Number
(TIN) ............................................... 301
GAWR (Gross Axle Weight Rating)
(definition) ..................................... 302
GVW (Gross Vehicle Weight) (def-
inition) ........................................... 302
GVWR (Gross Vehicle Weight Rat-
ing) (definition) .............................. 302
Important safety notes .................. 285
Increased vehicle weight due to
optional equipment (definition) ...... 302
Information on driving .................... 285
Kilopascal (kPa) (definition) ........... 302
Labeling (overview) ........................ 298
Load bearing index (definition) ...... 303
Index19
Page 123 of 322
Notes on breaking-in a new vehicle
Important safety notes
The sensor system of some driving and driving
safety systems adjusts automatically while a
certain distance is being driven after the vehiclehas been delivered or after repairs. Full system
effectiveness is not reached until the end of this
teach-in procedure.
New and replaced brake pads and discs only
reach their optimum braking effect after several hundred kilometers of driving. Compensate for
this by applying greater force to the brake pedal.
The first 1000 miles (1500 km)
The more you look after the engine when it is
new, the more satisfied you will be with its per-
formance in the future.
RYou should therefore drive at varying vehicle
and engine speeds for the first 1,000 miles
(1,500 km).
RAvoid heavy loads, e.g. driving at full throttle,
during this period.
RChange gear in good time, before the tach-
ometer needle is Ôof the way to the red area
of the tachometer.
RDo not manually shift to a lower gear to brake
the vehicle.
RTry to avoid depressing the accelerator pedal
beyond the point of resistance (kickdown).
Additional breaking-in notes for Mercedes-AMG
vehicles:
RDo not drive faster than 85 mph (140 km/h)
for the first 1,000 miles (1,500 km).
ROnly allow the engine to reach a maximum
engine speed of 4,500 rpm briefly.
RIdeally, for the first 1000 miles (1500 km),
driv ein progra mC.
RChange gear ingood time.
After 1000 miles (1500 km), you can increase
the engine speed gradually and accelerate the
veh icle to full speed.
You should also observe these notes on break-
ing in if the engine or parts of the drive train on
your veh
i
cle have been replace d.
Alwa ys observe the maximum permis sible
speed.
Self-locking rear axle differential
(Mercedes-AMG vehicles)
Your vehicle isequipped with a self-locking dif-
ferential on the rear axle.
Change the oil to improve protection of the rear axle differential:
Rafter a breaking-in period of 2000 miles (USA)
Rafter a breaking-in period of 3000 km (Can-
ada)
Revery 30,000 miles or 3 years (USA)
Revery 60,000 km or 4 years (Canada)
These oil changes prolong the service life of the
differential. Have the oil change carried out at a
qualified specialist workshop.
Driving
Important safety notes
GWARNING
Objects inthe driver's footwell may restrict
the clearance around the pedals or block a
depressed pedal. This jeopardizes the oper-
ating and road safety of the vehicle. There isa
risk of an accident.
St ow all objects securely inthe vehicle so that
they do not get into the driver's footwell.
When using floormats or carpets, make sure
that they are properly secured so that they do
not slip or obstruct the pedals. Do not place
several floormats or carpets on top of one
another.
GWARNING
Unsuitable footwear can hinder correct usage
of the pedals, e.g.:
Rshoes with thick soles
Rshoes with high heels
Rslippers
There isa risk of an accident.
Wear suitable footwear to ensure correct
usage of the pedals.
Driving121
Driving and parking
Z
Page 141 of 322
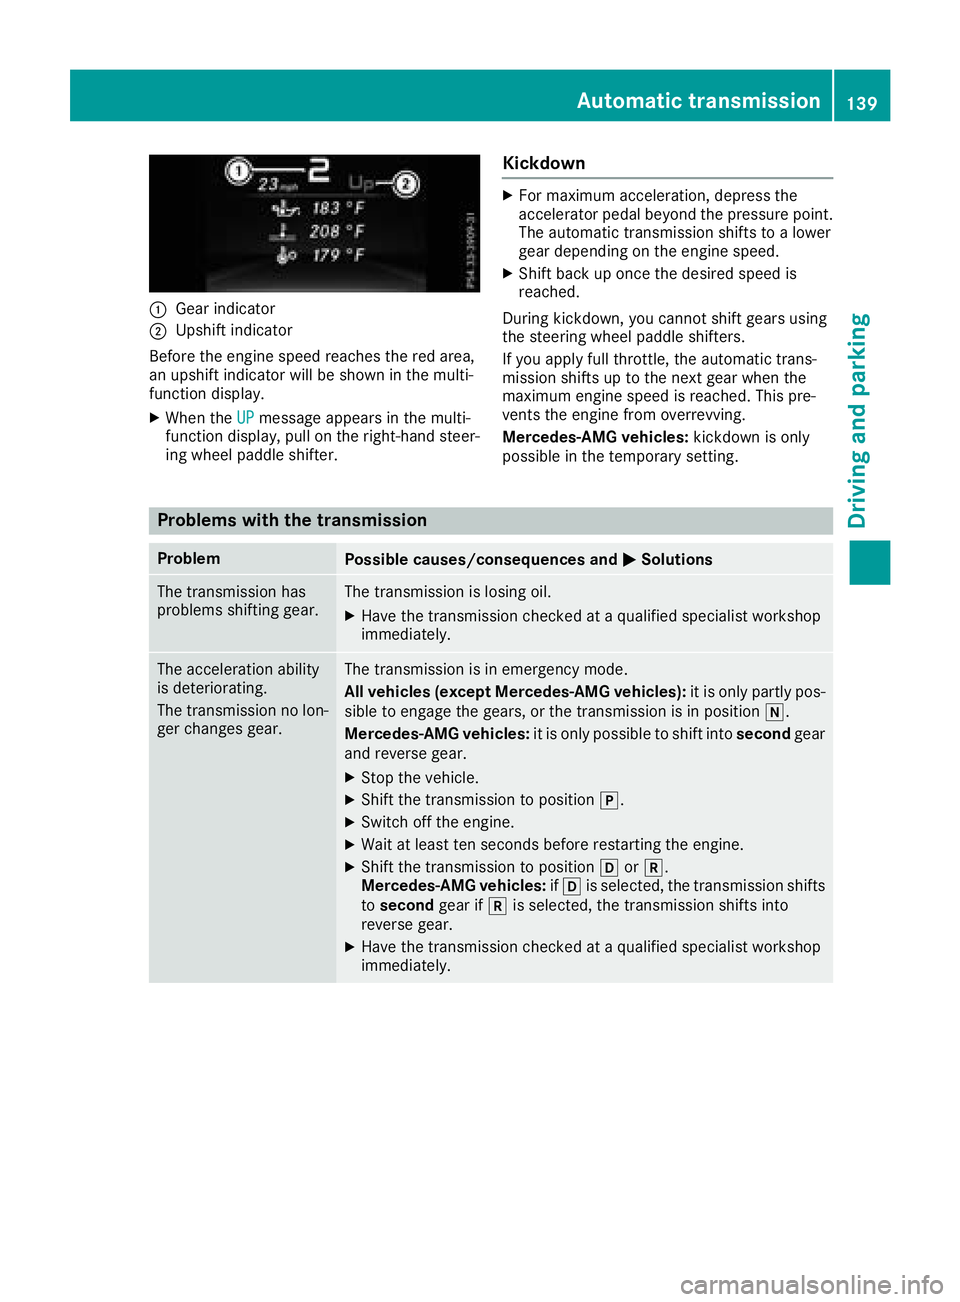
:Gear indicator
;Upshift indicator
Before the engine speed reaches the red area,
an upshift indicator will be shown in the multi-
function display.
XWhen the UPmessage appears in the multi-
function display, pull on the right-hand steer-
ing wheel paddle shifter.
Kickdown
XFor maximum acceleration, depress the
accelerator pedal beyond the pressure point. The automatic transmission shifts to a lower
gear depending on the engine speed.
XShift back up once the desired speed is
reached.
During kickdown, you cannot shift gears using
the steering wheel paddle shifters.
If you apply full throttle, the automatic trans-
mission shifts up to the next gear when the
maximum engine speed is reached. This pre-
vents the engine from overrevving.
Mercedes-AMG vehicles: kickdown is only
possible in the temporary setting.
Problems with the transmission
ProblemPossible causes/consequences and MSolutions
The transmission has
problems shifting gear.The transmission is losing oil.
XHave the transmission checked at a qualified specialist workshop
immediately.
The acceleration ability
is deteriorating.
The transmission no lon-
ger changes gear.The transmission is in emergency mode.
All vehicles (except Mercedes-AMG vehicles): it is only partly pos-
sible to engage the gears, or the transmission is in position i.
Mercedes-AMG vehicles: it is only possible to shift into secondgear
and reverse gear.
XStop the vehicle.
XShift the transmission to position j.
XSwitch off the engine.
XWait at least ten seconds before restarting the engine.
XShift the transmission to position hork.
Mercedes-AMG vehicles: ifh is selected, the transmission shifts
to second gear ifkis selected, the transmission shifts into
reverse gear.
XHave the transmission checked at a qualified specialist workshop
immediately.
Automatic transmission139
Driving and parking
Z
Page 264 of 322
ASSYST PLUS
Service messages
The ASSYSTPLU Sservic einterval display
inform syou of th enext servic edue date.
Information on th etyp eof servic eand servic e
intervals (see th eseparat eMaintenance Book -
let).
You can obtain further information from an
authorize dMercedes-Benz Cente ror at
http://www.mbusa.co m(US Aonly).
iThe ASSYS TPLU Sservic einterval display
does no tsho wany information on th eengin e
oil level. Observ eth enote son th eengin eoil
level (
Ypage 259).
The multifunction display shows aservic emes -
sage for several seconds, e.g. :
RService Ain .. Day s
RService ADue
RServic e AExceeded by .. Day s
Dependingon th eoperating condition sof th e
vehicle, th eremaining time or distanc euntil th e
next servic edue dat eis displayed.
The lette rA
or B,possibl yin connection wit h a
number or another letter, shows th etyp eof ser -
vice. A
stand sfor aminor servic eand Bfora
major service.
You can obtain further information from an
authorize dMercedes-Benz Center.
The ASSYS TPLU Sservic einterval display does
no ttak eint oaccoun tany periods of time during
whic hth ebattery is disconnected.
Maintainin gth etime-dependen tservic esched-
ule:
XNot edown th eservic edue dat edisplayed in
th emultifunction display before disconnect -
ing th ebattery.
or
XAfte rreconnecting th ebattery, subtrac tth e
battery disconnection periods from th eser -
vic edat eshown on th edisplay.
Hiding a service message
XPress th ea or% buttonon th esteering
wheel.
Displaying service messages
XSwitc hon th eignition .
XPress th e= or; buttonon th esteering
whee lto select th eServ.menu.
XPress th e9 or: buttonto select th e
ASSYSTPLU Ssubmen uand confirm by press-
ing th ea button.
The servic edue dat eappear sin th emulti-
function display.
Infor mation about Service
Resetting the ASSYST PLUS service
interval display
!If th eASSYS TPLU Sservic einterval display
has been inadvertentl yreset ,this setting can
be correcte dat aqualified specialist work-
shop.
Hav eservic ewor kcarrie dout as described in
th eMaintenance Booklet .This may otherwise
lead to increased wear and damag eto th e
major assemblies or th evehicle.
A qualified specialist workshop ,e.g. an author-
ized Mercedes-Benz Center, will reset th e
ASSYS TPLU Sservic einterval display after th e
servic ewor khas been carrie dout .You can also
obtain further information on maintenance
work, for example.
Special service requirements
The specifie dmaintenance interval takes only
th enormal operation of th evehicl eint o
account. Under arduous operating condition sor
increased load on th evehicle, maintenance
wor kmus tbe carrie dout mor efrequently, for
example:
Rregular cit ydrivin gwit hfrequen tintermediat e
stops
Rif th evehicl eis primarily used to travel short
distances
Ruse in mountainous terrain or on poor road
surfaces
Rif th eengin eis often lef tidlin gfor lon gperiods
Under these or similar conditions, have, for
example, th eair filter, engin eoil and oil filter
replace dor changed mor efrequently. Under
arduous operating conditions, th etires mus tbe
checke dmor eoften .Further information can be
262ASSYST PLUS
Maintenance and care
Page 306 of 322
tire can be found under "MOExtended tires (tires
with run-flat characteristics" (Ypage 271).
Rotating the wheels
GWARNING
Interchanging the front and rear wheels may
severely impair the driving characteristics if
the wheels or tires have different dimensions. The wheel brakes or suspension components
may also be damaged. There is a risk of acci-
dent.
Rotate front and rear wheels only if the wheels and tires are of the same dimensions.
!On vehicles equipped with a tire pressure
monitor, electronic components are located
in the wheel.
Tire-mounting tools should not be used near
the valve. This could damage the electronic
components.
Only have tires changed at a qualified spe-
cialist workshop.
Always pay attention to the instructions and
safety notes when changing a wheel
(
Ypage 304).
The wear patterns on the front and rear tires
differ, depending on the operating conditions.
Rotate the wheels before a clear wear pattern
has formed on the tires. Front tires typically
wear more on the shoulders and the rear tires in
the center.
On vehicles that have the same size front and
rear wheels, you can rotate the wheels accord-
ing to the intervals in the tire manufacturer's
warranty book in your vehicle documents. If no
warranty book is available, the tires s
hould be
rotated every 3,000 to 6,000 miles (5,000 to
10,000 km). Depending on tire wear, this may
be required earlier. Do not change the direction
of wheel rotation.
Clean the contact surfaces of the wheel and the
brake disc thoroughly every time a wheel is rota- ted. Check the tire pressure and reactivate the
tire pressure monitor if necessary.
Direction of rotation
Tires with a specified direction of rotation have
additional benefits, e.g. if there is a risk of hydro- planing. These advantages can only be gained if
the tires are installed corresponding to the
direction of rotation.
An arrow on the sidewall of the tire indicates its
correct direction of rotation.
Storing wheels
Store wheels that are not being used in a cool,
dry and preferably dark place. Protect the tires
from oil, grease, gasoline and diesel.
Mounting a wheel
Preparing the vehicle
XStop the vehicle on solid, non-slippery and
level ground.
XUnload the vehicle. The jack can only be used
when the vehicle is unladen.
XApply the electric parking brake manually.
XBring the front wheels into the straight-ahead
position.
XShift the transmission to position j.
XSwitch off the engine.
XVehicles without KEYLESS-GO:remove the
SmartKey from the ignition lock.
XVehicles with KEYLESS-GO: open the driv-
er's door.
The vehicle electronics now have status 0.
This is the same as the SmartKey having been
removed.
XVehicles with KEYLESS-GO: remove the
Start/Stop button from the ignition lock
(
Ypage 122).
XIf included in the vehicle equipment, remove
the tire-change tool kit from the vehicle.
XSafeguard the vehicle against rolling away.
304Changing a wheel
Wheels an d tires
Page 308 of 322
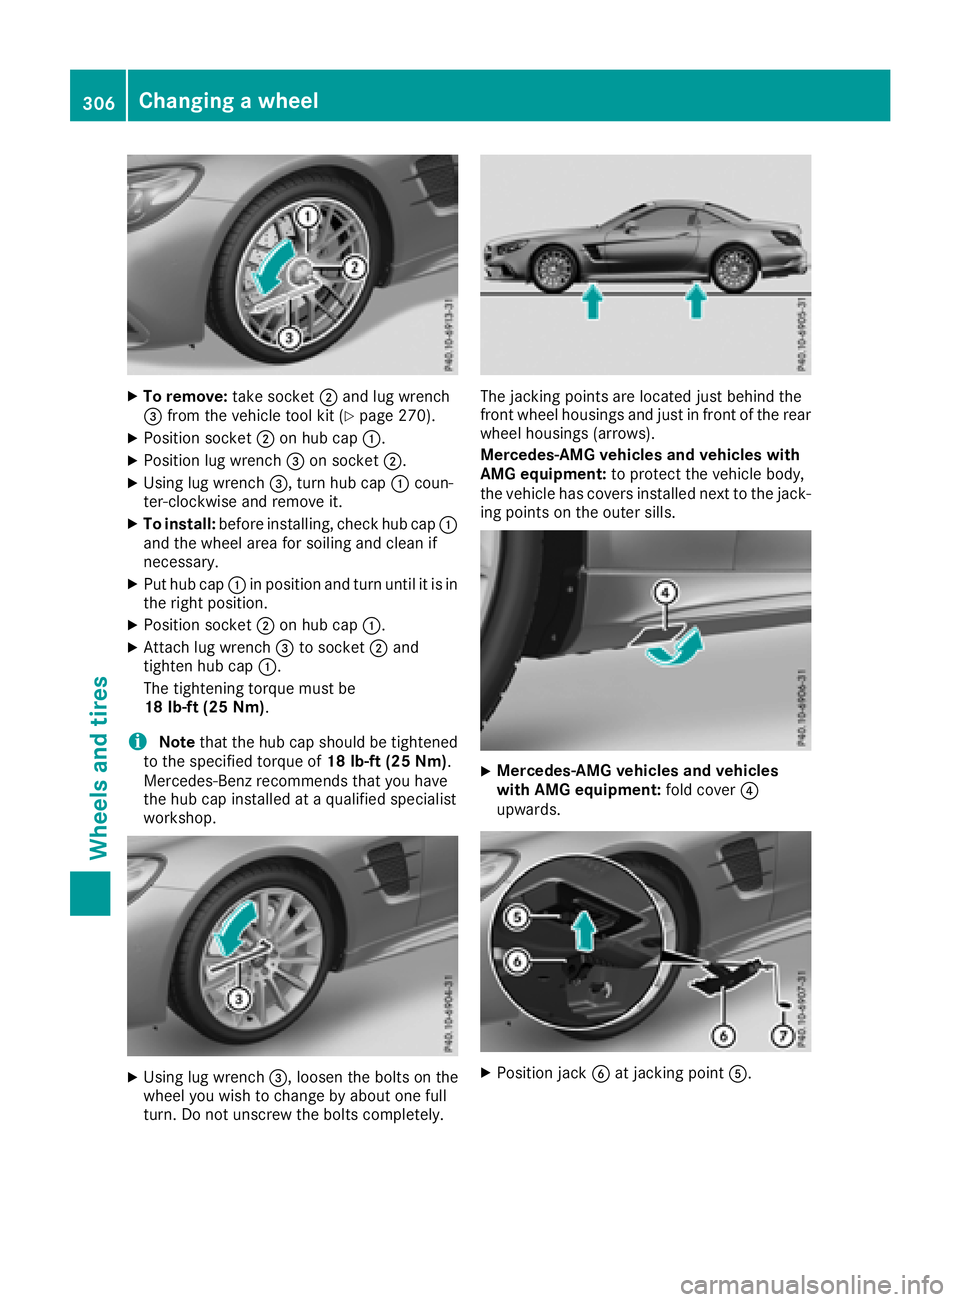
XTo remove:take socket;and lug wrench
= from the vehicle tool kit (Ypage 270).
XPosition socket ;on hub cap :.
XPosition lug wrench =on socket ;.
XUsing lug wrench =, turn hub cap:coun-
ter-clockwise and remove it.
XTo install: before installing, check hub cap :
and the wheel area for soiling and clean if
necessary.
XPut hub cap :in position and turn until it is in
the right position.
XPosition socket ;on hub cap :.
XAttach lug wrench =to socket ;and
tighten hub cap :.
The tightening torque must be
18 lb-ft (25 Nm) .
iNotethat the hub cap should be tightened
to the specified torque of 18 lb-ft (25 Nm).
Mercedes-Benz recommends that you have
the hub cap installed at a qualified specialist
workshop.
XUsing lug wrench =, loosen the bolts on the
wheel you wish to change by about one full
turn. Do not unscrew the bolts completely.
The jacking points are located just behind the
front wheel housings and just in front of the rear
wheel housings (arrows).
Mercedes-AMG vehicles and vehicles with
AMG equipment: to protect the vehicle body,
the vehicle has covers installed next to the jack-
ing points on the outer sills.
XMercedes-AMG vehicles and vehicles
with AMG equipment: fold cover?
upwards.
XPosition jack Bat jacking point A.
306Changing a wheel
Wheels and tires
Page 316 of 322
If standard unleaded gasoline is unavailable
and you have to refuel with unleaded gasoline
of a lower grade, observe the following pre-
cautions:
ROnly fill the fuel tank to half full with regular unleaded gasoline and fill the rest with pre-
mium-grade unleaded gasoline as soon as
possible.
RDo not drive at the maximum speed.
RAvoid sudden acceleration and engine
speeds over 3,000 rpm.
You will usually find information about the fuel
grade on the fuel pump. If you cannot find the
label on the fuel pump, ask the gas station staff.
iFor further information, consult a qualified
specialist workshop or visit
http://www.mbusa.com (USA only).
As a temporary measure, if the recommended
fuel is not available, you may also use regular
unleaded gasoline with an octane rating of
87 AKI/91 RON. This may reduce engine per-
formance and increase fuel consumption. Avoid
driving at full throttle and sudden acceleration.
Never refuel using gasoline with a lower AKI.
iThe fuels you can use in your vehicle may
differ from the information in the Operator's
Manual depending on the country. The fuels
that have been approved for your vehicle can be found on the instruction label on the inside
of the fuel filler flap.
Information on refueling (
Ypage 140).
Additives in gasoline
!Operating the engine with fuel additives
added later can lead to engine failure. Do not
mix fuel additives with fuel. This does not
include additives for the removal and preven-
tion of residue buildup. gasoline must only be
mixed with additives recommended by
Mercedes-Benz. Comply with the instructions
for use on the product label. More information
about recommended additives can be
obtained from any authorized Mercedes-Benz
Center.
Mercedes-Benz recommends that you use bran- ded fuels that have additives.
The fuel quality available in some countries may
not be sufficient. Residue could build up in the
fuel injection system as a result. In such cases,
and in consultation with a
n authorized
Mercedes-Benz Center, the fuel may be mixed with the cleaning additive recommended by
Mercedes-Benz. You must observe the notes
and mixing ratios specified on the container.
Engine oil
General notes
!Do not use engine oil or an oil filter with
specifications deviating from those expressly
required for the prescribed service intervals.
Do not change the engine oil or oil filter in
order to set replacement intervals longer than
those prescribed. This could otherwise cause
damage to the engine or exhaust gas after-
treatment.
Follow the instructions on the service interval
display for changing the engine oil. This could
otherwise cause damage to the engine or
exhaust gas aftertreatment.
When handling engine oil, observe the important
safety notes on service products (
Ypage 312).
The engine oils are matched to the performance
of Mercedes-Benz engines and service intervals.
You should therefore only use engine oils and oil
filters that are approved for vehicles with main- tenance systems.
For a list of approved engine oils and oil filters,
consult an authorized Mercedes-Benz Center.
Or visit the website
http://bevo.mercedes-benz.com.
The table shows which engine oils have been
approved for your vehicle.
ModelMB-Freigabe or MB-Approval
All models229.5
Mercedes‑AMG vehicles: use only SAE 0W-40
or SAE 5W-40 engine oils.
314Service products and filling capacities
Technical data
Page 317 of 322

iMB approval is indicated on the oil contain-
ers.
Filling capacities
The following values refer to an oil change
including the oil filter.
Missing values were not available at time of
going to print.
ModelCapacity
SL 4506.9 US qt (6.5 l)
SL 5508.5 US qt (8.0l)
Mercedes‑AMG
SL 638.9 US qt (8.5l)
Mercedes‑AMG
SL 6510.5 US qt (10.0 l)
Additives
!Do not use any additives in the engine oil.
This could damage the engine.
Brake fluid
GWARNING
The brake fluid constantly absorbs moisture
from the air. This lowers the boiling point of
the brake fluid. If the boiling point of the brake
fluid is too low, vapor pockets may form in the
brake system when the brakes are applied
hard. This would impair braking efficiency.
There is a risk of an accident.
You should have the brake fluid renewed at
the specified intervals.
When handling brake fluid, observe the impor-
tant safety notes on service products
(
Ypage 312).
The brake fluid change intervals can be found in
the Maintenance Booklet.
Only use brake fluid approved by Mercedes-
Benz in accordance with MB-Freigabe or MB-
Approval 331.0.
Information about approved brake fluid can be
obtained at any qualified specialist workshop or
on the Internet at
http://bevo.mercedes-benz.co m.
iHave the brake fluid regularly replaced at a
qualified specialist workshop and the replace-
ment confirmed in the Maintenance Booklet.
Coolant
Important safety notes
GWARNING
If antifreeze comes into contact with hot com- ponents in the engine compartment, it may
ignite. There is a risk of fire and injury.
Let the engine cool down before you add anti-
freeze. Make sure that antifreeze is not spilled
next to the filler neck. Thoroughly clean the
antifreeze from components before starting
the engine.
!Only add coolant that has been premixed
with the desired antifreeze protection. You
could otherwise damage the engine.
Further information on coolants can be found
in the Mercedes-Benz Specifications for Ser-
vice Products, MB BeVo 310.1, e.g. on the
Internet at
http://bevo.mercedes-benz.com. Or con-
tact a qualified specialist workshop.
!Always use a suitable coolant mixture, even
in countries where high temperatures prevail.
Otherwise, the engine cooling system is not
sufficiently protected from corrosion and
overheating.
iHave the coolant regularly replaced at a
qualified specialist workshop and the replace-
ment confirmed in the Maintenance Booklet.
Comply with the important safety precautions
for service products when handling coolant
(
Ypage 312).
The coolant is a mixture of water and anti-
freeze/corrosion inhibitor. It is responsible for
the following:
Ranti-corrosion protection
Rantifreeze protection
Rraising the boiling point
If the coolant has antifreeze protection down to
-35 ‡ (-37 †), the boiling point of the coolant
during operation is approximately 266 ‡
(130 †).
Service products and filling capacities315
Technical data
Z