2018 MERCEDES-BENZ SL ROADSTER door lock
[x] Cancel search: door lockPage 83 of 322
With the roof open, you can use the loading aid
to raise the folded roof in the trunk to make
loading easier (
Ypage 244). The trunk partition
opens automatically.
You can unlock the trunk lid if the vehicle is sta-
tionary and the roof is completely open or
closed.
Do not leave the SmartKey in the trunk. You
could otherwise lock yourself out.
The trunk lid can be:
Ropened/closed from outside
Ropened and closed automatically from out-
side (vehicles with trunk lid remote closing
feature)
Ropened and closed automatically from inside (vehicles with trunk lid remote closing fea-
ture)
Ropened, closed or stopped during operation
without the use of your hands (vehicles with
KEYLESS-GO and HANDS-FREE ACCESS)
Rlocked separately
Ropened with the emergency release button
Runlocked with the mechanical key
You should preferably place luggage or loads in
the trunk.
Trunk lid reversing feature
The trunk lid is equipped with an automatic
reversing feature. It reacts if a solid object
obstructs or restricts the trunk lid during the
closing procedure. The trunk lid opens again
automatically. The automatic reversing function
is only an aid and is not a substitute for your
attentiveness to the trunk lid while it is closing.
GWARNING
The reversing feature does not respond:
Rto soft, light and thin objects, e.g. fingers
Rover the last 1/3 in (8 mm) of the closing
movement
The reversing feature cannot prevent some-
one being trapped in these situations in par-
ticular. There is a risk of injury.
Make sure that no body parts are in close
proximity during the closing procedure.
If somebody becomes trapped:
Rpress the Fbutton on the SmartKey, or
Rpull or press the remote operating switch
on the driver's door or
Rpress the closing or locking button on the
trunk lid, or
Rpull on the trunk lid handle
Opening/closing from outside
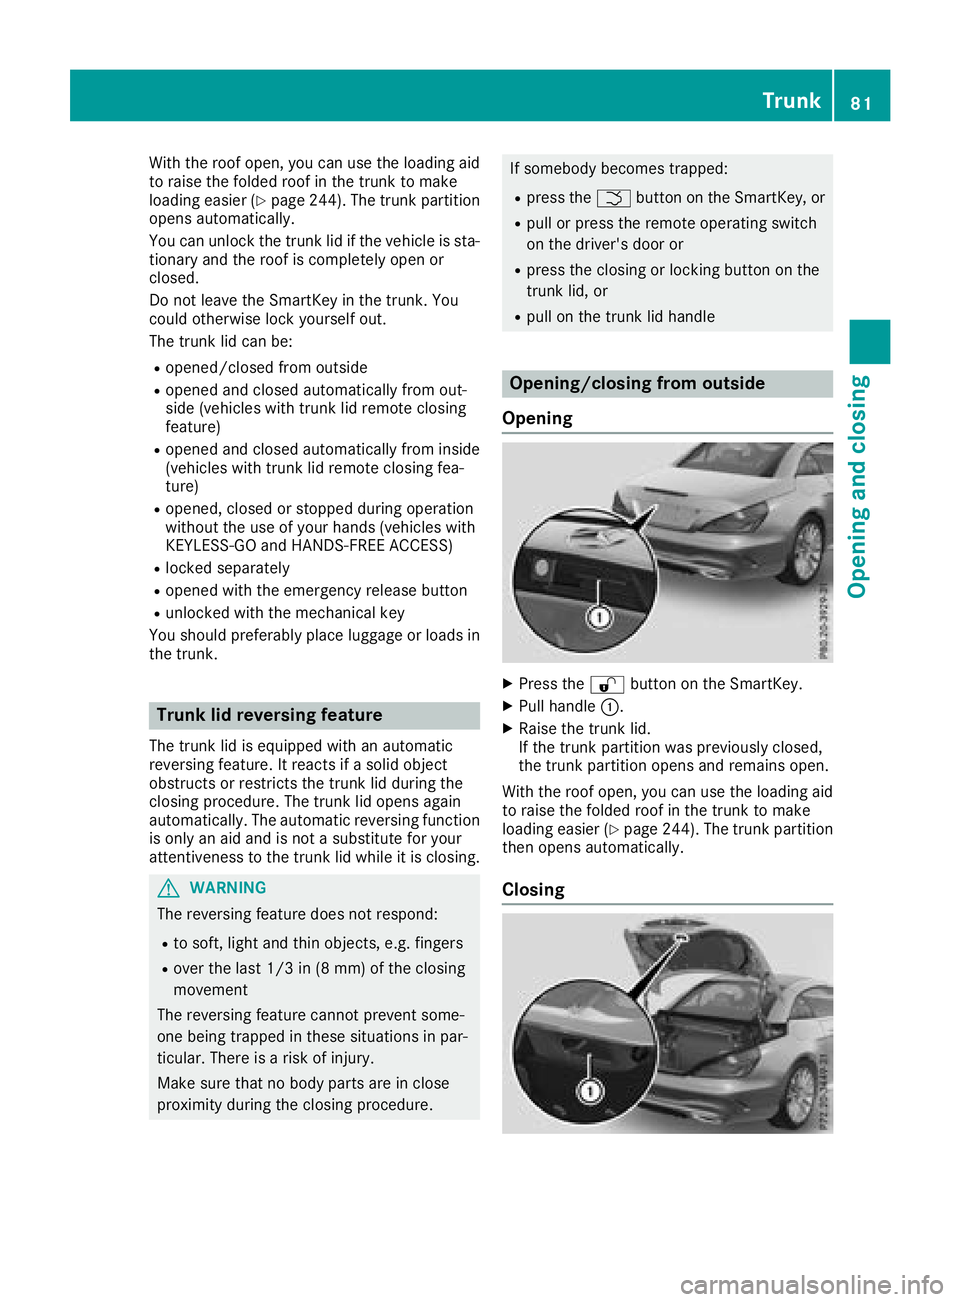
Opening
XPress the %button on the SmartKey.
XPull handle :.
XRaise the trunk lid.
If the trunk partition was previously closed,
the trunk partition opens and remains open.
With the roof open, you can use the loading aid
to raise the folded roof in the trunk to make
loading easier (
Ypage 244). The trunk partition
then opens automatically.
Closing
Trunk81
Opening and closing
Z
Page 84 of 322
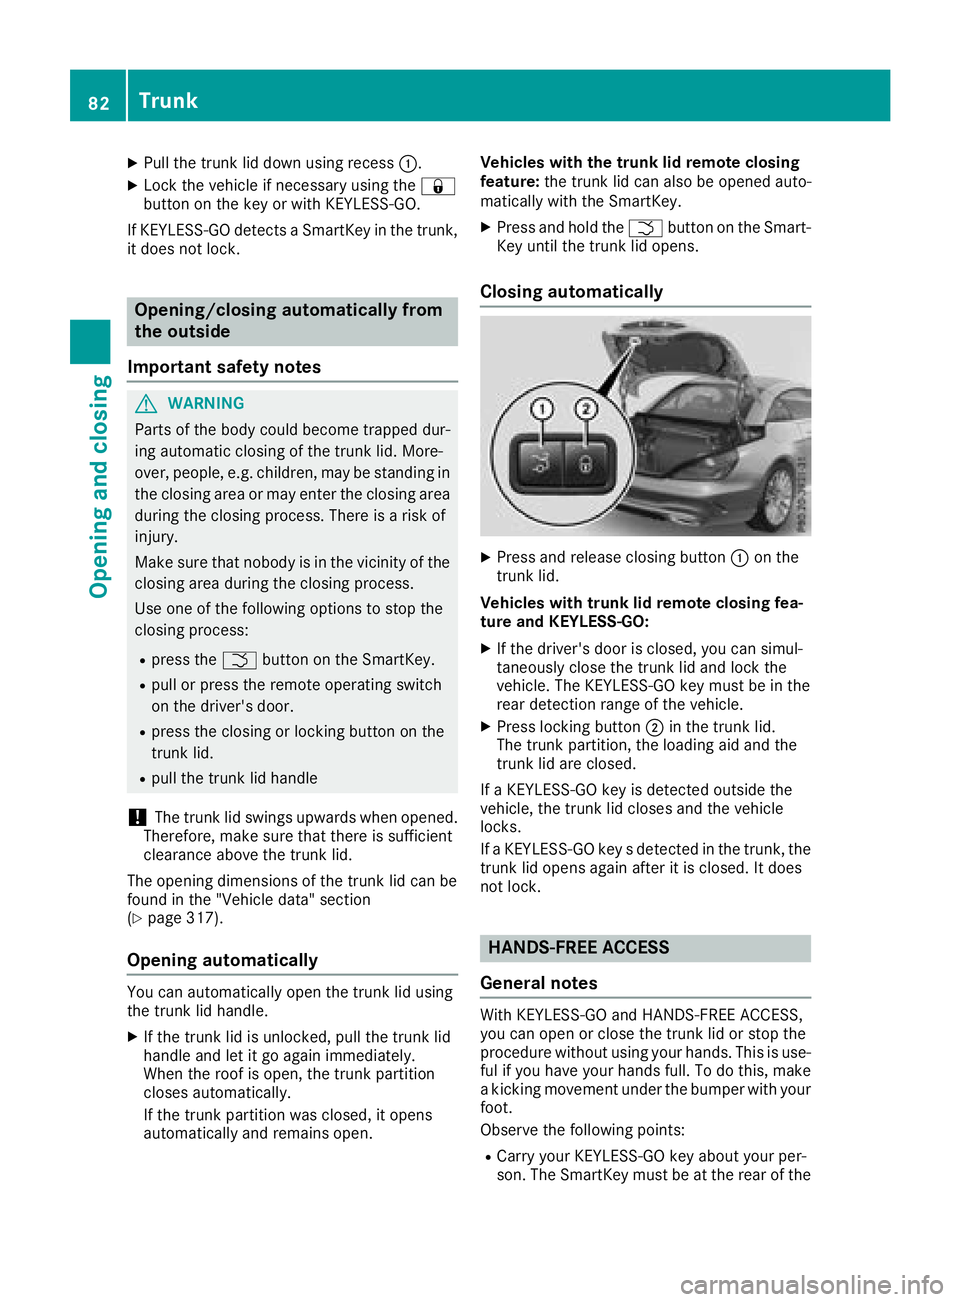
XPull the trunk lid down using recess:.
XLock the vehicle if necessary using the &
button on the key or with KEYLESS-GO.
If KEYLESS-GO detects a SmartKey in the trunk,
it does not lock.
Opening/closing automatically from
the outside
Important safety notes
GWARNING
Parts of the body could become trapped dur-
ing automatic closing of the trunk lid. More-
over, people, e.g. children, may be standing in the closing area or may enter the closing area
during the closing process. There is a risk of
injury.
Make sure that nobody is in the vicinity of the
closing area during the closing process.
Use one of the following options to stop the
closing process:
Rpress the Fbutton on the SmartKey.
Rpull or press the remote operating switch
on the driver's door.
Rpress the closing or locking button on the
trunk lid.
Rpull the trunk lid handle
!The trunk lid swings upwards when opened.
Therefore, make sure that there is sufficient
clearance above the trunk lid.
The opening dimensions of the trunk lid can be
found in the "Vehicle data" section
(
Ypage 317).
Opening automatically
You can automatically open the trunk lid using
the trunk lid handle.
XIf the trunk lid is unlocked, pull the trunk lid
handle and let it go again immediately.
When the roof is open, the trunk partition
closes automatically.
If the trunk partition was closed, it opens
automatically and remains open. Vehicles with the trunk lid remote closing
feature:
the trunk lid can also be opened auto-
matically with the SmartKey.
XPress and hold the Fbutton on the Smart-
Key until the trunk lid opens.
Closing automatically
XPress and release closing button :on the
trunk lid.
Vehicles with trunk lid remote closing fea-
ture and KEYLESS-GO:
XIf the driver's door is closed, you can simul-
taneously close the trunk lid and lock the
vehicle. The KEYLESS-GO key must be in the
rear detection range of the vehicle.
XPress locking button ;in the trunk lid.
The trunk partition, the loading aid and the
trunk lid are closed.
If a KEYLESS-GO key is detected outside the
vehicle, the trunk lid closes and the vehicle
locks.
If a KEYLESS-GO key s detected in the trunk, the
trunk lid opens again after it is closed. It does
not lock.
HANDS-FREE ACCESS
General notes
With KEYLESS-GO and HANDS-FREE ACCESS,
you can open or close the trunk lid or stop the
procedure without using your hands. This is use-
ful if you have your hands full. To do this, make
a kicking movement under the bumper with your
foot.
Observe the following points:
RCarry your KEYLESS-GO key about your per-
son. The SmartKey must be at the rear of the
82Trunk
Opening and closing
Page 87 of 322
XRemove themechanical key.
XInser tth emechanical ke yint oth eSmartKey.
Unlocking the trunk (mechanical key)
!
The trunk lid swings upwards when opened.
Therefore ,mak esur ethat there is sufficien t
clearance abov eth etrunk lid.
If th etrunk canno tbe unlocked wit hth eSmart -
Key or KEYLESS-GO ,use th emechanical key.
If you use th emechanical ke yto unlock and
open th etrunk lid, th eanti-thef talarm system
will be triggered .Switc hoff th ealarm
(
Ypage 72).
XTak eth emechanical ke yout of th eSmartKey
(Ypage 75).
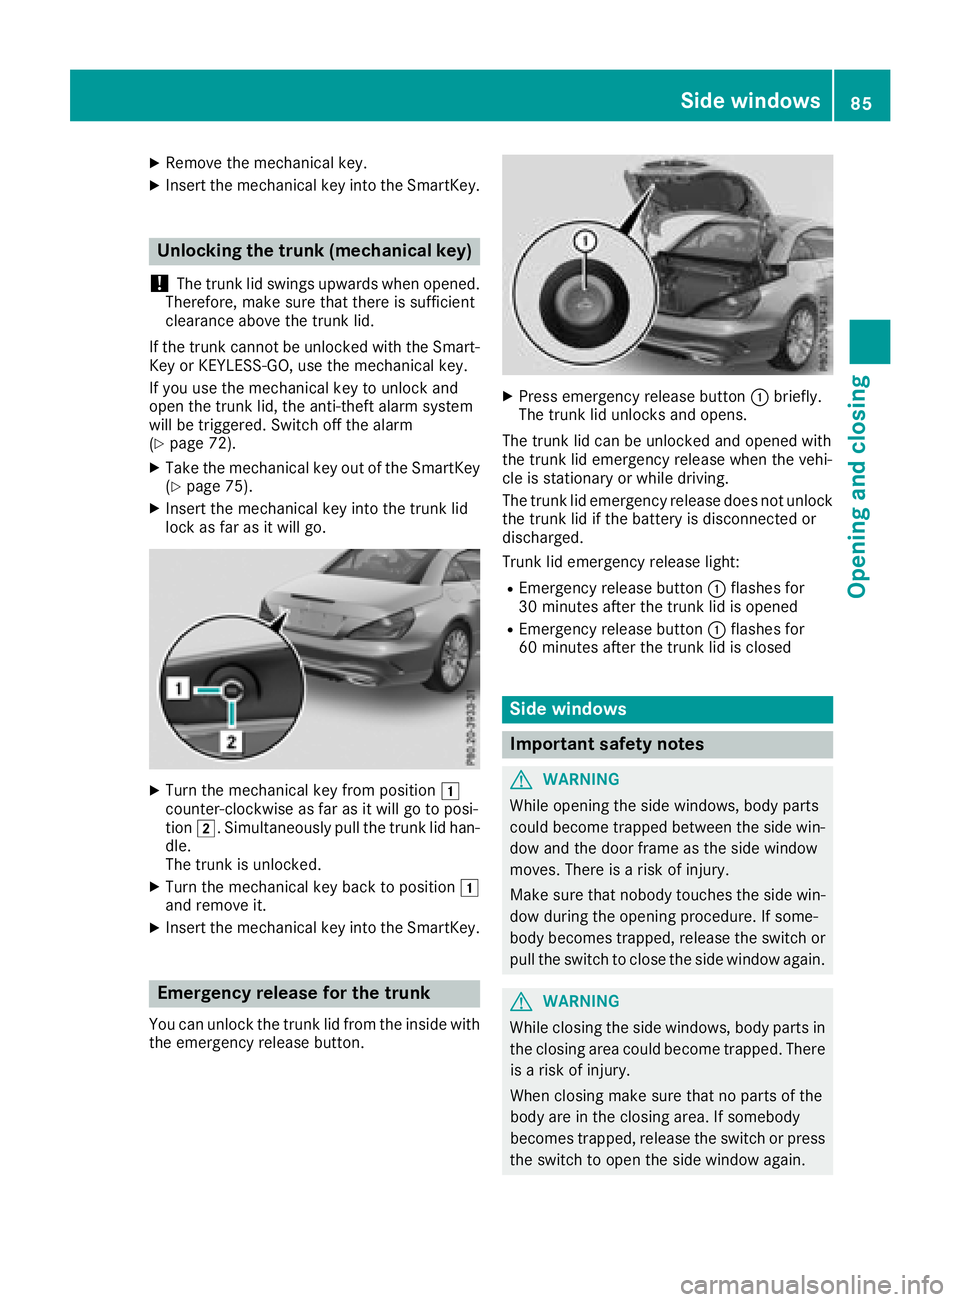
XInser tth emechanical ke yint oth etrunk lid
loc kas far as it will go.
XTurn th emechanical ke yfrom position 1
counter-clockwise as far as it will go to posi-
tion 2.Simultaneously pull th etrunk lid han -
dle.
The trunk is unlocked.
XTurn th emechanical ke ybac kto position 1
and remove it .
XInsertth emechanical ke yint oth eSmartKey.
Emergency release for the trunk
You can unlock th etrunk lid from th einside wit h
th eemergenc yrelease button.
XPress emergenc yrelease butto n: briefly.
The trunk lid unlocks and opens.
The trunk lid can be unlocke dand opened wit h
th etrunk lid emergenc yrelease when th evehi-
cle is stationary or while driving .
The trunk lid emergenc yrelease does no tunloc k
th etrunk lid if th ebattery is disconnected or
discharged.
Trun klid emergenc yrelease light:
REmergency release butto n: flashes for
30 minute safter th etrunk lid is opened
REmergency release butto n: flashes for
60 minute safter th etrunk lid is closed
Side windows
Important safety notes
GWARNIN G
Whil eopening th eside windows ,body part s
could become trapped between th eside win -
dow and th edoor frame as th eside window
moves. There is aris kof injury.
Mak esur ethat nobody touches th eside win -
dow during th eopening procedure .If some-
body become strapped ,release th eswitch or
pull th eswitch to close th eside window again .
GWARNING
Whil eclosin gth eside windows ,body part sin
th eclosin garea could become trapped .There
is aris kof injury.
When closin gmak esur ethat no part sof th e
body are in th eclosin garea. If somebod y
become strapped ,release th eswitch or press
th eswitch to open th eside window again .
Side windows85
Opening and closing
Z
Page 88 of 322
GWARNING
If children operate the side windows they
could become trapped, particularly if they are left unsupervised. There is a risk of injury.
When leaving the vehicle, always take the
SmartKey with you and lock the vehicle. Never
leave children unsupervised in the vehicle.
Side window reversing feature
The front side windows are equipped with an
automatic reversing feature. If a solid object
blocks or restricts the upward movement of one
of the front side windows during the closing
process, the side window opens again automat-
ically. During the manual closing process, the
side window only opens again automatically
after the corresponding switch is released. How-
ever, the automatic reversing feature is only an
aid and does not relieve you of the responsibility
of paying attention when closing a side window.
GWARNING
The reversing feature does not react:
Rto soft, light and thin objects, e.g. small fin-
gers
Rover the last 1/6 in(4 mm) of the closing
movement
Rduring resetting
Rwhen closing the side window again man-
ually immediately after automatic reversing
This means that the reversing feature cannot
prevent someone being trapped in these sit-
uations. There is a risk of injury.
Make sure that no body parts are in close
proximity during the closing procedure. If
someone becomes trapped, press the switch
to open the side window again.
Opening and closing the side win-
dows
Opening and closing the side windows
in the front
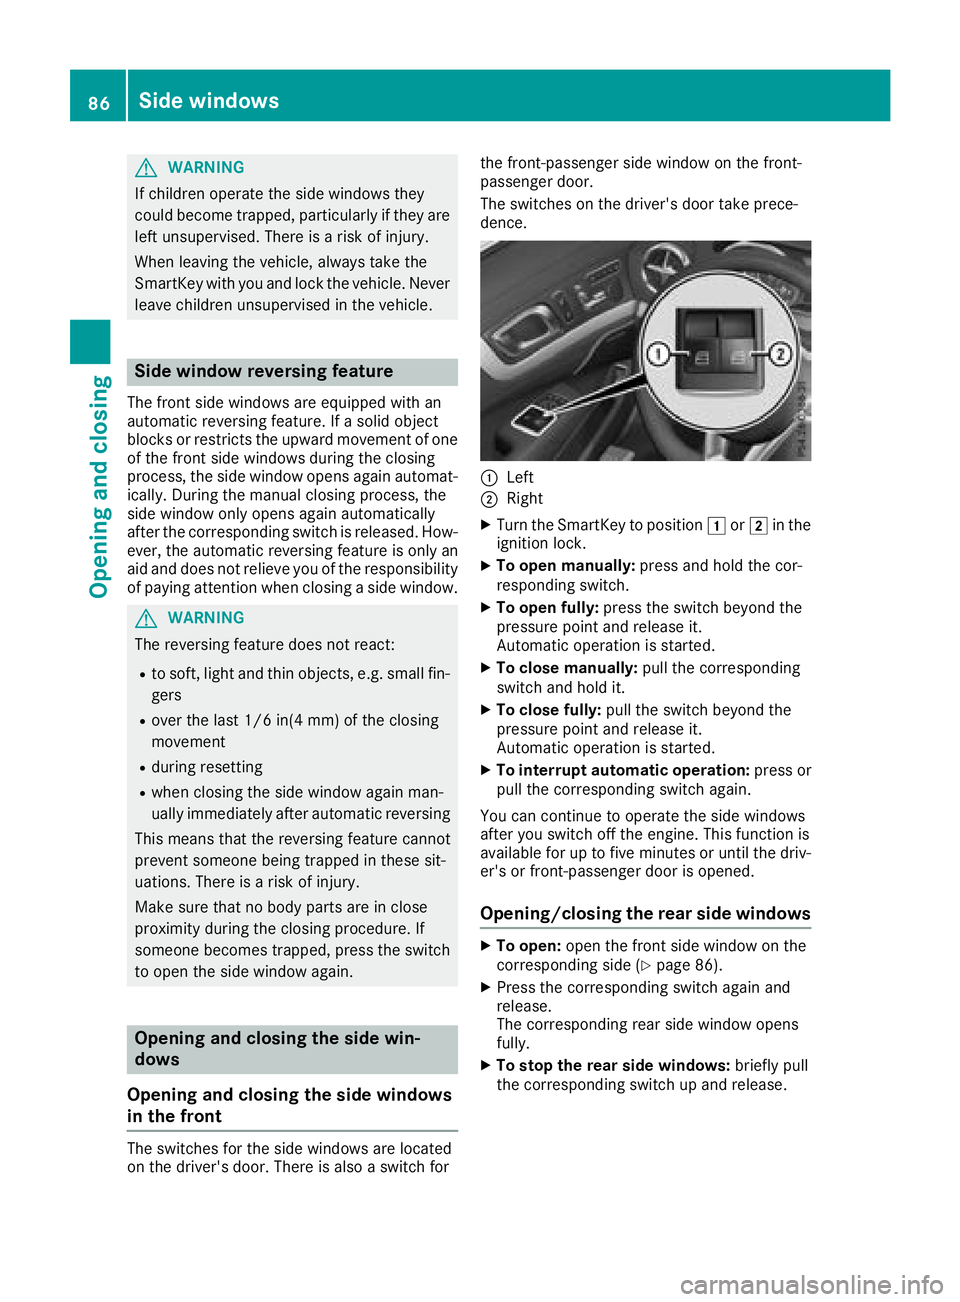
The switches for the side windows are located
on the driver's door. There is also a switch for the front-passenger side window on the front-
passenger door.
The switches on the driver's door take prece-
dence.
:Left
;Right
XTurn the SmartKey to position
1or2 in the
ignition lock.
XTo open manually: press and hold the cor-
responding switch.
XTo open fully: press the switch beyond the
pressure point and release it.
Automatic operation is started.
XTo close manually: pull the corresponding
switch and hold it.
XTo close fully: pull the switch beyond the
pressure point and release it.
Automatic operation is started.
XTo interrupt automatic operation: press or
pull the corresponding switch again.
You can continue to operate the side windows
after you switch off the engine. This function is
available for up to five minutes or until the driv-
er's or front-passenger door is opened.
Opening/closing the rear side windows
XTo open: open the front side window on the
corresponding side (Ypage 86).
XPress the corresponding switch again and
release.
The corresponding rear side window opens
fully.
XTo stop the rear side windows: briefly pull
the corresponding switch up and release.
86Side windows
Opening and closing
Page 90 of 322
Resetting the side windows
If a side window can no longer be closed fully,
you must reset it.
XClose all the doors.
XTurn the SmartKey to position1or2 in the
ignition lock.
XPull the corresponding switch on the door
control panel until the side window is com-
pletely closed (
Ypage 86).
XHold the switch for an additional second. If the side window opens again slightly:
XImmediately pull the corresponding switch on
the door control panel until the side window is
completely closed (
Ypage 86).
XHold the switch for an additional second.
If the respective side window remains closed
after the button is released, then it has been
set correctly. If this is not the case, repeat the
steps above.
Problems with the side windows
GWARNING
If you close a side window again immediately after it has been blocked or reset, the side window
closes with increased or maximum force. The reversing feature is then not active. Parts of the
body could be trapped in the closing area in the process. This poses an increased risk of injury or
even fatal injury.
Make sure that no parts of the body are in the closing area. To stop the closing process, release
the switch or push the switch again to reopen the side window.
ProblemPossible causes/consequences and MSolutions
A side window cannot be
closed because it is
blocked by objects, e.g.
leaves in the window
guide.XRemove the objects.
XClose the side window.
A side window cannot be
closed and you cannot
see the cause.If a side window is obstructed during closing and reopens again
slightly:
XImmediately after the window blocks, pull the corresponding switch
again until the side window has closed.
The side window is closed with increased force.
If a side window is obstructed again during closing and reopens again slightly:
XImmediately after the window blocks, pull the corresponding switchagain until the side window has closed.
The side window is closed without the automatic reversing feature.
The side windows cannot
be opened or closed
using the convenience
opening/closing fea-
ture.The SmartKey battery is discharged or nearly discharged.
XCheck the SmartKey battery (Ypage 76 )and replace it if necessary
(Ypage 76).
88Side windows
Opening and closing
Page 92 of 322
Opening and closing
XClose the trunk lid (Ypage 80).
If the trunk is loaded correctly, the trunk par-
tition closes automatically.
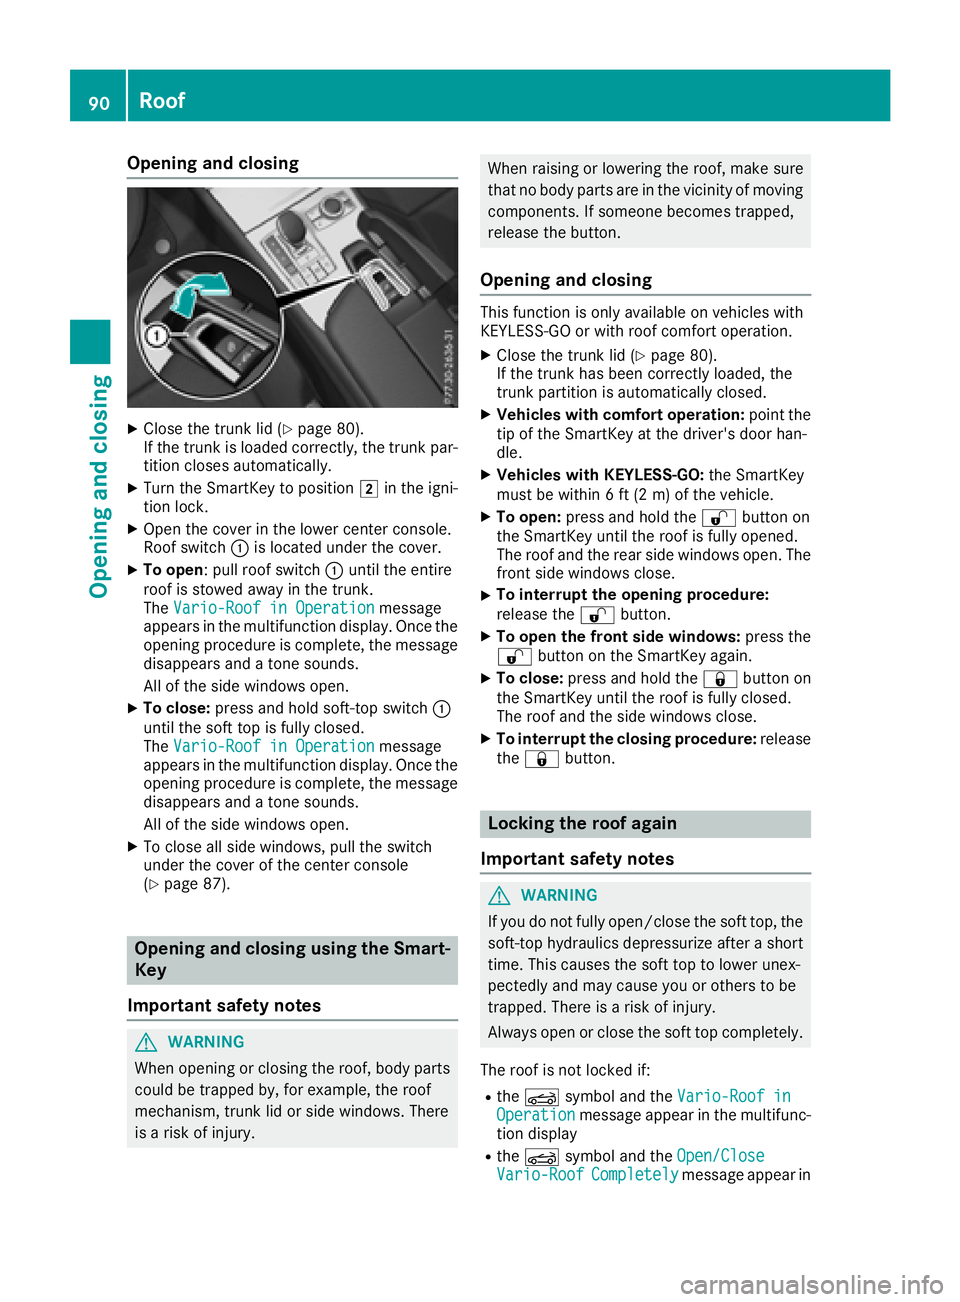
XTurn the SmartKey to position 2in the igni-
tion lock.
XOpen the cover in the lower center console.
Roof switch :is located under the cover.
XTo open: pull roof switch :until the entire
roof is stowed away in the trunk.
The Vario-Roof in Operation
message
appears in the multifunction display. Once the
opening procedure is complete, the message
disappears and a tone sounds.
All of the side windows open.
XTo close: press and hold soft-top switch :
until the soft top is fully closed.
The Vario-Roof in Operation
message
appears in the multifunction display. Once the opening procedure is complete, the message
disappears and a tone sounds.
All of the side windows open.
XTo close all side windows, pull the switch
under the cover of the center console
(
Ypage 87).
Opening and closing using the Smart-
Key
Important safety notes
GWARNING
When opening or closing the roof, body parts
could be trapped by, for example, the roof
mechanism, trunk lid or side windows. There
is a risk of injury.
When raising or lowering the roof, make sure
that no body parts are in the vicinity of moving components. If someone becomes trapped,
release the button.
Opening and closing
This function is only available on vehicles with
KEYLESS-GO or with roof comfort operation.
XClose the trunk lid (Ypage 80).
If the trunk has been correctly loaded, the
trunk partition is automatically closed.
XVehicles with comfort operation: point the
tip of the SmartKey at the driver's door han-
dle.
XVehicles with KEYLESS-GO: the SmartKey
must be within 6 ft (2 m) of the vehicle.
XTo open: press and hold the %button on
the SmartKey until the roof is fully opened.
The roof and the rear side windows open. The
front side windows close.
XTo interrupt the opening procedure:
release the %button.
XTo open the front side windows: press the
% button on the SmartKey again.
XTo close: press and hold the &button on
the SmartKey until the roof is fully closed.
The roof and the side windows close.
XTo interrupt the closing procedure: release
the & button.
Locking the roof again
Important safety notes
GWARNING
If you do not fully open/close the soft top, the
soft-top hydraulics depressurize after a short
time. This causes the soft top to lower unex-
pectedly and may cause you or others to be
trapped. There is a risk of injury.
Always open or close the soft top completely.
The roof is not locked if:
Rthe K symbol and the Vario-Roof inOperationmessage appear in the multifunc-
tion display
Rthe K symbol and the Open/CloseVario-RoofCompletelymessage appear in
90Roof
Opening and closing
Page 104 of 322
Position of the steering wheel when the
EASY-ENTRY/EXIT feature is active
The steering wheel swings up when you:
Rremove the SmartKey from the ignition lock
Ropen the driver's door with KEYLESS-GO in
position1
Ropen the driver's door and the SmartKey is in
position uor1
iThe steering wheel moves upwards only if it
has not already reached the upper steering
limiter.
Position of the steering wheel for driv-
ing
The steering wheel is moved to the last selected
position when:
Rthe driver's door is closed
Ryou insert the SmartKey into the ignition lock
or
Ryou press the Start/Stop button once on vehi-
cles with KEYLESS-GO
When you close the driver's door with the igni-
tion switched on, the steering wheel is also
automatically moved to the previously set posi-
tion.
The last position of the steering column is stored
when you switch off the ignition or when you
store the setting with the memory function
(
Ypage 105).
Crash-responsive EASY-EXIT feature
If the crash-responsive EASY-EXIT feature is trig-
gered in an accident, the steering column will
move upwards when the driver's door is opened. This occurs irrespective of the position of the
SmartKey in the ignition lock. This makes it eas-
ier to exit the vehicle and rescue the occupants.
The crash-responsive EASY-EXIT feature is only
operational if the EASY-EXIT/ENTRY feature is
activated in the on-board computer
(
Ypage 196).
Mirrors
Exterior mirrors
Adjusting the exterior mirrors
GWARNING
You could lose control of your vehicle if you do the following while driving:
Radjust the driver's seat, head restraint,
steering wheel or mirrors
Rfasten the seat belt
There is a risk of an accident.
Adjust the driver's seat, head restraint, steer-
ing wheel and mirror and fasten your seat belt before starting the engine.
GWARNING
The exterior mirror on the front-passenger
side reduces the size of the image. Visible
objects are actually closer than they appear.
This means that you could misjudge the dis-
tance from road users traveling behind, e.g.
when changing lane. There is a risk of an acci-
dent.
For this reason, always make sure of the
actual distance from the road users traveling
behind by glancing over your shoulder.
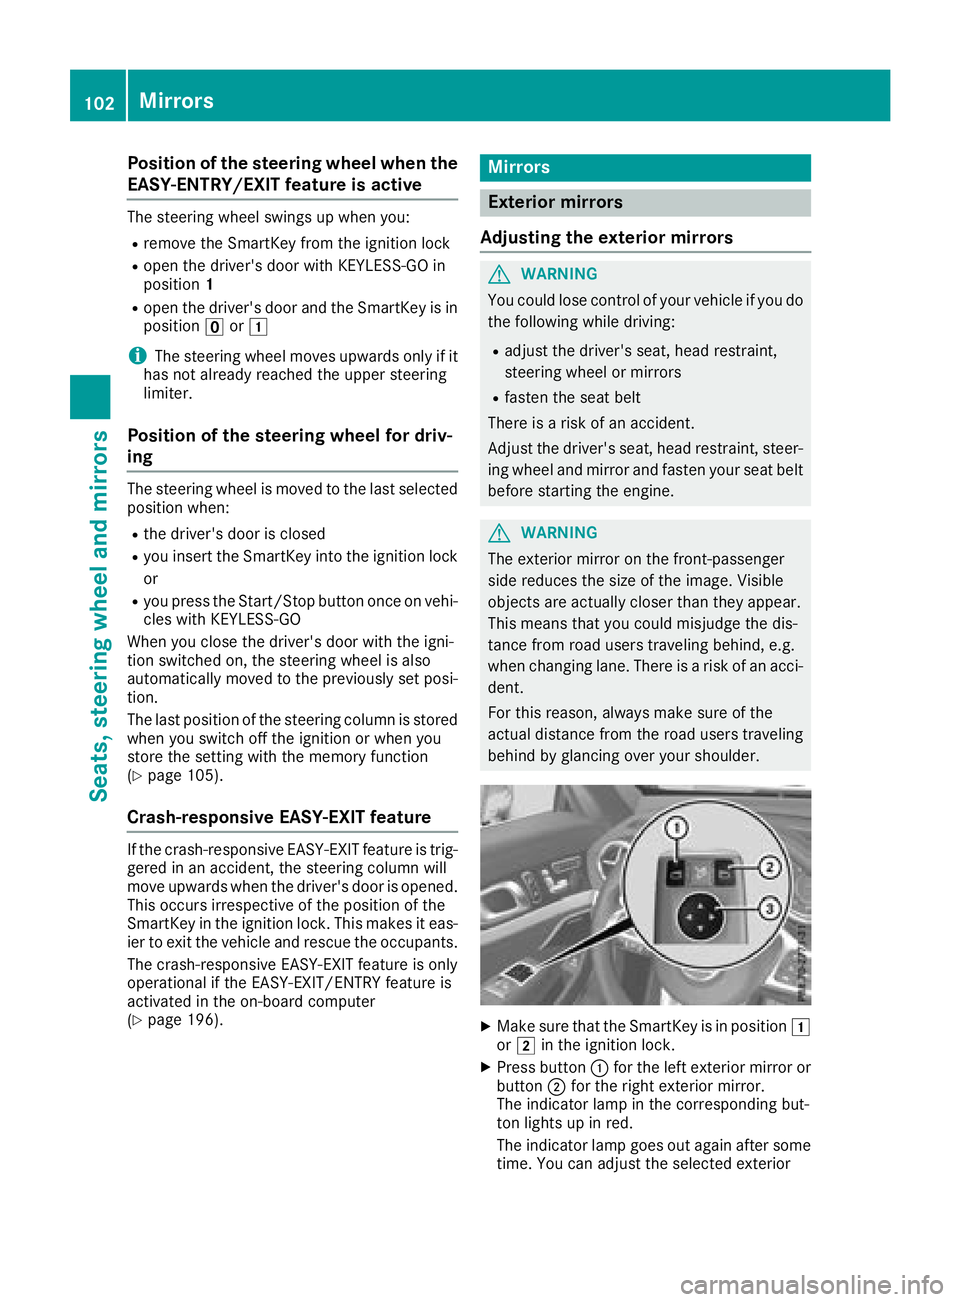
XMake sure that the SmartKey is in position 1
or 2 in the ignition lock.
XPress button :for the left exterior mirror or
button ;for the right exterior mirror.
The indicator lamp in the corresponding but-
ton lights up in red.
The indicator lamp goes out again after some time. You can adjust the selected exterior
102Mirrors
Seats, steering wheel and mirrors
Page 108 of 322
Exterior lighting
General notes
For reasons of safety, Mercedes-Benz recom-
mends that you drive with the lights switched on
even during the daytime. In some countries,
operation of the headlamps varies due to legal
requirements and self-imposed obligations.
Setting the exterior lighting
Setting options
Exterior lighting can be set using:
Rthe light switch
Rthe combination switch (Ypage 107)
Rthe on-board computer (Ypage 195)
Light switch
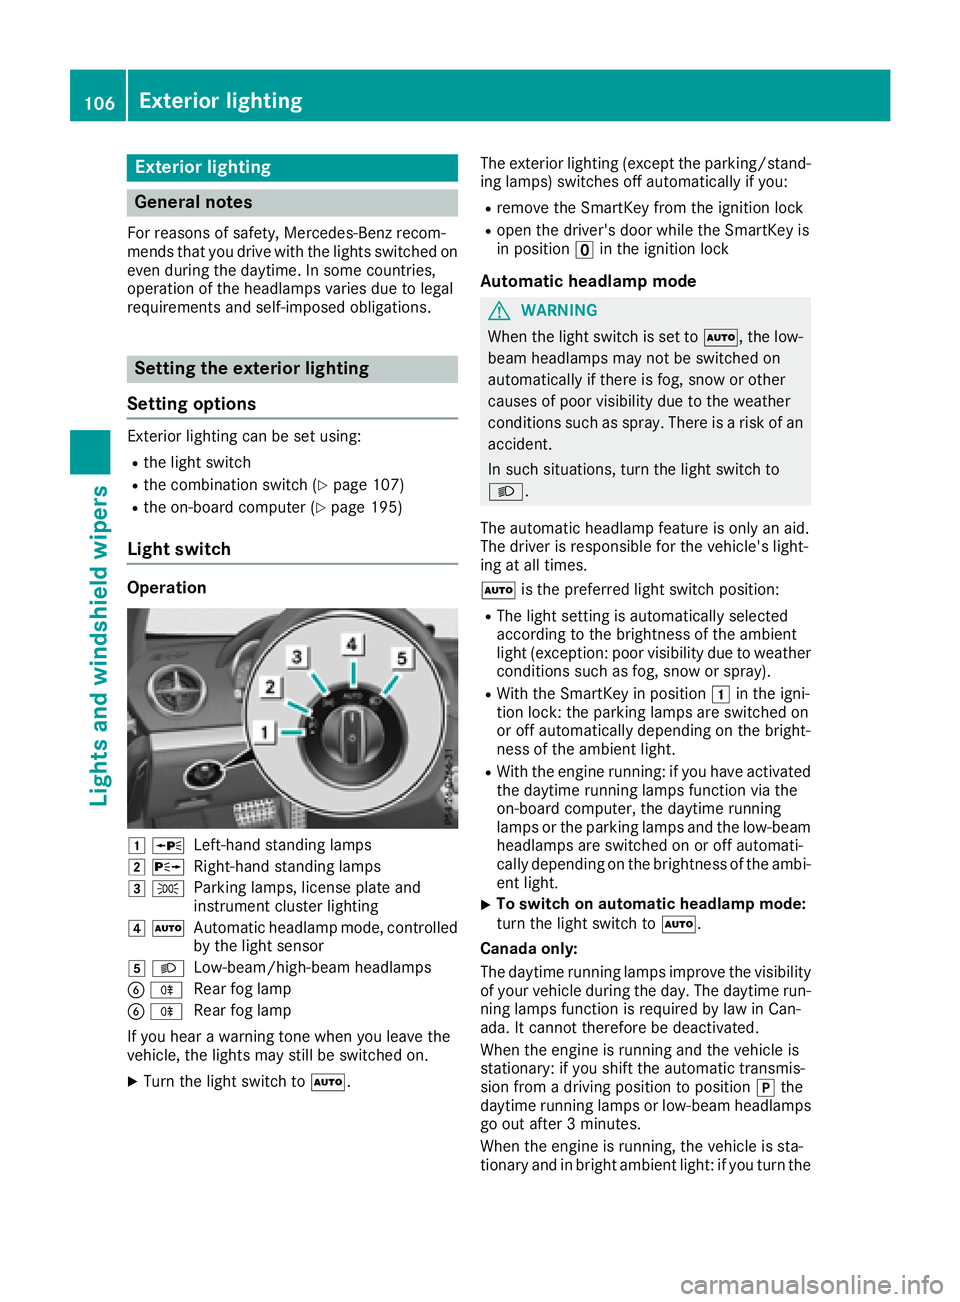
Operation
1 WLeft-hand standing lamps
2XRight-hand standing lamps
3TParking lamps, license plate and
instrument cluster lighting
4ÃAutomatic headlamp mode, controlled
by the light sensor
5 LLow-beam/high-beam headlamps
BRRear fog lamp
BRRear fog lamp
If you hear a warning tone when you leave the
vehicle, the lights may still be switched on.
XTurn the light switch to Ã. The exterior lighting (except the parking/stand-
ing lamps) switches off automatically if you:
Rremove the SmartKey from the ignition lock
Ropen the driver's door while the SmartKey is
in position uin the ignition lock
Automatic headlamp mode
GWARNING
When the light switch is set to Ã, the low-
beam headlamps may not be switched on
automatically if there is fog, snow or other
causes of poor visibility due to the weather
conditions such as spray. There is a risk of an
accident.
In such situations, turn the light switch to
L.
The automatic headlamp feature is only an aid.
The driver is responsible for the vehicle's light-
ing at all times.
à is the preferred light switch position:
RThe light setting is automatically selected
according to the brightness of the ambient
light (exception: poor visibility due to weather
conditions such as fog, snow or spray).
RWith the SmartKey in position 1in the igni-
tion lock: the parking lamps are switched on
or off automatically depending on the bright-
ness of the ambient light.
RWith the engine running: if you have activated
the daytime running lamps function via the
on-board computer, the daytime running
lamps or the parking lamps and the low-beam
headlamps are switched on or off automati-
cally depending on the brightness of the ambi-
ent light.
XTo switch on automatic headlamp mode:
turn the light switch to Ã.
Canada only:
The daytime running lamps improve the visibility of your vehicle during the day. The daytime run-
ning lamps function is required by law in Can
-
ada. It cannot therefore be deactivated.
When the engine is running and the vehicle is
stationary: if you shift the automatic transmis-
sion from a driving position to position jthe
daytime running lamps or low-beam headlamps
go out after 3 minutes.
When the engine is running, the vehicle is sta-
tionary and in bright ambient light: if you turn the
106Exterior lighting
Lights and windshield wipers