2018 MERCEDES-BENZ SL ROADSTER door lock
[x] Cancel search: door lockPage 198 of 322
matic headlamp mode is activated
(Ypage 106).
Rexterior lighting delayed switch-off:the
exterior lighting remains lit for 60 seconds
after the engine is switched off. If you close all
the doors and the trunk lid, the exterior light- ing goes off after 15 seconds.
Depending on your vehicle's equipment, when
the surround lighting and delayed switch-off
exterior lighting are on, the following light up:
Rparking lamps
Rlow-beam headlamps
Rdaytime running lamps
Rside marker lamps
Rsurround lighting in the exterior mirrors
Activating/deactivating the interior light-
ing delayed switch-off
If you activate the Interior Lighting Delayfunction, the interior lighting remains on for
20 seconds after you remove the SmartKey from
the ignition lock.
XPress the=or; button on the steering
wheel to select the Sett.menu.
XPress the:or9 button to select the
Lightsubmenu.
XPress ato confirm.
XPress the :or9 button to select the
Interior Lighting Delayfunction.
When the Interior Lighting Delayfunc-
tion is activated, the vehicle interior is dis-
played in orange in the multifunction display.
XPress the abutton to save the setting.
Vehicle
Activating/deactivating the automatic
door locking mechanism
If you activate the AutomaticDoorLockfunc-
tion, the vehicle is centrally locked above a
speed of approximately 9 mph (15 km/h).
XPress the =or; button on the steering
wheel to select the Sett.menu.
XPress the:or9 button to select the
Vehiclesubmenu.
XPress ato confirm.
XPress the :or9 button to select the
Automatic Door Lockfunction.
When the Automatic Door Lockfunction is
activated, the multifunction display shows the
left-hand vehicle door in orange.
XPress the abutton to save the setting.
For further information on the automatic locking
feature, see (
Ypage 79).
Activating/deactivating the acoustic
locking verification signal
If you switch on the AcousticLockfunction, an
acoustic signal sounds when you lock the vehi-
cle.
XPress the =or; button on the steering
wheel to select the Sett.menu.
XPress the:or9 button to select the
Vehiclesubmenu.
XPress ato confirm.
XPress the :or9 button to select the
Acoustic Lockfunction.
If the Acoustic Lockfunction is activated,
the & symbol in the multifunction display
lights up orange.
XPress the abutton to save the setting.
Comfort
Activating/deactivating the EASY-
ENTRY/EXIT feature
GWARNING
When the EASY-ENTRY/EXIT feature adjusts
the steering wheel, you and other vehicle
occupants – particularly children – could
become trapped. There is a risk of injury.
While the EASY-ENTRY/EXIT feature is mak-
ing adjustments, make sure that no one has
any body parts in the sweep of the steering
wheel.
If somebody becomes trapped:
Rpress one of the memory function position
buttons, or
Rmove the switch for steering wheel adjust-
ment in the opposite direction to that in
which the steering wheel is moving.
The adjustment process is stopped.
196Menus and submenus
On-board computer and displays
Page 199 of 322
XPress the=or; button on the steering
wheel to select the Sett.menu.
XPress the:or9 button to select the
Conveniencesubmenu.
XPress ato confirm.
XUsing :or9, select the EasyEntry/Exitfunction.
If the EasyEntry/Exitfunction is activated,
the multifunction display shows the steering
wheel in orange.
XPress the abutton to save the setting.
Further information on the EASY-ENTRY/EXIT
feature (
Ypage 101).
Switching the seat belt adjustment on/off
XPress the =or; button on the steering
wheel to select the Sett.menu.
XPress the:or9 button to select the
Conveniencesubmenu.
XPress ato confirm.
XPress the :or9 button to select the
Belt Adjustmentfunction.
When the Belt Adjustmentfunction is acti-
vated, the seat belt is displayed in orange in
the multifunction display.
XPress the abutton to save the setting.
For further information on belt adjustment, see
(
Ypage 44).
Switching the fold-in mirrors when lock-
ing feature on/off
This function is only available when the vehicle is
equipped with the electrical fold-in function.
This function is only available in Canada.
When you activate the Auto.
MirrorFoldingfunction, the exterior mirrors are folded in when
the vehicle is locked.
If you have switched on the Auto. Mirror
Foldingfunction and you fold in the exterior
mirrors using the button on the door
(
Ypage 103), they will not fold out automati-
cally. The exterior mirrors can then only be fol-
ded out using the button on the door.
XPress the =or; button on the steering
wheel to select the Sett.menu.
XPress the:or9 button to select the
Conveniencesubmenu.
XPress ato confirm.
XPress the :or9 button to select the
Auto. Mirror Foldingfunction.
If the Auto. Mirror Foldingfunction is
switched on, the multifunction display shows
the exterior mirror in orange.
XPress the abutton to save the setting.
Restoring the factory settings
XPress the =or; button on the steering
wheel to select the Sett.menu.
XPress the:or9 button to select the
Factory Settingsubmenu.
XPress ato confirm.
The Reset All Settings?function
appears.
XPress the :or9 button to select Noor
Yes.
XPress the abutton to confirm the selec-
tion.
If you have selected Yes
and confirmed, the
multifunction display shows a confirmation
message.
For safety reasons, the Daytime Running
Lightsfunction in theLightssubmenu is only
reset if the vehicle is stationary.
AMG menu (Mercedes-AMG vehicles)
Warm-up
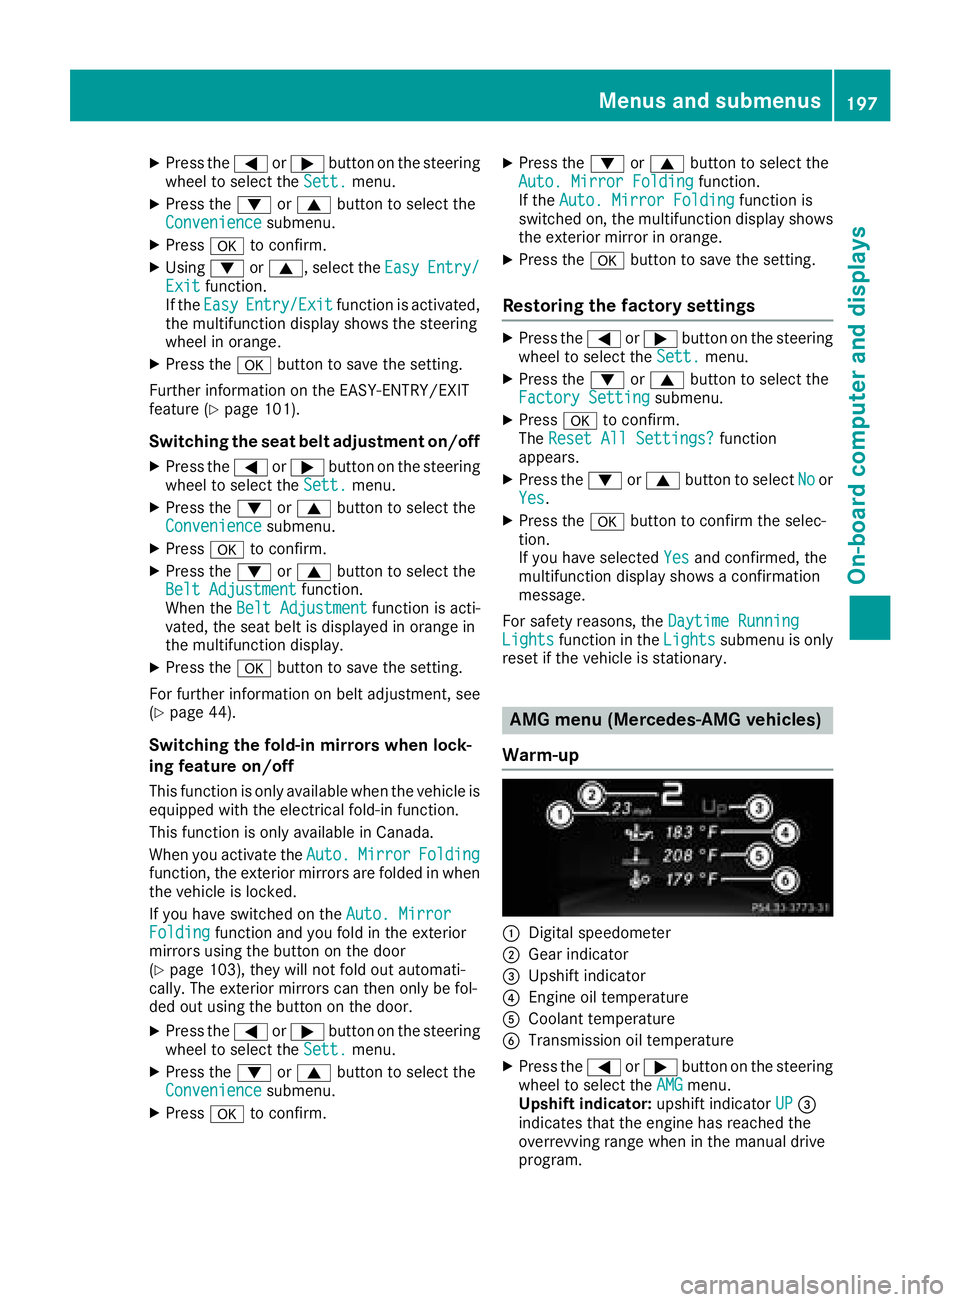
:Digital speedometer
;Gear indicator
=Upshift indicator
?Engine oil temperature
ACoolant temperature
BTransmission oil temperature
XPress the =or; button on the steering
wheel to select the AMGmenu.
Upshift indicator: upshift indicatorUP=
indicates that the engine has reached the
overrevving range when in the manual drive
program.
Menus and submenus197
On-board computer and displays
Z
Page 228 of 322
Display messagesPossible causes/consequences andMSolutions
Â
ObtainaNew Key
The SmartKey needs to be replaced.
XVisit aqualified specialist workshop .
Â
ReplaceKey Batter y
The SmartKey battery is discharged.
XChange thebattery (Ypage 76) .
Â
Don't Forget You rKey
The SmartKey is notin th eignition lock. You hav eopened th edriver's
door wit hth eengin eswitched off .
The multifunction display shows th edisplay message amaximum of
60 seconds and is simply areminder.
XTak eth eSmartKey wit hyou when you leav eth evehicle.
Â
Key Not Detected(re ddisplay message )
The SmartKey is no tin th evehicle.
A warning tone also sounds.
If th eengin eis switched off ,you can no longer loc kth evehicl ecen-
trally or start th eengine.
XPull ove rand stop th evehicl esafely as soo nas possible, payin g
attention to roa dand traffic conditions.
XSecur eth evehicl eagainst rollin gaway (Ypage 142).
XLocate th eSmartKey.
XPress aon thesteering whee lto confirm th edisplay message .
Becausethere is interferenc efrom astron gsource of radi owaves, th e
SmartKey is no tdetecte dwhils tth eengin eis running.
A warning tone also sounds.
XPull ove rand stop th evehicl esafely as soo nas possible, payin g
attention to roa dand traffic conditions.
XSecur eth evehicl eagainst rollin gaway (Ypage 142).
XInsertth eSmartKey int oth eignition loc kand bring int oke ymode.
Â
Key Not Detected(whit edisplay message )
The SmartKey is currentl yundetected.
XChange th elocation of th eSmartKey in th evehicle.
If th eSmartKey still canno tbe detected:
XInser tth eSmartKey int oth eignition loc kand tur nit to th edesire d
position .
Â
Remove 'Start 'But ‐ton and Insert Key
The SmartKey is continually undetected.
KEYLESS-GO is temporarily malfunctioning or is defective. Awarning
tone also sounds.
XInser tth eSmartKey int oth eignition loc kand tur nit to th edesire d
position .
XVisitaqualified specialist workshop .
226Display messages
On-board computer and displays
Page 254 of 322
are then, for example, guided to the nearest
Mercedes-Benz Service Center or a recovery
vehicle is called.
If vehicle data needs to be transferred during an
MB Info call or a Roadside Assistance call, this is
initiated by the Customer Assistance Center.
You will see theRoadside Assistance Con‐
nectedmessage in the COMAND display. If the
vehicle remote malfunction diagnosis can be
started, the Request for vehicle diagno‐
sisreceived.Startvehiclediagnosis?message appears in the display.
XConfirm the message with Yes.
XWhen theVehicle diagnosis: Pleasestart ignitionmessage appears, turn the
SmartKey to position 2in the ignition lock
(
Ypage 122).
XWhen the Please follow the instruc‐tions received by phone and moveyour vehicle to a safe positionmes-
sage appears, follow the customer service
representative's instructions.
The message in the display disappears.
If you select Cancel
the remote malfunction
diagnosis is canceled completely.
The vehicle operating state check begins. You
will see the Vehicle
diagnosisactivatedmessage.
When the diagnosis is completed, the Trans‐
fer vehicle diagnostics data (Voiceconnection may be interrupted duringdatatransfer)message appears. The vehicle
data can now be sent to the Customer Assis-
tance center.
XPress OKto confirm the message.
The voice connection with the Customer
Assistance Center is terminated.
You will see the Vehicle diagnosis:
Transferring data...message.
The vehicle data is sent to the Customer
Assistance Center.
Depending on what the customer service rep-
resentative agreed with you, the voice connec-
tion is re-established after the transfer is com-
plete. If necessary, you will be contacted at a
later time by another means, e.g. by e-mail or
phone.
Another function of the Vehicle Health Check is
the transfer of service data to the Customer
Assistance Center. If a service is overdue, the
COMAND display shows a message about vari-
ous special offers at your workshop. USA only: this information can also be called up
under "Owners Online" at http://
www.mbusa.com.
Information on the data stored in the vehicle
(
Ypage 29).
Information on Roadside Assistance
(
Ypage 26).
Garage door opener
General notes
The HomeLink®garage door opener integrated
in the rear-view mirror allows you to operate up
to three different door and gate systems.
Use the integrated garage door opener only on
garage doors that:
Rhave safety stop and reverse features and
Rmeet current U.S. federal safety standards
Once programed, the integrated garage door
opener in the rear-view mirror will assume the
function of the garage door system's remote
control. Please also read the operating instruc-
tions for the garage door system.
When programming a garage door opener, park
the vehicle outside the garage. Do not run the
engine while programming.
Certain garage door drives are incompatible
with the integrated garage door opener. If you
have difficulty programing the integrated garage door opener, contact an authorized Mercedes-
Benz Center.
Alternatively, you can call the following tele-
phone assistance services:
RUSA: Mercedes-Benz Customer Assistance
Center at 1-800-FOR-MERCedes
RCanada: Customer Service at
1-800-387-0100
RHomeLink®hotline 1-800-355-3515 (free of
charge)
More information on HomeLink
®and/or com-
patible products is also available online at
http://www.homelink.com.
Notes on the declaration of conformity
(
Ypage 27).
USA: FCC ID: CB2HMIHL4
Canada: IC: 279B-HMIH L4
252Features
Stowage and features
Page 256 of 322
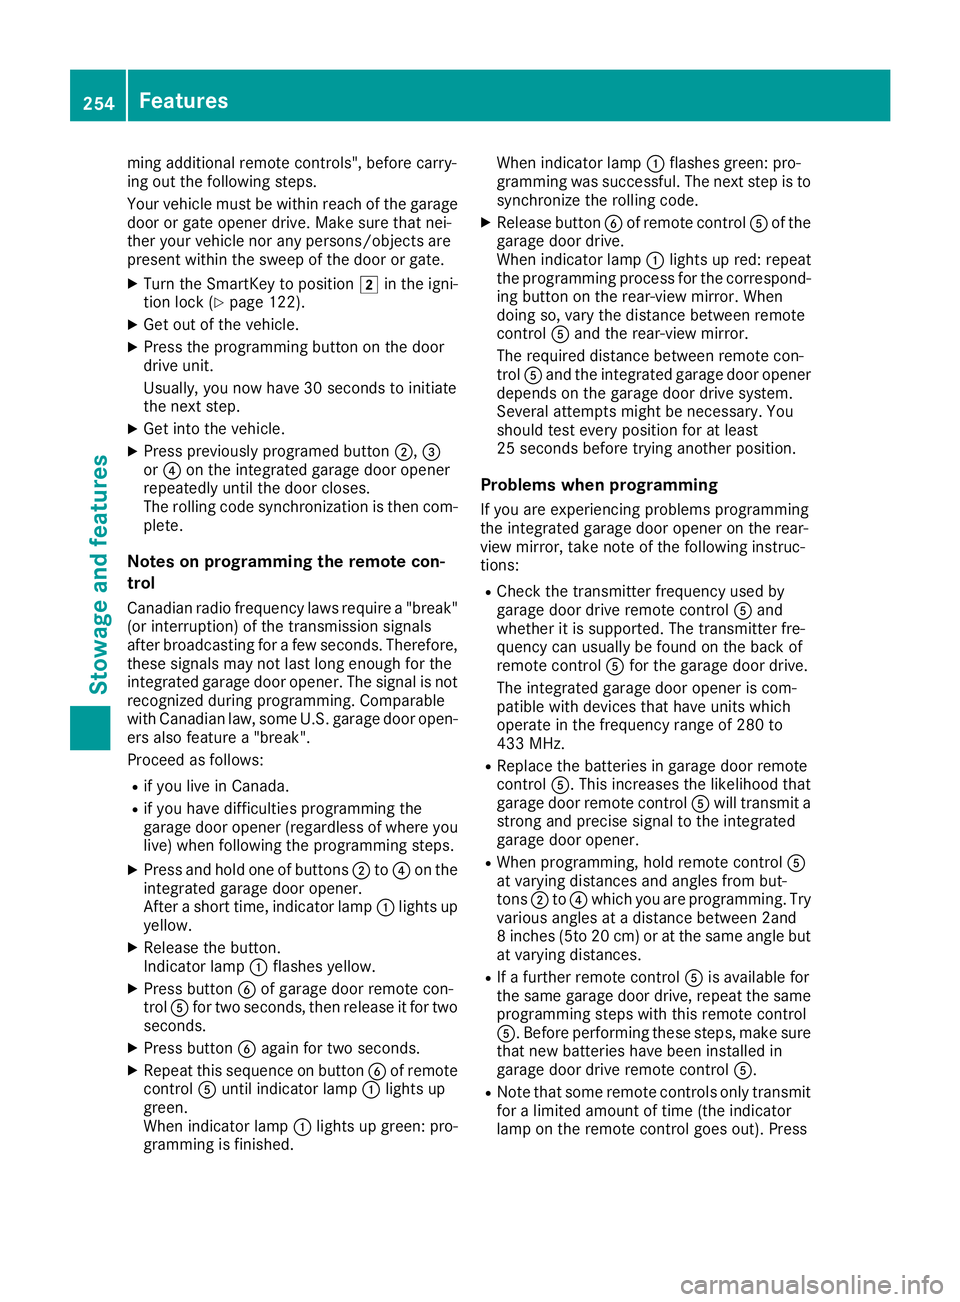
ming additional remote controls", before carry-
ing out the following steps.
Your vehicle must be within reach of the garage
door or gate opener drive. Make sure that nei-
ther your vehicle nor any persons/objects are
present within the sweep of the door or gate.
XTurn the SmartKey to position2in the igni-
tion lock (Ypage 122).
XGet out of the vehicle.
XPress the programming button on the door
drive unit.
Usually, you now have 30 seconds to initiate
the next step.
XGet into the vehicle.
XPress previously programed button ;,=
or ? on the integrated garage door opener
repeatedly until the door closes.
The rolling code synchronization is then com-
plete.
Notes on programming the remote con-
trol
Canadian radio frequency laws require a "break"
(or interruption) of the transmission signals
after broadcasting for a few seconds. Therefore,
these signals may not last long enough for the
integrated garage door opener. The signal is not
recognized during programming. Comparable
with Canadian law, some U.S. garage door open-
ers also feature a "break".
Proceed as follows:
Rif you live in Canada.
Rif you have difficulties programming the
garage door opener (regardless of where you live) when following the programming steps.
XPress and hold one of buttons ;to? on the
integrated garage door opener.
After a short time, indicator lamp :lights up
yellow.
XRelease the button.
Indicator lamp :flashes yellow.
XPress button Bof garage door remote con-
trol Afor two seconds, then release it for two
seconds.
XPress button Bagain for two seconds.
XRepeat this sequence on button Bof remote
control Auntil indicator lamp :lights up
green.
When indicator lamp :lights up green: pro-
gramming is finished. When indicator lamp
:flashes green: pro-
gramming was successful. The next step is to
sy
nchronize the rolling code.
XRelease button Bof remote control Aof the
garage door drive.
When indicator lamp :lights up red: repeat
the programming process for the correspond-
ing button on the rear-view mirror. When
doing so, vary the distance between remote
control Aand the rear-view mirror.
The required distance between remote con-
trol Aand the integrated garage door opener
depends on the garage door drive system.
Several attempts might be necessary. You
should test every position for at least
25 seconds before trying another position.
Problems when programming
If you are experiencing problems programming
the integrated garage door opener on the rear-
view mirror, take note of the following instruc-
tions:
RCheck the transmitter frequency used by
garage door drive remote control Aand
whether it is supported. The transmitter fre-
quency can usually be found on the back of
remote control Afor the garage door drive.
The integrated garage door opener is com-
patible with devices that have units which
operate in the frequency range of 280 to
433 MHz.
RReplace the batteries in garage door remote
control A. This increases the likelihood that
garage door remote control Awill transmit a
strong and precise signal to the integrated
garage door opener.
RWhen programming, hold remote control A
at varying distances and angles from but-
tons ;to? which you are programming. Try
various angles at a distance between 2and
8 inches (5to 20 cm) or at the same angle but
at varying distances.
RIf a further remote control Ais available for
the same garage door drive, repeat the same
programming steps with this remote control
A. Before performing these steps, make sure
that new batteries have been installed in
garage door drive remote control A.
RNote that some remote controls only transmit
for a limited amount of time (the indicator
lamp on the remote controlgoes ou
t). Press
254Features
Stowage and features
Page 257 of 322
buttonBon remote control Aagain before
transmission ends.
RAlign the antenna cable of the garage door
opener unit. This can improve signal recep-
tion/transmission.
Opening/closing the garage door
After it has been programmed, the integrated
garage door opener performs the function of the
garage door system remote control. Please also
read the operating instructions for the garage
door system.
XTurn the SmartKey to position 2in the igni-
tion lock (Ypage 122).
XPress either button ;,=or? which you
have programmed to operate the garage
door.
Garage door system with a fixed code: indi-
cator lamp :lights up green.
Garage door system with a rolling code: indi-
cator lamp :flashes green.
The transmitter will transmit a signal as long
as the button is pressed. The transmission is
halted after a maximum of ten seconds and
indicator lamp :lights up yellow.
XPress button ;,=or? again if necessary.
Clearing the memory
Make sure that you clear the memory of the
integrated garage door opener before selling the
vehicle.
XTurn the SmartKey to position 2in the igni-
tion lock (Ypage 122).
XPress and hold buttons ;and ?.
The indicator lamp initially lights up yellow
and then green.
XRelease buttons ;and ?.
The memory of the integrated garage door
opener in the rear-view mirror is cleared.
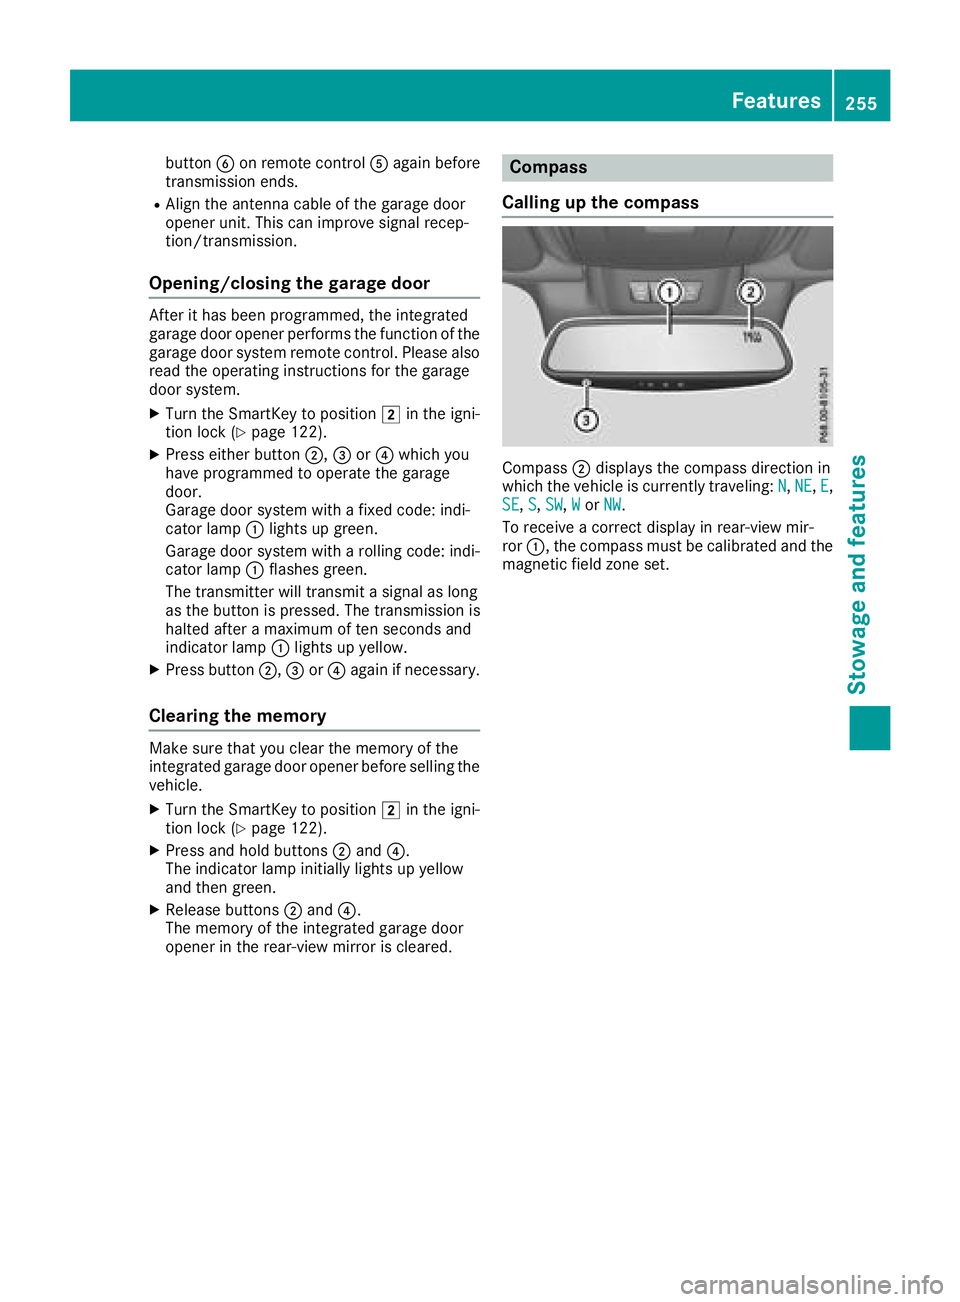
Compass
Calling up the compass
Compass ;displays the compass direction in
which the vehicle is currently traveling: N,NE,E,
SE, S, SW,Wor NW.
To receive a correct display in rear-view mir-
ror :, the compass must be calibrated and the
magnetic field zone set.
Features255
Stowage and features
Z
Page 258 of 322
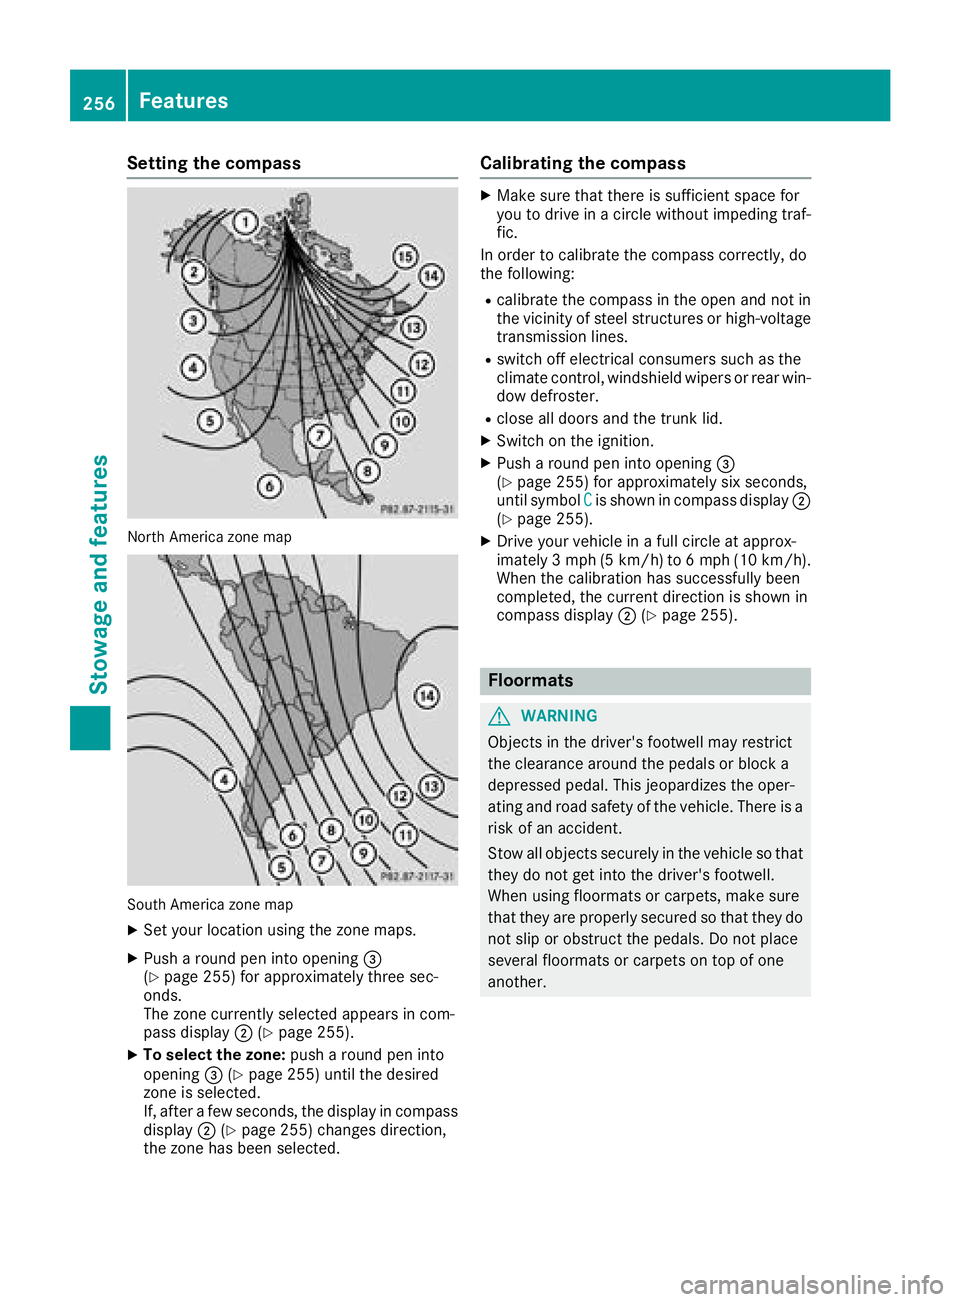
Setting the compass
North America zone map
South America zone map
XSet your location using the zone maps.
XPush a round pen into opening=
(Ypage 255) for approximately three sec-
onds.
The zone currently selected appears in com-
pass display ;(
Ypage 255).
XTo select the zone: push a round pen into
opening =(Ypage 255) until the desired
zone is selected.
If, after a few seconds, the display in compass
display ;(
Ypage 255) changes direction,
the zone has been selected.
Calibrating the compass
XMake sure that there is sufficient space for
you to drive in a circle without impeding traf-
fic.
In order to calibrate the compass correctly, do
the following:
Rcalibrate the compass in the open and not in
the vicinity of steel structures or high-voltage
transmission lines.
Rswitch off electrical consumers such as the
climate control, windshield wipers or rear win- dow defroster.
Rclose all doors and the trunk lid.
XSwitch on the ignition.
XPush a round pen into opening =
(Ypage 255) for approximately six seconds,
until symbol Cis shown in compass display ;
(Ypage 255).
XDrive your vehicle in a full circle at approx-
imately 3 mph (5 km/h) to 6 mph (10 km/h).
When the calibration has successfully been
completed, the current direction is shown in
compass display ;(
Ypage 255).
Floormats
GWARNING
Objects in the driver's footwell may restrict
the clearance around the pedals or block a
depressed pedal. This jeopardizes the oper-
ating and road safety of the vehicle. There is a risk of an accident.
Stow all objects securely in the vehicle so that
they do not get into the driver's footwell.
When using floormats or carpets, make sure
that they are properly secured so that they do not slip or obstruct the pedals. Do not place
several floormats or carpets on top of one
another.
256Features
Stowage and features
Page 271 of 322
Where will I find...?
Warning triangle
Removing the warning triangle
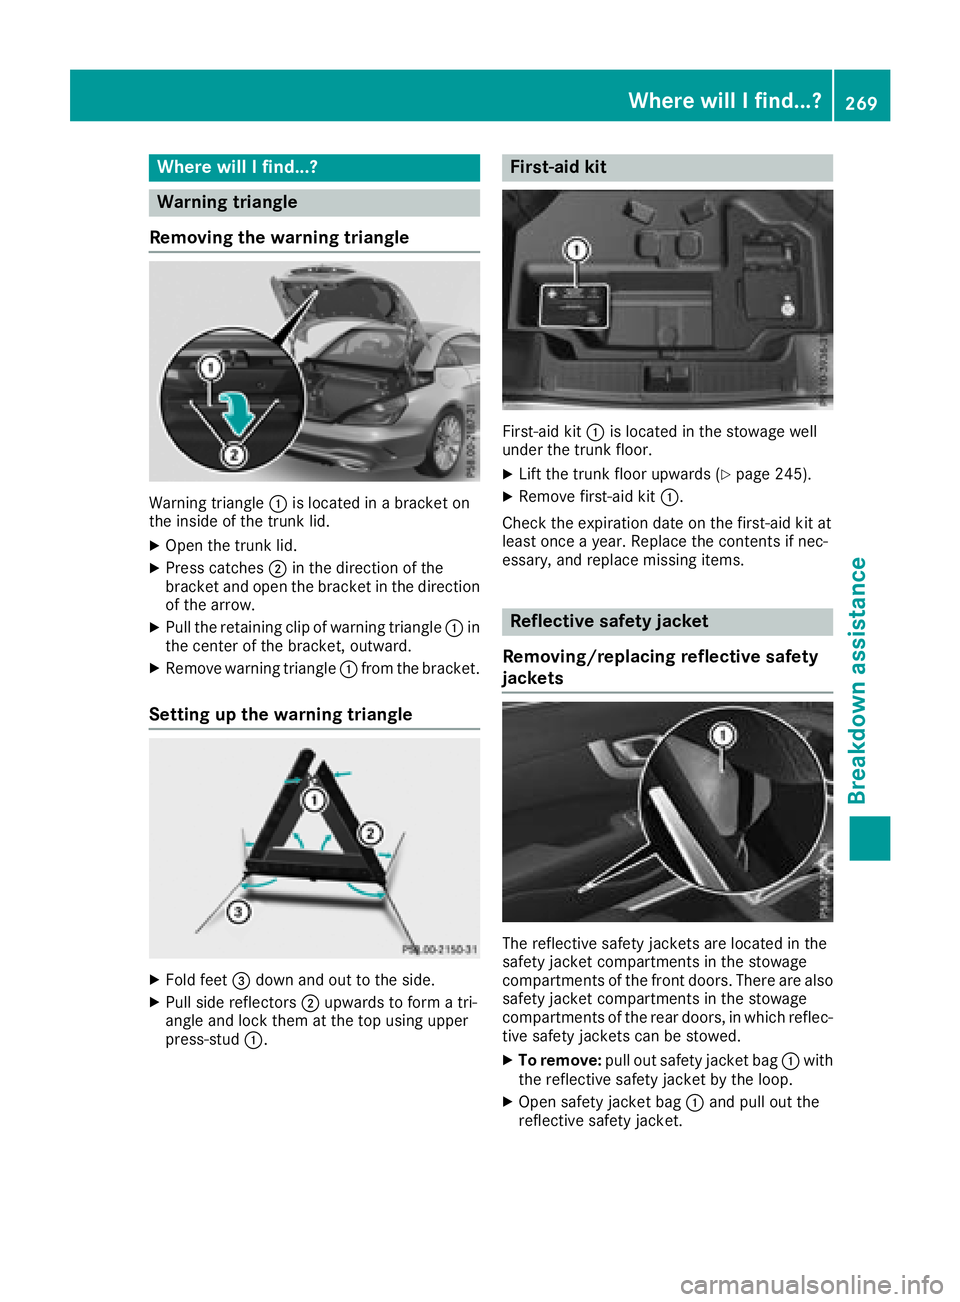
Warning triangle :is located in a bracket on
the inside of the trunk lid.
XOpen the trunk lid.
XPress catches ;in the direction of the
bracket and open the bracket in the direction
of the arrow.
XPull the retaining clip of warning triangle :in
the center of the bracket, outward.
XRemove warning triangle :from the bracket.
Setting up the warning triangle
XFold feet =down and out to the side.
XPull side reflectors ;upwards to form a tri-
angle and lock them at the top using upper
press-stud :.
First-aid kit
First-aid kit :is located in the stowage well
under the trunk floor.
XLift the trunk floor upwards (Ypage 245).
XRemove first-aid kit :.
Check the expiration date on the first-aid kit at
least once a year. Replace the contents if nec-
essary, and replace missing items.
Reflective safety jacket
Removing/replacing reflective safety
jackets
The reflective safety jackets are located in the
safety jacket compartments in the stowage
compartments of the front doors. There are also
safety jacket compartments in the stowage
compartments of the rear doors, in which reflec-
tive safety jackets can be stowed.
XTo remove: pull out safety jacket bag :with
the reflective safety jacket by the loop.
XOpen safety jacket bag :and pull out the
reflective safety jacket.
Where will I find...?269
Breakdown assistance