2018 MERCEDES-BENZ SL ROADSTER heating
[x] Cancel search: heatingPage 13 of 322
F
FavoritesOverview ........................................ 238
Filler cap
see Refueling
Filling capacities (Technical data) ...3 12
First-aid kit ......................................... 269
Flat tire
MOExtended tires .......................... 271
Preparing the vehicle ..................... 271
TIREFIT kit ...................................... 272
Floormats ...........................................2 56
Frequencies
Mobile phone ................................. 310
Two-way radio ................................ 310
Front-passenger seat
Adjusting from the driver's seat ....... 97
Fuel
Additives ........................................ 314
Consumption statistics .................. 188
Displaying the current consump-
tion ................................................ 188
Displaying the range ......................1 88
Driving tips ....................................1 44
Fuel gauge ....................................... 33
Grade (gasoline) ............................ 313
Important safety notes .................. 313
Problem (malfunction) ................... 141
Refueling ........................................ 140
Tank content/reserve fuel ............. 313
Fuel filler flap
Opening ......................................... 140
Fuel level
Calling up the range (on-board
computer) ...................................... 188
Fuel tank
Capacity ........................................ 313
Problem (malfunction) ................... 141
Fuse allocation chart (vehicle tool
kit) ...................................................... 270
Fuses
Allocation chart .............................2 82
Before changing .............................2 83
Dashboard fuse box ....................... 283
Fuse box in the engine compart-
ment .............................................. 283
Fuse box in the rear compartment .. 284 Important safety notes .................. 282G
Garage door opener
Clearing the memory ..................... 255
General notes ................................ 252
Important safety notes .................. 253
Opening/closing the garage door .. 255
Problems when programming ........2 54
Programming (button in the rear-
view mirror) ................................... 253
Synchronizing the rolling code ....... 253
Gear indicator (on-board com-
puter, Mercedes-AMG vehicles) ....... 197
Genuine parts ...................................... 24
Glove box ...........................................2 42
Google™ Local Search
see also Digital Operator's Man-
ual ..................................................2 36
H
HANDS-FREE ACCESS.......................... 82
Hazard warning lamps
Display message ............................ 225
Switching on/off ........................... 108
Head bags
Display message ............................ 209
Operation ......................................... 47
Head level heating (AIRSCARF) ........100
Head restraints
Adjusting ......................................... 98
see NECK-PRO head restraints
Headlamps
see Automatic headlamp mode
Heating
see Climate control
High beam flasher .............................1 07
High-beam headlamps
Display message ............................ 212
Switching on/off ........................... 107
Hill start assist .................................. 125
HOLD function
Activating ....................................... 160
Activation conditions ..................... 160
Deactivating ................................... 160
Display message ............................ 217
Index11
Page 19 of 322
SD memory cardsee also Digital Operator's Man-
ual .................................................. 236
Selecting ........................................1 91
Search & Send
see also Digital Operator's Man-
ual ..................................................2 36
Seat
Correct driver's seat position ........... 95
Seat belts
Adjusting the driver's and front-
passenger seat belt ......................... 44
Correct usage .................................. 43
Fastening ......................................... 44
Important safety guidelines ............. 42
Introduction ..................................... 41
Releasing ......................................... 44
Seat belt guide ................................. 97
Switching belt adjustment on/off
(on-board computer) ...................... 197
Warning lamp ................................. 227
Warning lamp (function) ................... 44
Seats
Adjusting (electrically) ..................... 97
Adjusting the head restraint ............ 98
Belt guide ......................................... 97
Important safety notes .................... 95
Overview .......................................... 95
Seat heating problem ...................... 99
Seat ventilation problem ................ 100
Sliding forward/back ....................... 98
Storing settings (memory func-
tion) ............................................... 105
Switching AIRSCARF on/off .......... 100
Switching seat heating on/off ......... 99
Switching seat ventilation on/off .... 99
Selector lever
Positions ........................................ 130
Sensors (cleaning instructions) ....... 267
Service menu (on-board com-
puter) .................................................. 194
Service message
see ASSYST PLUS
Service products
Brake fluid ..................................... 315
Coolant (engine) ............................ 315
Engine oil ....................................... 314
Fuel ................................................ 313 Important safety notes .................. 312
Refrigerant (air-conditioning sys-
tem) ............................................... 316
Washer fluid ................................... 316
Setting the air distribution ............... 117
Setting the airflow ............................ 117
Se
tting the date/time format
see also Digital Operator's Man-
ual .................................................. 236
Setting the language
see also Digital Operator's Man-
ual .................................................. 236
Setting the time
see also Digital Operator's Man-
ual .................................................. 236
Settings
Factory (on-board computer) ......... 197
On-board computer ....................... 194
SETUP (on-board computer,
Mercedes-AMG vehicles) .................. 198
Side impact air bag ............................. 46
Side marker lamp (display mes-
sage) ................................................... 212
Side windows
Cleaning ......................................... 266
Convenience closing feature ............ 87
Important safety information ........... 85
Opening/closing (all) ....................... 87
Opening/closing (front) ................... 86
Opening/closing (rear) .................... 86
Overview .......................................... 85
Problem (malfunction) ..................... 88
Resetting ......................................... 88
Reversing feature ............................. 86
SIRIUS services
see also Digital Operator's Man-
ual .................................................. 236
SmartKey
Changing the battery ....................... 76
Changing the programming ............. 74
Checking the battery ....................... 76
Display message ............................ 225
Door central locking/unlocking ....... 73
Important safety notes .................... 73
Loss ................................................. 77
Mechanical key ................................ 75
Opening/closing the roof ................ 90
Index17
Page 37 of 322
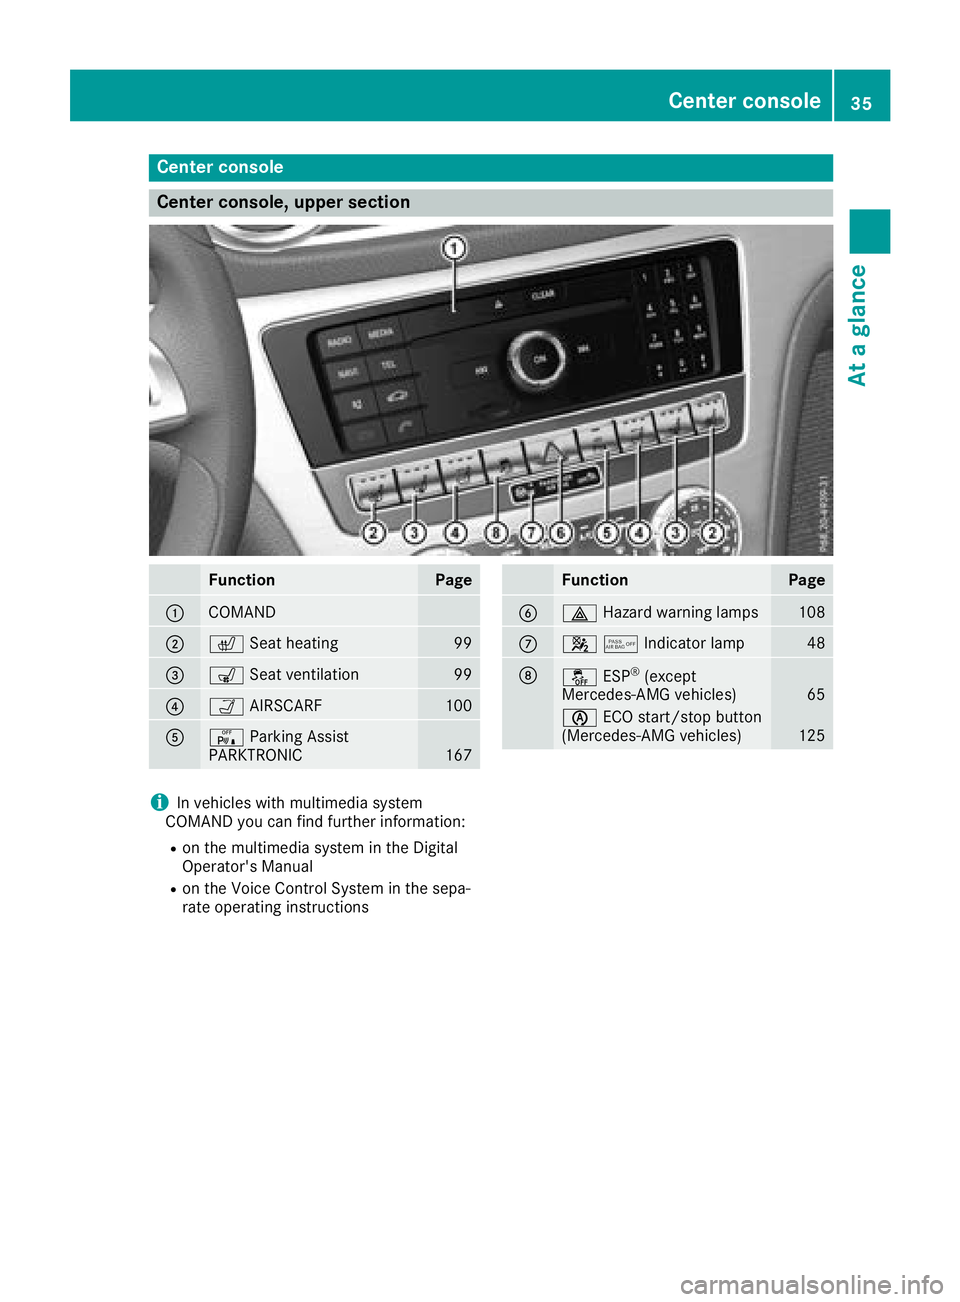
Center console
Center console, upper section
FunctionPage
:COMAND
;cSeat heating99
=sSeat ventilation99
?ÒAIRSCARF100
AcParking Assist
PARKTRONIC167
FunctionPage
B£ Hazard warning lamps108
C45Indicator lamp48
DåESP®(except
Mercedes-AMG vehicles)65
è ECO start/stop button
(Mercedes-AMG vehicles)125
iIn vehicles with multimedia system
COMAND you can find further information:
Ron the multimedia system in the Digital
Operator's Manual
Ron the Voice Control System in the sepa-
rate operating instructions
Center console35
At a glance
Page 80 of 322
ProblemPossible causes/consequences andMSolutions
The engine cannot be
started using the Smart-
Key.The on-board voltage is too low.
XSwitch off non-essential consumers, e.g. seat heating or interior
lighting, and try to start the engine again.
If this does not work:
XCheck the starter battery and charge it if necessary (Ypage 277).
or
XJump-start the vehicle (Ypage 278).
or
XConsult a qualified specialist workshop.
The engine cannot be
started using KEYLESS-
GO. The SmartKey is in
the vehicle.The vehicle is locked.
XUnlock the vehicle and try to start the vehicle again.
The SmartKey battery is discharged or nearly discharged.
XCheck the SmartKey battery (Ypage 76) and replace it if necessary
(Ypage 76).
If this does not work:
XStart your vehicle with the SmartKey in the ignition lock.
There is interference from a powerful source of radio waves.
XStart your vehicle with the SmartKey in the ignition lock.
You have lost a Smart-
Key.XHave the SmartKey deactivated at a qualified specialist workshop.
XReport the loss immediately to the vehicle insurers.
XIf necessary, have the locks changed as well.
You have lost the
mechanical key.XReport the loss immediately to the vehicle insurers.
XIf necessary, have the locks changed as well.
The side windows cannot
be opened or closed
using the convenience
opening/closing fea-
ture.The SmartKey battery is discharged or nearly discharged.
XCheck the SmartKey battery (Ypage 76) and replace it if necessary
(Ypage 76).
Doors
Important safety notes
GWARNING
If children are left unsupervised in the vehicle,
they could:
Roperate the vehicle's equipment.
Additionally, children could set the vehicle in
motion if, for example, they:
Rrelease the parking brake
Rshift the automatic transmission out of park
position P
Rstart the engine
There is a risk of an accident and injury.
Never leave children or animals unattended in
the vehicle.
78Doors
Opening and closing
Page 98 of 322
GWARNING
When you adjust a seat, you or other vehicle
occupants could become trapped, e.g. on the seat guide rail. There is a risk of injury.
Make sure when adjusting a seat that no one
has any body parts in the sweep of the seat.
GWARNING
If the driver's seat is not engaged, it could
move forwards as far as the next catch during movement such as braking or abrupt changes
of direction. As a result, you would be pushed
against your seat belt by the unsecured driv-
er's seat.
This could cause you to lose control of the
vehicle. The seat belt cannot protect as inten-
ded and could result in additional injury.
There is a risk of an accident and injury.
Before every journey, make sure that the driv-
er's seat is fully engaged.
Observe the safety notes on "Air bags"
(
Ypage 45) and "Children in the vehicle"
(Ypage 56).
GWARNING
If you adjust the seat height carelessly, you or
other vehicle occupants could be trapped and
thereby injured. Children in particular could
accidentally press the electrical seat adjust-
ment buttons and become trapped. There is a
risk of injury.
While moving the seats, make sure that your
hands or other body parts do not get under the
lever assembly of the seat adjustment sys-
tem.
GWARNING
If the head restraints are not installed or not
adjusted correctly, they cannot provide pro-
tection as intended. There is an increased risk
of injury in the head and neck area, e.g. in the event of an accident or when braking.
Always drive with the head restraints instal-
led. Before driving off, make sure for every
vehicle occupant that the center of the head
restraint supports the back of the head at
about eye level.
GWARNING
You could lose control of your vehicle if you do the following while driving:
Radjust the driver's seat, head restraint,
steering wheel or mirrors
Rfasten the seat belt
There is a risk of an accident.
Adjust the driver's seat, head restraint, steer-
ing wheel and mirror and fasten your seat belt before starting the engine.
!To prevent damage to the seats and the seat
heating, observe the following notes:
RDo not spill liquids onto the seats. Dry the
seats as soon as possible if liquid does get
spilled on the seats.
RIf the seat covers are damp or wet, do not
switch on the seat heating. Also, do not use
the seat heating to dry the seats.
RClean the seat covers as recommended;
see the "Interior care" section.
RDo not transport heavy loads on the seats.
Do not place pointed objects on the seat
cushions such as knives, nails or tools.
Where possible, use the seats only for car-
rying passengers.
RWhen operating the seat heating, do not
cover the seats with insulating materials,
e.g. blankets, coats, bags, protective cov-
ers, child seats or booster seats.
RWhen the seat heating is switched on, the
seat surface can be damaged as a result of
objects being placed on the seats; for
example, seat cushions, child seats and
protective covers not approved by
Mercedes-Benz.
!Make sure that there are no objects in the
footwell under or behind the seats when mov-
ing the seats back. There is a risk that the
seats and/or the objects could be damaged.
iThe head restraints cannot be removed.
For more information, contact a qualified spe-
cialist workshop.
96Seats
Seats, steering wheel and mirrors
Page 101 of 322
Switching the seat heating on/off
Switching on/off
GWARNING
Repeatedly switching on the seat heating can
cause the seat cushion and backrest pads to
become very hot. The health of persons with
limited temperature sensitivity or a limited
ability to react to high temperatures may be
affected or they may even suffer burn-like
injuries. There is a risk of injury.
Therefore, do not switch the seat heating on
repeatedly.
!When the seat heating is switched on, the
seat surface can be damaged as a result of
objects being placed on the seats; for exam-
ple, seat cushions, child seats and protective
covers not approved by Mercedes-Benz.
When the seat heating is switched on, ensure
that there are no objects on the seats.
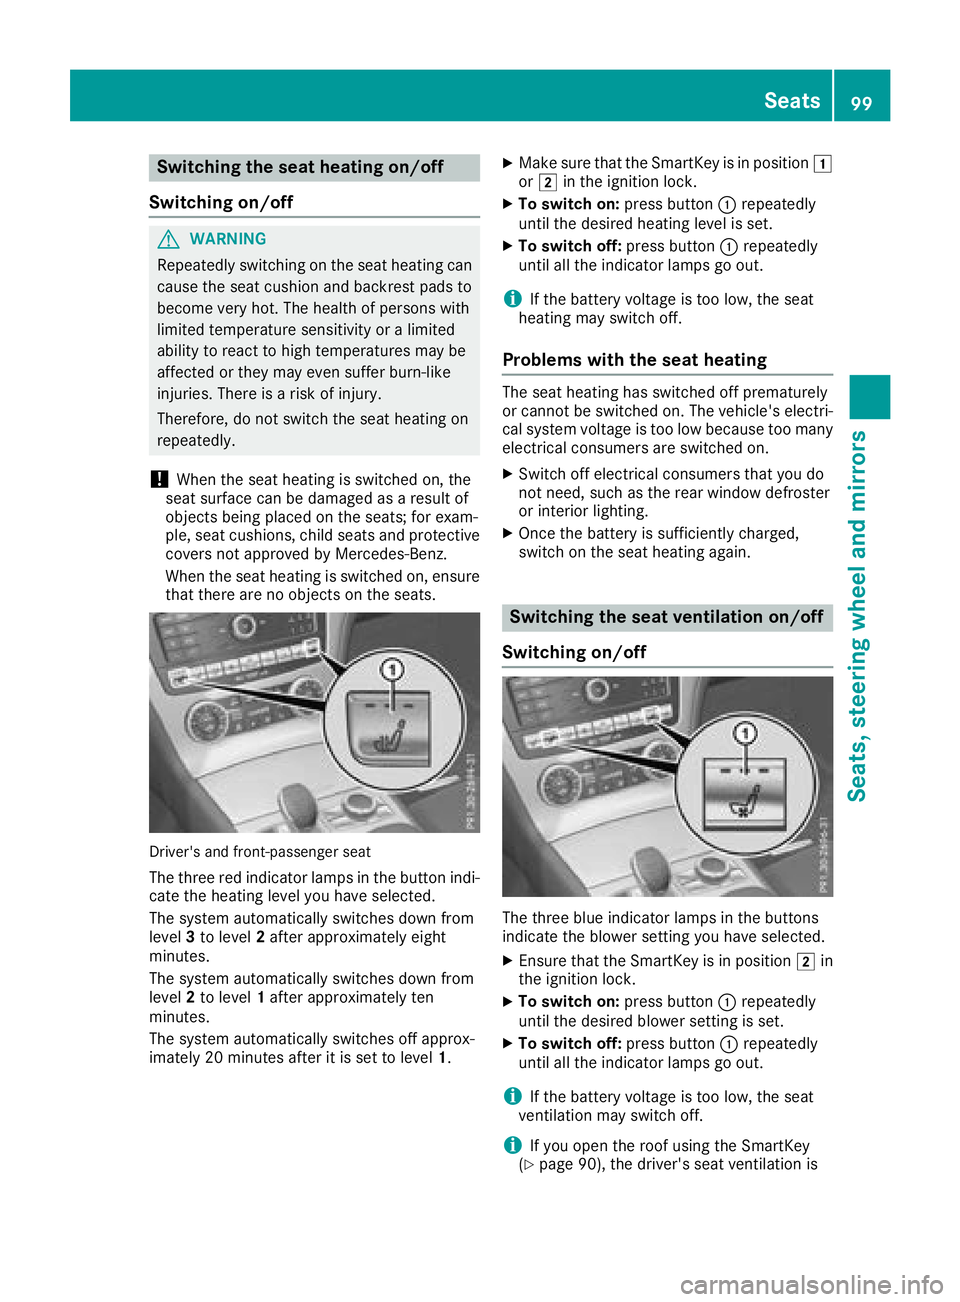
Driver's and front-passenger seat
The three red indicator lamps in the button indi-
cate the heating level you have selected.
The system automatically switches down from
level 3to level 2after approximately eight
minutes.
The system automatically switches down from
level 2to level 1after approximately ten
minutes.
The system automatically switches off approx-
imately 20 minutes after it is set to level 1.
XMake sure that the SmartKey is in position 1
or 2 in the ignition lock.
XTo switch on: press button:repeatedly
until the desired heating level is set.
XTo switch off: press button:repeatedly
until all the indicator lamps go out.
iIf the battery voltage is too low, the seat
heating may switch off.
Problems with the seat heating
The seat heating has switched off prematurely
or cannot be switched on. The vehicle's electri- cal system voltage is too low because too many
electrical consumers are switched on.
XSwitch off electrical consumers that you do
not need, such as the rear window defroster
or interior lighting.
XOnce the battery is sufficiently charged,
switch on the seat heating again.
Switching the seat ventilation on/off
Switching on/off
The three blue indicator lamps in the buttons
indicate the blower setting you have selected.
XEnsure that the SmartKey is in position 2in
the ignition lock.
XTo switch on: press button:repeatedly
until the desired blower setting is set.
XTo switch off: press button:repeatedly
until all the indicator lamps go out.
iIf the battery voltage is too low, the seat
ventilation may switch off.
iIf you open the roof using the SmartKey
(Ypage 90), the driver's seat ventilation is
Seats99
Seats, steering wheel and mirrors
Z
Page 102 of 322
automatically switched on and the side win-
dows open.
Problems with the seat ventilation
The seat ventilation has switched off prema-
turely or cannot be switched on. The vehicle's
electrical system voltage is too low because too
many electrical consumers are switched on.
XSwitch off electrical consumers that you do
not need, such as the rear window defroster
or interior lighting.
XOnce the battery is sufficiently charged,
switch on the seat heating again.
AIRSCARF
Setting head level heating (AIRSCARF)
GWARNING
When AIRSCARF is switched on, very hot air
can flow from the vents in the head restraints. This could result in burns in the immediate
vicinity of the air vents. There is a risk of injury.
Reduce the heater output before it becomes
too hot.
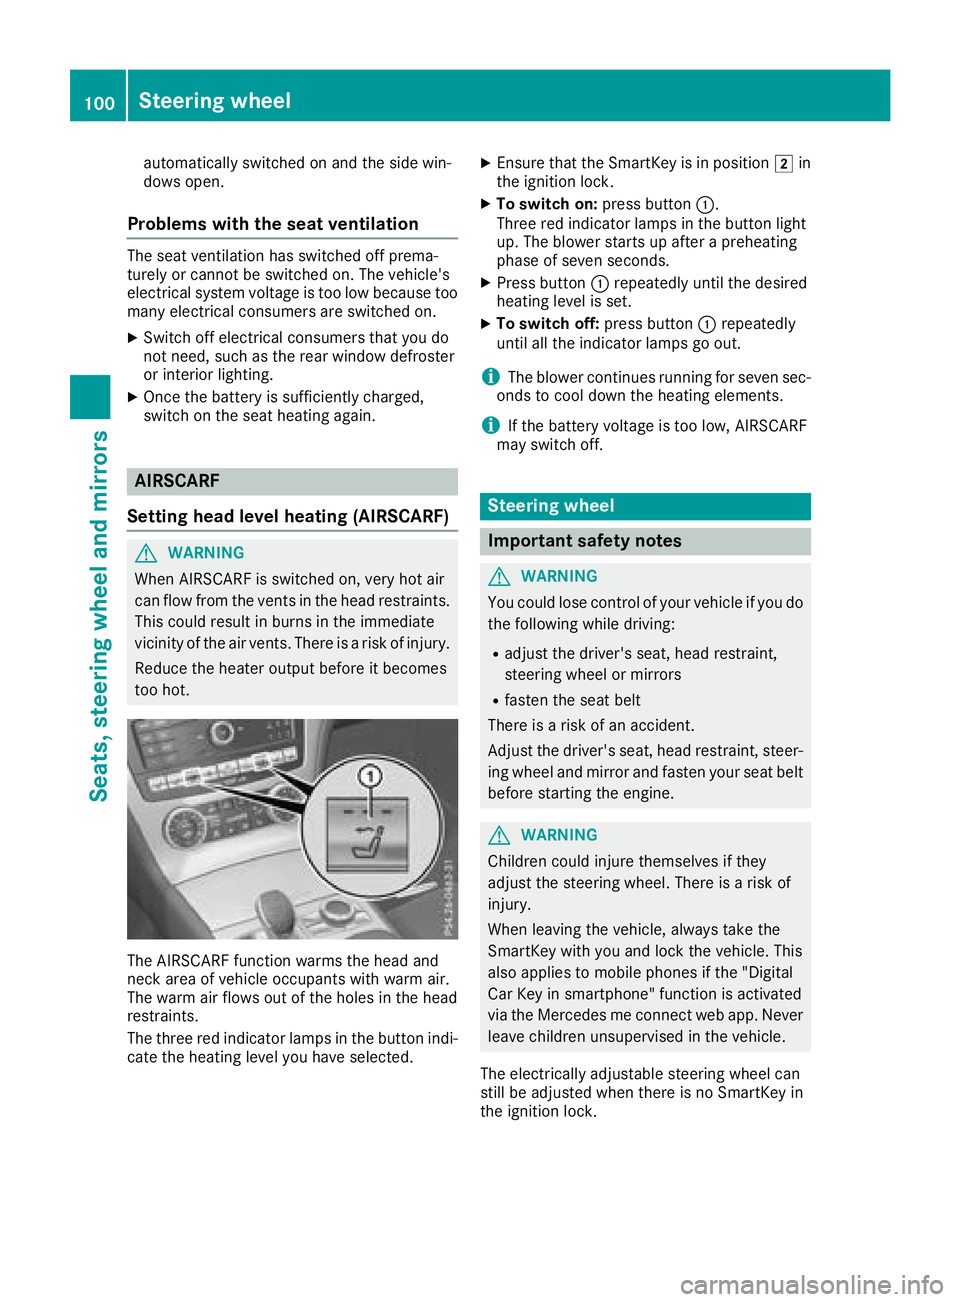
The AIRSCARF function warms the head and
neck area of vehicle occupants with warm air.
The warm air flows out of the holes in the head
restraints.
The three red indicator lamps in the button indi-
cate the heating level you have selected.
XEnsure that the SmartKey is in position 2in
the ignition lock.
XTo switch on: press button:.
Three red indicator lamps in the button light
up. The blower starts up after a preheating
phase of seven seconds.
XPress button :repeatedly until the desired
heating level is set.
XTo switch off: press button:repeatedly
until all the indicator lamps go out.
iThe blower continues running for seven sec-
onds to cool down the heating elements.
iIf the battery voltage is too low, AIRSCARF
may switch off.
Steering wheel
Important safety notes
GWARNING
You could lose control of your vehicle if you do the following while driving:
Radjust the driver's seat, head restraint,
steering wheel or mirrors
Rfasten the seat belt
There is a risk of an accident.
Adjust the driver's seat, head restraint, steer-
ing wheel and mirror and fasten your seat belt before starting the engine.
GWARNING
Children could injure themselves if they
adjust the steering wheel. There is a risk of
injury.
When leaving the vehicle, always take the
SmartKey with you and lock the vehicle. This
also applies to mobile phones if the "Digital
Car Key in smartphone" function is activated
via the Mercedes me connect web app. Never leave children unsupervised in the vehicle.
The electrically adjustable steering wheel can
still be adjusted when there is no SmartKey in
the ignition lock.
100Steering wheel
Seats, steering wheel and mirrors
Page 105 of 322
mirror using button=as long as the indicator
lamp is lit.
XPress button =up, down, to the right or to
the left.
The exterior mirror must be set to a position
that provides you with a good overview of
traffic conditions.
The convex exterior mirrors provide a larger field
of vision.
The exterior mirrors are automatically heated
after starting the vehicle if the rear window
defroster is switched on and the outside tem-
perature is low. Mirror heating lasts up to 10
minutes.
iYou can also heat up the exterior mirrors
manually by switching on the rear window
defroster.
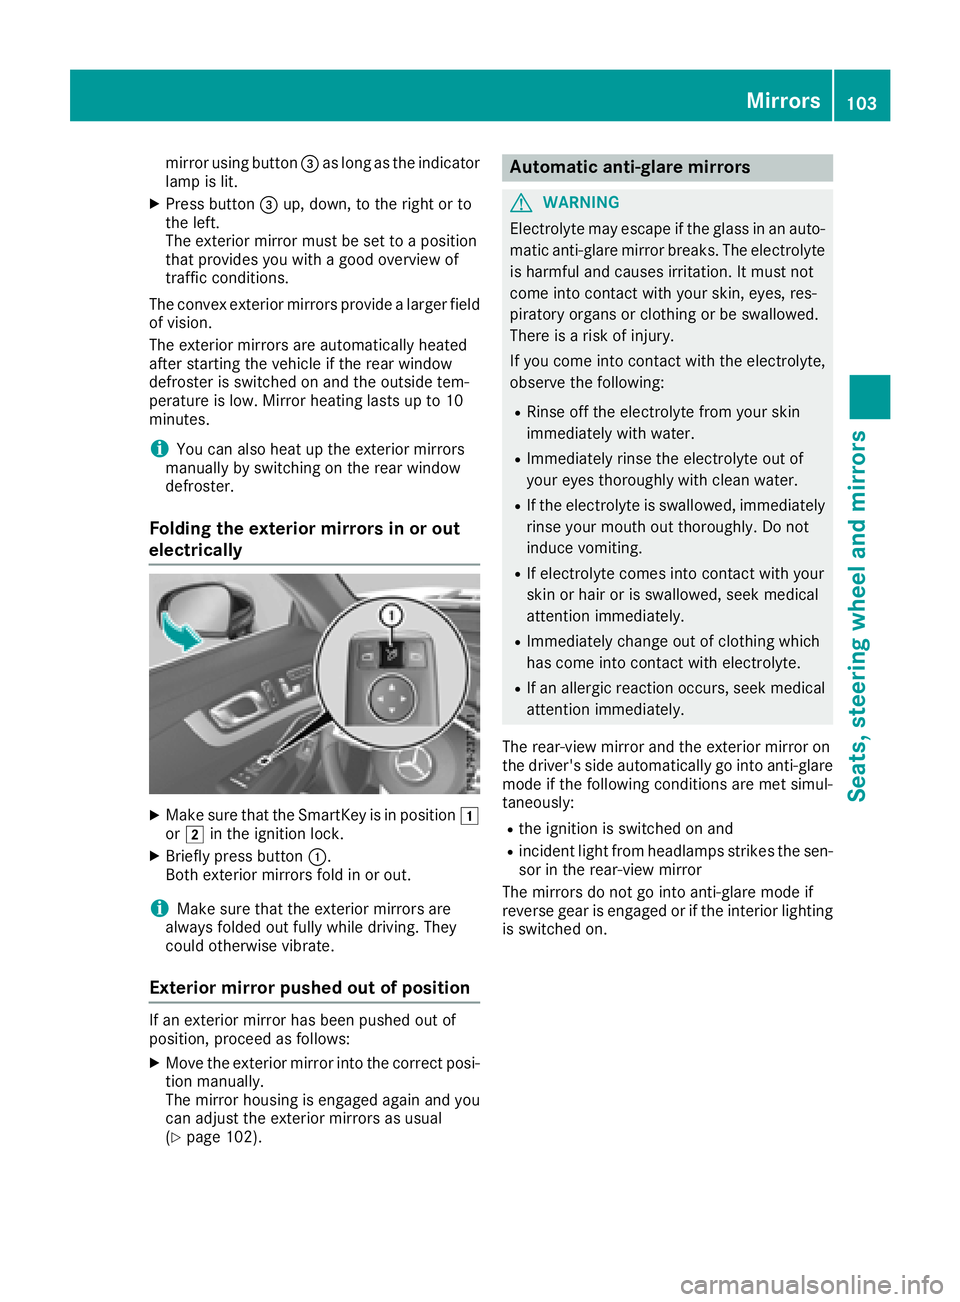
Folding the exterior mirrors in or out
electrically
XMake sure that the SmartKey is in position 1
or 2 in the ignition lock.
XBriefly press button :.
Both exterior mirrors fold in or out.
iMake sure that the exterior mirrors are
always folded out fully while driving. They
could otherwise vibrate.
Exterior mirror pushed out of position
If an exterior mirror has been pushed out of
position, proceed as follows:
XMove the exterior mirror into the correct posi-
tion manually.
The mirror housing is engaged again and you
can adjust the exterior mirrors as usual
(
Ypage 102).
Automatic anti-glare mirrors
GWARNING
Electrolyte may escape if the glass in an auto-
matic anti-glare mirror breaks. The electrolyte
is harmful and causes irritation. It must not
come into contact with your skin, eyes, res-
piratory organs or clothing or be swallowed.
There is a risk of injury.
If you come into contact with the electrolyte,
observe the following:
RRinse off the electrolyte from your skin
immediately with water.
RImmediately rinse the electrolyte out of
your eyes thoroughly with clean water.
RIf the electrolyte is swallowed, immediately
rinse your mouth out thoroughly. Do not
induce vomiting.
RIf electrolyte comes into contact with your
skin or hair or is swallowed, seek medical
attention immediately.
RImmediately change out of clothing which
has come into contact with electrolyte.
RIf an allergic reaction occurs, seek medical
attention immediately.
The rear-view mirror and the exterior mirror on
the driver's side automatically go into anti-glare
mode if the following conditions are met simul-
taneously:
Rthe ignition is switched on and
Rincident light from headlamps strikes the sen-
sor in the rear-view mirror
The mirrors do not go into anti-glare mode if
reverse gear is engaged or if the interior lighting
is switched on.
Mirrors103
Seats, steering wheel and mirrors
Z