2018 MERCEDES-BENZ SL ROADSTER glove box
[x] Cancel search: glove boxPage 7 of 322

Head bag ......................................... 47
Important safety notes .................... 45
Introduction .....................................45
Knee bag .......................................... 46
Occupant Classification System
(OCS) ............................................... 47
PASSENGER AIR BAG indicator
lamps ............................................... 41
Side impact air bag .......................... 46
AIR FLOW ........................................... 116
Air vents
Glove box ....................................... 120
Important safety notes .................. 119
Setting ........................................... 119
Setting the blower output of the
AIRSCARF vents .............................1 20
Setting the center air vents ........... 120
Setting the side air vents ...............1 20
Switching AIRSCARF on/off .......... 100
Air-conditioning system
see Climate control
AIRSCARF
Switching on/off ........................... 100
AIRSCARF vents
Setting the blower output .............. 120
Alarm
ATA (Anti-Theft Alarm system) ......... 72
Switching off (ATA) .......................... 72
Switching the function on/off
(ATA) ................................................ 72
Alarm system
see ATA (Anti-Theft Alarm system)
Ambient lighting
Setting the brightness (on-board
computer) ...................................... 195
Setting the color (on-board com-
puter) ............................................. 195
AMG menu (on-board computer) ..... 197
Anti-lock braking system
see ABS (Anti-lock Braking System)
Anti-skid chains
see Snow chains
Anti-theft alarm system
see ATA (Anti-Theft Alarm system)
Ashtray ............................................... 247
Assistance display (on-board com-
puter) ..................................................1 93Assistance menu (on-board com-
puter)
..................................................1 92
ASSYST PLUS
Displaying a service message ........2
62
Hi
ding a service message .............. 262
Resetting the service interval dis-
play ................................................ 262
Service message ............................ 262
Special service requirements ......... 262
ATA (Anti-Theft Alarm system)
Activating/deactivating ................... 72
Function ...........................................7 2
Switching off the alarm .................... 72
ATTENTION ASSIST
Activating/deactivating ................. 193
Display message ............................ 216
Function/notes ............................. 177
Audio menu (on-board computer) .... 190
Audio system
see Digital Operator's Manual
Authorized Mercedes-Benz Center
see Qualified specialist workshop
Authorized workshop
see Qualified specialist workshop
AUTO lights
Display message ............................ 212
see Lights
Automatic car wash (care) ............... 263
Automatic engine start (ECO start/
stop function) .................................... 126
Automatic engine switch-off (ECO
start/stop function) .......................... 125
Automatic headlamp mode .............. 106
Automatic transmission
Accelerator pedal position ............. 133
Changing gear ............................... 133
Display message ............................ 222
Drive program ................................ 134
Drive program display .................... 131
Driving tips .................................... 133
DYNAMIC SELECT button (all vehi-
cles except Mercedes-AMG vehi-
cles) ............................................... 128
DYNAMIC SELECT controller
(Mercedes-AMG vehicles) .............. 129
Emergency running mode .............. 139
Engaging drive position .................. 132
Index5
Page 13 of 322
F
FavoritesOverview ........................................ 238
Filler cap
see Refueling
Filling capacities (Technical data) ...3 12
First-aid kit ......................................... 269
Flat tire
MOExtended tires .......................... 271
Preparing the vehicle ..................... 271
TIREFIT kit ...................................... 272
Floormats ...........................................2 56
Frequencies
Mobile phone ................................. 310
Two-way radio ................................ 310
Front-passenger seat
Adjusting from the driver's seat ....... 97
Fuel
Additives ........................................ 314
Consumption statistics .................. 188
Displaying the current consump-
tion ................................................ 188
Displaying the range ......................1 88
Driving tips ....................................1 44
Fuel gauge ....................................... 33
Grade (gasoline) ............................ 313
Important safety notes .................. 313
Problem (malfunction) ................... 141
Refueling ........................................ 140
Tank content/reserve fuel ............. 313
Fuel filler flap
Opening ......................................... 140
Fuel level
Calling up the range (on-board
computer) ...................................... 188
Fuel tank
Capacity ........................................ 313
Problem (malfunction) ................... 141
Fuse allocation chart (vehicle tool
kit) ...................................................... 270
Fuses
Allocation chart .............................2 82
Before changing .............................2 83
Dashboard fuse box ....................... 283
Fuse box in the engine compart-
ment .............................................. 283
Fuse box in the rear compartment .. 284 Important safety notes .................. 282G
Garage door opener
Clearing the memory ..................... 255
General notes ................................ 252
Important safety notes .................. 253
Opening/closing the garage door .. 255
Problems when programming ........2 54
Programming (button in the rear-
view mirror) ................................... 253
Synchronizing the rolling code ....... 253
Gear indicator (on-board com-
puter, Mercedes-AMG vehicles) ....... 197
Genuine parts ...................................... 24
Glove box ...........................................2 42
Google™ Local Search
see also Digital Operator's Man-
ual ..................................................2 36
H
HANDS-FREE ACCESS.......................... 82
Hazard warning lamps
Display message ............................ 225
Switching on/off ........................... 108
Head bags
Display message ............................ 209
Operation ......................................... 47
Head level heating (AIRSCARF) ........100
Head restraints
Adjusting ......................................... 98
see NECK-PRO head restraints
Headlamps
see Automatic headlamp mode
Heating
see Climate control
High beam flasher .............................1 07
High-beam headlamps
Display message ............................ 212
Switching on/off ........................... 107
Hill start assist .................................. 125
HOLD function
Activating ....................................... 160
Activation conditions ..................... 160
Deactivating ................................... 160
Display message ............................ 217
Index11
Page 20 of 322
Overview .......................................... 73
Positions (ignition lock) ................. 122
Problem (malfunction) ..................... 77
Starting the engine ........................ 124
SMS
see also Digital Operator's Man-
ual .................................................. 236
Snow chains ...................................... 287
Sockets
Front-passenger footwell ............... 248
General notes ................................ 247
Trunk ............................................. 248
Sound
Switching on/off ........................... 237
Special seat belt retractor .................. 57
Specialist workshop ............................28
Speed, controlling
see Cruise control
Speedometer
Digital ............................................ 189
In the Instrument cluster ................. 33
Segments ...................................... 185
Selecting the display unit ............... 194
SPORT handling mode
Deactivating/activating
(Mercedes-AMG vehicles) ................6 7
Warning lamp ................................. 231
Standing lamps
Display message ............................2 12
Switching on/off ........................... 107
Start/stop function
see ECO start/stop function
Starting (engine) ................................ 123
STEER CONTROL .................................. 71
Steering
Display message ............................ 224
Steering Assist and Stop&Go Pilot
(DISTRONIC PLUS)
Activating/deactivating ................. 193
Steering assistant STEER CON-
TROL
see STEER CONTROL
Steering Pilot and Stop&Go Pilot
Display message ............................ 220
Steering wheel
Adjusting (electrically) ................... 101
Button overview ............................... 34 Buttons (on-board computer)
......... 186
Important sa
fety notes .................. 100
Storing settings (memory func-
tion) ............................................... 105
Steering wheel paddle shifters ........136
Stopwatch (RACETIMER) ................... 198
Stowage areas ................................... 242
Stowage compartments
Armrest (under) .............................2 42
Center console .............................. 243
Center console (rear) ..................... 243
Cup holders ................................... 245
Eyeglasses compartment ...............2 43
Glove box ....................................... 242
Important safety information ......... 242
Rear ............................................... 244
Stowage net ................................... 244
Stowage net ....................................... 244
Stowage space
Umbrella holder .............................2 43
Stowage well beneath the trunk
floor .................................................... 245
Summer tires ..................................... 287
Sun visor ............................................ 246
Surround lighting (on-board com-
puter) ..................................................1 95
Suspension settings
Active Body Control (ABC) (except
Mercedes-AMG vehicles) ...............1 64
Active Body Control (ABC)
(Mercedes-AMG vehicles) .............. 166
Suspension tuning
SETUP (on-board computer,
Mercedes-AMG vehicles) ...............1 98
Switching air-recirculation mode
on/off ................................................. 118
Switching on media mode
Via the device list .......................... 241
T
Tachometer ........................................ 185
Tail lamps
Display message ............................ 212
see Lights
Tank content
Fuel gauge ....................................... 33
18Index
Page 48 of 322
area of an air bag, e.g. to doors or side win-
dows
Rno heavy, sharp-edged or fragile objects are in
the pockets of your clothing. Store such
objects in a suitable place
GWARNING
If you modify the air bag cover or affix objects
such as stickers to it, the air bag can no longer
function correctly. There is an increased risk
of injury.
Never modify an air bag cover or affix objects
to it.
GWARNING
Sensors to control the air bags are located in
the doors. Modifications or work not per-
formed correctly to the doors or door panel-
ing, as well as damaged doors, can lead to the
function of the sensors being impaired. The air
bags might therefore not function properly
anymore. Consequently, the air bags cannot
protect vehicle occupants as they are
designed to do. There is an increased risk of
injury.
Never modify the doors or parts of the doors.
Always have work on the doors or door pan-
eling carried out at a qualified specialist work-
shop.
Front air bags
!Do not place heavy objects on the front-
passenger seat. This could cause the system
to identify the seat as being occupied. In the
event of an accident, the restraint systems on
the front-passenger side may be triggered
and have to be replaced.
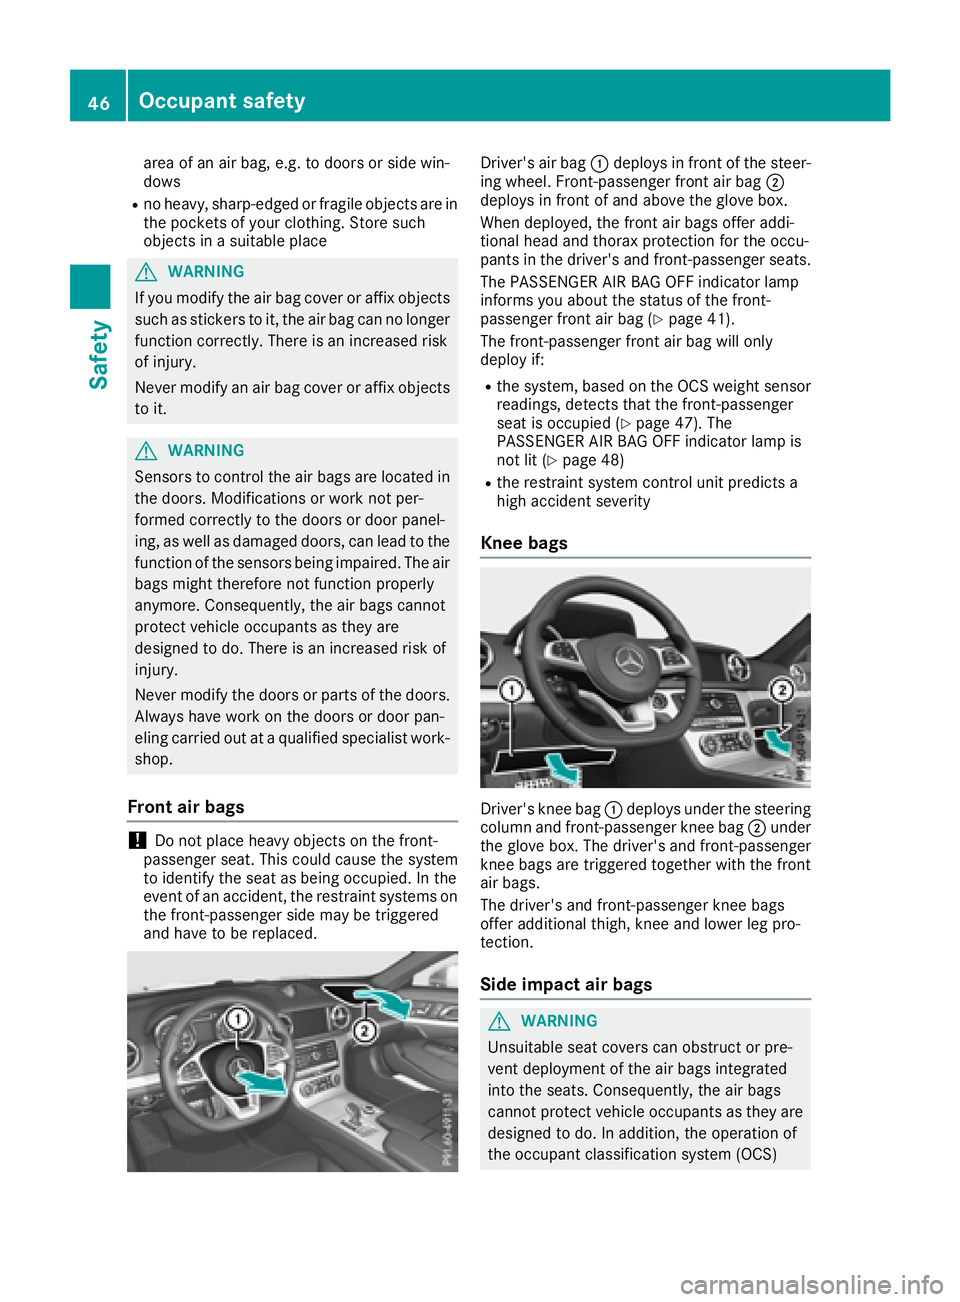
Driver's air bag :deploys in front of the steer-
ing wheel. Front-passenger front air bag ;
deploys in front of and above the glove box.
When deployed, the front air bags offer addi-
tional head and thorax protection for the occu-
pants in the driver's and front-passenger seats.
The PASSENGER AIR BAG OFF indicator lamp
informs you about the status of the front-
passenger front air bag (
Ypage 41).
The front-passenger front air bag will only
deploy if:
Rthe system, based on the OCS weight sensor
readings, detects that the front-passenger
seat is occupied (
Ypage 47). The
PASSENGER AIR BAG OFF indicator lamp is
not lit (
Ypage 48)
Rthe restraint system control unit predicts a
high accident severity
Knee bags
Driver's knee bag :deploys under the steering
column and front-passenger knee bag ;under
the glove box. The driver's and front-passenger
knee bags are triggered together with the front
air bags.
The driver's and front-passenger knee bags
offer additional thigh, knee and lower leg pro-
tection.
Side impact air bags
GWARNING
Unsuitable seat covers can obstruct or pre-
vent deployment of the air bags integrated
into the seats. Consequently, the air bags
cannot protect vehicle occupants as they are designed to do. In addition, the operation of
the occupant classification system (OCS)
46Occupant safety
Safety
Page 75 of 322
SmartKey
Important safety notes
GWARNING
If children are left unsupervised in the vehicle,
they could:
Roperate the vehicle's equipment.
Additionally, children could set the vehicle in
motion if, for example, they:
Rrelease the parking brake
Rshift the automatic transmission out of park
position P
Rstart the engine
There is a risk of an accident and injury.
Never leave children or animals unattended in
the vehicle.
When leaving the vehicle, always take the
SmartKey with you and lock the vehicle. This
also applies to mobile phones if the "Digital
Car Key in smartphone" function is activated
via the Mercedes me connect web app.
GWARNING
If you attach heavy or large objects to the
SmartKey, the SmartKey could be uninten-
tionally turned in the ignition lock. This could
cause the engine to be switched off. There is a risk of an accident.
Do not attach any heavy or large objects to the
SmartKey. Remove any bulky key rings before
inserting the SmartKey into the ignition lock.
!Keep the SmartKey away from strong mag-
netic fields. Otherwise, the remote control
function could be affected.
Strong magnetic fields can occur in the vicin-
ity of powerful electrical installations.
Do not keep the SmartKey:
Rwith electronic devices, e.g. a mobile phone
or another SmartKey
Rwith metallic objects, e.g. coins or metal foil
Rinside metallic objects, e.g. a metal case
This can affect the functionality of the Smart- Key.
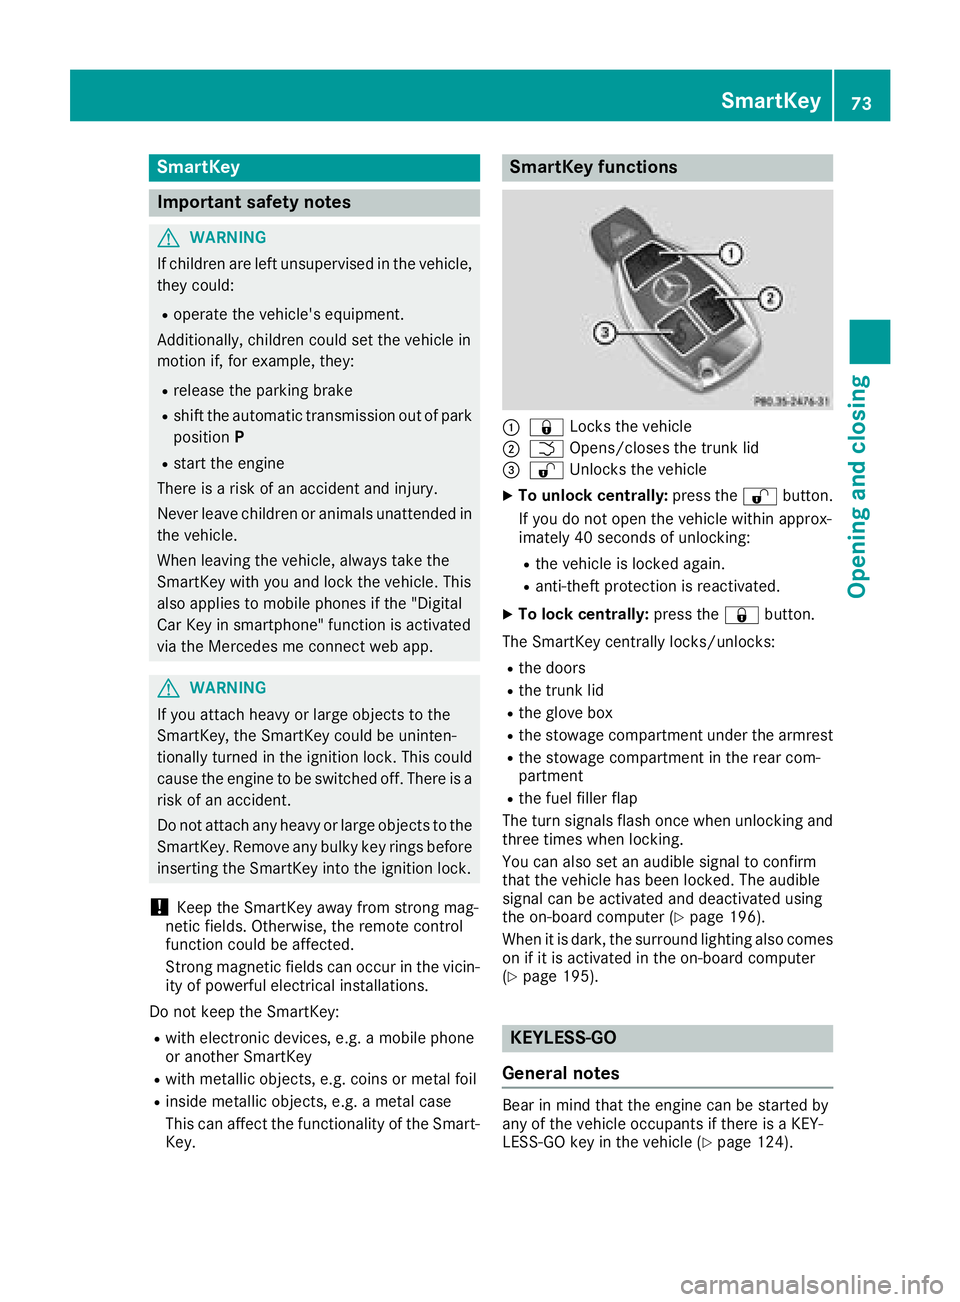
SmartKey functions
:& Locks the vehicle
;FOpens/closes the trunk lid
=%Unlocks the vehicle
XTo unlock centrally: press the%button.
If you do not open the vehicle within approx-
imately 40 seconds of unlocking:
Rthe vehicle is locked again.
Ranti-theft protection is reactivated.
XTo lock centrally: press the&button.
The SmartKey centrally locks/unlocks:
Rthe doors
Rthe trunk lid
Rthe glove box
Rthe stowage compartment under the armrest
Rthe stowage compartment in the rear com-
partment
Rthe fuel filler flap
The turn signals flash once when unlocking and
three times when locking.
You can also set an audible signal to confirm
that the vehicle has been locked. The audible
signal can be activated and deactivated using
the on-board computer (
Ypage 196).
When it is dark, the surround lighting also comes
on if it is activated in the on-board computer
(
Ypage 195).
KEYLESS-GO
General notes
Bear in mind that the engine can be started by
any of the vehicle occupants if there is a KEY-
LESS-GO key in the vehicle (
Ypage 124).
SmartKey73
Opening and closing
Z
Page 81 of 322
When leaving the vehicle, always take the
SmartKey with you and lock the vehicle. This
also applies to mobile phones if the "Digital
Car Key in smartphone" function is activated
via the Mercedes me connect web app.
Unlocking and opening doors from
the inside
!
The side windows will not open/close if the
battery is discharged or if the side windows
have iced up. It will then not be possible to
close the door. Do not attempt to force the
door closed. You could otherwise damage the door or the side window.
You can open a door from inside the vehicle
even if it has been locked.
If the vehicle has previously been locked from
the outside, opening a door from the inside will
trigger the anti-theft alarm system. Switch off
the alarm (
Ypage 72).
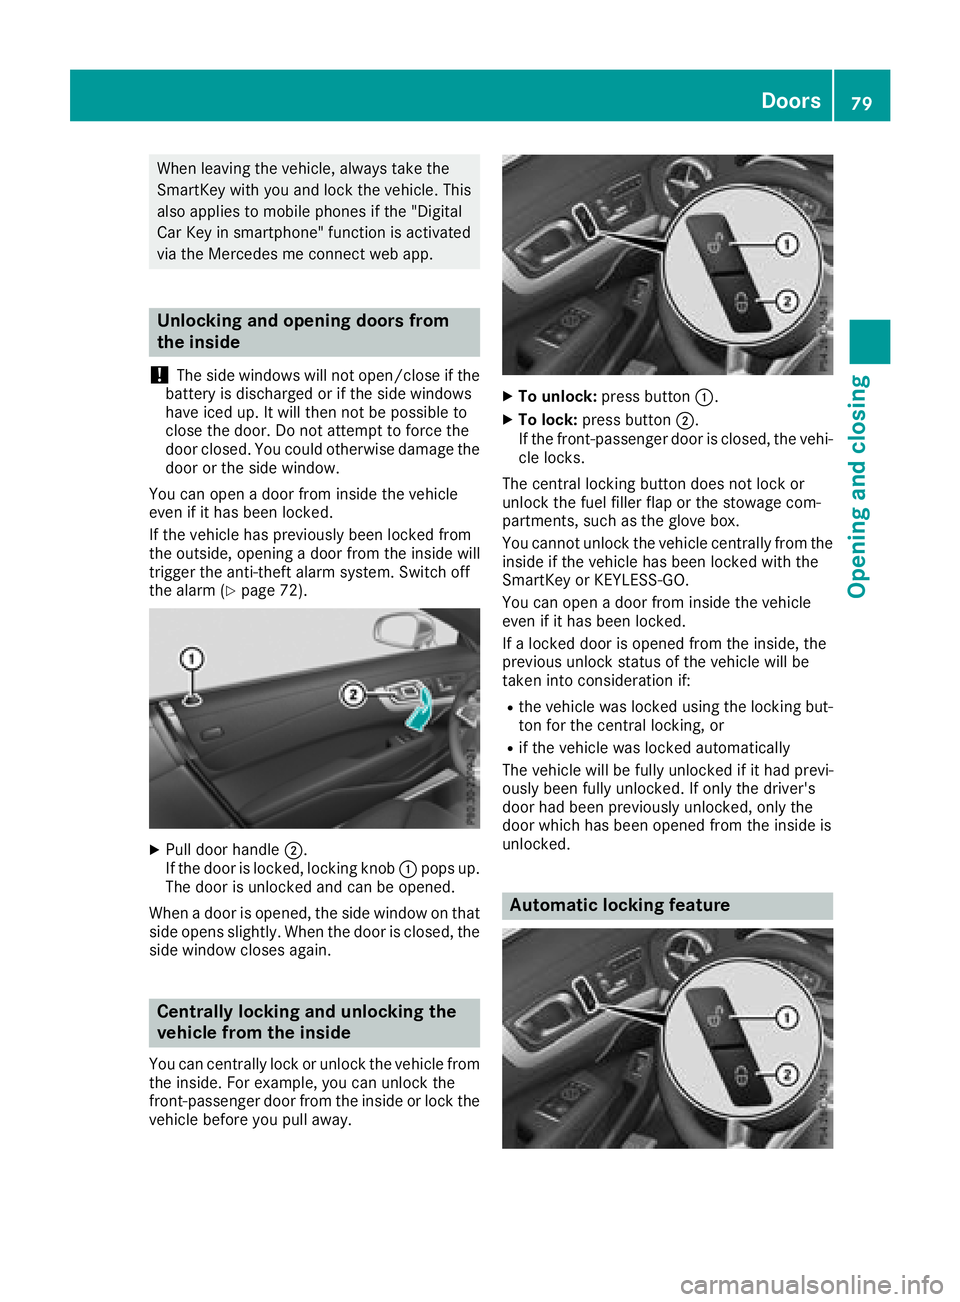
XPull door handle ;.
If the door is locked, locking knob :pops up.
The door is unlocked and can be opened.
When a door is opened, the side window on that
side opens slightly. When the door is closed, the
side window closes again.
Centrally locking and unlocking the
vehicle from the inside
You can centrally lock or unlock the vehicle from
the inside. For example, you can unlock the
front-passenger door from the inside or lock the
vehicle before you pull away.
XTo unlock: press button :.
XTo lock:press button ;.
If the front-passenger door is closed, the vehi-
cle locks.
The central locking button does not lock or
unlock the fuel filler flap or the stowage com-
partments, such as the glove box.
You cannot unlock the vehicle centrally from the
inside if the vehicle has been locked with the
SmartKey or KEYLESS-GO.
You can open a door from inside the vehicle
even if it has been locked.
If a locked door is opened from the inside, the
previous unlock status of the vehicle will be
taken into consideration if:
Rthe vehicle was locked using the locking but-
ton for the central locking, or
Rif the vehicle was locked automatically
The vehicle will be fully unlocked if it had previ-
ously been fully unlocked. If only the driver's
door had been previously unlocked, only the
door which has been opened from the inside is
unlocked.
Automatic locking feature
Doors79
Opening and closing
Z
Page 122 of 322
Setting the center air vents
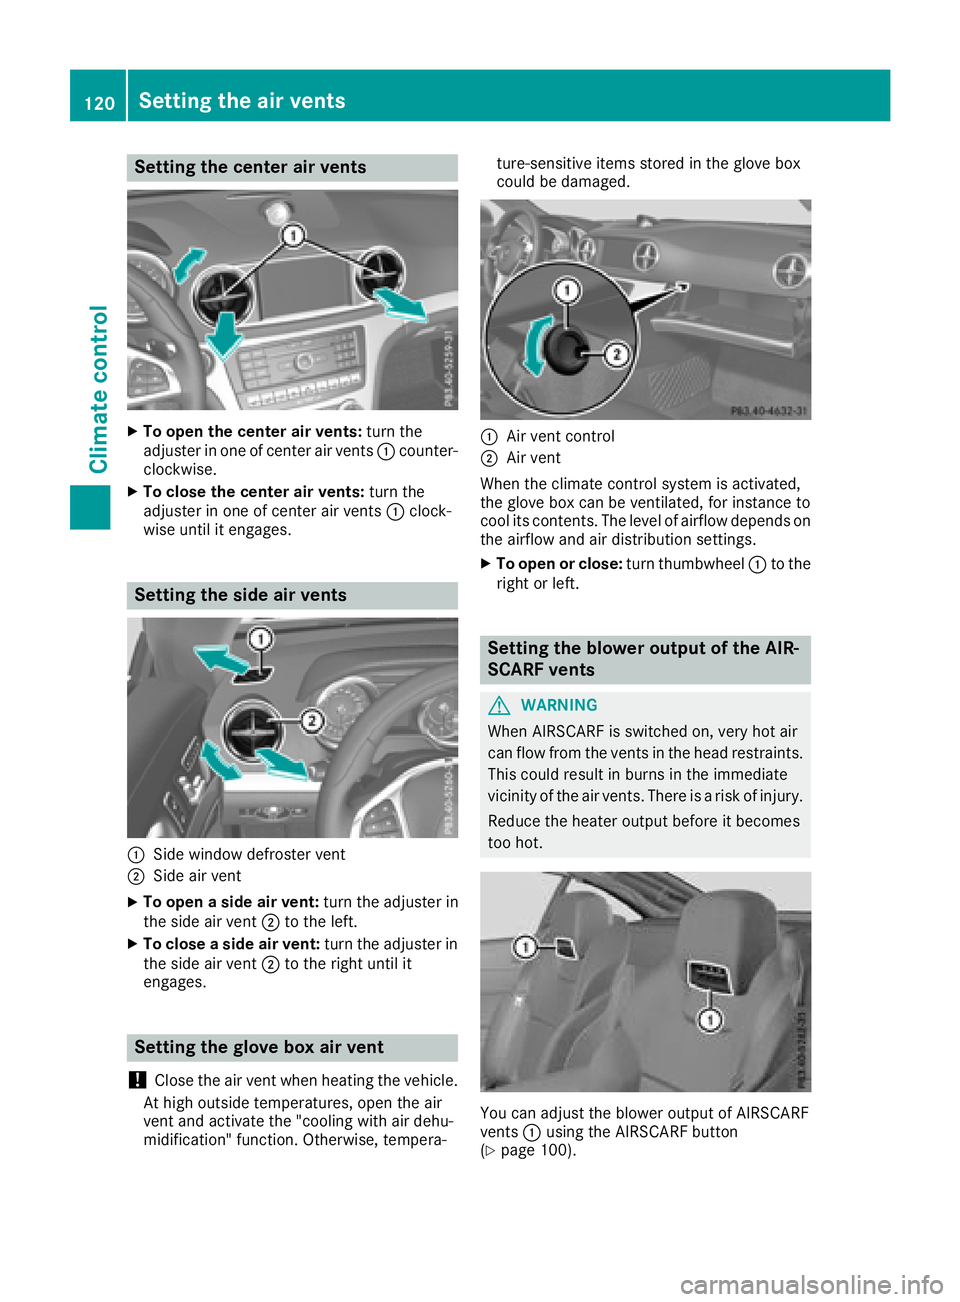
XTo open the center air vents:turn the
adjuster in one of center air vents :counter-
clockwise.
XTo close the center air vents: turn the
adjuster in one of center air vents :clock-
wise until it engages.
Setting the side air vents
:Side window defroster vent
;Side air vent
XTo open a side air vent: turn the adjuster in
the side air vent ;to the left.
XTo close a side air vent: turn the adjuster in
the side air vent ;to the right until it
engages.
Setting the glove box air vent
!
Close the air vent when heating the vehicle.
At high outside temperatures, open the air
vent and activate the "cooling with air dehu-
midification" function. Otherwise, tempera- ture-sensitive items stored in the glove box
could be damaged.
:Air vent control
;Air vent
When the climate control system is activated,
the glove box can be ventilated, for instance to
cool its contents. The level of airflow depends on the airflow and air distribution settings.
XTo open or close: turn thumbwheel:to the
right or left.
Setting the blower output of the AIR-
SCARF vents
GWARNING
When AIRSCARF is switched on, very hot air
can flow from the vents in the head restraints. This could result in burns in the immediate
vicinity of the air vents. There is a risk of injury.
Reduce the heater output before it becomes
too hot.
You can adjust the blower output of AIRSCARF
vents :using the AIRSCARF button
(
Ypage 100).
120Setting the air vents
Climate control
Page 244 of 322
Stowage areas
Stowage spaces
Important safety notes
GWARNING
If objects in the passenger compartment are
stowed incorrectly, they can slide or be
thrown around and hit vehicle occupants. In
addition, cup holders, open stowage spaces
and mobile phone brackets cannot always
retain all objects they contain. There is a risk of injury, particularly in the event of sudden
braking or a sudden change in direction.
RAlways stow objects so that they cannot be
thrown around in such situations.
RAlways make sure that objects do not pro-
trude from stowage spaces, parcel nets or
stowage nets.
RClose the lockable stowage spaces before
starting a journey.
RAlways stow and secure heavy, hard, poin-
ted, sharp-edged, fragile or bulky objects in
the trunk.
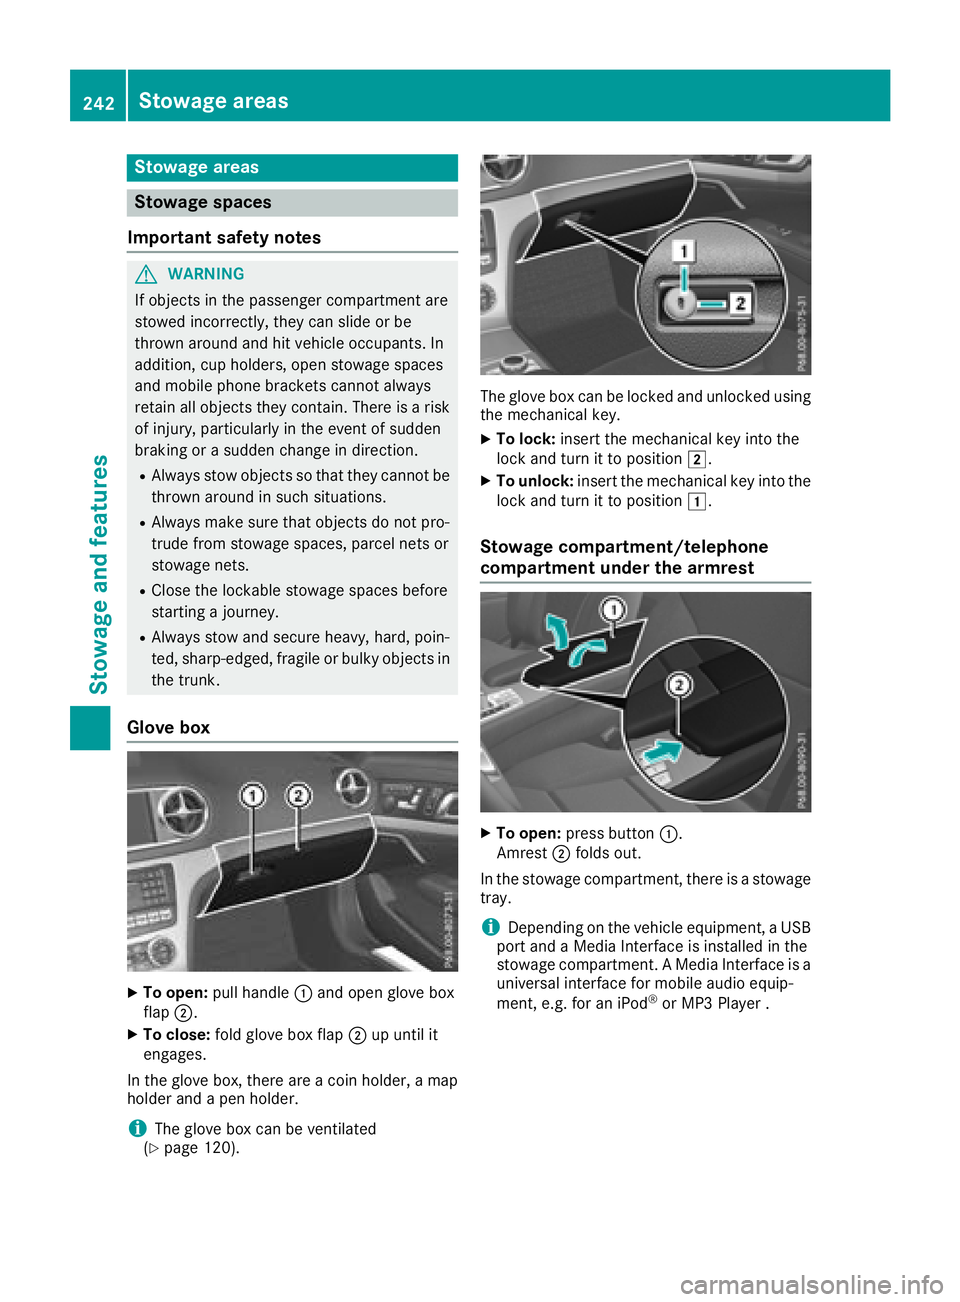
Glove box
XTo open: pull handle :and open glove box
flap ;.
XTo close: fold glove box flap ;up until it
engages.
In the glove box, there are a coin holder, a map
holder and a pen holder.
iThe glove box can be ventilated
(Ypage 120).
The glove box can be locked and unlocked using
the mechanical key.
XTo lock: insert the mechanical key into the
lock and turn it to position 2.
XTo unlock:insert the mechanical key into the
lock and turn it to position 1.
Stowage compartment/telephone
compartment under the armrest
XTo open:press button :.
Amrest ;folds out.
In the stowage compartment, there is a stowage tray.
iDepending on the vehicle equipment, a USB
port and a Media Interface is installed in the
stowage compartment. A Media Interface is a
universal interface for mobile audio equip-
ment, e.g. for an iPod
®or MP3 Player .
242Stowage areas
Stowage and features