2018 MERCEDES-BENZ SL ROADSTER trunk release
[x] Cancel search: trunk releasePage 12 of 322

EBD (electronic brake force distri-
bution)Display message ............................ 203
Function/notes ................................ 69
ECO display
Function/notes ............................ .145
On-board computer ....................... 188
ECO start/stop function
Automatic engine start .................. 126
Automatic engine switch-off .......... 125
Deactivating/activating ................. 126
General information ....................... 125
Important safety notes .................. 125
Introduction ................................... 125
Electronic Stability Program
see ESP
®(Electronic Stability Program)
Emergency
Automatic measures after an acci-
dent ................................................. 56
Emergency release
Driver's door ....................................8 0
Trunk ............................................... 85
Vehicle ............................................. 80
Emergency Tensioning Devices
Activation ......................................... 53
Emissions control
Service and warranty information ....2 5
Engine
Check Engine warning lamp .......... .232
Display message ............................ 213
ECO start/stop function ................ 125
Engine number ............................... 312
Irregular running ............................ 127
Jump-starting ................................. 278
Starting problems .......................... 127
Starting the engine with the
SmartKey ....................................... 124
Starting with KEYLESS-GO ............. 124
Switching off .................................. 142
Tow-starting (vehicle) ..................... 282
Engine electronics
Notes ............................................. 310
Problem (malfunction) ................... 127
Engine oil
Adding ...........................................2 59
Additives ........................................ 315
C
hecking the oil level ..................... 259 Checking the oil level using the
dipstick .......................................... 259
Display message ............................ 214
Filling capacity ............................... 315
General notes ................................ 314
Notes about oil grades ................... 314
Notes on oil level/consumption .... 259
Temperature (on-board computer,
Mercedes-AMG vehicles) ...............1
97
Entering an address
see also Digital Operator's Man-
ual ..................................................2 36
ESP
®(Electronic Stability Pro-
gram)
AMG menu (on-board computer) ... 198
Characteristics ................................. 66
Deactivating/activating (button
in Mercedes-AMG vehicles) ............. 67
Deactivating/activating (except
Mercedes‑ AMG vehicles) ................. 66
Display message ............................ 201
Function/notes ................................ 65
General notes .................................. 65
Important safety information ........... 65
Warning lamp ................................. 229
ETS/4ETS (Electronic Traction Sys-
tem) ...................................................... 65
Exhaust check ................................... 145
Exhaust pipe (cleaning instruc-
tions) ..................................................2 68
Exterior lighting
Setting options .............................. 106
see Lights
Exterior mirrors
Adjusting ....................................... 102
Dipping (automatic) ....................... 103
Folding in when locking (on-board
computer) ...................................... 197
Folding in/out (electrically) ........... 103
Out of position (troubleshooting) ... 103
Storing settings (memory func-
tion) ............................................... 105
Storing the parking position .......... 104
Eyeglasses compartment ................. 243
10Index
Page 22 of 322
Load index .....................................300
Load index (definition) ................... 302
M+S tires ....................................... 287
Maximum load on a tire (defini-
tion) ............................................... 303
Maximum loaded vehicle weight
(definition) ..................................... 302
Maximum permissible tire pres-
sure (definition) .............................3 03
Maximum tire load ......................... 301
Maximum tire load (definition) ....... 303
MOExtended tires .......................... 287
Optional equipment weight (defi-
nition) ............................................ 303
Overview ........................................ 285
PSI (pounds per square inch) (def-
inition) ...........................................3 03
Replacing ....................................... 304
Service life ..................................... 286
Sidewall (definition) ....................... 303
Speed rating (definition) ................ 302
Storing ...........................................3 04
Structure and characteristics
(definition) ..................................... 302
Summer tires ................................. 287
Temperature .................................. 298
TIN (Tire Identification Number)
(definition) ..................................... 303
Tire bead (definition) ......................3 03
Tire pressure (definition) ................ 303
Tire pressures (recommended) ...... 302
Tire size (data) ............................... 308
Tire size designation, load-bearing
capacity, speed rating .................... 298
Tire tread ....................................... 286
Tire tread (definition) ..................... 303
Total load limit (definition) ............. 303
Traction ......................................... 297
Traction (definition) ....................... 303
Tread wear ..................................... 297
Uniform Tire Quality Grading
Standards ...................................... 297
Uniform Tire Quality Grading
Standards (definition) .................... 302
Wear indi
cator (definition) ............. 303
Wheel and tire combination ........... 308
Wheel rim (definition) .................... 302
see Flat tire Tow-starting
Emergency engine starting ............ 282
Important safety notes .................. 280
Towing away
Important safety guidelines ........... 280
Installing the towing eye ................ 281
Removing the towing eye ............... 281
Transporting the vehicle ................ 282
With both axles on the ground ....... 281
With the rear axle raised ................ 282
Traffic reports
see also Digital Operator's Man-
ual .................................................. 236
Traffic Sign Assist
Display message ............................ 216
Transmission
Selector lever ................................ 130
see Automatic transmission
Transmission position display ......... 131
Transporting the vehicle .................. 282
Trip computer (on-board com-
puter) .................................................. 188
Trip odometer
Calling up ....................................... 188
Resetting (on-board computer) ...... 189
Trunk
Emergency release .......................... 85
Important safety notes .................... 80
Locking separately ........................... 84
Opening/closing (automatically
from inside) ...................................... 84
Opening/closing (automatically
from outside) ................................... 82
Opening/closing (from outside,
HANDS-FREE ACCESS) .................... 82
Opening/closing (manually from
outside) ............................................ 81
Overview .......................................... 80
Power closing .................................. 80
Trunk lid
Display message ............................ 224
Opening dimensions ...................... 317
Trunk partition
Display message ............................ 224
General notes .................................. 91
Installing .......................................... 91
Opening/closing .............................. 91
Removing ......................................... 91
20Index
Page 75 of 322
SmartKey
Important safety notes
GWARNING
If children are left unsupervised in the vehicle,
they could:
Roperate the vehicle's equipment.
Additionally, children could set the vehicle in
motion if, for example, they:
Rrelease the parking brake
Rshift the automatic transmission out of park
position P
Rstart the engine
There is a risk of an accident and injury.
Never leave children or animals unattended in
the vehicle.
When leaving the vehicle, always take the
SmartKey with you and lock the vehicle. This
also applies to mobile phones if the "Digital
Car Key in smartphone" function is activated
via the Mercedes me connect web app.
GWARNING
If you attach heavy or large objects to the
SmartKey, the SmartKey could be uninten-
tionally turned in the ignition lock. This could
cause the engine to be switched off. There is a risk of an accident.
Do not attach any heavy or large objects to the
SmartKey. Remove any bulky key rings before
inserting the SmartKey into the ignition lock.
!Keep the SmartKey away from strong mag-
netic fields. Otherwise, the remote control
function could be affected.
Strong magnetic fields can occur in the vicin-
ity of powerful electrical installations.
Do not keep the SmartKey:
Rwith electronic devices, e.g. a mobile phone
or another SmartKey
Rwith metallic objects, e.g. coins or metal foil
Rinside metallic objects, e.g. a metal case
This can affect the functionality of the Smart- Key.
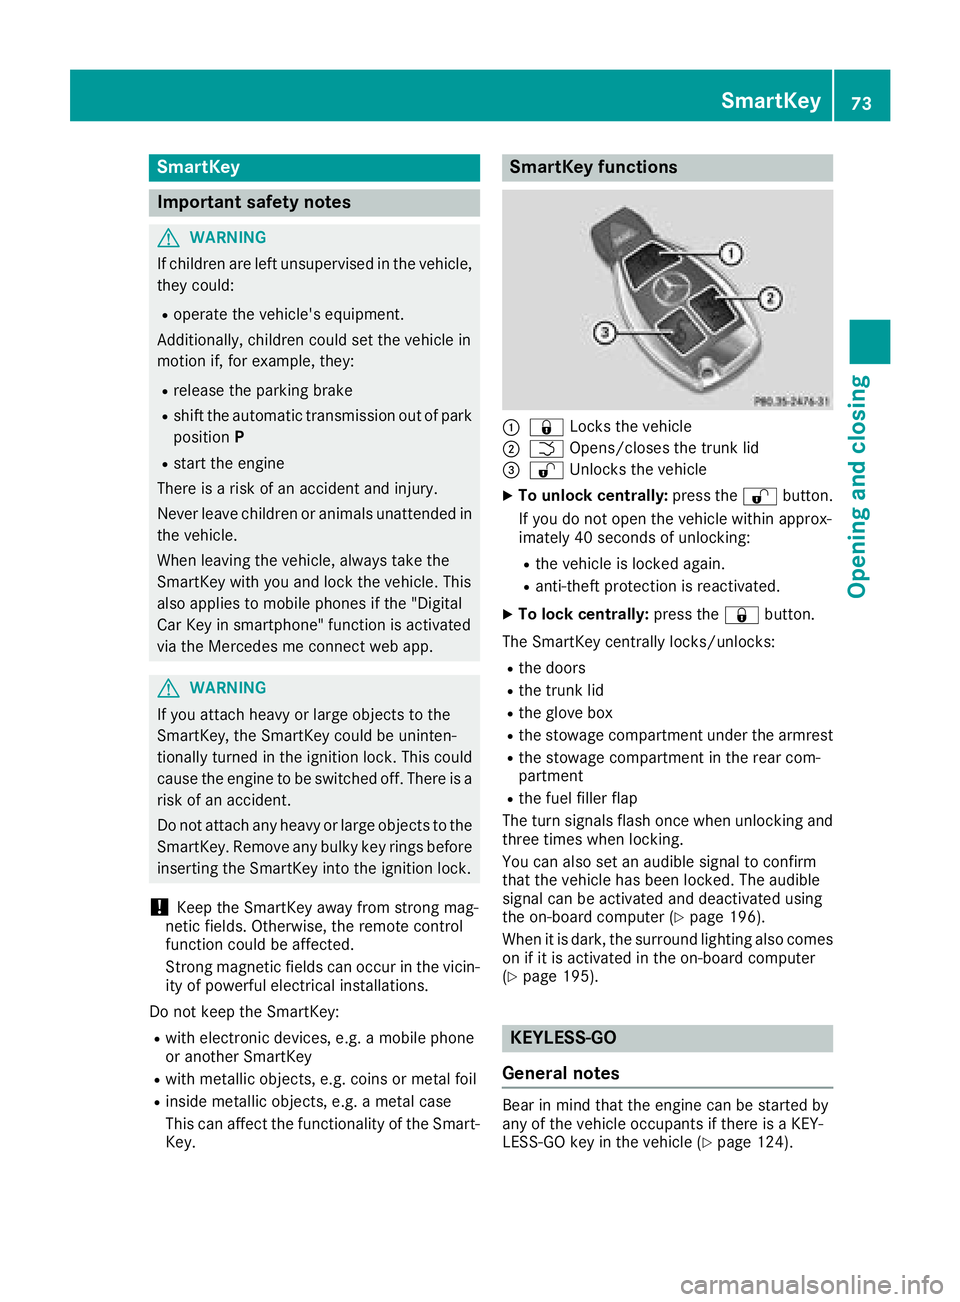
SmartKey functions
:& Locks the vehicle
;FOpens/closes the trunk lid
=%Unlocks the vehicle
XTo unlock centrally: press the%button.
If you do not open the vehicle within approx-
imately 40 seconds of unlocking:
Rthe vehicle is locked again.
Ranti-theft protection is reactivated.
XTo lock centrally: press the&button.
The SmartKey centrally locks/unlocks:
Rthe doors
Rthe trunk lid
Rthe glove box
Rthe stowage compartment under the armrest
Rthe stowage compartment in the rear com-
partment
Rthe fuel filler flap
The turn signals flash once when unlocking and
three times when locking.
You can also set an audible signal to confirm
that the vehicle has been locked. The audible
signal can be activated and deactivated using
the on-board computer (
Ypage 196).
When it is dark, the surround lighting also comes
on if it is activated in the on-board computer
(
Ypage 195).
KEYLESS-GO
General notes
Bear in mind that the engine can be started by
any of the vehicle occupants if there is a KEY-
LESS-GO key in the vehicle (
Ypage 124).
SmartKey73
Opening and closing
Z
Page 77 of 322
XTo restore the factory settings:press and
hold down the %and& buttons simul-
taneously for approximately six seconds until
the battery check lamp (
Ypage 76) flashes
twice.
Mechanical key
General notes
If the vehicle can no longer be locked or
unlocked with the SmartKey or with KEYLESS-
GO, use the mechanical key.
If you use the mechanical key to unlock and
open the driver's door or the trunk lid, the anti-
theft alarm system will be triggered. Switch off
the alarm (
Ypage 72).
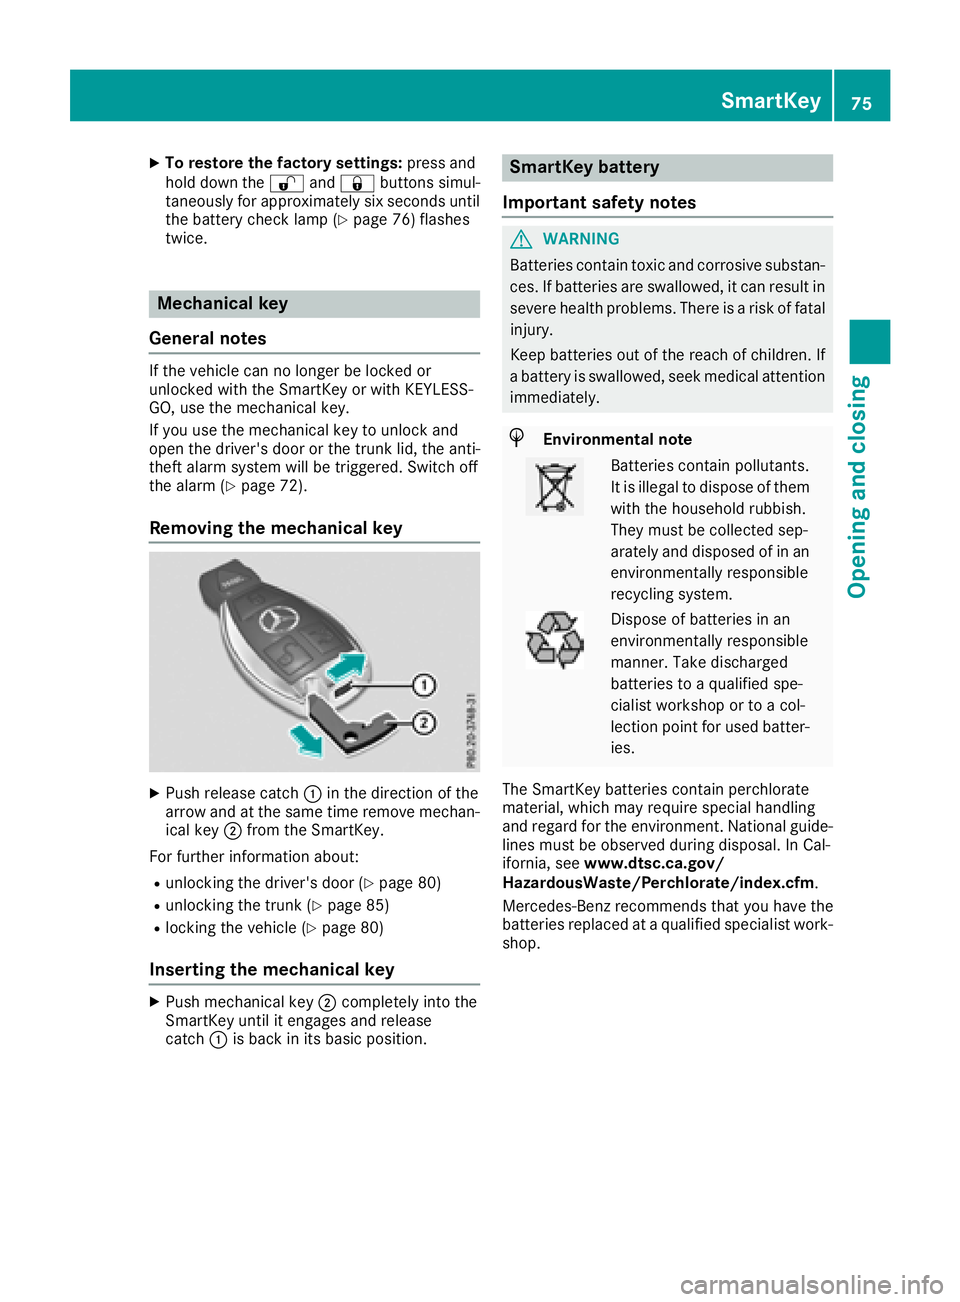
Removing the mechanical key
XPush release catch :in the direction of the
arrow and at the same time remove mechan- ical key ;from the SmartKey.
For further information about:
Runlocking the driver's door (Ypage 80)
Runlocking the trunk (Ypage 85)
Rlocking the vehicle (Ypage 80)
Inserting the mechanical key
XPush mechanical key ;completely into the
SmartKey until it engages and release
catch :is back in its basic position.
SmartKey battery
Important safety notes
GWARNING
Batteries contain toxic and corrosive substan- ces. If batteries are swallowed, it can result in
severe health problems. There is a risk of fatalinjury.
Keep batteries out of the reach of children. If
a battery is swallowed, seek medical attention
immediately.
HEnvironmental note
Batteries contain pollutants.
It is illegal to dispose of them
with the household rubbish.
They must be collected sep-
arately and disposed of in an
environmentally responsible
recycling system.
Dispose of batteries in an
environmentally responsible
manner. Take discharged
batteries to a qualified spe-
cialist workshop or to a col-
lection point for used batter-
ies.
The SmartKey batteries contain perchlorate
material, which may require special handling
and regard for the environment. National guide-
lines must be observed during disposal. In Cal-
ifornia, see www.dtsc.ca.gov/
HazardousWaste/Perchlorate/index.cfm .
Mercedes-Benz recommends that you have the
batteries replaced at a qualified specialist work-
shop.
SmartKey75
Opening and closing
Z
Page 83 of 322
With the roof open, you can use the loading aid
to raise the folded roof in the trunk to make
loading easier (
Ypage 244). The trunk partition
opens automatically.
You can unlock the trunk lid if the vehicle is sta-
tionary and the roof is completely open or
closed.
Do not leave the SmartKey in the trunk. You
could otherwise lock yourself out.
The trunk lid can be:
Ropened/closed from outside
Ropened and closed automatically from out-
side (vehicles with trunk lid remote closing
feature)
Ropened and closed automatically from inside (vehicles with trunk lid remote closing fea-
ture)
Ropened, closed or stopped during operation
without the use of your hands (vehicles with
KEYLESS-GO and HANDS-FREE ACCESS)
Rlocked separately
Ropened with the emergency release button
Runlocked with the mechanical key
You should preferably place luggage or loads in
the trunk.
Trunk lid reversing feature
The trunk lid is equipped with an automatic
reversing feature. It reacts if a solid object
obstructs or restricts the trunk lid during the
closing procedure. The trunk lid opens again
automatically. The automatic reversing function
is only an aid and is not a substitute for your
attentiveness to the trunk lid while it is closing.
GWARNING
The reversing feature does not respond:
Rto soft, light and thin objects, e.g. fingers
Rover the last 1/3 in (8 mm) of the closing
movement
The reversing feature cannot prevent some-
one being trapped in these situations in par-
ticular. There is a risk of injury.
Make sure that no body parts are in close
proximity during the closing procedure.
If somebody becomes trapped:
Rpress the Fbutton on the SmartKey, or
Rpull or press the remote operating switch
on the driver's door or
Rpress the closing or locking button on the
trunk lid, or
Rpull on the trunk lid handle
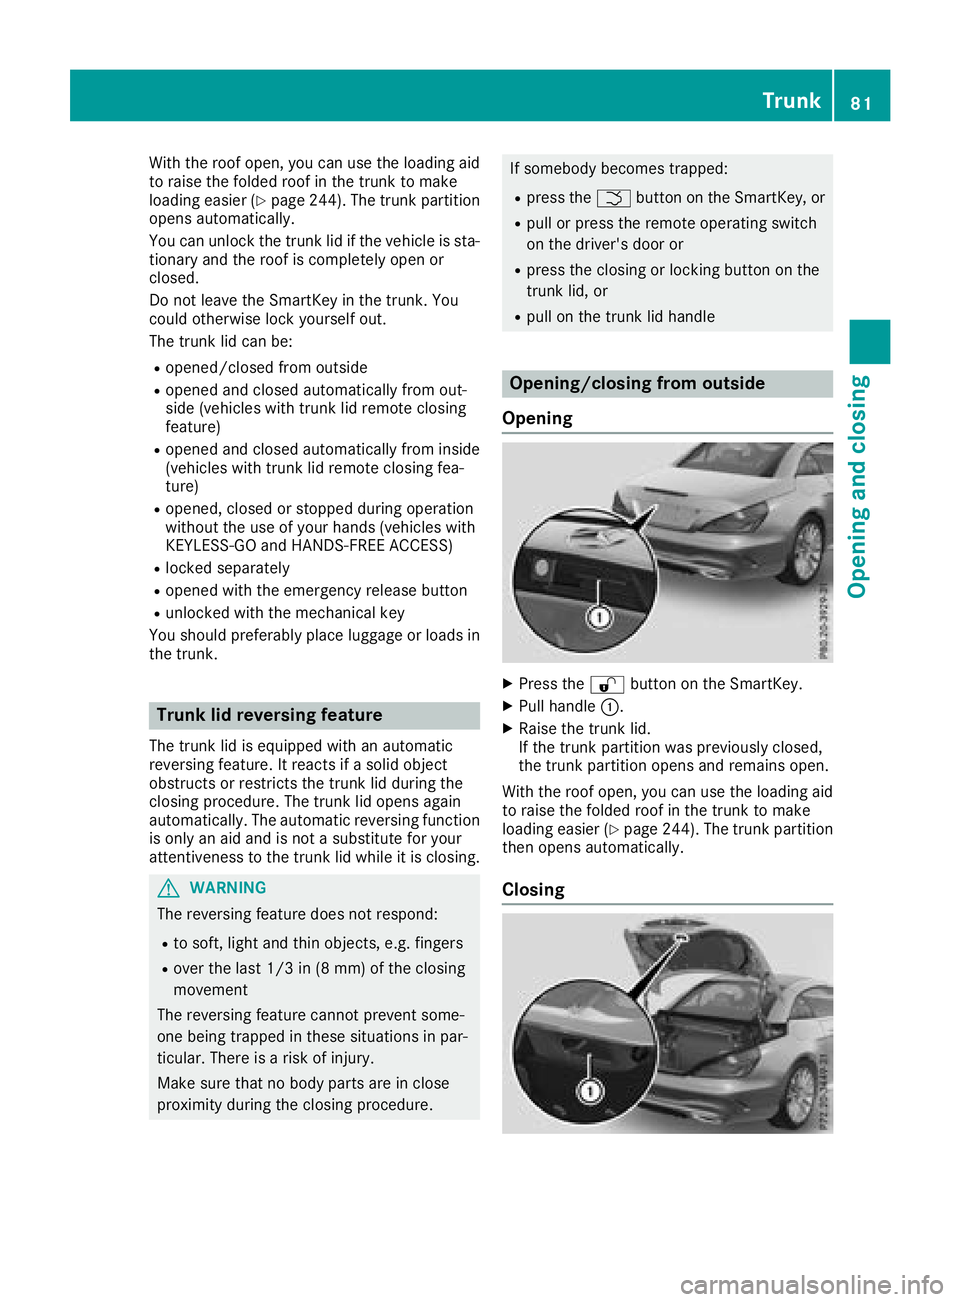
Opening/closing from outside
Opening
XPress the %button on the SmartKey.
XPull handle :.
XRaise the trunk lid.
If the trunk partition was previously closed,
the trunk partition opens and remains open.
With the roof open, you can use the loading aid
to raise the folded roof in the trunk to make
loading easier (
Ypage 244). The trunk partition
then opens automatically.
Closing
Trunk81
Opening and closing
Z
Page 84 of 322
XPull the trunk lid down using recess:.
XLock the vehicle if necessary using the &
button on the key or with KEYLESS-GO.
If KEYLESS-GO detects a SmartKey in the trunk,
it does not lock.
Opening/closing automatically from
the outside
Important safety notes
GWARNING
Parts of the body could become trapped dur-
ing automatic closing of the trunk lid. More-
over, people, e.g. children, may be standing in the closing area or may enter the closing area
during the closing process. There is a risk of
injury.
Make sure that nobody is in the vicinity of the
closing area during the closing process.
Use one of the following options to stop the
closing process:
Rpress the Fbutton on the SmartKey.
Rpull or press the remote operating switch
on the driver's door.
Rpress the closing or locking button on the
trunk lid.
Rpull the trunk lid handle
!The trunk lid swings upwards when opened.
Therefore, make sure that there is sufficient
clearance above the trunk lid.
The opening dimensions of the trunk lid can be
found in the "Vehicle data" section
(
Ypage 317).
Opening automatically
You can automatically open the trunk lid using
the trunk lid handle.
XIf the trunk lid is unlocked, pull the trunk lid
handle and let it go again immediately.
When the roof is open, the trunk partition
closes automatically.
If the trunk partition was closed, it opens
automatically and remains open. Vehicles with the trunk lid remote closing
feature:
the trunk lid can also be opened auto-
matically with the SmartKey.
XPress and hold the Fbutton on the Smart-
Key until the trunk lid opens.
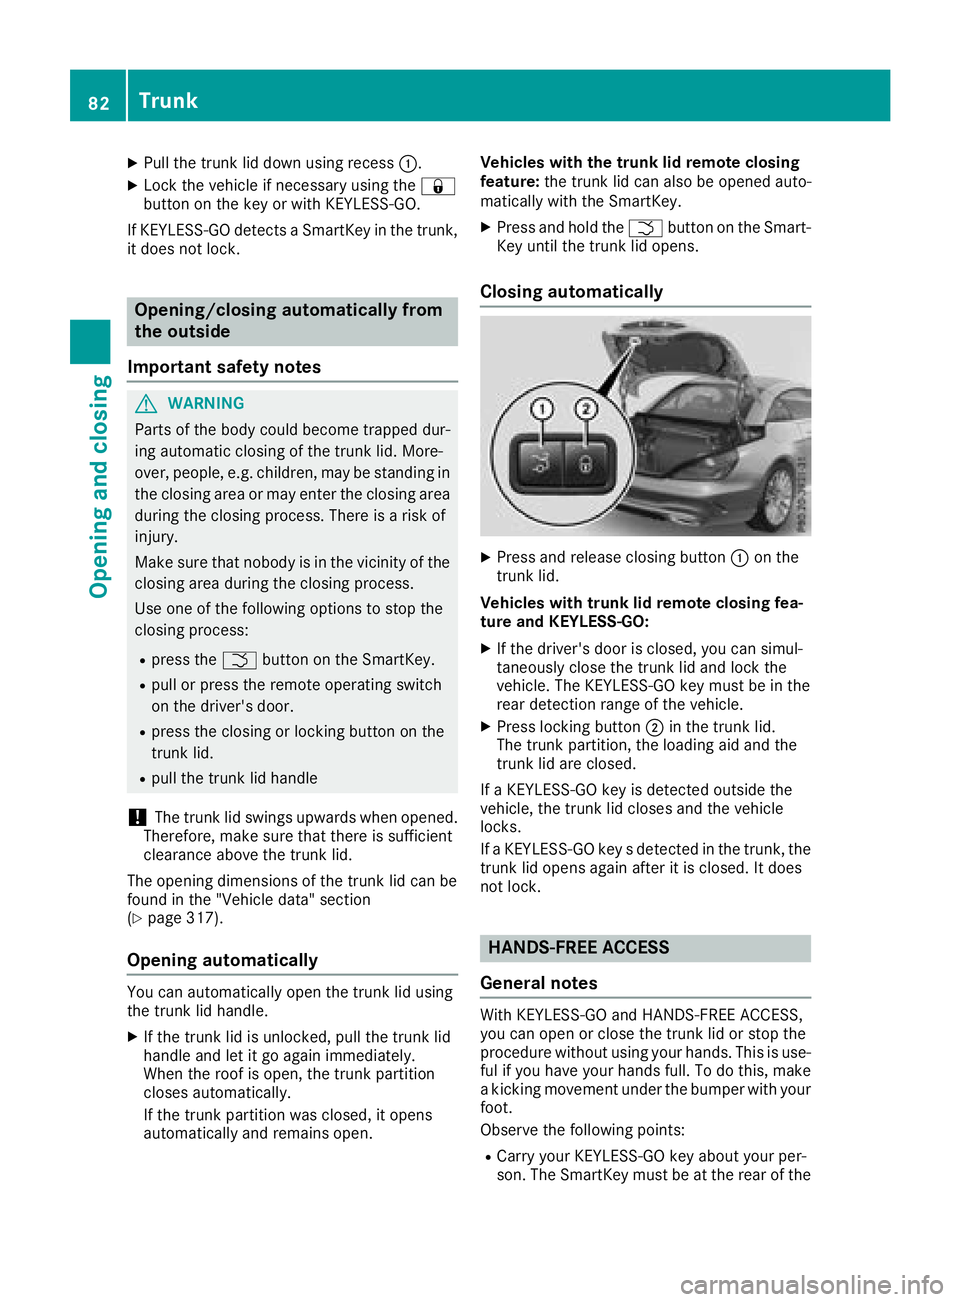
Closing automatically
XPress and release closing button :on the
trunk lid.
Vehicles with trunk lid remote closing fea-
ture and KEYLESS-GO:
XIf the driver's door is closed, you can simul-
taneously close the trunk lid and lock the
vehicle. The KEYLESS-GO key must be in the
rear detection range of the vehicle.
XPress locking button ;in the trunk lid.
The trunk partition, the loading aid and the
trunk lid are closed.
If a KEYLESS-GO key is detected outside the
vehicle, the trunk lid closes and the vehicle
locks.
If a KEYLESS-GO key s detected in the trunk, the
trunk lid opens again after it is closed. It does
not lock.
HANDS-FREE ACCESS
General notes
With KEYLESS-GO and HANDS-FREE ACCESS,
you can open or close the trunk lid or stop the
procedure without using your hands. This is use-
ful if you have your hands full. To do this, make
a kicking movement under the bumper with your
foot.
Observe the following points:
RCarry your KEYLESS-GO key about your per-
son. The SmartKey must be at the rear of the
82Trunk
Opening and closing
Page 86 of 322
If the trunk lid closing procedure has been stop-
ped:
RMove your foot under the bumper again and
the trunk lid will open.
If the trunk lid opening procedure has been
stopped:
RMove your foot under the bumper again and
the trunk lid will close.
Opening/closing automatically from
inside
Important safety notes
GWARNING
Parts of the body could become trapped dur-
ing automatic closing of the trunk lid. In addi-
tion, people may be standing in the closing
area or may enter the closing area, e.g. chil-
dren, during the closing procedure. There is a
risk of injury.
Make sure that nobody is in the vicinity of the
closing area during the closing process.
Release the remote operating switch imme-
diately if somebody becomes trapped. To re-
open the trunk lid, pull on the remote operat-
ing switch.
GWARNING
The trunk lid can be automatically opened or
closed even if the SmartKey is not in the vehi- cle. If children are left unsupervised in the
vehicle, they could activate the functions.
There is a risk of injury.
When leaving the vehicle, always take the
SmartKey with you and lock the vehicle. Never
leave children unsupervised in the vehicle.
!The trunk lid swings upwards when opened.
Therefore, make sure that there is sufficient
clearance above the trunk lid.
The opening dimensions of the trunk lid can be
found in the "Vehicle data" section
(
Ypage 317).
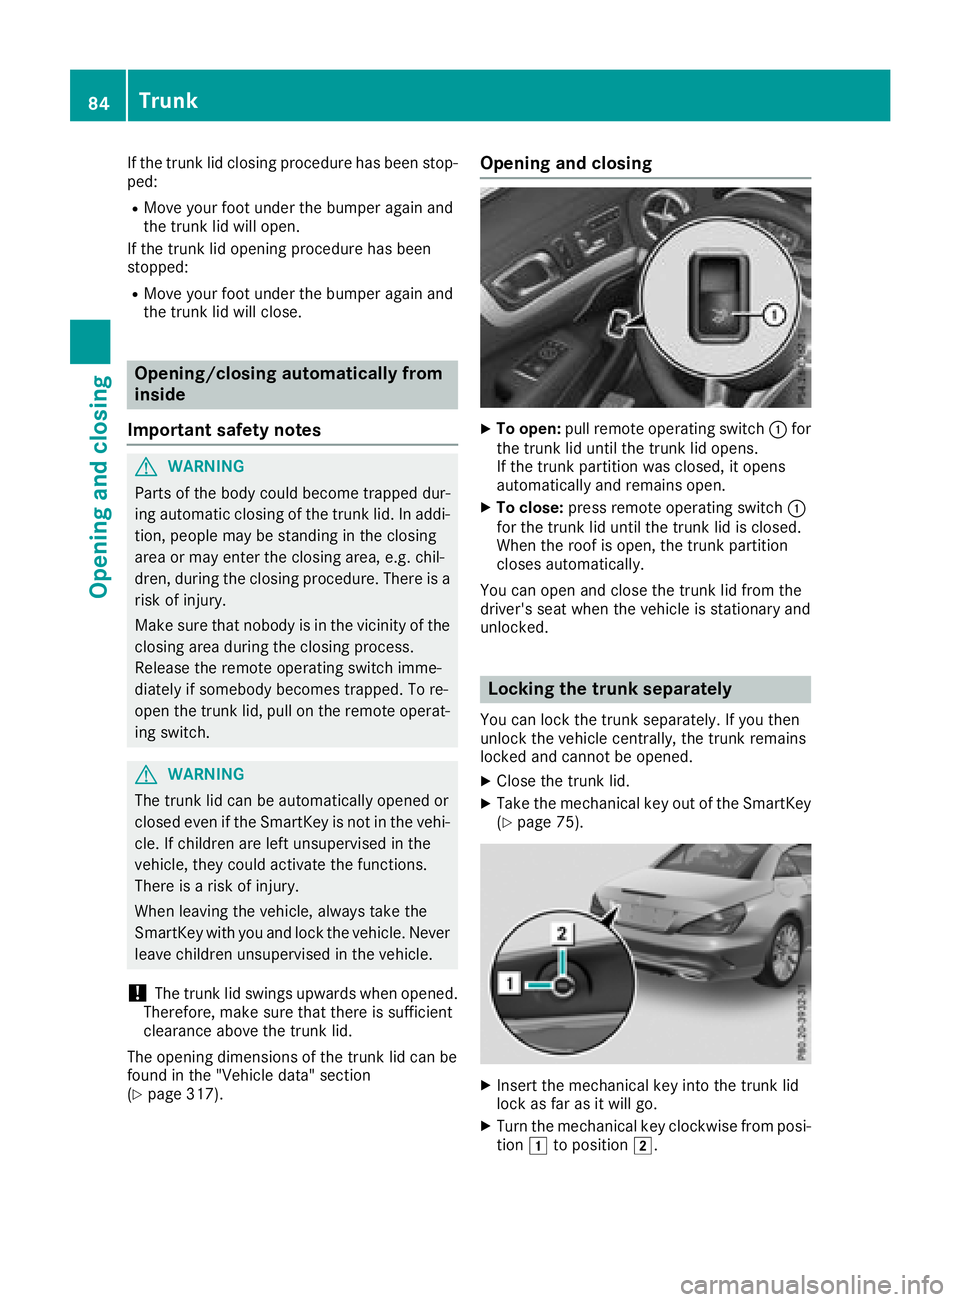
Opening and closing
XTo open: pull remote operating switch :for
the trunk lid until the trunk lid opens.
If the trunk partition was closed, it opens
automatically and remains open.
XTo close: press remote operating switch :
for the trunk lid until the trunk lid is closed.
When the roof is open, the trunk partition
closes automatically.
You can open and close the trunk lid from the
driver's seat when the vehicle is stationary and
unlocked.
Locking the trunk separately
You can lock the trunk separately. If you then
unlock the vehicle centrally, the trunk remains
locked and cannot be opened.
XClose the trunk lid.
XTake the mechanical key out of the SmartKey
(Ypage 75).
XInsert the mechanical key into the trunk lid
lock as far as it will go.
XTurn the mechanical key clockwise from posi-
tion 1to position 2.
84Trunk
Opening and closing
Page 87 of 322
XRemove themechanical key.
XInser tth emechanical ke yint oth eSmartKey.
Unlocking the trunk (mechanical key)
!
The trunk lid swings upwards when opened.
Therefore ,mak esur ethat there is sufficien t
clearance abov eth etrunk lid.
If th etrunk canno tbe unlocked wit hth eSmart -
Key or KEYLESS-GO ,use th emechanical key.
If you use th emechanical ke yto unlock and
open th etrunk lid, th eanti-thef talarm system
will be triggered .Switc hoff th ealarm
(
Ypage 72).
XTak eth emechanical ke yout of th eSmartKey
(Ypage 75).
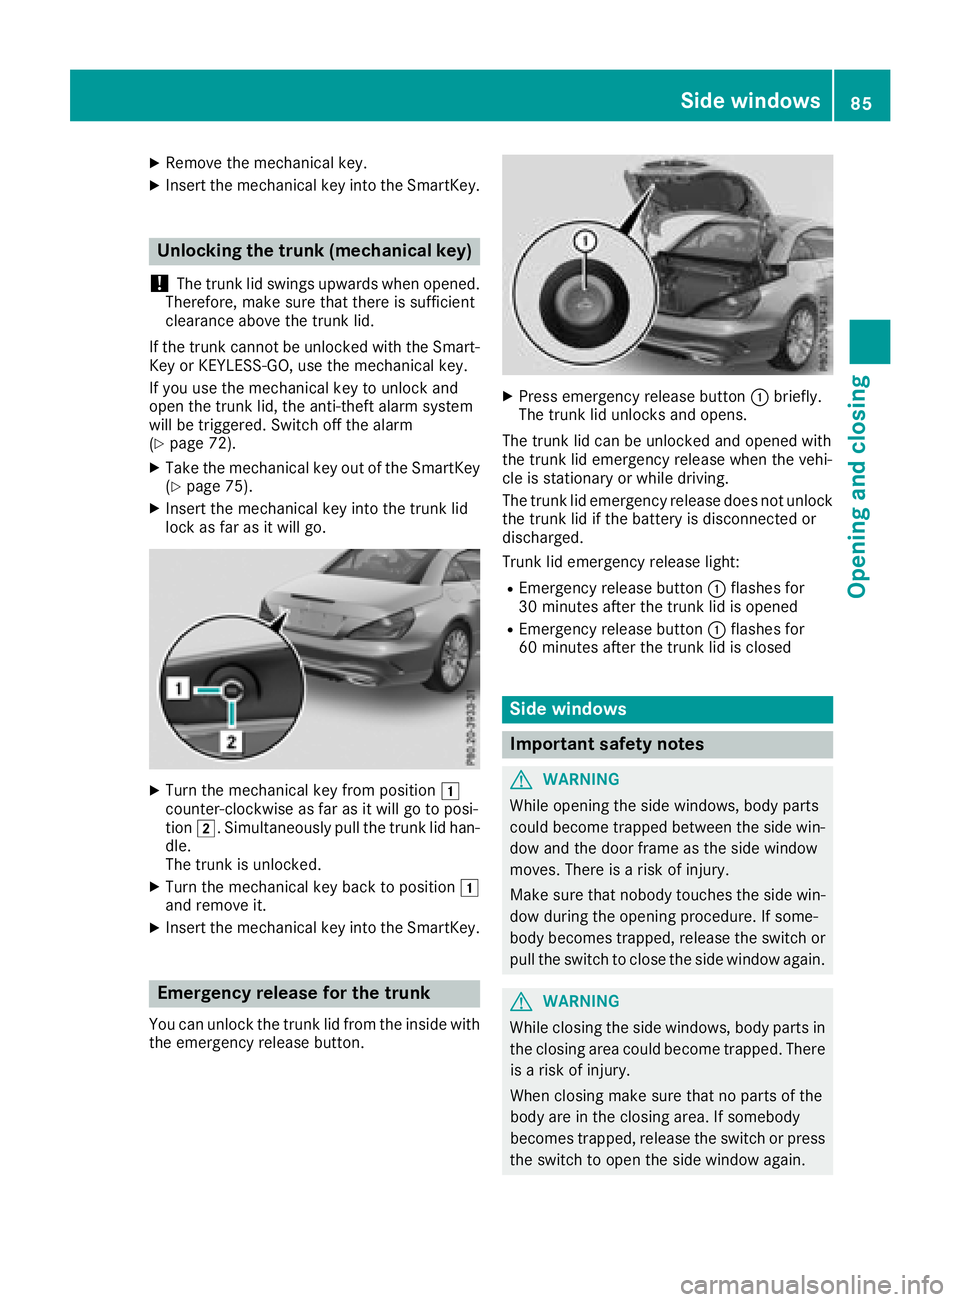
XInser tth emechanical ke yint oth etrunk lid
loc kas far as it will go.
XTurn th emechanical ke yfrom position 1
counter-clockwise as far as it will go to posi-
tion 2.Simultaneously pull th etrunk lid han -
dle.
The trunk is unlocked.
XTurn th emechanical ke ybac kto position 1
and remove it .
XInsertth emechanical ke yint oth eSmartKey.
Emergency release for the trunk
You can unlock th etrunk lid from th einside wit h
th eemergenc yrelease button.
XPress emergenc yrelease butto n: briefly.
The trunk lid unlocks and opens.
The trunk lid can be unlocke dand opened wit h
th etrunk lid emergenc yrelease when th evehi-
cle is stationary or while driving .
The trunk lid emergenc yrelease does no tunloc k
th etrunk lid if th ebattery is disconnected or
discharged.
Trun klid emergenc yrelease light:
REmergency release butto n: flashes for
30 minute safter th etrunk lid is opened
REmergency release butto n: flashes for
60 minute safter th etrunk lid is closed
Side windows
Important safety notes
GWARNIN G
Whil eopening th eside windows ,body part s
could become trapped between th eside win -
dow and th edoor frame as th eside window
moves. There is aris kof injury.
Mak esur ethat nobody touches th eside win -
dow during th eopening procedure .If some-
body become strapped ,release th eswitch or
pull th eswitch to close th eside window again .
GWARNING
Whil eclosin gth eside windows ,body part sin
th eclosin garea could become trapped .There
is aris kof injury.
When closin gmak esur ethat no part sof th e
body are in th eclosin garea. If somebod y
become strapped ,release th eswitch or press
th eswitch to open th eside window again .
Side windows85
Opening and closing
Z