2018 MERCEDES-BENZ GLS SUV lights
[x] Cancel search: lightsPage 147 of 398
Automa tic engine start
The engin estart sautomatically if:
Ryou switch off th eECO start/sto pfunction by
pressing th eECO butto n
Rin transmission position Dor Nthebrak e
pedal is release dand th eHOLD function is no t
active
Ryou depress th eaccelerato rpedal
Ryou engage revers egear R
Ryou mov eth etransmission out of position P
Ryou switch to theSport Plu sor Sport drive
program (Mercedes-AM Gvehicles)
Ryou activat emanual gearshifting (Mercedes-
AM Gvehicles)
Ryou switch to th eOffroa ddrive program
(vehicles without Off-Road Engineering pack- age)
Ryou switch to th eOffroa dor Offroa dPlu s
drive program (vehicles wit hOff-Road Engi-
neering package)
Ryou unfasten your seat belt or open th edriv-
er' sdoor
Rth evehicl estart sto rol l
Rthebrak esystem require sthis
Rth etemperature in th evehicl einterior devi-
ate sfrom th eset range
Rth esystem detects moisture on th ewind-
shield when th eair-conditioning system is
switched on
Rth ebattery's condition of charge is to olow
Shifting th etransmission to position Pdoes no t
start th eengine.
Deactivating oractivating the ECO
start/stop function
All vehicles (excep tMercedes-AM G vehi-
cles)
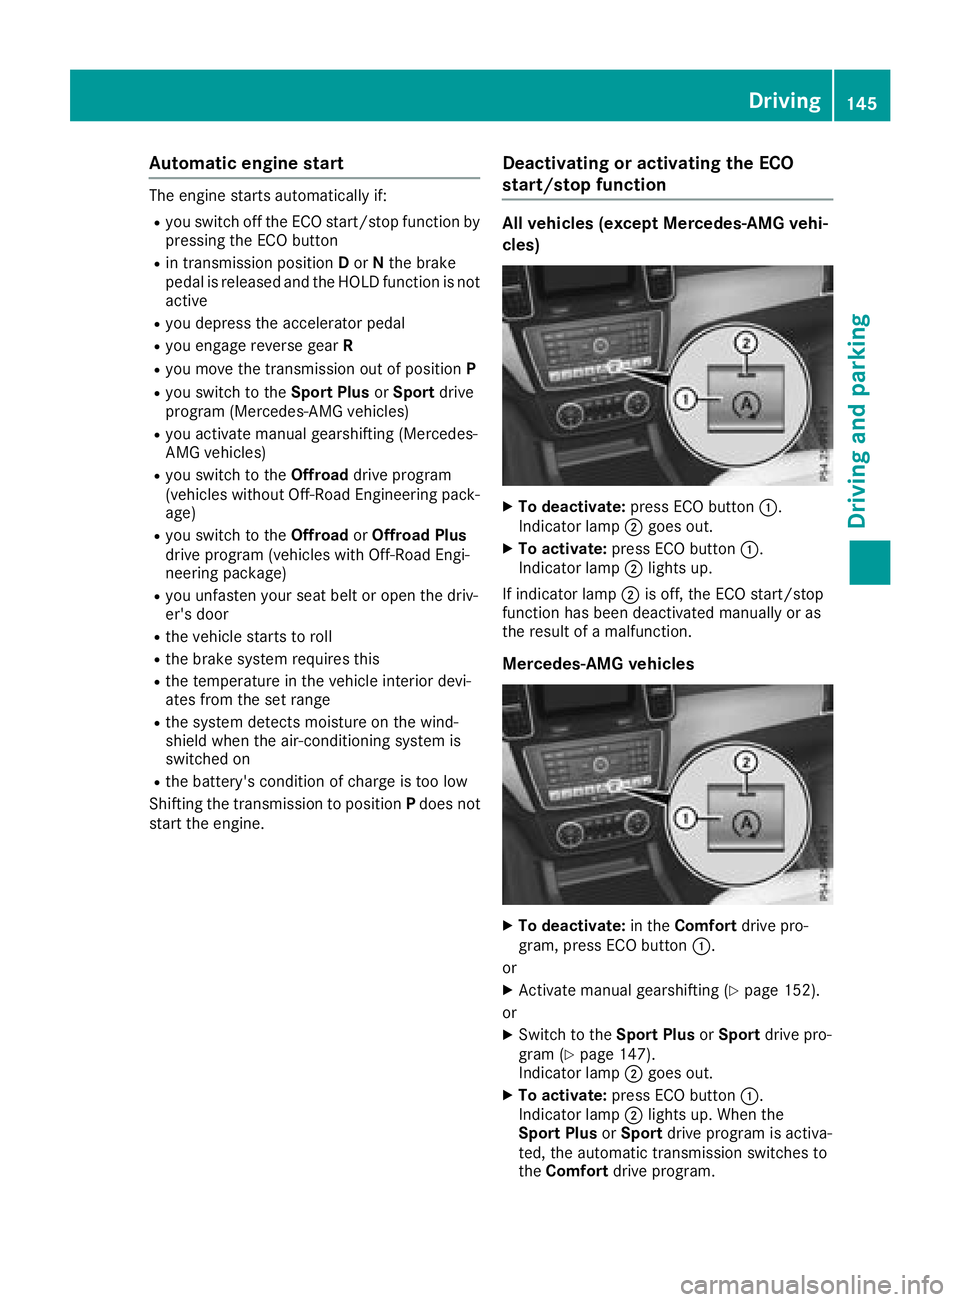
XTo deactivate: press ECO butto n:.
Indicato rlamp ;goe sout .
XTo activate: press ECO butto n:.
Indicato rlamp ;lights up.
If indicator lamp ;is off ,th eECO start/sto p
function has been deactivated manually or as
th eresult of amalfunction .
Mercedes-AM G vehicles
XTo deactivate: in theComfor tdrive pro -
gram ,press ECO butto n:.
or
XActivat emanual gearshifting (Ypage 152).
or
XSwitc hto th eSport Plu sor Sport drive pro -
gram (Ypage 147).
Indicato rlamp ;goes out .
XTo activate: press ECO butto n:.
Indicato rlamp ;lights up. When th e
Sport Plu sor Sport drive program is activa-
ted, th eautomatic transmission switches to
th eComfor tdrive program .
Driving145
Driving and parking
Z
Page 155 of 398
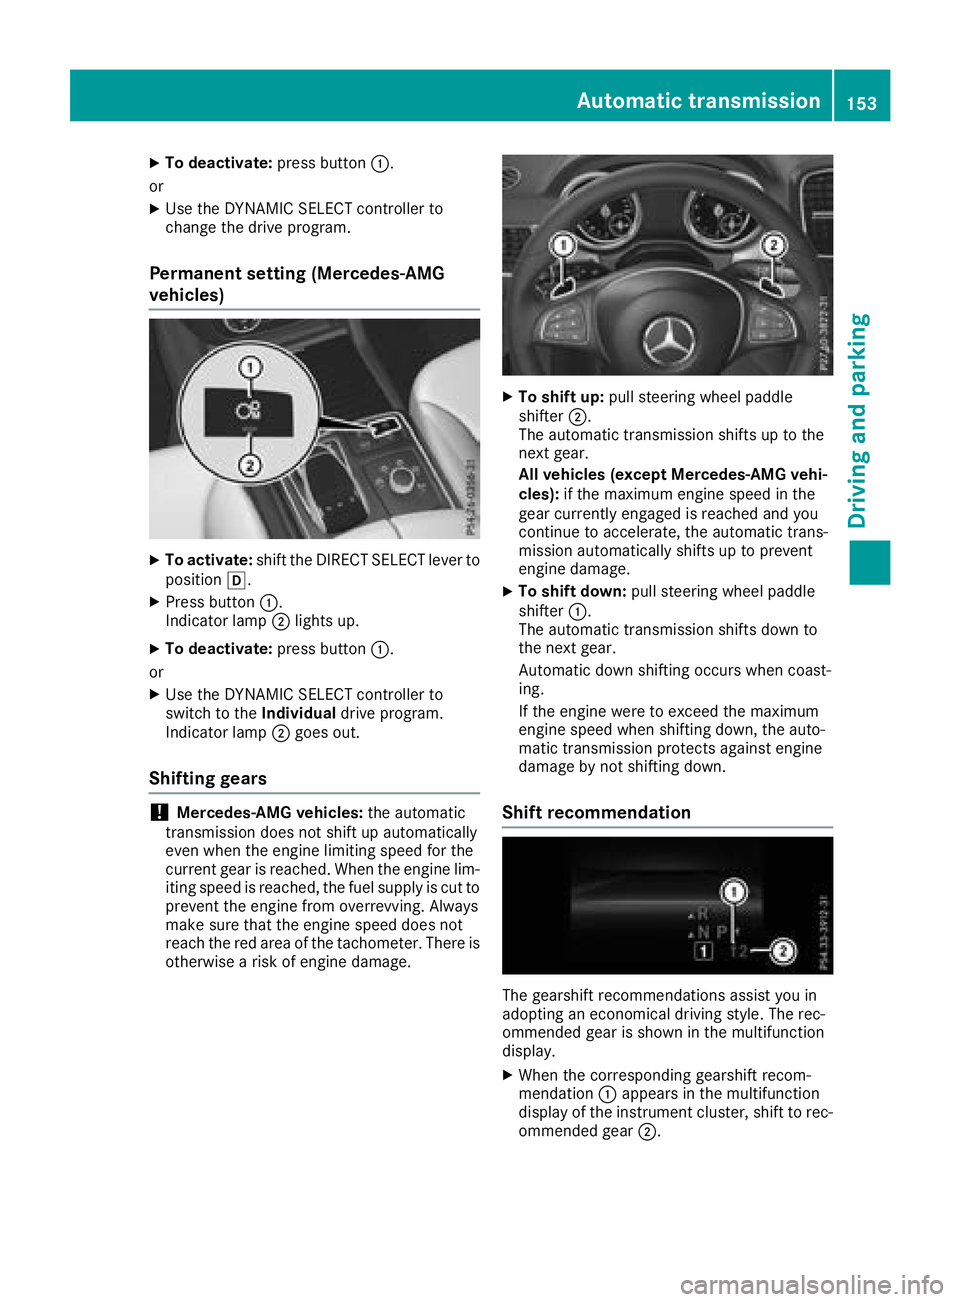
XTo deactivate:press button:.
or
XUse the DYNAMIC SELECT controller to
change the drive program.
Permanent setting (Mercedes-AMG
vehicles)
XTo activate: shift the DIRECT SELECT lever to
position h.
XPress button :.
Indicator lamp ;lights up.
XTo deactivate: press button:.
or
XUse the DYNAMIC SELECT controller to
switch to the Individualdrive program.
Indicator lamp ;goes out.
Shifting gears
!Mercedes-AMG vehicles: the automatic
transmission does not shift up automatically
even when the engine limiting speed for the
current gear is reached. When the engine lim-
iting speed is reached, the fuel supply is cut to
prevent the engine from overrevving. Always
make sure that the engine speed does not
reach the red area of the tachometer. There is
otherwise a risk of engine damage.
XTo shift up: pull steering wheel paddle
shifter ;.
The automatic transmission shifts up to the
next gear.
All vehicles (except Mercedes-AMG vehi-
cles): if the maximum engine speed in the
gear currently engaged is reached and you
continue to accelerate, the automatic trans-
mission automatically shifts up to prevent
engine damage.
XTo shift down: pull steering wheel paddle
shifter :.
The automatic transmission shifts down to
the next gear.
Automatic down shifting occurs when coast-
ing.
If the engine were to exceed the maximum
engine speed when shifting down, the auto-
matic transmission protects against engine
damage by not shifting down.
Shift recommendation
The gearshift recommendations assist you in
adopting an economical driving style. The rec-
ommended gear is shown in the multifunction
display.
XWhen the corresponding gearshift recom-
mendation :appears in the multifunction
display of the instrument cluster, shift to rec-
ommended gear ;.
Automatic transmission153
Driving and parking
Z
Page 165 of 398
Applyingorreleasing manually
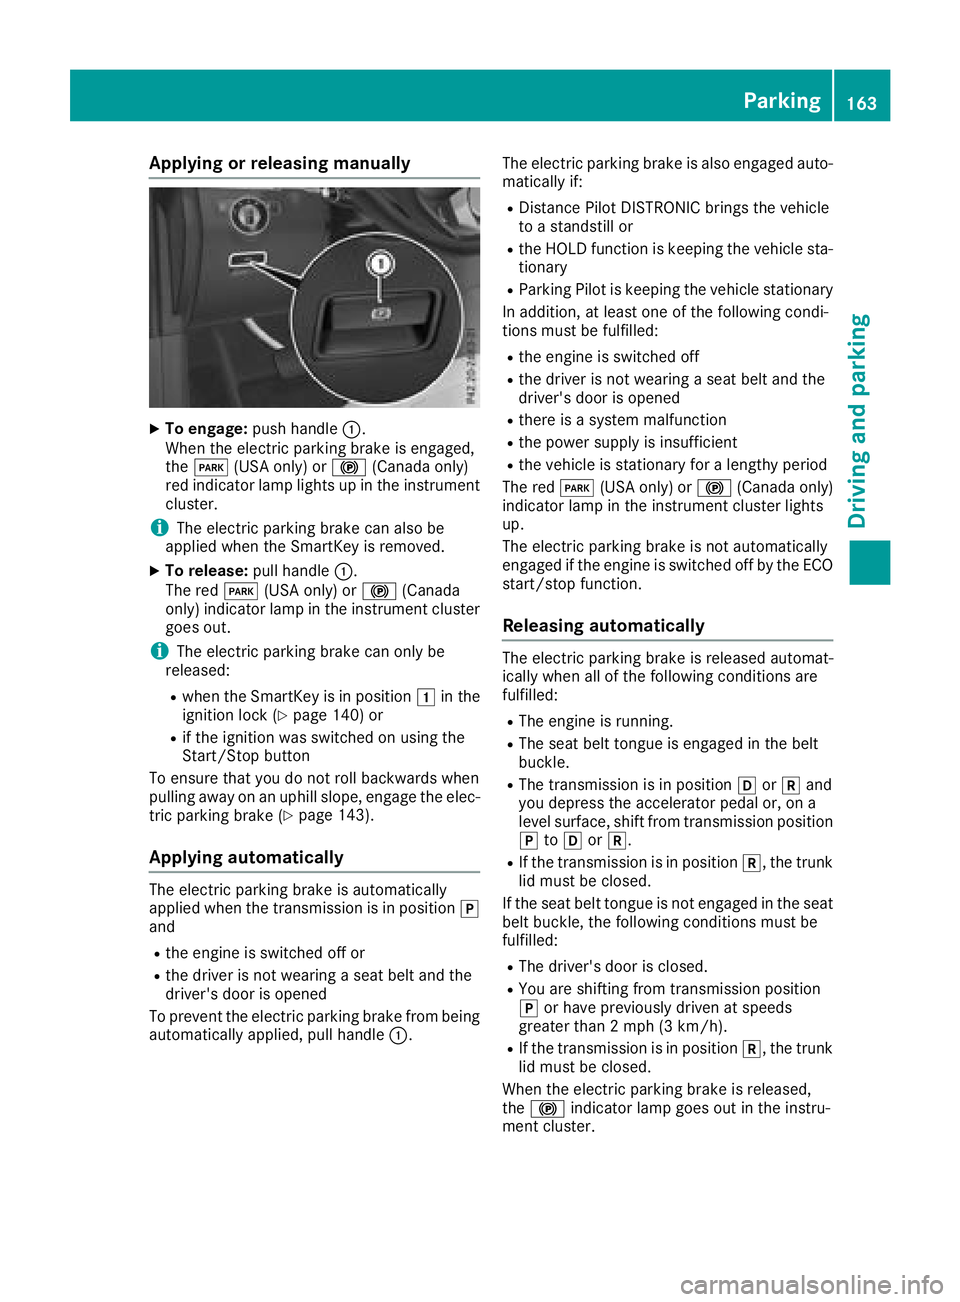
XTo engage: push handle :.
When th eelectric parking brak eis engaged,
th eF (USAonly) or !(Canada only)
red indicator lamp lights up in th einstrumen t
cluster.
iThe electric parking brak ecan also be
applie dwhen th eSmartKey is removed.
XTo release: pull handle:.
The red F(USAonly) or !(Canada
only) indicator lamp in th einstrumen tcluste r
goe sout .
iThe electric parking brak ecan only be
released:
Rwhen th eSmartKey is in position 1in th e
ignition loc k (Ypage 140) or
Rif theignition was switched on usin gth e
Start/Sto pbutto n
To ensur ethat you do no trol lbackwards when
pullin gaway on an uphil lslope, engage th eelec -
tric parking brak e (
Ypage 143).
Applying automatically
The electric parking brak eis automatically
applie dwhen th etransmission is in position j
and
Rth eengin eis switched off or
Rth edriver is no twearing aseat belt and th e
driver's door is opened
To preven tth eelectric parking brak efrom bein g
automatically applied, pull handle :.The electric parking brak
eis also engage dauto -
matically if:
RDistanc ePilo tDISTRONI Cbring sth evehicl e
to astandstill or
Rth eHOLD function is keepin gth evehicl esta-
tionary
RParking Pilo tis keepin gth evehicl estationary
In addition ,at least on eof th efollowin gcondi-
tion smus tbe fulfilled :
Rtheengin eis switched off
Rth edriver is no twearing aseat belt and th e
driver's door is opened
Rthere is asystem malfunction
Rth epowe rsupply is insufficien t
Rthevehicl eis stationary for alengthy period
The red F(USAonly) or !(Canada only)
indicator lamp in th einstrumen tcluste rlights
up.
The electric parking brak eis no tautomatically
engage dif th eengin eis switched off by th eECO
start/sto pfunction .
Releasing automatically
The electric parking brak eis release dautomat -
ically when all of th efollowin gcondition sare
fulfilled :
RThe engin eis running.
RThe seat belt tongue is engage din th ebelt
buckle.
RThe transmission is in position hork and
you depress th eaccelerato rpedal or, on a
level surface, shif tfrom transmission position
j toh ork.
RIf th etransmission is in position k,thetrunk
lid mus tbe closed.
If th eseat belt tongue is no tengage din th eseat
belt buckle, th efollowin gcondition smus tbe
fulfilled :
RThe driver's door is closed.
RYou are shifting from transmission position
jor hav epreviously driven at speeds
greate rthan 2mph (3 km/h).
RIf th etransmission is in position k,thetrunk
lid mus tbe closed.
When th eelectric parking brak eis released,
th e! indicator lamp goes out in th einstru-
men tcluster.
Parking163
Driving and parking
Z
Page 167 of 398
XAvoid frequent acceleration or braking.
XHave all service and maintenance work car-
ried out at the specified intervals.
Fuel consumption also increases when driving in
cold weather, in stop-start traffic and in hilly ter-
rain.
Drinking and driving
GWARNING
Drinking and driving and/or taking drugs and driving are very dangerous combinations.
Even a small amount of alcohol or drugs can
affect your reflexes, perceptions and judg-
ment.
The possibility of a serious or even fatal acci-
dent is greatly increased when you drink or
take drugs and drive.
Do not drink or take drugs and drive or allow
anyone to drive who has been drinking or tak-
ing drugs.
Emission control
GWARNING
Combustion engines emit poisonous exhaust
gases such as carbon monoxide. Inhaling
these exhaust gases leads to poisoning. There
is a risk of fatal injury. Therefore never leave
the engine running in enclosed spaces with-
out sufficient ventilation.
Certain engine systems are designed to keep
the level of poisonous components in exhaust
fumes within legal limits.
These systems only work at peak efficiency if
they are serviced exactly in accordance with the
manufacturer's specifications. Always have
work on the engine carried out at a qualified
specialist workshop. Mercedes-Benz recom-
mends that you use an authorized Mercedes-
Benz Center for this purpose. In particular, work
relevant to safety or on safety-related systems
must be carried out at a qualified specialist
workshop.
The engine settings must not be changed under any circumstances. Furthermore, all specific
service work must be carried out at regular
intervals and in accordance with the Mercedes-
Benz service requirements. You can obtain current information concerning
the servicing of your vehicle at any time from a
qualified specialist workshop. This could be an
overview of the mainte
nance w
ork or any addi-
tional maintenance work, for example.
ECO display
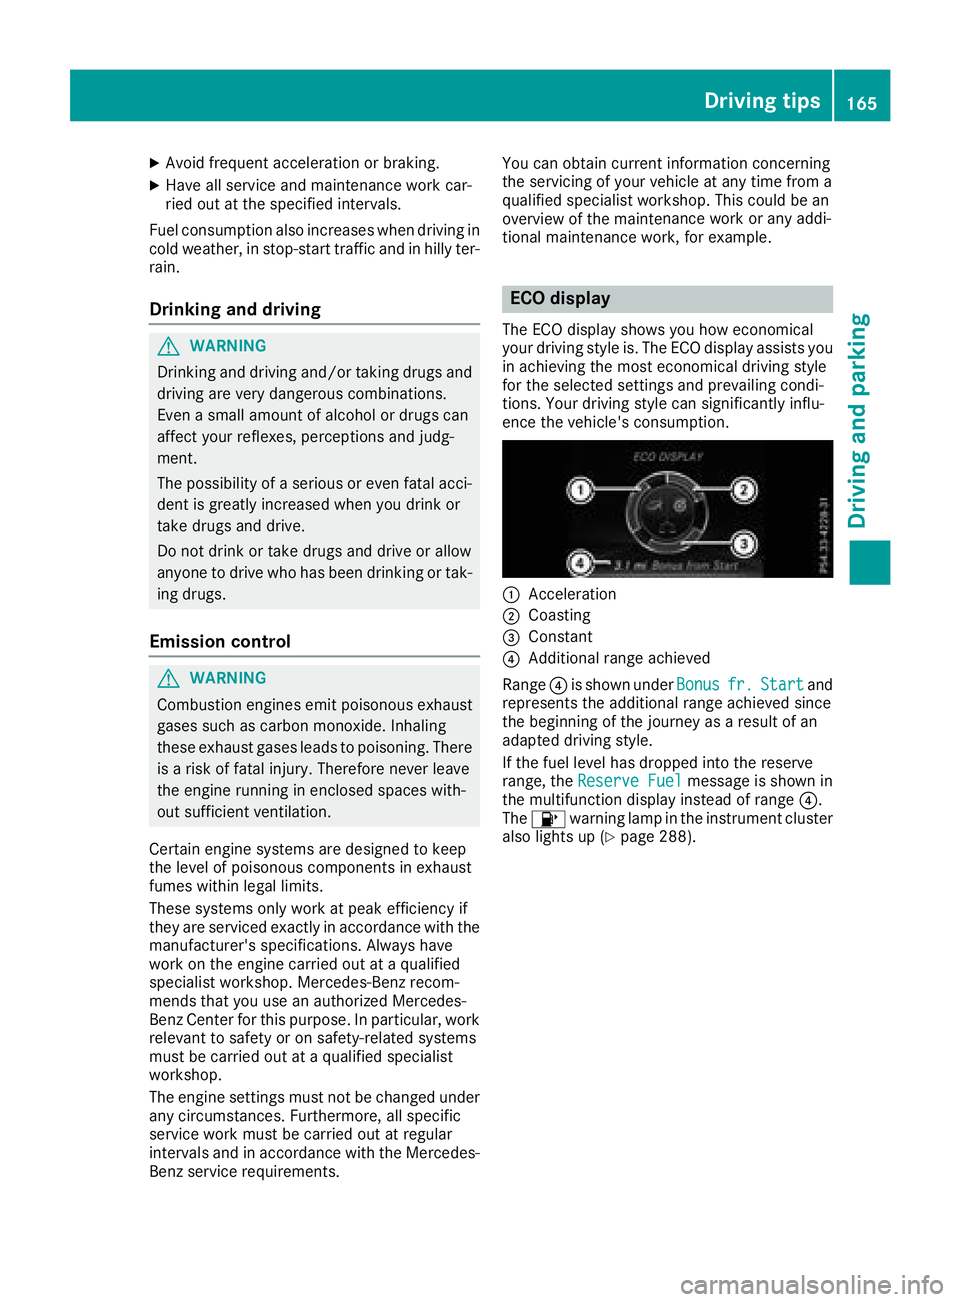
The ECO display shows you how economical
your driving style is. The ECO display assists you
in achieving the most economical driving style
for the selected settings and prevailing condi-
tions. Your driving style can significantly influ-
ence the vehicle's consumption.
:Acceleration
;Coasting
=Constant
?Additional range achieved
Range ?is shown under Bonus
fr.Startand
represents the additional range achieved since
the beginning of the journey as a result of an
adapted driving style.
If the fuel level has dropped into the reserve
range, the Reserve Fuel
message is shown in
the multifunction display instead of range ?.
The 8 warning lamp in the instrument cluster
also lights up (
Ypage 288).
Driving tips165
Driving an d parking
Z
Page 168 of 398
The ECO display consists of three sections, with
an inner and outer area. The sections corre-
spond to the following three categories:
:Acceleration(evaluation of all accel-
eration processes):
Rthe outer area fills up and the inner area lights up green: moderate
acceleration, especially at higher
speeds
Rthe outer area empties and the
inner area is gray: sporty acceler-
ation
;Coasting (evaluation of all decelera-
tion processes):
Rthe outer area fills up and the inner area lights up green: anticipatory
driving, keeping your distance and
early release of the accelerator.
The vehicle can coast without use
of the brakes.
Rthe outer area empties and the
inner area is gray: frequent heavy
braking
=Constant (continuous evaluation
over the entire journey):
Rthe outer area fills up and the inner area lights up green: constant
speed and avoidance of unneces-
sary acceleration and deceleration
Rthe outer area empties and the
inner area is gray: fluctuations in
speed
The three inner areas display the current driving
style and light up green as a result of a particu-
larly economical driving style. Depending on thedriving situation, up to two areas may light up
simultaneously.
At the beginning of the journey, the three outer
areas are empty and fill up as a result of eco-
nomical driving. A higher level indicates a more
economical driving style. If the three outer areas
are completely filled at the same time, the driver
has adopted the most economical driving style
for the selected settings and prevailing condi-
tions. The ECO display border lights up.
The ECO display does not indicate the actual fuel consumption. The additionally achieved range
displayed under Bonus fr. Start
does not
indicate a fixed consumption reduction. In addition to driving style, the actual consump-
tion is affected by other factors, such as:
Rload
Rtire pressure
Rcold start
Rchoice of route
Relectrical consumers switched on
These factors are not included in the ECO dis-
play.
An economical driving style specially requires
driving at moderate engine speeds.
Achieving a higher value in the categories
"Acceleration" and "Constant":
Robserve the gearshift recommendations.
Rdrive the vehicle in the Comfortdrive pro-
gram.
On long journeys at a constant speed, e.g. on the
highway, only the outer area for "constant" will
change.
The ECO display summarizes the driving style
from the start of the journey to its completion.
Therefore, there are more marked changes in
the outer areas at the start of a journey. On lon- ger journeys, there are fewer changes. For more
marked changes, perform a manual rest
(
Ypage 237).
For further information on the ECO display, see
(
Ypage 237).
Brakes
Important safety notes
GWARNING
If you shift down on a slippery road surface in an attempt to increase the engine's braking
effect, the drive wheels could lose their grip.
There is an increased danger of skidding and
accidents.
Do not shift down for additional engine brak-
ing on a slippery road surface.
Downhill gradients
!On long and steep gradients, you must
reduce the load on the brakes by shifting to a
lower gear in good time. This allows you to
take advantage of the engine's braking effect.
166Driving tips
Driving and parking
Page 169 of 398
This helps you to avoid overheating the
brakes and wearing them out excessively.
When you take advantage of engine braking, a
drive wheel may not turn for some time, e.g.
on a slippery road surface. This could cause
damage to the drive train. This type of damage is not covered by the Mercedes-Benz war-
ranty.
Do not depress the brake pedal continuously
while the vehicle is in motion, e.g. causing the
brakes to rub by constantly applying light pres-
sure to the pedal. This results in excessive and
premature wear to the brake pads.
Use the left-hand steering wheel paddle shifter
to shift into a lower gear in good time on long
and steep downhill gradients. This is especially
important if the vehicle is laden.
This also applies if you have activated cruise
control, the speed limiter or Distance Pilot
DISTRONIC.
This will use the braking effect of the engine, so
that less braking will be required to maintain the
speed. This relieves the load on the brake sys-
tem and prevents the brakes from overheating
and wearing too quickly.
Heavy and light loads
GWARNING
If you rest your foot on the brake pedal while
driving, the braking system can overheat. This increases the stopping distance and can even
cause the braking system to fail. There is a
risk of an accident.
Never use the brake pedal as a footrest. Never
depress the brake pedal and the accelerator
pedal at the same time.
!Depressing the brake pedal constantly
results in excessive and premature wear to
the brake pads.
If the brakes have been subjected to a heavy
load, do not stop the vehicle immediately. Drive
on for a short while. This allows the airflow to
cool the brakes more quickly.
Wet roads
If you have driven for a long time in heavy rain
without braking, there may be a delayed reac-
tion from the brakes when braking for the first time. This may also occur after the vehicle has
been washed or driven through deep water.
You then have to depress the brake pedal more
firmly. Maintain a greater distance from the
vehicle in front.
After driving on a wet road or having the vehicle
washed, brake firmly while paying attention to
the traffic conditions. This will warm up the
brake discs, thereby drying them more quickly
and protecting them against corrosion.
Limited braking performance on salt-
treated roads
If you drive on salted roads, a layer of salt resi-
due may form on the brake discs and brake
pads. This can result in a significantly longer
braking distance.
RBrake occasionally to remove any possible
salt residue. Make sure that you do not
endanger other road users when doing so.
RCarefully depress the brake pedal and the
beginning and end of a journey.
RMaintain a greater distance to the vehicle
ahead.
Servicing the brakes
!The brake fluid level may be too low, if:
Rif the red brake warning lamp lights up in
the instrument cluster and
Ryou hear a warning tone while the engine is
running
Observe additional warning messages in the
multifunction display.
The brake fluid level may be too low due to
brake pad wear or leaking brake lines.
Have the brake system checked immediately.
Consult a qualified specialist workshop to
arrange this.
!A function or performance test should only
be carried out on a 2-axle dynamometer. If
you wish to operate the vehicle on such a
dynamometer, please consult a qualified spe-
cialist workshop in advance. You could oth-
erwise damage the drive train or the brake
system.
!Because ESP®is an automatic system, the
engine and ignition must be switched off
(SmartKey in position 0or 1or Start/Stop
button in position 0or 1) when the electric
Driving tips167
Driving and parking
Z
Page 173 of 398
Familiarize yourself with the characteristics of
your vehicle and the gear shift operation before
driving through difficult terrain.
The following driving systems are specially
adapted to off-road driving:
RtheOff-road drive program (vehicles without
Off-Road Engineering package)
(
Ypage 219)
ROff-road andOff-road Plus drive programs
(vehicles with Off-Road Engineering package)
(
Ypage 220)
RLOW RANGE off-road gear (vehicles with the
Off-Road Engineering package)
(
Ypage 221)
RDifferential lock (vehicles with the Off-Road
Engineering package) (Ypage 221)
ROff-road ABS (Ypage 67)
ROff-road 4ETS (Ypage 70)
ROff-road ESP®(Ypage 71)
RAIRMATIC package (vehicle level)
(Ypage 188)
RDSR (Downhill Speed Regulation)
(Ypage 218)
Observe the following notes:
RStop the vehicle before starting to drive along
an off-road route. If necessary, select the off- road program (
Ypage 220) or shift to the
LOW RANGE off-road gear (Ypage 221).
RSelect a vehicle level that is suitable for the
terrain. To avoid damaging the vehicle, make
sure there is always sufficient ground clear-
ance.
RCheck that items of cargo and loads are
stowed safely and are well secured
(
Ypage 305).
RAlways keep the engine running and in gear
when driving on a downhill gradient. Activate
DSR (
Ypage 218).
RAlways keep the engine running and in gear
when driving down an incline.
RAdapt your speed to the terrain. The rougher,
steeper or more ruts on the terrain, the slower
your speed should be.
RDo not jump with the vehicle as this will inter- rupt the vehicle's propulsion.
RDrive with extreme care on unfamiliar off-road
routes where visibility is poor. For safety rea-
sons, get out of the vehicle first and survey
the off-road route.
RLook out for obstacles, such as rocks, holes,
tree stumps and furrows.
RTake care when turning on an uphill or down-hill slope or when driving across a slope. The
vehicle could otherwise tip over.
RAlways keep the doors, the tailgate, the side
windows and the sliding sunroof closed whilethe vehicle is in motion.
RDo not shift the automatic transmission to
position i.
RObserve the notes on off-road fording
(Ypage 169).
iInformation about retrofitting special all-ter-
rain tires is available from any qualified spe-
cialist workshop.
iDo not use the HOLD function when driving
off-road, on steep uphill or downhill gradients
or on slippery or loose surfaces. The HOLD
function cannot hold the vehicle on such sur-
faces.
Checklist before driving off-road
!If the engine oil warning lamp lights up while
the vehicle is in motion, stop the vehicle in a
safe place as soon as possible. Check the
engine oil level. The engine oil warning lamp
warning must not be ignored. Continuing the
journey while the symbol is displayed could
lead to engine damage.
XEngine oil level: check the engine oil level
and add oil if necessary.
When driving on steep gradients, the engine
oil level must be sufficiently high to ensure a
correct oil supply in the vehicle.
XDEF tank (BlueTEC vehicles): check the
level and add if necessary (Ypage 158).
XTire-changing tool kit: check that the jack is
working and make sure you have the lug
wrench, a robust tow cable and a folding
spade in the vehicle.
XWheels and tires: check the tread depth and
pressure of the tires.
XCheck for damage and remove any foreign
objects, e.g. small stones, from the wheels/
tires.
XReplace any missing valve caps.
XReplace dented or damaged wheels.
XRims: dented or bent rims can result in a loss
of tire pressure and damage the tire bead.
Driving tips171
Driving and parking
Z
Page 174 of 398
Before driving off-road, check the wheels and
replace them if necessary.
Checklist after driving off-road
!If you detect damage to the vehicle after
driving off-road, have the vehicle checked
immediately at a qualified specialist work-
shop.
Driving over rough terrain places greater
demands on your vehicle than driving on normal
roads. After driving off-road, check the vehicle.
This allows you to detect damage promptly and
reduce the risk of an accident to yourself and
other road users.
XIf the Offroad orOffroad Plus drive program
is selected: select the Individual,Sport ,
Comfort orSlippery drive program
(
Ypage 147).
XDeactivate the LOW RANGE off-road gear
(Ypage 221).
XDeactivate DSR (Ypage 218).
XLower the vehicle level again to a level suita-
ble to the road conditions, e.g. to the normal
level.
XClean the headlamps and rear lights and
check for damage.
XClean the front and rear license plates.
XClean the wheels and tires with a water jet
and remove any foreign objects.
XClean the wheels, wheel housings and the
vehicle underside with a water jet; check for
any foreign objects and damage.
XCheck whether twigs or other parts of plants
have become trapped. These increase the risk of fire and can damage fuel pipes, brake
hoses or the rubber bellows of the axle joints
and propeller shafts.
XAfter the trip, examine without fail the entire
undercarriage, wheels, tires, brakes, body-
wor k stru
cture, steering, chassis and exhaust
system for damage.
XAfter driving for extended periods across
sand, mud, gravel, water or in similarly dirty
conditions, have the brake discs, wheels,
brake pads/linings and axle joints checked
and cleaned.
XIf you detect strong vibrations after off-road
travel, check for foreign objects in the wheels
and drive train and remove them if necessary.
Foreign objects can disturb the balance and
cause vibrations.
Driving on sand
Observe the following rules when driving on
sand:
RSelect the Offroaddrive program (vehicles
without Off-Road Engineering package)
(
Ypage 219).
RSelect the Offroaddrive program (vehicles
with Off-Road Engineering package)
(
Ypage 220).
RSelect a higher vehicle level.
RAvoid high engine speeds.
RUse the left-hand steering wheel paddle
shifter to shift to a lower gear appropriate to
the terrain.
RDrive quickly to overcome the rolling resist-
ance. Otherwise the vehicle's wheels could
become stuck in loose ground.
RDrive in the tracks of other vehicles if possi-
ble. Make sure that:
-the tire ruts are not too deep.
-the sand is sufficiently firm.
-the ground clearance of the vehicle is suf-
ficient.
Tire ruts and gravel roads
!Check that the ruts are not too deep and
that your vehicle has sufficient clearance.
Otherwise, your vehicle could be damaged or
bottom out and get stuck.
Observe the following rules when driving along
ruts in off-road terrain or on roads with loose
gravel:
RSelect the Offroaddrive program (vehicles
without Off-Road Engineering package)
(
Ypage 219).
RSelect the Offroaddrive program (vehicles
with Off-Road Engineering package)
(
Ypage 220).
RSelect a higher vehicle level.
RAvoid high engine speeds.
RShift to a lower gear using the left-hand steer-
ing wheel paddle shifter.
RDrive slowly.
RWhere ruts are too deep, drive with the
wheels of one side on the center grassy area,
if possible.
172Driving tips
Driving and parking