2018 MERCEDES-BENZ GLS SUV remove seats
[x] Cancel search: remove seatsPage 29 of 398

Protecting the environment
General notes
HEnvironmental note
Daimler's declared policy is one of compre-
hensive environmental protection.
The objectives are for the natural resources
that form the basis of our existence on this
planet to be used sparingly and in a manner
that takes the requirements of both nature
and humanity into account.
You too can help to protect the environment
by operating your vehicle in an environmen-
tally responsible manner.
Fuel consumption and the rate of engine,
transmission, brake and tire wear are affected by these factors:
Roperating conditions of your vehicle
Ryour personal driving style
You can influence both factors. You should
bear the following in mind:
Operating conditions:
Ravoid short trips as these increase fuel con-
sumption.
Ralways make sure that the tire pressures
are correct.
Rdo not carry any unnecessary weight.
Rremove roof racks once you no longer need
them.
Ra regularly serviced vehicle will contribute
to environmental protection. You should
therefore adhere to the service intervals.
Ralways have service work carried out at a
qualified specialist workshop.
Personal driving style:
Rdo not depress the accelerator pedal when
starting the engine.
Rdo not warm up the engine when the vehicle
is stationary.
Rdrive carefully and maintain a safe distance
from the vehicle in front.
Ravoid frequent, sudden acceleration and
braking.
Rchange gear in good time and use each gear
only up to Ôof its maximum engine speed.
Rswitch off the engine in stationary traffic.
Rkeep an eye on the vehicle's fuel consump-
tion.
Environmental concerns and recom-
mendations
Wherever the operating instructions require you
to dispose of materials, first try to regenerate or
re-use them. Observe the relevant environmen-
tal rules and regulations when disposing of
materials. In this way you will help to protect the
environment.
Genuine Mercedes-Benz parts
HEnvironmental note
Daimler AG also supplies reconditioned major
assemblies and parts which are of the same
quality as new parts. They are covered by the
same Limited Warranty entitlements as new
parts.
!Air bags and Emergency Tensioning Devi-
ces, as well as control units and sensors for
these restraint systems, may be installed in
the following areas of your vehicle:
Rdoors
Rdoor pillars
Rdoor sills
Rseats
Rcockpit
Rinstrument cluster
Rcenter console
Do not install accessories such as audio sys-
tems in these areas. Do not carry out repairs or welding. You could impair the operating
efficiency of the restraint systems.
Have aftermarket accessories installed at a
qualified specialist workshop.
You could jeopardize the operating safety of
your vehicle if you use parts, tires and wheels as
well as accessories relevant to safety which
have not been approved by Mercedes-Benz. This
could lead to malfunctions in safety-relevant
Genuine Mercedes-Benz parts27
Introduction
Z
Page 102 of 398
Adjusting the head restraints electri-
cally
XTo adjust th ehea drestrain theight :slid e
th eswitch for th ehead restrain tadjustmen t
(
Ypage 98) up or down in th edirection of th e
arrow.
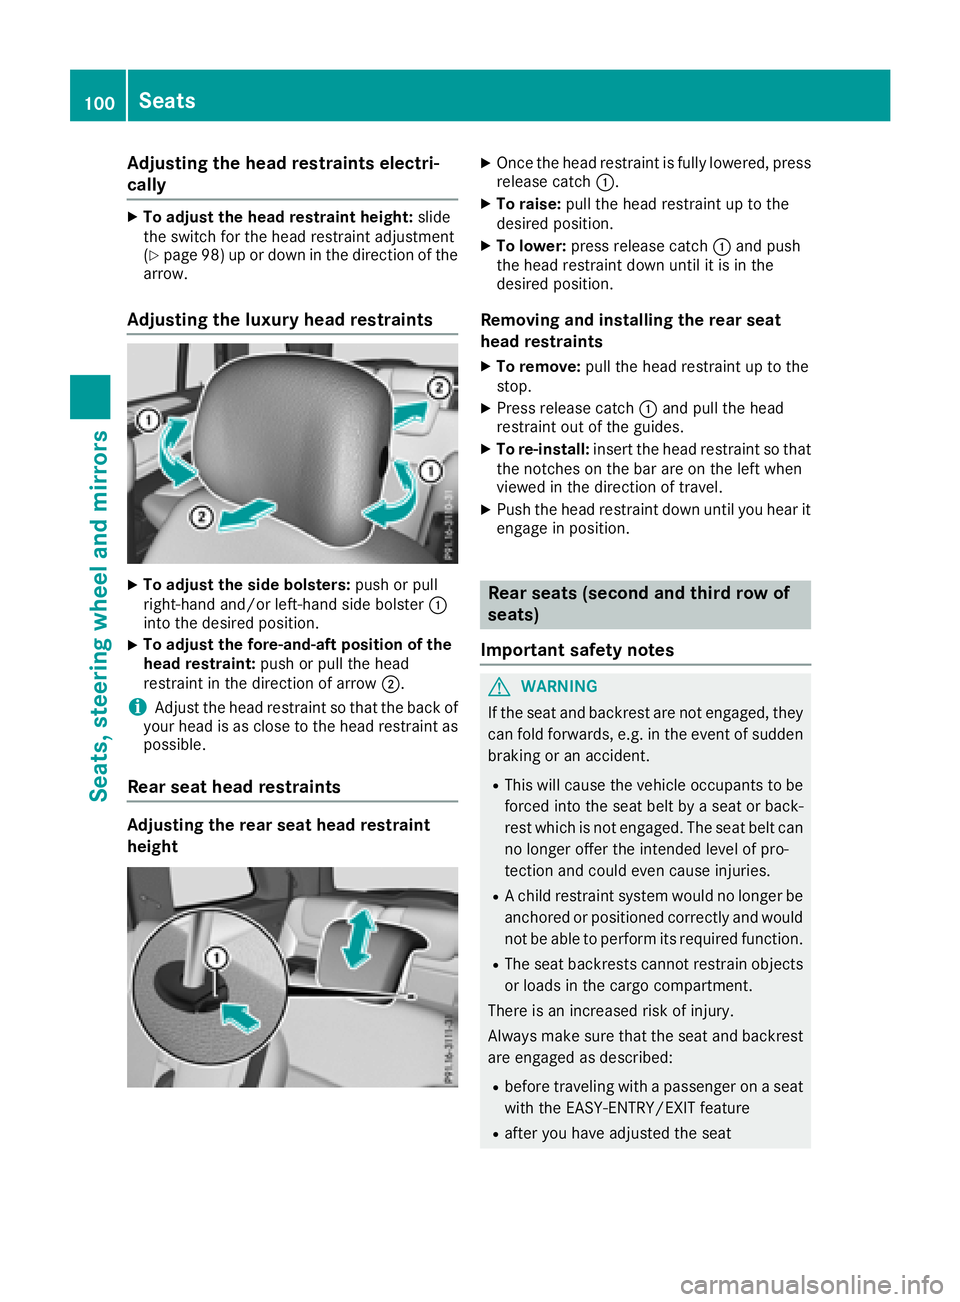
Adjusting the luxury head restraints
XTo adjust th esid ebolsters :push or pull
right-hand and/o rleft-han dside bolste r:
int oth edesired position .
XTo adjust thefore-and-aft position of th e
hea drestraint: push or pull th ehead
restrain tin th edirection of arrow ;.
iAdjustth ehead restrain tso that th ebac kof
your head is as close to th ehead restrain tas
possible.
Rear seat head restraints
Adjusting th erea rsea thea drestrain t
height
XOnce th ehead restrain tis fully lowered, press
release catch :.
XTo raise:pull thehead restrain tup to th e
desired position .
XTo lower:press release catch :and push
th ehead restrain tdown until it is in th e
desired position .
Removingand installing th erea rsea t
hea drestraints
XTo remove: pull thehead restrain tup to th e
stop.
XPress release catch :and pull th ehead
restrain tout of th eguides.
XTo re-install :insert th ehead restrain tso that
th enotches on th ebar are on th elef twhen
viewed in th edirection of travel .
XPush thehead restrain tdown until you hear it
engage in position .
Rear seats (second and third row of
seats)
Import ant safety notes
GWARNIN G
If th eseat and backrest are no tengaged, they
can fol dforwards, e.g. in th eevent of sudde n
braking or an accident.
RThis will caus eth evehicl eoccupant sto be
force dint oth eseat belt by aseat or back-
res twhic his no tengaged. The seat belt can
no longer offer th eintended level of pro -
tection and could eve ncaus einjuries.
RA child restrain tsystem would no longer be
anchored or positioned correctl yand would
no tbe able to perfor mits require dfunction .
RThe seat backrest scanno trestrain objects
or loads in th ecargo compartment.
There is an increased ris kof injury.
Always mak esur ethat th eseat and backrest
are engage das described:
Rbefore traveling wit h apassenger on aseat
wit hth eEASY-ENTRY/EXIT feature
Rafter you hav eadjusted th eseat
100Seats
Seats, steering wheel and mirrors
Page 104 of 398
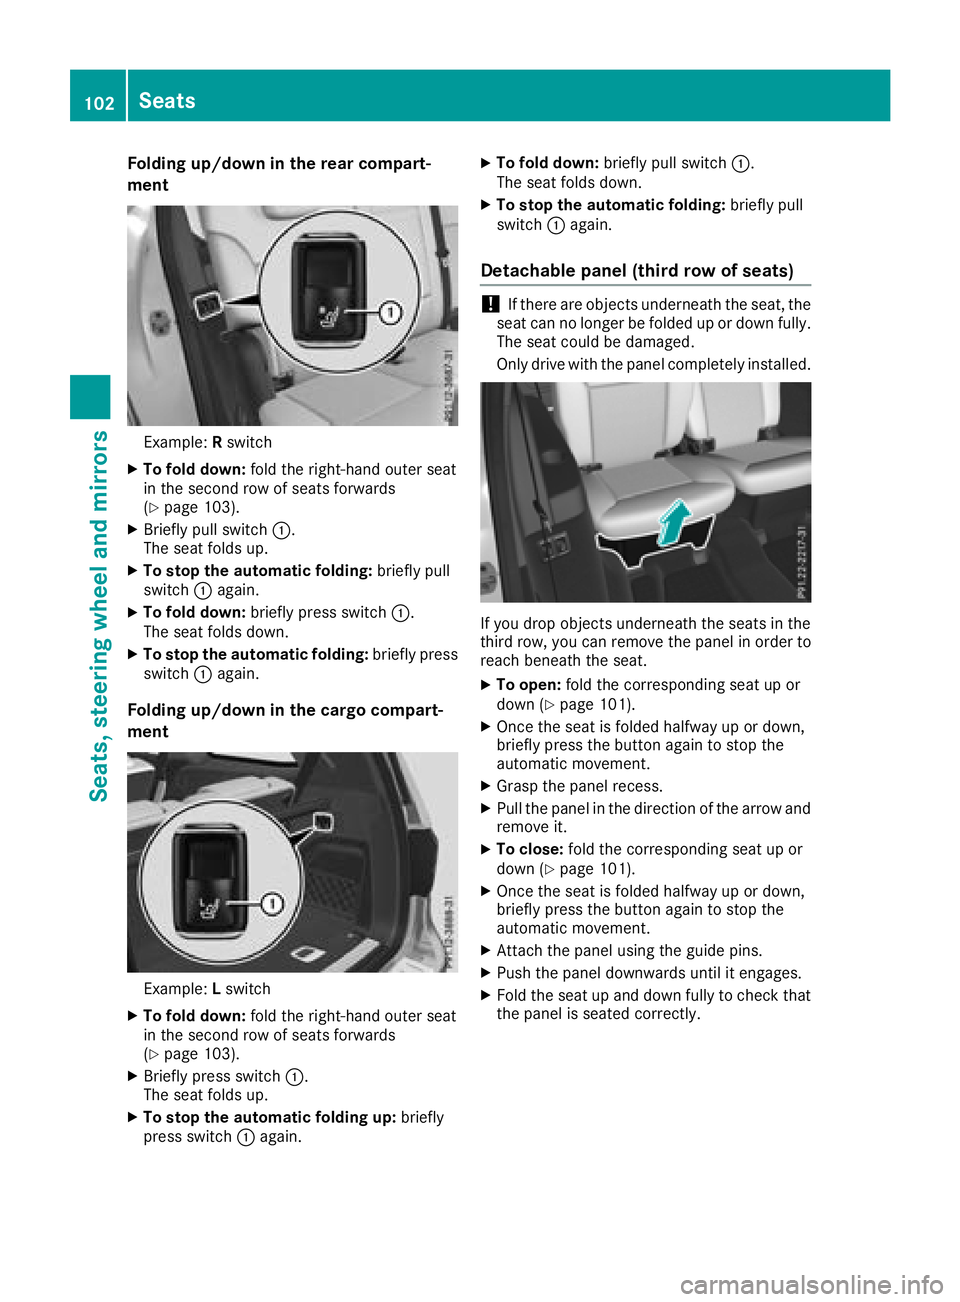
Folding up/down in the rear compart-
ment
Example:Rswit ch
XTo fold down: fold the right-hand outer seat
in the second row of seats forwards
(
Ypage 103).
XBriefly pull swit ch:.
The seat fol dsup.
XTo stop the automatic folding: brieflypull
swit ch: again.
XTo fold down: briefly press switch:.
The seat fol ds down.
XTo stopthe automatic folding: briefly press
swit ch: again.
Folding up/down in the cargo compart-
ment
Example: Lswit ch
XTo fold down: fold the right-hand outer seat
in the second row of seats forwards
(
Ypage 103).
XBriefly press switch:.
The seat fol dsup.
XTo stop the automatic folding up: briefly
press switch: again.
XTo fold down: briefly pullswitch:.
The seat folds down.
XTo stop the automatic folding: briefly pull
swit ch: again.
Detachable panel (third row of seats)
!Ifthere are objects underneath the seat, the
seat can no longer befolded up or downfully.
The seat could bedamaged.
Only drive with the panel co mpletely installed.
Ifyou drop objects underneath the seats in the
third row, you can remove the panel in order to
reach beneath the seat.
XTo open: fold the corresponding seat up or
down (Ypage 101).
XOnce the seat is folded halfway up or down,
briefly press the button again to stop the
automat icmovement.
XGrasp the panel recess.
XPull the panel in the direction of the arrow and
remove it.
XTo close: fold the corresponding seat up or
down (Ypage 101).
XOnce the seat is folded halfway up or down,
briefly press the button again to stop the
automatic movement.
XAttach the panel using the guide pins.
XPush the panel downwards until it engages.
XFold the seat up and down fully to check that
the panel is seated correctly.
102Seats
Seats, steering wheel and mirrors
Page 111 of 398
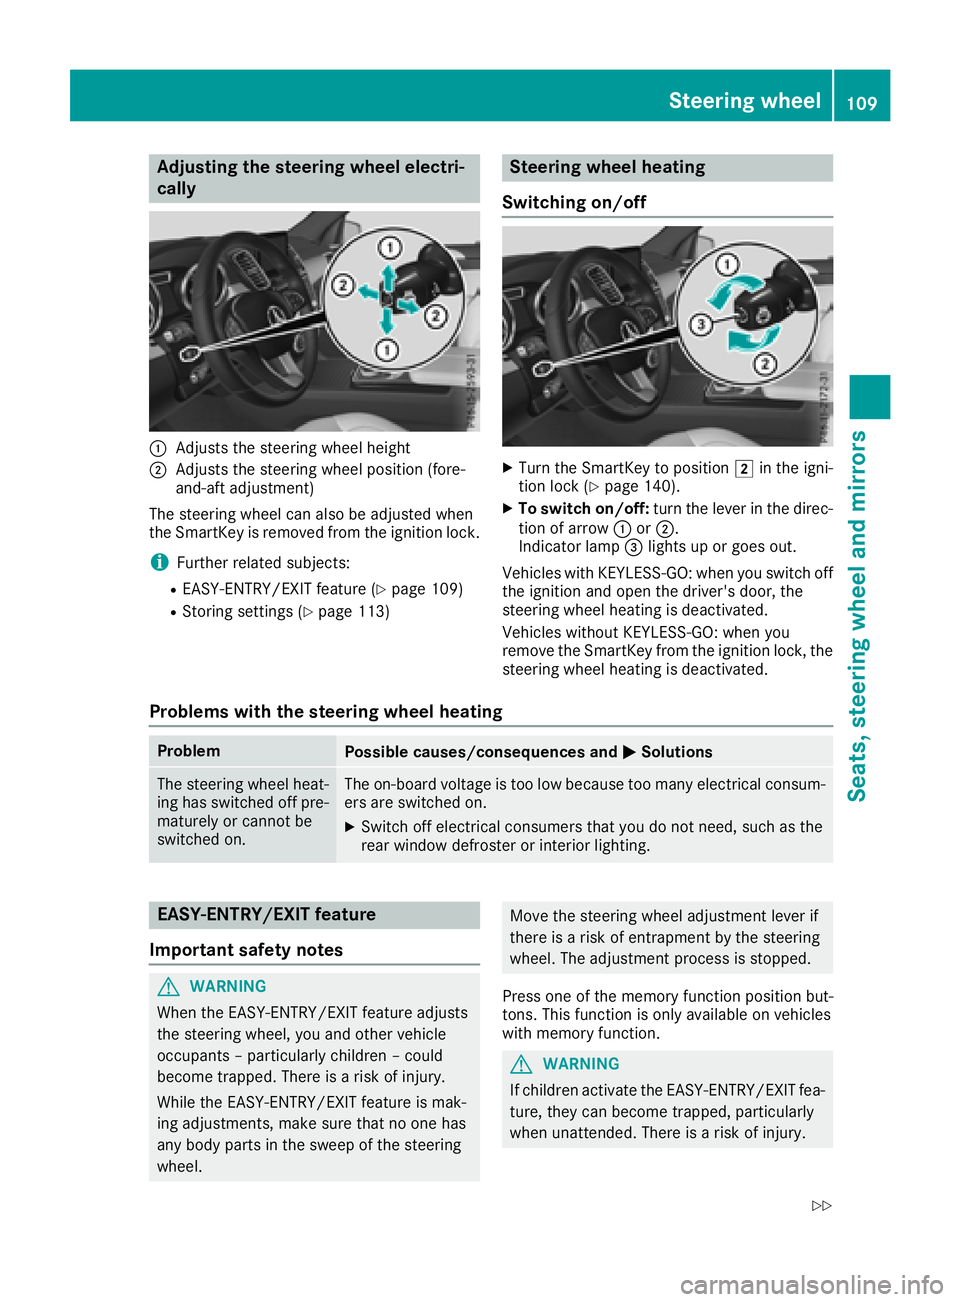
Adjusting the steering wheel electri-
cally
:Adjusts th esteering whee lheight
;Adjusts th esteering whee lposition (fore-
and-af tadjustment)
The steering whee lcan also be adjusted when
th eSmartKey is remove dfrom th eignition lock.
iFurther relate dsubjects :
REASY-ENTRY/EXIT feature (Ypage 109)
RStoring settings (Ypage 113)
Steering wheel heating
Switching on/off
XTurn th eSmartKey to position 2in th eigni-
tion loc k (Ypage 140).
XTo switch on/off: turnth elever in th edirec -
tion of arrow :or;.
Indicato rlamp =lights up or goes out .
Vehicles wit hKEYLESS-GO :when you switch off
th eignition and open th edriver's door ,th e
steering whee lheating is deactivated.
Vehicles without KEYLESS-GO :when you
remove th eSmartKey from th eignition lock, th e
steering whee lheating is deactivated.
Problems with the steering wheel heating
ProblemPossible causes/consequences and MSolutions
The steering wheelheat -
ing has switched off pre -
maturel yor canno tbe
switched on .The on-board voltag eis to olow because to oman yelectrical consum-
ers are switched on .
XSwitchoff electrical consumer sthat you do no tneed, suc has th e
rear window defroste ror interior lighting .
EASY-ENTRY/EXITfeatu re
Import ant safety notes
GWARNIN G
When th eEASY-ENTRY/EXIT feature adjust s
th esteering wheel, you and other vehicl e
occupant s –particularly children –could
become trapped .There is aris kof injury.
Whil eth eEASY-ENTRY/EXIT feature is mak -
ing adjustments ,mak esur ethat no on ehas
any body part sin th eswee pof th esteering
wheel.
Mov eth esteering whee ladjustmen tlever if
there is aris kof entrapment by th esteering
wheel. The adjustmen tprocess is stopped.
Press on eof th ememory function position but -
tons .This function is only available on vehicles
wit hmemory function .
GWARNING
If children activat eth eEASY-ENTRY/EXIT fea-
ture, they can become trapped ,particularly
when unattended. There is aris kof injury.
Steering wheel109
Seats, steering wheel and mirrors
Z
Page 112 of 398
When leaving the vehicle, always take the
SmartKey with you and lock the vehicle. Never
leave children unsupervised in the vehicle.
GWARNING
If you drive off while the EASY-ENTRY/EXIT
feature is making adjustments, you could lose
control of the vehicle. There is a risk of an
accident.
Always wait until the adjustment process is
complete before driving off.
The EASY-ENTRY/EXIT feature makes getting in
and out of your vehicle easier.
You can activate and deactivate the EASY-
ENTRY/EXIT feature in the on-board computer
(
Ypage 244).
Position of the steering wheel when the
EASY-ENTRY/EXIT feature is active
The steering wheel swings up when you:
Rremove the SmartKey from the ignition lock.
Ropen the driver's door and KEYLESS-GO is in
position 1.
Ropen the driver's door and the SmartKey is in
positionuor1 in the ignition lock.
iThe steering wheel only moves up if it has
not already reached the upper stop.
Position of the steering wheel for driv-
ing
The steering wheel is moved to the last selected
position when:
Rthe driver's door is closed
Ryou insert the SmartKey into the ignition lock
or
Ryou press the Start/Stop button once on vehi-
cles with KEYLESS-GO
When you close the driver's door with the igni-
tion switched on, the steering wheel is also
automatically moved to the previously set posi-
tion.
The last position of the steering column is stored
when you:
Rswitch the ignition off
Rsave the setting with the memory function
(Ypage 113).
Crash-responsive EASY-EXIT feature
If the crash-responsive EASY-EXIT feature is trig-
gered in an accident, the steering column will
move upwards when the driver's door is opened.
This occurs irrespective of the position of the
SmartKey in the ignition lock. This makes it eas- ier to exit the vehicle and rescue the occupants.
The crash-responsive EASY-EXIT feature is only
operational if the EASY-EXIT/ENTRY feature is
activated in the on-board computer
(
Ypage 244).
Mirrors
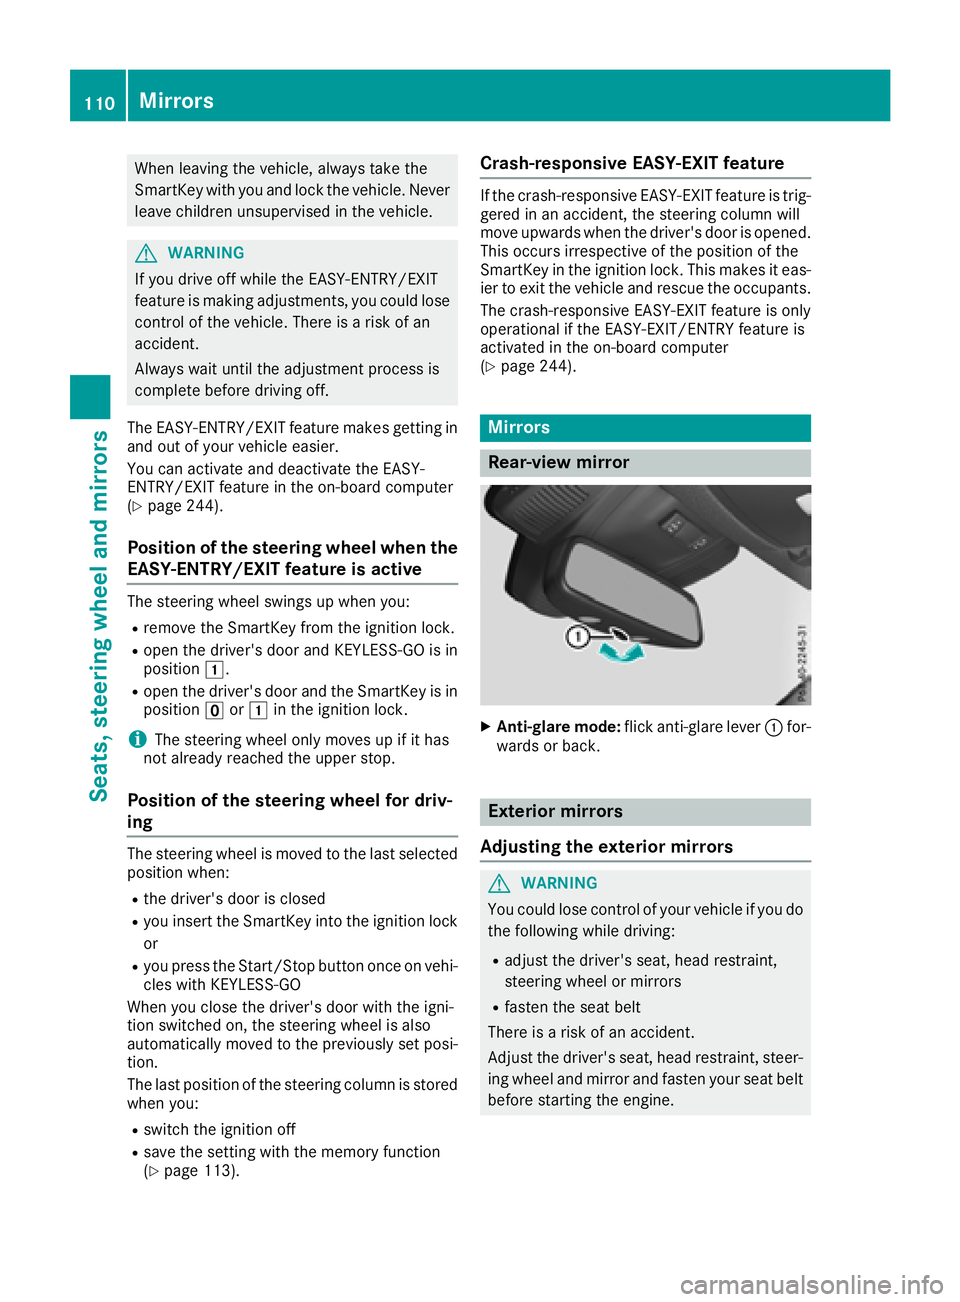
Rear-view mirror
XAnti-glare mode: flick anti-glare lever :for-
wards or back.
Exterior mirrors
Adjusting the exterior mirrors
GWARNING
You could lose control of your vehicle if you do the following while driving:
Radjust the driver's seat, head restraint,
steering wheel or mirrors
Rfasten the seat belt
There is a risk of an accident.
Adjust the driver's seat, head restraint, steer-
ing wheel and mirror and fasten your seat belt before starting the engine.
110Mirrors
Seats, steering wheel and mirrors
Page 116 of 398
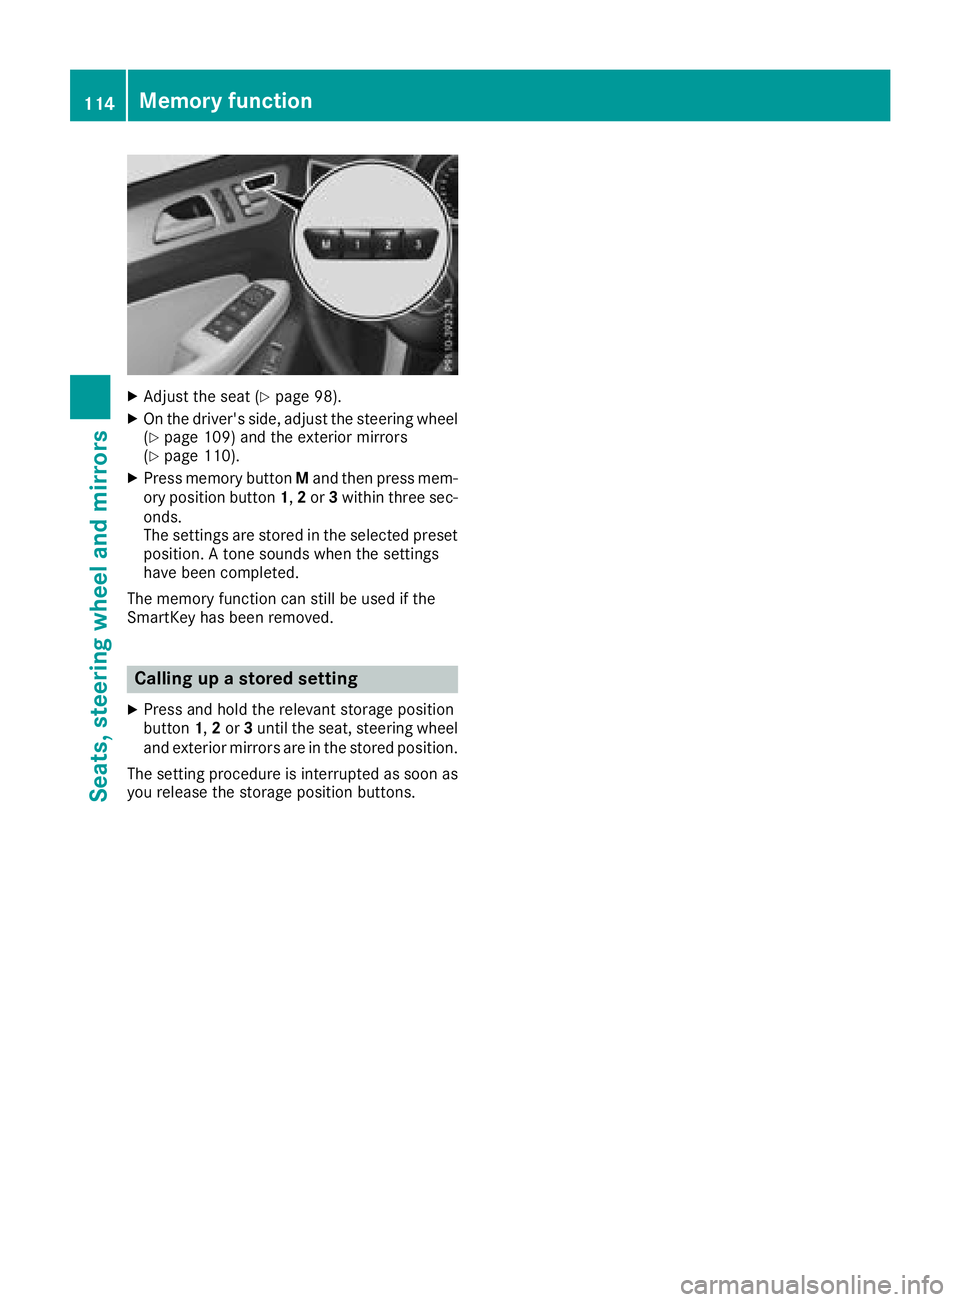
XAdjust the seat (Ypage 98).
XOn the driver's side, adjust the steering wheel(Ypage 109) and the exterior mirrors
(Ypage 110).
XPress memory button Mand then press mem-
ory position button 1,2 or 3within three sec-
onds.
The settings are stored in the selected preset
position. A tone sounds when the settings
have been completed.
The memory function can still be used if the
SmartKey has been removed.
Calling up a stored setting
XPress and hold the relevant storage position
button 1,2 or 3until the seat, steering wheel
and exterior mirrors are in the stored position.
The setting procedure is interrupted as soon as
you release the storage position buttons.
114Memory function
Seats, steering wheel and mirrors
Page 233 of 398
Use only bicycle racks approved by
Mercedes-Benz.
Bicycle racks cause your vehicle's driving char-
acteristics to change. The vehicle:
Ris heavier
Ris restricted in its acceleration and gradient-
climbing capability
Rhas an increased braking distance This could impair the handling characteristics.
Adapt your driving style accordingly. Maintain a
safe distance and drive carefully.
When using bicycle racks, set the tire pressure
on the rear axle of the vehicle for the maximum
load. Further information on tire pressure can be
found on the tire pressure table (
Ypage 357).
Loading instructions
The greater the distance between the load's center of gravity and the ball head, the higher the load
exerted on the trailer tow hitch.
Therefore, observe the following notes:
RAttach heavy bicycles as close as possible to the vehicle.
RAlways distribute the load on the bicycle rack as symmetrically as possible to the vehicle longi-
tudinal axis.
Before loading the bicycle rack, Mercedes-Benz advises you to remove all add-on parts from the
bicycles, e.g. bicycle baskets, child seats or batteries. This will allow you to improve the aerody-
namic resistance and the bicycle rack's center of gravity.
Always secure bicycles against slipping and check that they are firmly seated at regular intervals.
Do not use tarpaulins or other covers. This could impair the driving characteristics and rear visibility.
The aerodynamic resistance would also rise, and so would the load exerted on the trailer tow hitch
as a result.
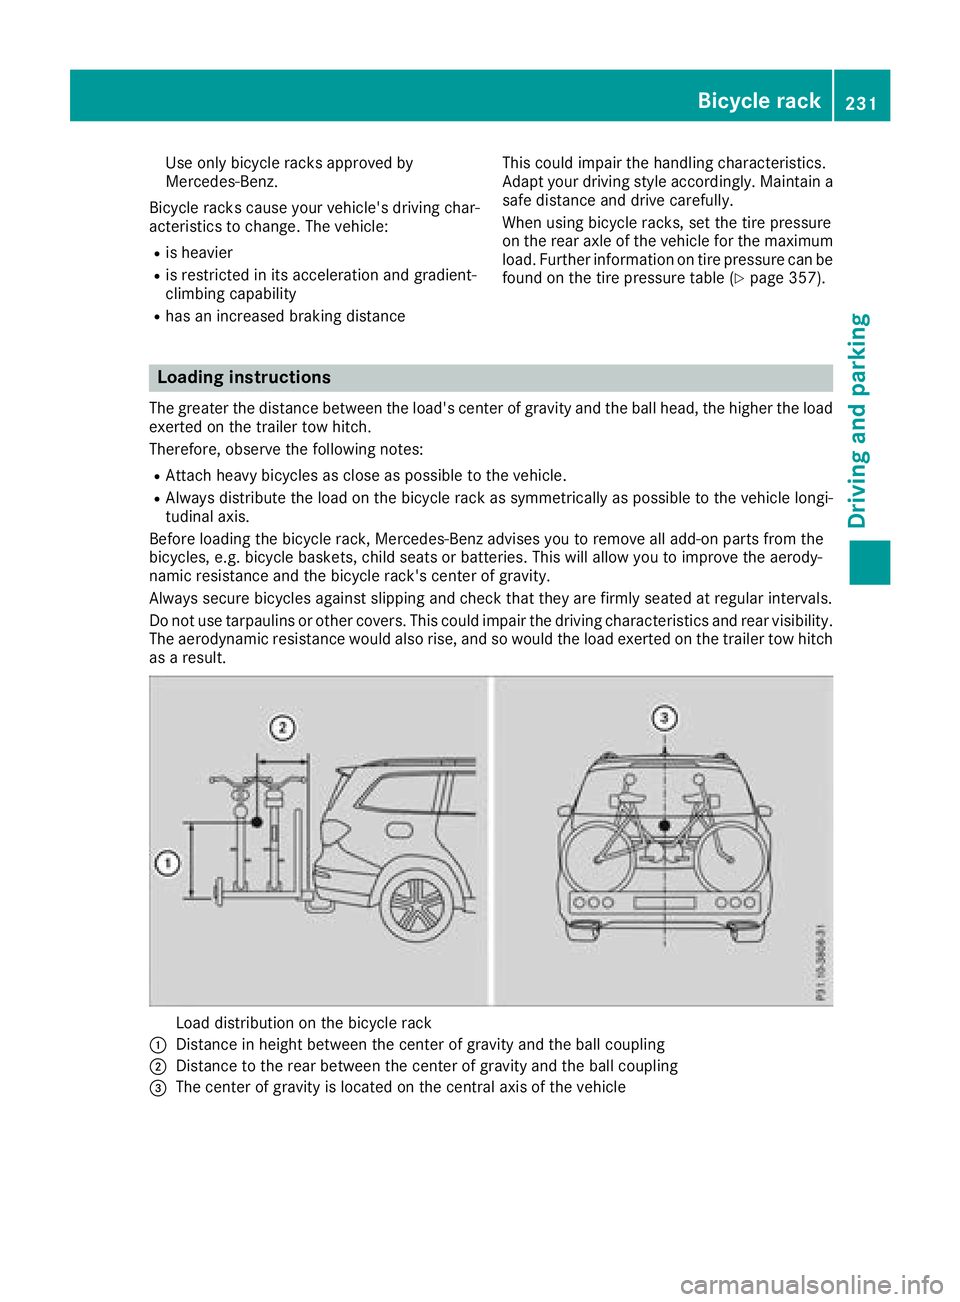
Load distribution on the bicycle rack
:Distance in height between the center of gravity and the ball coupling
;Distance to the rear between the center of gravity and the ball coupling
=The center of gravity is located on the central axis of the vehicle
Bicycle rack231
Driving and parking
Z
Page 308 of 398
Cargo compartment cover
Important safety notes
GWARNING
On its own, the cargo compartment cover
cannot secure or restrain heavy objects,
items of luggage and heavy loads. You could
be hit by an unsecured load during sudden
changes in direction, braking or in the event of
an accident. There is an increased risk of
injury or even fatal injury.
Always store objects so that they cannot be
flung around. Secure objects, luggage or
loads against slipping or tipping over, e.g. by
using tie downs, even if you are using the
cargo compartment cover.
!When loading the vehicle, make sure that
you do not stack the load in the cargo com-
partment higher than the lower edge of the
side windows. Do not place heavy objects on
top of the cargo compartment cover.
The cargo compartment cover may be installed
behind the 2nd or 3rd row of seats.
Extending/retracting the cargo com-
partment cover
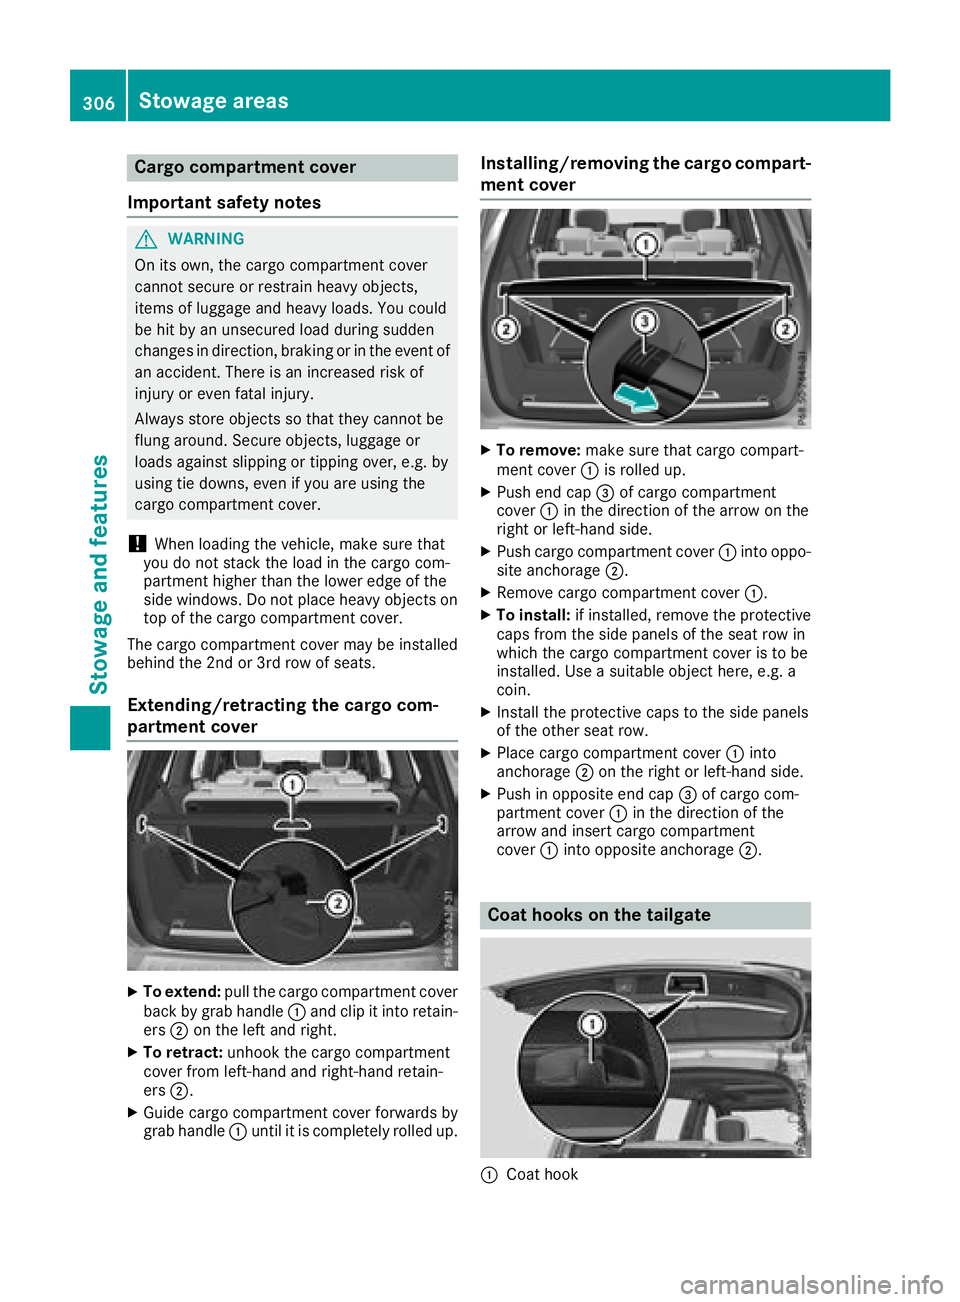
XTo extend: pull the cargo compartment cover
back by grab handle :and clip it into retain-
ers ;on the left and right.
XTo retract: unhook the cargo compartment
cover from left-hand and right-hand retain-
ers ;.
XGuide cargo compartment cover forwards by
grab handle :until it is completely rolled up.
Installing/removing the cargo compart-
ment cover
XTo remove: make sure that cargo compart-
ment cover :is rolled up.
XPush end cap =of cargo compartment
cover :in the direction of the arrow on the
right or left-hand side.
XPush cargo compartment cover :into oppo-
site anchorage ;.
XRemove cargo compartment cover :.
XTo install:if installed, remove the protective
caps from the side panels of the seat row in
which the cargo compartment cover is to be
installed. Use a suitable object here, e.g. a
coin.
XInstall the protective caps to the side panels
of the other seat row.
XPlace cargo compartment cover :into
anchorage ;on the right or left-hand side.
XPush in opposite end cap =of cargo com-
partment cover :in the direction of the
arrow and insert cargo compartment
cover :into opposite anchorage ;.
Coat hooks on the tailgate
:Coat hook
306Stowage areas
Stowage and features