2018 MERCEDES-BENZ GLS SUV run flat
[x] Cancel search: run flatPage 10 of 398

Switching the ZONE function
on/off ............................................ 133
Coat hooks ......................................... 306
Cockpit
Overview .......................................... 36
see Instrument cluster
Collapsible spare wheel
Inflating ......................................... 382
see Emergency spare wheel
COMAND
Driving dynamics display ............... 223
COMAND display
Cleaning ......................................... 335
Combination switch .......................... 116
Connecting a USB device
see also Digital Operator's Man-
ual .................................................. 292
Consumption statistics (on-board
computer) .......................................... 236
Controller ........................................... 293
Convenience closing feature .............. 90
Convenience opening feature ............ 90
Coolant (engine)
Checking the level ......................... 328
Display message ............................ 261
Filling capacity ............................... 391
Important safety notes .................. 390
Temperature (on-board computer,
Mercedes-AMG vehicles) ............... 245
Temperature gauge ........................ 234
Warning lamp ................................. 288
Cooling
see Climate control
Copyright ............................................. 35
Cornering light function
Display message ............................ 260
Crash-responsive emergency light-
ing ....................................................... 120
Crosswind Assist ................................. 71
Crosswind driving assistance ............ 71
Cruise control
Activating ....................................... 175
Activation conditions ..................... 175
Cruise control lever ....................... 175
Deactivating ................................... 176
Display message ............................ 271
Driving system ............................... 174 Function/notes ............................. 174
Important safety notes .................. 174
Storing and maintaining current
speed ............................................. 175
Cup holder
Center console .............................. 309
Important safety notes .................. 308
Rear compartment ......................... 309
Temperature controlled ................. 309
Third row of seats .......................... 310
Customer Ass
istance Center
(CAC) ..................................................... 31
Customer Relations Department ....... 31
D
Data
see Technical data
Data carrier
Selecting ........................................ 239
Daytime running lamps
Display message ............................ 260
Function/notes ............................. 115
Switching on/off (on-board com-
puter) ............................................. 243
Declarations of conformity ................. 30
DEF
Adding ........................................... 158
Display message ............................ 264
Filling capacity ............................... 389
Important safety notes .................. 389
Diagnostics connection ...................... 31
Differential lock (display mes-
sage) ................................................... 267
Digital Operator's Manual
Help ................................................. 26
Introduction ..................................... 26
Digital speedometer ......................... 237
DIRECT SELECT lever
Automatic transmission ................. 148
Display messages
ASSYST PLUS ................................ 329
Calling up (on-board computer) ..... 248
Driving systems ............................. 265
Engine ............................................ 261
General notes ................................ 248
Hiding (on-board computer) ........... 248
KEYLESS-GO .................................. 278
8Index
Page 13 of 398

Display message ............................ 261
ECO start/stop function ................ 144
Engine number ............................... 386
Irregular running ............................ 146
Jump-starting ................................. 346
Starting (important safety notes) ... 141
Starting problems .......................... 146
Starting the engine with the
SmartKey ....................................... 142
Starting via smartphone ................ 142
Starting with KEYLESS-GO ............. 142
Switching off .................................. 162
Tow-starting (vehicle) ..................... 352
Engine electronics
Problem (malfunction) ................... 146
Engine jump starting
see Jump starting (engine)
Engine oil
Adding ........................................... 327
Additives ........................................ 390
Checking the oil level ..................... 326
Checking the oil level using the
dipstick .......................................... 327
Display message ............................ 263
Filling capacity ............................... 390
Notes about oil grades ................... 389
Notes on oil level/consumption .... 326
Temperature (on-board computer,
Mercedes-AMG vehicles) ............... 245
Engine switch-off
see ECO start/stop function
Entering an address
see also Digital Operator's Man-
ual .................................................. 292
ESP
®(Electronic Stability Pro-
gram)
AMG menu (on-board computer) ... 246
Characteristics ................................. 70
Deactivating/activating ................... 71
Display message ............................ 249
Function/notes ................................ 69
General notes .................................. 69
Important safety information ........... 70
Warning lamp ................................. 284
ETS/4ETS (Electronic Traction Sys-
tem) ...................................................... 70
Exhaust check ................................... 165 Exhaust pipe (cleaning instruc-
tions)
.................................................. 334
Exterior lighting
see Lights
Exterior mirrors
Adjusting ....................................... 110
Dipping (automatic) ....................... 112
Folding in whe
n locking (on-board
computer) ...................................... 245
Folding in/out (automatically) ....... 111
Folding in/out (electrically) ........... 111
Out of position (troubleshooting) ... 112
Setting ........................................... 111
Storing settings (memory func-
tion) ............................................... 113
Storing the parking position .......... 112
Eyeglasses compartment ................. 302
F
Favorites
Overview ........................................ 294
Filler cap
see Refueling
Flat tire
MOExtended tires .......................... 340
Preparing the vehicle ..................... 339
TIREFIT kit ...................................... 341
see Emergency spare wheel
Floormats ........................................... 324
Fog lamps (extended range) ............. 118
Folding the rear bench seat for-
wards/back ....................................... 303
Fording
Off-road ......................................... 169
On flooded roads ........................... 168
Frequencies
Mobile phone ................................. 384
Two-way radio ................................ 384
Fuel
Additives ........................................ 388
Consumption statistics .................. 236
Displaying the current consump-
tion ................................................ 237
Displaying the range ...................... 237
Driving tips .................................... 164
Fuel gauge ....................................... 37
Grade (gasoline) ............................ 387
Index11
Page 58 of 398
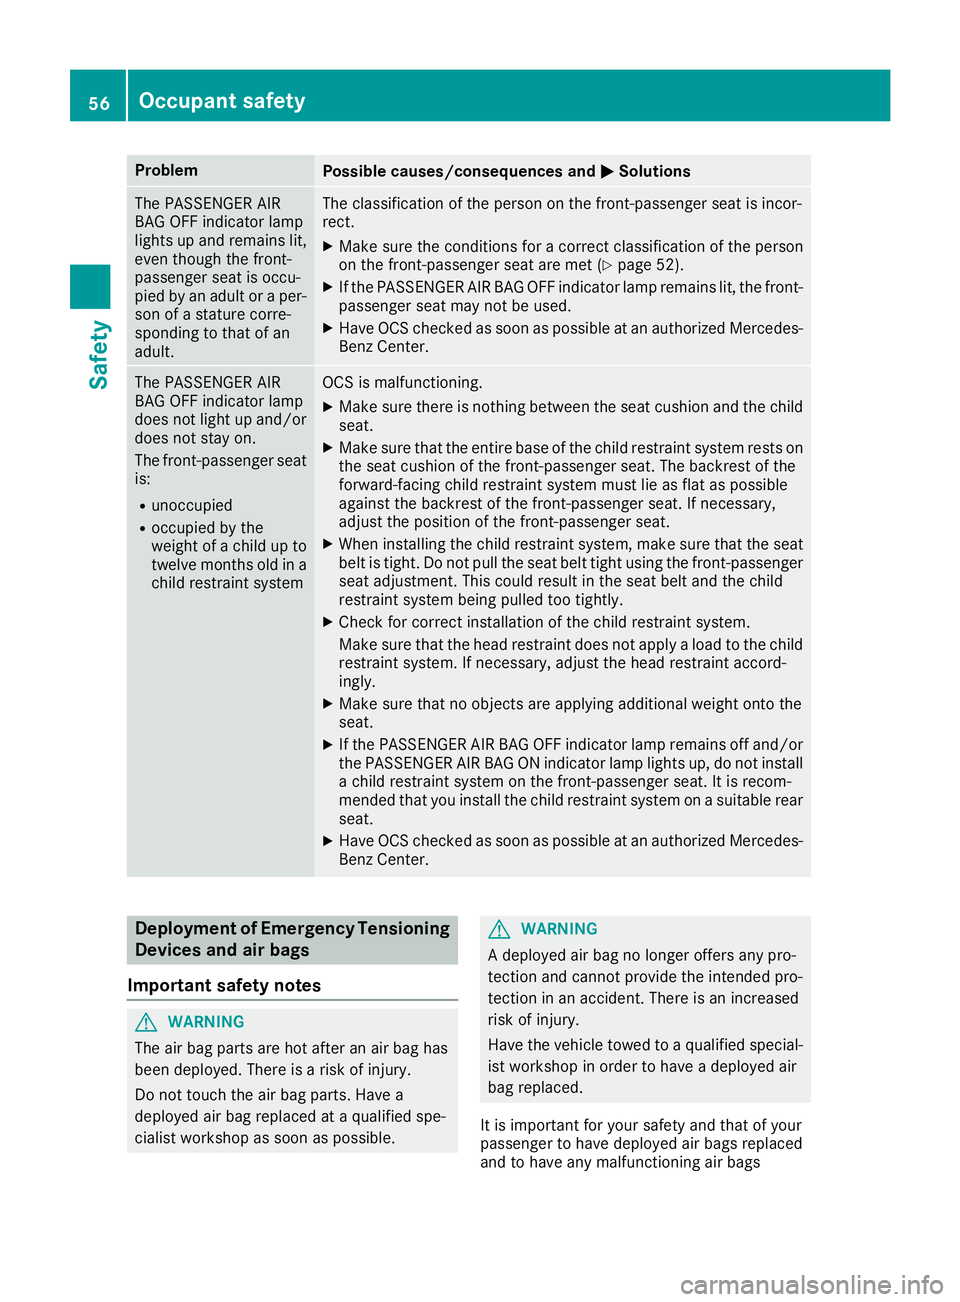
ProblemPossible causes/consequences andMSolutions
The PASSENGER AIR
BAG OFF indicator lamp
lights up and remains lit,
even though the front-
passenger seat is occu-
pied by an adult or a per-
son of a stature corre-
sponding to that of an
adult.The classification of the person on the front-passenger seat is incor-
rect.
XMake sure the conditions for a correct classification of the person
on the front-passenger seat are met (Ypage 52).
XIf the PASSENGER AIR BAG OFF indicator lamp remains lit, the front-
passenger seat may not be used.
XHave OCS checked as soon as possible at an authorized Mercedes- Benz Center.
The PASSENGER AIR
BAG OFF indicator lamp
does not light up and/or
does not stay on.
The front-passenger seat
is:
Runoccupied
Roccupied by the
weight of a child up to
twelve months old in a
child restraint system
OCS is malfunctioning.
XMake sure there is nothing between the seat cushion and the child
seat.
XMake sure that the entire base of the child restraint system rests on
the seat cushion of the front-passenger seat. The backrest of the
forward-facing child restraint system must lie as flat as possible
against the backrest of the front-passenger seat. If necessary,
adjust the position of the front-passenger seat.
XWhen installing the child restraint system, make sure that the seat belt is tight. Do not pull the seat belt tight using the front-passenger
seat adjustment. This could result in the seat belt and the child
restraint system being pulled too tightly.
XCheck for correct installation of the child restraint system.
Make sure that the head restraint does not apply a load to the child
restraint system. If necessary, adjust the head restraint accord-
ingly.
XMake sure that no objects are applying additional weight onto the
seat.
XIf the PASSENGER AIR BAG OFF indicator lamp remains off and/or
the PASSENGER AIR BAG ON indicator lamp lights up, do not install a child restraint system on the front-passenger seat. It is recom-
mended that you install the child restraint system on a suitable rear
seat.
XHave OCS checked as soon as possible at an authorized Mercedes-Benz Center.
Deployment of Emergency Tensioning
Devices and air bags
Important safety notes
GWARNING
The air bag parts are hot after an air bag has
been deployed. There is a risk of injury.
Do not touch the air bag parts. Have a
deployed air bag replaced at a qualified spe-
cialist workshop as soon as possible.
GWARNING
A deployed air bag no longer offers any pro-
tection and cannot provide the intended pro-
tection in an accident. There is an increased
risk of injury.
Have the vehicle towed to a qualified special-
ist workshop in order to have a deployed air
bag replaced.
It is important for your safety and that of your
passenger to have deployed air bags replaced
and to have any malfunctioning air bags
56Occupant safety
Safety
Page 171 of 398
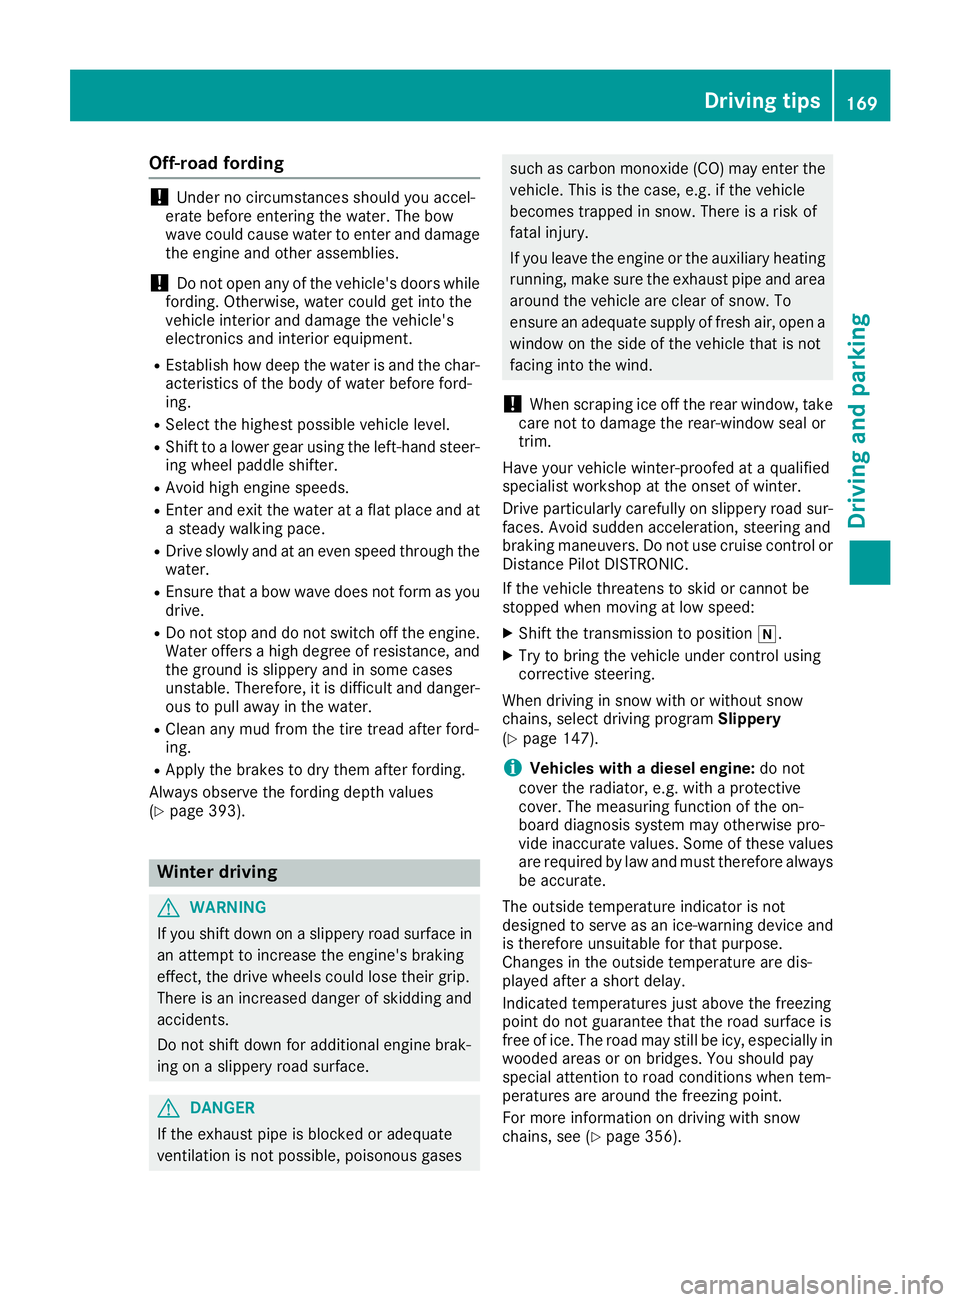
Off-road fording
!Under no circumstances should you accel-
erate before entering the water. The bow
wave could cause water to enter and damage
the engine and other assemblies.
!Do not open any of the vehicle's doors while
fording. Otherwise, water could get into the
vehicle interior and damage the vehicle's
electronics and interior equipment.
REstablish how deep the water is and the char-
acteristics of the body of water before ford-
ing.
RSelect the highest possible vehicle level.
RShift to a lower gear using the left-hand steer-
ing wheel paddle shifter.
RAvoid high engine speeds.
REnter and exit the water at a flat place and at
a steady walking pace.
RDrive slowly and at an even speed through the
water.
REnsure that a bow wave does not form as you
drive.
RDo not stop and do not switch off the engine.
Water offers a high degree of resistance, and
the ground is slippery and in some cases
unstable. Therefore, it is difficult and danger-
ous to pull away in the water.
RClean any mud from the tire tread after ford-
ing.
RApply the brakes to dry them after fording.
Always observe the fording depth values
(
Ypage 393).
Winter driving
GWARNING
If you shift down on a slippery road surface in an attempt to increase the engine's braking
effect, the drive wheels could lose their grip.
There is an increased danger of skidding and
accidents.
Do not shift down for additional engine brak-
ing on a slippery road surface.
GDANGER
If the exhaust pipe is blocked or adequate
ventilation is not possible, poisonous gases
such as carbon monoxide (CO) may enter the vehicle. This is the case, e.g. if the vehicle
becomes trapped in snow. There is a risk of
fatal injury.
If you leave the engine or the auxiliary heating
running, make sure the exhaust pipe and area
around the vehicle are clear of snow. To
ensure an adequate supply of fresh air, open a
window on the side of the vehicle that is not
facing into the wind.
!When scraping ice off the rear window, take
care not to damage the rear-window seal or
trim.
Have your vehicle winter-proofed at a qualified
specialist workshop at the onset of winter.
Drive particularly carefully on slippery road sur-
faces. Avoid sudden acceleration, steering and
braking maneuvers. Do not use cruise control or
Distance Pilot DISTRONIC.
If the vehicle threatens to skid or cannot be
stopped when moving at low speed:
XShift the transmission to position i.
XTry to bring the vehicle under control using
corrective steering.
When driving in snow with or without snow
chains, select driving program Slippery
(
Ypage 147).
iVehicles with a diesel engine: do not
cover the radiator, e.g. with a protective
cover. The measuring function of the on-
board diagnosis system may otherwise pro-
vide inaccurate values. Some of these values
are required by law and must therefore always be accurate.
The outside temperature indicator is not
designed to serve as an ice-warning device and
is therefore unsuitable for that purpose.
Changes in the outside temperature are dis-
played after a short delay.
Indicated temperatures just above the freezing
point do not guarantee that the road surface is
free of ice. The road may still be icy, especially in
wooded areas or on bridges. You should pay
special attention to road conditions when tem-
peratures are around the freezing point.
For more information on driving with snow
chains, see (
Ypage 356).
Driving tips169
Driving and parking
Z
Page 275 of 398
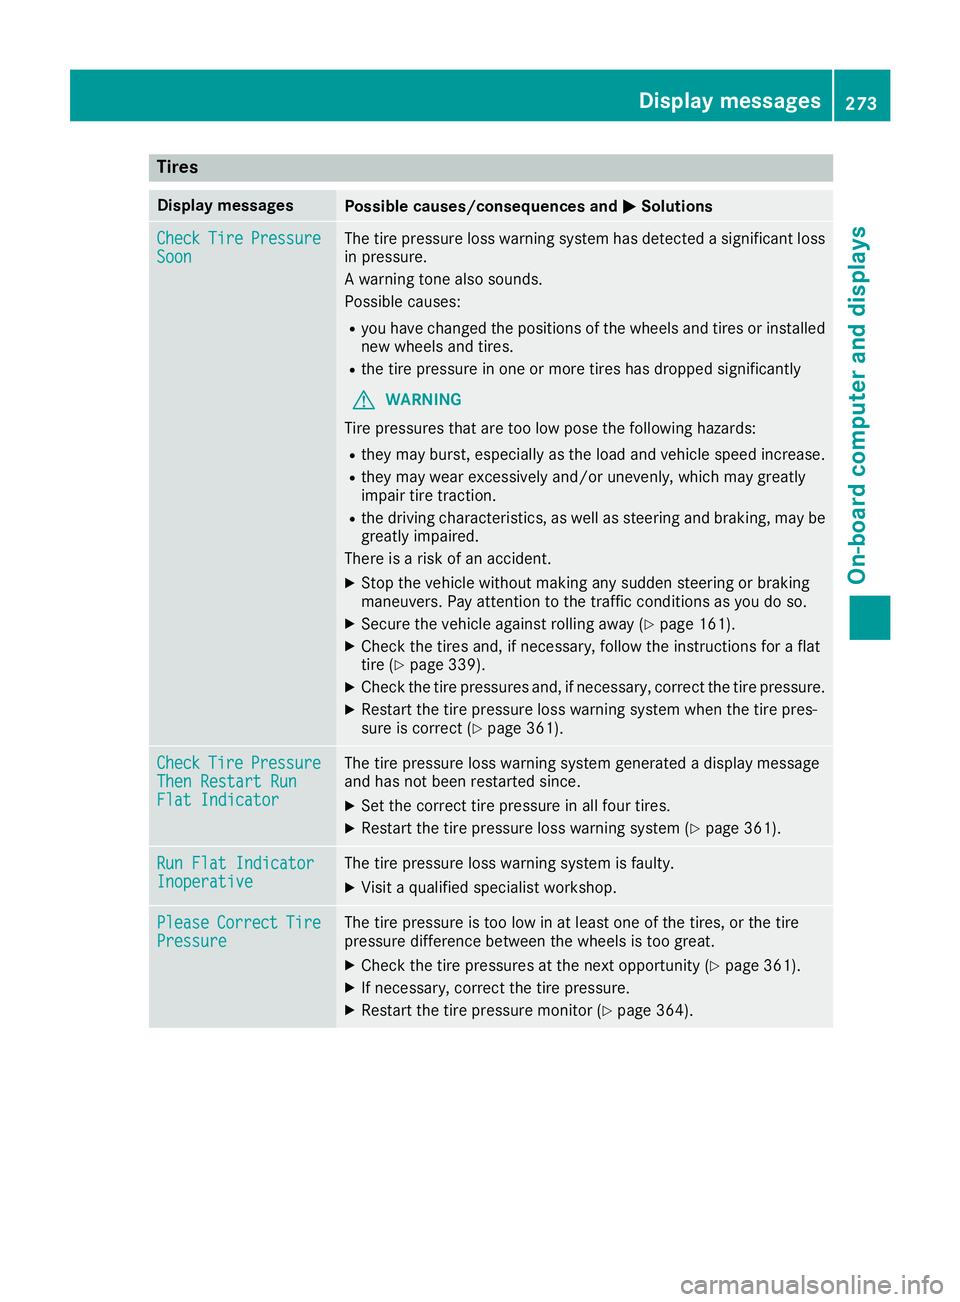
Tires
Display messagesPossible causes/consequences andMSolutions
CheckTirePressureSoonThe tire pressure loss warning system has detected a significant loss
in pressure.
A warning tone also sounds.
Possible causes:
Ryou have changed the positions of the wheels and tires or installed
new wheels and tires.
Rthe tire pressure in one or more tires has dropped significantly
GWARNING
Tire pressures that are too low pose the following hazards:
Rthey may burst, especially as the load and vehicle speed increase.
Rthey may wear excessively and/or unevenly, which may greatly
impair tire traction.
Rthe driving characteristics, as well as steering and braking, may be
greatly impaired.
There is a risk of an accident.
XStop the vehicle without making any sudden steering or braking
maneuvers. Pay attention to the traffic conditions as you do so.
XSecure the vehicle against rolling away (Ypage 161).
XCheck the tires and, if necessary, follow the instructions for a flat
tire (Ypage 339).
XCheck the tire pressures and, if necessary, correct the tire pressure.
XRestart the tire pressure loss warning system when the tire pres-
sure is correct (Ypage 361).
CheckTirePressureThen Restart RunFlat Indicator
The tire pressure loss warning system generated a display message
and has not been restarted since.
XSet the correct tire pressure in all four tires.
XRestart the tire pressure loss warning system (Ypage 361).
Run Flat IndicatorInoperativeThe tire pressure loss warning system is faulty.
XVisit a qualified specialist workshop.
PleaseCorrectTirePressureThe tire pressure is too low in at least one of the tires, or the tire
pressure difference between the wheels is too great.
XCheck the tire pressures at the next opportunity (Ypage 361).
XIf necessary, correct the tire pressure.
XRestart the tire pressure monitor (Ypage 364).
Displa y messages273
On-board computer and displays
Z
Page 276 of 398

Display messagesPossible causes/consequences andMSolutions
Check TiresThe tire pressurein on eor mor etires has dropped significantly. The
whee lposition is displayed in th emultifunction display.
A warning tone also sounds.
GWARNIN G
Tir epressures that are to olow pos eth efollowin ghazards :
Rthey may burst, especially as th eload and vehicl espeed increase.
Rthey may wear excessivel yand/o runevenly, whic hmay greatl y
impair tire traction .
Rthedrivin gcharacteristics ,as well as steering and braking ,may be
greatl yimpaired.
There is aris kof an accident.
XStop th evehicl ewithout making any sudden steering or braking
maneuvers .Pay attention to th etraffic condition sas you do so.
XSecur eth evehicl eagainst rollin gaway (Ypage 161).
XCheckth etires and ,if necessary, follow th einstruction sfor aflat
tire (Ypage 339).
XChec kth etire pressur e (Ypage 361).
XIf necessary, correc tth etire pressure.
Warnin gTir eMal ‐functionThe tire pressur ein on eor mor etires has dropped suddenly. The whee l
position is shown in th emultifunction display.
GWARNIN G
Drivin gwit h a flat tire poses aris kof th efollowin ghazards :
Raflat tire affects th eabilit yto steer or brak eth evehicle.
Ryou could lose control of th evehicle.
Rcontinued drivin gwit h a flat tire will caus eexcessive heat build-up
and possibl y afire.
There is aris kof an accident.
XStop th evehicl ewithout making any sudden steering or braking
maneuvers .Pay attention to th etraffic condition sas you do so.
XSecur eth evehicl eagainst rollin gaway (Ypage 161).
XCheckth etires and ,if necessary, follow th einstruction sfor aflat
tire (Ypage 339).
TirePress.Monito rCurrently Unavaila‐ble
Becausethere is interferenc efrom astron gsource of radi owaves, no
signals from th etire pressur esensor sare detected. The tire pressur e
monitor is temporarily malfunctioning .
XDrive on.
The tire pressur emonitor restarts automatically as soo nas th e
problem has been resolved.
Tir ePress. Sen ‐sor(s) Missin gThere is no signal from th etire pressur esensor of on eor several
wheels. The pressur eof th eaffecte dtire is no tdisplayed in th emul-
tifunction display.
XHav eth efault ytire pressur esensor replace dat aqualified special -
ist workshop .
274Display messages
On-board computer and displays
Page 341 of 398
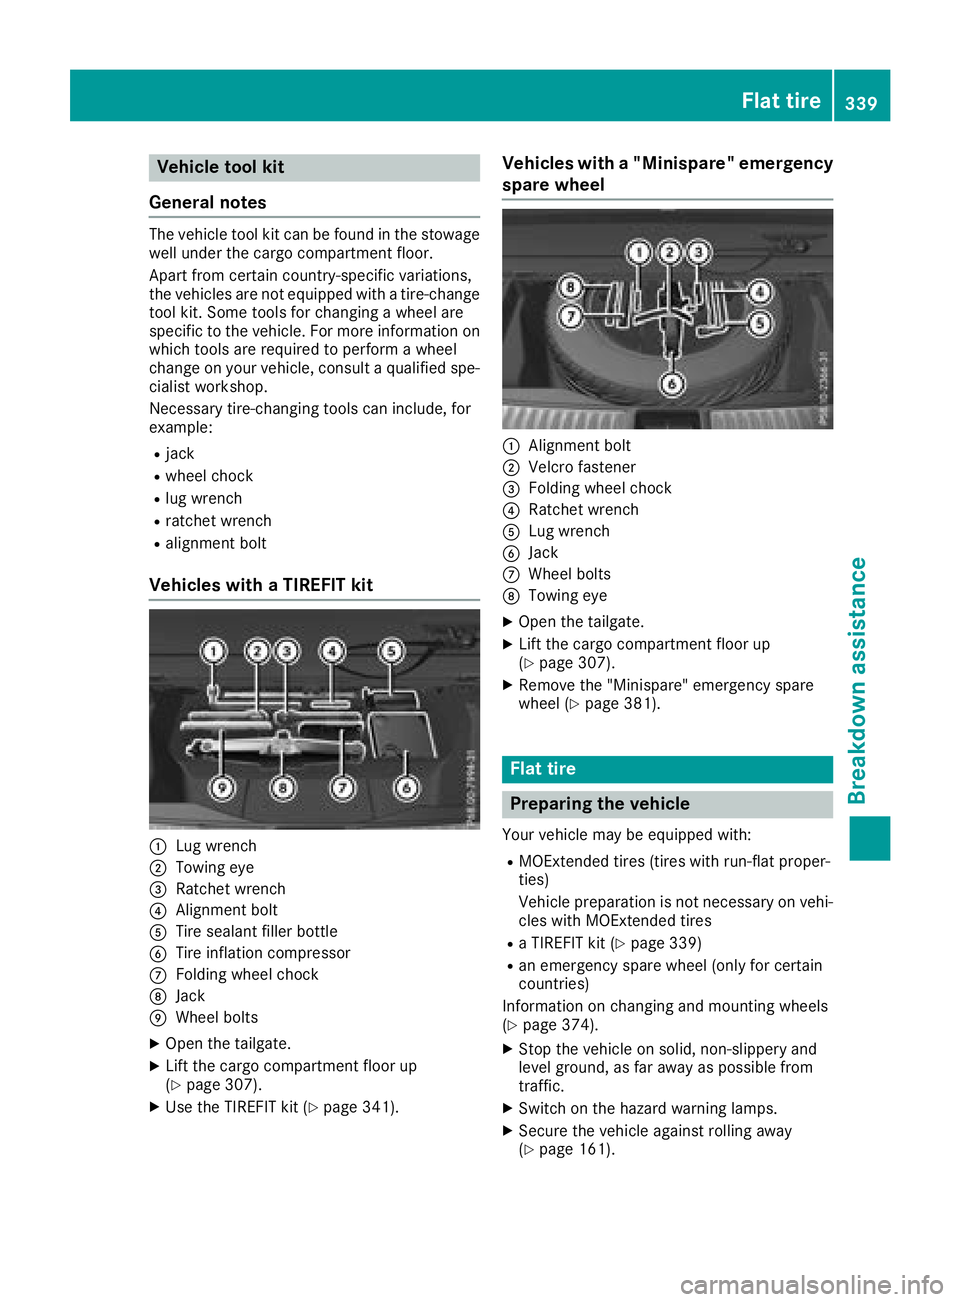
Vehicle tool kit
General notes
The vehicle tool kit can be found in the stowage
well under the cargo compartment floor.
Apart from certain country-specific variations,
the vehicles are not equipped with a tire-change
tool kit. Some tools for changing a wheel are
specific to the vehicle. For more information on
which tools are required to perform a wheel
change on your vehicle, consult a qualified spe-
cialist workshop.
Necessary tire-changing tools can include, for
example:
Rjack
Rwheel chock
Rlug wrench
Rratchet wrench
Ralignment bolt
Vehicles with a TIREFIT kit
:Lug wrench
;Towing eye
=Ratchet wrench
?Alignment bolt
ATire sealant filler bottle
BTire inflation compressor
CFolding wheel chock
DJack
EWheel bolts
XOpen the tailgate.
XLift the cargo compartment floor up
(Ypage 307).
XUse the TIREFIT kit (Ypage 341).
Vehicles with a "Minispare" emergency
spare wheel
:Alignment bolt
;Velcro fastener
=Folding wheel chock
?Ratchet wrench
ALug wrench
BJack
CWheel bolts
DTowing eye
XOpen the tailgate.
XLift the cargo compartment floor up
(Ypage 307).
XRemove the "Minispare" emergency spare
wheel (Ypage 381).
Flat tire
Preparing the vehicle
Your vehicle may be equipped with:
RMOExtended tires (tires with run-flat proper-
ties)
Vehicle preparation is not necessary on vehi-
cles with MOExtended tires
Ra TIREFIT kit (Ypage 339)
Ran emergency spare wheel (only for certain
countries)
Information on changing and mounting wheels
(
Ypage 374).
XStop the vehicle on solid, non-slippery and
level ground, as far away as possible from
traffic.
XSwitch on the hazard warning lamps.
XSecure the vehicle against rolling away
(Ypage 161).
Flat tire339
Breakdo wn assis tance
Page 342 of 398
XIf possible, bring the front wheels into the
straight-ahead position.
XVehicles with the AIRMATIC package:
make sure that the normal vehicle level is
selected (
Ypage 190).
XVehicles with the Off-Road Engineering
package:make sure that the normal level is
selected (
Ypage 184).
XSwitch off the engine.
XVehicles without KEYLESS-GO: remove the
SmartKey from the ignition lock.
XVehicles with KEYLESS-GO: open the driv-
er's door.
The vehicle electronics are now in position
u. This means no SmartKey is in the ignition
lock.
XVehicles with KEYLESS-GO: remove the
Start/Stop button from the ignition lock
(
Ypage 140).
XMake sure that the passengers are not endan-
gered as they do so. Make sure that no one is near the danger area while a wheel is being
changed. Anyone who is not directly assisting
in the wheel change should, for example,
stand behind the barrier.
XGet out of the vehicle. Pay attention to traffic
conditions when doing so.
XClose the driver's door.
XUnload heavy luggage.
iOnly operate the tire inflation compressor
using a 12 V socket, even if the ignition is
turned off (
Ypage 312).
An emergency cut-out ensures that the on-
board voltage does not drop too low. If the on-
board voltage is too low, the power to the
sockets is automatically cut. This ensures
that there is sufficient power to start the
engine.
MOExtended tires (tires with run-flat
properties)
General notes
With MOExtended tires (tires with run flat char-
acteristics), you can continue to drive your vehi-
cle even if there is a total loss of pressure in one
or more tires. The affected tire must not show
any clearly visible damage.
You can recognize a MOExtended tire by the
MOExtended marking which appears on the sidewall of the tire. You will find this marking
next to the tire size designation, the load-bear-
ing capacity and the speed index (
Ypage 369).
MOExtended tires may only be used in conjunc-
tion with an active tire pressure loss warning
system or with an active tire pressure monitor.
If a pressure loss warning message appears
in the multifunction display:
Robserve the instructions in the display mes-
sages (Ypage 273).
Rcheck the tire for damage
Rif driving on, observe the following notes
The driving distance possible in run-flat mode is
approximately 50 miles (80 km) when the vehi-
cle is partially laden and approximately 18 miles
(30 km) when the vehicle is fully laden.
In addition to the vehicle load, the driving dis-
tance possible depends upon:
RVehicle speed
RRoad condition
ROutside temperature
The driving distance possible in run-flat mode
may be reduced by extreme driving conditions
or maneuvers, or it can be increased through a
moderate style of driving.
The driving distance possible in run-flat mode is
counted from the moment the tire pressure loss
warning appears in the multifunction display.
You must not exceed a maximum permissible
speed of 50 mph (80 km/h).
iWhen replacing one or all tires, please
observe the following specifications for your
vehicle's tires:
Rsize
Rtype and
Rthe "MOExtended" mark
If a tire has gone flat and cannot be replaced with a MOExtended tire, a standard tire may
be used as a temporary measure. Make sure
that you use the proper size and type (sum-
mer or winter tire).
iVehicles equipped with MOExtended tires
are not equipped with a TIREFIT kit at the fac-
tory. It is therefore recommended that you
additionally equip your vehicle w
ith a TIREFIT
kit if you mount tires that do not feature run-
flat properties, e.g. winter tires. A TIREFIT kit
may be obtained from a qualified specialist
workshop.
340Flat tire
Breakdown assistance