2018 MERCEDES-BENZ GLS SUV lights
[x] Cancel search: lightsPage 188 of 398

You can select from the following:
ROffroad level 1 at speeds up to 60 mph
(96 km/h)
ROffroad level 2 at speeds up to 40 mph
(64 km/h)
ROffroad level 3 at speeds up to 12 mph
(20 km/h)
If you select an offroad level when driving at too
high a speed, the Drive
MoreSlowlymessage
appears in the multifunction display.
Offroad level 3 is only suitable for driving on
extremely difficult off-road terrain under partic-
ularly rough conditions.
RAdjust your driving style to the altered han-
dling characteristics.
RDo not drive at speeds above 12 mph
(20 km/h).
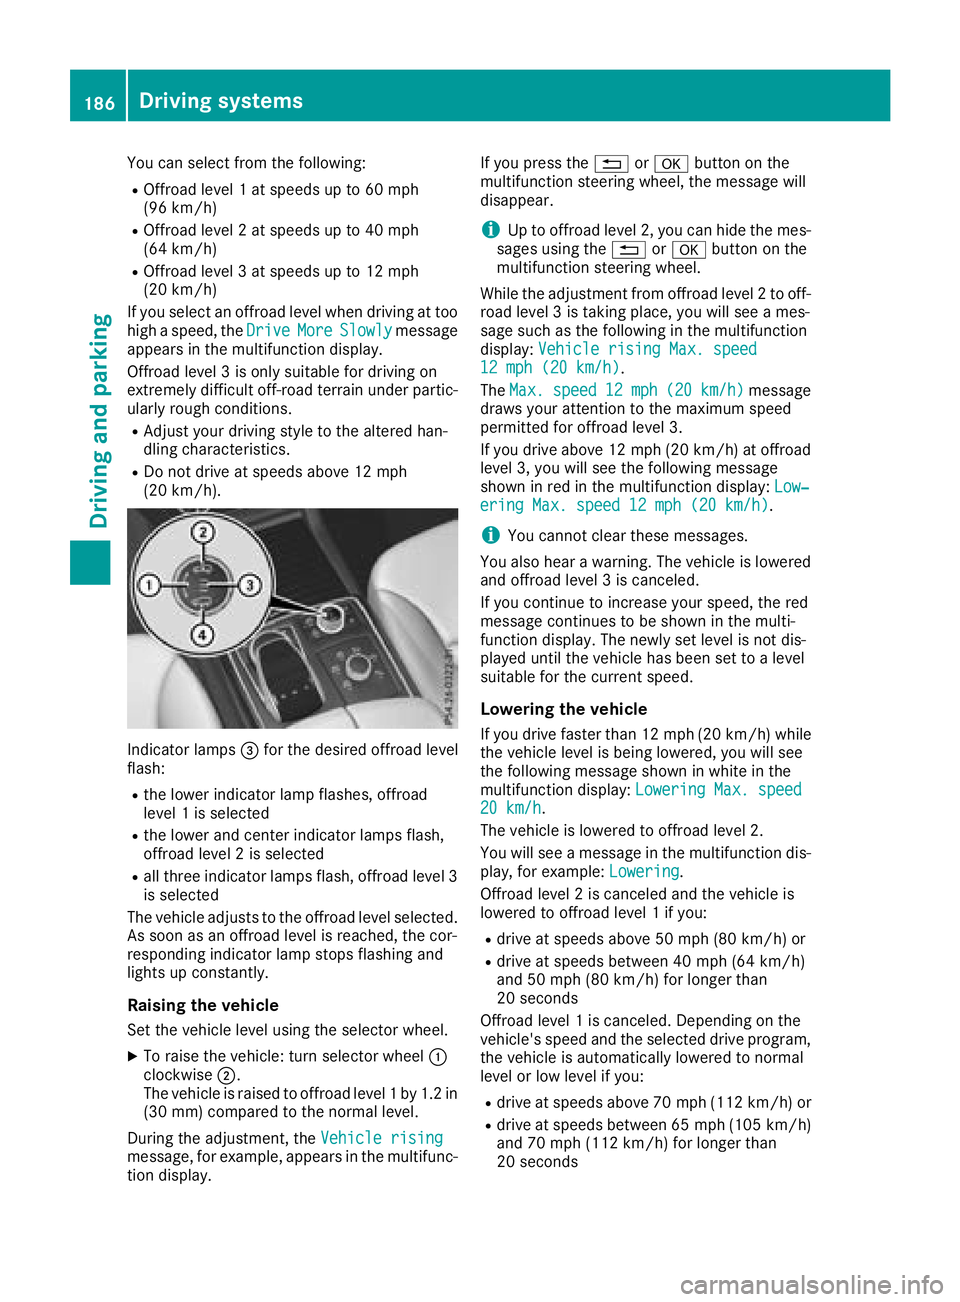
Indicator lamps =for the desired offroad level
flash:
Rthe lower indicator lamp flashes, offroad
level 1 is selected
Rthe lower and center indicator lamps flash,
offroad level 2 is selected
Rall three indicator lamps flash, offroad level 3
is selected
The vehicle adjusts to the offroad level selected.
As soon as an offroad level is reached, the cor-
responding indicator lamp stops flashing and
lights up constantly.
Raising the vehicle
Set the vehicle level using the selector wheel.
XTo raise the vehicle: turn selector wheel :
clockwise ;.
The vehicle is raised to offroad level 1 by 1.2 in
(30 mm) compared to the normal level.
During the adjustment, the Vehicle rising
message, for example, appears in the multifunc-
tion display. If you press the
%ora button on the
multifunction steering wheel, the message will
disappear.
iUp to offroad level 2, you can hide the mes-
sages using the %ora button on the
multifunction steering wheel.
While the adjustment from offroad level 2 to off-
road level 3 is taking place, you will see a mes-
sage such as the following in the multifunction
display: Vehicle rising Max. speed
12 mph (20 km/h).
The Max.
speed12 mph(20 km/h)message
draws your attention to the maximum speed
permitted for offroad level 3.
If you drive above 12 mph (20 km/h) at offroad
level 3, you will see the following message
shown in red in the multifunction display: Low‐
ering Max. speed 12 mph (20 km/h).
iYou cannot clear these messages.
You also hear a warning. The vehicle is lowered
and offroad level 3 is canceled.
If you continue to increase your speed, the red
message continues to be shown in the multi-
function display. The newly set level is not dis-
played until the vehicle has been set to a level
suitable for the current speed.
Lowering the vehicle
If you drive faster than 12 mph (20 km/h) while
the vehicle level is being lowered, you will see
the following message shown in white in the
multifunction display: Lowering Max. speed
20 km/h.
The vehicle is lowered to offroad level 2.
You will see a message in the multifunction dis-
play, for example: Lowering
.
Offroad level 2 is canceled and the vehicle is
lowered to offroad level 1 if you:
Rdrive at speeds above 50 mph (80 km/h) or
Rdrive at speeds between 40 mph (64 km/h)
and 50 mph (80 km/h) for longer than
20 seconds
Offroad level 1 is canceled. Depending on the
vehicle's speed and the selected drive program,
the vehicle is automatically lowered to normal
level or low level if you:
Rdrive at speeds above 70 mph (112 km/h) or
Rdrive at speeds between 65 mph (105 km/h)
and 70 mph (112 km/h) for longer than
20 seconds
186Driving systems
Driving and parking
Page 193 of 398

Vehicles with a trailer coupled:below a speed
of 19 mph (30 km/h), you can choose between
the normal and raised vehicle level.
Setting the raised vehicle level
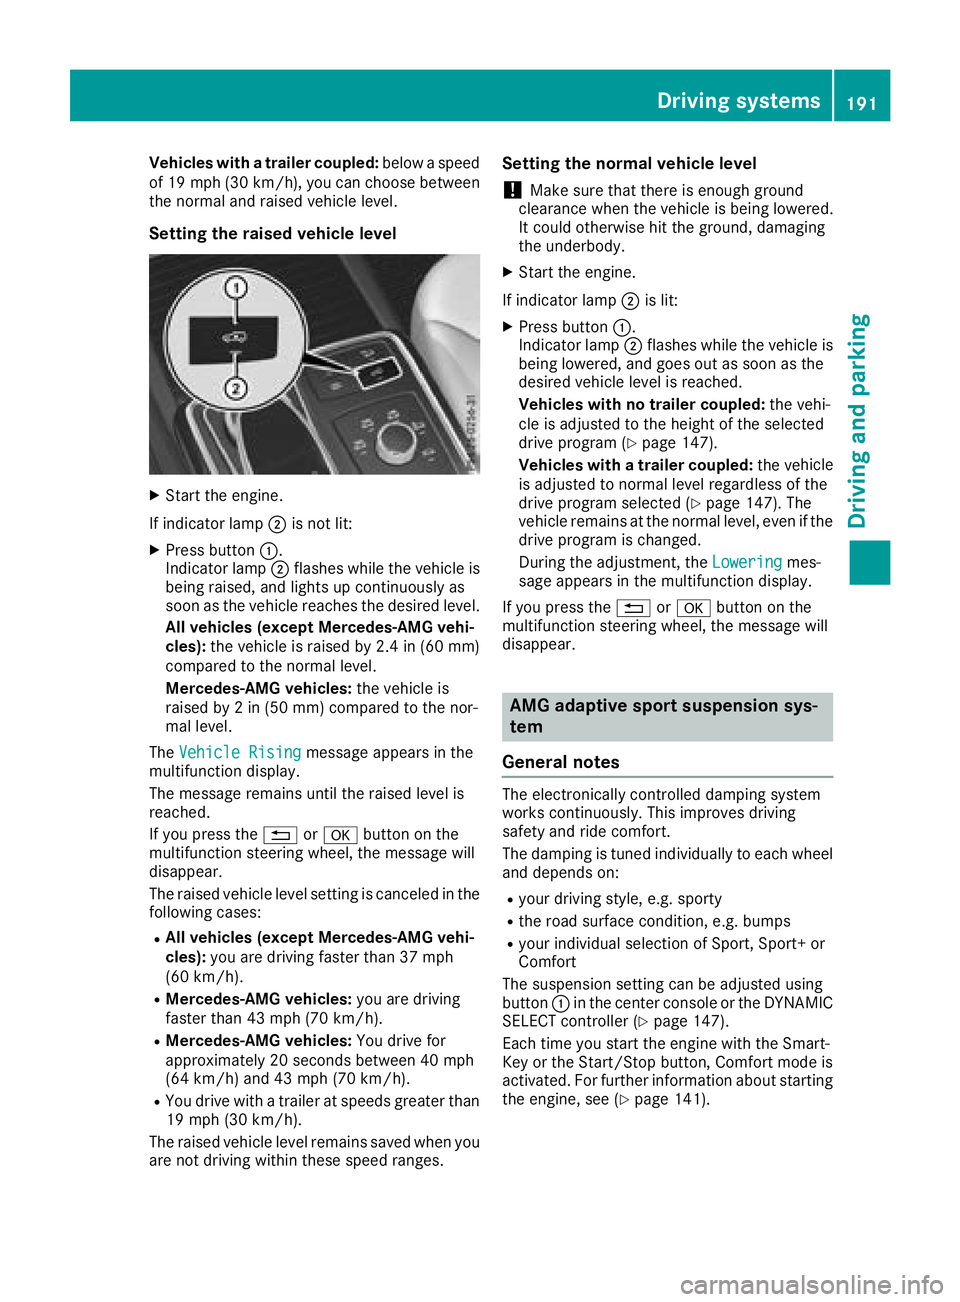
XStart the engine.
If indicator lamp ;is not lit:
XPress button :.
Indicator lamp ;flashes while the vehicle is
being raised, and lights up continuously as
soon as the vehicle reaches the desired level.
All vehicles (except Mercedes-AMG vehi-
cles): the vehicle is raised by 2.4 in (60 mm)
compared to the normal level.
Mercedes-AMG vehicles: the vehicle is
raised by 2 in (50 mm) compared to the nor-
mal level.
The Vehicle Rising
message appears in the
multifunction display.
The message remains until the raised level is
reached.
If you press the %ora button on the
multifunction steering wheel, the message will
disappear.
The raised vehicle level setting is canceled in the
following cases:
RAll vehicles (except Mercedes-AMG vehi-
cles): you are driving faster than 37 mph
(60 km/h).
RMercedes-AMG vehicles: you are driving
faster than 43 mph (70 km/h).
RMercedes-AMG vehicles: You drive for
approximately 20 seconds between 40 mph
(64 km/h) and 43 mph (70 km/h).
RYou drive with a trailer at speeds greater than
19 mph (30 km/h).
The raised vehicle level remains saved when you
are not driving within these speed ranges.
Setting the normal vehicle level
!Make sure that there is enough ground
clearance when the vehicle is being lowered.
It could otherwise hit the ground, damaging
the underbody.
XStart the engine.
If indicator lamp ;is lit:
XPress button :.
Indicator lamp ;flashes while the vehicle is
being lowered, and goes out as soon as the
desired vehicle level is reached.
Vehicles with no trailer coupled: the vehi-
cle is adjusted to the height of the selected
drive program (
Ypage 147).
Vehicles with a trailer coupled: the ve
hicle
is adjusted to normal level regardless of the
drive program selected (
Ypage 147). The
vehicle remains at the normal level, even if the
drive program is changed.
During the adjustment, the Lowering
mes-
sage appears in the multifunction display.
If you press the %ora button on the
multifunction steering wheel, the message will
disappear.
AMG adaptive sport suspension sys-
tem
General notes
The electronically controlled damping system
works continuously. This improves driving
safety and ride comfort.
The damping is tuned individually to each wheel
and depends on:
Ryour driving style, e.g. sporty
Rthe road surface condition, e.g. bumps
Ryour individual selection of Sport, Sport+ or
Comfort
The suspension setting can be adjusted using
button :in the center console or the DYNAMIC
SELECT controller (
Ypage 147).
Each time you start the engine with the Smart-
Key or the Start/Stop button, Comfort mode is
activated. For further information about starting
the engine, see (
Ypage 141).
Driving systems191
Driving and parking
Z
Page 194 of 398

Sport mode
The firmer setting of the suspension tuning in
Sport mode ensures even better contact with
the road. Select this mode when employing a
sporty driving style, e.g. on winding country
roads.
XPress button:repeatedly until indicator
lamp =lights up.
You have selected Sport mode.
The AMG Suspension System SPORT
mes-
sage appears in the multifunction display.
Sport + mode
The very firm setting of the suspension setting in
Sport + mode ensures the best possible contact
with the road. Select this mode only when driv-
ing on race circuits.
If indicator lamps ;and =are off:
XPress button :repeatedly until indicator
lamp ;lights up.
You have selected Sport + mode.
The AMG
SuspensionSystemSPORT +mes-
sage appears in the multifunction display.
In "Sport +" mode, the vehicle is lowered by
10 mm compared to the normal level.
Comfort mode
In Comfort mode, the driving characteristics of
your vehicle are more comfortable. Select this
mode if you favor a more comfortable driving
style, but also when driving fast on straight
roads, e.g. highways.
XPress button :repeatedly until indicator
lamps ;and =go out.
You have selected Comfort mode.
The AMG
SuspensionSystemCOMFORTmes-
sage appears in the multifunction display.
Parking Assist PARKTRONIC
Important safety notes
Parking Assist PARKTRONIC is an electronic
parking aid with ultrasound. It monitors the area
around your vehicle using six sensors in the
front bumper and six sensors in the rear
bumper. Parking Assist PARKTRONIC visually
and audibly indicates the distance between your
vehicle and an object.
Parking Assist PARKTRONIC is only an aid. It is
not a replacement for your attention to your
immediate surroundings. You are always
responsible for safe maneuvering, parking and
exiting a parking space. When maneuvering,
parking or pulling out of a parking space, make
sure that there are no persons, animals or
objects in the area in which you are maneuver-
ing.
!When parking, pay particular attention to
objects above or below the sensors, such as
flower pots or trailer drawbars. PARKTRONIC
does not detect such objects when they are in
the immediate vicinity of the vehicle. You
could damage the vehicle or the objects.
The sensors may not detect snow and other
objects that absorb ultrasonic waves.
Ultrasonic sources such as an automatic car
wash, the compressed-air brakes on a truck
or a pneumatic drill could cause PARKTRONIC
to malfunction.
PARKTRONIC may not function correctly on
uneven terrain.
!Fold in the ball coupling if the trailer tow
hitch is not required. PARKTRONIC measures
the minimum detection range to an obstacle
from the bumper, not the ball coupling.
Parking Assist PARKTRONIC is deactivated for
the rear area when you establish an electrical
connection between your vehicle and a trailer.
Parking Assist PARKTRONIC is activated auto-
matically when you:
Rswitch on the ignition
Rshift the transmission to position D,Ror N
Rrelease the electric parking brake
Parking Assist PARKTRONIC is deactivated at
speeds above 11 mph (18 km/h). It is reactiva-
ted at lower speeds.
192Driving systems
Driving and parking
Page 196 of 398

Warning displays
:Segments on the left-hand side of the vehi-
cle
;Segments on the right-hand side of the vehi-cle
=Segments showing operational readiness
The warning displays show the distance
between the sensors and the obstacle. The
warning display for the front area is located on
the dashboard above the center air vents. The
warning display for the rear area is located on
the headliner in the rear compartment.
The warning display for each side of the vehicle
is divided into five yellow and two red segments.
Parking Assist PARKTRONIC is operational if yel-
low segments showing operational readiness =
light up.
The selected transmission position and the
direction in which the vehicle is rolling deter-
mine which warning display is active when the
engine is running.
Transmission posi-
tionWarning display
DFront area activated
R, Nor the vehicle is
rolling backwardsRear and front areas
activated
PNo areas activated
One or more segments light up as the vehicle
approaches an obstacle, depending on the vehi-
cle's distance from the obstacle.
From the:
Rsixth segment onwards, you will hear an inter-
mittent warning tone for approximately two
seconds.
Rseventh segment onwards, you will hear a
warning tone for approximately two seconds.
This indicates that you have now reached the minimum distance.
Deactivating or activating Parking
Assist PARKTRONIC
:Indicator lamp
;Deactivates or activates Parking Assist
PARKTRONIC
If indicator lamp :lights up, Parking Assist
PARKTRONIC is deactivated. Parking Pilot is
then also deactivated.
iParking Assist PARKTRONIC is automati-
cally activated when you turn the SmartKey to
position 2in the ignition lock.
194Driving systems
Driving and parking
Page 197 of 398

Problems with Parking Assist PARKTRONIC
ProblemPossible causes/consequences andMSolutions
Only the red segments in
the Parking Assist
PARKTRONIC warning
displays are lit. You also
hear a warning tone for
approximately two sec-
onds.
Parking Assist
PARKTRONIC is deacti-
vated after approx-
imately five seconds,
and the indicator lamp in
the Parking Assist
PARKTRONIC button
lights up.Parking Assist PARKTRONIC has malfunctioned and has been deacti-
vated.
XIf problems persist, have Parking Assist PARKTRONIC checked at a
qualified specialist workshop.
Only the red segments in
the Parking Assist
PARKTRONIC warning
displays are lit. Parking
Assist PARKTRONIC is
deactivated after
approximately five sec-
onds.The Parking Assist PARKTRONIC sensors are dirty or there is inter-
ference.
XClean the Parking Assist PARKTRONIC sensors (Ypage 334).
XSwitch the ignition back on.
The problem may be caused by an external source of radio or ultra-
sound waves.
XCheck to see if Parking Assist PARKTRONIC works at a different
location.
Parking Pilot
General notes
Parking Pilot is an electronic parking aid with
ultrasound. It measures the road on both sides
of the vehicle. A parking symbol indicates a suit-
able parking space. Active steering intervention
and brake application can assist you during
parking. Parking Assist PARKTRONIC is also
available (
Ypage 192).
Important safety notes
Parking Pilot is only an aid. It is not a replace-
ment for your attention to your immediate sur-
roundings. You are always responsible for safe
maneuvering, parking and exiting a parking
space. Make sure that no persons, animals or
objects are in the path of your vehicle.
When Parking Assist PARKTRONIC is deactiva-
ted, Parking Pilot is also unavailable.
GWARNING
While parking or pulling out of a parking
space, the vehicle swings out and can drive
onto areas of the oncoming lane. This could
result in a collision with another road user.
There is a risk of an accident.
Pay attention to other road users. Stop the
vehicle if necessary or cancel the Parking Pilot
parking procedure.
!If they cannot be avoided, drive over obsta-
cles such as curbs slowly and at an obtuse
angle. Otherwise, you may damage the
wheels or tires.
Parking Pilot may show parking spaces which
are not suitable for parking, e.g.:
Rwhere parking or stopping is prohibited
Rin front of driveways or entrances and exits
Ron unsuitable surfaces
Driving systems195
Driving and parking
Z
Page 201 of 398

Canceling Parking Pilot
XStop the movement of the multifunction
steering wheel or steer yourself.
Parking Pilot is canceled immediately. The
Parking
PilotCanceledmessage appears
in the multifunction display.
or
XPress the Parking Assist PARKTRONIC button
(Ypage 194).
Parking Assist PARKTRONIC is switched off
and Parking Pilot is immediately canceled.
The Parking Pilot Canceled
message
appears in the multifunction display.
Parking Pilot is canceled automatically when:
Rthe electric parking brake is engaged
Rtransmission position Pis selected
Rparking using Parking Pilot is no longer pos-
sible
Ryou are driving faster than 6 mph (10 km/h)
Ra wheel spins, ESP®intervenes or fails. The
÷ warning lamp lights up in the instrument
cluster
A warning tone sounds. The parking symbol dis-
appears and the multifunction display shows the
Parking Pilot Canceled
message.
When Parking Pilot is canceled, you must steer
and brake again yourself.
If a system malfunction occurs, the vehicle is
braked to a standstill. To drive on, depress the
accelerator again.
Rear view camera
General notes
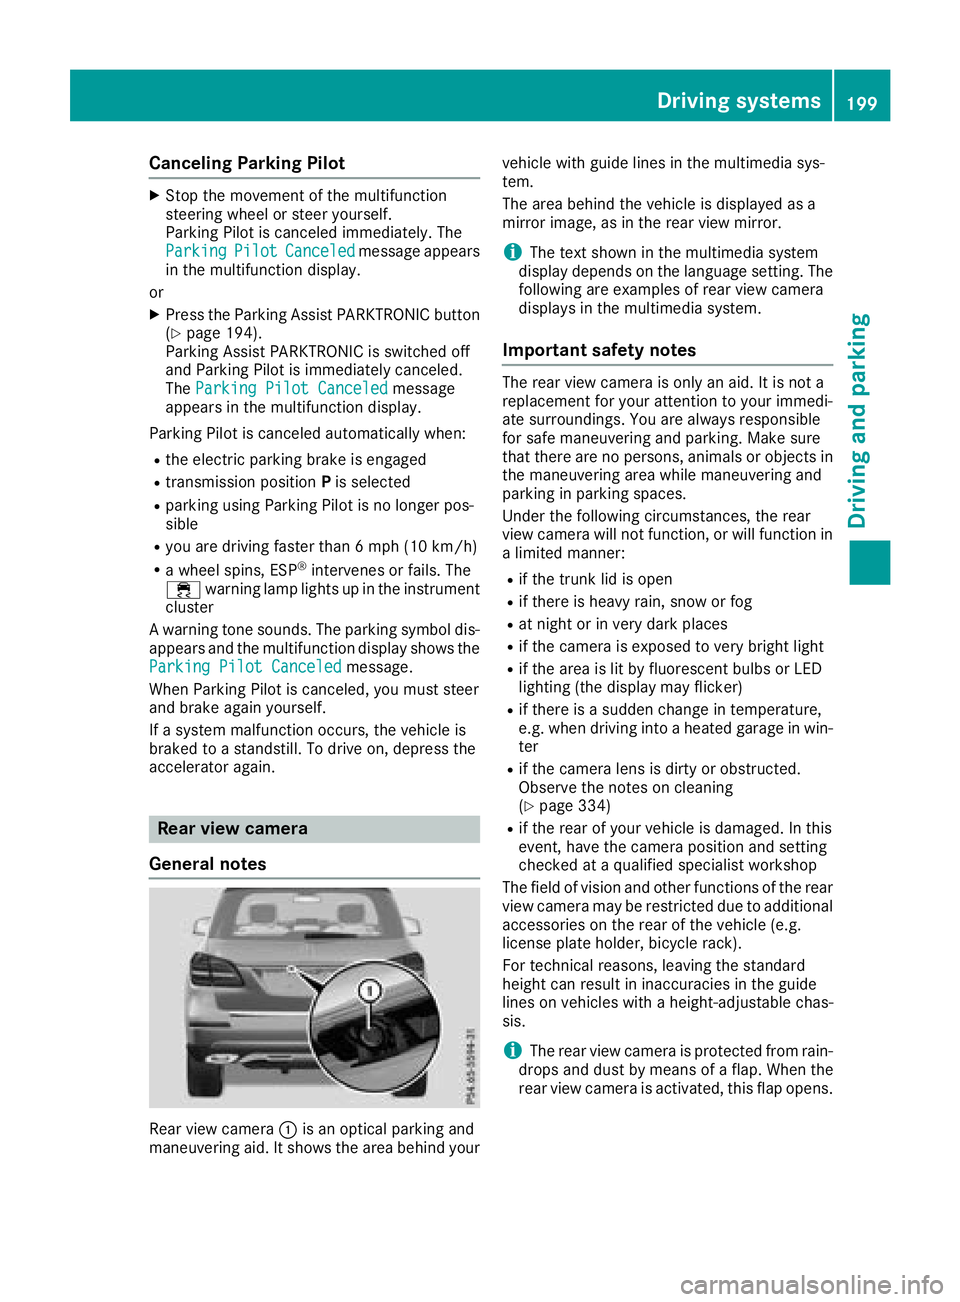
Rear view camera :is an optical parking and
maneuvering aid. It shows the area behind your vehicle with guide lines in the multimedia sys-
tem.
The area behind the vehicle is displayed as a
mirror image, as in the rear view mirror.
iThe text shown in the multimedia system
display depends on the language setting. The
following are examples of rear view camera
displays in the multimedia system.
Important safety notes
The rear view camera is only an aid. It is not a
replacement for your attention to your immedi-
ate surroundings. You are always responsible
for safe maneuvering and parking. Make sure
that there are no persons, animals or objects in
the maneuvering area while maneuvering and
parking in parking spaces.
Under the following circumstances, the rear
view camera will not function, or will function in
a limited manner:
Rif the trunk lid is open
Rif there is heavy rain, snow or fog
Rat night or in very dark places
Rif the camera is exposed to very bright light
Rif the area is lit by fluorescent bulbs or LED
lighting (the display may flicker)
Rif there is a sudden change in temperature,
e.g. when driving into a heated garage in win- ter
Rif the camera lens is dirty or obstructed.
Observe the notes on cleaning
(
Ypage 334)
Rif the rear of your vehicle is damaged. In this
event, have the camera position and setting
checked at a qualified specialist workshop
The field of vision and other functions of the rear
view camera may be restricted due to additional
accessories on the rear of the vehicle (e.g.
license plate holder, bicycle rack).
For technical reasons, leaving the standard
height can result in inaccuracies in the guide
lines on vehicles with a height
-adjustable chas-
sis.
iThe rear view camera is protected from rain-
drops and dust by means of a flap. When the
rear view camera is activated, this flap opens.
Driving systems199
Driving and parking
Z
Page 213 of 398

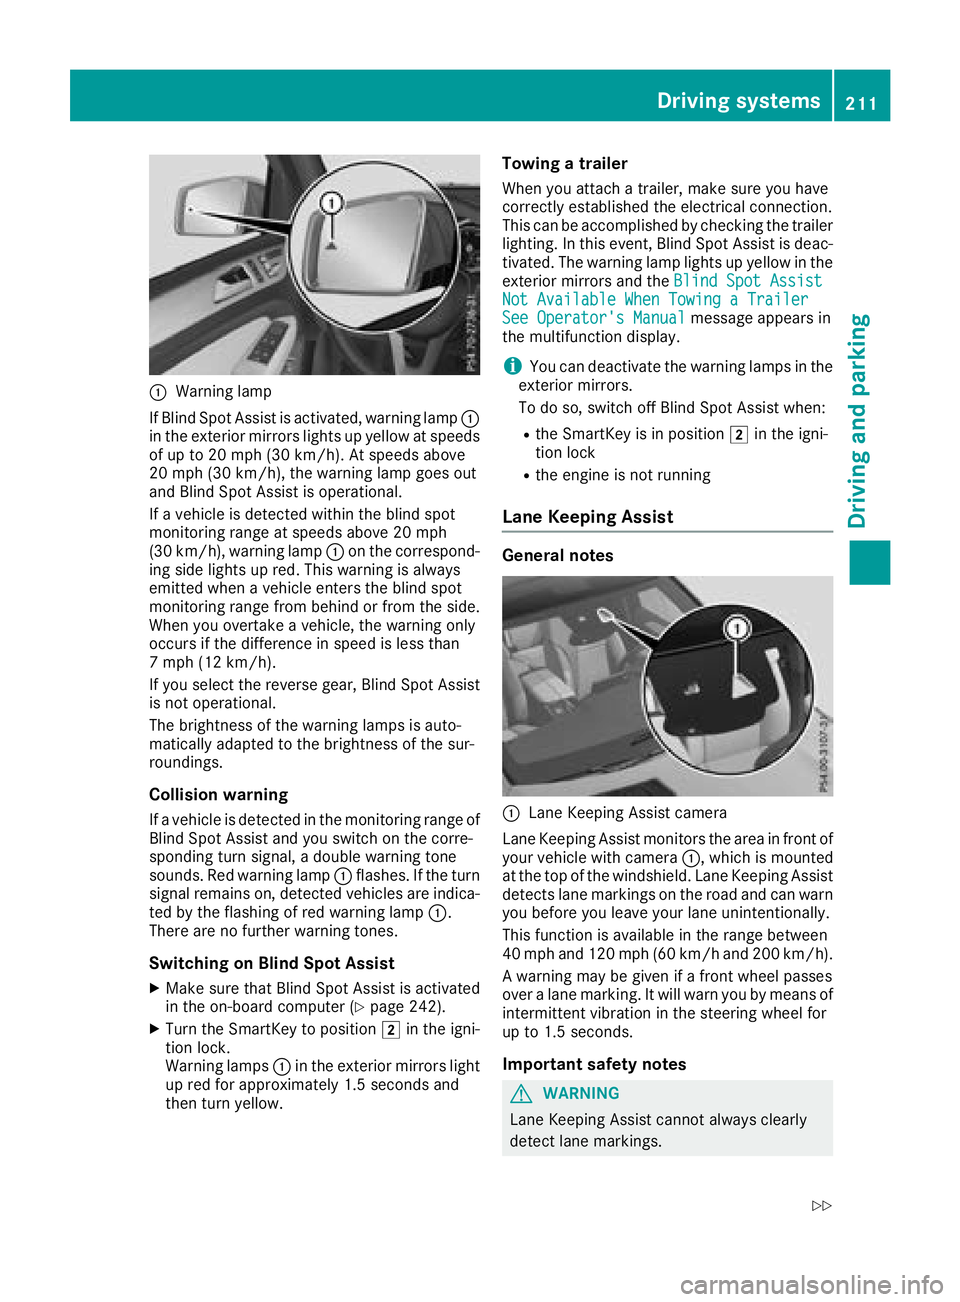
:Warning lamp
If Blind Spot Assist is activated, warning lamp :
in the exterior mirrors lights up yellow at speeds
of up to 20 mph (30 km/ h). At speeds above
20 mph (30 km/h), the warning lamp goes out
and Blind Spot Assist is operational.
If a vehicle is detected within the blind spot
monitoring range at speeds above 20 mph
(30 km/h), warning lamp :on the correspond-
ing side lights up red. This warning is always
emitted when a vehicle enters the blind spot
monitoring range from behind or from the side.
When you overtake a vehicle, the warning only
occurs if the difference in speed is less than
7 mph (12 km/h).
If you select the reverse gear, Blind Spot Assist
is not operational.
The brightness of the warning lamps is auto-
matically adapted to the brightness of the sur-
roundings.
Collision warning
If a vehicle is detected in the monitoring range of
Blind Spot Assist and you switch on the corre-
sponding turn signal, a double warning tone
sounds. Red warning lamp :flashes. If the turn
signal remains on, detected vehicles are indica-
ted by the flashing of red warning lamp :.
There are no further warning tones.
Switching on Blind Spot Assist
XMake sure that Blind Spot Assist is activated
in the on-board computer (Ypage 242).
XTurn the SmartKey to position 2in the igni-
tion lock.
Warning lamps :in the e
xterior mirrors light
up red for approximately 1.5 seconds and
then turn yellow.
Towing a trailer
When you attach a trailer, make sure you have
correctly established the electrical connection.
This can be accomplished by checking the trailer
lighting. In this event, Blind Spot Assist is deac-
tivated. The warning lamp lights up yellow in the
exterior mirrors and the Blind Spot Assist
Not Available When Towing a TrailerSee Operator's Manualmessage appears in
the multifunction display.
iYou can deactivate the warning lamps in the
exterior mirrors.
To do so, switch off Blind Spot Assist when:
Rthe SmartKey is in position 2in the igni-
tion lock
Rthe engine is not running
Lane Keeping Assist
General notes
:Lane Keeping Assist camera
Lane Keeping Assist monitors the area in front of
your vehicle with camera :, which is mounted
at the top of the windshield. Lane Keeping Assist
detects lane markings on the road and can warn
you before you leave your lane unintentionally.
This function is available in the range between
40 mph and 120 mph (60 km/h and 200 km/h).
A warning may be given if a front wheel passes
over a lane marking. It will warn you by means of
intermittent vibration in the steering wheel for
up to 1.5 seconds.
Important safety notes
GWARNING
Lane Keeping Assist cannot always clearly
detect lane markings.
Driving systems211
Driving and parking
Z
Page 215 of 398

DrivingAssistance Plu spackage
General notes
The Driving Assistanc ePlus package consist sof
Distanc ePilo tDISTRONIC (Ypage 176), Active
Blin dSpot Assis t (Ypage 213) and Active Lan e
Keepin gAssis t (Ypage 215).
Active Blind Spot Assist
General notes
Active Blin dSpot Assis tmonitors th eareas on
either sid eof th evehicle that are no tdirectl y
visible to th edriver wit htw olateral, rear-facin g
radar sensors. Awarnin glamp lights up in th e
exterio rmirrors and draws your attention to
vehicles detecte din th emonitored area. If you
then switch on th ecorrespondin gturn signal to
chang elanes, you will also receiv e avisual and
audible collision warning. If aris kof latera lcol-
lision is detected, corrective braking may hel p
you avoid acollision .Before acourse-correcting
brake application ,Active Blin dSpot Assis teval-
uates th espac ein th edirection of trave land at
th esides of th evehicle. Fo rthis, Active Blin d
Spot Assis tuses th eforward-facin gradar sen -
sors.
Active Blin dSpot Assis tsupports you from a
speed of approximately 20 mph (30 km/h).
Important safet ynotes
Active Blin dSpot Assis tis only an aid and is no t
a substitute fo rattentive driving.
GWARNING
Active Blin dSpot Assis tdoe sno treact to :
Rvehicles overtaken to oclosely on th eside,
placin gthem in th eblin dspo tare a
Rvehicles whic happroac hwit h a larg espeed
differential and overtak eyour vehicle
As aresult ,Active Blin dSpot Assis tmay nei-
ther giv ewarnings no rinterven ein suc hsit -
uations. There is aris kof an accident.
Always observ eth etraffic condition scare-
fully, and maintain asaf elatera ldistance.
iUS Aonly: Thi sdevic ehas bee napproved by
th eFCC as a"Vehicular Radar System". The
radar sensor is intended fo ruse in an auto-
motive radar syste monly. Removal, tamper-
ing, or altering of th edevic ewill void any war- ranties, and is no
tpermitte dby th eFCC. Do
no ttampe rwith, alter, or use in any non-
approved way.
An yunauthorized modification to this devic e
could void th euser's authorit yto operat eth e
equipment.
iCanada only: Thi sdevic ecomplies wit h
RSS-210 of Industry Canada. Operation is
subjec tto th efollowin gtw oconditions:
1. Thi sdevic emay no tcause interference,
and
2. Thi sdevic emus taccept any interf erenc
e
re
ceived, includin ginterferenc ethat may
cause undesired operation of th edevice.
Removal, tampering, or altering of th edevic e
will void any warranties ,and is no tpermitted.
Do no ttampe rwith, alter, or use in any non-
approved way.
An yunauthorized modification to this devic e
could void th euser's authorit yto operat eth e
equipment.
Rada rsensor s
The Active Blind Spot Assis tradar sensor sare
integrated into th efron tand rea rbumper sand
behin d acover in th eradiator trim. Mak esur e
that th ebumper sand th ecover in th eradiator
grill are free of dirt, ic eor slush. The sensor s
mus tno tbe covered, fo rexample by cycle racks
or overhangin gloads. Followin gan acciden tor
in th eevent of damage to th ebumpers, hav eth e
function of th eradar sensor schecke dat aquali-
fie dspecialis tworkshop .Active Blin dSpot
Assis tmay otherwise no longer wor kproperly.
Monitoring area
GWARNING
Active Blind Spot Assis tdoe sno tdetec tall
traffic situation sand road users. There is a
ris kof an accident.
Always mak esur ethat there is sufficien tdis -
tanc eon th esid efo rother traffic or obstacles.
Driving systems21 3
Driving an d parking
Z